120 В~, 60 Гц
Разъем XLR, сбалансированный, дискретная цепь
12
XENYX QX1202USB/QX1002USB
13
QX1202USB
QX1002USB
→
QX1202USB
QX1002USB
MXSAA6
MXUK6 / MXEU6
MXCCC6 / MXKR6
MXJP6
USB
Руководство по быстрому началу работы
RU
RU
Технические характеристики
Моновходы
Стереовходы
Вход CD/Tape
Эквалайзер
Aux посылы
Aux возвраты
Частотная характеристика (Микр вход
Осн.выход)
Основные выходы
Выход Control Room
Выход на наушники
ВыходCD/Tape
Секция эффектов
Блоки питания
Размеры/вес
Основной микс (шум)
Разъём
Линейный вход
Микрофонные входы (предусилители XENYX)
Экв.шум (20 Гц — 20 кГц)
Тип
Сопротивление источника 0 Ом
-133 дБ / 137 дБ А-взвешенный
Сопротивление источника 50 Ом
-130 дБ / 134 дБ А-взвешенный
Сопротивление источника 150 Ом
-127 дБ / 131 дБ А-взвешенный
Частотный диапазон
(-1 дБ)
<10 Гц — 150 кГц (-1 дБ)
Частотный диапазон
(-3 дБ)
<10 Гц — 200 кГц (-3 дБ)
Диапазон усиления
+10 дБ до +60 дБ
Макс.уровень входа
+10,8 dBu при + усилении 10 дБ
Сопротивление
1,9 кОм сбалансир.
Соотношение сигнал-шум
107 дБ / 110 дБ A-взвеш.,Усиление +22 дБ
Искажения (THD+шум)
0,006%/0,005% А-взвеш.
Тип
Сопротивление
20 кОм сбланс., 10 кОм несбаланс.
Диапазон усиления
-10 дБ до +40 дБ
Макс.уровень входа
+22 dBu при усилении 0 дБ
¼»
Разъёмы TRS, сбалансированнные
<10 Гц — 137 кГц
±3 дБ
Тип
Сопротивление
Диапазон усиления
Макс.уровень входа
20 кОм сбаланс., 10 кОм несбаланс.
-20 дБ до + 20 дБ
+22 dBu
2 разъёма TRS, сбалансированные
¼»
(рабочий уровень +4 dBu)
20 кОм сбаланс., 5 кОм несбаланс. (-10 dBV)
Тип
Сопротивление
Макс.уровень входа
разъёмы RCA
19,5 кОм
+21 dBu
Низкие
80 Hz / ±15 dB
Средние
2.5 kHz / ±15 dB
Высокие
12 кГц/±15 dB
Тип
Сопротивление
Макс.уровень входа
120 Ом
+21 dBu
Разъёмы TRS, сбалансир.
¼»
Тип
Сопротивление
Макс.уровень входа
Разъёмы
TRS, сбалансир.
¼»
20 кОм сбаланс., 10 кОм несбаланс.
+21 dBu
Тип
Сопротивление
Макс.уровень входа
Разъёмы
TRS, сбалансир.
¼»
+21 dBu
120 Ом сбалансированный
Тип
Сопротивление
Макс.уровень входа
Разъёмы
TRS, сбалансир.
¼»
+21 dBu
120 Ом
TRS, несбалансир.
Тип
Макс.уровень входа
Разъёмы
¼»
+21 dBu / 22 Ом (+25 dBm)
Тип
Сопротивление
Макс.уровень входа
Разъём RCA, несбаланс.
1 кОм
+21 dBu
Осн.микс —
,
∞
∞
фейдер канала —
∞
Осн. микс 0 дБ,
фейдер канала —
Осн.микс 0 дб,
фейдер канала на 0 дБ
-105 дБ / -108 дБ A-взвеш.
-83 дБ / -85 дБ A-взвеш.
-93 дБ / -96 дБ A-взвеш.
Тип
KLARK TEKNIK
Конвертер
24-бит Sigma Delta
Частота сэмплирования
40 кГц
США/Канада
Австралия
230 — 240 В~, 50 Гц
Англия/Европа
230 В~, 50 Гц
Китай/Корея
220 В~, 50 Гц / 220 В~, 60 Гц
Япония
100 В~, 50/60 Гц
Выход
2 x 14.8 В~, 2 x 500 мА
Адаптер
MXUL6
Адаптер
Адаптер
Адаптер
Адаптер
Разъём
Тип Б
Частота сэмплирования
48 кГц
Размеры (Ш x Г x В)
Вес
50 x 250 x 248 мм
50 x 195 x 248 мм
1,5 кг
1,1 кг
Другая важная информация
RU
Важная информация
1.
2.
3.
Регистрация через интернет. Пожалуйста, зарегистрируйте
ваш пульт, посетив сайт behringer.com. Регистрация вашей
покупки с помощью простой формы поможет нам быстрее и
эффективнее обрабатывать ваши заявки на ремонт.
Также прочитайте сроки и условия вашей гарантии.
Неисправности. Если поблизости нет уполномоченного
торгового представителя компании MUSIC Group, то
вы можете обратиться к уполномоченному
представителю компании в вашей стране, список
которых находится в разделе “Support” на сайте
behringer.com. Если в списке адресов нет вашей страны,
пожалуйста, проверьте, можно ли решить вашу
проблему с помощью службы поддержки, которую
можно найти на странице «Support» нашего сайта
behringer.com. В качестве альтернативы вы можете
заполнить гарантийную заявку прямо на сайте
ПЕРЕД возвратом изделия.
Подключение питания. Перед подключением
устройства в розетку питания убедитесь, что
напряжение в сети питания соответствует
рабочему напряжению вашей конкретной модели.
Сгоревшие предохранители необходимо заменять
только на предохранители того же типа и с
такими же параметрами
-
Contents
-
Table of Contents
-
Bookmarks
Quick Links
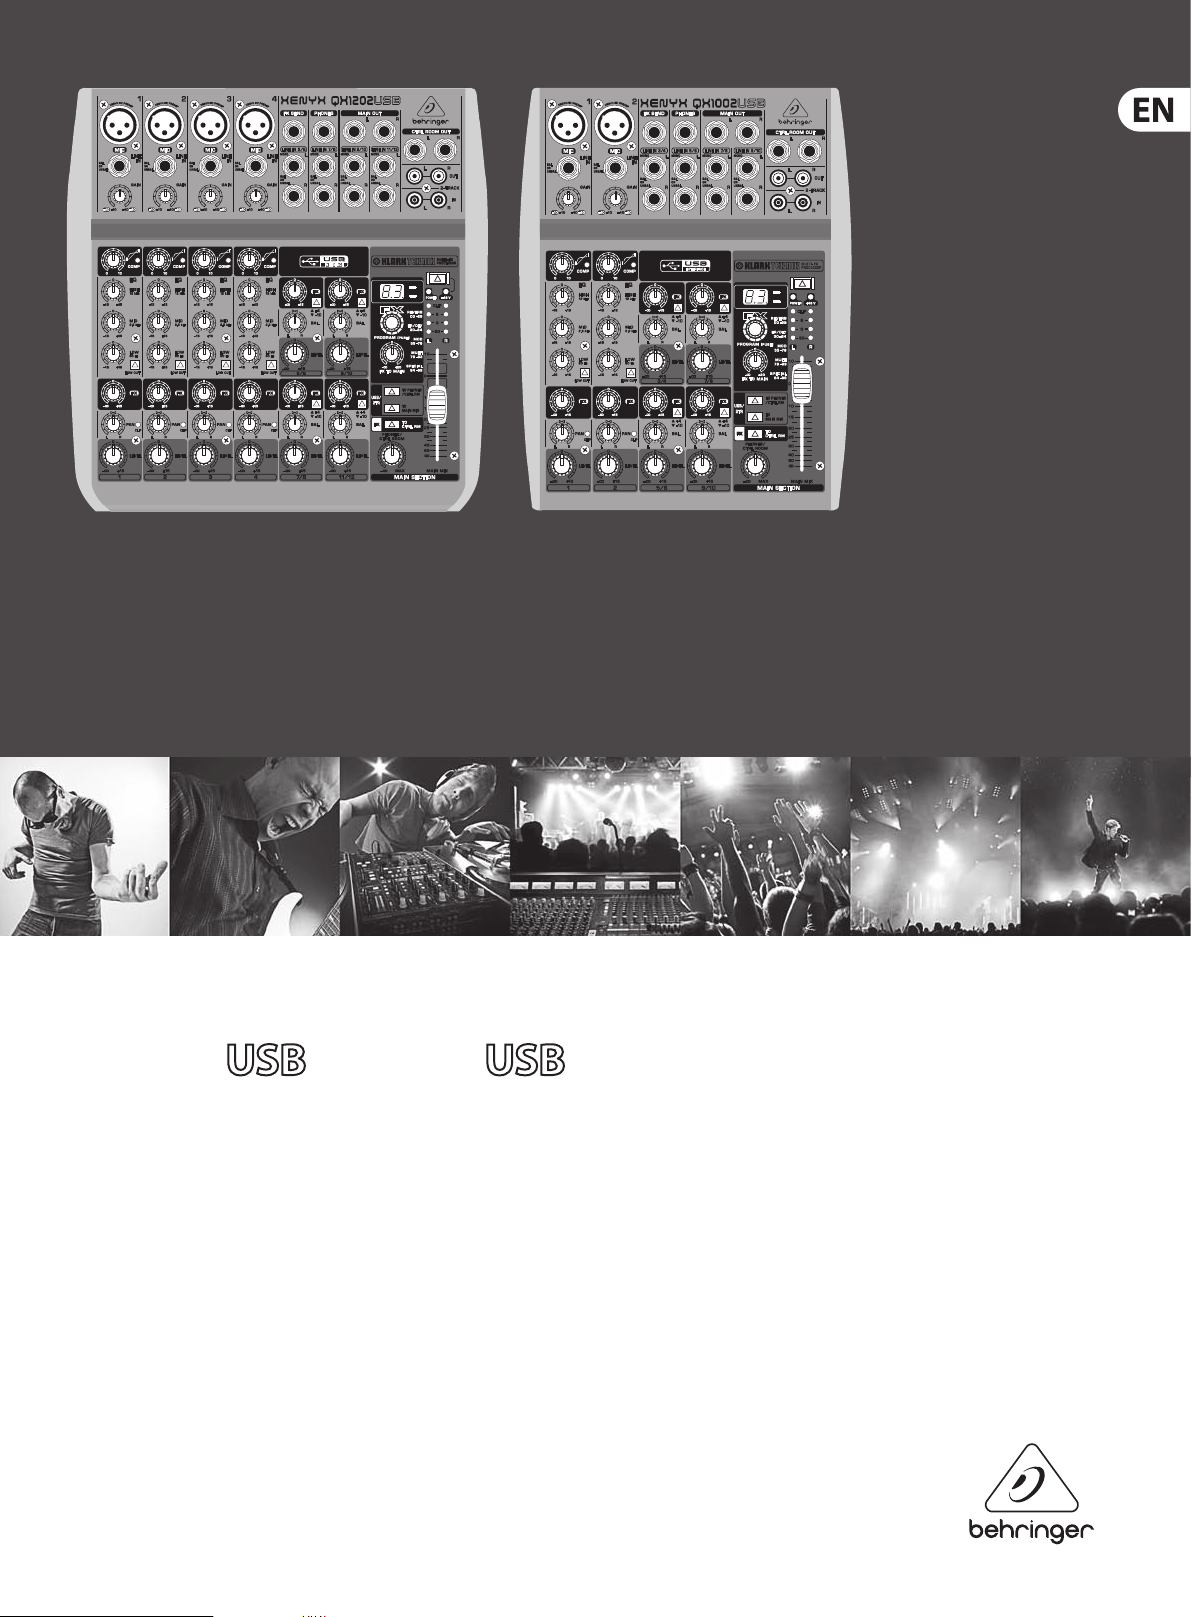
Quick Start Guide
XENYX
QX1202
USB
Premium 12/10-Input 2-Bus Mixer with XENYX Mic Preamps
& Compressors, British EQs, KLARK TEKNIK Multi-FX Processor
and USB/Audio Interface
CLIP
SIG
/QX1002
USB
Related Manuals for Behringer Xenyx QX1002USB
Summary of Contents for Behringer Xenyx QX1002USB
-
Page 1
CLIP Quick Start Guide XENYX QX1202 /QX1002 Premium 12/10-Input 2-Bus Mixer with XENYX Mic Preamps & Compressors, British EQs, KLARK TEKNIK Multi-FX Processor and USB/Audio Interface… -
Page 2: Legal Disclaimer
This symbol, wherever it appears, TC ELECTRONIC, TC HELICON, BEHRINGER, BUGERA especifi cados por el fabricante. the apparatus. When a cart descripciones, fotografías o afi rmaciones contenidas en alerts you to the presence of uninsulated…
-
Page 3: Garantie Limitée
Toutes les marques appartiennent à auszuschließen, darf die Geräteabdeckung Attention Stative, Halter oder Tische, des présentoirs, des pieds BEHRINGER, BUGERA und DDA sind Warenzeichen oder leurs propriétaires respectifs. MIDAS, KLARK TEKNIK, bzw. Geräterückwand nicht abgenommen werden. die vom Hersteller benannt Ce symbol signale les consignes et des surfaces de eingetragene Warenzeichen der MUSIC Group IP Ltd.
-
Page 4: Instruções De Segurança Importantes
TANNOY, TURBOSOUND, TC ELECTRONIC, TC HELICON, Atenção especifi cados pelo BEHRINGER, BUGERA e DDA são marcas ou marcas fabricante ou vendidos De forma a diminuir o risco de choque registradas do MUSIC Group IP Ltd. © MUSIC Group com o dispositivo.
-
Page 5
XENYX QX1202USB/QX1002USB Quick Start Guide XENYX QX1202USB/QX1002USB Hook-up Step 1: Hook-Up (EN) Paso 1: Conexión (ES) Etape 1 : Connexions (FR) Schritt 1: Verkabelung (DE) Home Studio Passo 1: Conexões (PT) Live Performance HPS3000 B215D Active Speakers B212D Bass Guitar XM8500 XM8500 DI100… -
Page 6
XENYX QX1202USB/QX1002USB Quick Start Guide XENYX QX1202USB/QX1002USB Controls Step 2: Controls (EN) Paso 2: Controles (ES) Etape 2 : Réglages (FR) Schritt 2: (DE) (10) (15) Bedienelemente Passo 2: Controles (PT) (10) (15) (19) (18) (27) (28) (19) (24) (29) (23) (18) (28) -
Page 7
To confi rm your selection, press the function similar to those of the mono XENYX or BEHRINGER ULTRALINK PRO MX882 PROGRAM control; the blinking stops. (3) GAIN – Use the GAIN control to adjust the channels. -
Page 8
+4/-10 – Las entradas estéreo de la alta precisión. +48 V de alimentación fantasma a las (6) FX – El envío auxiliar, o de efectos, le permite XENYX QX1002USB y QX1202USB poseen entradas XLR para que pueda usarlas con (20) El boton USB/2-TR a PHONES/CTRL ROM tomar una copia de la señal de uno o varios… -
Page 9
(4) EGALISEUR – Les canaux mono disposent canaux mono. Etant donné que les départs PRO MX882 BEHRINGER. Si tel est le cas, fermez en partie les d’un égaliseur 3 bandes. Chaque d’eff et sont tous deux mono, le signal des potentiomètres FX des canaux. -
Page 10
PROGRAM – Der PROGRAM-Regler der Equalizer neutral. (12) BAL – Der (Bal)ance-Regler bestimmt den eines zweiten XENYX oder des BEHRINGER besitzt zwei Funktionen: durch Drehen (5) LOW CUT – Zusätzlich dazu verfügen relativen Anteil zwischen dem linken und ULTRALINK PRO MX882 angeschlossen des PROGRAM-Reglers wählen Sie eine… -
Page 11
Se for esse o caso, baixe ligeiramente os estéreo, o regulador de BAL(ANÇO) determina do ULTRALINK PRO MX882 da BEHRINGER. máximo em 15 dB, o equalizador é neutro na reguladores FX nos canais. a percentagem relativa entre o sinal de Mesmo que se queira, por norma, controlar o posição central. -
Page 12
XENYX QX1202USB/QX1002USB Quick Start Guide XENYX QX1202USB/QX1002USB Getting started Presets List Step 3: Getting (EN) (EN) To correctly set the gains of the channels, fi rst (DE) Aussteuerung: Zum Einpegeln sollten Sie den Reverb Early Refl ections / Delay Multi set the LEVEL controls of the input channels to their LEVEL-Regler der Eingangskanäle in Mittelstellung started… -
Page 13: Specifications
“Support” de nuestra ist. Sollte Ihr Land nicht aufgelistet sein, prüfen Sie Adapter MXJP6 página web behringer.com. En caso de que su país no bitte, ob Ihr Problem von unserem „Online Support“ High 12 kHz / ±15 dB Output 2 x 14.8 V~, 2 x 500 mA…
-
Page 14: Federal Communications Commission Compliance Information
XENYX QX1202USB/QX1002USB Quick Start Guide FEDERAL COMMUNICATIONS COMMISSION COMPLIANCE INFORMATION XENYX QX1202USB/QX1002USB Responsible Party Name: MUSIC Group Services NV Inc. Address: 5270 Procyon Street Las Vegas, NV 89118 Phone Number: +1 702 800 8290 XENYX QX1202USB/QX1002USB complies with the FCC rules as mentioned in the following paragraph: This equipment has been tested and found to comply with the limits for a Class B digital device, pursuant to part 15 of the FCC Rules.
-
Page 15
Dedicate Your Life to MUSIC…
User Manual
XENYX
QX1202 /QX1002
Premium 12/10-Input 2-Bus Mixer with XENYX Mic Preamps
& Compressors, British EQs, KLARK TEKNIK Multi-FX Processor
andUSB/Audio Interface
CLIP
SIG

2 XENYX QX1202USB/QX1002USB User Manual
Thank you
Congratulations! In purchasing our XENYX QX1202USB/QX1002USB you have
acquired a mixing console whose small size belies its incredible versatility and
audioperformance.
The BEHRINGER XENYX mixing console oers you premium-quality microphone
preampliers with optional phantom power supply, balanced line inputs and
the ability to connec t external eects processors. Because of its extensive and
carefully thought-out routing possibilities, your XENYX lends itself equally to
both live and studio use.
Table of Contents
Thank you ……………………………………………………………..2
Important Safety Instructions ……………………………….. 3
Legal Disclaimer ……………………………………………………. 3
Limited warranty …………………………………………………… 3
1. Introduction ……………………………………………………… 4
1.1 General mixing console functions …………………………. 4
1.2 Before you get started ……………………………………………… 5
1.2.1 Shipment ………………………………………………………………. 5
1.2.2 Initial operation ……………………………………………………. 5
1.2.3 Online registration ………………………………………………. 5
2. Control Elements and Connectors …………………….. 5
2.1 Mono channels ………………………………………………………….. 5
2.2 Stereo channels …………………………………………………………. 6
2.3 Connector array of the main section ……………………… 7
2.4 Main section ………………………………………………………………. 7
2.5 USB Connector ………………………………………………………….. 8
2.6 Digital eects processor ………………………………………….. 8
3. Applications ……………………………………………………. 10
3.1 Recording studio ………………………………………………………10
3.2 Live sound ………………………………………………………………… 11
4. Installation ……………………………………………………… 11
4.1 Mains connection ……………………………………………………. 11
4.2 Audio connections ………………………………………………….. 12
5. Specications …………………………………………………. 13
3 XENYX QX1202USB/QX1002USB User Manual
Important Safety
Instructions
LEGAL DISCLAIMER
LIMITED WARRANTY
Terminals marked with this symbol carry
electrical current of su cient magnitude
to constitute risk of electric shock.
Use only high-quality professional speaker cables with
¼» TS or twist-locking plugs pre-installed. Allother
installation or modi cation should be performed only
by quali edpersonnel.
This symbol, wherever it appears,
alertsyou to the presence of uninsulated
dangerous voltage inside the
enclosure-voltage that may be su cient to constitute a
risk ofshock.
This symbol, wherever it appears,
alertsyou to important operating and
maintenance instructions in the
accompanying literature. Please read the manual.
Caution
To reduce the risk of electric shock, donot
remove the top cover (or the rear section).
No user serviceable parts inside. Refer servicing to
quali ed personnel.
Caution
To reduce the risk of re or electric shock,
do not expose this appliance to rain and
moisture. The apparatus shall not be exposed to dripping
or splashing liquids and no objects lled with liquids,
suchas vases, shall be placed on the apparatus.
Caution
These service instructions are for use
by quali ed service personnel only.
Toreduce the risk of electric shock do not perform any
servicing other than that contained in the operation
instructions. Repairs have to be performed by quali ed
servicepersonnel.
1. Read these instructions.
2. Keep these instructions.
3. Heed all warnings.
4. Follow all instructions.
5. Do not use this apparatus near water.
6. Clean only with dry cloth.
7. Do not block any ventilation openings. Install in
accordance with the manufacturer’s instructions.
8. Do not install near any heat sources such as
radiators, heat registers, stoves, or other apparatus
(including ampli ers) that produce heat.
9. Do not defeat the safety purpose of the polarized
or grounding-type plug. A polarized plug has two blades
with one wider than the other. A grounding-type plug
has two blades and a third grounding prong. The wide
blade or the third prong are provided for your safety. Ifthe
provided plug does not t into your outlet, consult an
electrician for replacement of the obsolete outlet.
10. Protect the power cord from being walked on or
pinched particularly at plugs, convenience receptacles,
and the point where they exit from the apparatus.
11. Use only attachments/accessories speci ed by
themanufacturer.
12. Use only with the
cart, stand, tripod, bracket,
or table speci ed by the
manufacturer, orsold with
the apparatus. When a cart
is used, use caution when
moving the cart/apparatus
combination to avoid
injury from tip-over.
13. Unplug this apparatus during lightning storms or
when unused for long periods of time.
14. Refer all servicing to quali ed ser vice personnel.
Servicing is required when the apparatus has been
damaged in any way, such as power supply cord or plug
is damaged, liquid has been spilled or objects have fallen
into the apparatus, the apparatus has been exposed
to rain or moisture, does not operate normally, or has
beendropped.
15. The apparatus shall be connected to a MAINS socket
outlet with a protective earthing connection.
16. Where the MAINS plug or an appliance coupler is
used as the disconnect device, the disconnect device shall
remain readily operable.
TECHNICAL SPECIFICATIONS AND APPEARANCES
ARE SUBJECT TO CHANGE WITHOUT NOTICE AND
ACCURACY IS NOT GUARANTEED. BEHRINGER,
KLARKTEKNIK, MIDAS, BUGERA, AND TURBOSOUND
ARE PART OF THE MUSIC GROUP MUSICGROUP.COM.
ALL TRADEMARKS ARE THE PROPERTY OF THEIR
RESPECTIVE OWNERS. MUSICGROUP ACCEPTS NO
LIABILITY FOR ANY LOSS WHICH MAY BE SUFFERED
BY ANY PERSON WHO RELIES EITHER WHOLLY OR
IN PART UPON ANY DESCRIPTION, PHOTOGRAPH
OR STATEMENT CONTAINED HEREIN. COLORS AND
SPECIFICATIONS MAY VARY FROM ACTUAL PRODUCT.
MUSIC GROUP PRODUCTS ARE SOLD THROUGH
AUTHORIZED FULLFILLERS AND RESELLERS ONLY.
FULLFILLERSAND RESELLERS ARE NOT AGENTS OF
MUSICGROUP AND HAVE ABSOLUTELY NO AUTHORITY
TO BIND MUSICGROUP BY ANY EXPRESS OR IMPLIED
UNDERTAKING OR REPRESENTATION. THIS MANUAL
IS COPYRIGHTED. NO PART OF THIS MANUAL MAY
BE REPRODUCED OR TRANSMITTED IN ANY FORM
OR BY ANY MEANS, ELECTRONIC OR MECHANICAL,
INCLUDING PHOTOCOPYING AND RECORDING OF ANY
KIND, FOR ANY PURPOSE, WITHOUT THE EXPRESS
WRITTEN PERMISSION OF MUSICGROUPIPLTD.
ALL RIGHTS RESERVED.
© 2013 MUSICGroupIPLtd.
Trident Chambers, Wickhams Cay, P.O. Box 146,
Road Town, Tor tola, British Virgin Islands
For the applicable warranty terms and conditions
and additional information regarding MUSIC Group’s
Limited Warranty, please see complete details online at
www.music-group.com/warranty.

4 XENYX QX1202USB/QX1002USB User Manual
1. Introduction
The XENYX Series represents a milestone in the development of mixing console
technology. With the new XENYX microphone preamps including phantom power
as an option, balanced line inputs and a powerful eects section, themixing
consoles in the XENYX Series are optimally equipped for live and studio
applications. Owing to state-of-the-art circuitry your XENYX console produces
a warm analog sound that is unrivalled. With the addition of the latest digital
technology these best-in-class consoles combine the advantages of both analog
and digital technology.
The microphone channels feature high-end XENYX Mic Preamps that compare
well with costly outboard preamps in terms of sound quality and dynamics and
boast the following features:
• 130 dB dynamic range for an incredible amount of headroom
• A bandwidth ranging from below 10 Hz to over 200 kHz for crystal-clear
reproduction of even the nest nuances
• The extremely low-noise and distortion-free circuitry guarantees absolutely
natural and transparent signal reproduction
• They are perfectly matched to every conceivable microphone with up to
60dB gain and +48 volt phantom power supply
• They enable you to use the greatly extended dynamic range of your
24-bit/192-kHz HD recorder to the fullest, thereby maintaining optimal
audioquality
“British EQ”
The equalizers used for the XENYX Series are based on the legendary circuitry of
top-notch consoles made in Britain, which are renowned throughout the world
for their incredibly warm and musical sound character. Even with extreme gain
settings these equalizers ensure outstanding audio properties.
KLARK TEKNIK FX Processor
Additionally, your XENYX mixing console has a KLARK TEKNIK eects processor
with 24-bit A/D and D/A converters included, which gives you 100 presets
producing rst-class reverb, delay and modulation eects plus numerous
multi-eec ts in excellent audio quality.
Caution!
◊ We should like to draw your attention to the fac t that extreme volumes
may damage your hearing and/or your headphones or loudspeakers.
Turn the MAIN MIX control and PHONES control in the main section fully
counterclockwise before you switch on the unit. Always be careful to
set appropriate volume levels.
1.1 General mixing console functions
A mixing console fulls three main functions:
• Signal processing:
Preamplication
Microphones convert sound waves into voltage that has to be amplied
several-fold; then, this voltage is turned into sound that is reproduced
in a loudspeaker. Because micro phone capsules are very delicate in their
construction, output voltage is very low and therefore susceptible to
interference. Therefore, mic signal voltage is amplied directly at the mixer
input to a higher signal level that is less prone to interference. This higher,
interference-safe signal level has to be achieved through amplication using
an amplier of the highest quality in order to amplify the signal and add
as little noise to it as possible. The XENYX Mic Preamp performs this role
beautifully, leaving no traces of noise or sound coloration. Interferencethat
could take place at the preamplication level could aect signal quality
and purity, and would then be passed on to all other devices, resulting in
inaccurate sounding program during recording or playback.
Level-setting
Signals fed into the mixer using a DI-box (Direct Injection) or the output of a
sound card or a keyboard, often have to be adjusted to the operating level of
your mixing console.
Frequency response correction
Using the equalizers found in each channel strip, you can simply, quickly and
eectively adjust the way a signal sounds.
• Signal distribution:
Individual, processed signals from the channel strips are compiled on
busses and are fed into the main section for fur ther processing. Connections
for recording equipment, power ampliers, headphones as well as RCA
connectors are available here. The mix is sent to the internal FX processors or
external eects processors via aux sends and returns. Similarly, a mix can be
created for the musicians on the stage (monitor mix).
• Mix:
All other mixing console functions fall under this vital category. Creating a
mix means primarily adjusting the volume levels of individual instruments
and voices to one another as well as giving them the appropriate weight
within the overall frequency spectrum. Likewise, you’ll have to sensibly
spread individual voices across the stereo image of a signal. At the end of
this process, adjusting the level of the entire mix to other equipment in the
signal path is required (e. g. recorder/crossover/amplier).
The interface of BEHRINGER mixing consoles is optimized for these tasks,
enabling you to easily keep track of the signal path.
5 XENYX QX1202USB/QX1002USB User Manual
1.2 Before you get started
1.2.1 Shipment
Your mixing console was carefully packed in the factory to guarantee safe
transport. Nevertheless, we recommend that you carefully examine the
packaging and its contents for any signs of physical damage that may have
occurred during transit.
◊ If the unit is damaged, please do NOT return it to us, but notify your
dealer and the shipping company immediately, otherwise claims for
damage or replacement may not be granted.
◊ To assure optimal protection of your XENYX during use or transport,
we recommend utilizing a carrying case.
◊ Please always use the original packaging to avoid damage due to
storage or shipping.
◊ Never let unsupervised children play with the XENYX or with
its packaging.
◊ Please dispose of all packaging materials in an environmentally-
friendly fashion.
1.2.2 Initial operation
Be sure that there is enough space around the unit for cooling purposes and to
avoid overheating please do not place your mixing console on high-temperature
equipment such as radiators or power amps.
◊ Never connect the XENYX to the power supply unit when the latter is
connected to the mains! First connect the power supply unit to the
console, then connect the power supply unit to the mains.
◊ Please make sure that all units have a proper ground connection.
For your own safety, never remove or disable the ground
conductor from the unit or on the AC power cord. The unit should
always be connected to a mains socket outlet with a protective
earthing connection.
◊ When installing the product, ensure the appliance coupler or power
cord is easily accessible for disconnecting the unit from mains.
1.2 .3 Online registration
Please register your new BEHRINGER equipment right after your purchase
by visiting http://behringer.com and read the terms and conditions of our
warrantycarefully.
Should your BEHRINGER product malfunction, it is our intention to have it
repaired as quickly as possible. To arrange for warranty service, please contact
the BEHRINGER retailer from whom the equipment was purchased. Shouldyour
BEHRINGER dealer not be located in your vicinity, you may directly contact
one of our subsidiaries. Corresponding contact information is included in the
original equipment packaging (Global Contact Information/European Contact
Information). Should your country not be listed, please contact the distributor
nearest you. A list of distributors can be found in the support area of our
website(http://behringer.com).
Registering your purchase and equipment with us helps us process your repair
claims more quickly and eciently.
Thank you for your cooperation!
2. Control Elements and Connectors
This chapter describes the various control elements of your mixing console.
Allcontrols, switches and connectors will be discussed in detail.
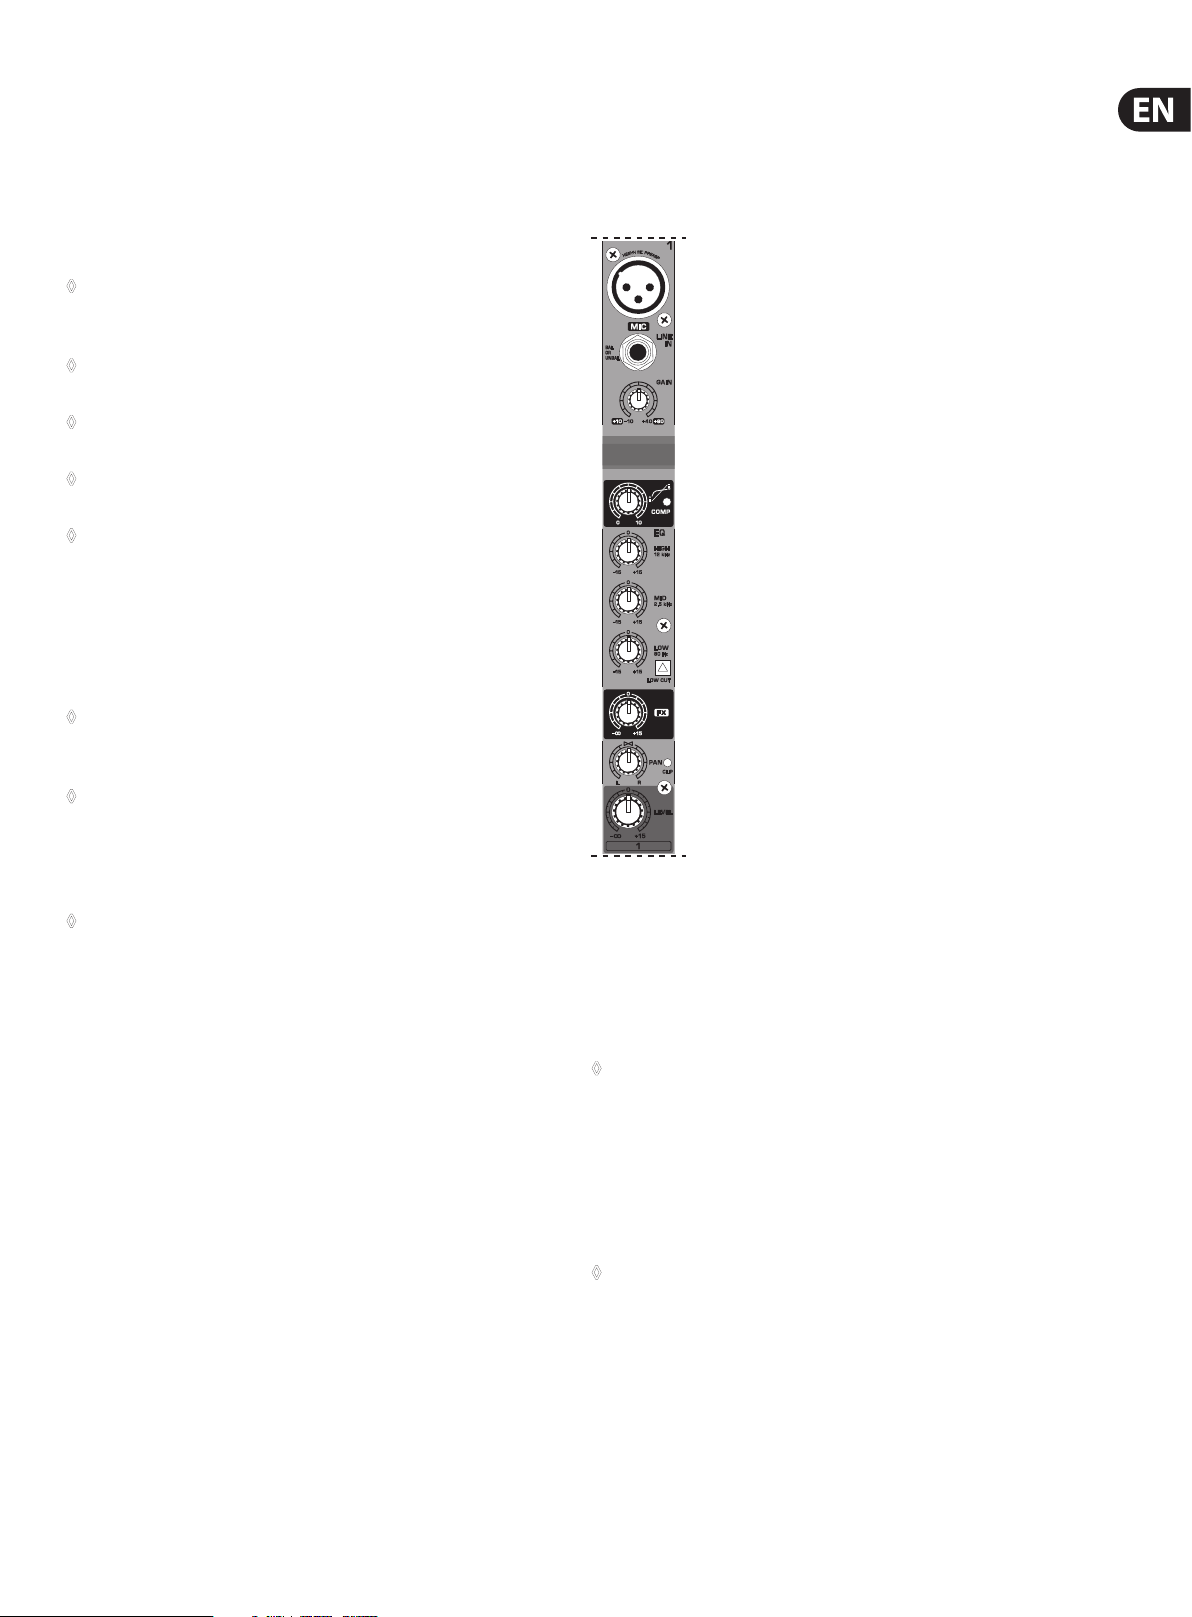
2.1 Mono channels
Fig. 2.1: Connector s and controls on the mo nochannels
MIC
Each mono input channel oers a balanced microphone input via the XLR
connector and also features switchable +48 V phantom power supply for
condenser microphones. The XENYX preamps provide undistorted and noise-free
gain as is typically known only from costly outboard preamps.
◊ Please mute your playback system before you activate the phantom
power supply to prevent switch-on thumps being directed to
your loudspeakers. Please also note the instructions in chapter
2.4 “Main section”.
LINE IN
Each mono input also features a balanced line input on a ¼»connector.
Unbalanced devices (mono connectors) canalso be connected to these inputs.
◊ Please remember that you can only use either the microphone
or the line input of a channel at any one time. You can never use
both simultaneously!
 Loading…
Скачать
User Manual
XENYX
QX1202
/QX1002
Premium 12/10-Input 2-Bus Mixer with XENYX Mic Preamps
& Compressors, British EQs, KLARK TEKNIK Multi-FX Processor
and USB/Audio Interface
CLIP
SIG
120 В~, 60 Гц
Разъем XLR, сбалансированный, дискретная цепь
12
XENYX QX1202USB/QX1002USB
13
QX1202USB
QX1002USB
→
QX1202USB
QX1002USB
MXSAA6
MXUK6 / MXEU6
MXCCC6 / MXKR6
MXJP6
USB
Руководство по быстрому началу работы
RU
RU
Технические характеристики
Моновходы
Стереовходы
Вход CD/Tape
Эквалайзер
Aux посылы
Aux возвраты
Частотная характеристика (Микр вход
Осн.выход)
Основные выходы
Выход Control Room
Выход на наушники
ВыходCD/Tape
Секция эффектов
Блоки питания
Размеры/вес
Основной микс (шум)
Разъём
Линейный вход
Микрофонные входы (предусилители XENYX)
Экв.шум (20 Гц — 20 кГц)
Тип
Сопротивление источника 0 Ом
-133 дБ / 137 дБ А-взвешенный
Сопротивление источника 50 Ом
-130 дБ / 134 дБ А-взвешенный
Сопротивление источника 150 Ом
-127 дБ / 131 дБ А-взвешенный
Частотный диапазон
(-1 дБ)
<10 Гц — 150 кГц (-1 дБ)
Частотный диапазон
(-3 дБ)
<10 Гц — 200 кГц (-3 дБ)
Диапазон усиления
+10 дБ до +60 дБ
Макс.уровень входа
+10,8 dBu при + усилении 10 дБ
Сопротивление
1,9 кОм сбалансир.
Соотношение сигнал-шум
107 дБ / 110 дБ A-взвеш.,Усиление +22 дБ
Искажения (THD+шум)
0,006%/0,005% А-взвеш.
Тип
Сопротивление
20 кОм сбланс., 10 кОм несбаланс.
Диапазон усиления
-10 дБ до +40 дБ
Макс.уровень входа
+22 dBu при усилении 0 дБ
¼»
Разъёмы TRS, сбалансированнные
<10 Гц — 137 кГц
±3 дБ
Тип
Сопротивление
Диапазон усиления
Макс.уровень входа
20 кОм сбаланс., 10 кОм несбаланс.
-20 дБ до + 20 дБ
+22 dBu
2 разъёма TRS, сбалансированные
¼»
(рабочий уровень +4 dBu)
20 кОм сбаланс., 5 кОм несбаланс. (-10 dBV)
Тип
Сопротивление
Макс.уровень входа
разъёмы RCA
19,5 кОм
+21 dBu
Низкие
80 Hz / ±15 dB
Средние
2.5 kHz / ±15 dB
Высокие
12 кГц/±15 dB
Тип
Сопротивление
Макс.уровень входа
120 Ом
+21 dBu
Разъёмы TRS, сбалансир.
¼»
Тип
Сопротивление
Макс.уровень входа
Разъёмы
TRS, сбалансир.
¼»
20 кОм сбаланс., 10 кОм несбаланс.
+21 dBu
Тип
Сопротивление
Макс.уровень входа
Разъёмы
TRS, сбалансир.
¼»
+21 dBu
120 Ом сбалансированный
Тип
Сопротивление
Макс.уровень входа
Разъёмы
TRS, сбалансир.
¼»
+21 dBu
120 Ом
TRS, несбалансир.
Тип
Макс.уровень входа
Разъёмы
¼»
+21 dBu / 22 Ом (+25 dBm)
Тип
Сопротивление
Макс.уровень входа
Разъём RCA, несбаланс.
1 кОм
+21 dBu
Осн.микс —
,
∞
∞
фейдер канала —
∞
Осн. микс 0 дБ,
фейдер канала —
Осн.микс 0 дб,
фейдер канала на 0 дБ
-105 дБ / -108 дБ A-взвеш.
-83 дБ / -85 дБ A-взвеш.
-93 дБ / -96 дБ A-взвеш.
Тип
KLARK TEKNIK
Конвертер
24-бит Sigma Delta
Частота сэмплирования
40 кГц
США/Канада
Австралия
230 — 240 В~, 50 Гц
Англия/Европа
230 В~, 50 Гц
Китай/Корея
220 В~, 50 Гц / 220 В~, 60 Гц
Япония
100 В~, 50/60 Гц
Выход
2 x 14.8 В~, 2 x 500 мА
Адаптер
MXUL6
Адаптер
Адаптер
Адаптер
Адаптер
Разъём
Тип Б
Частота сэмплирования
48 кГц
Размеры (Ш x Г x В)
Вес
50 x 250 x 248 мм
50 x 195 x 248 мм
1,5 кг
1,1 кг
Другая важная информация
RU
Важная информация
1.
2.
3.
Регистрация через интернет. Пожалуйста, зарегистрируйте
ваш пульт, посетив сайт behringer.com. Регистрация вашей
покупки с помощью простой формы поможет нам быстрее и
эффективнее обрабатывать ваши заявки на ремонт.
Также прочитайте сроки и условия вашей гарантии.
Неисправности. Если поблизости нет уполномоченного
торгового представителя компании MUSIC Group, то
вы можете обратиться к уполномоченному
представителю компании в вашей стране, список
которых находится в разделе “Support” на сайте
behringer.com. Если в списке адресов нет вашей страны,
пожалуйста, проверьте, можно ли решить вашу
проблему с помощью службы поддержки, которую
можно найти на странице «Support» нашего сайта
behringer.com. В качестве альтернативы вы можете
заполнить гарантийную заявку прямо на сайте
ПЕРЕД возвратом изделия.
Подключение питания. Перед подключением
устройства в розетку питания убедитесь, что
напряжение в сети питания соответствует
рабочему напряжению вашей конкретной модели.
Сгоревшие предохранители необходимо заменять
только на предохранители того же типа и с
такими же параметрами