IMPORTANT NOTES
• Read the instructions carefully before using the co—
—
ffee maker for the first time. Safeguard them for future
reference.
• Only connect it to the voltage stated on the charac—
—
teristics plate.
• It is advisable to use an earthed electrical socket.
• This appliance has been designed exclusively for do—
—
mestic use.
• Do not use the appliance for uses other than those
stated in the this manual.
• The On/Off switch should be in the Off position
when plugging it in or when unplugging it.
• Always place the appliance on a flat, level surface.
• Try not move the appliance while it is operating.
• This appliance is not intended for use by persons
(including children) with reduced physical, sensory
or mental capabilities, or lack of experience and
knowledge, unless they have been given supervision
or instruction concerning use of the appliance by a
person responsible for their safety.
• Children should be supervised to ensure that they do
not play with the appliance.
• The apliance is not intended to be operated by
means of an external timer or separate remote-control
system.
• Do not immerse the coffee maker in water or
any other liquids.
• Do not handle the appliance with wet hands.
• Do not operate the appliance with the cable still
coiled.
• Do not touch the hot surfaces. Handle the coffee
maker by its handles or buttons.
• Do not leave the coffee maker unattended when it is
in use, nor when there are children about.
• Unplug it from the mains when it is not in use and
before cleaning it.
• Do not unplug it by tugging on the mains cable. Do
not leave the plug hanging freely.
• Do not leave the appliance close to sources of heat
nor allow the cable to come into contact with hot
surfaces.
• Do not operate the coffee maker without water.
• Make sure that the lid on the tank is closed before
switching the coffee maker on.
• Before cleaning it, make sure that the appliance is
unplugged and cold.
• Do not switch the coffee maker on if either the cable
or plug are damaged, if it can be detected that it is not
operating correcting, or if it has suffered any type of
damage.
• Cable repairs and replacements must be carried out
exclusively by an Authorised Technical Service Centre.
OPERATION
Before using it for the first time wash all of the acces-
—
sories and operate it once without coffee.
Preparing Espresso Coffee
1. Plug the appliance into the mains and check that the
switch is in the Off position.
2. Unscrew the lid on the tank and pour in the desired
amount of water. The jug shows the amounts required
for two or four cups. Screw the lid back on and tighten
it securely.
3. Place the filter into the filter holder. Use the filter’s
two or four cup level marks to gauge the amount of
coffee needed. Clean off any coffee that may be left
around the edge of the filter holder.
Important: To get the best results out of your espres-—
so coffee maker, use a coarsely ground coffee, Italian
espresso type. Do not pack the coffee down.
4. Put the filter holder into position. Place the jug so
that the opening lines up with the coffee outlet.
5. Turn the selector to the coffee position. The pilot
lamp will come on. After a few minutes the water will
boil, filter through the coffee and flow down into the
jug. When the coffee stops coming out put the switch
to the Off position.
Important:
• The tank can only be opened safely when all the
water has been used up. To release the pressure, pla—
—
ES
1. Depósito de agua
2. Selector café-vapor
3. Tubo de vaporización
4. Portafiltros
5. Filtro
6. Bandeja de goteo
7. Jarra
8. Recogecables
9. Cuchara dosificadora
10. Boquilla de vapor
PT
1. Depósito de água
2. Selector café-vapor
3. Tubo vaporizador
4. Porta-filtros
5. Filtro
6. Bandeja para recolher as gotas
7. Jarro
8. Enrolador do cabo
9. Colher doseadora
10. Doseador
HU
1.Víztartály
2.Kávé-gŒzszabályozó
3.GŒzkieresztŒcsŒ
4.SzırŒtartó
5.SzırŒ
6.CsepegtetŒkanna
7. Üvegkanna
8.VezetékfeltekerŒ
9. Adagolókanál
10. GŒzkieresztŒ
BU
GB
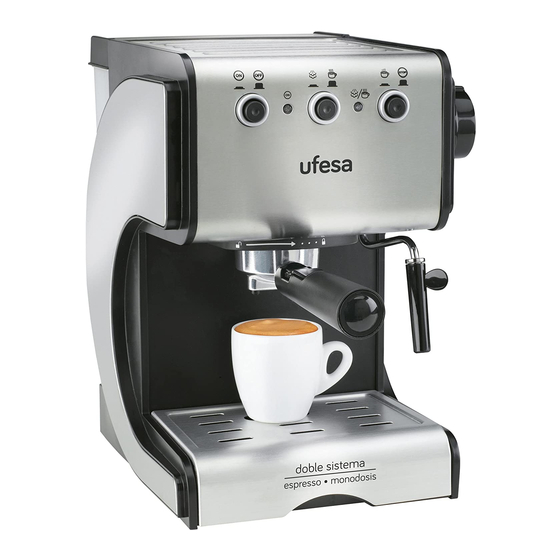
1. Water tank
2. Coffee-steam selector
3. Steam pipe
4. Filter holder
5. Filter
6. Drip tray
7. Jug
8. Cable coiler
9. Measuring scoop
10. Steam nozzle
RU
RO
1. Rezervor apã
2. Selector cafea-abur
3. Tub de vaporizare
4. Portfiltru
5. Filtru
6. Tava de picurare
7. Canã
8. Loc pentru strângerea cablului
9. Lingurã pentru dozare
10 Gura aburului
AR
1
2
3
4
5
6
7
8
9
10
NOTAS IMPORTANTES
• Lea con atención las instrucciones antes de usar la
cafetera por primera vez. Guárdelas para futuras con—
—
sultas.
• Conéctese únicamente a la tensión indicada en la
placa de características.
• Es recomendable un enchufe con toma de tierra.
• Este aparato ha sido diseñado exclusivamente para
uso doméstico.
• No emplee el aparato para usos diferentes de los
descritos en este manual.
• Tanto al introducir como al sacar la clavija del enchu-
—
fe, el selector debe estar en la posición de apagado.
• Coloque siempre el aparato sobre una superficie lisa
y estable.
• Evite mover el aparato durante su funcionamiento.
• No coloque el aparato cerca de la bañera, ducha o
piscina.
• No permitir el uso del aparato a personas (incluidos
niños) con capacidades intelectuales o sensoriales
disminuidas o con insuficiente experiencia y cono-
—
cimientos, a no ser que sean vigilados o hayan sido
instruidos en el manejo del aparato por la persona
responsable de su seguridad.
• Mantenga la máquina fuera del alcance de los niños.
Asegúrese de que no juegan con ella.
• El aparato no se ha diseñado para su utilización con
un temporizador externo o un sistema de control re-—
moto separado.
• No introduzca la cafetera en agua u otros líquidos.
• No manipule el aparato con las manos mojadas.
• No haga funcionar el aparato con el cable enrollado.
• No toque las partes calientes. Manipule la cafetera
por las asas e interruptores.
• No deje la cafetera desatendida cuando esté en fun-
—
cionamiento, ni en presencia de niños.
• Desenchufe de la toma cuando no esté en uso y an-
—
tes de su limpieza.
• No desconecte tirando del cable. No deje la co-
—
nexión colgando.
• No deje el aparato cerca de una fuente de calor ni
permita que el cable toque superficies calientes.
• No haga funcionar la cafetera sin agua.
• Asegúrese de que la tapa del depósito está cerrada
antes de poner la cafetera en marcha.
• Antes de su limpieza compruebe que el aparato se
encuentra desconectado y frío.
• No ponga en marcha la cafetera con el cable o en-
—
chufe dañados, si ha observado que no funciona co——
rrectamente o si ha sufrido daños de algún tipo.
• Las reparaciones y cambios de cable deben ser
realizadas exclusivamente por un Servicio Técnico
Autorizado.
FUNCIONAMIENTO
Antes del primer uso lave todos los accesorios y hága—
—
la funcionar una vez sin café.
Preparación de Café Exprés
1. Conecte el aparato a la red y compruebe que el
selector está en la posición de apagado.
2. Desenrosque el tapón del depósito y vierta la canti-
—
dad de agua deseada. La jarra indica la cantidad nece-—
saria para dos o cuatro tazas. Gire el tapón y apriételo
con fuerza.
3. Coloque el filtro en el portafiltros. Para poner el
café guíese por las marcas de dos y cuatro tazas del
filtro. Limpie el café que pueda quedar en el borde
del portafiltros.
Importante: Para obtener un resultado óptimo con su
cafetera de hidropresión, utilice un café con un mo li do
grueso, tipo cafetera italiana. No prense el café.
4. Coloque el portafiltros. Coloque la jarra de manera
que la abertura coincida con la salida de café.
5. Gire el selector hasta la posición café. El piloto se
iluminará. Al cabo de unos minutos el agua hierve y
cae a través del café molido a la jarra. Cuando el café
termine de salir vuelva a poner el interruptor en la po-
—
sición de apagado.
Importante:
• El depósito sólo puede ser abierto con seguridad
cuando toda el agua ha sido utilizada. Para liberar la
presión, coloque una jarra con agua bajo el vapori—
—
zador y gire el selector hasta la posición de vapor.
Cuando el vapor deje de salir vuelva a poner el
selector en la posición de apagado.
• Después preparar café, el portafiltro debe dejarse
enfriar durante dos minutos antes de retirarlo de la ca-
—
fetera.
Preparación de Capuccino
1. Siga las instrucciones para hacer café. El indicador
de nivel de la jarra marca la cantidad que se precisa
para preparar dos tazas de café y la espuma de la le-
—
che. Para preparar cuatro tazas, llene la jarra hasta la
parte inferior de la banda metálica.
2. Cuando obtenga la cantidad deseada de café pon—
—
ga el selector en la posición de apagado. Ponga una
jarra con leche fría bajo la salida de vapor y sitúe el
selector en la posición vapor.
3. Para obtener espuma coloque el tubo de vapor
justo en la superficie de la leche y mueva la jarra en
sentido circular. Una vez preparada la espuma suba y
baje ligeramente la jarra para calentar la leche. Vuelva
a situar el selector en «apagado».
4. Vierta la leche con espuma en el café. Si lo desea
puede espolvorearlo con canela o chocolate molido y
decorarlo con canela en rama.
MANTENIMIENTO Y LIMPIEZA
Antes de proceder a la limpieza desconecte el apara-
—
to de la red. Lave las partes móviles con agua y jabón.
Pase un paño húmedo para limpiar el cuerpo de la
cafetera.
Es necesario realizar regularmente una limpieza del
vaporizador para asegurarse de que no se encuentra
obstruida. Para limpiar el interior del tubo del vapori—
—
zador llene el depósito con agua suficiente como para
una taza y accione el vaporizador sin leche. Cierre el
vaporizador y frote inmediatamente la boquilla con
un paño húmedo. Tenga cuidado al realizar esta ope-—
ración, pues podría estar aún muy caliente. En caso
de estar obstruido, el tubo del vaporizador se puede
desatornillar con el orificio hexagonal de la cuchara
dosificadora y limpiar con una aguja.
Después de cada uso, vacíe el depósito. No la guarde
con el portafiltros colocado. El cable puede recogerse
debajo del aparato.
DESCALCIFICACION
La cafetera debe ser regularmente descalcificada.
Vierta en el depósito dos tazas de vinagre y haga fun-
—
cionar el aparato sin café dos veces, incluído el tubo
de vapor. Para eliminar los restos de vinagre, hágalo
funcionar sólo con agua dos veces más.
ADVERTENCIAS DE DEPOSICION/
ELIMINACION
Para su transporte, nuestras mercancías cuen-—
tan con un embalaje optimizado. Este con-—
siste –por principio— en materiales no conta-—
minantes que deberían ser entregados como
materia prima secundaria al servicio local de elimina——
ción de basuras.
Este producto cumple la Directiva de la UE
2002/96/CE.
El símbolo del cubo de basura tachado sobre el
aparato indica que el producto, cuando finalice
su vida útil, deberá desecharse separado de los
residuos domésticos, llevándolo a un centro de
desecho de residuos separado para aparatos eléctricos
o electrónicos o devolviéndolo a su distribuidor cuando
compre otro aparato similar. El usuario es el responsable
de llevar el aparato a un centro de desecho de residuos
especiales al finalizar su vida útil. De lo contrario, podrá
ser sancionado en virtud de los reglamentos de desecho
de residuos vigentes. Si el aparato inutilizado es reco-
—
gido correctamente como residuo separado, podrá ser
reciclado, tratado y desechado de forma ecológica; esto
evita un impacto negativo sobre el medio ambiente y la
salud, y contribuye al reciclaje de los materiales del pro-—
ducto. Para obtener más información sobre los servicios
de desecho de residuos disponibles, contacte con su
agencia de desecho de residuos local o con la tienda
donde compró el aparato. Los fabricantes e importa-—
dores se hacen responsables del reciclaje, tratamiento y
desecho ecológico, sea directamente o a través de un
sistema público.
Su Ayuntamiento o Municipio le informará sobre posi-
—
bilidades de deposición/elimi nación para los aparatos
en desuso.
ce a jug of water under the steam sprayer and turn the
selector to the steam position. When the steam stops
coming out put the switch back to the Off position.
• After making the coffee, the filter holder should be
left to cool down for a few minutes before removing it
from the coffee maker.
Preparing Cappuccino
1. Follow the instructions for making coffee. Remember
that slightly more water will be necessary to froth up
the milk.
2. When you have made the desired amount of co—
—
ffee put the switch to the Off position. Place a jug of
cold milk under the steam outlet and then switch the
selector to the steam position.
3. To obtain froth, place the steam pipe just on the
surface of the milk and move the jug with a circular
motion. Once the froth is ready move the jug up and
down slightly to heat up the milk. Put the selector back
to the «Off» position.
4. Pour the frothed-up milk onto the coffee. If so desi-
—
red, it can be sprinkled with cinnamon or grated cho-—
colate and decorated with a stick of cinnamon.
MAINTENANCE & CLEANING
Unplug the appliance from the mains before procee-
—
ding to clean it. Remove the drip tray and filter holder.
Wash the moving parts with soapy water. Wipe down
the coffee maker’s body with a damp cloth.
It is necessary to regularly flush the steam nozzle
through to stop it from becoming blocked. To clean
the inside of the steam pipe, fill the tank with enough
water for one cup and use the steam spray without any
milk. Switch off the steam and rub the nozzle down
with a damp cloth immediately afterwards. Take care
when doing this as it may still be very hot. In the event
that it is blocked, the steam pipe can be unscrewed by
using the hexagonal hole on the measuring scoop and
then cleaned out using a needle.
Empty out any water that may be left over after each
use. Do not store it away with the filter holder fitted.
The cable can be coiled up under the appliance.
DESCALING
The coffee maker should be descaled regularly: Dilute
one cup of vinegar in one cup of water, pour the mix-
—
ture into the tank and run the appliance, including the
steam pipe, twice, but without any coffee. To flush out
any vinegar remains run it with just water, twice more.
ADVICE ON DISPOSAL:
Our goods come in optimised packaging.
This basically consists in using non-contami-—
nating materials which should be handed
over to the local waste disposal service as
secondary raw materials.
This product complies with EU Directive
2002/96/CE. The crossed wheelie bin symbol
shown on the appliance indicates that when
it comes to dispose of the product it must
not be included in with household refuse. It
must be taken to a special refuse collection
point for electric and electronic appliances or retur-—
ned to the distributor when purchasing a similar
appliance. Under current refuse disposal regulations,
users who fail to take discarded appliances to special
refuse collection points may be penalised. Correct
disposal of discarded appliances means that they can
be recycled and processed ecologically, helping the
environment and allowing materials used in the pro——
duct to be reused. For more information on available
waste disposal schemes contact your local refuse ser-—
vice or the shop where the product was purchased.
Manufacturers and importers are responsible for eco-—
logical recycling, processing and disposal of pro-—
ducts, whether directly or via a public system.
Your local town council can provide you with informa-
—
tion about how to dispose of obsolete appliances.
REMARQUES IMPORTANTES
• Avant d’utiliser la cafetière pour la première fois, lire
attentivement ces instructions. Conservez-les pour de
futures consultations.
• Brancher uniquement sur la tension indiquée sur la
plaque des caractéristiques.
• Il est conseillé d’utiliser une prise de terre.
• Cet appareil a été conçu pour une utilisation domes-
—
tique exclusivement.
• Ne pas employer cet appareil pour des utilisations
autres que celles indiquées dans ce manuel.
• Que ce soit pour introduire comme pour sortir la fi-
—
che de la prise, le sélecteur doit être éteint.
• L’appareil doit toujours être placé sur une surface
lisse et stable.
• Eviter de bouger l’appareil quand il fonctionne.
• Ne pas confier l’appareil à des enfants ou à des per-
—
sonnes aux capacités sensorielles ou intellectuelles
diminuées ou ne dispo-sant pas d’une expérience ou
d’une connaissance suffisante, sauf si elles le font sous
surveillance ou si elles ont bénéficié préalablement
d’une information à propos de la manipulation de
l’appareil de la part de la personne responsable de
leur sécurité.
• Tenir les enfants éloignés de la machine. Bien sur-
—
veiller les enfants afin de les empêcher de jouer avec
l’appareil.
• Cet appareil ne fonctionne ni avec un temporisateur
externe ni avec une télécommande.
• Ne pas introduire l’appareil dans l’eau ou autres
liquides.
• Ne manipulez jamais l’appareil, les mains mouillées.
• Ne pas faire fonctionner l’appareil avec le câble en-
—
roulé.
• Ne pas toucher les surfaces chaudes. Pour manipu—
ler la cafetière, servez-vous de l’anse et des interrup—
—
teurs.
• Ne laissez jamais fonctionner la cafetière sans survei-
—
llance, et plus particulièrement près des enfants.
• Si vous n’utilisez pas la cafetière et avant de la netto—
—
yer, débranchez-la de la prise.
• Ne débranchez jamais en tirant du câble. Ne pas lais—
—
ser pendre le cordon.
• Ne jamais laisser l’appareil près d’une source de cha-
—
leur, le cordon ne doit pas toucher les surfaces chaudes.
• Ne pas faire fonctionner la cafetière sans eau.
• Avant de mettre en marche la cafetière, assurez-vous
que le couvercle du réservoir est bien fermé.
• Avant de le nettoyer, vérifiez si l’appareil est bien
débranché et complètement froid.
• Ne pas le faire fonctionner si le câble ou la fiche sont
abîmés ou si vous remarquez que l’appareil ne fonc—
—
tionne pas correctement ou s’il a subi un dommage
quelconque.
• Les réparations et remplacements de câble doivent
être réalisés exclusivement par un Service Technique
Agréé.
FONCTIONNEMENT
Avant la première utilisation, il est conseillé de laver
tous les accessoires et de faire fonctionner une fois la
cafetière sans café.
Préparation d’un expresso
1. Connectez l’appareil au réseau et vérifiez si le sélec—
—
teur sur trouve sur la position “éteint”.
2. Dévissez le bouchon de réservoir et versez la quan-
—
tité d’eau voulue. La verseuse indique la quantité né-—
cessaire pour deux ou trois tasses. Tournez le bouchon
et serrez-le très fort.
3. Placez le filtre dans le porte-filtres. Pour mettre le
café, guidez-vous par les marques de deux et quatre
tasses du filtre. Nettoyez le café resté sur le bord du
porte-filtre.
Important: Pour que votre cafetière à hydropression
vous donne un excellent résultat, il faudra utiliser un
café moulu gros, type cafetière italienne. Ne tasser pas
le café.
4. Placez le porte-filtres. Placez ensuite la verseuse de fa —
çon à ce que l’ouverture coïncide avec la sortie du café.
5. Tournez le sélecteur jusqu’à la position café. Le
voyant lumineux s’allumera. Quelques minutes après,
l’eau bout et tombe dans la verseuse à travers le café
moulu. Quand le café ne coule plus, placez à nouveau
l’interrupteur sur la position “éteint”.
Important :
• On peut ouvrir le réservoir en toute sécurité seule-
—
ment quand toute l’eau a été utilisée. Pour lâcher la
pression, placez un récipient avec de l’eau sous le
vaporisateur et tournez le sélecteur jusqu’à la position
vapeur. Quand la vapeur cesse, placer à nouveau le
sélecteur sur la position “éteint”.
• Après la préparation du café, il faut laisser refroidir le
porte-filtre durant deux minutes avant de l’enlever de
la cafetière.
Préparation du Capuccino
Suivre les mêmes instructions données pour la prépa—
—
ration du café. N’oubliez pas que pour vaporiser du
lait, il faut une quantité d’eau légèrement supérieure.
1. Quand on aura obtenu la quantité de café voulue, il
faudra placer le sélecteur sur la position “éteint”.
Placez un récipient avec du lait froid sous la sortie de
vapeur et placez le sélecteur sur la position vapeur.
3. Pour faire la crème, placez la buse vapeur juste à la
surface du lait et faites tourner le récipient. Dès obten-
—
tion de la crème, montez et descendez légèrement
le récipient pour chauffer le lait. Placez à nouveau le
sélecteur sur la position “éteint”.
4. Versez le lait avec la crème dans le café. Si vous le
souhaitez vous pouvez saupoudrer de cannelle ou de
chocolat râpé et décorer avec une brindille de cannelle.
ENTRETIEN ET NETTOYAGE
Avant le nettoyage, débranchez l’appareil du réseau.
Démontez le réceptacle pour les gouttes de café et
le porte-filtre. Lavez les parties mobiles à l’eau et au
savon. Passez un chiffon humide pour nettoyer le
corps de la cafetière.
Le vaporisateur doit être nettoyé régulièrement pour
éviter qu’il se bouche. Pour nettoyer l’intérieur du
tuyau du vaporisateur, remplir le réservoir avec l’eau
d’une tasse environ et actionner le vaporisateur sans
lait. Fermer le vaporisateur et frotter immédiatement la
buse avec un chiffon humide. Faire très attention car la
buse pourrait encore être très chaude. Si le tuyau est
bouché, dévisser avec l’orifice hexagonal de la cuillère
à doser et nettoyer à l’aide d’une aiguille.
Après chaque utilisation, videz l’eau qu’il pourrait
encore y avoir dans le réservoir. Ne rangez pas la ca-
—
fetière avec le porte-filtre placé. Le cordon doit être
enroulé sous l’appareil.
DÉTARTRAGE
La cafetière doit être détartrée régulièrement. Diluer
une tasse de vinaigre dans une tasse d’eau, versez le
mélan ge dans le réservoir et faites fonctionner l’appa—
reil sans ca fé deux fois, y compris la buse vapeur. Pour
éliminer les restes de vinaigre, faites fonctionner deux
fois en core, la cafetière avec de l’eau seulement.
REMARQUES CONCERNANT LE DÉ PÔT / ÉLI—
MINATION DES DÉCHETS
Toutes nos marchandises sont conditionnées
dans un emballage optimisé pour le trans-—
port. En principe, ces emballages sont com-—
posés de matériaux non polluants qui de-—
vront être déposés comme matière première secon-—
daire au Service Local d’élimination des déchets.
Produit aux normes de la Directive de l’UE
2002/96/CE.
Le logo “poubelle” apposé sur l’appareil indique
que tout appareil électroménager hors d’usage
ne doit pas être jeté dans les déchets ménagers
mais être déposé dans un centre de collecte de
déchets d’appareils électriques ou électroniques ou qu’il
doit être remis à votre vendeur à l’occasion de l’achat d’un
nouvel appareil. Il incombe à l’utilisateur de déposer lui-
même l’appareil hors d’usage dans un centre de collecte
spécialement prévu à cet effet, faute de quoi, celui-ci
risque de se voir sanctionné pour manquement au règle—
—
ment en vigueur concernant les déchets. Si l’appareil hors
d’usage est correctement collecté comme déchet trié, il
pourra être recyclé, traité et éliminé écologiquement évi-—
tant ainsi tout impact négatif sur l’environnement tout en
contribuant au recyclage des matériaux qui composent
le produit. Pour toutes informations relatives aux Services
d’élimination des déchets, adressez-vous à la déchetterie
de votre ville ou à votre vendeur habituel. Les fabricants
et les importateurs réalisent le recyclage, le traitement
et l’élimination écologique, soit directement soit par
l’intermédiaire d’un système public.
Pour toute information concernant le dépôt et
l’élimination des appareils usagés, renseignez-vous
auprès de la Mairie de votre Commune ou de la
Préfecture de votre Département.
NOTAS IMPORTANTES
• Leia atentamente as instruções antes de utilizar a
máquina de café pela primeira vez. Guarde-as para
futuras consultas.
• Ligue-a unicamente à tensão indicada na placa de
características.
• Recomenda-se a utilização duma tomada com li-
—
gação á t erra.
• Este aparelho foi exclusivamente desenhado para
uso doméstico.
• Não utilize o aparelho com outras finalidades, distin-
—
tas das referidas neste manual.
• Tanto ao introduzir como ao retirar a ficha da toma-
—
da, o selector deverá estar na posição Off.
• Coloque sempre o aparelho sobre uma superfície
lisa e estável.
• Evite mover o aparelho durante o seu funcio-namento.
• Não permitir a utilização do aparelho por pessoas
(incluindo crianças) de capacidade física, sensorial ou
mental diminuída ou sem conhecimento ou experiên-
—
cia suficiente, a não ser sob supervisão ou após de——
vida instrução na utilização do aparelho pela pessoa
responsável pela sua segurança.
• Mantenha crianças afastadas do aparelho ou super-
—
visione-as para garantir que não brinquem com o apa——
relho.
• O aparelho não foi concebido para ser utilizado com
um temporizador externo ou um sistema de controlo
remoto em separado.
• Não mergulhe a máquina de café em água nem
em nenhum outro liquido.
• Não manipule o aparelho com as mãos molhadas.
• Não ponha o aparelho em funcionamento estando o
cabo enrolado.
• Não toque as superfícies quentes. Manipule a má-
—
quina de café pelas pegas e interruptores.
• Não deixe a máquina de café em funciona mento
sem estar sob vigilância, especial mente se existirem
crianças por perto.
• Desligue o aparelho da tomada quando não esti ver a
utilizá-lo e antes de efectuar a sua limpeza.
• Nunca desligue puxando pelo cabo. Não deixe o
cabo pendurado.
• Não deixe o aparelho perto de fontes de calor nem
deixe que o cabo toque superfícies quentes.
• Não ponha a máquina de café em funcionamento
sem água.
• Certifique-se de que a tampa do depósito está fe cha —
da antes de pôr a máquina de café em funcio na men to.
• Antes de efectuar a sua limpeza comprove que o
aparelho está desligado e frio.
• Não ponha a máquina de café em funciona men to
se o cabo ou a ficha estiverem estragados, se observa
que esta não funciona correctamente ou quando tiver
sofrido qualquer tipo de dano.
• As reparações e mudanças de cabo deverão ser
rea li za das exclusivamente por um Serviço Técnico
Autorizado.
FUNCIONAMENTO
Antes de utilizar a sua máquina de café pela primeira
vez lave todos os acessórios e ponha-a a funcionar
uma vez sem café.
Preparação do Café Expresso
1. Ligue o aparelho á rede e comprove que o selector
está na posição Off.
2. Abra a tampa do depósito e deite a quantidade de
água desejada. O jarro tem indicada a quantidade ne-
—
cessária para duas ou quatro chávenas. Rode a tampa
e aperte-a com força.
3. Coloque o filtro no porta-filtros. Para por o café de-
—
verá guiar-se pelas marcas para duas e quatro cháve——
nas existentes no filtro. Limpe o café que possa ter
ficado na borda do porta-filtros.
Importante: Para obter um resultado óptimo com a
sua máquina de café expresso de hidropressão, utilize
um café com uma moagem grossa, tipo cafeteira italia——
na. Não comprima o café.
Coloque o porta-filtros. Coloque o jarro de ma neira
que a abertura coincida com a saída de café.
Rode o selector até á posição de café. A lâm pada-
piloto iluminar-se-á. Depois de uns minutos a água
começará a ferver e cairá através do café moído para
o jarro. Quando o café terminar de sair volte a pôr o
interruptor na posição Off.
Importante:
• Só poderá abrir o depósito com segurança depois
de toda a água ter sido utilizada. Para libertar a pressão
coloque um jarro com água debaixo do vaporizador e
rode o selector até á posição de vapor. Quando já não
sair vapor, volte a colocar o selector na posição Off.
• Depois de ter preparado café, deverá deixar arre-
—
fecer o porta-filtros durante dois minutos, antes de
retirá-lo da máquina de café.
PREPARAÇÃO DO CAPUCCINO
1. Siga as instruções dadas para fazer café. Tenha em
conta que para vaporizar o leite será necessá ria uma
quantidade de água ligeiramente superior.
2. Quando tiver a quantidade desejada de café, pon-
—
ha o selector na posição Off. Ponha um jarro com leite
frio debaixo da saída de vapor e coloque o selector
na posição de vapor.
3. Para conseguir espuma coloque o tubo de vapor
mesmo por cima da superfície do leite e mexa o ja-
—
rro fazendo círculos. Depois de preparada a espuma,
suba e baixe ligeiramente o jarro para aquecer o leite.
Volte a colocar o selector em Off..
4. Deite o leite com espuma no café. Se desejar po-
—
derá espalhar por cima canela ou chocolate moído e
decorá-lo com canela em rama.
MANUTENÇÃO E LIMPEZA
Antes de efectuar a limpeza desligue o aparelho da
rede eléctrica. Desmonte a bandeja para recolher as
gotas e o porta-filtro. Lave as peças moveis com água
e sabão. Passe um pano húmido para limpar o corpo
da máquina de café.
É necessário realizar regularmente uma limpeza do
vaporizador para certificar-se que este não está obs-
—
truído. Para limpar o interior do tubo do vaporizador
encha o depósito com água suficiente como para uma
chávena e ponha o vaporizador em funcionamento
sem leite. Feche o vaporizador e limpe imediatamente
a boquilha com um pano húmido. Deverá ter cuidado
ao realizar esta operação, pois esta poderia estar ain——
da muito quente. No caso de estar obstruído, o tubo
do vaporizador poderá ser desaparafusado com o
orifício hexagonal da colher doseadora e poderá lim——
par-se com uma agulha.
Depois de cada uso, esvazie a água que possa ter fi-
—
cado no depósito. Não o guarde com o porta-filtros
posto. O cabo poderá ficar recolhido debaixo do
aparelho.
DESCALCIFICAÇÃO
A máquina de café deverá passar regularmente por uma
descalcificação. Dilua uma chávena de vinagre numa
chávena de água, entorne a mistura no depósito e pon-
—
ha o aparelho a funcionar duas vezes, sem café, incluin-—
do o tubo do vapor. Para eliminar os restos de vi nagre,
ponha-a a funcionar mais duas vezes, só com água.
ADVERTÊNCIAS DE DEPOSIÇÃO /
ELIMINAÇÃO
Para o seu transporte, as nossas mercadorias
contam com uma embalagem optimizada.
Esta consiste — em principio- em materiais não
contaminantes que deveriam ser entregues
como matéria prima secundaria ao serviço local de eli-—
minação de lixos.
Este produto cumpre a Directiva da UE
2002/96/CE.
O símbolo de um caixote de lixo riscado so-
—
bre o aparelho indica que o produto, quando
finalize a sua vida útil, deverá deitar-se fora se-—
parado dos resíduos domésticos, levando-o
a um centro de materiais residuais com separação de
aparelhos eléctricos e electrónicos ou devolvendo-o
ao seu fornecedor ao comprar outro aparelho similar.
É ao usuário que lhe corresponde a responsabilidade
de levar o aparelho a um centro de materiais residuais
especiais ao finalizar a sua vida útil. Caso contrário, po-—
derá ser sancionado em virtude dos regulamentos de
materiais residuais vigentes. Se o aparelho inutilizado
for recolhido correctamente como resíduo separado,
poderá ser reciclado, tratado e eliminado de forma
ecológica; isto evita um impacto negativo sobre o meio
ambiente e a saúde, e contribui á reciclagem dos ma——
teriais do produto. Para obter mais informação sobre
os serviços de materiais residuais disponíveis, contacte
com a sua agência de materiais residuais local ou com
a loja onde comprou o aparelho. Os fabricantes e os
importadores tornam-se responsáveis pela reciclagem,
tratamento e eliminação ecológica, seja directamente
ou através de um sistema público.
A sua Câmara ou Município informar-lhe-á sobre as
possibilidades de deposição/eliminação para os apa-
—
relhos que já não se usam.
BIZTONSÁGTECHNIKAI ELÃÍRÁSOK
•OlvassaelfigyelmesenezelŒírásokat,mielŒttelŒször
használatbavesziakávéfŒzŒt,tartsamegazútmutatót
késŒbbiproblémáktisztázásaérdekében
•AkészülékhasználataelŒttellenŒrizzeazadattáblán,
hogyakészülékmegadottfeszültségemegegyezik-ea
hálózatifeszültséggel.
•Ajánlatosföldeltkonnektorokhasználata.
•Ezakészülékcsakháztartásicélrakészült.
•NehasználjaakávéfŒzŒtahasználatiutasításbanle—
—
írtaktóleltérŒcélra.
• Mind az elektromos vezeték a konnektorból való
kihúzásánálmindabehelyezésénélakészüléketkap-
—
csoljaki.
• A kávéfŒzŒt állítsa mindig egyenes kiegyenlített fe-
—
lületre.
•Kerüljeakészülékmozgatásátahasználatalatt.
• Az olyan személyeknek (gyermekeket is beleértve),
vagy hiányos tapasztalattal és tudással rendelkeznek,
ne engedje használni a készüléket, kivéve, ha felügyeli
• Gyermekeket ne engedjen a készülék közelébe. A
gyermekeket ne engedje a készülékkel játszani.
—
• Ne merítse a kávéfŒzŒt vízbe vagy más egyéb
folyadékba.
•Nehasználjaakészüléketvizeskézzel.
•Nehasználjaakészüléketfeltekertkábellel.
•A készülékforrórészeit ne érintse meg.Használja a
fogantyútésagombokat.
•NehagyjaakávéfŒzŒtegyedül,akkorhahasználatban
van,vagyhagyerekekisjelenvannak.
•KapcsoljakiakávéfŒzŒtéshúzzakiacsatlakozótha
márnemkívánjahasználniilletvetisztításelŒtt.
• Ne húzza ki a kábelt rángatva. Ne hagyja hogy a
csatlakozó kábel azasztalról vagymásegyéb helyrŒl
lelógjon.
•Nehagyjaakészüléketmelegfelületekközelében,és
nehagyjahogyakábelmelegrészeketérintsen.
•Nehasználjaakészüléketvíznélkül.
• EllenŒrizze, hogy a víztartály teteje zárva van —e,
mielŒttbekapcsoljaakészüléket.
•AtisztításelŒttellenŒrizze,hogyakészüléklehılt,és
kikapcsoltállapotbanvan.
•Nehasználjaakészüléket,haacsatlakozókábelvagy
akonnektorbármilyenkárosodástszenvedett,illetveha
bármilyenmıködésirendellenességetvagykárosodást
észlelt.
•Ajavítástilletveakárosodottcsatlakozókábeltcsak
a jótállási javításokkal megbízott szerviz szakemberei
javíthatjákmeg.
HASZNÁLAT
TisztítsamegakávéfŒzŒtazelsŒhasználatelŒtt
Expres kávékészítés
1. Kapcsolja a készüléket az elektromos áramra.
EllenŒrizze,hogykivan-ekapcsolva.
2.Csavarjaleavíztartálytetejétéstöltsönvizetavíz-
—
tartályba.Akannajelziaszükségesvízmennyiségetkét
vagynégycsészerészére. Szorosancsavarjavisszaa
zárócsavart.
3.Helyezzeafiltertafiltertartóba.Akávéadagolásá-
—
hoztöltsebe a kávét a megfelelŒ jeligattólfüggŒen,
hogykétvagynégyszemélyrefŒzi.Töröljeleakávéma-—
radványokatakávétartószélérŒl.
Fontos:Egyjobbkávékészítéseérdekébenhasználjon
nagyobb szemcséjıre ŒrŒlt kávét, olasz kávéhoz ha-
—
sonlóan.Nepréseljeakávét.
4.Helyezze be a szırŒtartót.Tegye akannát a helyé-
—
re,úgyhogy a kannaszájaegyezzen a kávékifolyási
helyével.
5.Állítsaaszabályozótakávépozícióba.AzellenŒrzŒ
lámpakigyullad.PárpercmúlvaavízfelforrésazŒrŒlt
kávénátszırŒdveakannábafolyik.Amikorakávételje—
—
senlefolytkapcsoljakiakészüléket.
Fontos:
Avíztartálycsakakkornyithatóbiztonságosan,hamár
teljesenkiürült.Anyomásfelszabadításáhozhelyezzen
Внимание:
ПРИГОТОВЛЕНИЕ КАПУЧИНО
УХОД И ЧИСТКА
ДЕКАЛЬЦИНАЦИЯ
РЕКОМЕНДАЦИИ ПО СДАЧЕ/ВЫБРОСУ
УПАКОВКИ И СТАРЫХ АППАРАТОВ
FRANÇAIS PORTUGUES MAGYAR
ESPAÑOL
ENGLISH
egyvízzelteltkannát a gŒzkieresztŒ alá ésfordítsa a
szabályozótagŒzpozícióba.HaagŒzteljesenelpá-—
rolgottkapcsoljakiismételtenakészüléket.
AkávéelkészítéseutánakávészırŒthagyjakétpercig
lehılnimielŒttkivesziakészülékbŒl.
Kapucíner Készitése
1.Kövesseakávékészítésénélleírtakat.Figyeljen arra,
hogyatejgŒzöléséhezvalamivelnagyobbvízmennyi-
—
ségrevanszükség.
2. Ha akívánt kávémennyiséglefojt kapcsolja kiaké-
—
szüléket.Helyezzen egyhidegtejjelmegteltkannát a
gŒzkieresztŒaláésaszabályozókapcsolótállítsaagŒz
pozícióba.
3.AhabosításeléréseérdekébentartsaagŒzkieresztŒ
csövetatejfelszínére,és mozgassaakannát körkörö—
—
sen.AhabképzŒdéseutánmozgassale-felakannáta
tejteljesfelmelegítéséhez.Zárjaelaszabályozót.
4.Öntsea habosítotttejet a kávéba. Hakívánja meg-
—
szórhatjaegykisŒröltfahéjjal,vagykakaóval,ésdíszít-—
hetiegyágfahéjjal.
TÁROLÁS ÉS TISZTÍTÁS
AtisztításmegkezdéseelŒttbizonyosodjonmegarról,
hogyakávéfŒzŒkilegyenkapcsolva és a csatlakozót
húzzaki.SzereljeszétacsöpögtetŒtésafiltertartót.A
mozgathatórészeketmossaelvízzelésmosogatószer-
—
rel.Amıanyagházattöröljelevizesruhával.
AjánlatosagŒzkieresztŒcsŒállandótisztítása,azeldu-
—
guláselkerüléseérdekében.AcsŒ belsejénektisztítá-—
sáhoztöltsemeg a víztartályt egy csészényi kávéhoz
szükséges vízzel, és mıködtesse a gŒzkieresztŒt tej
használatanélkül.ZárjaelagŒzkieresztŒt,éstöröljele
acsövetazonnalegyvizesruhával.Járjonelóvatosan,
mivelacsŒmégnagyonmeleglehet.HaacsŒeldugult
lecsavarozhatjaazadagolókanálhatszögletıfejével,és
tisztítsamegegytıvel.
Mindenhasználatutánürítsekiavíztartót.Netároljaa
készüléketafiltertartóval.Akényelmestároláshozhasz-
—
náljaakészülékaljánbeépítettkábeltárolót.
VÍZKÃ ELTÁVOLÍTÁSA
AjánlatosakávéfŒzŒnélarendszeresvízkŒeltávolítás.
Keverjenelegypohárvízbenegypohárecetetésöntse
avíztartályba.MıködtesseakávéfŒzŒtkétszerkávénél-
—
kül,agŒzkieresztŒcsŒvelegyütt. Azeceteltávolítása
érdekébenmossaátakészüléketkétszertisztavízzel.
FIGYELMEZTETÉS A KÉSZÜLÉK
MEGSEMMISÍTÉSÉT ILLETÃEN
Az árucikkeink optimalizált csomagolásban
kerülnek kiszállításra. Ez alapjában a nem
központban másodlagos nyersanyagként.
—
szimbólum jelzi, hogy, amikor a termék hulla-—
dékrendelkezésre kerül, nem szabad a ház——
tartási hulladékok közé számítani. El kell szállí-—
tania egy különleges, elektronikai és elektro-—
vagy vissza kell küldenie a forgalmazóhoz egy hasonló
—
kiselejtezett készülékeket nem adják le egy speciális
helyes hulladékrendelkezése azt jelenti, hogy újra-—
hasznosíthatóak és ökológiailag feldolgozhatóak, vi-—
felhasznált anyagok újra használhatóságát. További in——
—
duljon a helyi hulladék központjához, vagy az üzlet-—
—
feldolgozásáért és hulladékrendelkezéséért, akár köz-—
vetlenül vagy egy nyilvános rendszeren keresztül.
A helyi városi tanácsa információkkal szolgál az elavult
ВАЖНЫЕ ПРИМЕЧАНИЯ
•
• Запрещается использовать аппарат не по
назначению.
ФУНКЦИОНИРОВАНИЕ
ПРИГОТОВЛЕНИЕ КОФЕ-ЭКСРЕСС
Внимание:
РУССКИЙ
FR
1. Réservoir eau
2. Sélecteur café/vapeur
3. Tuyau vaporisation
4. Porte-filtres
5. Filtre
6. Réceptacle pour les gouttes
7. Verseuse
8. Enrouleur de cordon
9. Cuillère à doser
10. Buse vapeur
CZ
1.NádrÏkanavodu
2.Voliãkáva-pára
3.Tryskavaporizátoru
4.Pouzdronafiltr
5.Filtr
6.Táceknaodkapávání
7. Konvice
8.Svinutí‰ÀÛry
9. Odmûrka
10. Ústív˘stupupáry
GR
1. Ntepøzito nero¥
2. Epilog™aq kaf™-atmo¥
3. Svl¸naq atmopoiht¸
4. U¸kh fºltro y
5. Fºltro
6. Dºskoq stajºmatoq
7. Kanåta
8. Perit¥lijh kalvdºoy
9. Koytåla dosologºaq
10. Stømio atmo¥
Смотреть руководство для Ufesa Futura Eleganza CE7121 ниже. Все руководства на ManualsCat.com могут просматриваться абсолютно бесплатно. Нажав кнопку «Выбор языка» вы можете изменить язык руководства, которое хотите просмотреть.

MANUALSCAT | RU
Вопросы и ответы
У вас есть вопрос о Ufesa Futura Eleganza CE7121, но вы не можете найти ответ в пользовательском руководстве? Возможно, пользователи ManualsCat.com смогут помочь вам и ответят на ваш вопрос. Заполните форму ниже — и ваш вопрос будет отображаться под руководством для Ufesa Futura Eleganza CE7121. Пожалуйста, убедитесь, что вы опишите свои трудности с Ufesa Futura Eleganza CE7121 как можно более детально. Чем более детальным является ваш вопрос, тем более высоки шансы, что другой пользователь быстро ответит на него. Вам будет автоматически отправлено электронное письмо, чтобы проинформировать вас, когда кто-то из пользователей ответит на ваш вопрос.
Задать вопрос о Ufesa Futura Eleganza CE7121
- Бренд:
- Ufesa
- Продукт:
- кофеварки
- Модель/название:
- Futura Eleganza CE7121
- Тип файла:
- Доступные языки:
- английский, французский, испанский, португальский, русский, румынский, венгерский, Арабский, Болгарский
Сопутствующие товары Ufesa Futura Eleganza CE7121
ةيبرعلا
DÒLEÎITÁ UPOZORNùNÍ
•Pfied prvním pouÏitím kávovaru si peãlivû pfieãtûte
návodkpouÏitíauschovejtesihopropfiípadnékon—
—
zultace.
•Spotfiebiã zapojujte v˘hradnû do sítû, jejíÏ napûtí
odpovídá hodnotû,uvedenévtabulcestechnick˘mi
údaji.
•JevhodnépouÏívatzásuvkusuzemnûním.
•Spotfiebiã je urãen v˘hradnû pro pouÏití v domác-
—
nosti.
•NepouÏívejte ho k úãelÛm, které nejsou uvedeny v
návodunaobsluhu.
•Pfiizapojeníãiodpojeníkávovaruzesítûjenezbytné,
abyspínaãbylvpoloze«vypnuto».
•UmísÈujte spotfiebiã zásadnû na hladkou a pevnou
plochu.
•Nepfiená‰ejtezapnut˘spotfiebiãzjednohomístana
druhé.
—
nebo zvláštním systémem pro dálkové ovládání.
•Nedot˘kejtesepfiístrojevlhk˘marukama.
•NepouÏívejte spotfiebiã se svinutou pfiipojovací
‰ÀÛrou.
•Nedot˘kejtesehork˘chãástípfiístroje.Pfiimanipulaci
skávovarempouÏívejtedrÏákyatlaãítka.
•Zapojen˘kávovarnenechávejtebezdozoru,zejména
vpfiítomnostidûtí.
•PopouÏitíkávovaruapfiimytíhovypnûteaodpojte
zesítû.
•Spotfiebiãneodpojujtezesítûtrháním‰ÀÛry.
Nenechávejtejivolnûviset.
•Nestavte kávovar do blízkosti tepeln˘ch zdrojÛ a
dbejte,aby‰ÀÛranepfii‰ladostykushork˘mipovrchy.
•Neuvádûjtekávovardochodubezvody.
•Pfied zapojením kávovaru se pfiesvûdãte, zda je
nádrÏkanavoduzaji‰tûnavíkem.
•Pfiedãi‰tûnímspotfiebiãesiovûfite,zdajeodpojenze
sítûazdaúplnûvychladl.
•Zjistíte-li, Ïe spotfiebiã nefunguje správnû, Ïe je
po‰kozen nebo Ïe má vadnou ‰ÀÛru ãi zástrãku,
pfiestaÀtehopouÏívat.
•Opravunebov˘mûnu‰ÀÛryjsouoprávnûniprovádût
v˘hradnûpracovníciautorizovanéopravny.
UVEDENÍ DO CHODU
Pfied prvním pouÏitím kávovaru omyjte v‰echna
pfiíslu‰enství a spotfiebiã uveìte do chodu jednou
bezkávy.
P¤ÍPRAVA KÁVY ESPRESO
1. Spotfiebiã zapojte dosítûa pfiesvûdãte se,zda je
spínaãvypnut˘.
2. Od‰roubujteuzávûrnádrÏkyavlijtedonípotfiebné
mnoÏství vody. Na konvici je znázornûno mnoÏství
vodynezbytnéprodvaneboãtyfii‰álky.Za‰roubujte
pevnûuzávûr.
3. Do pouzdra vloÏte filtr. Pfii sypání kávy sledujte
znaãenínafiltru,udávajícímnoÏstvíprodvaneboãtyfii
‰álky. Z okraje pouzdra filtru odstraÀte rozsypanou
kávu.
DÛleÏité: Pro pfiípravu chutného nápoje je vhod-
—
né pouÏívat hrubû mletou kávu, bûÏnû uÏívanou,
napfiíklad,vitalsk˘chkávovarech.
Kávuneudusávejte.
4. VloÏtepouzdronafiltr.Konvicipostavtetak,abyse
otvorshodovalsv˘stupemkávy.
5. Otoãte voliã do polohy «káva». Svûteln˘ ukazatel
serozsvítí.Zanûkolikminutzaãnevfiítvodaaprotékat
mletou kávou do konvice. V okamÏiku, kdy pfiestane
kávatéci,kávovarvypnûte.
DÛleÏité:
•NádrÏkulzebezpeãnûotevfiítjenvokamÏiku,kdyje
v‰echna voda spotfiebována. Vnitfiní tlak uvolníte tím
zpÛsobem,Ïepododparkuumístítekonvicisvodoua
ВАЖНИ ЗАБЕЛЕЖКИ
• Прочететевнимателноуказаниятапредидаизползвате
кафемашинатазапървипът.Запазетегиизасверяване
вбъдеще.
• Уредът да се свъpзва единствено с напpежението,
посоченовтаблицатасxаpактеpистиките.
• Препоръчителенезаземенконтакт.
• Тозиуредепредназначенсамозаупотребавдомашни
условия.
• Неизполвайтеуредазацели,различниотописанитев
тозинаръчник.
• Кактопpивключваневконтактатакаиприизключване,
превключвателятрябвадаевпозиция«изключен».
• Винаги поставяйте уреда въpxу pавна и стабилна
повъpxост.
• Отбягвайтедадвижитеуредаповременаупотребатаму.
• Неслагайтеуредаблизодована,душилибасейн.
•
Неоставяйтелица(същоидеца)снамаленифизически
сетивни или умствени възприятия или с недостатъчен
опит и знания, даобслужват уреда, освен аконе бъдат
обучени или не са получили указания във връзка с
обслужванетонауредаотлице,коетоотговарязатяхната
безопасност.
•
Пазете уредадалечот деца. Неоставяйте безнадзор
деца,задапредотвратитевъзможносттатедасииграятс
уреда.
• Уредът не е предназначен за използване с външен
таймер или отделна система за дистанционно
управление.
• Не потапяйте кафе машината във вода или други
течности.
• Небораветесуредасмокриръце.
• Невкл≤чвайтеуреда,когатокабелътенавит
• Не докосвайте горещите части. Боравете с кафе
машинатапосредсвтомдръжкитеипрекъсвачите.
• Неоставяйтекафемашинатабезнаблюдениедокатое
включена,нитопъквприсъствиетонадеца.
• Изключетеуредаотмрежата,когатонеевупотреба,а
същоипpедипочистванетому.
• Не изключвайте с дърпане на кабела. Не оставяйте
кабеладависи.
• Непоставяйтеуредавблизостдоизточникнатоплина.
Неоставяйтекабелададокосватоплиповъpxности.
• Невключвайтекафемашинатабезвода.
• Уверетесе,чекапакътнарезервоараезатворенпреди
давключватеуреда.
• Предидагочистите,уверетесе,чеуредътизключенот
мрежатаиизстинал.
• Не ползвайте кафе машината с повреден кабел или
щепсел, ако забележите, че не работи правилно или е
повреден.
• Поправкитеисмянатанакабелатрябвадаставатсамо
отупълномощентеэническисеpвиз.
УПОТРЕБА
Предипърватаупотребаизмийтевсичкипринадлежности
игипуснетедаработятведнъжбезкафе.
Приготвяне на кафе Еспресо 1. Включете уреда в
мрежата и се уверете, че превключвателя е в позиция
«изключен».
2. Отвийте тапата на резервоара и налейте желаното
количествовода.Канатапобираколичествонужнозадве
иличетиричаши.
Завийтетапатаиянатиснетесилно.
3. Поставете филтъpа в дъpжателя на филтри. За да
сложите кафе се водете от маркировките на филтъра,
посочващидвеиличетиричаши.Почистетекафето,което
можедаеостаналопоръбанадъpжателянафилтри.
Важно: За да постигнете оптимален резултат с кафе
машината, работеща на принципа на водното налягане,
използвайтеедромлянокафе.
Не го мелете повече.
4.Поставетедържателянафилтри.Поставетеканатапо
такъвначин,чеотворътдасъвпадасизэодазакафето.
5. Завъpтете пpевключвателя до позицията «кафе».
Пилотната лампичка ще светне. След няколко минути
водата ще заври и ще се излива пре смляното кафе
в каната. Когато кафето спре да тече, превключете
прекъсвачанапозиция«изключен».
Важно:
• Резервоарът може да бъде отвоpен безопасно само
когатоцялатаводаебилаизpазэодвана.Задаосвободите
FOARTE IMPORTANT :
• Citi
i cu atenie instruciunile înainte de a folosi acest
aparat pentru prima oarã. Pãstra
i-le pentru viitoare
consultaii.
• Conecta
i doar la tensiunea indicatã pe placa cu
caracteristici.
• Recomandãm o prizã cu împãmântare.
• Acest aparat a fost conceput doar pentru uz casnic.
• Nu folosi
i aparatul pentru alte scopuri decât pentru
acelea descrise în acest manual.
• Atât la introducerea cât
i la scoaterea fiei de con——
tact din prizã, selectorul trebuie sã fie în pozi
ia stins.
• A
ezai întotdeauna aparatul pe o suprafaã netedã
i stabilã.
• Evita
i sã micai aparatul pe durata funcionãrii.
• Acest aparat nu este conceput pentru a fi exploa-
—
tat prin intermediul unui programator sau sistem de
• Nu introduceţi aparatul în apã sau alte lichide.
• Nu manipula
i aparatul cu mâinile umezite.
• Nu pune
i sã funcioneze aparatul cu cablul înco-—
lãcit.
• Nu atinge
i pãrile calde. Manipulai aparatul cu aju-—
torul tor
ilor i întrerupãtoarelor.
• Nu lãsa
i aparatul fãrã supraveghere când
funcioneazã, i când se aflã în apropierea copiilor.
• Scoate
i din prizã când nu se folosete sau înainte de
a proceda la curã
irea lui.
• Nu deconecta
i trãgând de cablu. Nu lãsai conexiu-—
nea sã atârne.
• Nu lãsa
i aparatul în apropierea unei surse de cãldurã
i nu lãsai cablul sã atingã suprafee calde.
• Nu pune
i în funciune aparatul fãrã apã.
• Asigura
i-vã cã rezervorul este acoperit înainte de a
pune în func
iune aparatul.
• Înainte de a proceda la curã
irea lui, verificai cã apa-—
ratul este deconectat
i rece.
• Nu pune
i sã funcioneze aparatul cu cablul sau priza
stricate, dacã observa
i cã nu funcioneazã corect sau
cã a suferit vreun fel de stricãciune.
• Repara
iile sau schimbãrile de cablu trebuiesc rea——
lizate în mod exclusiv de cãtre un Serviciu Tehnic
Autorizat.
FUNCŢIONAREA
Înainte de prima folosin
ã spãlai toate accesoriile i
punei sã funcioneze o datã fãrã cafea.
Pregãtirea Cafelei Expres
1. Conectai aparatul la reea i verificai ca selectorul
sã fie în pozi
ia stins.
2. Deurubai dopul rezervorului i vãrsai cantitatea
de apã doritã. Cana va indica cantitatea de apã ne-
—
cesarã pentru douã sau patru ce
cue. Rotii dopul i
apãsai-l tare.
3. Punei filtrul în portfiltru. Pentru a pune cafeaua
ghidai-vã dupã semnele filtrului de douã sau patru
cecue. Înlãturai cafeaua care ar putea rãmâne pe
marginea portfiltrului.
Important : Pentru a ob
ine un rezultat optim cu apa-—
ratul de cafea cu hidropresiune, folosi
i o cafea cu un
mãcinat gros, tip aparat de cafea italienesc. Nu presa
i
cafeaua.
4. Punei portfiltrul. Aezai cana în aa fel încât des-—
chizãtura sã coincidã cu locul de ie
ire al cafelei.
5. Rotii selectorul pânã la poziia cafea. Indicatorul
luminos se va aprinde. Dupã câteva minute apa fierbe
i cade printre cafeaua mãcinatã în canã. Când cafeaua
s-a fãcut pune
i din nou întrerupãtorul la poziia stins.
Important :
• Rezervorul se poate deschide cu siguran
ã doar când
a fost folositã toatã apa. Pentru a elibera presiunea,
aezai o canã cu apã sub vaporizator i rotii selec——
torul pânã la pozi
ia de abur. Când aburul nu mai iese
punei din nou selectorul în poziia stins.
• Dupã pregãtirea cafelei, portfiltrul trebuie lãsat sã se
rãceascã timp de douã minute înainte de a-l scoate
din aparat.
Pregãtirea Cafelei Capuccino
1. Urmãrii instruciunile pentru pregãtirea cafelei.
Tinei cont cã pentru vaporizarea laptelui va fi necesarã
o cantitate de apã ceva mai mare.
2. Când ob
inei cantitatea doritã de cafea, punei se-—
lectorul în poziia stins. Aezai o canã cu lapte rece
sub orificiul de ieirea aburului i plasai selectorul în
poziia abur.
3. Pentru a ob
ine spumã, aezai tubul de abur exact
pe suprafaa laptelui i micai cana în sens circular.O
datã ce este pregãtitã spuma urcai i coborâi uor
cana pentru a încãlzi laptele. Punei din nou selectorul
în poziia å stins å.
4. Vãrsai laptele cu spuma în cafea. Dacã dorii putei
presãra scorioarã sau ciocolatã rasã i decorai cu
bee de scorioarã.
ÎNTREŢINEREA ŞI CURÃŢIREA :
Înainte de a proceda la curã
irea lui, desconectai apa-—
ratul de la reea. Demontai tava care adunã picãturile
i porfiltrul. Spãlai pãrile mobile cu apã i detergent.
Trecei o cârpã umedã pentru a curãi corpul aparatului
de cafea.
Este necesar sã se realizeze în mod regulat o curã
ire
a vaporizatorului pentru a se asigura cã nu se aflã obs-—
truit. Pentru a curãi interiorul tubului vaporizatorului
umplei drezervorul cu suficientã apã, cam cât pentru
o ceacã i acionai vaporizatorul fãrã lapte. Închidei
vaporizatorul i frecai imediat gura cu o cârpã umedã.
Avei grijã când realizai aceastã operaie pentru cã ar
putea fi încã cald. În cazul în care este obstruit, tubul
vaporizator se poate deuruba cu orificiul hexagonal
dela lingura pentru dozare i se poate curãi cu un ac.
Dupã fiecare folosin
ã, golii apa care ar fi putut rãmâ——
ne în rezervor. N-o pãstrai cu portfiltrul pus. Cablul se
poate strânge sub aparat.
DECALCIFICAREA
Aparatul de cafea trebuie decalcificat cu regularita-
—
te. Dizolvai o ceacã de oet într-una de apã, vãrsai
amestecul în rezervor i punei sã funcioneze aparatul
fãrã cafea de douã ori, împreunã cu tubul de abur.
Pentru eliminarea resturilor de oet , punei aparatul sã
funcioneze doar cu apã de douã ori.
SFATURI PENTRU DEPOZITARE/ELIMINARE
—
—
balajul este fabricat numai din materiale care
—
—
nu mai este util, acesta nu trebuie aruncat
—
buie dus la un centru special de colectare a
—
utilizatorii care nu duc aparatele uzate la centrele spe-—
—
—
zafectarea în mod ecologic a produselor, fie direct,
fie prin intermediul unui sistem public.
•
h
12345
2
12
34
hh
200296
CE
CE7110
CE7111
CE7120
CE7121
INSTRUCCIONES DE USO ES
OPERATING INSTRUCTIONS GB
MODE D’EMPLOI FR
INSTRUÇÕES DE USO PT
HASZNÁLATI UTASÍTÁS HU
РУKОВОДСТВО ПО ЭКСПЛУАТАЦИИ
RU
NÁVOD K POU
Î
ITÍ CZ
УКАЗАНИЯ ЗА УПОТРЕБА
BU
INSTRUC
Ţ
IUNI DE FOLOSIRE RO
BIBLIO OLHGIVN GR
AR
44-10
100% recycled paper
BSH Electrodomésticos España, S.A.
CIF A-28-893550
C/ Itaroa, n° 1, 31.620 HUARTE (Navarra)
España
SHMANTIKES SHMEIVSEIS
– Diabåsate me prosox¸ tiq odhgºeq prin
xrhsimopoi¸sete thn kafeti™ra gia pr˜th forå.
Na tiq fylåjete gia mellontik™q anafor™q,
– Na synd™ete thn kafeti™ra apokleistikå sthn tåsh
poy shmei˜netai sthn plåka me ta xarakthristikå
thq syskey¸q.
– Syniståtai h xr¸sh prºzaq poy na diau™tei
geºvsh.
– Ayt¸ h syskey¸ ™xei sxediasueº apokleistikå gia
oikiak¸ xr¸sh.
– Mh xrhsimopoieºte th syskey¸ gia xr¸seiq
diaforetik™q apø ayt™q poy perigråfontai sto
parøn biblºo odhgi˜n.
– Tøso øtan eisågete øso kai øtan afaireºte
to b¥sma apø thn prºza, o epilog™aq pr™pei na
brºsketai sth u™sh toy sbhsºmatoq.
– Na topoueteºte pånta th syskey¸ pånv se mºa
epºpedh kai stauer¸ epifåneia.
– Mhn metakineºte th syskey¸ øso brºsketai se
leitoyrgºa.
– Mh byuºzete thn kafeti™ra se nerø ¸ ålla ygrå.
– Mh xeirºzeste th syskey¸ me bregm™na x™ria.
– Mhn thn u™tete se leitoyrgºa me to kal˜dio
perityligm™no.
– Mhn aggºzete tiq uerm™q epifåneieq. Na xeirºzeste
th syskey¸ me tiq lab™q kai toyq diakøpteq.
– Na diathreºte thn kafeti™ra ypø thn epºblec¸ saq
øso brºsketai se leitoyrgºa, øpvq epºshq kai me
thn paroysºa paidi˜n.
– Na aposynd™ete thn kafeti™ra apø to re¥ma øtan
den thn xrhsimopoieºte kai prin na thn kauarºsete.
– Mhn thn aposynd™ete apø to re¥ma trab˜ntaq to
kal˜dio. Mhn af¸nete to kal˜dio na kr™metai.
– Mhn af¸nete thn kafeti™ra kontå se phg™q uer-
—
møthtaq kai mhn epitr™pete na ™rxetai se epaf¸ to
kal˜dio me uerm™q epifåneieq.
– Mhn u™tete se leitoyrgºa thn kafeti™ra xvrºq
nerø.
– Na bebai˜neste øti to kapåki toy ntepøzitoy eºnai
kleistø prin u™sete se leitoyrgºa th syskey¸.
– Prin ton kauarismø thq, na el™gxete an h syskey¸
eºnai aposyndem™nh apø to re¥ma kai kr¥a.
– Mhn u™tete se leitoyrgºa th syskey¸ an to kal˜dio
¸ to b¥sma paroysiåzoyn blåbh ¸ an parathreºte
øti ayt¸ den leitoyrgeº svstå ¸ øti ™xei yposteº
kåpoia zhmiå.
– Oi epidioru˜seiq kai oi allag™q kalvdºoy pr™pei
na gºnontai apokleistikå apø mia Ejoysiodothm™nh
Texnik¸ Yphresºa.
LEITOYRGIA
Prin apø thn pr˜th xr¸sh, pl¥nate øla ta ajes-
—
oyår kai bålte th syskey¸ na leitoyrg¸sei mºa
forå xvrºq kaf™.
ETOIMASIA KAFE ESPRESSO
1. Synd™sate th syskey¸ sto re¥ma kai
bebaivueºte øti o epilog™aq brºsketai sth u™sh toy
sbhsºmatoq.
2. Jebid˜sate to kapåki toy ntepøzitoy kai
prosu™sate thn epiuymht¸ posøthta nero¥. H
kanåta f™rei endeºjeiq me thn aparaºthth posøthta
gia d¥o ¸ t™ssera flytzånia. Bid˜sate to kapåki
kai sfºjte to me d¥namh.
3. Topouet¸sate to fºltro sth u¸kh toy fºltroy.
Gia na prosu™sete ton kaf™, pros™jate tiq mår-
—
keq gia d¥o kai t™ssera flytzånia sto fºltro. Na
kauarºzete ton kaf™ poy tyxøn m™nei sto xeºloq thq
u¸khq toy fºltroy.
Shmantikø: Gia na epitygxånete ™na åristo apot™lesma
me thn kafeti™ra ydropºeshq, na xrhsimopoieºte kaf™
me xondrø ålesma, t¥poy italik¸q kafeti™raq. Mhn
sympi™zete ton kaf™.
4. Topouet¸sate th u¸kh toy fºltroy. U™sate thn
kanåta katå trøpo ˜ste to ånoigma na sympºptei
me thn ™jodo toy kaf™.
5. Str™cate ton epilog™a m™xri th u™sh kaf™q. O
fvteinøq deºkthq ua anåcei. Metå apø merikå lep—
—
tå, to nerø arxºzei na bråzei kai p™ftei m™sa apø
ton alesm™no kaf™ sthn kanåta. Otan o kaf™q
telei˜sei kai påcei na bgaºnei, u™sate to diakøpth
sth u™sh toy sbhsºmatoq.
Shmantikø:
* To ntepøzito mporeº na anoixueº me asfåleia mø—
—
non eføson ™xei xrhsimopoihueº ølo to nerø. Gia
na apeleyuer˜sete thn pºesh, u™sate mºa kanåta
me nerø kåtv apø ton atmopoiht¸ kai str™cate ton
epilog™a m™xri th u™sh toy atmo¥. Otan stamat¸sei
na ej™rxetai atmøq, str™cate kai påli ton epilog™a
sth u™sh toy sbhsºmatoq.
* Afo¥ etoimåsete kaf™, h u¸kh toy fºltroy ua
pr™pei na parameºnei sth u™sh thq gia d¥o lep-—
tå gia na kry˜sei prin na thn apos¥rete apø thn
kafeti™ra.
ETOIMASIA KAFE KAPOYTSINO
1. Akoloyu¸sate tiq odhgºeq gia thn etoimasºa
kaf™. Låbate ypøch øti gia na afrºsete to gåla
ua xreiasueºte mºa kåpvq megal¥terh posøthta
nero¥.
2. Afo¥ ™xete ftiåjei thn epiuymht¸ posøthta
kaf™, str™cate ton epilog™a sth u™sh sbhsºmatoq.
U™sate ™na doxeºo me kr¥o gåla kåtv apø thn
™jodo toy atmo¥ kai str™cate ton epilog™a sth
u™sh toy atmo¥.
3. Prokeim™noy na kånete afrø, u™sate to svlhnå—
—
ki toy atmo¥ akrib˜q sthn epifåneia toy gålaktoq
kai kin¸sate kyklikå to doxeºo. Afo¥ gºnei o afrøq,
anebåste kai katebåste elafrå to doxeºo gia na
zestaueº to gåla. Str™cate janå ton epilog™a sth
u™sh «sbhsm™no».
4. X¥ste to gåla me ton afrø ston kaf™. An to
epiuymeºte, mporeºte na ton paspalºsete me kan™la
¸ trimm™nh sokolåta kai na ton diakosm¸sete me
f¥llo kan™laq.
SYNTHRHSH KAI KAUARISMOS
Prin na proxvr¸sete ston kauarismø thq syskey¸q,
bebaivueºte øti eºnai aposyndem™nh apø to re¥ma.
Afair™sate to dºsko stajºmatoq kai th u¸kh toy
fºltroy. Pl¥nate ta kinhtå m™rh me nerø kai sapo¥ni.
Peråste ™na ygrø panº gia na kauarºsete to kyrºvq
s˜ma thq kafeti™raq.
Eºnai aparaºthto na pragmatopoieºte taktikå ™nan
kauarismø toy atmopoiht¸ gia na sigoyre¥este øti
den eºnai fragm™noq. Prokeim™noy na kauarºsete
to esvterikø toy svl¸na toy atmopoiht¸, gemºste
to ntepøzito me nerø øso gia ™na flytzåni kai
energopoi¸sate ton atmopoiht¸ xvrºq gåla. Kleºste
ton atmopoiht¸ kai trºcte am™svq to stømio me
™na ygrø panº. Na pros™xete øtan kånete ayt¸n thn
en™rgeia, giatº mporeº na eºnai akømh pol¥ zestøq.
Se perºptvsh poy eºnai fragm™noq, mporeºte na
jebid~sete ton svl¸na toy atmopoiht¸ me thn eja-—
gvnik¸ op¸ thq koytålaq dosologºaq kai na ton
kauarºsete me mºa beløna.
Metå apø kåue xr¸sh, na adeiåzete to nerø poy mporeº
na ™xei meºnei sto ntepøzito. Mhn to fylåssete me th
u¸kh fºltroy sth u™sh thq. Mporeºte na maz™cete to
kal˜dio sto kåtv m™roq thq syskey¸q.
APOMAKRYNSH ALATVN
Na ejaleºfete ta ålata apø th syskey¸ se taktikå
diast¸mata. Proq to¥to, dial¥sate ™na flytzåni
j¥di se ™na flytzåni nerø, x¥sate to meºgma sto
ntepøzito kai u™sate se leitoyrgºa thn kafeti™ra
d¥o for™q xvrºq kaf™. Gia na apomakr¥nete ta
katåloipa toy jydio¥, u™sate janå se leitoyrgºa
thn kafeti™ra møno me nerø d¥o for™q akømh.
налягането,поставетееднаканасводапод изпаpителя
и завъртете превключвателя до позиция «пара».Когато
паратаспредаизлиза,поставетеотновопревключвателя
впозиция«изключен».
• Следкатостеприготвиликафето,държателятнафилтри
трябвадабъдеоставендаизстиневпродължениенадве
минутипредидагоприберетевкафемашината.
Приготвяне на Капучино
1.Следвайте указанията за направата на кафе. Въpxу
каната има маpкоpовка, бележеща количеството, което
е нужно за да се напpавит две чаши кафе, а също и
млечнатапяна.Заданаправитечетиричаши,напълнете
канатадодолнатачастнаметалнаталента.
2. Когато получите желаното количествокафе, сложете
превключвателяв позиция «изключен».Поставете една
кана със студено мляко под изxда на паpата и сложете
пpевключвателявпозиция«пара».
3. За да се получи пяна, поставете тръбичката за
изпаряване точно на повъpxността на млякото и
разклатетеканатаскръговидвижения.Щомстанеготова
пяната,повдигайте и понижавайте леко каната за да се
стопли млякото. Поставете отново превключвателя в
позиция«изключен».
4. Налейтемлякотоспянатавкафето.Пожеланиеможе
да го напръскате с канела илиначупен шоколади да го
украситесканеланапръчки.
ПОДДРЪЖКА И ЧИСТОТА
Преди да пристъпите к¤м почистване, изключете уреда
от мрежата. Измийте подвижните части с вода и сапун.
Почистетесвлаженпарцалкорпусанакафемашината.
Необэодимоеpедовнодасепочистваизпаpителязада
стесигуpни,ченеезапушен.
За да почистите вътрешната част на тръбичката на
изпарителя, напълнете резервоара с вода, достатъчно
като за една чаша и пуснете изпарителя да работи без
мляко.
Затворете изпарителя и веднага потъркайте отвора с
влажен парцал. Внимавайте когато извършвате тази
манипулация,тъйкатовсеощеможедаемногогорещ.В
случай,чеезапушена,тръбичкатанаизпарителяможеда
сеотвинтисшестоъг¤лнияотворнадозиращаталъжица
идасепочистисигла.
След всяка употреба, изпразвайте резервоара. Не го
съxpанявайте с държателя на филтри поствен в него.
Кабелътможедабъдеприбранподуреда.
ПОЧИСТВАНЕ ОТ ВАРОВИТИ
НАСЛАГВАНИЯ
Кафе машината трябва редовно да бъде почиствана от
варовититенаслагвания.Налейтеврезервоарадвечаши
оцет и пуснете уредадаработибезкафедва пъти, вкл.
тpъбичкатазаизпаряване.Задаотстранитеостатъкаот
оцет,пуснетеуредадаработисамосводаощедвапъти.
ПРЕДУПРЕЖДЕНИЕ ЗА СКЛАДИРАНЕ /
ИЗХВЪРЛЯНЕ
Опаковките на нашите продукти са
висококачествени.Товапо—съществоозначава,
че се използват безвредни за околната среда
материали, които е препоръчително да се предадат на
пунктзавторичнисуровини.
Този продукт отговаря на директивата на ЕС
2002/96/CE.Зачеркнатиятсимвол,изобразяващ
кофа за боклук на колелца, означава, че този
продукт не трябва да се изхвърля заедно с
отпадъците от домакинството. Трябва да се
предаде на специален пункт за събиране на
изхвърлениотупотребаелектрическииелектронниуреди
илидасевърненадистрибутора,когатокупуватеподобен
уред.Споредсегадействащитеразпоредбизаизхвърляне
на отпадъци, потребителите, които не предадат
изхвърлени от употреба уреди на някой от специалните
пунктове за събиране на отпадъци, могат да бъдат
глобени.Правилнотоизхвърляненаизлезлиотупотреба
уреди означава, че те могат да бъдат рециклирани и
преработени екологично. Това помага за опазването на
околната среда и позволява повторната употреба на
материали, използвани в уреда. За повече информация
относно съществуващите програми за изхвърляне на
отпадъцисесвържетесместнатаслужбапоотпадъциили
с магазина, откъдето сте закупили продукта.
Производителитеивносителитеотговарятзаекологичното
рециклиране,преработване и изхвърляненапродуктите,
прякоилипосредствомобщественатасистема.
Информация за това, как да изхвърлите уред, излязъл
вечеотупотреба,можетедаполучитеотместнияГрадски
съвет.
voliãotoãítedopolohy«pára».Jakmilepárapfiestane
vycházet,voliãvraÈtedopÛvodnípolohy.
•Podokonãenípfiípravykávynechtedvûminutyzchla-
—
ditpouzdronafiltravyjmûteho.
P¤ÍPRAVA KÁVY CAPPUCCINO
1. Postupujte podle návodukpfiípravûkávyespreso.
Mûjte na pamûti, Ïe pfii vaporizaci mléka je potfieba
vût‰ímnoÏstvívody.
2. Jakmile získáte potfiebné mnoÏství kávy, vypnûte
spínaã.Podv˘stuppárypostavtekonvicisestuden˘m
mlékemavoliãuveìtedopolohy«pára».
3. Pûnu vytvofiíte tím zpÛsobem, Ïe trysku na páru
umístítetûsnûnadhladinumlékaakrouÏiv˘mipohyby
budete pohybovat konvicí. Jakmile pûnu pfiipravíte,
posunetelehcekonvicínahoru a dolÛ,aby seohfiálo
mléko.Voliãopûtvypnûte.
4. Pfielijtemlékospûnoudokávy. Máte-chuÈ, mÛÏete
ho jemnû posypat skofiicíãinastrouhanou ãokoládou
neboozdobitúlomkemceléskofiice.
ÚDRÎBA A âI·TùNÍ
Pfiedãi‰tûnímodpojtekávovarzesítû.Sejmûtetácekna
odkapáváníavyjmûtepouzdronafiltr.Pohyblivéãásti
omyjtevodousmycímprostfiedkem.Samotn˘kávovar
otfietevlhk˘mhadfiíkem.
JenezbytnéprovádûtpravidelnouúdrÏbuvaporizáto-
—
ru,abyjsteseujistili,Ïev˘stupnezÛstanezahrazen.Pfii
ãi‰tûnívnitfiníãástitryskyvaporizátorunaplÀtenádrÏku
na kávu expresso mnoÏstvím vody, odpovídajícím
pfiípravûjednoho‰álku,auveìtevaporizátordocho—
—
dubezmléka.Zavfietevaporizátor aústíihnedotfiete
vlhk˘mhadfiíkem.Buìtevelmiopatrní,protoÏetryska
mÛÏeb˘tje‰tûvelmihorká.Vpfiípadû,Ïejetryskava——
porizátoruzahrazena,jemoÏnéjipomocí‰estihranné-—
hootvoruvodmûrceod‰roubovatavyãistitjehlou.
ZÛstane-li v nádrÏce voda, po kaÏdém pouÏití ji
vyprázdnûte.PfiiuloÏeníkávovaruvÏdyvyjímejtepouz-
—
dronafiltr.VyuÏívejtemoÏnostisvinutí‰ÀÛryvespodní
ãástispotfiebiãe.
ODVÁPNùNÍ
KávovarjetfiebapravidelnûodvápÀovat.Rozfieìte‰álek
octase‰álkemvodyaroztokvlijtedonádrÏky.Kávovar,
vãetnûtrysky, uveìte dvakrát do chodu, aniÏ byjste
do nûho nasypali kávu.Zbytekocta odstraÀte dal‰ím
dvojit˘muvedenímkávovarudochodunabázivody.
UPOZORNÙNÍ PRO UÎIVATELE
—
—
2002/96/CE.
—
—
—
—
—
—
—
—
- Manuals
- Brands
- UFESA Manuals
- Coffee Maker
- CE7141
- Operating instructions manual
-
Contents
-
Table of Contents
-
Bookmarks
Quick Links
CE7141 manual.indd 1
CE7141 manual.indd 1
CE7141 (TYPE: C_CE14)
INSTRUCCIONES DE USO
OPERATING INSTRUCTIONS
MODE D’EMPLOI
õ
INSTRUÇ
ES DE USO
GEBRAUCHSANLEITUNG
HASZN LATI UTASĺT S
PУKОBОДCTBО ПО ЭΚСПЛУАΤΑЦИИ
N VOD K POUŽITĺ
УKA3AHИЯ 3A УПOTPЕБА
INSTRUCTIUNI DE FOLOSIRE
ﺇﺭﺷﺎﺩﺍﺕ ﺍﻟﺘﺸﻐﻴﻞ
ES
GB
FR
PT
DE
HU
RU
CZ
BU
RO
AR
2009-06-17 5:14:17.MD
2009-06-17 5:14:17.MD
Related Manuals for UFESA CE7141
Summary of Contents for UFESA CE7141
-
Page 1
CE7141 (TYPE: C_CE14) INSTRUCCIONES DE USO OPERATING INSTRUCTIONS MODE D’EMPLOI õ INSTRUÇ ES DE USO GEBRAUCHSANLEITUNG HASZN LATI UTASĺT S PУKОBОДCTBО ПО ЭΚСПЛУАΤΑЦИИ N VOD K POUŽITĺ УKA3AHИЯ 3A УПOTPЕБА INSTRUCTIUNI DE FOLOSIRE ﺇﺭﺷﺎﺩﺍﺕ ﺍﻟﺘﺸﻐﻴﻞ CE7141 manual.indd 1 CE7141 manual.indd 1 2009-06-17 5:14:17.MD… -
Page 2
2a) Preparación de 1 taza de café con café molido Fig. 2b Fig. 2c 2b) Preparación de 2 tazas de café con café 2c) Preparación de 1 taza de café con molido monodosis individuales Fig. 2d Fig. 3 CE7141 manual.indd 2 CE7141 manual.indd 2 2009-06-17 5:14:21.MD 2009-06-17 5:14:21.MD… -
Page 3
Fig. 4 Fig. 5 Fig. 6 Fig. 7 CE7141 manual.indd 3 CE7141 manual.indd 3 2009-06-17 5:14:40.MD 2009-06-17 5:14:40.MD… -
Page 4: Instrucciones De Seguridad
2. A continuación, siga los pasos 3-4 de las instrucciones normal, usted debe girar el regulador de vapor hasta para preparar un espresso usando café molido. CE7141 manual.indd 4 CE7141 manual.indd 4 2009-06-17 5:14:43.MD 2009-06-17 5:14:43.MD…
-
Page 5: Limpieza Y Mantenimiento
Unión Europea. Por favor, Retire el portafiltros con cuidado pues puede quedar pregunte a su distribuidor acerca de las medidas de agua caliente en él. deposición/eliminación actuales. CE7141 manual.indd 5 CE7141 manual.indd 5 2009-06-17 5:14:44.MD 2009-06-17 5:14:44.MD…
-
Page 6: Connecting To The Mains
flush 2. Then follow steps 3-4 of the instructions for making through all of the internal parts of the coffee maker. espresso with coffee powder. CE7141 manual.indd 6 CE7141 manual.indd 6 2009-06-17 5:14:45.MD 2009-06-17 5:14:45.MD…
-
Page 7: Preparing Cappuccino
EU. Please ask your dealer be hot water left inside it. about current means of disposal. In order to prolong the life of the machine, do not refit CE7141 manual.indd 7 CE7141 manual.indd 7 2009-06-17 5:14:45.MD 2009-06-17 5:14:45.MD…
-
Page 8: Connexion De L’alimentation
à ce votre magazin habituel. 1. Placez le filtre à dosettes dans le porte-filtre. Placez que l’eau circule dans toutes les pièces de la cafetière. CE7141 manual.indd 8 CE7141 manual.indd 8 2009-06-17 5:14:46.MD 2009-06-17 5:14:46.MD…
-
Page 9
Faites attention lorsque vous retirez le porte-filtre car au rebut actuels. de l’eau chaude peut encore se trouver à l’intérieur. CE7141 manual.indd 9 CE7141 manual.indd 9 2009-06-17 5:14:47.MD 2009-06-17 5:14:47.MD… -
Page 10
Após cerca de 20 segundos, 2. Em seguida, siga os passos 3-4 das instruções para o barulho vai desaparecer e a água vai sair. fazer expresso com pó de café. CE7141 manual.indd 10 CE7141 manual.indd 10 2009-06-17 5:14:47.MD 2009-06-17 5:14:47.MD… -
Page 11
De forma a prolongar a vida da máquina, não coloque disposição dos aparelhos. o suporte do filtro na máquina de café se a for guardar por um período prolongado. Não lave nenhuma das peças na máquina de louça. CE7141 manual.indd 11 CE7141 manual.indd 11 2009-06-17 5:14:48.MD 2009-06-17 5:14:48.MD… -
Page 12: Wichtige Hinweise
BEACHTEN SIE: Wenn das Wasser das erste Mal 2. Befolgen Sie dann die Schritte 3-4 der Anweisungen heraufgepumpt wird, könnte es sein, dass es Geräusche zur Zubereitung von Espresso mit Kaffeepulver. CE7141 manual.indd 12 CE7141 manual.indd 12 2009-06-17 5:14:48.MD 2009-06-17 5:14:48.MD…
-
Page 13: Zubereitung Von Cappuccino
Recycling von Altgeräten fest. Fragen Sie bitte Setzen Sie den Siebträger nicht wieder ein, wenn Ihren Vertriebshändler nach den derzeit verfügbaren die Kaffeemaschine über einen längeren Zeitraum Entsorgungsmöglichkeiten. nicht benutzt wird, um die Lebensdauer der CE7141 manual.indd 13 CE7141 manual.indd 13 2009-06-17 5:14:49.MD 2009-06-17 5:14:49.MD…
-
Page 14: Fontos Tudnivalók
Győződjön meg róla, hogy a BE/KI kapcsoló (9) be lett pozícióba fordítani. Kb. 20 másodperc múlva a zaj kapcsolva (7. ábra). megszűnik, és a víz kifolyik. CE7141 manual.indd 14 CE7141 manual.indd 14 2009-06-17 5:14:50.MD 2009-06-17 5:14:50.MD…
-
Page 15
és újrahasznosítását az EU-ban elterjedt Ajánlatos kávéfőzőnél vízkő rendszeres alkalmazás szerint. Kérjük érdeklődjön kereskedőjénél eltávolítása. Ehhez töltse meg a tartályt 3:1-es az aktuális visszaszolgáltatási eljárást illetően. arányban elkészített víz és ecet keverékével. CE7141 manual.indd 15 CE7141 manual.indd 15 2009-06-17 5:14:51.MD 2009-06-17 5:14:51.MD… -
Page 16
используйте прибор в режиме приготовления Для нагрева чашек, жидкостей или для приготовления эспрессо, но без добавления кофе. горячего вспененного молока для капучино может ПРИМЕЧАНИЕ. При первом откачивании вода использоваться пар. CE7141 manual.indd 16 CE7141 manual.indd 16 2009-06-17 5:14:51.MD 2009-06-17 5:14:51.MD… -
Page 17
сведения о текущих способах утилизации можно устанавливайте фильтродержатель на место, если узнать у вашего продавца. кофеварка не будет использоваться в течение длительного времени. Не мойте детали кофеварки в посудомоечной машине. CE7141 manual.indd 17 CE7141 manual.indd 17 2009-06-17 5:14:52.MD 2009-06-17 5:14:52.MD… -
Page 18: Připojení K Síti
filtru. (Obr. 2c) espreso, ale pouze s vodou, bez použití kávy. Tímto 2. Pak postupujte podle kroků 3-4 pokynů pro přípravu způsobem dokonale vyčistíte všechny vnitřní části espressa s kávovým práškem. kávovaru. CE7141 manual.indd 18 CE7141 manual.indd 18 2009-06-17 5:14:52.MD 2009-06-17 5:14:52.MD…
-
Page 19
Abyste prodloužili životnost kávovaru, nevracejte na svého prodejce. něj držák filtru, jestliže má být kávovar delší dobu uskladněn. Žádný díl kávovaru nemyjte v myčce na nádobí. CE7141 manual.indd 19 CE7141 manual.indd 19 2009-06-17 5:14:53.MD 2009-06-17 5:14:53.MD… -
Page 20
Отстранете държача на филтъра преди да използвате парата, тъй като това ще спре голямото въздуха от уреда. След около 20 секунди, шумът налягане вътре във филтъра. ще изчезне и водата ще потече. CE7141 manual.indd 20 CE7141 manual.indd 20 2009-06-17 5:14:54.MD 2009-06-17 5:14:54.MD… -
Page 21
целия ЕС. Моля, обърнете се към вашия доставчик котлен камък. За тази цел, напълнете резервоара относно актуалните начини за изхвърляне. със смес от три части вода и една част оцет. CE7141 manual.indd 21 CE7141 manual.indd 21 2009-06-17 5:14:54.MD 2009-06-17 5:14:54.MD… -
Page 22: Conectarea La Reţea
Puneţi 1 capsulă de cafea în filtru. (Fig. 2c) dar fără cafea, astfel încât să spălaţi toate părţile 2. Urmaţi apoi paşii 3-4 din instrucţiunile pentru interne ale aparatului de cafea. prepararea cafelei espreso cu cafea măcinată. CE7141 manual.indd 22 CE7141 manual.indd 22 2009-06-17 5:14:55.MD 2009-06-17 5:14:55.MD…
-
Page 23
filtru în aparat dacă acesta nu va fi folosit o perioadă Vă rugăm să vă întrebaţi comerciantul despre mijloacele lungă de timp. Nu curăţaţi nici o parte a aparatului cu curente de reciclare. maşina de spălat. CE7141 manual.indd 23 CE7141 manual.indd 23 2009-06-17 5:14:56.MD 2009-06-17 5:14:56.MD… -
Page 24
ﻟﻜﻲ ﺗﺰﻳﺪ ﻣﻦ ﻋﻤﺮ ﺍﻟﺠﻬﺎﺯ، ﻻ ﺗﻘﻢ ﺑﺈﻋﺎﺩﺓ ﺗﺮﻛﻴﺐ ﺣﺎﻣﻞ ﺍﻟﻘﻬﻮﺓ ﺇﺫﺍ ﻛﻨﺖ .ﺗﺎﺟﺮﻙ ﻋﻦ ﺍﻟﺴﺒﻞ ﺍﻟﺤﺎﻟﻴﺔ ﻟﻺﻳﺪﺍﻉ ﻭﺍﻟﺘﺨﻠﺺ ﺗﻨﻮﻱ ﺗﺨﺰﻳﻦ ﺍﻟﺠﻬﺎﺯ ﻟﻔﺘﺮﺓ ﻃﻮﻳﻠﺔ ﻣﻦ ﺍﻟﻮﻗﺖ. ﻻ ﺗﻘﻢ ﺑﺘﻨﻈﻴﻒ ﺃﻱ ﺟﺰء .ﻣﻦ ﺃﺟﺰﺍء ﺍﻟﺠﻬﺎﺯ ﻓﻲ ﻏﺴﺎﻟﺔ ﺍﻷﻃﺒﺎﻕ CE7141 manual.indd 24 CE7141 manual.indd 24 2009-06-17 5:14:56.MD 2009-06-17 5:14:56.MD… -
Page 25
٢. ﺛﻢ ﺍﺗﺒﻊ ﺍﻟﺨﻄﻮﺍﺕ ٣ ﻭ٤ ﻟﻠﺘﻌﺮﻑ ﻋﻠﻰ ﺗﻌﻠﻴﻤﺎﺕ ﻋﻤﻞ ﺍﻻﺳﺒﺮﺳﻮ ﻣﻦ ﻗﻢ ﺑﺘﺸﻐﻴﻞ ﺍﻟﺠﻬﺎﺯ ﻭ ﻛﺄﻧﻚ ﺳﺘﻬﻴﺊ ﻗﻬﻮﺓ ﺃﺳﺒﺮﺳﻮ ﻭ ﻟﻜﻦ ﻓﻘﻂ ﺑﺎﻟﻤﺎء ﺣﺘﻰ .ﺑﻮﺩﺭﺓ ﺍﻟﻘﻬﻮﺓ .ﺗﻨﻈﻒ ﺟﻤﻴﻊ ﺍﻷﺟﺰﺍء ﺍﻟﺪﺍﺧﻠﻴﺔ ﻓﻲ ﺟﻬﺎﺯﻋﻤﻞ ﺍﻟﻘﻬﻮﺓ CE7141 manual.indd 25 CE7141 manual.indd 25 2009-06-17 5:14:57.MD 2009-06-17 5:14:57.MD… -
Page 26
BSH Electrodomésticos España, S.A. CIF A-28-893550 C/ Itaroa, n° 1, 31.620 HUARTE (Navarra) España 100% recycled paper 100% recycled paper CE7141 manual.indd 26 CE7141 manual.indd 26 2009-06-17 5:14:58.MD 2009-06-17 5:14:58.MD…
IMPORTANT NOTES
• Read the instructions carefully before using the co—
—
ffee maker for the first time. Safeguard them for future
reference.
• Only connect it to the voltage stated on the charac—
—
teristics plate.
• It is advisable to use an earthed electrical socket.
• This appliance has been designed exclusively for do—
—
mestic use.
• Do not use the appliance for uses other than those
stated in the this manual.
• The On/Off switch should be in the Off position
when plugging it in or when unplugging it.
• Always place the appliance on a flat, level surface.
• Try not move the appliance while it is operating.
• This appliance is not intended for use by persons
(including children) with reduced physical, sensory
or mental capabilities, or lack of experience and
knowledge, unless they have been given supervision
or instruction concerning use of the appliance by a
person responsible for their safety.
• Children should be supervised to ensure that they do
not play with the appliance.
• The apliance is not intended to be operated by
means of an external timer or separate remote-control
system.
• Do not immerse the coffee maker in water or
any other liquids.
• Do not handle the appliance with wet hands.
• Do not operate the appliance with the cable still
coiled.
• Do not touch the hot surfaces. Handle the coffee
maker by its handles or buttons.
• Do not leave the coffee maker unattended when it is
in use, nor when there are children about.
• Unplug it from the mains when it is not in use and
before cleaning it.
• Do not unplug it by tugging on the mains cable. Do
not leave the plug hanging freely.
• Do not leave the appliance close to sources of heat
nor allow the cable to come into contact with hot
surfaces.
• Do not operate the coffee maker without water.
• Make sure that the lid on the tank is closed before
switching the coffee maker on.
• Before cleaning it, make sure that the appliance is
unplugged and cold.
• Do not switch the coffee maker on if either the cable
or plug are damaged, if it can be detected that it is not
operating correcting, or if it has suffered any type of
damage.
• Cable repairs and replacements must be carried out
exclusively by an Authorised Technical Service Centre.
OPERATION
Before using it for the first time wash all of the acces-
—
sories and operate it once without coffee.
Preparing Espresso Coffee
1. Plug the appliance into the mains and check that the
switch is in the Off position.
2. Unscrew the lid on the tank and pour in the desired
amount of water. The jug shows the amounts required
for two or four cups. Screw the lid back on and tighten
it securely.
3. Place the filter into the filter holder. Use the filter’s
two or four cup level marks to gauge the amount of
coffee needed. Clean off any coffee that may be left
around the edge of the filter holder.
Important: To get the best results out of your espres-—
so coffee maker, use a coarsely ground coffee, Italian
espresso type. Do not pack the coffee down.
4. Put the filter holder into position. Place the jug so
that the opening lines up with the coffee outlet.
5. Turn the selector to the coffee position. The pilot
lamp will come on. After a few minutes the water will
boil, filter through the coffee and flow down into the
jug. When the coffee stops coming out put the switch
to the Off position.
Important:
• The tank can only be opened safely when all the
water has been used up. To release the pressure, pla—
—
ES
1. Depósito de agua
2. Selector café-vapor
3. Tubo de vaporización
4. Portafiltros
5. Filtro
6. Bandeja de goteo
7. Jarra
8. Recogecables
9. Cuchara dosificadora
10. Boquilla de vapor
PT
1. Depósito de água
2. Selector café-vapor
3. Tubo vaporizador
4. Porta-filtros
5. Filtro
6. Bandeja para recolher as gotas
7. Jarro
8. Enrolador do cabo
9. Colher doseadora
10. Doseador
HU
1.Víztartály
2.Kávé-gŒzszabályozó
3.GŒzkieresztŒcsŒ
4.SzırŒtartó
5.SzırŒ
6.CsepegtetŒkanna
7. Üvegkanna
8.VezetékfeltekerŒ
9. Adagolókanál
10. GŒzkieresztŒ
BU
GB
1. Water tank
2. Coffee-steam selector
3. Steam pipe
4. Filter holder
5. Filter
6. Drip tray
7. Jug
8. Cable coiler
9. Measuring scoop
10. Steam nozzle
RU
RO
1. Rezervor apã
2. Selector cafea-abur
3. Tub de vaporizare
4. Portfiltru
5. Filtru
6. Tava de picurare
7. Canã
8. Loc pentru strângerea cablului
9. Lingurã pentru dozare
10 Gura aburului
AR
1
2
3
4
5
6
7
8
9
10
NOTAS IMPORTANTES
• Lea con atención las instrucciones antes de usar la
cafetera por primera vez. Guárdelas para futuras con—
—
sultas.
• Conéctese únicamente a la tensión indicada en la
placa de características.
• Es recomendable un enchufe con toma de tierra.
• Este aparato ha sido diseñado exclusivamente para
uso doméstico.
• No emplee el aparato para usos diferentes de los
descritos en este manual.
• Tanto al introducir como al sacar la clavija del enchu-
—
fe, el selector debe estar en la posición de apagado.
• Coloque siempre el aparato sobre una superficie lisa
y estable.
• Evite mover el aparato durante su funcionamiento.
• No coloque el aparato cerca de la bañera, ducha o
piscina.
• No permitir el uso del aparato a personas (incluidos
niños) con capacidades intelectuales o sensoriales
disminuidas o con insuficiente experiencia y cono-
—
cimientos, a no ser que sean vigilados o hayan sido
instruidos en el manejo del aparato por la persona
responsable de su seguridad.
• Mantenga la máquina fuera del alcance de los niños.
Asegúrese de que no juegan con ella.
• El aparato no se ha diseñado para su utilización con
un temporizador externo o un sistema de control re-—
moto separado.
• No introduzca la cafetera en agua u otros líquidos.
• No manipule el aparato con las manos mojadas.
• No haga funcionar el aparato con el cable enrollado.
• No toque las partes calientes. Manipule la cafetera
por las asas e interruptores.
• No deje la cafetera desatendida cuando esté en fun-
—
cionamiento, ni en presencia de niños.
• Desenchufe de la toma cuando no esté en uso y an-
—
tes de su limpieza.
• No desconecte tirando del cable. No deje la co-
—
nexión colgando.
• No deje el aparato cerca de una fuente de calor ni
permita que el cable toque superficies calientes.
• No haga funcionar la cafetera sin agua.
• Asegúrese de que la tapa del depósito está cerrada
antes de poner la cafetera en marcha.
• Antes de su limpieza compruebe que el aparato se
encuentra desconectado y frío.
• No ponga en marcha la cafetera con el cable o en-
—
chufe dañados, si ha observado que no funciona co——
rrectamente o si ha sufrido daños de algún tipo.
• Las reparaciones y cambios de cable deben ser
realizadas exclusivamente por un Servicio Técnico
Autorizado.
FUNCIONAMIENTO
Antes del primer uso lave todos los accesorios y hága—
—
la funcionar una vez sin café.
Preparación de Café Exprés
1. Conecte el aparato a la red y compruebe que el
selector está en la posición de apagado.
2. Desenrosque el tapón del depósito y vierta la canti-
—
dad de agua deseada. La jarra indica la cantidad nece-—
saria para dos o cuatro tazas. Gire el tapón y apriételo
con fuerza.
3. Coloque el filtro en el portafiltros. Para poner el
café guíese por las marcas de dos y cuatro tazas del
filtro. Limpie el café que pueda quedar en el borde
del portafiltros.
Importante: Para obtener un resultado óptimo con su
cafetera de hidropresión, utilice un café con un mo li do
grueso, tipo cafetera italiana. No prense el café.
4. Coloque el portafiltros. Coloque la jarra de manera
que la abertura coincida con la salida de café.
5. Gire el selector hasta la posición café. El piloto se
iluminará. Al cabo de unos minutos el agua hierve y
cae a través del café molido a la jarra. Cuando el café
termine de salir vuelva a poner el interruptor en la po-
—
sición de apagado.
Importante:
• El depósito sólo puede ser abierto con seguridad
cuando toda el agua ha sido utilizada. Para liberar la
presión, coloque una jarra con agua bajo el vapori—
—
zador y gire el selector hasta la posición de vapor.
Cuando el vapor deje de salir vuelva a poner el
selector en la posición de apagado.
• Después preparar café, el portafiltro debe dejarse
enfriar durante dos minutos antes de retirarlo de la ca-
—
fetera.
Preparación de Capuccino
1. Siga las instrucciones para hacer café. El indicador
de nivel de la jarra marca la cantidad que se precisa
para preparar dos tazas de café y la espuma de la le-
—
che. Para preparar cuatro tazas, llene la jarra hasta la
parte inferior de la banda metálica.
2. Cuando obtenga la cantidad deseada de café pon—
—
ga el selector en la posición de apagado. Ponga una
jarra con leche fría bajo la salida de vapor y sitúe el
selector en la posición vapor.
3. Para obtener espuma coloque el tubo de vapor
justo en la superficie de la leche y mueva la jarra en
sentido circular. Una vez preparada la espuma suba y
baje ligeramente la jarra para calentar la leche. Vuelva
a situar el selector en «apagado».
4. Vierta la leche con espuma en el café. Si lo desea
puede espolvorearlo con canela o chocolate molido y
decorarlo con canela en rama.
MANTENIMIENTO Y LIMPIEZA
Antes de proceder a la limpieza desconecte el apara-
—
to de la red. Lave las partes móviles con agua y jabón.
Pase un paño húmedo para limpiar el cuerpo de la
cafetera.
Es necesario realizar regularmente una limpieza del
vaporizador para asegurarse de que no se encuentra
obstruida. Para limpiar el interior del tubo del vapori—
—
zador llene el depósito con agua suficiente como para
una taza y accione el vaporizador sin leche. Cierre el
vaporizador y frote inmediatamente la boquilla con
un paño húmedo. Tenga cuidado al realizar esta ope-—
ración, pues podría estar aún muy caliente. En caso
de estar obstruido, el tubo del vaporizador se puede
desatornillar con el orificio hexagonal de la cuchara
dosificadora y limpiar con una aguja.
Después de cada uso, vacíe el depósito. No la guarde
con el portafiltros colocado. El cable puede recogerse
debajo del aparato.
DESCALCIFICACION
La cafetera debe ser regularmente descalcificada.
Vierta en el depósito dos tazas de vinagre y haga fun-
—
cionar el aparato sin café dos veces, incluído el tubo
de vapor. Para eliminar los restos de vinagre, hágalo
funcionar sólo con agua dos veces más.
ADVERTENCIAS DE DEPOSICION/
ELIMINACION
Para su transporte, nuestras mercancías cuen-—
tan con un embalaje optimizado. Este con-—
siste –por principio— en materiales no conta-—
minantes que deberían ser entregados como
materia prima secundaria al servicio local de elimina——
ción de basuras.
Este producto cumple la Directiva de la UE
2002/96/CE.
El símbolo del cubo de basura tachado sobre el
aparato indica que el producto, cuando finalice
su vida útil, deberá desecharse separado de los
residuos domésticos, llevándolo a un centro de
desecho de residuos separado para aparatos eléctricos
o electrónicos o devolviéndolo a su distribuidor cuando
compre otro aparato similar. El usuario es el responsable
de llevar el aparato a un centro de desecho de residuos
especiales al finalizar su vida útil. De lo contrario, podrá
ser sancionado en virtud de los reglamentos de desecho
de residuos vigentes. Si el aparato inutilizado es reco-
—
gido correctamente como residuo separado, podrá ser
reciclado, tratado y desechado de forma ecológica; esto
evita un impacto negativo sobre el medio ambiente y la
salud, y contribuye al reciclaje de los materiales del pro-—
ducto. Para obtener más información sobre los servicios
de desecho de residuos disponibles, contacte con su
agencia de desecho de residuos local o con la tienda
donde compró el aparato. Los fabricantes e importa-—
dores se hacen responsables del reciclaje, tratamiento y
desecho ecológico, sea directamente o a través de un
sistema público.
Su Ayuntamiento o Municipio le informará sobre posi-
—
bilidades de deposición/elimi nación para los aparatos
en desuso.
ce a jug of water under the steam sprayer and turn the
selector to the steam position. When the steam stops
coming out put the switch back to the Off position.
• After making the coffee, the filter holder should be
left to cool down for a few minutes before removing it
from the coffee maker.
Preparing Cappuccino
1. Follow the instructions for making coffee. Remember
that slightly more water will be necessary to froth up
the milk.
2. When you have made the desired amount of co—
—
ffee put the switch to the Off position. Place a jug of
cold milk under the steam outlet and then switch the
selector to the steam position.
3. To obtain froth, place the steam pipe just on the
surface of the milk and move the jug with a circular
motion. Once the froth is ready move the jug up and
down slightly to heat up the milk. Put the selector back
to the «Off» position.
4. Pour the frothed-up milk onto the coffee. If so desi-
—
red, it can be sprinkled with cinnamon or grated cho-—
colate and decorated with a stick of cinnamon.
MAINTENANCE & CLEANING
Unplug the appliance from the mains before procee-
—
ding to clean it. Remove the drip tray and filter holder.
Wash the moving parts with soapy water. Wipe down
the coffee maker’s body with a damp cloth.
It is necessary to regularly flush the steam nozzle
through to stop it from becoming blocked. To clean
the inside of the steam pipe, fill the tank with enough
water for one cup and use the steam spray without any
milk. Switch off the steam and rub the nozzle down
with a damp cloth immediately afterwards. Take care
when doing this as it may still be very hot. In the event
that it is blocked, the steam pipe can be unscrewed by
using the hexagonal hole on the measuring scoop and
then cleaned out using a needle.
Empty out any water that may be left over after each
use. Do not store it away with the filter holder fitted.
The cable can be coiled up under the appliance.
DESCALING
The coffee maker should be descaled regularly: Dilute
one cup of vinegar in one cup of water, pour the mix-
—
ture into the tank and run the appliance, including the
steam pipe, twice, but without any coffee. To flush out
any vinegar remains run it with just water, twice more.
ADVICE ON DISPOSAL:
Our goods come in optimised packaging.
This basically consists in using non-contami-—
nating materials which should be handed
over to the local waste disposal service as
secondary raw materials.
This product complies with EU Directive
2002/96/CE. The crossed wheelie bin symbol
shown on the appliance indicates that when
it comes to dispose of the product it must
not be included in with household refuse. It
must be taken to a special refuse collection
point for electric and electronic appliances or retur-—
ned to the distributor when purchasing a similar
appliance. Under current refuse disposal regulations,
users who fail to take discarded appliances to special
refuse collection points may be penalised. Correct
disposal of discarded appliances means that they can
be recycled and processed ecologically, helping the
environment and allowing materials used in the pro——
duct to be reused. For more information on available
waste disposal schemes contact your local refuse ser-—
vice or the shop where the product was purchased.
Manufacturers and importers are responsible for eco-—
logical recycling, processing and disposal of pro-—
ducts, whether directly or via a public system.
Your local town council can provide you with informa-
—
tion about how to dispose of obsolete appliances.
REMARQUES IMPORTANTES
• Avant d’utiliser la cafetière pour la première fois, lire
attentivement ces instructions. Conservez-les pour de
futures consultations.
• Brancher uniquement sur la tension indiquée sur la
plaque des caractéristiques.
• Il est conseillé d’utiliser une prise de terre.
• Cet appareil a été conçu pour une utilisation domes-
—
tique exclusivement.
• Ne pas employer cet appareil pour des utilisations
autres que celles indiquées dans ce manuel.
• Que ce soit pour introduire comme pour sortir la fi-
—
che de la prise, le sélecteur doit être éteint.
• L’appareil doit toujours être placé sur une surface
lisse et stable.
• Eviter de bouger l’appareil quand il fonctionne.
• Ne pas confier l’appareil à des enfants ou à des per-
—
sonnes aux capacités sensorielles ou intellectuelles
diminuées ou ne dispo-sant pas d’une expérience ou
d’une connaissance suffisante, sauf si elles le font sous
surveillance ou si elles ont bénéficié préalablement
d’une information à propos de la manipulation de
l’appareil de la part de la personne responsable de
leur sécurité.
• Tenir les enfants éloignés de la machine. Bien sur-
—
veiller les enfants afin de les empêcher de jouer avec
l’appareil.
• Cet appareil ne fonctionne ni avec un temporisateur
externe ni avec une télécommande.
• Ne pas introduire l’appareil dans l’eau ou autres
liquides.
• Ne manipulez jamais l’appareil, les mains mouillées.
• Ne pas faire fonctionner l’appareil avec le câble en-
—
roulé.
• Ne pas toucher les surfaces chaudes. Pour manipu—
ler la cafetière, servez-vous de l’anse et des interrup—
—
teurs.
• Ne laissez jamais fonctionner la cafetière sans survei-
—
llance, et plus particulièrement près des enfants.
• Si vous n’utilisez pas la cafetière et avant de la netto—
—
yer, débranchez-la de la prise.
• Ne débranchez jamais en tirant du câble. Ne pas lais—
—
ser pendre le cordon.
• Ne jamais laisser l’appareil près d’une source de cha-
—
leur, le cordon ne doit pas toucher les surfaces chaudes.
• Ne pas faire fonctionner la cafetière sans eau.
• Avant de mettre en marche la cafetière, assurez-vous
que le couvercle du réservoir est bien fermé.
• Avant de le nettoyer, vérifiez si l’appareil est bien
débranché et complètement froid.
• Ne pas le faire fonctionner si le câble ou la fiche sont
abîmés ou si vous remarquez que l’appareil ne fonc—
—
tionne pas correctement ou s’il a subi un dommage
quelconque.
• Les réparations et remplacements de câble doivent
être réalisés exclusivement par un Service Technique
Agréé.
FONCTIONNEMENT
Avant la première utilisation, il est conseillé de laver
tous les accessoires et de faire fonctionner une fois la
cafetière sans café.
Préparation d’un expresso
1. Connectez l’appareil au réseau et vérifiez si le sélec—
—
teur sur trouve sur la position “éteint”.
2. Dévissez le bouchon de réservoir et versez la quan-
—
tité d’eau voulue. La verseuse indique la quantité né-—
cessaire pour deux ou trois tasses. Tournez le bouchon
et serrez-le très fort.
3. Placez le filtre dans le porte-filtres. Pour mettre le
café, guidez-vous par les marques de deux et quatre
tasses du filtre. Nettoyez le café resté sur le bord du
porte-filtre.
Important: Pour que votre cafetière à hydropression
vous donne un excellent résultat, il faudra utiliser un
café moulu gros, type cafetière italienne. Ne tasser pas
le café.
4. Placez le porte-filtres. Placez ensuite la verseuse de fa —
çon à ce que l’ouverture coïncide avec la sortie du café.
5. Tournez le sélecteur jusqu’à la position café. Le
voyant lumineux s’allumera. Quelques minutes après,
l’eau bout et tombe dans la verseuse à travers le café
moulu. Quand le café ne coule plus, placez à nouveau
l’interrupteur sur la position “éteint”.
Important :
• On peut ouvrir le réservoir en toute sécurité seule-
—
ment quand toute l’eau a été utilisée. Pour lâcher la
pression, placez un récipient avec de l’eau sous le
vaporisateur et tournez le sélecteur jusqu’à la position
vapeur. Quand la vapeur cesse, placer à nouveau le
sélecteur sur la position “éteint”.
• Après la préparation du café, il faut laisser refroidir le
porte-filtre durant deux minutes avant de l’enlever de
la cafetière.
Préparation du Capuccino
Suivre les mêmes instructions données pour la prépa—
—
ration du café. N’oubliez pas que pour vaporiser du
lait, il faut une quantité d’eau légèrement supérieure.
1. Quand on aura obtenu la quantité de café voulue, il
faudra placer le sélecteur sur la position “éteint”.
Placez un récipient avec du lait froid sous la sortie de
vapeur et placez le sélecteur sur la position vapeur.
3. Pour faire la crème, placez la buse vapeur juste à la
surface du lait et faites tourner le récipient. Dès obten-
—
tion de la crème, montez et descendez légèrement
le récipient pour chauffer le lait. Placez à nouveau le
sélecteur sur la position “éteint”.
4. Versez le lait avec la crème dans le café. Si vous le
souhaitez vous pouvez saupoudrer de cannelle ou de
chocolat râpé et décorer avec une brindille de cannelle.
ENTRETIEN ET NETTOYAGE
Avant le nettoyage, débranchez l’appareil du réseau.
Démontez le réceptacle pour les gouttes de café et
le porte-filtre. Lavez les parties mobiles à l’eau et au
savon. Passez un chiffon humide pour nettoyer le
corps de la cafetière.
Le vaporisateur doit être nettoyé régulièrement pour
éviter qu’il se bouche. Pour nettoyer l’intérieur du
tuyau du vaporisateur, remplir le réservoir avec l’eau
d’une tasse environ et actionner le vaporisateur sans
lait. Fermer le vaporisateur et frotter immédiatement la
buse avec un chiffon humide. Faire très attention car la
buse pourrait encore être très chaude. Si le tuyau est
bouché, dévisser avec l’orifice hexagonal de la cuillère
à doser et nettoyer à l’aide d’une aiguille.
Après chaque utilisation, videz l’eau qu’il pourrait
encore y avoir dans le réservoir. Ne rangez pas la ca-
—
fetière avec le porte-filtre placé. Le cordon doit être
enroulé sous l’appareil.
DÉTARTRAGE
La cafetière doit être détartrée régulièrement. Diluer
une tasse de vinaigre dans une tasse d’eau, versez le
mélan ge dans le réservoir et faites fonctionner l’appa—
reil sans ca fé deux fois, y compris la buse vapeur. Pour
éliminer les restes de vinaigre, faites fonctionner deux
fois en core, la cafetière avec de l’eau seulement.
REMARQUES CONCERNANT LE DÉ PÔT / ÉLI—
MINATION DES DÉCHETS
Toutes nos marchandises sont conditionnées
dans un emballage optimisé pour le trans-—
port. En principe, ces emballages sont com-—
posés de matériaux non polluants qui de-—
vront être déposés comme matière première secon-—
daire au Service Local d’élimination des déchets.
Produit aux normes de la Directive de l’UE
2002/96/CE.
Le logo “poubelle” apposé sur l’appareil indique
que tout appareil électroménager hors d’usage
ne doit pas être jeté dans les déchets ménagers
mais être déposé dans un centre de collecte de
déchets d’appareils électriques ou électroniques ou qu’il
doit être remis à votre vendeur à l’occasion de l’achat d’un
nouvel appareil. Il incombe à l’utilisateur de déposer lui-
même l’appareil hors d’usage dans un centre de collecte
spécialement prévu à cet effet, faute de quoi, celui-ci
risque de se voir sanctionné pour manquement au règle—
—
ment en vigueur concernant les déchets. Si l’appareil hors
d’usage est correctement collecté comme déchet trié, il
pourra être recyclé, traité et éliminé écologiquement évi-—
tant ainsi tout impact négatif sur l’environnement tout en
contribuant au recyclage des matériaux qui composent
le produit. Pour toutes informations relatives aux Services
d’élimination des déchets, adressez-vous à la déchetterie
de votre ville ou à votre vendeur habituel. Les fabricants
et les importateurs réalisent le recyclage, le traitement
et l’élimination écologique, soit directement soit par
l’intermédiaire d’un système public.
Pour toute information concernant le dépôt et
l’élimination des appareils usagés, renseignez-vous
auprès de la Mairie de votre Commune ou de la
Préfecture de votre Département.
NOTAS IMPORTANTES
• Leia atentamente as instruções antes de utilizar a
máquina de café pela primeira vez. Guarde-as para
futuras consultas.
• Ligue-a unicamente à tensão indicada na placa de
características.
• Recomenda-se a utilização duma tomada com li-
—
gação á t erra.
• Este aparelho foi exclusivamente desenhado para
uso doméstico.
• Não utilize o aparelho com outras finalidades, distin-
—
tas das referidas neste manual.
• Tanto ao introduzir como ao retirar a ficha da toma-
—
da, o selector deverá estar na posição Off.
• Coloque sempre o aparelho sobre uma superfície
lisa e estável.
• Evite mover o aparelho durante o seu funcio-namento.
• Não permitir a utilização do aparelho por pessoas
(incluindo crianças) de capacidade física, sensorial ou
mental diminuída ou sem conhecimento ou experiên-
—
cia suficiente, a não ser sob supervisão ou após de——
vida instrução na utilização do aparelho pela pessoa
responsável pela sua segurança.
• Mantenha crianças afastadas do aparelho ou super-
—
visione-as para garantir que não brinquem com o apa——
relho.
• O aparelho não foi concebido para ser utilizado com
um temporizador externo ou um sistema de controlo
remoto em separado.
• Não mergulhe a máquina de café em água nem
em nenhum outro liquido.
• Não manipule o aparelho com as mãos molhadas.
• Não ponha o aparelho em funcionamento estando o
cabo enrolado.
• Não toque as superfícies quentes. Manipule a má-
—
quina de café pelas pegas e interruptores.
• Não deixe a máquina de café em funciona mento
sem estar sob vigilância, especial mente se existirem
crianças por perto.
• Desligue o aparelho da tomada quando não esti ver a
utilizá-lo e antes de efectuar a sua limpeza.
• Nunca desligue puxando pelo cabo. Não deixe o
cabo pendurado.
• Não deixe o aparelho perto de fontes de calor nem
deixe que o cabo toque superfícies quentes.
• Não ponha a máquina de café em funcionamento
sem água.
• Certifique-se de que a tampa do depósito está fe cha —
da antes de pôr a máquina de café em funcio na men to.
• Antes de efectuar a sua limpeza comprove que o
aparelho está desligado e frio.
• Não ponha a máquina de café em funciona men to
se o cabo ou a ficha estiverem estragados, se observa
que esta não funciona correctamente ou quando tiver
sofrido qualquer tipo de dano.
• As reparações e mudanças de cabo deverão ser
rea li za das exclusivamente por um Serviço Técnico
Autorizado.
FUNCIONAMENTO
Antes de utilizar a sua máquina de café pela primeira
vez lave todos os acessórios e ponha-a a funcionar
uma vez sem café.
Preparação do Café Expresso
1. Ligue o aparelho á rede e comprove que o selector
está na posição Off.
2. Abra a tampa do depósito e deite a quantidade de
água desejada. O jarro tem indicada a quantidade ne-
—
cessária para duas ou quatro chávenas. Rode a tampa
e aperte-a com força.
3. Coloque o filtro no porta-filtros. Para por o café de-
—
verá guiar-se pelas marcas para duas e quatro cháve——
nas existentes no filtro. Limpe o café que possa ter
ficado na borda do porta-filtros.
Importante: Para obter um resultado óptimo com a
sua máquina de café expresso de hidropressão, utilize
um café com uma moagem grossa, tipo cafeteira italia——
na. Não comprima o café.
Coloque o porta-filtros. Coloque o jarro de ma neira
que a abertura coincida com a saída de café.
Rode o selector até á posição de café. A lâm pada-
piloto iluminar-se-á. Depois de uns minutos a água
começará a ferver e cairá através do café moído para
o jarro. Quando o café terminar de sair volte a pôr o
interruptor na posição Off.
Importante:
• Só poderá abrir o depósito com segurança depois
de toda a água ter sido utilizada. Para libertar a pressão
coloque um jarro com água debaixo do vaporizador e
rode o selector até á posição de vapor. Quando já não
sair vapor, volte a colocar o selector na posição Off.
• Depois de ter preparado café, deverá deixar arre-
—
fecer o porta-filtros durante dois minutos, antes de
retirá-lo da máquina de café.
PREPARAÇÃO DO CAPUCCINO
1. Siga as instruções dadas para fazer café. Tenha em
conta que para vaporizar o leite será necessá ria uma
quantidade de água ligeiramente superior.
2. Quando tiver a quantidade desejada de café, pon-
—
ha o selector na posição Off. Ponha um jarro com leite
frio debaixo da saída de vapor e coloque o selector
na posição de vapor.
3. Para conseguir espuma coloque o tubo de vapor
mesmo por cima da superfície do leite e mexa o ja-
—
rro fazendo círculos. Depois de preparada a espuma,
suba e baixe ligeiramente o jarro para aquecer o leite.
Volte a colocar o selector em Off..
4. Deite o leite com espuma no café. Se desejar po-
—
derá espalhar por cima canela ou chocolate moído e
decorá-lo com canela em rama.
MANUTENÇÃO E LIMPEZA
Antes de efectuar a limpeza desligue o aparelho da
rede eléctrica. Desmonte a bandeja para recolher as
gotas e o porta-filtro. Lave as peças moveis com água
e sabão. Passe um pano húmido para limpar o corpo
da máquina de café.
É necessário realizar regularmente uma limpeza do
vaporizador para certificar-se que este não está obs-
—
truído. Para limpar o interior do tubo do vaporizador
encha o depósito com água suficiente como para uma
chávena e ponha o vaporizador em funcionamento
sem leite. Feche o vaporizador e limpe imediatamente
a boquilha com um pano húmido. Deverá ter cuidado
ao realizar esta operação, pois esta poderia estar ain——
da muito quente. No caso de estar obstruído, o tubo
do vaporizador poderá ser desaparafusado com o
orifício hexagonal da colher doseadora e poderá lim——
par-se com uma agulha.
Depois de cada uso, esvazie a água que possa ter fi-
—
cado no depósito. Não o guarde com o porta-filtros
posto. O cabo poderá ficar recolhido debaixo do
aparelho.
DESCALCIFICAÇÃO
A máquina de café deverá passar regularmente por uma
descalcificação. Dilua uma chávena de vinagre numa
chávena de água, entorne a mistura no depósito e pon-
—
ha o aparelho a funcionar duas vezes, sem café, incluin-—
do o tubo do vapor. Para eliminar os restos de vi nagre,
ponha-a a funcionar mais duas vezes, só com água.
ADVERTÊNCIAS DE DEPOSIÇÃO /
ELIMINAÇÃO
Para o seu transporte, as nossas mercadorias
contam com uma embalagem optimizada.
Esta consiste — em principio- em materiais não
contaminantes que deveriam ser entregues
como matéria prima secundaria ao serviço local de eli-—
minação de lixos.
Este produto cumpre a Directiva da UE
2002/96/CE.
O símbolo de um caixote de lixo riscado so-
—
bre o aparelho indica que o produto, quando
finalize a sua vida útil, deverá deitar-se fora se-—
parado dos resíduos domésticos, levando-o
a um centro de materiais residuais com separação de
aparelhos eléctricos e electrónicos ou devolvendo-o
ao seu fornecedor ao comprar outro aparelho similar.
É ao usuário que lhe corresponde a responsabilidade
de levar o aparelho a um centro de materiais residuais
especiais ao finalizar a sua vida útil. Caso contrário, po-—
derá ser sancionado em virtude dos regulamentos de
materiais residuais vigentes. Se o aparelho inutilizado
for recolhido correctamente como resíduo separado,
poderá ser reciclado, tratado e eliminado de forma
ecológica; isto evita um impacto negativo sobre o meio
ambiente e a saúde, e contribui á reciclagem dos ma——
teriais do produto. Para obter mais informação sobre
os serviços de materiais residuais disponíveis, contacte
com a sua agência de materiais residuais local ou com
a loja onde comprou o aparelho. Os fabricantes e os
importadores tornam-se responsáveis pela reciclagem,
tratamento e eliminação ecológica, seja directamente
ou através de um sistema público.
A sua Câmara ou Município informar-lhe-á sobre as
possibilidades de deposição/eliminação para os apa-
—
relhos que já não se usam.
BIZTONSÁGTECHNIKAI ELÃÍRÁSOK
•OlvassaelfigyelmesenezelŒírásokat,mielŒttelŒször
használatbavesziakávéfŒzŒt,tartsamegazútmutatót
késŒbbiproblémáktisztázásaérdekében
•AkészülékhasználataelŒttellenŒrizzeazadattáblán,
hogyakészülékmegadottfeszültségemegegyezik-ea
hálózatifeszültséggel.
•Ajánlatosföldeltkonnektorokhasználata.
•Ezakészülékcsakháztartásicélrakészült.
•NehasználjaakávéfŒzŒtahasználatiutasításbanle—
—
írtaktóleltérŒcélra.
• Mind az elektromos vezeték a konnektorból való
kihúzásánálmindabehelyezésénélakészüléketkap-
—
csoljaki.
• A kávéfŒzŒt állítsa mindig egyenes kiegyenlített fe-
—
lületre.
•Kerüljeakészülékmozgatásátahasználatalatt.
• Az olyan személyeknek (gyermekeket is beleértve),
vagy hiányos tapasztalattal és tudással rendelkeznek,
ne engedje használni a készüléket, kivéve, ha felügyeli
• Gyermekeket ne engedjen a készülék közelébe. A
gyermekeket ne engedje a készülékkel játszani.
—
• Ne merítse a kávéfŒzŒt vízbe vagy más egyéb
folyadékba.
•Nehasználjaakészüléketvizeskézzel.
•Nehasználjaakészüléketfeltekertkábellel.
•A készülékforrórészeit ne érintse meg.Használja a
fogantyútésagombokat.
•NehagyjaakávéfŒzŒtegyedül,akkorhahasználatban
van,vagyhagyerekekisjelenvannak.
•KapcsoljakiakávéfŒzŒtéshúzzakiacsatlakozótha
márnemkívánjahasználniilletvetisztításelŒtt.
• Ne húzza ki a kábelt rángatva. Ne hagyja hogy a
csatlakozó kábel azasztalról vagymásegyéb helyrŒl
lelógjon.
•Nehagyjaakészüléketmelegfelületekközelében,és
nehagyjahogyakábelmelegrészeketérintsen.
•Nehasználjaakészüléketvíznélkül.
• EllenŒrizze, hogy a víztartály teteje zárva van —e,
mielŒttbekapcsoljaakészüléket.
•AtisztításelŒttellenŒrizze,hogyakészüléklehılt,és
kikapcsoltállapotbanvan.
•Nehasználjaakészüléket,haacsatlakozókábelvagy
akonnektorbármilyenkárosodástszenvedett,illetveha
bármilyenmıködésirendellenességetvagykárosodást
észlelt.
•Ajavítástilletveakárosodottcsatlakozókábeltcsak
a jótállási javításokkal megbízott szerviz szakemberei
javíthatjákmeg.
HASZNÁLAT
TisztítsamegakávéfŒzŒtazelsŒhasználatelŒtt
Expres kávékészítés
1. Kapcsolja a készüléket az elektromos áramra.
EllenŒrizze,hogykivan-ekapcsolva.
2.Csavarjaleavíztartálytetejétéstöltsönvizetavíz-
—
tartályba.Akannajelziaszükségesvízmennyiségetkét
vagynégycsészerészére. Szorosancsavarjavisszaa
zárócsavart.
3.Helyezzeafiltertafiltertartóba.Akávéadagolásá-
—
hoztöltsebe a kávét a megfelelŒ jeligattólfüggŒen,
hogykétvagynégyszemélyrefŒzi.Töröljeleakávéma-—
radványokatakávétartószélérŒl.
Fontos:Egyjobbkávékészítéseérdekébenhasználjon
nagyobb szemcséjıre ŒrŒlt kávét, olasz kávéhoz ha-
—
sonlóan.Nepréseljeakávét.
4.Helyezze be a szırŒtartót.Tegye akannát a helyé-
—
re,úgyhogy a kannaszájaegyezzen a kávékifolyási
helyével.
5.Állítsaaszabályozótakávépozícióba.AzellenŒrzŒ
lámpakigyullad.PárpercmúlvaavízfelforrésazŒrŒlt
kávénátszırŒdveakannábafolyik.Amikorakávételje—
—
senlefolytkapcsoljakiakészüléket.
Fontos:
Avíztartálycsakakkornyithatóbiztonságosan,hamár
teljesenkiürült.Anyomásfelszabadításáhozhelyezzen
Внимание:
ПРИГОТОВЛЕНИЕ КАПУЧИНО
УХОД И ЧИСТКА
ДЕКАЛЬЦИНАЦИЯ
РЕКОМЕНДАЦИИ ПО СДАЧЕ/ВЫБРОСУ
УПАКОВКИ И СТАРЫХ АППАРАТОВ