- Manuals
- Brands
- Toyota Manuals
- Automobile
- HIGHLANDER 2014
Manuals and User Guides for Toyota HIGHLANDER 2014. We have 6 Toyota HIGHLANDER 2014 manuals available for free PDF download: Instruction Manual, Manual, Owner’s Manual, Warranty & Maintenance Manual, Quick Reference Manual, Accessories Manual
Keys to Quality Maintenance
Toyota Owner manuals and warranty information are the keys to quality maintenance for your vehicle. No need to hunt down a separate Toyota repair manual or Toyota service manual. From warranties on Toyota replacement parts to details on features, Toyota Owners manuals help you find everything you need to know about your vehicle, all in one place.
Detailed Toyota manuals and Toyota warranty information help with questions about your vehicle specifications and maintenance schedules. Plus, learn more about what your Toyota warranty coverage includes. What’s more, Toyota warranty information helps you identify your unique vehicle needs as well as plan future service visits. Select your Toyota model to learn more about the Toyota Warranty for your car, truck or SUV. Or, get the Toyota Manual for your Toyota ride free of charge using our Toyota Owners manual free download option.
Read More
Read Less
![]()
TABLE OF CONTENTS
|
1 |
QUICK GUIDE |
11 |
|
|
2 |
BASIC FUNCTION |
31 |
|
|
3 |
AUDIO/VISUAL SYSTEM |
69 |
|
|
4 |
VOICE COMMAND SYSTEM |
169 |
|
|
5 |
INFORMATION |
179 |
|
|
6 |
PERIPHERAL MONITORING SYSTEM |
6 |
|
|
18 |
|||
|
7 |
PHONE |
219 |
|
|
8 |
NAVIGATION SYSTEM |
258 |
|
|
9 |
Entune App Suite |
327 |
|
|
INDEX |
341 |
1

Introduction
NAVIGATION AND MULTIMEDIA SYSTEM OWNER’S MANUAL
This manual explains the operation of this system. Please read this manual carefully to ensure proper use. Keep this manual in your vehicle at all times.
The screen shots in this document and the actual screens of this system differ depending on whether the functions and/or a contract existed and the map data available at the time of producing this document.
Please be aware that the content of this manual may be different from this system in some cases, such as when the system’s software is updated.
NAVIGATION AND MULTIMEDIA SYSTEM (WITH NAVIGATION FUNCTION)
The Navigation System is one of the most technologically advanced vehicle accessories ever developed. The system receives satellite signals from the Global Positioning System (GPS) operated by the U.S. Department of Defense. Using these signals and other vehicle sensors, the system indicates your present position and assists in locating a desired destination.
The navigation system is designed to select efficient routes from your present starting location to your destination. The system is also designed to direct you to a destination that is unfamiliar to you in an efficient manner. The system uses AISIN AW maps. The calculated routes may not be the shortest nor the least traffic congested. Your own personal local knowledge or “short cut” may at times be faster than the calculated routes.
The navigation system’s database includes Point of Interest categories to allow you to easily select destinations such as restaurants and hotels. If a destination is not in the database, you can enter the street address or a major intersection close to it and the system will guide you there.
The system will provide both a visual map and audio instructions. The audio instructions will announce the distance remaining and the direction to turn in when approaching an intersection. These voice instructions will help you keep your eyes on the road and are timed to provide enough time to allow you to maneuver, change lanes or slow down.
Please be aware that all current vehicle navigation systems have certain limitations that may affect their ability to perform properly. The accuracy of the vehicle’s position depends on satellite conditions, road configuration, vehicle condition or other circumstances. For more information on the limitations of the system, refer to page 322.
2

IMPORTANT INFORMATION ABOUT THIS MANUAL
For safety reasons, this manual indicates items requiring particular attention with the following marks.
 WARNING
●This is a warning against anything which may cause injury to people if the warning is ignored. You are informed about what you must or must not do in order to reduce the risk of injury to yourself and others.
 NOTICE
●This is a warning against anything which may cause damage to the vehicle or its equipment if the warning is ignored. You are informed about what you must or must not do in order to avoid or reduce the risk of damage to your vehicle and its equipment.
SYMBOLS USED IN ILLUSTRATIONS
Safety symbol
The symbol of a circle with a slash through it means “Do not”, “Do not do this” or “Do not let this happen”.
Arrows indicating operations
Indicates the action (pushing, turning, etc.) used to operate switches and other devices.
3

HOW TO READ THIS MANUAL
|
No. |
Name |
Description |
|||||||||||
|
Operational |
An outline of the operation is explained. |
||||||||||||
|
Outlines |
|||||||||||||
|
Main Operations |
The steps of an operation are explained. |
||||||||||||
|
Related Operations |
A main operation’s supplementary operations are described. |
||||||||||||
|
Information |
Useful information for the user is described. |
||||||||||||
4

|
SAFETY INSTRUCTION |
SAFETY INSTRUCTION (WITH |
|||
|
(WITHOUT NAVIGATION |
NAVIGATION FUNCTION) |
|||
|
FUNCTION) |
To use this system in the safest possible manner, follow all the safety tips shown below.
Do not use any feature of this system to the extent it becomes a distraction and prevents safe driving. The first priority while driving should always be the safe operation of the vehicle. While driving, be sure to observe all traffic regulations.
Prior to the actual use of this system, learn how to use it and become thoroughly familiar with it. Read the entire manual to make sure you understand the system. Do not allow other people to use this system until they have read and understood the instructions in this manual.
For your safety, some functions may become inoperable when driving. Unavailable screen buttons are dimmed.
 WARNING
●For safety, the driver should not operate the system while he/she is driving. Insufficient attention to the road and traffic may cause an accident.
To use this system in the safest possible manner, follow all the safety tips shown below.
This system is intended to assist in reaching the destination and, if used properly, can do so. The driver is solely responsible for the safe operation of your vehicle and the safety of your passengers.
Do not use any feature of this system to the extent it becomes a distraction and prevents safe driving. The first priority while driving should always be the safe operation of the vehicle. While driving, be sure to observe all traffic regulations.
Prior to the actual use of this system, learn how to use it and become thoroughly familiar with it. Read the entire manual to make sure you understand the system. Do not allow other people to use this system until they have read and understood the instructions in this manual.
For your safety, some functions may become inoperable when driving. Unavailable screen buttons are dimmed. Only when the vehicle is not moving, can the destination and route selection be done.
5

 WARNING
●For safety, the driver should not operate the system while he/she is driving. Insufficient attention to the road and traffic may cause an accident.
●While driving, be sure to obey the traffic regulations and maintain awareness of the road conditions. If a traffic sign on the road has been changed, route guidance may not have the updated information such as the direction of a one way street.
While driving, listen to the voice instructions as much as possible and glance at the screen briefly and only when it is safe. However, do not totally rely on voice guidance. Use it just for reference. If the system cannot determine the current position correctly, there is a possibility of incorrect, late, or non-voice guidance.
The data in the system may occasionally be incomplete. Road conditions, including driving restrictions (no left turns, street closures, etc.) frequently change. Therefore, before following any instructions from the system, look to see whether the instruction can be done safely and legally.
This system cannot warn about such things as the safety of an area, condition of streets, and availability of emergency services. If unsure about the safety of an area, do not drive into it. Under no circumstances is this system a substitute for the driver’s personal judgement.
Use this system only in locations where it is legal to do so. Some states/provinces may have laws prohibiting the use of video and navigation screens next to the driver.
6
7

TABLE OF CONTENTS |
|
|
1 QUICK GUIDE |
|
|
1. BASIC FUNCTION……………………… |
12 |
|
OVERVIEW BUTTONS ……………………. |
12 |
|
“Apps” SCREEN ……………………………… |
14 |
|
HOME SCREEN ……………………………… |
16 |
|
“Setup” SCREEN …………………………….. |
20 |
|
2. QUICK REFERENCE………………….. |
20 |
|
REGISTERING HOME …………………….. |
22 |
|
3. NAVIGATION OPERATION ………… |
22 |
|
REGISTERING PRESET |
|
|
DESTINATIONS……………………………. |
24 |
|
OPERATION FLOW: |
|
|
GUIDING THE ROUTE ………………….. |
26 |
|
SETTING HOME AS THE |
|
|
DESTINATION ……………………………… |
27 |
|
4. FUNCTION INDEX……………………… |
28 |
|
FUNCTION INDEX ………………………….. |
28 |
|
2 |
BASIC FUNCTION |
|
|
1. BASIC INFORMATION |
||
|
BEFORE OPERATION……………… |
32 |
|
|
INITIAL SCREEN …………………………….. |
32 |
|
|
CAPACITIVE TOUCH SWITCHES …….. |
34 |
|
|
TOUCH SCREEN GESTURES………….. |
35 |
|
|
TOUCH SCREEN OPERATION ………… |
36 |
|
|
HOME SCREEN OPERATION ………….. |
37 |
|
|
ENTERING LETTERS AND NUMBERS/ |
||
|
LIST SCREEN OPERATION …………… |
38 |
|
|
SCREEN ADJUSTMENT ………………….. |
41 |
|
|
2. Bluetooth® SETTINGS………………. |
43 |
|
|
REGISTERING/CONNECTING |
||
|
Bluetooth® DEVICE ……………………….. |
43 |
|
|
SETTING Bluetooth® DETAILS …………. |
49 |
|
|
3. OTHER SETTINGS ……………………. |
57 |
|
|
GENERAL SETTINGS ……………………… |
57 |
|
|
VOICE SETTINGS …………………………… |
63 |
|
|
DRIVER SETTINGS…………………………. |
64 |
|
|
MAINTENANCE ………………………………. |
65 |
|
|
3 |
AUDIO/VISUAL SYSTEM |
|
|
1. BASIC OPERATION ………………….. |
72 |
|
|
QUICK REFERENCE……………………….. |
72 |
|
|
SOME BASICS………………………………… |
74 |
|
|
2. RADIO OPERATION………………….. |
81 |
|
|
AM/FM RADIO ………………………………… |
81 |
|
|
XM Satellite Radio……………………………. |
91 |
|
|
INTERNET RADIO …………………………… |
97 |
|
|
3. MEDIA OPERATION………………….. |
98 |
|
|
CD …………………………………………………. |
98 |
|
|
USB MEMORY………………………………. |
101 |
|
|
iPod ……………………………………………… |
105 |
|
|
Bluetooth® AUDIO………………………….. |
109 |
|
|
AUX……………………………………………… |
114 |
|
|
VTR ……………………………………………… |
116 |
8

|
4. AUDIO/VISUAL REMOTE |
||
|
CONTROLS …………………………… |
118 |
|
|
STEERING SWITCHES …………………. |
118 |
|
|
5. SETUP ……………………………………. |
121 |
|
|
AUDIO SETTINGS ………………………… |
121 |
|
|
6. TIPS FOR OPERATING THE |
||
|
AUDIO/VISUAL SYSTEM ………… |
123 |
|
|
OPERATING INFORMATION …………. |
123 |
|
|
7. REAR SEAT ENTERTAINMENT |
||
|
SYSTEM OPERATION ……………. |
132 |
|
|
REAR SEAT ENTERTAINMENT |
||
|
SYSTEM FEATURES ………………….. |
132 |
|
|
PLAYING A Blu-ray Disc™ (BD) AND |
||
|
DVD DISCS………………………………… |
145 |
|
|
PLAYING AN AUDIO CD AND |
||
|
MP3/WMA DISCS……………………….. |
160 |
|
|
PLAYING AN SD CARD…………………. |
163 |
|
|
USING THE VIDEO MODE …………….. |
168 |
|
|
4 |
VOICE COMMAND SYSTEM |
|
|
1. VOICE COMMAND SYSTEM |
||
|
OPERATION ………………………….. |
170 |
|
|
VOICE COMMAND SYSTEM………….. |
170 |
|
|
CASUAL SPEECH |
||
|
RECOGNIZATION ………………………. |
176 |
|
|
COMMAND LIST …………………………… |
177 |
|
|
5 |
INFORMATION |
|
|
1. USEFUL INFORMATION…………… |
180 |
|
|
RECEIVING WEATHER |
||
|
INFORMATION…………………………… |
180 |
|
|
RECEIVING TRAFFIC MAP |
||
|
INFORMATION…………………………… |
182 |
|
|
DATA SERVICES SETTINGS…………. |
183 |
|
|
Driver Easy Speak…………………………. |
184 |
|
6 |
PERIPHERAL MONITORING |
||
|
SYSTEM |
|||
|
1. REAR VIEW MONITOR |
1 |
||
|
SYSTEM ……………………………….. |
188 |
||
|
REAR VIEW MONITOR SYSTEM ……. |
188 |
||
|
REAR VIEW MONITOR SYSTEM |
2 |
||
|
PRECAUTIONS ………………………….. |
190 |
||
|
THINGS YOU SHOULD KNOW ………. |
195 |
||
|
2. TOYOTA PARKING ASSIST |
|||
|
MONITOR ……………………………… |
196 |
3 |
|
|
TOYOTA PARKING ASSIST |
|||
|
MONITOR ………………………………….. |
196 |
||
|
ESTIMATED COURSE LINE |
4 |
||
|
DISPLAY MODE |
201 |
||
|
PARKING ASSIST GUIDE LINE |
|||
|
DISPLAY MODE …………………………. |
203 |
||
|
TOYOTA PARKING ASSIST |
5 |
||
|
MONITOR PRECAUTIONS…………… |
205 |
||
|
THINGS YOU SHOULD KNOW ………. |
210 |
||
|
3. INTUITIVE PARKING |
6 |
||
|
ASSIST …………………………………. |
212 |
||
|
INTUITIVE PARKING ASSIST…………. |
212 |
||
|
INTUITIVE PARKING ASSIST |
7 |
||
|
SETTING |
217 |
||
|
8 |
|||
|
9 |
9

TABLE OF CONTENTS
7 
 PHONE
PHONE
1.PHONE OPERATION (HANDS-FREE SYSTEM FOR
|
CELLULAR PHONES) …………….. |
220 |
|
QUICK REFERENCE …………………….. |
220 |
|
SOME BASICS ……………………………… |
221 |
|
CALLING ON THE |
|
|
Bluetooth® PHONE ……………………… |
224 |
|
RECEIVING ON THE |
|
|
Bluetooth® PHONE ……………………… |
229 |
|
TALKING ON THE |
|
|
Bluetooth® PHONE ……………………… |
230 |
|
Bluetooth® PHONE MESSAGE |
|
|
FUNCTION…………………………………. |
233 |
|
2. SETUP ……………………………………. |
238 |
|
PHONE/MESSAGE SETTINGS ………. |
238 |
|
3. WHAT TO DO IF… ……………………. |
250 |
|
TROUBLESHOOTING……………………. |
250 |
|
8 NAVIGATION SYSTEM |
|
|
1. BASIC OPERATION…………………. |
260 |
|
QUICK REFERENCE …………………….. |
260 |
|
MAP SCREEN OPERATION …………… |
263 |
|
MAP SCREEN INFORMATION ……….. |
269 |
|
TRAFFIC INFORMATION……………….. |
273 |
|
2. DESTINATION SEARCH…………… |
276 |
|
DESTINATION SEARCH SCREEN….. |
276 |
|
SEARCH OPERATION…………………… |
278 |
|
STARTING ROUTE GUIDANCE ……… |
288 |
|
3. ROUTE GUIDANCE………………….. |
292 |
|
ROUTE GUIDANCE SCREEN ………… |
292 |
|
TYPICAL VOICE GUIDANCE |
|
|
PROMPTS………………………………….. |
297 |
|
EDITING ROUTE…………………………… |
298 |
|
4. MEMORY POINTS …………………… |
303 |
|
MEMORY POINTS SETTINGS………… |
303 |
|
5. SETUP……………………………………. |
312 |
|
DETAILED NAVIGATION |
|
|
SETTINGS………………………………….. |
312 |
|
TRAFFIC SETTINGS ……………………… |
316 |
|
6. TIPS FOR THE NAVIGATION |
|
|
SYSTEM ……………………………….. |
322 |
|
GPS (GLOBAL POSITIONING |
|
|
SYSTEM)……………………………………. |
322 |
|
MAP DATABASE VERSION AND |
|
|
COVERED AREA ………………………… |
324 |
|
9 Entune App Suite |
|
|
1. Entune App Suite OVERVIEW …. |
328 |
|
Entune App Suite SERVICE…………….. |
328 |
|
2. Entune App Suite |
|
|
OPERATION………………………….. |
333 |
|
Entune App Suite …………………………… |
333 |
|
3. SETUP……………………………………. |
340 |
|
Entune App Suite SETTINGS ………….. |
340 |
|
INDEX |
|
|
ALPHABETICAL INDEX………………. |
342 |
10
![]()
|
1 |
BASIC FUNCTION |
|
|
1. |
OVERVIEW BUTTONS …………….. |
12 |
|
2. |
“Apps” SCREEN …………………….. |
14 |
|
3. |
HOME SCREEN ………………………. |
16 |
|
STATUS DISPLAY…………………………… |
18 |
|
|
2 |
QUICK REFERENCE |
|
|
1. |
“Setup” SCREEN ……………………. |
20 |
|
3 |
NAVIGATION OPERATION |
|
|
1. |
REGISTERING HOME ……………… |
22 |
|
2. |
REGISTERING PRESET |
|
|
DESTINATIONS …………………….. |
24 |
|
|
3. |
OPERATION FLOW: |
|
|
GUIDING THE ROUTE……………. |
26 |
|
|
4. |
SETTING HOME AS THE |
|
|
DESTINATION ………………………. |
27 |
|
|
4 |
FUNCTION INDEX |
|
|
1. |
FUNCTION INDEX …………………… |
28 |
11

1. BASIC FUNCTION
1. OVERVIEW BUTTONS
12

1. BASIC FUNCTION
|
No. |
Function |
Page |
||
|
By touching the screen with your finger, you can control the selected |
35, 36 |
|||
|
functions. |
||||
|
Insert a disc into this slot. The CD player turns on immediately. |
76 |
|||
|
81, 98, 101, |
||||
|
Press to play/pause. |
105, 109, |
|||
|
114, 116 |
||||
|
Turn the tune/scroll knob to select a radio station or skip to the next or |
81, 91, 98, |
|||
|
101, 105, |
||||
|
previous track/file. |
||||
|
109 |
||||
|
Press to access the Bluetooth® hands-free system. |
220 |
|||
|
Press the “ ” or “ ” button to seek up or down for a radio station or to |
81, 91, 98, |
|||
|
101, 105, |
||||
|
access a desired track/file. |
||||
|
109 |
||||
|
MAP card slot |
||||
|
* |
Do not eject the SD card, as doing so may deactivate the navigation |
325 |
||
|
system. |
||||
|
Press to display the “Apps” screen. |
14 |
|||
|
Press to display the home screen. |
16, 37 |
|||
|
Press to access the audio/visual system. The audio/visual system |
72, 74, 75 |
|||
|
turns on in the last mode used. |
||||
|
Press the “PWR/VOL” knob to turn the system on and off, and turn it |
74 |
|||
|
to adjust the volume. |
||||
|
Press to eject a disc. |
76 |
|||
*: With Navigation function
1 QUICKGUIDE
13

1.BASIC FUNCTION
2.“Apps” SCREEN
Press the “APPS” button to display the “Apps” screen.
14

1. BASIC FUNCTION
|
No. |
Function |
Page |
||||||||
|
* |
Select to display the map screen. |
260 |
||||||||
|
Select to display the audio control screen. |
72 |
|||||||||
|
Select to display the hands-free operation screen. |
220 |
|||||||||
|
Select to display the “Message Inbox” screen. |
233 |
|||||||||
|
Select to turn the Driver Easy Speak on/off. |
184 |
|||||||||
|
* |
||||||||||
|
Select to reorder the applications. |
335 |
|||||||||
|
Select the desired application then |
or |
to reorder. |
||||||||
|
Select to display traffic information. |
182, 273 |
|||||||||
|
Select to display the “Setup” screen. |
20 |
|||||||||
|
Select to update the applications. |
334 |
|||||||||
|
* |
||||||||||
|
Select to display the fuel consumption screen. |
“Owner’s |
|||||||||
|
Manual” |
||||||||||
|
Select to display weather information. |
180 |
|||||||||
|
Select to display the “Maintenance” screen. |
65 |
|||||||||
|
* |
||||||||||
|
* |
Select to display the application screen. |
328 |
||||||||
*: With navigation function
INFORMATION
● When there are two pages, select  or
or  to change the page.
1 QUICKGUIDE
15
1. BASIC FUNCTION
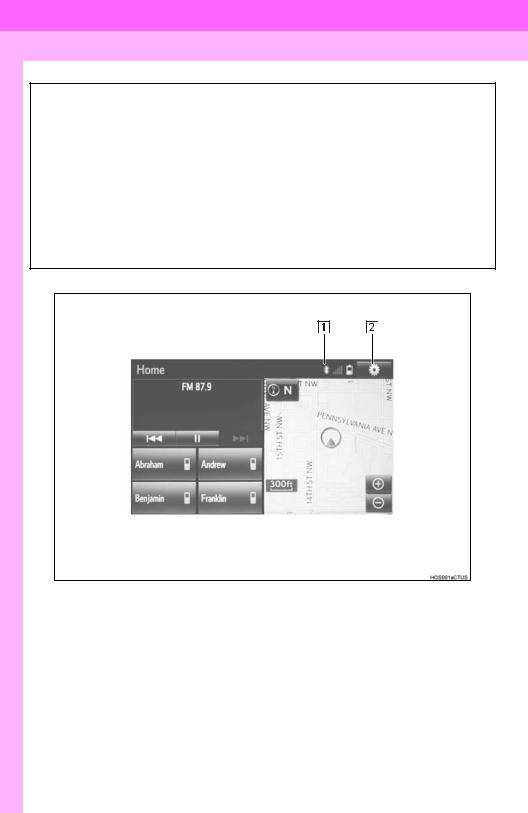
3. HOME SCREEN
Press the “HOME” button to display the home screen.
The home screen can display multiple information screens, such as the audio system screen, hands-free screen and navigation screen, simultaneously. When hands-free mode is selected, it is possible to make a call on the home screen if the desired telephone number is registered to one of the 4 displayed buttons. In order to register the contact, select and hold the desired button and register the desired contact by obey displayed messages on the screen. ( P.228)
When a screen is selected, the selected screen is switched to a full-screen display. The home screen can be set to either a three-way split screen or a two-way split screen.
For details about setting the home screen: P.37
Three-way split screen
16

1. BASIC FUNCTION
Two-way split screen
1 QUICKGUIDE
|
No. |
Function |
Page |
||
|
Displays the condition of the Bluetooth® connection |
18 |
|||
|
Select to display the “Setup” screen. |
20 |
|||
17
1. BASIC FUNCTION
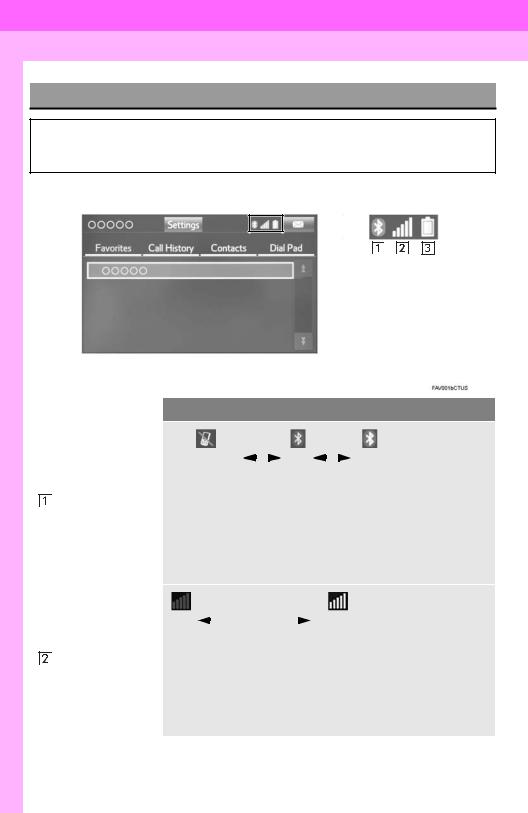
STATUS DISPLAY
The condition of the Bluetooth® connection, as well as the level of reception and the amount of cellular phone battery charge left, are displayed on the status display.
|
No. |
Indicators |
Conditions |
|||||||||||||||||||||||||||
|
(Gray) |
(Blue) |
||||||||||||||||||||||||||||
|
No connection |
Poor |
Good |
|||||||||||||||||||||||||||
|
An antenna for the Bluetooth® connection is built into the instru- |
|||||||||||||||||||||||||||||
|
The |
condition |
of |
ment panel. The condition of the Bluetooth® connection may dete- |
||||||||||||||||||||||||||
|
the |
Bluetooth® |
riorate and the system may not function when a Bluetooth® phone |
|||||||||||||||||||||||||||
|
connection |
is used in the following conditions and/or places: |
||||||||||||||||||||||||||||
|
The cellular phone is obstructed by certain objects (such as when |
|||||||||||||||||||||||||||||
|
it is behind the seat or in the glove box or console box). |
|||||||||||||||||||||||||||||
|
The cellular phone is touching or is covered with metal materials. |
|||||||||||||||||||||||||||||
|
Leave the Bluetooth® phone in a place where the condition of the |
|||||||||||||||||||||||||||||
|
Bluetooth® connection is good. |
|||||||||||||||||||||||||||||
|
Poor |
Excellent |
||||||||||||||||||||||||||||
|
The level of reception does not always correspond with the level |
|||||||||||||||||||||||||||||
|
The |
level of |
re- |
displayed on the cellular phone. The level of reception may not be |
||||||||||||||||||||||||||
|
displayed depending on the phone you have. |
|||||||||||||||||||||||||||||
|
ception |
|||||||||||||||||||||||||||||
|
When the cellular phone is out of the service area or in a place |
|||||||||||||||||||||||||||||
|
inaccessible by radio waves, “No Service” is displayed. |
|||||||||||||||||||||||||||||
|
“Rm” is displayed when receiving in a roaming area. While roam- |
|||||||||||||||||||||||||||||
|
ing, display “Rm” top-left on the icon. |
|||||||||||||||||||||||||||||
|
The receiving area may not be displayed depending on the type of |
|||||||||||||||||||||||||||||
|
phone you have. |
|||||||||||||||||||||||||||||
18

1. BASIC FUNCTION
|
No. |
Indicators |
Conditions |
||||||||
|
The amount of |
Empty |
Full |
||||||||
|
battery charge |
The amount displayed does not always correspond with the |
|||||||||
|
left |
amount displayed on the Bluetooth® device. |
|||||||||
|
The amount of battery charge left may not be displayed depend- |
||||||||||
|
ing on the type of the Bluetooth® device connected. |
||||||||||
|
This system does not have a charging function. |
||||||||||
1 QUICKGUIDE
19

2. QUICK REFERENCE
1. “Setup” SCREEN
The items shown on the “Setup” screen can be set. Press the “APPS” button, then select “Setup” to display the “Setup” screen.
20
![]()
2. QUICK REFERENCE
|
No. |
Function |
Page |
||
|
Select to change the selected language, operation sound, automatic |
57 |
|||
|
screen change settings, etc. |
||||
|
Select to customize the home screen. |
37 |
|||
|
Select to set the voice settings. |
63 |
|||
|
Select to adjust the contrast and brightness of the screens. |
41 |
|||
|
Select to set memory points (home, preset destinations, address book |
||||
|
* |
entries, areas to avoid), navigation details or to delete previous desti- |
303, 312 |
||
|
nations. |
||||
|
Select to set audio settings. |
121 |
|||
|
Select to set the phone sound, contacts, message settings, etc. |
238 |
|||
|
Select to set Bluetooth® phones and Bluetooth® audio devices. |
49 |
|||
|
Select to turn the screen off. |
||||
|
Select to set Entune App Suite settings. |
340 |
|||
|
* |
||||
|
* |
Select to set data services settings. |
183 |
||
|
Select to link the driver’s cellular phone settings. (audio presets, lan- |
64 |
|||
|
guage, etc.) |
||||
|
Select to set vehicle settings. Customizable features, refer to Owner’s |
200, 217 |
|||
|
Manual. |
||||
|
* |
Select to set traffic information. |
316 |
||
|
Select to set Driver Easy Speak settings. |
184 |
|||
*: With navigation function
1 QUICKGUIDE
21

3. NAVIGATION OPERATION
1. REGISTERING HOME*
|
1 |
Press the “APPS” button. |
4 |
Select “Go Home”. |
5 Select “Yes”.
2 Select “Navigation”.
|
6 |
There are different kinds of meth- |
||
|
ods to search for your home. |
|||
|
3 |
Select “Dest.”. |
( P.276) |
*: With navigation function
22

7 Select “Enter”.
8 Select “OK”.
Registration of home is complete.
Registering home in a different wayP.304
Editing the name, location, phone number and icon
P.304
Setting home as the destinationP.279
3. NAVIGATION OPERATION
1 QUICKGUIDE
23

3. NAVIGATION OPERATION
2. REGISTERING PRESET DESTINATIONS*
1 Press the “APPS” button.
4Select one of the preset destination buttons.
5 Select “Yes”.
2 Select “Navigation”.
6 There are different kinds of methods to search for a destination. ( P.276)
3 Select “Dest.”.
*: With navigation function
24

3. NAVIGATION OPERATION
7Select “Enter”.
8Select a position for this preset destination.
1 QUICKGUIDE
9 Select “OK”.
Registration of preset destinations is complete.
Registering preset destinations in a different way
P.305
Editing the name, location, phone number and icon
P.306
Setting preset destinations as the destination
P.279
25

3. NAVIGATION OPERATION
3. OPERATION FLOW: GUIDING THE ROUTE*
|
1 Press the “APPS” button. |
5 Select “Go”. |
|
6 Select “OK”. |
|
|
2 Select “Navigation”. |
Selecting routes other than the one recom- |
|
mended. ( P.288) |
Guidance to the destination is displayed on the screen and can be heard via voice guidance.
3 Select “Dest.”.
4There are different kinds of methods to search for a destination. ( P.276)
*: With navigation function
26

3.NAVIGATION OPERATION
4.SETTING HOME AS THE DESTINATION*
|
1 Press the “APPS” button. |
5 Select “OK”. |
|
Selecting routes other than the one recom- |
|
|
mended. ( P.288) |
|
|
Guidance to the destination is displayed |
|
|
on the screen and can be heard via |
|
|
voice guidance. |
2 Select “Navigation”.
3 Select “Dest.”.
4 Select “Go Home”.
*: With navigation function
1 QUICKGUIDE
27

4. FUNCTION INDEX
1. FUNCTION INDEX
Map*
|
Displaying maps |
Page |
|
Viewing the map screen |
260 |
|
Displaying the current position |
263 |
|
Viewing the current position vicinity map |
267 |
|
Changing the scale |
263 |
|
Changing the map orientation |
264 |
|
Displaying map information |
269 |
|
Displaying the estimated travel/arrival time to the destination |
292 |
|
Selecting the map mode |
265 |
|
Displaying traffic information |
273 |
|
Searching for destinations |
Page |
|
Searching for the destination |
278 |
|
Changing the search area |
279 |
|
Route guidance* |
|
|
Before starting or during route guidance |
Page |
|
Starting route guide |
288 |
|
Editing the route |
298 |
|
Viewing the entire route map |
293 |
|
Pausing guidance |
291 |
|
Adjusting route guidance volume |
63 |
|
Deleting the destination |
299 |
|
Address book |
Page |
|
Registering address book entries |
307 |
|
Marking icons on the map |
308 |
|
*: With navigation function |
28

4. FUNCTION INDEX
Useful functions
|
Information |
Page |
|
Displaying vehicle maintenance* |
65 |
|
Hands-free system (for cellular phone) |
Page |
|
Registering/connecting Bluetooth® phone |
43 |
|
Making a call on a Bluetooth® phone |
224 |
|
Receiving a call on the Bluetooth® phone |
229 |
|
Voice command system |
Page |
|
Operating the system with your voice |
170 |
|
Peripheral monitoring system |
Page |
|
Viewing behind the rear of the vehicle |
188 |
|
*: With navigation function |
1 QUICKGUIDE
29
30
![]()
1BASIC INFORMATION BEFORE OPERATION
|
1. |
INITIAL SCREEN ……………………… |
32 |
|
2. |
CAPACITIVE TOUCH |
|
|
SWITCHES ……………………………. |
34 |
|
|
3. |
TOUCH SCREEN GESTURES …… |
35 |
|
4. |
TOUCH SCREEN OPERATION …. |
36 |
|
5. |
HOME SCREEN OPERATION …… |
37 |
|
6. |
ENTERING LETTERS AND |
|
|
NUMBERS/LIST SCREEN |
||
|
OPERATION ………………………….. |
38 |
|
|
ENTERING LETTERS AND |
||
|
NUMBERS …………………………………… |
38 |
|
|
LIST SCREEN ………………………………… |
38 |
|
|
7. |
SCREEN ADJUSTMENT …………… |
41 |
2Bluetooth® SETTINGS
1.REGISTERING/CONNECTING
|
Bluetooth® DEVICE ……………….. |
43 |
|
REGISTERING A Bluetooth® |
|
|
PHONE FOR THE FIRST TIME………. |
43 |
|
REGISTERING A Bluetooth® AUDIO |
|
|
PLAYER FOR THE FIRST TIME …….. |
44 |
|
PROFILES……………………………………… |
45 |
|
CERTIFICATION …………………………….. |
46 |
|
2. |
SETTING Bluetooth® DETAILS … 49 |
|
|
“Bluetooth* Setup” SCREEN……………… |
49 |
|
|
REGISTERING A |
||
|
Bluetooth® DEVICE……………………….. |
50 |
|
|
DELETING A Bluetooth® DEVICE ……… |
51 |
|
|
CONNECTING A |
||
|
Bluetooth® DEVICE……………………….. |
52 |
|
|
EDITING THE Bluetooth® DEVICE |
||
|
INFORMATION …………………………….. |
54 |
|
|
“System Settings” SCREEN………………. |
55 |
|
|
3 |
OTHER SETTINGS |
|
|
1. |
GENERAL SETTINGS ……………… |
57 |
|
GENERAL SETTINGS SCREEN……….. |
57 |
|
|
2. |
VOICE SETTINGS……………………. |
63 |
|
VOICE SETTINGS SCREEN…………….. |
63 |
|
|
3. |
DRIVER SETTINGS …………………. |
64 |
|
MANUALLY SELECT LINKED |
||
|
SETTINGS …………………………………… |
64 |
|
|
4. |
MAINTENANCE ………………………. |
65 |
*: Bluetooth is a registered trademark of Bluetooth SIG, Inc.
31

1. BASIC INFORMATION BEFORE OPERATION
1. INITIAL SCREEN
1When the engine switch is in the “ACC”
or “ON” position, the initial screen will be displayed and the system will begin operating. (Vehicles without a smart key system)
When the engine <power> switch is in ACCESSORY or IGNITION ON <ON> mode, the initial screen will be displayed and the system will begin operating. (Vehicles with a smart key system)
MAINTENANCE
INFORMATION*
This system reminds users when to replace certain parts or components and shows dealer information (if registered) on the screen.
When the vehicle reaches a previously set driving distance or date specified for a scheduled maintenance check, the “Maintenance Reminder” screen will be displayed when the system is turned on.
Images shown on the initial screen can be changed to suit individual preferences. ( P.60.)
After a few seconds, the “Caution” screen will be displayed.
After about 5 seconds, the “Caution” screen automatically switches to the next screen.
 WARNING
●When the vehicle is stopped with the engine running <the hybrid system operating>, always apply the parking brake for safety.
The screen goes off if the screen is not operated for several seconds.
To prevent the screen from being displayed again, select “Do Not Tell Me Again”.
To register maintenance information:P.65
If  is selected, the registered phone number can be called.
*: With navigation function
32

1. BASIC INFORMATION BEFORE OPERATION
RESTARTING THE SYSTEM
When system response is extremely slow, the system can be restarted.
1Press and hold the “PWR/VOL” knob for 3 seconds or more.
2 BASICFUNCTION
33

1.BASIC INFORMATION BEFORE OPERATION
2.CAPACITIVE TOUCH SWITCHES
The control panel uses capacitive touch sensors.
INFORMATION
●Please do not reach your hand to the part of button when the system turn on. Because the button may become unresponsive for a while.
But it will be back to normal for a given time even if the system turned on under the condition.
Capacitive touch switch sensor sensitivity can be adjusted. ( P.57)
■HANDLING OF THE CONTROL
PANEL
In the following cases, incorrect operation or non-response may occur.
If the operating section is dirty or has liquid attached to it, incorrect operation or non-response may occur.
If the operating section receives electromagnetic waves, incorrect operation or non-response may occur.
If wearing gloves during operation, nonresponse may occur.
If fingernails are used to operate the system, non-response may occur.
If a touch pen is used to operate the system, non-response may occur.
If the palm of your hand touches the operating section during operation, incorrect operation may occur.
If the palm of your hand touches the operating section, incorrect operation may occur.
If operations are performed quickly, nonresponse may occur.
34

1. BASIC INFORMATION BEFORE OPERATION
3. TOUCH SCREEN GESTURES
Operations are performed by touching the touch screen directly with your finger.
|
Operation method |
Outline |
Main use |
|
|
Touch |
Changing and selecting various set- |
||
|
Quickly touch and release |
|||
|
tings |
|||
|
once. |
|||
|
Drag*1 |
Scrolling the lists |
||
|
Touch |
the screen with |
Scrolling the map screen*2 |
|
|
your finger, and move the |
|||
|
screen to the desired posi- |
|||
|
tion. |
|||
|
Flick*1 |
Scrolling the main screen page |
||
|
Scrolling the map screen*2 |
|||
|
Quickly move the screen |
|||
|
by flicking with your finger. |
*1: The above operations may not be performed on all screens. *2: With navigation function
INFORMATION
● Flick operations may not be performed smoothly in high altitudes.
2 BASICFUNCTION
35

1. BASIC INFORMATION BEFORE OPERATION
4. TOUCH SCREEN OPERATION
This system is operated mainly by the buttons on the screen. (Referred to as screen buttons in this manual.)
When a screen button is touched, a beep sounds. (To set the beep sound, see page 57.)
 NOTICE
●To prevent damaging the screen, lightly touch the screen buttons with your finger.
●Do not use objects other than your finger to touch the screen.
●Wipe off fingerprints using a glass cleaning cloth. Do not use chemical cleaners to clean the screen, as they may damage the touch screen.
INFORMATION
●If the system does not respond to touching a screen button, move your finger away from the screen and then touch it again.
●Dimmed screen buttons cannot be operated.
●The displayed image may become darker and moving images may be slightly distorted when the screen is cold.
●In extremely cold conditions, the map may not be displayed and the data input by a user may be deleted. Also, the screen buttons may be harder than usual to depress.
●When you look at the screen through polarized material such as polarized sunglasses, the screen may be dark and hard to see. If so, look at the screen from different angles, adjust the screen settings on the “Display Settings” screen or take off your sunglasses.
36

1. BASIC INFORMATION BEFORE OPERATION
5. HOME SCREEN OPERATION
The home screen can display multiple information screens, such as the audio system screen and hands-free screen, simultaneously.
1Press the “HOME” button.
2“Home” screen is displayed.
When a screen is selected, the selected screen will change to a full-screen display.
CUSTOMIZING THE HOME
SCREEN
The display items/area on the home screen can be changed.
1 Select  .
.
2 Select “Home Screen”.
Select “Two Panel” or “Three Panel”.
3Select the desired area.
4Select the desired item.
5Select “OK”.
INFORMATION
●When the selected item is already being displayed and another area is selected for that item, the item that it is replacing will be displayed in the original item’s location.
2 BASICFUNCTION
37

1. BASIC INFORMATION BEFORE OPERATION
6. ENTERING LETTERS AND NUMBERS/LIST SCREEN OPERATION
When searching by an address, name, etc., or entering data, letters and numbers can be entered via the screen.
ENTERING LETTERS AND NUMBERS
LIST SCREEN
The list screen may be displayed after entering characters.
DISPLAYING THE LIST
1 Enter characters and select “OK”.
No. Function
Select to enter desired characters.
Text field. Entered character(s) will be displayed.
During entering character(s), when there is only one available option for the next character(s), the next character(s) will be displayed in gray text in the text field automatically. Gray text is entered by selecting this button.
Select to erase one character. Select and hold to continue erasing characters.
Select to display the alphabet keys.
Select to display other symbols.
On certain letter entry screens, letters can be entered in upper or lower case.
 : Select to enter in lower case.
  : Select to enter in upper case.
Keyboard layout can be changed. ( P.57)
Matching items from the database are listed even if the entered address or name is incomplete.
The list will be displayed automatically if the maximum number of characters is entered or matching items can be displayed on a single list screen.
INFORMATION
●The number of matching items is shown on the right side of the screen. If the number of matching items is more than 999, the system displays “ ” on the screen.
38

1. BASIC INFORMATION BEFORE OPERATION
■SELECTING ALL ITEMS
Some lists contain “Select All”. If “Select All” is selected, it is possible to select all items.
1 Select “Select All”.
“Unselect All”: Unselect all items in the list.
LIST SCREEN OPERATION
When a list is displayed, use the appropriate screen button to scroll through the list.
|
2 |
||||||||||
|
BASIC |
||||||||||
|
FUNCTION |
||||||||||
|
Icon |
Function |
|||||||||
|
Select to skip to the next or previ- |
||||||||||
|
ous page. |
||||||||||
|
Select |
and hold |
or |
to |
|||||||
|
scroll through the displayed |
||||||||||
|
list. |
||||||||||
|
This |
indicates the |
displayed |
||||||||
|
screen’s position. |
||||||||||
If  appears to the right of an
item name, the complete name is too long to display.
Select  to scroll to the end of
the name.
Select  to move to the begin-
ning of the name.
39

1. BASIC INFORMATION BEFORE OPERATION
SORTING
The order of a list displayed on the screen can be sorted in the order of distance from the current location, date, category, etc.
1 Select “Sort”.
2 Select the desired sorting criteria.
CHARACTER JUMP BUTTONS IN LISTS
Some lists contain character screen buttons, “ABC”, “DEF” etc., which allow a direct jump to list entries that begin with the same letter as the character screen button.
1Select the desired character jump buttons.
INFORMATION
●Every time the same character screen button is selected, the list starting with the subsequent character is displayed.
40
![]()
1. BASIC INFORMATION BEFORE OPERATION
7. SCREEN ADJUSTMENT
The contrast and brightness of the screen display and the image of the camera display can be adjusted. The screen can also be changed to either day or night mode.
For information regarding audio/visual screen adjustment: P.78
1 Press the “APPS” button.
2Select “Setup”.
3Select “Display”.
4Select the items to be set.
INFORMATION
●When the screen is viewed through polarized sunglasses, a rainbow pattern may appear on the screen due to optical characteristics of the screen. If this is disturbing, please operate the screen without polarized sunglasses.
CHANGING BETWEEN DAY AND NIGHT MODE
Depending on the position of the headlight switch, the screen changes to day or night mode. This feature is available when the headlight is switched on.
1 Select “Day Mode”.
INFORMATION
●If the screen is set to day mode with the headlight switch turned on, this condition is memorized even with the engine <hybrid system> turned off.
2 BASICFUNCTION
|
No. |
Function |
Page |
||||||
|
Select to adjust the screen |
||||||||
|
display. |
42 |
|||||||
|
Select to adjust the camera |
||||||||
|
display. |
||||||||
|
Select to adjust the video |
78 |
|||||||
|
display. |
||||||||
|
Select to turn day mode on/ |
41 |
|||||||
|
off. |
||||||||
41

1. BASIC INFORMATION BEFORE OPERATION
ADJUSTING THE CONTRAST/ BRIGHTNESS
The contrast and brightness of the screen can be adjusted according to the brightness of your surroundings.
1Select “General” or “Camera”.
2Select the desired item.
General
Camera
|
Screen button |
Function |
||||
|
“Brightness” “+” |
Select |
to |
brighten |
the |
|
|
screen. |
|||||
|
“Brightness” “-” |
Select |
to |
darken |
the |
|
|
screen. |
|||||
|
“Contrast” “+” |
Select to strengthen the |
||||
|
contrast of the screen. |
|||||
“Contrast” “-” Select to weaken the contrast of the screen.
3 Select “OK”.
42

2. Bluetooth® SETTINGS
1. REGISTERING/CONNECTING Bluetooth® DEVICE
REGISTERING A Bluetooth®
PHONE FOR THE FIRST TIME
To use the hands-free system, it is
necessary to register a Bluetooth® phone with the system.
Once the phone has been registered, it is possible to use the hands-free system.
This operation cannot be performed while driving.
For details about registering a Bluetooth® device: P.50
1Turn the Bluetooth® connection setting of your cellular phone on.
This function is not available when Bluetooth® connection setting of your cellular phone is set to off.
2 Press the “APPS” button.
3 Select “Phone”.
Operations up to this point can also be
performed by pressing the  switch on
the steering wheel or  switch on the instrument panel.
4 Select “Yes” to register a phone.
5When this screen is displayed, search
for the device name displayed on this screen on the screen of your Bluetooth® device.
|
2 |
||
|
For details about operating the Bluetooth® |
BASIC |
|
|
device, see the manual that comes with it. |
FUNCTION |
|
|
To cancel the registration, select “Can- |
||
|
cel”. |
||
|
6 Register the Bluetooth® device using |
||
|
your Bluetooth® device. |
A PIN-code is not required for SSP (Secure Simple Pairing) compatible Bluetooth® devices. Depending on the type of Bluetooth® device being connected, a message confirming registra-
tion may be displayed on the Bluetooth® device’s screen. Respond and operate the Bluetooth® device according to the confirmation message.
43

2. Bluetooth® SETTINGS
7Check that the screen is displayed when registration is complete.
The system waits for connection requests coming from the registered device.
At this stage, the Bluetooth® functions are not yet available.
8Select “OK” when the connection sta-
tus changes from “Connection waiting…” to “Connected”.
If an error message is displayed, follow the guidance on the screen to try again.
REGISTERING A Bluetooth® AUDIO PLAYER FOR THE FIRST TIME
To use the Bluetooth® Audio, it is necessary to register an audio player with the system.
Once the player has been registered, it
is possible to use the Bluetooth® Audio.
This operation cannot be performed while driving.
For details about registering a Bluetooth® device: P.50
1Turn the Bluetooth® connection setting of your audio player on.
This function is not available when the
Bluetooth® connection setting of your audio player is set to off.
2 Press the “AUDIO” button.
3Select “Source” on the audio screen or press “AUDIO” button again.
4Select “ Audio”.
5Select “Yes” to register an audio player.
6Follow the steps in “REGISTERING A
Bluetooth® DEVICE” from “STEP 2”. ( P.50)
44

2. Bluetooth® SETTINGS
PROFILES
This system supports the following services.
|
Bluetooth® |
Spec. |
Function |
Require- |
Recommen- |
||||
|
Device |
ments |
dations |
||||||
|
Bluetooth® |
Registering |
a |
||||||
|
Phone/ |
Ver. 3.0 |
|||||||
|
Bluetooth® |
Bluetooth® Specification |
Bluetooth® |
de- |
Ver. 2.0 |
||||
|
+EDR |
||||||||
|
Audio |
vice |
|||||||
|
Player |
||||||||
|
Bluetooth® |
Profile |
Function |
Require- |
Recommen- |
||||
|
Device |
ments |
dations |
||||||
|
HFP (Hands-Free Profile) |
Hands-free |
Ver. 1.0 |
Ver. 1.6 |
|||||
|
system |
||||||||
|
OPP (Object Push Profile) |
Transferring |
the |
Ver. 1.1 |
Ver. 1.2 |
||||
|
PBAP (Phone Book Ac- |
||||||||
|
Bluetooth® |
contacts |
Ver. 1.0 |
Ver. 1.1 |
|||||
|
Phone |
cess profile) |
|||||||
|
Bluetooth® |
||||||||
|
MAP |
(Message |
Access |
Ver. 1.0 |
|||||
|
Profile) |
phone message |
|||||||
|
SPP (Serial Port Profile) |
Entune |
App |
Ver. 1.1 |
|||||
|
Suite* |
||||||||
|
Bluetooth® |
A2DP |
(Advanced |
Audio |
Ver. 1.0 |
Ver. 1.2 |
|||
|
Distribution Profile) |
Bluetooth® audio |
|||||||
|
Audio |
AVRCP (Audio/Video Re- |
system |
||||||
|
Player |
Ver. 1.0 |
Ver. 1.4 |
||||||
|
mote Control Profile) |
||||||||
|
*: With navigation function |
INFORMATION
●If your cellular phone does not support HFP, registering the Bluetooth® phone or using OPP, PBAP, MAP or SPP profiles individually will not be possible.
●If the connected Bluetooth® device version is older than recommended or incompatible, the Bluetooth® device function may not work properly.
●Refer to http://www.toyota.com/entune/ to find approved Bluetooth® phones for this system.
Bluetooth is a registered trademark of Bluetooth SIG, Inc.
2 BASICFUNCTION
45

2. Bluetooth® SETTINGS
CERTIFICATION
U.S.A. (Without navigation function)
FCC ID: AJDK066
This device complies with part 15 of the FCC Rules. Operation is subject to the following two conditions: (1) This device may not cause harmful interference, and (2) this device must accept any interference received, including interference that may cause undesired operation.
CAUTION:
FCC WARNING: Changes or modifications not expressly approved by the party responsible for compliance could void the user’s authority to operate the equipment.
CAUTION: Radio Frequency Radiation Exposure
This equipment complies with FCC radiation exposure limits set forth for an uncontrolled environment and meets the FCC radio frequency (RF) Exposure Guidelines in Supplement C to OET65. This equipment should be installed and operated keeping the radiator at least 20cm or more away from person’s body (excluding extremities: hands, wrists, feet and ankles).
Co-location: This transmitter must not be co-located or operated in conjunction with any other antenna or transmitter.
Canada (Without navigation function)
IC: 775E-K066
This device complies with Part 15 of FCC Rules and Industry Canada licence-exempt RSS standard(s). Operation is subject to the following two conditions: (1) this device may not cause interference, and (2) this device must accept any interference, including interference that may cause undesired operation of this device.
Le présent appareil est conforme aux la partie 15 des règles de la FCC et CNR d’Industrie Canada applicables aux appareils radio exempts de licence. L’exploitation est autorisée aux deux conditions suivantes: (1) l’appareil ne doit pas produire de brouillage, et (2) l’utilisateur de l’appareil doit accepter tout brouillage radioélectrique subi, même si le brouillage est susceptible d’en compromettre le fonctionnement.
46

2. Bluetooth® SETTINGS
CAUTION:
CAUTION: Radio Frequency Radiation Exposure
This equipment complies with FCC/IC radiation exposure limits set forth for an uncontrolled environment and meets the FCC radio frequency (RF) Exposure Guidelines in Supplement C to OET65 and RSS-102 of the IC radio frequency (RF) Exposure rules. This equipment should be installed and operated keeping the radiator at least 20cm or more away from person’s body (excluding extremities: hands, wrists, feet and ankles).
Cet équipement est conforme aux limites d’exposition aux rayonnements énoncées pour un environnement non contrôlé et respecte les règles les radioélectriques (RF) de la FCC lignes directrices d’exposition dans le Supplément C à OET65 et d’exposition aux fréquences radioélectriques (RF) CNR102 de l’IC. Cet équipement doit être installé et utilisé en gardant une distance de 20 cm ou plus entre le dispositif rayonnant et le corps (à l’exception des extrémités : mains, poignets, pieds et chevilles).
The Bluetooth® antenna cannot be removed (or replaced) by user.
L’antenne Bluetooth® ne peut pas être supprimé (ou remplacé) par l’utilisateur.
U.S.A. (With navigation function)
FCC ID: ACJ932YEAP01A473W
This device complies with Part 15 of the FCC Rules. Operation is subject to the following two conditions: (1) this device may not cause harmful interference, and (2) this device must accept any interference received, including interference that may cause undesired operation.
CAUTION:
FCC WARNING: Changes or modifications not expressly approved by the party responsible for compliance could void the user’s authority to operate the equipment.
Radiofrequency radiation exposure information:
This equipment complies with FCC radiation exposure limits set forth for an uncontrolled environment. This equipment should be installed and operated with minimum distance of 20cm between the radiator and your body. This transmitter must not be co-located or operating in conjunction with any other antenna or transmitter.
2 BASICFUNCTION
47

2. Bluetooth® SETTINGS
Canada (With navigation function)
IC: 216J-YEAP01A473W
This device complies with Industry Canada license-exempt RSS standard(s). Operation is subject to the following two conditions: (1) this device may not cause interference, and (2)this device must accept any interference, including interference that may cause undesired operation of the device.
Le présent appareil est conforme aux CNR d’Industrie Canada applicables aux appareils radio exempts de licence. L’exploitation est autorisée aux deux conditions suivantes: (1)l’appareil ne doit pas produire de brouillage, et (2) l’utilisateur de l’appareil doit accepter tout brouillage radioélectrique subi, même si le brouillage est susceptible d’en compromettre le fonctionnement.
CAUTION:
This radio transmitter (identify the device by certification number, or model number if Category II) has been approved by Industry Canada to operate with the antenna types listed below with the maximum permissible gain and required antenna impedance for each antenna type indicated. Antenna types not included in this list, having a gain greater than the maximum gain indicated for that type, are strictly prohibited for use with this device.
Le présent émetteur radio (identifier le dispositif par son numéro de certification ou son numéro de modèle s’il fait partie du matériel de catégorie I) a été approuvé par Industrie Canada pour fonctionner avec les types d’antenne énumérés ci-dessous et ayant un gain admissible maximal et
l’impédance requise pour chaque type d’antenne. Les types d’antenne non inclus dans cette liste, ou dont le gain est supérieur au gain maximal indiqué, sont strictement interdits pour l’exploitation de l’émetteur.
Mexico
La operación de este equipo esta sujeta a las siguientes des condiciones:
(1)es posible que este equipo o dispositivo no cause interferencia peljudicial y
(2)este equipo o dispositive debe aceptar cualquier interferencia, incluyendo Ia que pueda causar su operaclón no deseada.
48

2. Bluetooth® SETTINGS
2. SETTING Bluetooth® DETAILS
|
1 Press the “APPS” button. |
“Bluetooth* Setup” SCREEN |
2Select “Setup”.
3Select “Bluetooth*”.
4Select the desired item to be set.
|
Function |
Page |
|
|
Registering a Bluetooth® device |
50 |
|
|
Deleting a Bluetooth® device |
51 |
|
|
Connecting a Bluetooth® device |
52 |
|
|
Editing the Bluetooth® device infor- |
54 |
|
|
mation |
||
|
Bluetooth® system settings |
55 |
*: Bluetooth is a registered trademark of Bluetooth SIG, Inc.
2 BASICFUNCTION
49

2. Bluetooth® SETTINGS
DISPLAYING THE “Bluetooth*
Setup” SCREEN IN A
DIFFERENT WAY
From the phone/message settings screen
1Press the “APPS” button.
2Select “Setup”.
3Select “Phone”.
4Select “Connect Phone”.
From the status display
1 Select status display area on the screen.
REGISTERING A Bluetooth®
DEVICE
Up to 5 Bluetooth® devices can be registered.
Bluetooth® compatible phones (HFP) and audio players (AVP) can be registered simultaneously.
This operation cannot be performed while driving.
1Display the “Bluetooth* Setup” screen. ( P.49)
2Select “Add”.
When another Bluetooth® device is connected
To disconnect the Bluetooth® device, select “Yes”.
When 5 Bluetooth® devices have already been registered
A registered device needs to be replaced. Select “Yes”, and select the device to be replaced.
3When this screen is displayed, search
for the device name displayed on this screen on the screen of your Bluetooth® device.
*: Bluetooth is a registered trademark of Bluetooth SIG, Inc.
50
 Loading…
Manufacturer: TOYOTA, Model Year: 2014,
Model line: HIGHLANDER,
Model: TOYOTA HIGHLANDER 2014 XU50 / 3.G
Pages: 712, PDF Size: 11.43 MB
Trending: radiator, diagram, maintenance schedule, weight, headlight washer, towing, steering
Page 1 of 712

Pictorial indexSearch by illustration
1For safety
and securityMake sure to read through them
2Instrument
clusterHow to read the gauges and meters, the variety of
warning lig")
Page 2 of 712
For your information....................... 8
Reading this manual .................... 12
How to search .............................. 13
Pictorial index ....")
Page 3 of 712

10
3-4. Adjusting the steering wheel and mirrors
Steering wheel .................. 172
Inside rear view mirror....... 174
Outside rear view mirrors .......")
Page 4 of 712
5-1. Basic Operations
Audio system types ........... 334
Audio system..................... 338
Steering wheel audio switches .......................... 341
US")
Page 5 of 712

10
5-8. Bluetooth® Audio
Listening to Bluetooth®
Audio ............................... 383
5-9. Bluetooth
® phone
Using a Bluetooth®
Phone............")
Page 6 of 712
6-4. Using the other interior
features
Other interior features ....... 455
• Sun visors .................... 455
• Vanity mirrors............... 455
�")
Page 7 of 712

10
8-1. Essential informationEmergency flashers .......... 554
If your vehicle has to be stopped in an
emergency ...................... 555
8-2. Steps to")
Page 8 of 712
Please note that this manual applies to all models and all equipment, includ-
ing options. Therefore, you may find some explanations for equipment not
installed on your vehicl")
Page 9 of 712
The installation of a mobile two-way radi
o system in your vehicle could affect
electronic systems such as:
● Multiport fuel injection system/sequential multiport fuel inje")
Page 10 of 712
This vehicle is equipped with an event data recorder (EDR). The main pur-
pose of an EDR is to record, in certain crash or near crash-like situations,
such as an air bag depl")
- Load next 10 pages
Trending: fuse, brake pads, maintenance schedule, fuel, cooling, towing, steering
View, print and download for free: TOYOTA HIGHLANDER 2014 XU50 / 3.G Owners Manual, 712 Pages, PDF Size: 11.43 MB. Search in TOYOTA HIGHLANDER 2014 XU50 / 3.G Owners Manual online. CarManualsOnline.info is the largest online database of car user manuals. TOYOTA HIGHLANDER 2014 XU50 / 3.G Owners Manual PDF Download.
All product names, logos, and brands are property of their respective owners.
Privacy Policy | About Us & Contact
View a manual of the Toyota Highlander (2014) below. All manuals on ManualsCat.com can be viewed completely free of charge. By using the ‘Select a language’ button, you can choose the language of the manual you want to view.
Page: 1
HIGHLANDER_U (OM48A12U)
Pictorial index Search by illustration
1
For safety
and security
Make sure to read through them
2
Instrument
cluster
How to read the gauges and meters, the variety of
warning lights and indicators, etc.
3
Operation of
each
component
Opening and closing the doors and windows,
adjustment before driving, etc.
4 Driving Operations and advices which are necessary for
driving
5 Audio system Operating the audio system
6 Interior features Usage of the interior features, etc.
7
Maintenance
and care
Caring for your vehicle and maintenance
procedures
8
When trouble
arises
What to do in case of malfunction or emergency
9
Vehicle
specifications
Vehicle specifications, customizable features, etc.
10 For owners
Reporting safety defects for U.S. owners, and seat
belt and SRS airbag instructions for Canadian
owners
Index
Search by symptom
Search alphabetically
Page: 2
TABLE OF CONTENTS
2
HIGHLANDER_U (OM48A12U)
For your information………………….. 8
Reading this manual……………….. 12
How to search………………………… 13
Pictorial index ………………………… 14
1-1. For safe use
Before driving…………………. 26
For safety drive ………………. 28
Seat belts ………………………. 30
SRS airbags…………………… 40
Front passenger occupant
classification system ……… 53
Safety information for
children ……………………….. 60
Child restraint systems…….. 61
Installing child restraints…… 65
Exhaust gas precautions….. 79
1-2. Theft deterrent system
Engine immobilizer
system…………………………. 80
Alarm…………………………….. 82
Theft prevention labels
(U.S.A.) ……………………….. 85
2. Instrument cluster
Warning lights and
indicators………………………88
Gauge and meters……………94
Multi-information display
(with monochrome
display)…………………………97
Multi-information display
(with color display)………..101
Eco Driving Indicator ………107
Fuel consumption
information…………………..109
3-1. Key information
Keys……………………………..114
3-2. Opening, closing and
locking the doors
Side doors …………………….121
Back door ……………………..129
Glass hatch……………………142
Smart key system…………..147
3-3. Adjusting the seats
Front seats…………………….155
Rear seats …………………….157
Driving position memory….164
Head restraints ………………168
1 For safety and security
2 Instrument cluster
3
Operation of each
component
Page: 3
3
1
8
7
6
5
4
3
2
9
HIGHLANDER_U (OM48A12U)
10
3-4. Adjusting the steering
wheel and mirrors
Steering wheel ……………… 172
Inside rear view mirror……. 174
Outside rear view
mirrors……………………….. 176
3-5. Opening and closing the
windows
Power windows …………….. 178
Moon roof…………………….. 182
Panoramic moon roof…….. 186
4-1. Before driving
Driving the vehicle…………. 192
Cargo and luggage………… 201
Vehicle load limits …………. 206
Trailer towing………………… 207
Dinghy towing……………….. 224
4-2. Driving procedures
Engine (ignition) switch
(vehicles without a
smart key system)……….. 225
Engine (ignition) switch
(vehicles with a smart
key system)………………… 228
Automatic transmission….. 234
Turn signal lever……………. 239
Parking brake……………….. 240
4-3. Operating the lights and
wipers
Headlight switch …………….241
Automatic High Beam……..246
Fog light switch………………252
Windshield wipers and
washer………………………..253
Rear window wiper and
washer………………………..255
4-4. Refueling
Opening the fuel tank
cap……………………………..257
4-5. Using the driving support
systems
Cruise control ………………..261
Dynamic radar cruise
control…………………………266
LDA
(Lane Departure Alert)…..280
Rear view monitor
system ………………………..288
All-wheel drive lock
switch …………………………297
Driving assist systems…….298
Downhill assist control
system ………………………..304
PCS
(Pre-Collision System)…..306
BSM
(Blind Spot Monitor)………313
• The Blind Spot Monitor
function……………………..317
• The Rear Cross Traffic
Alert function ……………..320
4-6. Driving tips
Winter driving tips…………..323
Off-road precautions……….327
4 Driving
Page: 4
TABLE OF CONTENTS
4
HIGHLANDER_U (OM48A12U)
5-1. Basic Operations
Audio system types……….. 334
Audio system………………… 338
Steering wheel audio
switches …………………….. 341
USB Port/AUX Port ……….. 342
Basic audio operations…… 343
5-2. Setup
Setup menu………………….. 345
General settings……………. 346
Audio settings……………….. 347
Display settings…………….. 348
Voice settings……………….. 349
5-3. Using the Multimedia
system
Selecting the audio
source ……………………….. 350
List screen operation……… 351
Optimal use of the
audio system………………. 353
5-4. Using the radio
Radio operation…………….. 354
5-5. Playing an audio CD and
MP3/WMA/AAC discs
CD player operation………..356
5-6. Using an external device
Listening to an iPod………..362
Listening to a USB
memory device …………….366
Using the AUX port…………370
5-7. Connecting Bluetooth®
Preparations to use
wireless
communication …………….371
Registering a
Bluetooth®
audio player
for the first time…………….375
Registering a Bluetooth®
phone for the first time…..376
Registering a Bluetooth®
device …………………………377
Connecting a Bluetooth®
device …………………………379
Displaying a Bluetooth®
device details……………….381
Detailed Bluetooth®
system settings…………….382
5 Audio system
Page: 5
5
1
8
7
6
5
4
3
2
9
HIGHLANDER_U (OM48A12U)
10
5-8. Bluetooth®
Audio
Listening to Bluetooth®
Audio…………………………. 383
5-9. Bluetooth®
phone
Using a Bluetooth®
Phone………………………… 384
Making a call ………………… 386
Receiving a call…………….. 389
Speaking on the phone ….. 390
Bluetooth® phone
message function………… 393
Using the steering
wheel switches……………. 397
Bluetooth®
phone
settings………………………. 398
Contact/Call History
Settings……………………… 399
What to do if…
(Troubleshooting)………… 408
5-10.Bluetooth®
Bluetooth® …………………… 412
5-11.Using the voice
command system
Voice command system…. 417
6-1. Using the air conditioning
system and defogger
Front manual air
conditioning system………422
Front automatic air
conditioning system………428
Rear manual air
conditioning system………435
Rear automatic air
conditioning system………438
Heated steering
wheel/seat heaters/seat
ventilators……………………441
6-2. Using the interior lights
Interior lights list……………..444
• Interior lights…………….. 444
• Personal lights………….. 445
6-3. Using the storage features
List of storage features……446
• Glove box………………… 447
• Console box …………….. 447
• Bottle holders …………… 448
• Cup holders……………… 449
• Auxiliary boxes …………. 451
• Open tray ………………… 452
Luggage compartment
features ………………………453
6 Interior features
Page: 6
TABLE OF CONTENTS
6
HIGHLANDER_U (OM48A12U)
6-4. Using the other interior
features
Other interior features ……. 455
• Sun visors ……………….. 455
• Vanity mirrors…………… 455
• Conversation mirror ….. 456
• Clock………………………. 457
• Outside temperature
display…………………….. 458
• Power outlets …………… 459
• Rear sunshades………… 462
• Armrest …………………… 463
• Coat hooks………………. 464
• Assist grips ……………… 464
• Side table………………… 465
Garage door opener………. 466
Safety Connect……………… 473
Compass……………………… 479
7-1. Maintenance and care
Cleaning and protecting
the vehicle exterior ……….484
Cleaning and protecting
the vehicle interior ………..487
7-2. Maintenance
Maintenance
requirements ……………….490
General maintenance ……..493
Emission inspection and
maintenance (I/M)
programs …………………….497
7-3. Do-it-yourself maintenance
Do-it-yourself service
precautions………………….498
Hood…………………………….500
Positioning a floor jack…….502
Engine compartment ………503
Tires……………………………..515
Tire inflation pressure……..525
Wheels………………………….528
Air conditioning filter ……….530
Wireless remote control/
electronic key battery ……532
Checking and replacing
fuses…………………………..535
Light bulbs …………………….539
7 Maintenance and care
Page: 7
7
1
8
7
6
5
4
3
2
9
HIGHLANDER_U (OM48A12U)
10
8-1. Essential information
Emergency flashers ………. 554
If your vehicle has to be
stopped in an
emergency …………………. 555
8-2. Steps to take in
an emergency
If your vehicle needs to
be towed ……………………. 557
If you think something
is wrong……………………… 561
Fuel pump shut off
system……………………….. 562
If a warning light turns on
or a warning buzzer
sounds ………………………. 563
If a warning message is
displayed……………………. 572
If you have a flat tire………. 590
If the engine will not
start…………………………… 615
If the shift lever cannot
be shifted from P…………. 617
If the electronic key does
not operate properly…….. 618
If the vehicle battery is
discharged …………………. 621
If your vehicle overheats … 626
If the vehicle becomes
stuck………………………….. 629
9-1. Specifications
Maintenance data
(fuel, oil level, etc.) ……….632
Fuel information……………..646
Tire information………………649
9-2. Customization
Customizable features…….662
Items to initialize…………….672
Reporting safety defects
for U.S. owners…………….674
Seat belt instructions
for Canadian owners
(in French)…………………..675
SRS airbag instructions
for Canadian owners
(in French)…………………..678
What to do if…
(Troubleshooting)…………………688
Alphabetical index………………….694
8 When trouble arises 9 Vehicle specifications
10 For owners
Index
Page: 8
8
HIGHLANDER_U (OM48A12U)
Please note that this manual applies to all models and all equipment, includ-
ing options. Therefore, you may find some explanations for equipment not
installed on your vehicle.
All specifications provided in this manual are current at the time of printing.
However, because of the Toyota policy of continual product improvement, we
reserve the right to make changes at any time without notice.
Depending on specifications, the vehicle shown in the illustrations may differ
from your vehicle in terms of color and equipment.
Approximately five hours after the engine is turned off, you may hear sound
coming from under the vehicle for several minutes. This is the sound of a fuel
evaporation leakage check and, it does not indicate a malfunction.
A wide variety of non-genuine spare parts and accessories for Toyota vehi-
cles are currently available in the market. You should know that Toyota does
not warrant these products and is not responsible for their performance,
repair, or replacement, or for any damage they may cause to, or adverse
effect they may have on, your Toyota vehicle.
This vehicle should not be modified with non-genuine Toyota products. Modi-
fication with non-genuine Toyota products could affect its performance, safety
or durability, and may even violate governmental regulations. In addition,
damage or performance problems resulting from the modification may not be
covered under warranty.
For your information
Main Owner’s Manual
Noise from under vehicle after turning off the engine
Accessories, spare parts and modification of your Toyota
Page: 9
9
HIGHLANDER_U (OM48A12U)
The installation of a mobile two-way radio system in your vehicle could affect
electronic systems such as:
●Multiport fuel injection system/sequential multiport fuel injection system
●Dynamic radar cruise control system (if equipped)
●Cruise control system (if equipped)
●Anti-lock brake system
●SRS airbag system
●Seat belt pretensioner system
Be sure to check with your Toyota dealer for precautionary measures or spe-
cial instructions regarding installation of a mobile two-way radio system.
Your Toyota is equipped with several sophisticated computers that will record
certain data, such as:
• Engine speed
• Accelerator status
• Brake status
• Vehicle speed
• Shift position
The recorded data varies according to the vehicle grade level and options
with which it is equipped. Furthermore, these computers do not record con-
versations, sounds or pictures.
● Data usage
Toyota may use the data recorded in these computers to diagnose malfunc-
tions, conduct research and development, and improve quality.
Toyota will not disclose the recorded data to a third party except:
• With the consent of the vehicle owner or with the consent of the lessee if
the vehicle is leased
• In response to an official request by the police, a court of law or a govern-
ment agency
• For use by Toyota in a law suit
• For research purposes where the data is not tied to a specific vehicle or
vehicle owner
● Usage of data collected through Safety Connect (U.S. mainland only)
If your Toyota has Safety Connect and if you have subscribed to those ser-
vices, please refer to the Safety Connect Telematics Subscription Service
Agreement for information on data collected and its usage.
Installation of a mobile two-way radio system
Vehicle data recordings
Page: 10
10
HIGHLANDER_U (OM48A12U)
This vehicle is equipped with an event data recorder (EDR). The main pur-
pose of an EDR is to record, in certain crash or near crash-like situations,
such as an air bag deployment or hitting a road obstacle, data that will assist
in understanding how a vehicle’s systems performed. The EDR is designed to
record data related to vehicle dynamics and safety systems for a short period
of time, typically 30 seconds or less.
The EDR in this vehicle is designed to record such data as:
• How various systems in your vehicle were operating;
• Whether or not the driver and passenger safety belts were buckled/fas-
tened;
• How far (if at all) the driver was depressing the accelerator and/or brake
pedal; and,
• How fast the vehicle was traveling.
These data can help provide a better understanding of the circumstances in
which crashes and injuries occur.
NOTE: EDR data are recorded by your vehicle only if a nontrivial crash situa-
tion occurs; no data are recorded by the EDR under normal driving conditions
and no personal data (e.g., name, gender, age, and crash location) are
recorded. However, other parties, such as law enforcement, could combine
the EDR data with the type of personally identifying data routinely acquired
during a crash investigation.
To read data recorded by an EDR, special equipment is required, and access
to the vehicle or the EDR is needed. In addition to the vehicle manufacturer,
other parties, such as law enforcement, that have the special equipment, can
read the information if they have access to the vehicle or the EDR.
● Disclosure of the EDR data
Toyota will not disclose the data recorded in an EDR to a third party except
when:
• An agreement from the vehicle’s owner (or the lessee for a leased vehi-
cle) is obtained
• In response to an official request by the police, a court of law or a govern-
ment agency
• For use by Toyota in a law suit
However, if necessary, Toyota may:
• Use the data for research on vehicle safety performance
• Disclose the data to a third party for research purposes without disclosing
information about the specific vehicle or vehicle owner
Event data recorder
Page: 11
11
HIGHLANDER_U (OM48A12U)
The SRS airbag and seat belt pretensioner devices in your Toyota contain
explosive chemicals. If the vehicle is scrapped with the airbags and seat belt
pretensioners left as they are, this may cause an accident such as fire. Be
sure to have the systems of the SRS airbag and seat belt pretensioner
removed and disposed of by a qualified service shop or by your Toyota dealer
before you scrap your vehicle.
Special handling may apply, See www.dtsc.ca.gov/hazardouswaste/perchlor-
ate.
Your vehicle has components that may contain perchlorate. These compo-
nents may include airbag, seat belt pretensioners, and wireless remote con-
trol batteries.
Scrapping of your Toyota
Perchlorate Material
WARNING
■General precautions while driving
Driving under the influence: Never drive your vehicle when under the influ-
ence of alcohol or drugs that have impaired your ability to operate your vehi-
cle. Alcohol and certain drugs delay reaction time, impair judgment and
reduce coordination, which could lead to an accident that could result in
death or serious injury.
Defensive driving: Always drive defensively. Anticipate mistakes that other
drivers or pedestrians might make and be ready to avoid accidents.
Driver distraction: Always give your full attention to driving. Anything that
distracts the driver, such as adjusting controls, talking on a cellular phone or
reading can result in a collision with resulting death or serious injury to you,
your occupants or others.
■General precaution regarding children’s safety
Never leave children unattended in the vehicle, and never allow children to
have or use the key.
Children may be able to start the vehicle or shift the vehicle into neutral.
There is also a danger that children may injure themselves by playing with
the windows, the moon roof, or other features of the vehicle. In addition,
heat build-up or extremely cold temperatures inside the vehicle can be fatal
to children.
Page: 12
12
HIGHLANDER_U (OM48A12U)
WARNING:
Explains something that, if not obeyed, could cause death or
serious injury to people.
NOTICE:
Explains something that, if not obeyed, could cause damage to
or a malfunction in the vehicle or its equipment.
Indicates operating or working procedures. Follow the steps
in numerical order.
Indicates the action (push-
ing, turning, etc.) used to
operate switches and other
devices.
Indicates the outcome of an
operation (e.g. a lid opens).
Indicates the component or
position being explained.
Means “Do not”, “Do not do
this”, or “Do not let this hap-
pen”.
Reading this manual
1 2 3
Page: 13
13
HIGHLANDER_U (OM48A12U)
■ Searching by name
• Alphabetical index…….P. 694
■ Searching by installation
position
• Pictorial index…………….P. 14
■ Searching by symptom or
sound
• What to do if…
(Troubleshooting)……..P. 688
■ Searching by title
• Table of contents………….P. 2
How to search
Page: 14
14
HIGHLANDER_U (OM48A12U)
Pictorial index
Pictorial index
■Exterior
Doors . . . . . . . . . . . . . . . . . . . . . . . . . . . . . . . . . . . . . . . . . . . P. 121
Locking/unlocking . . . . . . . . . . . . . . . . . . . . . . . . . . . . . . . . . . P. 121
Opening/closing the side windows. . . . . . . . . . . . . . . . . . . . . . P. 178
Locking/unlocking by using the mechanical key* . . . . . . . . . . P. 618
Warning lights/warning messages . . . . . . . . . . . . . . . . . . P. 565, 574
Back door . . . . . . . . . . . . . . . . . . . . . . . . . . . . . . . . . . . . . . . . P. 129
Locking/unlocking . . . . . . . . . . . . . . . . . . . . . . . . . . . . . . . . . . P. 121
Warning lights/warning messages . . . . . . . . . . . . . . . . . . P. 565, 575
Glass hatch* . . . . . . . . . . . . . . . . . . . . . . . . . . . . . . . . . . . . . P. 142
Warning lights/warning messages . . . . . . . . . . . . . . . . . . P. 565, 576
Outside rear view mirrors . . . . . . . . . . . . . . . . . . . . . . . . . . . P. 176
Adjusting the mirror angle . . . . . . . . . . . . . . . . . . . . . . . . . . . . P. 176
Folding the mirrors. . . . . . . . . . . . . . . . . . . . . . . . . . . . . . . . . . P. 176
Driving position memory* . . . . . . . . . . . . . . . . . . . . . . . . . . . . P. 164
Defogging the mirrors* . . . . . . . . . . . . . . . . . . . . . . . . . . P. 424, 430
Windshield wipers . . . . . . . . . . . . . . . . . . . . . . . . . . . . . . . . . P. 253
Precautions against winter season . . . . . . . . . . . . . . . . . . . . . P. 323
To prevent freezing (windshield wiper de-icer)*. . . . . . . . P. 424, 431
1
2
3
4
5
Page: 15
15
Pictorial index
HIGHLANDER_U (OM48A12U)
Fuel filler door . . . . . . . . . . . . . . . . . . . . . . . . . . . . . . . . . . . . P. 257
Refueling method. . . . . . . . . . . . . . . . . . . . . . . . . . . . . . . . . . . P. 257
Fuel type/fuel tank capacity . . . . . . . . . . . . . . . . . . . . . . . . . . . P. 635
Tires . . . . . . . . . . . . . . . . . . . . . . . . . . . . . . . . . . . . . . . . . . . . P. 515
Tire size/inflation pressure. . . . . . . . . . . . . . . . . . . . . . . . . . . . P. 642
Winter tires/tire chain . . . . . . . . . . . . . . . . . . . . . . . . . . . . . . . . P. 323
Checking/rotation/tire pressure warning system . . . . . . . . . . . P. 515
Coping with flat tires . . . . . . . . . . . . . . . . . . . . . . . . . . . . . . . . P. 590
Hood . . . . . . . . . . . . . . . . . . . . . . . . . . . . . . . . . . . . . . . . . . . . P. 500
Opening . . . . . . . . . . . . . . . . . . . . . . . . . . . . . . . . . . . . . . . . . . P. 500
Engine oil . . . . . . . . . . . . . . . . . . . . . . . . . . . . . . . . . . . . . . . . . P. 636
Coping with overheat . . . . . . . . . . . . . . . . . . . . . . . . . . . . . . . . P. 626
Warning messages . . . . . . . . . . . . . . . . . . . . . . . . . . . . . . . . . P. 575
Headlights/daytime running lights . . . . . . . . . . . . . . . . . . . . P. 241
Front fog lights*. . . . . . . . . . . . . . . . . . . . . . . . . . . . . . . . . . . P. 252
Turn signal lights . . . . . . . . . . . . . . . . . . . . . . . . . . . . . . . . . . P. 239
Stop/tail lights . . . . . . . . . . . . . . . . . . . . . . . . . . . . . . . . . . . . P. 241
Hill-start assist control . . . . . . . . . . . . . . . . . . . . . . . . . . . . . . . P. 298
Downhill assist control system*. . . . . . . . . . . . . . . . . . . . . . . . P. 304
License plate lights . . . . . . . . . . . . . . . . . . . . . . . . . . . . . . . . P. 241
Back-up lights
Shifting the shift lever to R. . . . . . . . . . . . . . . . . . . . . . . . . . . . P. 234
Side marker lights . . . . . . . . . . . . . . . . . . . . . . . . . . . . . . . . . P. 241
6
7
8
Light bulbs of the exterior lights for driving
(Replacing method: P. 539, Watts: P. 645)
*: If equipped
9
10
11
12
13
14
15
Page: 16
16 Pictorial index
HIGHLANDER_U (OM48A12U)
■Instrument panel
Engine switch. . . . . . . . . . . . . . . . . . . . . . . . . . . . . . . . . P. 225, 228
Starting the engine/changing the modes . . . . . . . . . . . . . P. 225, 228
Emergency stop of the engine . . . . . . . . . . . . . . . . . . . . . . . . . P. 555
When the engine will not start . . . . . . . . . . . . . . . . . . . . . . . . . P. 615
Warning messages*1
. . . . . . . . . . . . . . . . . . . . . . . . . . . . . . . . P. 586
Shift lever . . . . . . . . . . . . . . . . . . . . . . . . . . . . . . . . . . . . . . . . P. 234
Changing the shift position. . . . . . . . . . . . . . . . . . . . . . . . . . . . P. 234
Precautions against towing . . . . . . . . . . . . . . . . . . . . . . . . . . . P. 557
When the shift lever does not move. . . . . . . . . . . . . . . . . . . . . P. 617
Meters . . . . . . . . . . . . . . . . . . . . . . . . . . . . . . . . . . . . . . . . . . . . P. 94
Reading the meters/adjusting the meter light . . . . . . . . . . . . . . P. 94
Warning lights/indicator lights . . . . . . . . . . . . . . . . . . . . . . . . . . P. 88
When the warning lights come on . . . . . . . . . . . . . . . . . . . . . . P. 563
Multi-information display . . . . . . . . . . . . . . . . . . . . . . . . P. 97, 101
Display . . . . . . . . . . . . . . . . . . . . . . . . . . . . . . . . . . . . . . . . P. 97, 101
When a warning message or indicator is displayed. . . . . . . . . P. 572
1
2
3
Page: 17
17
Pictorial index
HIGHLANDER_U (OM48A12U)
Parking brake . . . . . . . . . . . . . . . . . . . . . . . . . . . . . . . . . . . . . P. 240
Applying/releasing . . . . . . . . . . . . . . . . . . . . . . . . . . . . . . . . . . P. 240
Precautions against winter season . . . . . . . . . . . . . . . . . . . . . P. 324
Warning buzzer/message . . . . . . . . . . . . . . . . . . . . . . . . . . . . P. 572
Turn signal lever . . . . . . . . . . . . . . . . . . . . . . . . . . . . . . . . . . P. 239
Headlight switch . . . . . . . . . . . . . . . . . . . . . . . . . . . . . . . . . . P. 241
Headlights/tail lights/daytime running lights . . . . . . . . . . . . . . . P. 241
Front fog lights*1 . . . . . . . . . . . . . . . . . . . . . . . . . . . . . . . . . . . P. 252
Wiper and washer switch . . . . . . . . . . . . . . . . . . . . . . . P. 253, 255
Usage . . . . . . . . . . . . . . . . . . . . . . . . . . . . . . . . . . . . . . . P. 253, 255
Adding washer fluid . . . . . . . . . . . . . . . . . . . . . . . . . . . . . . . . . P. 514
Warning messages . . . . . . . . . . . . . . . . . . . . . . . . . . . . . . . . . P. 582
Emergency flasher switch . . . . . . . . . . . . . . . . . . . . . . . . . . P. 554
Hood lock release lever. . . . . . . . . . . . . . . . . . . . . . . . . . . . . P. 500
Tilt and telescopic steering lock release lever . . . . . . . . . . P. 172
Adjustment. . . . . . . . . . . . . . . . . . . . . . . . . . . . . . . . . . . . . . . . P. 172
Manual air conditioning system*1
. . . . . . . . . . . . . . . . . . . . P. 422
Automatic air conditioning system*1
. . . . . . . . . . . . . . . . . P. 428
Usage . . . . . . . . . . . . . . . . . . . . . . . . . . . . . . . . . . . . . . . P. 422, 428
Rear window defogger. . . . . . . . . . . . . . . . . . . . . . . . . . . P. 424, 430
Audio system*1, 2
. . . . . . . . . . . . . . . . . . . . . . . . . . . . . . . . . P. 338
Navigation system*1, 3
Clock . . . . . . . . . . . . . . . . . . . . . . . . . . . . . . . . . . . . . . . . . . . . P. 457
Power back door main switch*1. . . . . . . . . . . . . . . . . . . . . . P. 132
Fuel filler door opener switch. . . . . . . . . . . . . . . . . . . . . . . . P. 259
*1
: If equipped
*2
: For Entune Audio Plus, refer to “Navigation and Multimedia System Owner’s Manual”.
*3
: Refer to “Navigation and Multimedia System Owner’s Manual”.
4
5
6
7
8
9
10
11
12
13
14
Page: 18
18 Pictorial index
HIGHLANDER_U (OM48A12U)
■Switches
Automatic High Beam switch*1
. . . . . . . . . . . . . . . . . . . . . . P. 246
BSM (Blind Spot Monitor) main switch*1 . . . . . . . . . . . . . . P. 313
LDA (Lane Departure Alert) switch*1
. . . . . . . . . . . . . . . . . . P. 280
Power back door switch*1
. . . . . . . . . . . . . . . . . . . . . . . . . . P. 129
Windshield wiper de-icer switch*1. . . . . . . . . . . . . . . . P. 424, 431
Heated steering wheel switch*1
. . . . . . . . . . . . . . . . . . . . . . P. 442
Intuitive parking assist switch*1, 2
1
2
3
4
5
6
7
Page: 19
19
Pictorial index
HIGHLANDER_U (OM48A12U)
Inside lock buttons . . . . . . . . . . . . . . . . . . . . . . . . . . . . . . . . P. 125
Driving position memory switches*1
. . . . . . . . . . . . . . . . . . P. 164
Outside rear view mirror switch . . . . . . . . . . . . . . . . . . . . . . P. 176
Door lock switches . . . . . . . . . . . . . . . . . . . . . . . . . . . . . . . . P. 125
Power window switches . . . . . . . . . . . . . . . . . . . . . . . . . . . . P. 178
Window lock switch. . . . . . . . . . . . . . . . . . . . . . . . . . . . . . . . P. 179
Tire pressure warning reset switch . . . . . . . . . . . . . . . . . . . P. 517
PCS OFF switch*1
. . . . . . . . . . . . . . . . . . . . . . . . . . . . . . . . . P. 307
*1
: If equipped
*2
: Refer to “Navigation and Multimedia System Owner’s Manual”.
1
2
3
4
5
6
7
8
Page: 20
20 Pictorial index
HIGHLANDER_U (OM48A12U)
Talk switch*1 . . . . . . . . . . . . . . . . . . . . . . . . . . . . . . . . . . . . . P. 417
Audio remote control switches*1
. . . . . . . . . . . . . . . . . . . . . P. 341
“DISP” switch. . . . . . . . . . . . . . . . . . . . . . . . . . . . . . . . . . . . . . P. 97
Cruise control switch
Cruise control. . . . . . . . . . . . . . . . . . . . . . . . . . . . . . . . . . . . . . P. 261
Telephone switches*1 . . . . . . . . . . . . . . . . . . . . . . . . . . . . . . P. 397
Meter control switches . . . . . . . . . . . . . . . . . . . . . . . . . . . . . P. 102
Vehicle-to-vehicle distance button*2 . . . . . . . . . . . . . . . . . . P. 269
Cruise control switch
Cruise control*2
. . . . . . . . . . . . . . . . . . . . . . . . . . . . . . . . . . . . P. 261
Dynamic radar cruise control*2 . . . . . . . . . . . . . . . . . . . . . . . . P. 266
Type A
Type B
1
2
3
4
5
6
7
8
Page: 21
21
Pictorial index
HIGHLANDER_U (OM48A12U)
VSC OFF switch . . . . . . . . . . . . . . . . . . . . . . . . . . . . . . . . . . . P. 300
“SNOW” button . . . . . . . . . . . . . . . . . . . . . . . . . . . . . . . . . . . P. 235
“DAC” switch*2
. . . . . . . . . . . . . . . . . . . . . . . . . . . . . . . . . . . P. 304
All-wheel drive lock switch*2 . . . . . . . . . . . . . . . . . . . . . . . . P. 297
Seat heater/ventilator switches*2
. . . . . . . . . . . . . . . . . . . . . P. 442
Seat heater switches*2
. . . . . . . . . . . . . . . . . . . . . . . . . . . . . P. 442
*1
: For vehicles with a navigation system or Entune Audio Plus, refer to
“Navigation and Multimedia System Owner’s Manual”.
*2
: If equipped
Type A
Type B
1
2
3
4
5
6
Page: 22
22 Pictorial index
HIGHLANDER_U (OM48A12U)
■Interior
SRS airbags . . . . . . . . . . . . . . . . . . . . . . . . . . . . . . . . . . . . . . . P. 40
Floor mats. . . . . . . . . . . . . . . . . . . . . . . . . . . . . . . . . . . . . . . . . P. 26
Front seats . . . . . . . . . . . . . . . . . . . . . . . . . . . . . . . . . . . . . . . P. 155
Head restraints. . . . . . . . . . . . . . . . . . . . . . . . . . . . . . . . . . . . P. 168
Seat belts . . . . . . . . . . . . . . . . . . . . . . . . . . . . . . . . . . . . . . . . . P. 30
Console box . . . . . . . . . . . . . . . . . . . . . . . . . . . . . . . . . . . . . . P. 447
Cup holders . . . . . . . . . . . . . . . . . . . . . . . . . . . . . . . . . . . . . . P. 449
Rear seats. . . . . . . . . . . . . . . . . . . . . . . . . . . . . . . . . . . . . . . . P. 157
Rear manual air conditioning switches*1
. . . . . . . . . . . . . . P. 435
Rear automatic air conditioning switches*1
. . . . . . . . . . . . P. 438
Second seat heater switches*1
. . . . . . . . . . . . . . . . . . . . . . P. 443
Armrest . . . . . . . . . . . . . . . . . . . . . . . . . . . . . . . . . . . . . . . . . . P. 463
Side table*1
. . . . . . . . . . . . . . . . . . . . . . . . . . . . . . . . . . . . . . P. 465
Rear seat entertainment system*1, 2
1
2
3
4
5
6
7
8
9
10
11
12
Page: 23
23
Pictorial index
HIGHLANDER_U (OM48A12U)
Inside rear view mirror . . . . . . . . . . . . . . . . . . . . . . . . . . . . . P. 174
Sun visors . . . . . . . . . . . . . . . . . . . . . . . . . . . . . . . . . . . . . . . P. 455
Vanity mirrors. . . . . . . . . . . . . . . . . . . . . . . . . . . . . . . . . . . . . P. 455
Interior lights/personal lights . . . . . . . . . . . . . . . . . . . . . . . . P. 444
Moon roof switches*1 . . . . . . . . . . . . . . . . . . . . . . . . . . . . . . P. 182
Panoramic moon roof switches*1 . . . . . . . . . . . . . . . . . . . . P. 186
Auxiliary boxes . . . . . . . . . . . . . . . . . . . . . . . . . . . . . . . . . . . P. 451
Conversation mirror . . . . . . . . . . . . . . . . . . . . . . . . . . . . . . . P. 456
“SOS” button*1 . . . . . . . . . . . . . . . . . . . . . . . . . . . . . . . . . . . P. 473
Garage door opener switches*1
. . . . . . . . . . . . . . . . . . . . . . P. 466
Assist grips . . . . . . . . . . . . . . . . . . . . . . . . . . . . . . . . . . . . . . P. 464
*1
: If equipped
*2
: Refer to “Navigation and Multimedia System Owner’s Manual”.
1
2
3
4
5
6
7
8
9
Page: 24
24 Pictorial index
HIGHLANDER_U (OM48A12U)
Page: 25
25
For safety and security 1
HIGHLANDER_U (OM48A12U)
1-1. For safe use
Before driving…………………. 26
For safety drive ………………. 28
Seat belts………………………. 30
SRS airbags…………………… 40
Front passenger occupant
classification system ……… 53
Safety information for
children ……………………….. 60
Child restraint systems…….. 61
Installing child restraints…… 65
Exhaust gas precautions….. 79
1-2. Theft deterrent system
Engine immobilizer
system ………………………… 80
Alarm…………………………….. 82
Theft prevention labels
(U.S.A.) ……………………….. 85
Page: 26
26
HIGHLANDER_U (OM48A12U)
1-1. For safe use
Use only floor mats designed specifically for vehicles of the same
model and model year as your vehicle. Fix them securely in place
onto the carpet.
Insert the retaining hooks (clips)
into the floor mat eyelets.
Turn the upper knob of each
retaining hook (clip) to secure
the floor mats in place.
*: Always align the marks.
The shape of the retaining hooks (clips) may differ from that shown in the
illustration.
Before driving
Floor mat
1
*
2
Page: 27
27
1-1. For safe use
1
For
safety
and
security
HIGHLANDER_U (OM48A12U)
WARNING
Observe the following precautions.
Failure to do so may cause the driver’s floor mat to slip, possibly interfering
with the pedals while driving. An unexpectedly high speed may result or it may
become difficult to stop the vehicle, leading to an accident, or leading to death
or a serious injury.
■When installing the driver’s floor mat
●Do not use floor mats designed for other models or different model year
vehicles, even if they are Toyota Genuine floor mats.
●Only use floor mats designed for the driver’s seat.
●Always install the floor mat securely using the retaining hooks (clips) pro-
vided.
●Do not use two or more floor mats on top of each other.
●Do not place the floor mat bottom-side up or upside-down.
■Before driving
●Check that the floor mat is securely
fixed in the correct place with all the
provided retaining hooks (clips). Be
especially careful to perform this check
after cleaning the floor.
●With the engine stopped and the shift
lever in P, fully depress each pedal to
the floor to make sure it does not inter-
fere with the floor mat.
Page: 28
28 1-1. For safe use
HIGHLANDER_U (OM48A12U)
Adjust the angle of the seat-
back so that you are sitting
straight up and so that you do
not have to lean forward to
steer. (P. 155)
Adjust the seat so that you can
depress the pedals fully and so
that your arms bend slightly at
the elbow when gripping the
steering wheel. (P. 155)
Lock the head restraint in place with the center of the head restraint
closest to the top of your ears. (P. 168)
Wear the seat belt correctly. (P. 30)
Make sure that all occupants are wearing their seat belts before driv-
ing the vehicle. (P. 30)
Use a child restraint system appropriate for the child until the child
becomes large enough to properly wear the vehicle’s seat belt.
(P. 61)
For safety drive
For safe driving, adjust the seat and mirror to an appropriate
position before driving.
Correct driving posture
1
2
Correct use of the seat belts
3
4
Page: 29
29
1-1. For safe use
1
For
safety
and
security
HIGHLANDER_U (OM48A12U)
Make sure that you can see backward clearly by adjusting the inside
and outside rear view mirrors properly. (P. 174, 176)
Adjusting the mirrors
WARNING
Observe the following precautions.
Failure to do so may result in death or serious injury.
●Do not adjust the position of the driver’s seat while driving.
Doing so could cause the driver to lose control of the vehicle.
●Do not place a cushion between the driver or passenger and the seatback.
A cushion may prevent correct posture from being achieved, and reduce
the effectiveness of the seat belt and head restraint.
●Do not place anything under the front seats.
Objects placed under the front seats may become jammed in the seat
tracks and stop the seat from locking in place. This may lead to an acci-
dent and the adjustment mechanism may also be damaged.
●When driving over long distances, take regular breaks before you start to
feel tired.
Also, if you feel tired or sleepy while driving, do not force yourself to con-
tinue driving and take a break immediately.
Page: 30
30 1-1. For safe use
HIGHLANDER_U (OM48A12U)
● Extend the shoulder belt so that
it comes fully over the shoulder,
but does not come into contact
with the neck or slide off the
shoulder.
● Position the lap belt as low as
possible over the hips.
● Adjust the position of the seat-
back. Sit up straight and well
back in the seat.
● Do not twist the seat belt.
To fasten the seat belt, push the
plate into the buckle until a click
sound is heard.
To release the seat belt, press
the release button.
Seat belts
Make sure that all occupants are wearing their seat belts before
driving the vehicle.
Correct use of the seat belts
Fastening and releasing the seat belt (except for the third center
seat)
Release button
1
2
Page: 31
31
1-1. For safe use
1
For
safety
and
security
HIGHLANDER_U (OM48A12U)
Take the plate out of the holder,
and then pull down the seat
belt.
Push plate “A” into buckle “A”
until a click sound is heard.
Push plate “B” into buckle “B”
until a click sound is heard.
Fastening the seat belt (for the third center seat)
1
Plate “A”
Buckle “A”
2
Plate “B”
Buckle “B”
3
Page: 32
32 1-1. For safe use
HIGHLANDER_U (OM48A12U)
To release plate “B”, press the
release button on buckle “B”.
To release plate “A”, insert the
key (P. 114) or plate “B” into
the hole on buckle “A”.
Retract the belt slowly when
releasing and stowing the seat
belt.
Holding plate “A” and “B”
together, insert both plates into
the holder on the roof.
Releasing and stowing the seat belt (for the third center seat)
Release button
Plate “B”
Buckle “B”
1
Buckle “A”
Buckle “A”
Plate “B”
Plate “A”
Plate “A”
2
3
Page: 33
33
1-1. For safe use
1
For
safety
and
security
HIGHLANDER_U (OM48A12U)
Push the seat belt shoulder
anchor down while pressing the
release button.
Push the seat belt shoulder
anchor up.
Move the height adjuster up and
down as needed until you hear a
click.
If the shoulder belt sits close to a person’s neck, use the seat belt
comfort guide.
Pull the comfort guide from the
pocket.
Slide the belt past the slot of the
guide.
The elastic cord must be behind
the seat belt.
Buckle the seat belt and posi-
tion it comfortably.
Adjusting the seat belt shoulder anchor height (front seats)
1
2
Seat belt comfort guide (for the third center seat)
1
2
3
Page: 34
34 1-1. For safe use
HIGHLANDER_U (OM48A12U)
The pretensioners help the seat
belts to quickly restrain the occu-
pants by retracting the seat belts
when the vehicle is subjected to
certain types of severe frontal col-
lision or a vehicle rollover.
The pretensioners do not activate
in the event of a minor frontal
impact, a side impact or a rear
impact.
Seat belt pretensioners (front seats)
Page: 35
35
1-1. For safe use
1
For
safety
and
security
HIGHLANDER_U (OM48A12U)
■Emergency locking retractor (ELR)
The retractor will lock the belt during a sudden stop or on impact. It may also
lock if you lean forward too quickly. A slow, easy motion will allow the belt to
extend so that you can move around fully.
■Automatic locking retractor (ALR)
When a passenger’s shoulder belt is completely extended and then retracted
even slightly, the belt is locked in that position and cannot be extended. This
feature is used to hold the child restraint system (CRS) firmly. To free the belt
again, fully retract the belt and then pull the belt out once more. (P. 65)
■When not using the rear seat belts
Second seat belts
Third seat belts
Pass the outer seat belts through the seat
belt hangers and secure the seat belt
plates to prevent the shoulder belts from
being damaged.
Pass the outer seat belts through the seat
belt hangers and secure the seat belt
plates to prevent the shoulder belts from
being damaged.
Page: 36
36 1-1. For safe use
HIGHLANDER_U (OM48A12U)
■Child seat belt usage
The seat belts of your vehicle were principally designed for persons of adult
size.
●Use a child restraint system appropriate for the child, until the child
becomes large enough to properly wear the vehicle’s seat belt. (P. 61)
●When the child becomes large enough to properly wear the vehicle’s seat
belt, follow the instructions regarding seat belt usage. (P. 30)
■Replacing the belt after the pretensioner has been activated (front seats)
If the vehicle is involved in multiple collisions, the pretensioner will activate for
the first collision, but will not activate for the second or subsequent collisions.
■Seat belt extender
If your seat belts cannot be fastened
securely because they are not long
enough, a personalized seat belt extender
is available from your Toyota dealer free
of charge.
Page: 37
37
1-1. For safe use
1
For
safety
and
security
HIGHLANDER_U (OM48A12U)
WARNING
Observe the following precautions to reduce the risk of injury in the event of
sudden braking, sudden swerving or an accident.
Failure to do so may cause death or serious injury.
■Wearing a seat belt
●Ensure that all passengers wear a seat belt.
●Always wear a seat belt properly.
●Each seat belt should be used by one person only. Do not use a seat belt
for more than one person at once, including children.
●Toyota recommends that children be seated in the rear seat and always
use a seat belt and/or an appropriate child restraint system.
●To achieve a proper seating position, do not recline the seat more than
necessary. The seat belt is most effective when the occupants are sitting
up straight and well back in the seats.
●Do not wear the shoulder belt under your arm.
●Always wear your seat belt low and snug across your hips.
■Pregnant women
■People suffering illness
Obtain medical advice and wear the seat belt in the proper way. (P. 30)
Obtain medical advice and wear the seat
belt in the proper way. (P. 30)
Women who are pregnant should posi-
tion the lap belt as low as possible over
the hips in the same manner as other
occupants, extending the shoulder belt
completely over the shoulder and avoid-
ing belt contact with the rounding of the
abdominal area.
If the seat belt is not worn properly, not
only the pregnant woman, but also the
fetus could suffer death or serious injury
as a result of sudden braking or a colli-
sion.
Page: 38
38 1-1. For safe use
HIGHLANDER_U (OM48A12U)
WARNING
■When children are in the vehicle
Do not allow children to play with the seat belt. If the seat belt becomes
twisted around a child’s neck, it may lead to choking or other serious injuries
that could result in death.
If this occurs and the buckle cannot be unfastened, scissors should be used
to cut the belt.
■Seat belt pretensioners (front seats)
If the pretensioner has activated, the SRS warning light will come on. In that
case, the seat belt cannot be used again and must be replaced at your
Toyota dealer.
■Adjustable shoulder anchor (front seats)
Always make sure the shoulder belt is positioned across the center of your
shoulder. The belt should be kept away from your neck, but not falling off
your shoulder. Failure to do so could reduce the amount of protection in an
accident and cause death or serious injuries in the event of a sudden stop,
sudden swerve or accident. (P. 33)
■Seat belt damage and wear
●Do not damage the seat belts by allowing the belt, plate, or buckle to be
jammed in the door.
●Inspect the seat belt system periodically. Check for cuts, fraying, and loose
parts. Do not use a damaged seat belt until it is replaced. Damaged seat
belts cannot protect an occupant from death or serious injury.
●Ensure that the belt and plate are locked and the belt is not twisted.
If the seat belt does not function correctly, immediately contact your Toyota
dealer.
●Replace the seat assembly, including the belts, if your vehicle has been
involved in a serious accident, even if there is no obvious damage.
●Do not attempt to install, remove, modify, disassemble or dispose of the
seat belts. Have any necessary repairs carried out by your Toyota dealer.
Inappropriate handling may lead to incorrect operation.
Page: 39
39
1-1. For safe use
1
For
safety
and
security
HIGHLANDER_U (OM48A12U)
WARNING
■Using a seat belt comfort guide (third center seat)
Failure to observe the following precautions could reduce the effectiveness
of the seat belt in an accident, causing death or serious injury.
●Make sure the belt is not twisted and that it lies flat. The elastic cord must
be behind the belt and the guide must be on the front.
●To reduce the chance of injury in case of a sudden stop, sudden swerve or
accident while driving, remove and store the comfort guide in its pocket
when it is not in use.
●Always make sure the shoulder belt is positioned across the center of the
shoulder. The belt should be kept away from the neck, and should not fall
off the shoulder.
■Using a seat belt extender
●Do not wear the seat belt extender if you can fasten the seat belt without
the extender.
●Do not use the seat belt extender when installing a child restraint system
because the belt will not securely hold the child restraint system, increas-
ing the risk of death or serious injury in the event of an accident.
●The personalized extender may not be safe on another vehicle, when
used by another person, or at a different seating position other than the
one originally intended.
■When using the third center seat belt
NOTICE
■When using a seat belt extender
When releasing the seat belt, press on the buckle release button on the
extender, not on the seat belt.
This helps prevent damage to the vehicle interior and the extender itself.
Do not use the third center seat belt with
either buckle released. Fastening only
one of the buckles may result in death or
serious injury in case of sudden braking,
sudden swerving or a collision.
Page: 40
40 1-1. For safe use
HIGHLANDER_U (OM48A12U)
SRS airbags
The SRS airbags inflate when the vehicle is subjected to certain
types of severe impacts that may cause significant injury to the
occupants. They work together with the seat belts to help reduce
the risk of death or serious injury.
Page: 41
41
1-1. For safe use
1
For
safety
and
security
HIGHLANDER_U (OM48A12U)
◆ SRS front airbags
SRS driver airbag/front passenger airbag
Can help protect the head and chest of the driver and front pas-
senger from impact with interior components
SRS driver’s knee airbag
Can help provide driver protection
SRS seat cushion airbag
Can help restrain the front passenger
◆ SRS side and curtain shield airbags
SRS side airbags
Can help protect the torso of the front seat occupants
SRS curtain shield airbags
● Can help protect primarily the head of occupants in the outer
seats
● Can prevent the occupants from being thrown from the vehicle
in the event of vehicle rollover
1
2
3
4
5
Page: 42
42 1-1. For safe use
HIGHLANDER_U (OM48A12U)
SRS airbag system components
Front passenger airbag
Curtain shield airbags
Side impact sensors (front
doors)
“AIR BAG ON” and “AIR BAG
OFF” indicator lights
Seat belt pretensioners and
force limiters
Side airbags
Seat cushion airbag
SRS warning light
Driver airbag
Side impact sensors (rear)
Front passenger’s seat belt
buckle switch
Driver’s seat position sensor
Driver’s seat belt buckle
switch
Driver’s knee airbag
Front passenger occupant
classification system (ECU
and sensors)
Front impact sensors
Airbag sensor assembly
1
2
3
4
5
6
7
8
9
10
11
12
13
14
15
16
17
Page: 43
43
1-1. For safe use
1
For
safety
and
security
HIGHLANDER_U (OM48A12U)
Your vehicle is equipped with ADVANCED AIRBAGS designed based
on the US motor vehicle safety standards (FMVSS208). The airbag
sensor assembly (ECU) controls airbag deployment based on infor-
mation obtained from the sensors etc. shown in the system compo-
nents diagram above. This information includes crash severity and
occupant information. As the airbags deploy, a chemical reaction in
the inflators quickly fills the airbags with non-toxic gas to help restrain
the motion of the occupants.
WARNING
■SRS airbag precautions
Observe the following precautions regarding the SRS airbags.
Failure to do so may cause death or serious injury.
●The driver and all passengers in the vehicle must wear their seat belts
properly.
The SRS airbags are supplemental devices to be used with the seat belts.
●The SRS driver airbag deploys with considerable force, and can cause
death or serious injury especially if the driver is very close to the airbag.
The National Highway Traffic Safety Administration (NHTSA) advises:
Since the risk zone for the driver’s airbag is the first 2 — 3 in. (50 — 75 mm)
of inflation, placing yourself 10 in. (250 mm) from your driver airbag pro-
vides you with a clear margin of safety. This distance is measured from
the center of the steering wheel to your breastbone. If you sit less than 10
in. (250 mm) away now, you can change your driving position in several
ways:
• Move your seat to the rear as far as you can while still reaching the ped-
als comfortably.
• Slightly recline the back of the seat.
Although vehicle designs vary, many drivers can achieve the 10 in. (250
mm) distance, even with the driver seat all the way forward, simply by
reclining the back of the seat somewhat. If reclining the back of your
seat makes it hard to see the road, raise yourself by using a firm, non-
slippery cushion, or raise the seat if your vehicle has that feature.
• If your steering wheel is adjustable, tilt it downward. This points the air-
bag toward your chest instead of your head and neck.
The seat should be adjusted as recommended by NHTSA above, while
still maintaining control of the foot pedals, steering wheel, and your view
of the instrument panel controls.
Page: 44
44 1-1. For safe use
HIGHLANDER_U (OM48A12U)
WARNING
■SRS airbag precautions
●The SRS front passenger airbag also deploys with considerable force, and
can cause death or serious injury especially if the front passenger is very
close to the airbag. The front passenger seat should be as far from the air-
bag as possible with the seatback adjusted, so the front passenger sits
upright.
●Improperly seated and/or restrained infants and children can be killed or
seriously injured by a deploying airbag. An infant or child who is too small
to use a seat belt should be properly secured using a child restraint sys-
tem. Toyota strongly recommends that all infants and children be placed in
the rear seats of the vehicle and properly restrained. The rear seats are
safer for infants and children than the front passenger seat. (P. 61)
●If the seat belt extender has been con-
nected to the front seat belt buckles but
the seat belt extender has not also been
fastened to the latch plate of the seat
belt, the SRS front airbags will judge
that the driver and front passenger are
wearing the seat belt even though the
seat belt has not been connected. In
this case, the SRS front airbags may
not activate correctly in a collision,
resulting in death or serious injury in the
event of a collision. Be sure to wear the
seat belt with the seat belt extender.
●Do not sit on the edge of the seat or
lean against the dashboard.
Page: 45
45
1-1. For safe use
1
For
safety
and
security
HIGHLANDER_U (OM48A12U)
WARNING
■SRS airbag precautions
●Do not allow a child to stand in front of
the SRS front passenger airbag unit or
sit on the knees of a front passenger.
●Do not allow the front seat occupants to
hold items on their knees.
●Do not lean against the door, the roof
side rail or the front, side and rear pil-
lars.
●Do not allow anyone to kneel on the
passenger seat toward the door or put
their head or hands outside the vehicle.
●Do not attach anything to or lean any-
thing against areas such as the dash-
board, steering wheel pad and lower
portion of the instrument panel.
These items can become projectiles
when the SRS driver, front passenger
and driver’s knee airbags deploy.
Page: 46
46 1-1. For safe use
HIGHLANDER_U (OM48A12U)
WARNING
■SRS airbag precautions
●Do not hang coat hangers or other hard objects on the coat hooks. All of
these items could become projectiles and may cause death or serious
injury, should the SRS curtain shield airbags deploy.
●If a vinyl cover is put on the area where the SRS driver’s knee airbag will
deploy, be sure to remove it.
●Do not use seat accessories which cover the parts where the SRS side
airbags and SRS seat cushion airbag inflate as they may interfere with
inflation of the airbags. Such accessories may prevent the side airbags
and seat cushion airbag from activating correctly, disable the system or
cause the side airbags and seat cushion airbag to inflate accidentally,
resulting in death or serious injury.
●Do not strike or apply significant levels of force to the area of the SRS air-
bag components.
Doing so can cause the SRS airbags to malfunction.
●Do not touch any of the component parts immediately after the SRS air-
bags have deployed (inflated) as they may be hot.
●If breathing becomes difficult after the SRS airbags have deployed, open a
door or window to allow fresh air in, or leave the vehicle if it is safe to do
so. Wash off any residue as soon as possible to prevent skin irritation.
●Do not attach anything to areas such as
a door, windshield, side window, front or
rear pillar, roof side rail and assist grip.
●Vehicles without a smart key system:
Do not attach any heavy, sharp or hard
objects such as keys and accessories
to the key. The objects may restrict the
SRS driver’s knee airbag inflation or be
thrust into the driver’s seat area by the
force of the deploying airbag, thus caus-
ing a danger.
Page: 47
47
1-1. For safe use
1
For
safety
and
security
HIGHLANDER_U (OM48A12U)
WARNING
■SRS airbag precautions
●If the areas where the SRS airbags are stored, such as the steering wheel
pad and front and rear pillar garnishes, are damaged or cracked, have
them replaced by your Toyota dealer.
●Do not place anything, such as a cushion, on the front passenger’s seat.
Doing so will disperse the passenger’s weight, which prevents the sensor
from detecting the passenger’s weight properly. As a result, the SRS front
airbags for the front passenger may not deploy in the event of a collision.
■Modification and disposal of SRS airbag system components
Do not dispose of your vehicle or perform any of the following modifications
without consulting your Toyota dealer. The SRS airbags may malfunction or
deploy (inflate) accidentally, causing death or serious injury.
●Installation, removal, disassembly and repair of the SRS airbags
●Repairs, modifications, removal or replacement of the steering wheel,
instrument panel, dashboard, seats or seat upholstery, front, side and rear
pillars or roof side rails
●Repairs or modifications of the front fender, front bumper or side of the
occupant compartment
●Installation of a grille guard (bull bars, kangaroo bar, etc.), snow plows,
winches or roof luggage carrier
●Modifications to the vehicle’s suspension system
●Installation of electronic devices such as mobile two-way radios and CD
players
●Modifications to your vehicle for a person with a physical disability
Page: 48
48 1-1. For safe use
HIGHLANDER_U (OM48A12U)
■If the SRS airbags deploy (inflate)
●Bruising and slight abrasions may result from contact with a deploying
(inflating) SRS airbag.
●A loud noise and white powder will be emitted.
●Parts of the airbag module (steering wheel hub, airbag cover and inflator) as
well as the front seats, parts of the front and rear pillars, and roof side rails
may be hot for several minutes. The airbag itself may also be hot.
●The windshield may crack.
●For U.S.A.: For Safety Connect subscribers, if the SRS airbags deploy or in
the event of a severe rear-end collision, the system is designed to send an
emergency call to the response center, notifying them of the vehicle’s loca-
tion (without needing to push the “SOS” button) and an agent will attempt to
speak with the occupants to ascertain the level of emergency and assis-
tance required. If the occupants are unable to communicate, the agent auto-
matically treats the call as an emergency and helps to dispatch the
necessary emergency services. (P. 473)
■SRS airbag deployment conditions (SRS front airbags)
●The SRS front airbags will deploy in the event of an impact that exceeds the
set threshold level (the level of force corresponding to an approximately 12 —
18 mph [20 — 30 km/h] frontal collision with a fixed wall that does not move or
deform).
However, this threshold velocity will be considerably higher in the following
situations:
• If the vehicle strikes an object, such as a parked vehicle or sign pole,
which can move or deform on impact
• If the vehicle is involved in an underride collision, such as a collision in
which the front of the vehicle “underrides”, or goes under, the bed of a
truck
●Depending on the type of collision, it is possible that only the seat belt pre-
tensioners will activate.
●The SRS front airbags for the front passenger will not activate if there is no
passenger sitting in the front passenger seat. However, the SRS front air-
bags for the front passenger may deploy if luggage is put in the seat, even if
the seat is unoccupied. (P. 53)
●The SRS seat cushion airbag on the front passenger’s seat will not operate
if the occupant is not wearing a seat belt.
Page: 49
49
1-1. For safe use
1
For
safety
and
security
HIGHLANDER_U (OM48A12U)
■SRS airbag deployment conditions (SRS side and curtain shield airbags)
●The SRS side and curtain shield airbags will deploy in the event of an
impact that exceeds the set threshold level (the level of force corresponding
to the impact force produced by an approximately 3300 lb. [1500 kg] vehicle
colliding with the vehicle cabin from a direction perpendicular to the vehicle
orientation at an approximate speed of 12 — 18 mph [20 — 30 km/h]).
●The SRS curtain shield airbags will deploy in the event of vehicle rollover.
●The SRS side and curtain shield airbags may also deploy in the event of a
severe frontal collision.
■Conditions under which the SRS airbags may deploy (inflate), other than
a collision
The SRS front airbags and SRS side and curtain shield airbags may also
deploy if a serious impact occurs to the underside of your vehicle. Some
examples are shown in the illustration.
The SRS curtain shield airbags may also deploy under the situations shown
in the illustration.
●Hitting a curb, edge of pavement or hard
surface
●Falling into or jumping over a deep hole
●Landing hard or falling
●The angle of vehicle tip-up is marginal
●The vehicle skids and hits a curb stone
Page: 50
50 1-1. For safe use
HIGHLANDER_U (OM48A12U)
■Types of collisions that may not deploy the SRS airbags (SRS front air-
bags)
The SRS front airbags do not generally inflate if the vehicle is involved in a
side or rear collision, if it rolls over, or if it is involved in a low-speed frontal
collision. But, whenever a collision of any type causes sufficient forward
deceleration of the vehicle, deployment of the SRS front airbags may occur.
■Types of collisions that may not deploy the SRS airbags (SRS side and
curtain shield airbags)
The SRS side and curtain shield airbags may not activate if the vehicle is
subjected to a collision from the side at certain angles, or a collision to the
side of the vehicle body other than the passenger compartment.
The SRS side airbags do not generally inflate if the vehicle is involved in a
rear collision, if it rolls over, or if it is involved in a low-speed side or low-
speed frontal collision.
●Collision from the side
●Collision from the rear
●Vehicle rollover
●Collision from the side to the vehicle
body other than the passenger compart-
ment
●Collision from the side at an angle
●Collision from the rear
●Vehicle rollover