Это руководство не рассчитано на создание передовых конструкций и приборов — для этого обратитесь к руководству по продвинутому строительству.
Предисловие
Для того, чтобы отыграть множество ролей (например, инженера), или просто украсить свой бар, тебе следует знать, как создавать вещи!
Это руководство будет охватывать все основные инструменты и способы их применения, а также список основных конструкций и способы их постройки и разбора.
Прежде всего важно ознакомиться со всеми инструментами, используемыми в строительстве! Пожалуйста, ознакомьтесь со списком ниже.
Строительные инструменты
Краткое изложение основных инструментов и их более продвинутых аналогов.
| Базовые инструменты | Продвинутые инструменты | Использование | Заметки |
|---|---|---|---|
| Монтировка
(Crowbar) |
Челюсти жизни
(Jaws of Life) |
Поддевать вещи |
|
| Кусачки
(Wirecutters) |
Срезать провода и решетки |
|
|
| Сварочный инструмент
(Welding Tool) |
Экспериментальный сварочный инструмент
(Experimental Welding Tool) |
Сварка и резка металла |
|
| Кабель
(Cable Coil) |
Кабельная катушка
(Cable Layer) |
Прокладывание проводки |
|
| Отвертка
(Screwdriver) |
Дрель-шуруповерт
(Hand Drill) |
Закрепление и открытие панелей |
|
| Разводной ключ
(Wrench) |
Приболчивание и разболчивание объектов |
|
|
| Мультитул
(Multitool) |
Изменение и указание специальных параметров |
|
|
| Ручное строительное устройство
(Rapid Construction Device) |
Боевое РСУ
(Combat RCD) |
Быстрое строительство и разбор конструкций |
|
| Раздатчик труб
(Pipe Dispenser) |
Ручной раздатчик труб
(Rapid Pipe Dispenser) |
Выдача и удаление труб. Подробное руководство. |
|


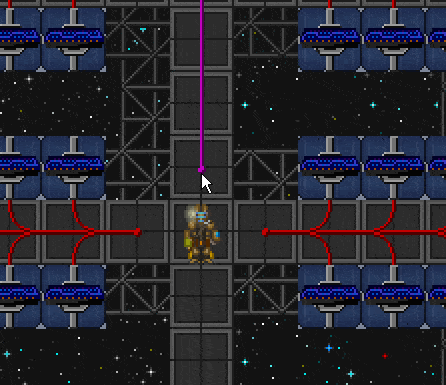
Прокладка провода
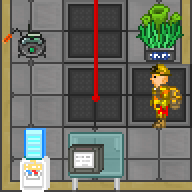
Инженер проводит кабель. Обратите внимание на изолированные перчатки и его положение на плитке.

Пример правильной или «гладкой» проводки.
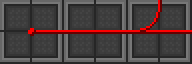
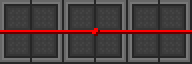
Пример узла. Узел (красный круг) — это место для соединения машин, таких как излучатели.
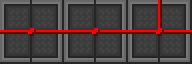
Пример неправильной проводки. Эти провода на самом деле не подключены надлежащим образом и в результате не могут передавать энергию.
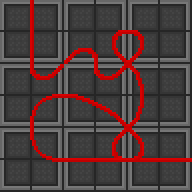
Пример подключения «спагетти». Это изображение демонстрирует, как можно управлять проводом.

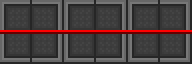
Пример стандартной проводки на станции.
Теперь, когда мы просмотрели список инструментов, важно понять, как работает проводка в SS13.
Помимо использования в ремонте роботизированных конечностей, мехов и других вещей, для маршрутизации питания в основном используется кабель. Например, к ЛКП или SMES вокруг станции.
- ЛКП, Локальные контроллеры питания (или АРС, Area Power Controllers) — это силовые терминалы, расположенные в каждой комнате, которые обеспечивают электричеством системы освещения, оборудования и окружающей среды для обозначенной области.
- ЛКП используют систему зарядки и содержат один элемент (батарею), который заряжается от электросети, к которой он подключен.
- ЛКП, которые не подключены к сети с помощью проводки, или ЛКП, которые получают недостаточный уровень мощности, будут терять заряд батареи.
- Проводка используется для подключения ЛКП к SMES\ам, которые получают заряд от источников питания (таких как сингулярность, Тесла и т. д.) и распределяют электричество.
Как мы видим, обеспечение правильной проводки является неотъемлемой частью работы на станции. Если что-то подключено ненадлежащим образом, ЛКП может не получить питания, и область, которую вы ремонтируете, останется в темноте.
Вот несколько важных предостережений, прежде чем начинать какой-либо проект:
- Провода, подключенные к активной электросети, могут поразить вас током и вызвать ожоги.
- Дешевые изолирующие перчатки (Budget insulated gloves) уменьшат или увеличат урон от ударов током.
- Настоящие изолирующие перчатки полностью защитят от поражения электрическим током.
Основные правила прокладки проводов
(Примечание: обычный тайл на станции имеет плитки поверх пола. Вам нужно будет использовать монтировку, чтобы снять эти плитки, и уже потом прокладывать провода).
Прокладывать провода довольно просто, хотя есть несколько важных вещей.
- Провода могут быть размещены только на плите или рабочей платформе (помосте).
- Расположение проводов всегда будет направлено на вашего персонажа.
- Если вы кладёте провод на тайл, на котором стоите, смотрите в сторону провода, чтобы проложить его правильно.
Для того, чтобы разместить провода, вы должны смотреть лицом на конкретный тайл с проводом в руке.
Когда вы будете готовы, просто нажмите на соседнюю плитку с проводом в руке, чтобы проложить проводку.
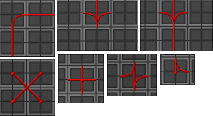
Ниже представлена краткая таблица, объясняющая различные результаты, которые вы получите в зависимости от положения вашего персонажа.
- Направление указывает, в какую сторону смотрит персонаж.
- Направления, как северо-восток, северо-запад, юго-восток и юго-запад, указывают, что плитка имеет диагональ к игроку.
| Направление — Результат проводки | ||
|---|---|---|
| Северо-запад
|
Север (вверх)
|
Северо-восток
|
|
Запад |

|

Восток |

Юго-запад |

Юг (вниз) |

Юго-восток |


Теперь, когда мы понимаем, как работает расположение проводов, мы можем начать соединять все вместе.
Однако, прежде чем мы это сделаем, необходимо обсудить две важные особенности проводки!
В любом проекте проводки есть «узлы» и «провода», каждый из которых выполняет специальные функции.
Провода это то, что фактически передает энергию, в то время как узлы позволяют специальным механизмам (таким как SMES, излучатели и генераторы поля) подключаться к электросети.
| Тип проводки | Объяснение |
|---|---|
| Правильная проводка | |
|
Плавная проводка позволяет передавать энергию из точки А в точку Б. |
| Узел проводки | |
|
Узел проводки используется для спецтехники и электрификации решёток.
Открытые узлы могут ударить током при прикосновении. |
Если вы проводите свой кабель неправильно, оставляя эти маленькие шаровидные узлы повсюду, вы вряд ли создадите соединения между двумя частями проводки.
Убедитесь, что нет ненужных узлов и все ваши кабели соединены правильно, иначе ваша система электропроводки, скорее всего, не будет передавать электричество.
Чтобы создать узел, нажмите на плитку, уже занятую кабелем.
Вы должны всегда прокладывать проводку перед созданием каких-либо узлов, чтобы убедиться, что ваши кабели правильно подключены.
Если вы пытаетесь сделать узел в середине провода, сначала его нужно правильно провести.
Соединение проводов наглядно, на примере солнечных панелей
Трубопровод
Смотрите в руководстве по атмосферике
Основные материалы
Список основных материалов, используемых в строительстве.
| Объект | Материалы | Создание | Деконструкция |
|---|---|---|---|
| Лист металла
(Metal Sheet) |
|
ИЛИ
ИЛИ
|
|
| Лист стекла
(Glass Sheet) |
|
ИЛИ
ИЛИ
|
|
| Деревянные доски
(Wood Plank) |
|
ИЛИ
|
|
| Металлические прутья
(Metal Rods) |
|
|
|
| Армированное стекло
(Reinforced Glass) |
|
ИЛИ
|
|
| Плазменное стекло
(Plasma Glass) |
|
|
|
| Усиленное плазменное стекло
(Reinforced Plasma Glass) |
|
|
|
| Пласталь
(Plasteel) |
|
ИЛИ
|
|
| Пластитан
(Plastitanium) |
|
|
|
| Пластитановое стекло
(Plastitanium Glass) |
|
|
|
| Титан
(Titanium) |
|
|
|
| Титановое стекло
(Titanium Glass) |
|
|
|
| Пластик
(Plastic) |
|
ИЛИ
|
|


Металлические конструкции
Список конструкций, которые предполагают использование металлических листов в качестве исходного компонента.
Цельнометаллические конструкции
Список конструкций, требующих применения только металлических листов.
| Объект | Материалы | Создание | Деконструкция | |
|---|---|---|---|---|
| Строительная решетка
(Lattice) |
|
|
|
|
| Рабочий помост
(Catwalk) |
|
|
|
|
| Обшивка
(Plating) |
|
|
|
|
| Усиленный пол
(Reinforced Floor) |
|
|
|
|
| Решетка
(Grille) |
|
|
|
|
| Перила
(Railing) |
|
|
|
|
| Забор
(Fence) |
|
|
|
|
| Край забора
(Fence end) |
|
|
|
|
| Дверь забора
(Fence door) |
|
|
|
|
| Стена
(Wall) |
|
|
|
|
| Ложная стена
(False Wall) |
|
|
|
|
| Напольная плитка (4)
(Floor Tiles) |
|
|
|
|
| Табурет / Стул
(Stool / Chair) |
|
|
|
|
| Диван
(Sofa) |
|
|
|
|
| Кресло-коляска
(Wheelchair) |
|
|
|
|
| Кровать
(Bed) |
|
|
|
|
| Кушетка психиатра
(Psychiatrist’s Bed) |
|
|
|
|
| Офисный стул
(Office Chair) |
|
|
|
|
| Удобное кресло
(Comfy Chair) |
|
|
|
|
| Парикмахерское кресло
(Barber Chair) |
|
|
|
|
| Стеллаж
(Rack) |
|
|
|
|
| Стойка для оружия
(Gun Rack) |
|
|
|
|
| Шкафчик
(Closet) |
|
|
|
|
| Канистра
(Canister) |
|
|
|
|
| Выключатель
(Light Switch) |
|
|
|
|
| Кнопка управления масс-драйвером
(Mass Driver Button) |
|
|
|
|
| Душ
(Shower) |
|
|
С помощью гаечного ключа можно регулировать температуру: холодная, нормальная и кипяток. Кипяток наносит 5 урона ожогами при вхождении в тайл. |


Смешанные конструкиции
| Объект | Материалы | Создание | Деконструкция |
|---|---|---|---|
| Усиленная стена
(Reinforced Wall) |
|
|
|
| Ложная усиленная стена
(Reinforced False Wall) |
|
|
|
| Светящийся пол
(Light Tile) |
|
|
|
| Стол
(Table) |
|
|
|
| Укрепленный стол
(Reinforced Table) |
|
|
|
| Модный/Стеклянный стол
(Fancy/Glass Table)
|
|
|
|
| Компьютерная консоль
(Computer Console) |
|
|
|
| Корпус прибора
(Machine frame) |
|
|
|
| Выставочная витрина
(Display Case) |
|
|
|
| Автоматическая турель
(Automated Turret) |
|
|
|
| Пожарный шлюз
(Firelock) |
|
|
|
| Воздушный шлюз
(Airlock) |
|
|
|
| Мясные крюки
(Meatspike) |
|
|
|
| Патрон для лампы
(Light Fixture) |
|
|
|
| Локальный контроллер питания
(Area Power Controller) |
|
|
|
| Датчик атмосферы
(Air Alarm) |
|
|
|
| Пожарная сигнализация
(Fire Alarm) |
|
|
|
| Интерком
(Intercom) |
|
|
|
| Камера наблюдения
(Security Camera) |
|
|
|
| Ящик для огнетушителя
(Extinguisher Cabinet) |
|
|
|
| Граната
(Grenade) |
|
|
|


Стеклянные конструкции
Список конструкций, требующих применения только стекла или армированных стеклянных листов.
| Объект | Материалы | Создание | Деконструкция |
|---|---|---|---|
| Малый аквариум
(Fishbowl) |
|
|
|
| Большой аквариум
(Fish Tank) |
|
|
|
| Настенный аквариум
(Wall Aquarium) |
|
|
|
| Боковое стекло
(Directional Window) |
ИЛИ
|
ИЛИ
|
|
| Полное стекло
(Fulltile Window) |
ИЛИ
|
|
|
| Армированное боковое стекло
(Reinforced Directional Window) |
ИЛИ
|
ИЛИ
|
|
| Армированное полное стекло
(Reinforced Fulltile Window) |
ИЛИ
|
|
|


Смешанные конструкции
Список конструкций, требующих применения обычного или армированного стекла в качестве исходного компонента.
| Объект | Материалы | Создание | Деконструкция |
|---|---|---|---|
| Стеклянная дверь
(Windoor) |
|
|
|

Пласталевые и прочие конструкции
Список конструкций, требующих для создания только особые материалы типа пластали и т. д.
| Объект | Материалы | Создание | Деконструкция |
|---|---|---|---|
| Хирургический стол
(Surgery Table) |
|
|
|
| Металлический ящик
(Metal Crate) |
|
|
|
| Титановое окно
(Titanium Window) |
|
|
|
| Пластитановое окно
(Plastitanium Window) |
|
|
|
| Пластитановая стена
(Plastitanium Wall) |
|
|
|
| Пластитановая плитка
(Plastitanium Tiles) |
|
|
|


Смешанные конструкции
Список конструкций, требующих применения особых материалов в качестве исходного компонента.
| Объект | Материалы | Создание | Деконструкция |
|---|---|---|---|
| Жаростойкая усиленная стена
(Coated Reinforced Wall) |
|
|
|
| Ядро ИИ
(AI Core) |
|
|
|
| Корпус бомбы
(Bomb Assembly) |
|
|
|
| Ускоритель масс
(Mass Driver) |
|
|
|
| Усиленный шлюз
(Reinforced Airlock) |
|
|
|


Деревянные конструкции
Список конструкций, требующих применения древесины в качестве исходного компонента.
| Объект | Материалы | Создание | Деконструкция |
|---|---|---|---|
| Паркет
(Wood Floor Tiles) |
|
|
|
| Деревянный / покерный стол
(Wood Table / Poker Table) |
|
ИЛИ
|
ИЛИ
|
| Деревянный стул
(Wooden Chair) |
|
|
|
| Деревянная баррикада
(Wooden Barricade) |
|
|
|
| Кострище
(Bonfire) |
|
|
|
| Книжная полка
(Bookcase) |
|
|
|
| Комод
(Dresser) |
|
|
|
| Вешалка для одежды
(Coat Rack) |
|
|
|
| (Сушилка)
Drying Rack
|
|
|
|
| Собачья подстилка
(Dog Bed) |
|
|
|
| Деревянная дверь
(Wooden Door) |
|
|
|
| Гроб
(Coffin) |
|
|
|
| Пасека
(Apiary) |
|
|
|
| Рама для сот
(Honey Frame) |
|
|
|
| Бочка для заквашивания
(Fermenting Barrel) |
|
|
|


Пластиковые и прочие конструкции
Список конструкций, требующих применения пластика и иных материалов в качестве исходного компонента.
| Объект | Материалы | Создание | Деконструкция |
|---|---|---|---|
| Пластиковые шторки
(Plastic Flaps) |
|
|
|
| Знак «Мокрый пол»
(Wet Floor Sign) |
|
|
|
| Пластиковый ящик
(Plastic Crate) |
|
|
|
| Пластиковая пепельница
(Plastic Ashtray) |
|
|
|
| Пластиковая посуда
(Plastic Utensils) |
|
|
|
| Пластиковая бутылка
(Water Bottle) |
|
|
|
| Картонная вырезка
(Cardboard Cutout) |
|
|
|
| Картонная коробка
(Cardboard Box) |
|
|
|
| Указатели и таблички
(signs) |
|
|
|


Особые конструкции
Список конструкций, требующих специальных материалов.
| Объект | Материалы | Создание | Деконструкция |
|---|---|---|---|
| Солнечный трекер
(Solar Tracker) |
|
|
|
| Солнечная панель
(Solar Panel) |
|
|
|
| Лента конвейера
(Conveyor Belt) |
|
|
|
| Рычаг конвейера
(Conveyor switch) |
|
|
|
| Раковина
(Sink) |
|
|
|
| Туалет
(Toilet) |
|
|
|
| Писсуар
(Urinal) |
|
|
|


Трубы
Список конструкций, строящихся с помощью раздатчика труб или его аналога ручного раздатчика труб (ака RPD).
| Объект | Материалы | Создание | Деконструкция |
|---|---|---|---|
| Мусорка
(Disposal bin) |
|
|
Открученную мусорку можно убрать с помощью режима Recycle в Rapid Pipe Dispenser. |
| Труба мусоросброса
(Disposal Pipe) |
|
|
Открученную трубу можно убрать с помощью режима Recycle в Rapid Pipe Dispenser. Для вращения незакреплённой трубы используйте Alt-ЛКМ. |
| Труба входа/выхода мусоросброса
(Disposal Trunk) |
|
|
Открученную трубу можно убрать с помощью режима Recycle в Rapid Pipe Dispenser. Для вращения незакреплённой трубы используйте Alt-ЛКМ. |
| Вход/выход мусоросброса
(Disposal Intake/Outlet) |
|
|
Открученный вход/выход мусоросброса можно убрать с помощью режима Recycle в Rapid Pipe Dispenser. Для вращения незакреплённого входа/выхода мусоросброса используйте Alt-ЛКМ. |


Отражатель (Reflector)
- Используйте Сварочный инструмент, чтобы закрепить или открепить от пола, или отремонтировать.
- Используйте Отвертку, чтобы зафиксировать вращение.
- Используйте Alt-ЛКМ, чтобы вращать.
| Отражатель
(Reflector) |
Материалы для постройки | Как построить |
|---|---|---|
|
|
|
|
| Как разобрать | ||
| Инструменты |
|
|
|
|


|
Доступно из игры |
| Внимание! Материал, изложенный ниже, доступен для прочтения в виде книги
Постарайтесь не размещать ниже этой плашки информацию, которая не должна быть доступна персонажам внутри игры (см. OOC в IC). |
Сборка
Как известно, корпорация печётся о своих сотрудниках, поэтому снабжает каждую станцию под своим контролем достаточным количеством ресурсов. Чтобы открыть меню конструирования при работе с деревом, используйте на нём ![]() отвёртку, а при работе со сталью-
отвёртку, а при работе со сталью- ![]() сварку (не забудьте надеть специальную маску или очки), и, о чудо, откроется меню с выбором конструкций!
сварку (не забудьте надеть специальную маску или очки), и, о чудо, откроется меню с выбором конструкций!
Материалы
| Результат | Компоненты | Инструменты | Действия |
|---|---|---|---|
| 1 x |
Используйте сталь и кликните «2x metal rods» (создает два прута) | ||
| 1 x |
Ваши ловкие руки | Используйте прутья на стекле |
Покрытие
| Результат | Компоненты | Действия | Описание |
|---|---|---|---|
| 1 x |
Используйте прутья на космосе. | Это базовая зона для постройки чего-либо. Она устанавливается в космосе. | |
| 1 x |
Используйте прутья на обшивке. | Используется как более постоянная структура на открытых пространствах или для того, чтобы оставлять подпольные трубопроводы и проводку видимыми. | |
| 1 x |
Используйте стальной пол на решётчатом поле. | Обычный пол, на котором вы можете прокладывать проводку и трубы. | |
| 1 x |
Используйте стальной пол на обшивке. | Это обычный пол, его следует ставить во всех отсеках. Он указывает на то, что никаких технических работ в отсеке не проходит. | |
| Изготовить в пол в Автолате, притащить пол в зону постройки, закрепить его при помощи отвертки. | Светящийся пол. Выглядит стильно! |
Стены
| Результат | Компоненты | Инструменты | Действия |
|---|---|---|---|
| 2 x |
|
||
| 2 x |
|
Окна
| Результат | Компоненты | Инструменты | Действия |
|---|---|---|---|
| Сборка рамы | |||
| 2 x |
|
||
| 1 x |
|
||
| 1 x |
|
||
| 1x |
|
||
| 1x |
|
||
| 1x |
|
||
| Остекление рамы | |||
| 1 x |
|
||
| 2 x |
|
||
| 1 x |
|
||
| 1 x |
|
||
| 1 x |
|
||
| 1 x |
|
Стеклянные панели
| Результат | Компоненты | Инструменты | Действия |
|---|---|---|---|
| 1 x |
|
||
| 1 x |
|
![]()
Информация, не подпадающая под нормы цензуры корпорации NanoTrasen
Настенные механизмы
| Результат | Компоненты | Инструменты | Действия |
|---|---|---|---|
| 2x |
APC можно размещать в отсеках, которые определены как отсек станции с помощью чертежей станции Главного Инженера. Если вы пытаетесь заменить сломанный APC, вы можете убрать корпус разбив его, например, огнетушителем. |
||
| 2x |
|
||
| 2x |
|
||
| 1x Camera Assembly (создается в |
|
||
| 2x |
|
Шлюзы
| Результат | Компоненты | Инструменты | Действия |
|---|---|---|---|
| 4x |
Поврежденные шлюзы |
||
| 4x |
|
||
| 5x |
|
Прочее
| Результат | Компоненты | Инструменты | Действия |
|---|---|---|---|
| 5x |
|
||
| 10x |
|
||
| 4x |
|
||
| 1x Раздатчик мусорных труб |
|
||
|
 Машины
Постройка машин описана в этом гайде.
![]()
Информация, не подпадающая под нормы цензуры корпорации NanoTrasen
Демонтаж
Полы
| Требуется |
|---|
Ломом снимаются все покрытия пола, кроме подсвеченного (light floor), тот откручивается отвёрткой
Стены
| Требуется |
|---|
 Разварите покрытие
 Открутите ключом балки
 (Или выбейте их ломом и перетащите)
Укреплённые стены
| Требуется |
|---|
 Кусачки.
 Отвёртка.
 Сварочный аппарат.
 Лом.
 Гаечный ключ.
 Сварочный аппарат.
 Лом.
 Отвёртка.
 Кусачки.
 Гаечный ключ.
Оконные рамы
| Требуется |
|---|
 Чтобы разрушить раму используйте кусачки
 или
 Используйте отвёртку и перетащите раму в другое место
Первый метод разбирает её, возвращая потраченные на сборку прутья.
Окна
| Требуется |
|---|
 Работаем отвёрткой.
 Работаем ломом.
 Вытаскиваем стекло ключом.
 Разбираемся, что делать с оставшейся рамой.
В случае с укреплённым окном — действия необходимо повторить и для внутреннего слоя стекла.
Стеклянные панели
| Требуется |
|---|
or |
 Многократное использование сварочного аппарата уничтожает его
 или
 Выкручиваем отвёрткой из пазов, затем демонтируем ключом.
Укреплённые стеклянные панели
| Требуется |
|---|
 Работаем отвёрткой.
 Работаем ломом.
 Откручиваем раму отвёрткой.
 Разбираем ключом.
Удары тупым предметом или разваривание сварочным аппаратом превратит панель в кучу прутьев и осколков стекла.
Скрытая дверь (Обычная или Укреплённая)
| Требуется |
|---|
 Отвёртка
 Сварочный аппарат
 Гаечный ключ
Стол
| Требуется |
|---|
 Гаечным ключом разбираем на части.
 Демонтируем части гаечным ключом.
Укреплённый стол
| Требуется |
|---|
 Удаляем армирование отвёрткой.
 Гаечным ключом разбираем на части.
 Демонтируем части гаечным ключом.
Настенное оборудование
APC
| Требуется |
|---|
 Разблокируем картой доступа APC.
 Удаляем батарею.
 Развинчиваем электронику отвёрткой.
 Отжимаем ломом тайл пола перед APC
 Удаляем кусачками кабель.
 Поддеваем ломом Power Control Board.
 Удаляем сварочным аппаратом пустой блок из-под APC.
 После этого блок можно разобрать гаечный ключом, получив два куска металла.
Панель контроля атмосферы
| Требуется |
|---|
Развинчиваем покрытие отвёрткой.
Перекусываем кусачками все провода.
Выудите плату ломом.
Открутите от стены пустой блок ключом.
Пожарная тревога
| Требуется |
|---|
Развинчиваем покрытие отвёрткой.
Перекусываем кусачками все провода.
Выудите плату ломом.
Открутите от стены пустой блок ключом.
Аварийный шлюз
| Требуется |
|---|
Открываем Шлюз-обыкновенный
Кликаем по жёлтенькой части аварийного шлюза - шлюз аварийный опускается
Завариваем его
Отвёрткой открываем панель
Достаём ломиком плату
кликаем по нему гаечным ключом
Теперь его можно двигать
Если на шлюз ещё раз воздействовать сваркой - он превратится в листья металла
Шлюз
| Требуется |
|---|
Сваркой его, сваркой
Отвёрткой его, отвёрткой
Мультитулом отключаем болты
Болты активировались? Обрезаем кусачками все провода, затем снова соединяем. Пока не добьемся airlocks off
Отключили болты, ломиком кликаем на шлюз
Сваркой убираем стекло
Убираем провода кусачками
Если на шлюз ещё раз воздействовать сваркой - он превратится в листья металла
Не факт, что актуально: Этим методом невозможно разобрать шлюз после применения E-mag’а. Его можно разобрать лишь при помощи RCD. Возможно создание нового шлюза поверх E-mag’нутого.
Консоли
| Требуется |
|---|
 Отделяем экран отвёрткой.
 Достаём его ломом.
 Кусачками перекусываем провода.
 Развинчиваем плату отвёрткой.
 Достаём плату ломом.
 Гаечным ключом отвинчиваем каркас.
 Сварочным аппаратом разбираем каркас.
Возвращает все компоненты, потребовавшиеся при сборке.
Машины
| Требуется |
|---|
 Развинчиваем покрытие отвёрткой.
 Ломом достаём плату.
 Кусачками удаляем провода.
 Ключом разбираем каркас.
Обычно возвращает все компоненты, потребовавшиеся при сборке. Некоторые могут оказаться сломанными.
Recharge Station/Станция подзарядки
| Требуется |
|---|
 Снимаем блокировку картой доступа
 Отвёрткой снимаем корпус.
 Разбираем гаечным ключом.
 Кусачками удаляем проводку.
 Ломом удаляем остальное.
Обычно возвращает все компоненты, потребовавшиеся при сборке. Некоторые могут оказаться сломанными.
Камера слежения
| Требуется |
|---|
 Открываем заднюю панель отвёрткой.
 Кусачками режем все провода. (Перекусывание кабеля тревоги не обязательно)
 Сварочный аппарат.
 Гаечным ключом откручиваем камеру от стены.
 Ломом вынимаем из камеры все апгрейды.
Почтовые трубы
| Требуется |
|---|
 Разварите соединение труб
 Открутите гаечным ключом от пола
Примечание: Вы можете перетащить трубы в disposal pipe dispenser чтобы уничтожить их
Мусорка
| Требуется |
|---|
 Отключите насос
 Обесточиваем отвёрткой
 Сварочный аппаратом развариваем соединения
 Гаечный ключом откручиваем от пола
Солнечные панели и Трекеры
| Требуется |
|---|
 Выньте панель ломом.
 Если вы разбираете трекер, выньте ломом электронику (НЕОБЯЗАТЕЛЬНО)
 Гаечным ключом отсоедините оставшиеся части. Теперь их можно перемещать.
Шкаф
| Требуется |
|---|
 Открыть шкаф.
 Разварить шкаф.
Power Wires/Провода
Провода доступны из желтых коробок с инструментами, в инженерных раздатчиках, а также разбросаны по техническим отсекам и туннелям.
- По проводу пойдет напряжение, если он подключен к сети (уже запитанным проводам или АРС). Если вы коснетесь, вас ударит током, причиняя ожоги в зависимости от напряжения в сети.
- Изолирующие перчатки полностью блокируют любые удары током. Да-да, жалкие желтые перчатки спасут вас от высоковольтового кабеля.
И как мне проложить провода?
Чтобы положить провода, нажмите по нужной плитке. Провода всегда кладутся по направлению к вам, как на рисунке:

Когда Вы не можете положить провод таким образом, у вас есть альтернативный способ. Просто встаньте на тайл, повернитесь в ту сторону, откуда провод должен идти (CTRL + стрелка) и нажмите на том тайле, на котором Вы стоите.
![]()
Эта картинка была сделана способом, описанным выше, никаких трюков!
Если Вы случайно ошибётесь и проложите провод не там, используйте кусачки для того, чтобы отсоединить его! Очень просто. И да, если Вам ценна Ваша жизнь, наденьте изолирующие перчатки.
Неплавная прокладка сети
Допустим, у вас есть ситуация такого типа:

Самый простой способ прокладки сети. Также известен, как узелковый способ. За такое инженеров бьют по рукам.
Чиним это вот так:
![]() →
→ ![]() →
→ ![]() Готово.
Готово.
Просто поместите себя возле обрезанного провода и кликните по полу, чтобы . Убедитесь, что вы попали именно по полу, а не по кабелю. Это нужно, потому что:
![]() +
+ ![]() =
= ![]()
Это выглядит почти как на предыдущей картинке, но на самом деле нет. На предыдущей картинке в конечном результате 3 части провода, один идёт от востока к центру, другой от севера к центру, третий от запада к центру. А в этой ситуации у Вас две части провода, одна идёт со стороны севера, другая — со стороны запада. Эти провода не встречаются в центре, ведь одна идёт со стороны севера, а горизонтальный кабель идёт с запада на восток без соединения (узелка) в центре.
Неплавные провода (также известны, как узелковые) также подают электрический ток на любое устройство, установленное в том же тайле.
Плавная прокладка проводов
Просто кликайте по проводу с «узелками» на конце.
Чтобы всё починить вам нужно следовать этой инструкции:
![]() →
→ ![]() →
→ ![]() →
→ ![]() Готово.
Готово.
В этом методе Вам нужно сначала проложить один кабель из одной из сторон в центр. Затем вы помещаете себя на противоположную сторону и тыкаете по кабелю (не по полу!). Вы соедините два провода и у Вас получится один длинный плавный провод (картинка 2). Затем Вы помещаете кусочек от последней доступной позиции в центр (картинка 3) и кликаете по нему из последнего направления, чтобы сделать второй плавный отрезок провода (картинка 4).
Этот метод требует больше кабеля, чем первый, но им чаще пользуются, так как он приятнее выглядит.
Соединение проводов
Два кабеля подключены к электросети, если их концы соединены.
| Соединены | Не соединены | |
|---|---|---|
|

|
Подключение аппаратов
Разнообразные механизмы должны быть подключены исключительно к узлам проводов:
![]() +
+ ![]() = Подключена
= Подключена
![]() +
+ ![]() = Не подключена
= Не подключена
![]() +
+ ![]() = Не подключена
= Не подключена
Исключения :
- APC должен быть подключен через терминал (то есть что бы соединить АРС с сетью, вы подключаете сеть к терминалу),
- Вход SMES должен быть подключен через терминал, а выход — через обычный узелок под SMES.
Перезагрузка электросети
Попытка электросети «перезагрузиться» целиком, чтобы заработали добавленные / удалённые провода, подающие ток на всю электросеть, заставит APC перестать заряжаться на секунду, а в огромных сетях это может вызвать целую кучу APC перестать заряжаться на некоторое время.
Не трогайте эти провода, пока не будете вынуждены, это вызывает не только потерю питания по всей станции, но и значительные задержки отклика оборудования («лаги»).
Если Вы хотите работать, например, Инженером, то должны знать как создавать и разбирать вещи.
Базовые Инструменты
Прежде чем что-то собирать или разбирать Вам нужно найти несколько полезных инструментов.
Все нужные инструменты Вы можете найти в синем Ящике с Инструментами, на станции. Их также можно сделать в Автолате или купить в торговом автомате YouTool.

|

|

|

|

|
Материалы
Что бы что-то построить Вам нужны материалы. Знайте, что большинство материалов можно использовать для постройки стен, дверей, плиток пола, стульев, столов и статуй.
Металл
| Описание |
Вещи, которые Вы можете создать, активировав металл в руке:
Прочие штуки,, которые можно делать с металлом:
Как производить Металл: Выплавить железную руду в печи на шахте. |
Стекло и Армированное Стекло
 Стекло и Армированное Стекло |
Можно найти в: Инженерном отделе, Внешнем хранилище инструментов, E.V.A., атмосе и Роботике. Шахтёры могут выплавить стекло из песка, добытого на Лаваленде. Запасной вариант: заказать в Карго Используется для: Создания окон и разных вещей из стекла Использование: Держите в активной руке и активируйте чтобы начать строительство. |
| Описание |
 Стекло: Стекло:
Вещи, которые Вы можете создать, активировав стекло или плазмастекло в руке::
Прочие вещи, которые можно делать со стеклом:
Прочие вещи, которые можно делать с усиленным стеклом:
Как добыть стекло: Расплавьте песок в Шахтёрской плавильне, или в Шахтёрской печи. Как сделать усиленное стекло: Используйте стержни Как произвести плазмастекло: Выберите пункт сплав Плазма + Стекло в Протолате карго, инженерного или научного отдела. Как сделать усиленное плазмастекло: Используйте стержни |
 Усиленное стекло:
 Усиленное плазмастекло:
Плазма
 Плазма |
Можно найти в: химии, вирусологии, немного в инженерном, немного в ксенобиологии, основной источник — руда на Лаваленде. Используется для: создания некоторых предметов, сжигания станции дотла, а так же в протолатах. Использование: Держите в активной руке и активируйте чтобы начать строительство. |
| Описание |
Вещи, которые Вы можете создать, активировав листы плазмы в руке:
Прочие штуки, которые можно делать с плазмой:
Как добыть плазму: |
Пласталь
 Пласталь |
Можно найти в: инженерном и робототехническом отделах, в Е.В.А., в лобби инженерного отдела. Карго может заказать пласталь по высокой цене. Загрузите листы железа и плазмы в любой протолат, шахтёрскую плавильню или хранилище ресурсов. Напечатайте «сплав Плазма + Железо» в протолате карго, инженерного или научного отдела. Используется для: строительства армированных стен, мехов, для создания ядра ИИ. Использование: держите в активной руке и активируйте чтобы начать строительство. |
| Описание |
| Пласталь это сплав металла и плазмы.
Вещи, которые Вы можете создать, активировав пласталь в руке:
Прочие штуки, которые можно делать с пласталью:
|
Стержни
 Стержни |
Можно найти в: инженерном, ЕВЕ, хранилище инструментов. Можно сделать из листов металла. Используется для: создания решёток, укрепления стекла, создания некоторых видов оружия. Использование: держите в активной руке и активируйте чтобы начать строительство. |
| Описание |
Вещи, которые Вы можете создать, активировав пласталь в руке:
Прочие штуки, которые можно делать со стержнями:
Как сделать стержни: Используйте Металл в активной руке и кликните на пункт «2x металлических стержня» в выпадающем окошке. |
Напольная плитка
 Напольная плитка |
Можно найти в: создаётся из листов железа или снимается ломиком с пола Используется для: создания пола или напольной плитки |
| Описание |
| Плитка используется для создания пола. Пол можно сделать красивее если создать плитку из другого материала.
Штуки которые можно делать с напольной плиткой:
Смотри строительство. Как сделать напольную плитку: Используйте металл или почти любой другой материал в активной руке и кликните на «4x напольная плитка» в появившемся окне (создаст 4 плитки для пола). |
Серебро
| Серебро Серебро |
Можно найти в: Шахте, протолате или шахтёрской печке. Химики могут создать серебро по специальному рецепту. Используется для: создания некоторых предметов в протолате, операционных столов. Использование: Держите в активной руке и активируйте чтобы начать строительство. |
| Описание |
Вещи, которые Вы можете создать, активировав серебро в руке:
Прочие штуки, которые можно делать с серебром:
|
Золото
 Золото |
Можно найти в: Шахте, протолате или шахтёрской печке. Используется для: создания некоторых предметов в протолате, статуй; как катализатор в некоторых реакциях. Использование: держите в активной руке и активируйте чтобы начать строительство. |
| Описание |
Вещи, которые Вы можете создать, активировав золото в активной руке:
Прочие штуки, которые можно делать с золотом:
|
Уран
| Уран Уран |
Можно найти в: Шахте, протолате или шахтёрской печке. Используется для: создания некоторых предметов в протолате, статуй. Использование: держите в активной руке и активируйте чтобы начать строительство. |
| Описание |
Вещи, которые Вы можете создать, активировав уран в активной руке:
Уран может облучать крошечными дозами радиации во время создания предметов. Прочие штуки, которые можно делать с ураном:
|
Титан
| Титан Титан |
Можно найти в: Deliver titanium ore to the ORM. Eject titanium from ORM or any silo-linked protolathe/techfab. Используется для: Used in a departmental Protolathe/Techfab and in Robotics Использование: Hold in active hand and activate it to start constructing |
| Описание |
Things you can make by having Titanium sheets in your hand and activating them:
Some other things you can do with Titanium:
|
Титановое Стекло
| Титановое Стекло Титановое Стекло |
Можно найти в: Deliver titanium ores and ash/sand/glass to the ORM. Print Titanium + Glass alloy from silo-linked cargo, engineering or science protolathe/techfab. Используется для: Construction Использование: Hold in active hand and activate it to start constructing |
| Описание |
Things you can make by having sheets in your hand and activating them:
|
Пластитаниум
| Пластитаниум Пластитаниум |
Можно найти в: Создаётся из плазмы и титана в ОРМ. Или же Сплав Плазмы + Титана в сило и карго, инженерном и научном Протолате/Фабрикаторе. Используется для: Строительство Использование: Держите в активной руке и активируйте чтобы начать строить. |
| Описание |
Вещи которые, Вы можете сделать, держа листы в руке и активировав их:
Другие вещи которые, можно сделать, из Пластитаниума:
|
Пластитановое Стекло
| Пластитановое Стекло Пластитановое Стекло |
Можно найти в: Создаётся из плазмы, титана и стекла в ОРМ. Или же Сплав Плазмы + Титана + Стекла в сило и карго, инженерном и научном Протолате/Фабрикаторе. Используется для: Строительство Использование: Держите в активной руке и активируйте чтобы начать строить. |
| Описание |
Вещи которые, Вы можете сделать, держа листы в руке и активировав их:
|
Алмазы
| Алмазы Алмазы |
Можно найти в: Доставляйте алмазную руду в ОРМ. Извлекайте их из ОРМ или из связанного с ним сило а также из Протолата/Фабрикатора. Используется для: Создание некоторых вещей или использование в Протолате/Фабрикаторе Использование: Держите в активной руке и активируйте для начала строительства. |
| Описание |
Это несколько вещей которые, Вы можете создать, из алмазов если активируете их в активной руке:
Другие вещи которые, можно сделать, из алмазов:
|
Блюспейс Поликристалл
| Описание |
| Это кристалл который Вы получаете при извлечении «Блюспейс крисстала» из сило. Его нельзя использовать не для чего, кроме как превратитб обратно в то что по сути является тем же самым что сырым блюспейс криссталом, который можно использовать для нескольких целей.
Вот некоторые вещи которые, Вы можете сделать, из Блюспейс Поликристалла:
|
Бананиум
 Бананиум |
Можно найти в: Руинах в космосе, на Лаваленде и в Ксенобиологии. Используется для: Создание вещей связанных с Клоуном, и использование в Протолате/Фабрикаторе. Использование: Держать в активной руке и активировать чтобы начать строительство. |
| Описание |
Вещи которые Вы можете создать держа в руке Бананиум и активировав его:
Другие вещи которые Вы можете сделать с Бананиумом:
Так как же произвести Бананиум: |
Рунит
| Рунит Рунит |
Можно найти в: Руинах на Лаваленде Используется для: Создание вещей в Автолате и использование как нестандартный материал. Использование: Использовать в автолате. Для создания ящика с инструментами или рыцарских доспехов. |
| Описание |
| Самый редкий материал который Вы только можете найти. Используется только для создания вещей, требующих нестандартные материалы, таких как рыцарские доспехи и ящик с инструментами из автолата. Для рыцарских доспехов необходим Магический кузнечный диск вставленный в автолат. |
Доски
 Доски |
Можно найти в: Ready stacks can be found nowhere, can be made from deconstructing tables. Используется для: Constructing various wooden things Использование: Hold in active hand and activate it to start constructing |
| Описание |
Things you can make by having Planks in your hand and activating them:
How to produce Planks: Grow Tower Caps and cut them up with a sharp item, for example a Hatchet. |
Кожа
| Кожа Кожа |
Можно найти в: Ready stacks can be found nowhere, but can be produced. Используется для: Making leather products such as toolbelts and bandoliers Использование: Hold in active hand and use it to craft things |
| Описание |
Things you can make by having Leather in your hand and activating it:
How to produce Leather: Either use the Biogenerator inside Hydroponics or Garden, or create leather through tanning:
|
Ткань
| Ткань Ткань |
Можно найти в: Ready stacks can be found nowhere, but can be produced. Используется для: Crafting certain textiles and repairing damaged clothes Использование: Hold in active hand and use it to craft things. |
| Описание |
| Use on clothes damaged by fire or acid to repair them.
Things you can make by having Cloth in your hand and activating it:
How to produce Cloth: Use the Biogenerator inside Hydroponics or Garden, or use Wirecutters on bedsheets. |
Пластик
| Пластик Пластик |
Можно найти в: Ready stacks can be found nowhere, but can be produced. Используется для: Making a few plastic products, or used in a departmental Protolathe/Techfab Использование: Hold in active hand and use it to craft things |
| Описание |
Things you can make by having Plastic in your hand and activating it:
Other things you can do with Plastic:
How to produce Plastic: Made in the Chemistry lab. |
Картон
| Картон Картон |
Можно найти в: Can sometimes be found in Maintenance. Используется для: Making a few items Использование: Hold in active hand and use it to craft things |
| Описание |
Things you can make by having Cardboard in your hand and activating it:
How to produce Cardboard: Empty a box and activate it in your hand to turn it into cardboard. Most crewmembers start with a box in their backpack. |
Песок
 Песок и Вулканический пепел |
Можно найти в: Crafted by using sand or volcanic ash in hand. Используется для: Turning into glass or sandstone. Использование: Hold in active hand and activate it to start constructing |
| Описание |
| Sand Things you can make by having piles of Sand or Ash in your hand and activating them:
Other things you can do with Sand and Ash:
How to produce Volcanic Ash: How to produce Sand: |
Песчаник
| Песчаник Песчаник |
Можно найти в: Crafted by using sand or volcanic ash in hand. Используется для: Making a few products, and ghetto hydroponics. Использование: Hold in active hand and activate it to start constructing |
| Описание |
Things you can make by having Sandstone bricks in your hand and activating them:
How to produce Sandstone: |
Блоки из песка
| Блоки из песка Блоки из песка |
Можно найти в: Crafted by using sand or volcanic ash on a sink. Используется для: Construction material. Использование: Hold in active hand and activate it to start constructing |
| Описание |
| Lets you build some things made out of sand. |
Мясо
| Мясо Мясо |
Можно найти в: Insert raw slabs of meat Используется для: Making a few products. Использование: Hold in active hand and activate it to start constructing. |
| Описание |
| An edible material which also makes squishy sounds.
Things you can make by having Meat sheets in your hand and activating them:
Some other things you can do with meat sheets:
|
Конструкции
Полы
Решётка
The basic base for all types of construction, this is placed directly in space.
| Lattice Lattice |
Requires to build | How to build |
|---|---|---|
|
Use the rod on an empty space tile. |
||
| How to deconstruct | ||
| Tools |
Use wirecutters to cut the lattice into one rod. |
|
|
|
Catwalk
Just like a lattice, except you can place wires on it.
| Catwalk Catwalk |
Requires to build | How to build |
|---|---|---|
|
Use the rods on a lattice. |
||
| How to deconstruct | ||
| Tools |
Use wirecutters to cut the catwalk into 2 rods. |
|
|
|
Plating
The basic floor which you put things like wires and pipes upon. ‘All’ floors and walls are built on top of this.
| Plating Plating |
Requires to build | How to build |
|---|---|---|
|
Use a floor tile on a lattice or catwalk. |
||
| How to deconstruct | ||
| Tools |
Use a crowbar on broken plating, otherwise it does not deconstruct. Can be deconstructed with an RCD. |
|
|
|
||
| How to repair | ||
| Tools |
Use a welder on broken plating to repair it. |
|
|
|
Железные плитки пола
This is the basic «nice» floor, this floor should be considered used in all public areas, hence why there’s none of these in maintenance tunnels.
| Steel Floor Steel Floor |
Requires to build | How to build |
|---|---|---|
|
Use a floor tile on plating. |
||
| How to deconstruct | ||
| Tools |
Use a crowbar on a floor tile to remove it. It will be destroyed if broken. |
|
|
|
Деревянный пол
This is a fancy floor, used in the library and similar places.
| Wood Floor Wood Floor |
Requires to build | How to build |
|---|---|---|
| Wood tilex1 |
Use a wood tile on plating. Wood tiles can be made of planks of wood. |
|
| How to deconstruct | ||
| Tools |
Detach the tile with a screwdriver. |
|
|
|
Армированный пол
This is a reinforced floor, used in science and similar areas for better protection against fire or explosions.
| Reinforced Floor Reinforced Floor |
Requires to build | How to build |
|---|---|---|
|
Use rods on a plating. |
||
| How to deconstruct | ||
| Tools |
Use a wrench to dismantle it to two rods. |
|
|
|
Ковровое покрытие
This is a carpeted floor, used to make your office look fancy.
| Carpeted Floor Carpeted Floor |
Requires to build | How to build |
|---|---|---|
| Carpetx1 |
Use any type of carpet floor on a plating. |
|
| How to deconstruct | ||
| Tools |
Use a crowbar to pick up the carpet tile. |
|
|
|
Some other carpets available from cargo (and their constructable tables):
Файл:Twaticus carpet comparison oct2019.png
Other kinds of carpet exist, like funky arcade carpets, or garishly beautiful corporate carpets with NT written on them everywhere.
Red carpets can be reskinned to have other religious symbols, or star shapes.
Светящийся пол
A fancy, more futuristic floor that lights up its surroundings.
| Disco fever! Light Floor |
Requires to build | How to build |
|---|---|---|
|
||
| How to deconstruct | ||
| Tools |
|
|
|
|
Стены
Обычная Стена
Это самые обычные стены которые Вы можете найти по всей станции, их легко построить и разобрать но они не такие прочные как армированные стены. Они так же могут быть потайными дверями. Стены так же можно сделать из любых материалов. Они полезны для:
- Не пускания людей внутрь.
- Удержание людей внутри.
- Удержание людей от посещения мест.
| Обычная Стена |
Требуется для постройки | Как построить |
|---|---|---|
|
||
| Для разбора | ||
| Инструменты |
|
|
|
|
Армированные Стены
Это усиленный тип обычной стены встречаться в более охраняемых зонах станции, их не так сложно построить, но демонтировать их это сплошное мучение. Как и обычная стена эта может быть потайной дверью. Их используют для:
- Удержания людей в зонах повышенной безопасности и за их пределами.
| Армированная Стена |
Требуется для постройки | Как построить |
|---|---|---|
|
||
| Для разбора | ||
| Инструменты |
|
|
|
|
Обычная/Усиленная скрытая дверь
Так же известные как «фальшивые стены» и «скрытые стены». При небольшом воображении их можно использовать во многих замечательных тактиках, начиная от засад и заканчивая секретными проходами в вашу базу-убежище.
- Нажмите чтобы открыть.
- Почти незаметный путь к отступлению.
- В остальном, обычная стена.
| Сюрприз, ублюдок! Потайная дверь Вау Усиленная скрытая дверь |
Требуется для постройки | Как построить |
|---|---|---|
Чтобы превратить обычную стену в скрытую дверь, разберите её, открутить каркас и используйте 2 листа металла на открученном каркасе. |
||
| Для разбора | ||
| Инструменты |
|
|
|
|
Normal/Reinforced Windows
Windows are aesthetically quite pleasing because they are almost invisible. You can build two types of windows:
- Full: A see-through wall. Usually only used if you don’t have enough for 2-4 one-directionals or the metal for a wall.
- One Direction: Stops movement only from the way it faces.
| One Directional Glass Full Glass Wall Windows One Directional Reinforced Glass Full Reinforced Glass Wall Reinforced Windows |
Requires to build | How to build |
|---|---|---|
or |
|
|
| How to deconstruct | ||
| Tools |
Normal window (including plasmaglass):
Hitting a normal pane repeatedly with a weapon will smash it into glass shards. Normal windows have 50 integrity (health), while plasma windows have 300. Directional windows have half integrity. Reinforced window (including reinforced plasmaglass):
Reinforced windows require a melee item over 11 damage to damage at all, have 150 integrity, and 80 melee armor. This is approximately 1 minute of sustained beating with a toolbox. Reinforced plasma windows require a melee item over 21 damage to damage at all, have 1000 integrity, and 80 melee armor. Breaks down into glass shards and a metal rods. Directional windows have half integrity. |
|
|
|
Wall Mountings
APC
Info about Area Power Controllers can be found here.
If broken, you will have to deconstruct then construct the APC. An entire set of fresh parts will be needed.
 APC |
Requires to build | How to build |
|---|---|---|
|
||
| How to deconstruct | ||
| Tools |
|
|
|
|
Air Alarm
Info about Air Alarms can be found here.
 Air Alarm |
Requires to build | How to build |
|---|---|---|
|
||
| How to deconstruct | ||
| Tools |
|
|
|
|
Fire Alarm
Info about Fire Alarms can be found here.
 Fire Alarm |
Requires to build | How to build |
|---|---|---|
|
||
| How to deconstruct | ||
| Tools |
|
|
|
|
Security Camera
Electric eyes of the AI or for camera monitors to look through.
Camera upgrades:
- Solid Plasma for EMP-proofing.
- Analyzer for X-ray.
- Proximity Sensor for motion alarm.
See here how to hack a Security Camera.
 Security Camera |
Requires to build | How to build |
|---|---|---|
|
||
| How to deconstruct | ||
| Tools |
The AI will receive a camera alarm upon re-activation of a camera, or if it gets deactivated from brute force. |
|
|
|
Light Fixture
Provides light for the people. Bulb fixture is much dimmer than the tube-one.
| Light Fixture Light Fixture |
Requires to build | How to build |
|---|---|---|
|
||
| How to deconstruct | ||
| Tools |
|
|
|
|
Requests Console
Can be found in every room where someone is supposed to work. The Requests Consoles can be used to request low/high urgency assistance, request supplies with low/high priority, relay anonymous information or view sent and received messages. All of these produce a message to the selected Request Console and can be swiped with an ID to confirm the identity of the sender. Can be hacked to enable the ‘EXTREME’ priority for your requests.
The Bridge and Heads’ Offices have special Requests Consoles which can send station-wide announcements if swiped with an authorized ID.
 Requests Console |
Requires to build | How to build |
|---|---|---|
| Roundstart only. Can not be constructed. | ||
| How to deconstruct | ||
| Tools |
Can’t be deconstructed without violence. |
|
Newscaster
The newscaster is a widespread type of wall console, thanks to NanoTrasen wanting to keep you up to date with the latest news.
You can view newsfeeds other crewmembers have made, or make your own! You can even attach photos to the news!
Every Newscaster can print out 15 newspapers for people who enjoy reading stuff from the paper.
Security Newscasters can be found in Brig and can make «Wanted» Issues, censor out harmful newsfeed stories, or lock down a whole channel with a D-Notice.
| Newscaster Newscaster |
Requires to build | How to build |
|---|---|---|
| 1x newscaster frame (from Autolathe) | Attach newscaster frame to wall. | |
| How to deconstruct | ||
| Tools |
|
|
Bounty Board
Used for players to request favors or items from other players for a price.
To create a bounty: Click the bounty board. Click New Bounty. Write your request in the empty field, then set a price in the next field, then click submit. Your name will show up in a list.
To complete someone elses bounty: Click the name of the requester in the bounty board. Click apply. Your name shows up as Requested Applicant. Deliver the item or complete the request of the issuer.
To pay someone for completing your bounty: Open the bounty console. Click your name. Click the little icon next to name of the person who completed your bounty (under Request Applicants). This will pay that person. You can click multiple times to pay extra. Then remove the bounty with DELETE if it is no longer wanted.
| Bounty Board Bounty Board |
Requires to build | How to build |
|---|---|---|
| 1x bounty board frame (from Autolathe) | Attach bounty board frame to wall. | |
| How to deconstruct | ||
| Tools |
|
|
Other
Grille
Grilles are usually used in combination with directional windows. They allow gases and energy rounds to pass through them, but stop other objects. They can also be electrified for high security areas by building them on top of a live power wire.
- Keeping people in or out.
- Securing an area with electrified grilles.
| Grille Grille |
Requires to build | How to build |
|---|---|---|
|
||
| How to deconstruct | ||
| Tools |
|
|
|
|
Barricade
The poor man’s barrier, not nearly as strong or cool looking. Useful for:
- Keeping people in or out, for a short while.
| Wooden Barricade Wooden Barricade |
Requires to build | How to build |
|---|---|---|
|
||
| How to deconstruct | ||
| Tools |
Cannot be neatly deconstructed. Just smash it with anything to get 3 planks. |
|
|
Anything |
||
| How to repair | ||
| Tools |
Use wooden planks to repair. |
|
|
|
Windoor (Window-door)
Like a door, but with access controls. Windoors can’t be hacked or even pried open with jaws of life. They can be pried open with a crowbar ![]() if unpowered, and emagging works.
if unpowered, and emagging works.
| Windoor Windoor |
Requires to build | How to build |
|---|---|---|
Airlock Electronics Airlock Electronics x1 |
|
|
| How to deconstruct | ||
| Tools |
|
|
|
|
Button
This is a button — it can remotely control an airlock. You can also put a signaler in one to have it pulse the signaler when pressed.
| A Button Button |
Requires to build | How to build |
|---|---|---|
OPTIONALAirlock ElectronicsAirlock Electronics x1 |
|
|
| How to deconstruct | ||
| Tools |
|
|
|
|
Firelock
This is a firelock — it locks an area when a fire alarm in the area is triggered. Don’t get squished!
| A Firelock Firelock |
Requires to build | How to build |
|---|---|---|
OPTIONAL: |
|
|
| How to deconstruct | ||
| Tools |
Has 40% chance to drop a frame when destroyed by force. |
|
|
|
Reflector
This is an angular beam reflector. Any energy projectiles hitting it will be reflected at an angle depending on rotation. There are also «box» reflectors that change the direction of struck projectiles to face a single way, regardless of where they impact the reflector. The supermatter engine uses reflectors to make its emitters’ beams go through a single path. Ballistic projectiles will not be reflected!
- You can weld it to anchor it to or unanchor it from the floor, or to repair it.
- Use a screwdriver to lock or unlock its rotation.
- Alt-click it to rotate its angle.
| A reflector A double reflectorA box reflector Reflector |
Requires to build | How to build |
|---|---|---|
|
||
| How to deconstruct | ||
| Tools |
|
|
|
|
Airlock
This is an airlock — it locks air. Everyone just calls them doors, although they are not actual doors. If you want to hack an airlock, see here.
 Airlock |
Requires to build | How to build |
|---|---|---|
OPTIONAL: Airlock ElectronicsAirlock Electronics x1 |
|
|
| How to deconstruct | ||
| Tools |
If the airlock has been emagged, skip to step 4.
|
|
|
|
Turret
To ensure no one trespasses an area. Its options are (first option is the default setting):
- Status: On/Off — wether the turret’s power is on or off.
- Behaviour control are locked/unlocked — can be unlocked with a Security level ID.
- Check for Weapon Authorization: No/Yes — neutralizes people who have a weapon out but are not Heads or Security staff.
- Check Security Records: Yes/No — searches Security Records for criminals.
- Neutralize Identified Criminals: Yes/No — neutralizes crew members set to Arrest on the Security Records.
- Neutralize All Non-Security and Non-Command Personnel: No/Yes — self explanatory.
- Neutralize All Unidentified Life Signs: Yes/No — neutralizes aliens.
| Turret Turret |
Requires to build | How to build |
|---|---|---|
(use ID and hand to unlock and change turret settings, or turn it off and use wrench to move it) |
||
| How to deconstruct | ||
| Tools |
If the turret is not finished (only works before construction step 9):
If the turret is finished:
|
|
|
|
Ядро ИИ
The AI’s house.
 AI Core |
Requires to build | How to build |
|---|---|---|
Optional: |
|
|
| How to deconstruct | ||
| Tools |
|
|
|
|
Solar Panels and Trackers
You can generate power with these things.
| Solar Panel Solar Panel Solar Tracker |
Requires to build | How to build |
|---|---|---|
| Solar Assemblyx1 Tracker: |
|
|
| How to deconstruct | ||
| Tools |
|
|
|
|
Disposal Pipes and Machinery
The disposal system of the station.
| Disposal Bin Disposal Outlet Disposal Pipes and Machinery |
Requires to build | How to build |
|---|---|---|
| Disposal Pipex1 or Disposal Binx1 or Disposal Outletx1 |
|
|
| How to deconstruct | ||
| Tools |
|
|
|
( |
Computers
Computers can have various uses.
| Some computer Computer |
Requires to build | How to build |
|---|---|---|
|
||
| How to deconstruct | ||
| Tools |
|
|
|
|
Modular Consoles
Modular Consoles are very flexible devices.
| A console Console |
Requires to build | How to build |
|---|---|---|
At least: one power source one drive (HDD or SSD) one processing unit access to programs (network cards or datadisks) |
|
|
| How to deconstruct | ||
| Tools |
|
|
|
|
 Machines
 Machines
 A machine frame with wiring and board installed |
Requires to build | How to build |
|---|---|---|
Components as specified by examining the mounted board |
|
|
| How to deconstruct | ||
| Tools |
|
|
|
|
For detailed information about each machine: machine construction guide.
Robots, Cyborgs and Mechs


 Robots, Cyborgs and Mechs
Their construction is described at: Robots, Cyborgs and Mechs -pages.
Mineral Door
The actual doors of the game. Nobody ever uses these poor things and they aren’t even airtight. Most ore materials (and wood) can be made into a door.
| Door
Door |
Requires to build | How to build |
|---|---|---|
| The mineral (or wood) of your choice x20 |
|
|
| How to deconstruct | ||
| Tools |
|
|
|
|
Conveyor Belt
The Conveyor Belts seen in Cargo, Disposals, and other places around the station can be set up similar to a floor tile, only they require a bit more setting up to become functional. Clicking a placed conveyor belt with an item will put that item on the belt unless it’s a wrench, screwdriver, crowbar or you are on Combat Mode ![]() Enable with 4, disable with 1 or toggle with F by default. Left-clicking people with an empty hand will Harm Файл:Harm 32.png them if on, or Help Файл:Help 32.png them if off. Prevents you from switching places or being pushed when colliding with people. .
Enable with 4, disable with 1 or toggle with F by default. Left-clicking people with an empty hand will Harm Файл:Harm 32.png them if on, or Help Файл:Help 32.png them if off. Prevents you from switching places or being pushed when colliding with people. .
| Conveyor Belt and Conveyor Belt Switch
|
Requires to build | How to build |
|---|---|---|
| An Autolathe or protolathe/techfab, with enough metal and glass. |
|
|
| How to deconstruct | ||
| Tools |
or attack it with a weapon on Combat Mode |
|
|
|

Railings
Railings are typically used on maps with extra Z-levels to prevent people from falling down.
| Файл:Railing.png Railings |
Requires to build | How to build |
|---|---|---|
|
||
| How to deconstruct | ||
| Tools |
|
|
|
|
Sink
Allows you to wash things. Have empty hands and click on sink to wash yourself, or have a tool in hand and click on sink to wash it. If you have nothing in your active hand you will wash your face (if targeting the head, eyes or mouth) or your hands (if targeting anywhere else).
Sinks slowly generate water, up to the max capacity of 100u. Click a sink with a liquid container to fill it with water. Sinks can be connected to a plumbing system to fill them with custom reagents instead of just water.
Some sinks have a cosmetically different appearance (e.g. Файл:Sink alt.png) but all of them work identically.
| Файл:Sink.png Sink |
Requires to build | How to build |
|---|---|---|
Water recyclerx1 |
|
|
| How to deconstruct | ||
| Tools |
|
|
|
|
Shower
The HS-451. Installed in the 2550s by the Nanotrasen Hygiene Division. Switch the shower on and off with an empty hand. Use a wrench ![]() to adjust the shower water temperature from normal to freezing, from freezing to boiling or from boiling to normal. Use an analyzer to identify the shower’s water temperature without risking burns.
to adjust the shower water temperature from normal to freezing, from freezing to boiling or from boiling to normal. Use an analyzer to identify the shower’s water temperature without risking burns.
Showers slowly generate water, up to the max capacity of 200u. Showers can be connected to a plumbing system to make them spray custom reagents instead of just water. Showering will cause touch reactions.
| Файл:Shower.png Shower |
Requires to build | How to build |
|---|---|---|
Water recyclerx1 |
|
|
| How to deconstruct | ||
| Tools |
Can only be deconstructed by force. Toggle automatic water regeneration with a multitool. |
|
Shutters
Airtight and surprisingly durable, shutters can be toggled on and off to open or close them and entirely lock down a tile. In order to link a shutter to a button or other device, you’ll need a multitool to edit the identifier for that particular shutter.
| Файл:Shutters.png Shutters |
Requires to build | How to build |
|---|---|---|
|
|
|
| How to deconstruct | ||
| Tools |
|
|
|
|
Furniture
Chairs
Chairs are for sitting down and making the place look nice. The only real use for chairs are to restrain people, building electric chairs or to buckle in when the shuttle is about to take off. Office chairs can also be used to move buckled people around.
| Chair Chair Stool Stool Bar Stool Bar Stool Comfy Chair Comfy Chair  Office Chair Wooden Chair Wooden Chair Winged Wooden Chair Winged Wooden Chair |
Requires to build | How to build |
|---|---|---|
or or or |
|
|
| How to deconstruct | ||
| Tools |
Wrench a chair to transform it back into the starting material. |
|
|
|
Tables/Reinforced Table
Tables are used to hold objects on. The most common ones are metal, glass and reinforced. You can climb onto tables, though it takes a short while. Tables can also be used for ghetto surgery.
 Table Wooden Table Wooden Table Glass Table Glass Table Poker Table Poker Table Fancy Table Fancy Table (has many types)  Reinforced Table  Operating Table |
Requires to build | How to build |
|---|---|---|
or
|
|
|
| How to deconstruct | ||
| Tools |
|
|
|
( |
Closet
Closet are among the most common and arguably the most useful of containers on the station. Nearly anything can fit inside, barring other closet, crates, and certain especially large objects like racks and MULEbots.
Besides being welded shut, some closet can be, well, locked. Several levels of access exist, such as security-, captain-, and private-level access. These can be opened with the proper level identification card, emag item, or with enough damage.
If you don’t want to take out your id to open these every time, you can alt-click them to lock/unlock them.
If you yourself are inside a closet, you can see your surroundings. Normally you can move in any direction to exit the closet, but if the closet is locked or welded, you will be unable to exit and you cannot unweld or unlock your cell from inside — at that point if you try to move around you will instead throw yourself against the sides of the closet, making a BANG BANG sound that can be heard from several squares away. Using the Resist button will allow you to slowly open the locker.
Coffins count as closets.
Different types of closets: Jumpsuit ClosetEmergency Closet![]()
![]()
![]()
![]()
![]()
![]()
![]()
 Closet |
Requires to build | How to build |
|---|---|---|
|
||
| How to deconstruct | ||
| Tools |
|
|
|
|
Rack
Racks are flat and wide, incapable of being walked over, and bolted together. They can hold any number of items, but they hold them stacked on top of each other like a table. They are most common in maintenance tunnels and the EVA room.
| Rack Rack |
Requires to build | How to build |
|---|---|---|
|
||
| How to deconstruct | ||
| Tools |
|
|
|
|
Beds
Get your mind out of the gutter, they’re for sleeping! Most station’s beds come with a bedsheet, and new beds without sheets can be made with metal. The Medbay’s preferred variation of a bed is the movable and collapsible ![]() Roller Bed, which is extremely useful for transporting patients.
Roller Bed, which is extremely useful for transporting patients.
You use a bed by going on top of it and *sleep. To buckle someone, put them on the bed and drag their sprite on it, to release click on the bed.
| Bed Bed |
Requires to build | How to build |
|---|---|---|
|
||
| How to deconstruct | ||
| Tools |
Use a wrench to dismantle it to two sheets of metal. |
|
|
|
Bookcase
Holds any number of books inside.
| Bookcase Bookcase |
Requires to build | How to build |
|---|---|---|
|
||
| How to deconstruct | ||
| Tools |
|
|
|
|
Drying Rack
Dries herbs for smoking, meat into jerky and grapes into raisins.
 Drying rack |
Requires to build | How to build |
|---|---|---|
|
||
| How to deconstruct | ||
| Tools |
|
|
|
|
Display Case
Show off an item within a glass case. Use an ID to open a display case.
| Display Case Display Case |
Requires to build | How to build |
|---|---|---|
| x2
|
|
|
| How to deconstruct | ||
| Tools |
|
|
|
|
Power Wires
Power wires (cable coils) ![]() are available from autolathes, yellow toolboxes, engineering vending machines or scattered about the station’s maintenance-, construction- and storage-areas.
are available from autolathes, yellow toolboxes, engineering vending machines or scattered about the station’s maintenance-, construction- and storage-areas.
- Wires can be electrified if connected to a power net (a charged SMES or APC is attached to the wire), and you will get fried if you place or cut them.
- Insulated gloves negate any electrical shocks to the player.
How Do I Wire?
After a change in the summer 2019, wires will automatically connect to other wires on tiles in cardinal directions. To place, lift any floor tile with a crowbar ![]() to reach the plating. Then click the plating while holding cable coil in your hand to place the wire. To remove wires, use wirecutters
to reach the plating. Then click the plating while holding cable coil in your hand to place the wire. To remove wires, use wirecutters ![]() on them. Powered wires will automatically electrify grilles and power some machines on top of them.
on them. Powered wires will automatically electrify grilles and power some machines on top of them.
Wire Art
The wire art that was available before June, 2019 can still be made by using an item called «pipe cleaner». See the Guide to wire art.
Connecting Machines
Most machines are connected to powernets wirelessly by being in an arbitrary «area» containing a charged APC. Though some machines must be connected by having a powered wire under them.
With wire knobs now being just what a wire looks like after it’s cut, all grilles on top of a wire that has power are shock grilles.
Please note those machines must also be anchored (generally wrenched down) to be connected.
Special cases :
- APCs are connected to an adjacent powered wire with a special terminal, by doing the cable coil construction step.
- An exception to the cardinal function is SMES, which has an input an output wire next to each other without being connected.
Wire Layers
Since October 2019 you can put cables on different layers. Ctrl-click the stack of cable coil to toggle layer.
Файл:Actioninja cable layer PR 46761.png
Layers do not connect, and can have separate powernets running along the same tile. Machines and terminals only connect to layer 2, yellow. Cable bridges can be crafted by using the cable coil inhand. Bridges link cables across layers on the same tile, or allow APC’s/machines (those that aren’t wireless) to connect to layers other than 2 when placed under them.
Wire-net Reset
This is Byond’s attempt to «reset» the whole power net in order to deal with new/removed wires that shift the power value of a whole system. It will cause APCs to stop charging for a moment, and in huge nets it can shut down the charging of all APCs for a while.
Don’t mess with wires unless you have to, it causes problems to everyone in both OOC (potential lag) and IC (power loss).
Pipes
Pipes are constructed from Pipe Dispensers in Atmospherics (or with an RPD if you aren’t a complete wally).
To use a Pipe Dispenser, follow these steps:
- Put Dispenser in a powered area.
- Wrench Dispenser to lock it into place.
- Click on the Pipe Dispenser with an empty hand and select the pipes you wish to use.
- You have a pipe to play with now.
- Wrench Dispenser to make it mobile once more.
Placing and Removing Pipes
Файл:Disposal pipe.png Disposal Pipes
- Rotate the pipe to the direction you wish the pipe to be in.
- Wrench the pipe to the ground.
- Use a lit welder to fuse the pipe to the ground.
Gas Pipes
 Gas Pipes
Rotate the pipe to the direction you wishGas pipes now act similar to wires, meaning, that pipes will form bends, manifolds, etc. depending on other pipes near them. For pipes to connect they must be on the same layer and must be the same color (gray pipes connect to all colors)(pay attention to gas pumps as they are direction dependent).- Wrench into place.
- Turn on the pipe, if necessary.
How to Remove a Pipe
- Perform the step you used to set the pipe into place in reverse (make sure the pipe is powered off).
- Brace for any junk that might blast out of the pipe.
ENGINEERING
Engineering roles
Guides
If you want to do a job, like Station Engineer, you need to know how to build and deconstruct stuff.
Basic Tools
Before you can begin any construction or deconstruction you need to gather a few useful tools.
These tools can be found in any blue Mechanical Toolbox on the station. They can also be made in an Autolathe or dispensed from a YouTool -vending machine.


Materials
To build anything, you need materials. Keep in mind that most materials can be used to make walls, doors, floor tiles, chairs, tables and statues.
Metal

Metal
- Можно найти в: Ready stacks in Engineering, Auxiliary Tool Storage, E.V.A., Robotics and Atmospherics.
Shaft Miners have the ability to smelt more from iron ore and Cargo can order more. - Используется для: Constructing various things from supportive elements to decorations
- Стратегия использования: Hold in active hand and activate to start building
Описание
Things you can make by having Metal in your hand and activating it:
- Stool (1 sheet)
- Bar Stool (1 sheet)
- Chair (1 sheet)
- Swivel Chair (i.e. office chairs) (5 sheets)
- Comfy Chair (2 sheets)
- Bed (2 sheets)
- Rack parts (1 sheets)
- Closet (2 sheets)
- Canister frame (5 sheets) (can be made into a tier 0-3 canister)
- 4x Floor tiles (1 sheet)
- 2x Metal rods (1 sheet)
- Wall girders (2 sheets)
- Computer frame (5 sheets)
- Modular console (10 sheets)
- Machine frame (5 sheets)
- Airlock assembly (4 sheets)
- Firelock frame (3 sheets)
- Turret frame (5 sheets)
- Meatspike frame (5 sheets)
- Reflector frame (5 sheets)
- Grenade Casing (1 sheet)
- Light fixture frame (2 sheets)
- Small light fixture frame (1 sheet)
- APC frame (2 sheets)
- Air alarm frame (2 sheets)
- Fire alarm frame (2 sheets)
- Extinguisher cabinet frame (2 sheets)
- Button frame (1 sheet)
- Iron Door (20 sheets)
- Floodlight frame (5 sheets)
- Voting box (15 sheets)
- Pestle (1 sheet). Use with mortar for ghetto grinding.
- Incomplete hygienebot assembly (2 sheets)
- Shower Frame (2 metal sheets)
- Sink Frame (1 metal sheet)
- Chair (1 metal sheet)
- Toilet (1 metal sheet)
Other things you can do with Metal:
- Turn a scooter frame into a skateboard, a scooter without a handle. (5 sheets)
- Metal tables when added to table frame. (1 sheet)
- Finish wall girders into walls. (2 sheets)
- Repair broken walls. (1 sheet)
- Add armor to turret frames. (5 sheets)
- Refill an Exosuit Fabricator, Autolathe or Protolathe/Techfab. (2000 material per sheet)
See Constructions.
How to produce Metal:
Smelt iron ore at the Mining furnace.
Glass and Reinforced Glass

Glass and Reinforced Glass
- Можно найти в: Stacks exist in Engineering, Auxiliary Tool Storage, E.V.A., Atmospherics and Robotics.
Shaft Miners have the ability to smelt more from sand and Cargo can order more. - Используется для: Constructing windows and other things
- Стратегия использования: Hold in active hand and activate to start building
Описание
 Glass:
Things you can make by having Glass or Plasmaglass in your hand and activating it:
-
-
- One Directional Glass panel
- Full Glass panel (2 sheets)
-
Other things you can do with Glass:
-
-
- Glass Tables when added to table frames (1 sheet)
- Glass Lenses to grenade casings.
- Refill a Circuit Imprinter, Autolathe or Protolathe/Techfab. (2000 material per sheet)
-
 Reinforced Glass:
Things you can make by having Reinforced Glass in your hand and activating it:
-
-
- One Directional Reinforced Glass panel
- Full Reinforced Glass panel (2 sheets)
- Windoor frame (5 sheets)
-
Other things you can do with Reinforced Glass:
-
-
- Part of AI Core assembling
- Add windows into Airlocks
- Refill a Circuit Imprinter, Autolathe or Protolathe/Techfab. (2000 glass and 1000 metal materials per sheet)
-
 Reinforced Plasma Glass:
Things you can make by having Reinforced Plasma Glass in your hand and activating it:
-
-
- One Directional Reinforced Glass panel
- Full Reinforced Glass panel (2 sheets)
-
How to produce Glass:
Smelt sand at the Ore Redemption Machine, or the Mining furnace, or smelt Glass shards with a Welding Tool to reform them into Glass sheets.
How to produce Reinforced Glass:
Use rods ![]() on glass.
on glass.
How to produce Plasma Glass:
Print Plasma + Glass alloy from cargo, engineering or science protolathe/techfab.
How to produce Reinforced Plasma Glass:
Use rods ![]() on plasma glass.
on plasma glass.
Plasma

Plasma
- Можно найти в: From mining and some other sources.
- Используется для: Making a few products, burning down the station, or used in a departmental Protolathe/Techfab
- Стратегия использования: Hold in active hand and activate it to start constructing
Описание
Things you can make by having Plasma sheets in your hand and activating them:
- Plasma door (10 plasma sheets)
- 4x plasma tiles (1 plasma sheet)
- Scientist Statue (5 plasma sheets)
Some other things you can do with Plasma:
- Light it on fire with a lighter to turn it into burning gas.
- Grind it for liquid plasma, useful for a large number of things, such as xenobiology.
- Insert into a Protolathe/Techfab. Some products need this material.
How to produce Plasma:
Smelt plasma ore in the Ore Redemption Machine or Mining furnace.
Plasteel

Plasteel
- Можно найти в: Deliver iron and plasma ores to the ORM. Print Plasma + Iron alloy from silo-linked cargo, engineering or science protolathe/techfab. Stacks may exists in Engineering, E.V.A. and Robotics.
Cargo can order more, but they are very expensive. - Используется для: Reinforcing walls, mechs, building an AI Core
- Стратегия использования: Hold in active hand and activate to start building
Описание
Plasteel is an alloy of plasma and iron.
Things you can make by having Plasteel in your hand and activating it:
- AI core (4 sheets)
- Bomb Assembly (10 sheets)
- Airlock Assemblies
- High security airlock assembly (4 plasteel sheets)
- Vault door assembly (6 plasteel sheets)
Other things you can do with Plasteel:
- Reinforcing, repairing and finalizing walls (2 sheets)
- Reinforced Tables when added to table frames (1 sheet)
See Constructions.
Rods

Rods
- Можно найти в: Stacks exist in Engineering, Auxiliary Tool Storage, E.V.A..
More can be made from Metal sheets. - Используется для: Constructing grilles and reinforcing
- Стратегия использования: Hold in active hand and use it on things
Описание
Things you can make by having rods in your hand and activating them:
- Grille (by clicking in your hand)
- Make a scooter frame
Other things you can do with rods:
- Lattice (for floors, by clicking on a space tile)
- Reinforcing plating (by clicking on the plating)
- Reinforcing normal glass into reinforced glass (have rods in hand while clicking glass sheet)
- Put a handle on a skateboard and turn it into a scooter
- Can be turned back into metal sheets by being welded with a Welding Tool
See Constructions
How to produce Rods:
Use Metal and click «2x metal rods» (makes two sets of rods).
Floor Tiles

Floor Tiles
Можно найти в: Can be made from metal or removed from the floor with a crowbar
Используется для: Constructing Plating or Steel Floor
Описание
Tiles used to construct floors.
Things you can do with Floor Tiles:
- Use on lattice to build plating.
- Use on plating to build steel floor.
- Use on another type of already placed floor tile while holding a crowbar in other hand to replace existing floor.
- Use on Metal Foam floor to convert it to plating.
See Constructions.
How to produce Floor Tiles:
Use metal or almost any other material and click «4x floor tiles» (makes 4 floor tiles).
Silver
Silver
- Можно найти в: Deliver silver ore to the ORM. Eject silver from ORM or any silo-linked protolathe/techfab.
- Используется для: Making a few products, or used in a departmental Protolathe/Techfab
- Стратегия использования: Hold in active hand and activate it to start constructing
Описание
Things you can make by having silver bars in your hand and activating them:
- Silver door (10 silver bars)
- 4x silver tiles (1 silver bar)
- Med Officer Statue (5 silver bars)
- Janitor Statue (5 silver bars)
- Sec Officer Statue (5 silver bars)
- Sec Borg Statue (5 silver bars)
- Med Borg Statue (5 silver bars)
Some other things you can do with Silver:
- Insert into a Protolathe/Techfab. Some products need this material.
- Operating table
Gold
Gold
- Можно найти в: Deliver gold ore to the ORM. Eject gold from ORM or any silo-linked protolathe/techfab.
- Используется для: Making a few products, or used in a departmental Protolathe/Techfab
- Стратегия использования: Hold in active hand and activate it to start constructing
Описание
Things you can make by having Gold bars in your hand and activating them:
- Golden door (10 gold bars)
- 4x gold tiles (1 gold bar)
- HoS Statue (5 gold bars)
- HoP Statue (5 gold bars)
- CE Statue (5 gold bars)
- RD Statue (5 gold bars)
- Simple Crown (5 gold bars)
- CMO Statue (5 gold bars)
Some other things you can do with Gold:
- Insert into a Protolathe/Techfab. Some products need this material.
Uranium
Uranium
- Можно найти в: Deliver uranium ore to the ORM. Eject uranium from ORM or any silo-linked protolathe/techfab.
- Используется для: Making a few products, or used in a departmental Protolathe/Techfab
- Стратегия использования: Hold in active hand and activate it to start constructing
Описание
Things you can make by having Uranium sheets in your hand and activating them:
- Uranium door (10 uranium sheets)
- 4x uranium tiles (1 uranium sheet)
- Nuke Statue (5 uranium sheets)
- Engineer Statue (5 uranium sheets)
May cause tiny amounts of radiation when constructing stuff with it.
Some other things you can do with Uranium:
- Insert into a Protolathe/Techfab. Some products need this material.
Titanium
Titanium
- Можно найти в: Deliver titanium ore to the ORM. Eject titanium from ORM or any silo-linked protolathe/techfab.
- Используется для: Used in a departmental Protolathe/Techfab and in Robotics
- Стратегия использования: Hold in active hand and activate it to start constructing
Описание
Things you can make by having Titanium sheets in your hand and activating them:
- 4x titanium tiles (1 titanium sheet)
- Shuttle seat (2 titanium sheets)
Some other things you can do with Titanium:
- Insert into a Protolathe/Techfab. Some products need this material.
- Insert into an exosuit fabricator. Roboticists need this for mechs.
Titanium Glass

Titanium Glass
- Можно найти в: Deliver titanium ores and ash/sand/glass to the ORM. Print Titanium + Glass alloy from silo-linked cargo, engineering or science protolathe/techfab.
- Используется для: Construction
- Стратегия использования: Hold in active hand and activate it to start constructing
Описание
Things you can make by having sheets in your hand and activating them:
- Shuttle window (2 titanium glass sheets)
Plastitanium
Plastitanium
- Можно найти в: Deliver titanium and plasma ores to the ORM. Print Plasma + Titanium alloy from silo-linked cargo, engineering or science protolathe/techfab.
- Используется для: Construction
- Стратегия использования: Hold in active hand and activate it to start constructing
Описание
Things you can make by having sheets in your hand and activating them:
- 4x plastitanium tiles (1 plastitanium sheet)
Some other things you can do with Plastitanium:
- Use on wall girders to build a durable wall.
Plastitanium Glass

Plastitanium Glass
- Можно найти в: Deliver ores for plasma, titanium and glass to the ORM. Print Plasma + Titanium + Glass alloy from silo-linked cargo, engineering or science protolathe/techfab.
- Используется для: Construction
- Стратегия использования: Hold in active hand and activate it to start constructing
Описание
Things you can make by having sheets in your hand and activating them:
- Plastitanium window (2 plastitanium glass sheets)
Diamond
Diamond
- Можно найти в: Deliver diamond ore to the ORM. Eject diamond from ORM or any silo-linked protolathe/techfab.
- Используется для: Making a few products, or used in a departmental Protolathe/Techfab
- Стратегия использования: Hold in active hand and activate it to start constructing
Описание
Things you can make by having Diamonds in your hand and activating them:
- Diamond door (10 diamonds)
- 4x diamond tiles (1 diamond)
- Captain Statue (5 diamonds)
- AI Hologram Statue (5 diamonds)
- AI Core Statue (5 diamonds)
Some other things you can do with Diamond:
- Insert into a Protolathe/Techfab. Some products need this material.
Bluespace Polycrystal
Описание
This is the crystal you get when ejecting «bluespace crystal» from the silo network. It can’t be used for much except turning it back into what is essentially the same thing as a raw crystal, which can be used for a few things.
Some things you can do with Bluespace Polycrystal:
- Insert into a Protolathe/Techfab. Some products need this material.
- Hold in one hand and click it with other hand to break off a refined bluespace crystal .
- Use «raw», artificial or refined bluespace bluespace crystals in hand to teleport.
- «Raw», artificial and refined bluespace crystals all work when contructing teleporting machinery or teleprods.
Bananium

Bananium
- Можно найти в: Ruins in space, on Lavaland or in Xenobio
- Используется для: Making a few clown related products, or used in a departmental Protolathe/Techfab
- Стратегия использования: Hold in active hand and activate it to start constructing
Описание
Things you can make by having Bananium sheets in your hand and activating them:
- 4x bananium tiles (1 bananium sheet)
- Clown Statue (5 bananium sheets)
Some other things you can do with Bananium:
- Insert into a Protolathe/Techfab. Some products need this material, such as the air horn.
- Insert into an exosuit fabricator. Roboticists need this to make the H.O.N.K exosuit and the Clown Module.
How to produce Bananium:
Find in certain space or lavaland ruins. There you can also find bananium ore which you can smelt in the Ore Redemption Machine or Mining furnace.
Runite
Runite
- Можно найти в: Ruin on Lavaland
- Используется для: Making things with Autolathe that let you use custom materials
- Стратегия использования: Insert into an autolathe. Print toolbox or knight armor.
Описание
Rare material you may find. Can only be used to make things that let you use custom materials, such as the knight armor or toolbox from the Autolathe. The knight armor requires the Magic Disk of Smithing to be inserted into the Autolathe first.
Planks

Planks
- Можно найти в: Ready stacks can be found nowhere, can be made from deconstructing tables.
- Используется для: Constructing various wooden things
- Стратегия использования: Hold in active hand and activate it to start constructing
Описание
Things you can make by having Planks in your hand and activating them:
- Wooden Sandals (1 plank)
- Wood floor tile 4x (1 plank)
- Wooden table frame (2 planks)
- Rifle stock (10 planks)
- Rolling pin (2 planks)
- Wooden chair (3 planks)
- Winged wooden chair (3 planks)
- Wooden barricade (5 planks)
- Wooden door (10 planks)
- Coffin (5 planks)
- Bookcase (4 planks)
- Drying Rack (10 planks)
- Wooden barrel (8 planks)
- Dog bed (10 planks)
- Dresser (10 planks)
- Picture frame (1 plank)
- Display case chassis (5 planks)
- Wooden buckler (20 planks)
- Apiary (40 planks)
- Tiki mask (2 planks)
- Honey frame (5 planks)
- Wooden bucket (3 planks)
- Rake (5 planks)
- Ore box (4 planks)
- Wooden crate (6 planks)
- Baseball Bat (5 planks)
- Loom (10 planks)
- Mortar (3 planks). Use with pestle for ghetto grinding. Can hold 100u.
- Firebrand (2 planks)
- Pew (3 planks)
How to produce Planks:
Grow Tower Caps and cut them up with a sharp item, for example a Hatchet.
Leather

Leather
- Можно найти в: Ready stacks can be found nowhere, but can be produced.
- Используется для: Making leather products such as toolbelts and bandoliers
- Стратегия использования: Hold in active hand and use it to craft things
Описание
Things you can make by having Leather in your hand and activating it:
- Wallet (1 piece)
- Muzzle (2 pieces)
- Botany gloves (3 pieces)
- Toolbelt (4 pieces)
- Leather satchel (5 pieces)
- Bandolier (5 pieces)
- Leather jacket (7 pieces)
- Leather overcoat (10 pieces)
How to produce Leather:
Either use the Biogenerator inside Hydroponics or Garden,
or create leather through tanning:
- Slaughter/gib certain animals/creatures for their hides.
- Use a sharp weapon on a hide to turn it into hairless hide.
- Wash the hairless hide by using water on it, to turn it into wet leather.
- Dry the wet leather by
using it on a drying rack, or by heating it above 500 Kelvin for some time.throwing it into the fucking microwave.
Cloth

Cloth
- Можно найти в: Ready stacks can be found nowhere, but can be produced.
- Используется для: Crafting certain textiles and repairing damaged clothes
- Стратегия использования: Hold in active hand and use it to craft things.
Описание
Use on clothes damaged by fire or acid to repair them.
Things you can make by having Cloth in your hand and activating it:
- Grey jumpsuit (3 rolls)
- Black shoes (2 rolls)
- Backpack (4 rolls)
- Duffel bag (6 rolls)
- Plant bag (4 rolls)
- Book bag (4 rolls)
- Mining satchel (4 rolls)
- Chemistry bag (4 rolls)
- Bio bag (4 rolls)
- Construction bag (4 rolls)
- 2x improvised gauzes (1 roll)
- Rag (1 roll)
- Bedsheet (3 rolls)
- Empty sandbag (4 rolls)
- Fingerless gloves (1 roll)
- Black gloves (3 rolls)
- Blindfold (2 rolls)
- 19×19 canvas (3 rolls)
- 23×19 canvas (4 rolls)
- 23×23 canvas (5 rolls)
How to produce Cloth:
Use the Biogenerator inside Hydroponics or Garden, or use Wirecutters on bedsheets.
Plastic

Plastic
- Можно найти в: Ready stacks can be found nowhere, but can be produced.
- Используется для: Making a few plastic products, or used in a departmental Protolathe/Techfab
- Стратегия использования: Hold in active hand and use it to craft things
Описание
Things you can make by having Plastic in your hand and activating it:
- 4x plastic floor tiles (1 plastic sheet)
- Folding plastic chair (2 plastic sheets)
- Plastic flaps (5 plastic sheets)
- Water bottle (1 plastic sheet)
- Large water bottle (3 plastic sheets)
- Colo cups (1 plastic sheet)
- Wet floor sign (2 plastic sheets)
- Blank sign (1 plastic sheet)
Other things you can do with Plastic:
- Insert into a Protolathe/Techfab. Some products need this material, such as XL beakers
How to produce Plastic:
Made in the Chemistry lab.
Cardboard

Cardboard
- Можно найти в: Can sometimes be found in Maintenance.
- Используется для: Making a few items
- Стратегия использования: Hold in active hand and use it to craft things
Описание
Things you can make by having Cardboard in your hand and activating it:
- Box (1 cardboard sheet)
- Light tubes (1 cardboard sheet)
- Light bulbs (1 cardboard sheet)
- Mouse traps (1 cardboard sheet)
- Cardborg suit (3 cardboard sheets)
- Cardborg helmet (1 cardboard sheet)
- Pizza box (1 cardboard sheet)
- Folder (1 cardboard sheet)
- Large box (4 cardboard sheets)
- Cardboard cutout (5 cardboard sheets)
- Fancy boxes (many types) (1 cardboard sheet)
How to produce Cardboard:
Empty a box and activate it in your hand to turn it into cardboard. Most crewmembers start with a box in their backpack.
Can be produced with a biogenerator.
Sand

Sand and Volcanic ash
- Можно найти в: Crafted by using sand or volcanic ash in hand.
- Используется для: Turning into glass or sandstone.
- Стратегия использования: Hold in active hand and activate it to start constructing
Описание
Sand ![]() and ash Файл:Volcanic ash.png are both basically the same thing but with different sprites.
and ash Файл:Volcanic ash.png are both basically the same thing but with different sprites.
Things you can make by having piles of Sand or Ash in your hand and activating them:
- Sandstone (1 sand pile)
- Aesthetic volcanic floor tile (2 sand piles)
Other things you can do with Sand and Ash:
- Smelt in the Ore Redemption Machine or Mining furnace to create glass.
- Use on an empty sandbag to create a sandbag.
How to produce Volcanic Ash:
Mine volcanic ash from lavaland ground.
How to produce Sand:
Mine volcanic ash from lavaland ground, and use it in hand to make Sandstone Bricks. Then use the Sandstone in hand to turn it into sand.
Sandstone
Sandstone
- Можно найти в: Crafted by using sand or volcanic ash in hand.
- Используется для: Making a few products, and ghetto hydroponics.
- Стратегия использования: Hold in active hand and activate it to start constructing
Описание
Things you can make by having Sandstone bricks in your hand and activating them:
- Pile of dirt (3 sandstone bricks)
- Sandstone door (10 sandstone bricks)
- Assistant Statue (5 sandstone bricks)
- Breakdown into sand (1 sandstone brick)
How to produce Sandstone:
Mine volcanic ash from lavaland ground, and use it in hand.
Blocks of Sand
Blocks of sand
- Можно найти в: Crafted by using sand or volcanic ash on a sink.
- Используется для: Construction material.
- Стратегия использования: Hold in active hand and activate it to start constructing
Описание
Lets you build some things made out of sand.
Meat
Описание
An edible material which also makes squishy sounds.
Things you can make by having Meat sheets in your hand and activating them:
- Chair (1 meat sheet)
- Toilet (1 meat sheet)
- Sink (1 meat sheet)
- 4x Floor tiles (1 meat sheet)
Some other things you can do with meat sheets:
- Meat walls
- Meat tables
Constructions
Floors
Lattice
The basic base for all types of construction, this is placed directly in space.
 Lattice |
Requires to build | How to build |
|---|---|---|
|
Use the rod on an empty space tile. |
||
| How to deconstruct | ||
| Tools |
Use wirecutters to cut the lattice into one rod. |
|
|
|
Catwalk
Just like a lattice, except you can place wires on it.
 Catwalk |
Requires to build | How to build |
|---|---|---|
|
Use the rods on a lattice. |
||
| How to deconstruct | ||
| Tools |
Use wirecutters to cut the catwalk into 2 rods. |
|
|
|
Plating
The basic floor which you put things like wires and pipes upon. ‘All’ floors and walls are built on top of this.
 Plating |
Requires to build | How to build |
|---|---|---|
|
Use a floor tile on a lattice. |
||
| How to deconstruct | ||
| Tools |
Use a crowbar on broken plating, otherwise it does not deconstruct. Can be deconstructed with an RCD. |
|
|
|
||
| How to repair | ||
| Tools |
Use a welder on broken plating to repair it. |
|
|
|
Steel Floor
This is the basic «nice» floor, this floor should be considered used in all public areas, hence why there’s none of these in maintenance tunnels.
 Steel Floor |
Requires to build | How to build |
|---|---|---|
|
Use a floor tile on plating. |
||
| How to deconstruct | ||
| Tools |
Use a crowbar on a floor tile to remove it. It will be destroyed if broken. |
|
|
|
Wood Floor
This is a fancy floor, used in the library and similar places.
 Wood Floor |
Requires to build | How to build |
|---|---|---|
|
Use a wood tile on plating. Wood tiles can be made of planks of wood. |
||
| How to deconstruct | ||
| Tools |
Detach the tile with a screwdriver. |
|
|
Screwdriver or |
Reinforced Floor
This is a reinforced floor, used in science and similar areas for better protection against fire or explosions.
 Reinforced Floor |
Requires to build | How to build |
|---|---|---|
|
Use rods on a plating. |
||
| How to deconstruct | ||
| Tools |
Use a wrench to dismantle it to two rods. |
|
|
|
Carpeted Floor
This is a carpeted floor, used to make your office look fancy.
 Carpeted Floor |
Requires to build | How to build |
|---|---|---|
|
Use any type of carpet floor on a plating. |
||
| How to deconstruct | ||
| Tools |
Use a crowbar to pick up the carpet tile. |
|
|
|
Some other carpets available from cargo (and their constructable tables):

Light Floor
A fancy, more futuristic floor that lights up its surroundings.
 Light Floor |
Requires to build | How to build |
|---|---|---|
| x1x1 |
|
|
| How to deconstruct | ||
| Tools |
|
|
|
|
Walls
Normal Wall
This is the standard type of wall found around the station, they are easy to construct and remove but are not as strong as reinforced walls. They also come in a hidden door variety. Walls can also be made out of different minerals. They’re useful for:
- Keeping people out.
- Keeping people in.
- Keeping people from going places.
 Wall |
Requires to build | How to build |
|---|---|---|
| x4
|
|
|
| How to deconstruct | ||
| Tools |
|
|
|
|
Reinforced Wall
This is the reinforced type of wall found in secure areas of station, they are reasonably simple to construct, but are very time consuming to remove. They also can be made as a hidden door. They’re useful for:
- Keeping people in and out of high security areas.
 Reinforced Wall |
Requires to build | How to build |
|---|---|---|
| x2 x2
|
|
|
| How to deconstruct | ||
| Tools |
|
|
|
|
Normal/Reinforced Hidden Door
Also known as «Fake Walls» or «Hidden Walls». With a little imagination, hidden doors can be used in many marvelous tactics, varying from ambushes to passages into your very own secret hideaway room.
- Click to open.
- An almost undetectable escape route.
- Otherwise, same as a regular wall.
 Hidden Door  Reinforced Hidden Door |
Requires to build | How to build |
|---|---|---|
| x4 orx2 x2
|
To turn a normal wall into a hidden door, deconstruct it until the final screwdriving of the girder, and instead use 2 sheet of metal on the girder. |
|
| How to deconstruct | ||
| Tools |
|
|
|
Screwdriver |
Normal/Reinforced Windows
Windows are aesthetically quite pleasing because they are almost invisible. You can build two types of windows:
- Full: A see-through wall. Usually only used if you don’t have enough for 2-4 one-directionals or the metal for a wall.
- One Direction: Stops movement only from the way it faces.
  Windows   Reinforced Windows |
Requires to build | How to build |
|---|---|---|
| x1/x2 (single/full) or x1/x2 (single/full)
|
|
|
| How to deconstruct | ||
| Tools |
Normal window (including plasmaglass):
Hitting a normal pane repeatedly with a weapon will smash it into glass shards. Normal windows have 50 integrity (health), while plasma windows have 300. Directional windows have half integrity. Reinforced window (including reinforced plasmaglass):
Reinforced windows require a melee item over 11 damage to damage at all, have 150 integrity, and 80 melee armor. This is approximately 1 minute of sustained beating with a toolbox. Reinforced plasma windows require a melee item over 21 damage to damage at all, have 1000 integrity, and 80 melee armor. Breaks down into glass shards and a metal rods. Directional windows have half integrity. |
|
|
|
Wall Mountings
APC
Info about Area Power Controllers can be found here.
If broken, you will have to deconstruct then construct the APC. An entire set of fresh parts will be needed.
 APC |
Requires to build | How to build |
|---|---|---|
| x2 Screwdriver  x1 x1 |
|
|
| How to deconstruct | ||
| Tools |
|
|
|
Screwdriver |
Air Alarm
Info about Air Alarms can be found here.
 Air Alarm |
Requires to build | How to build |
|---|---|---|
| x2 Screwdriver |
|
|
| How to deconstruct | ||
| Tools |
|
|
|
Screwdriver |
Fire Alarm
Info about Fire Alarms can be found here.
 Fire Alarm |
Requires to build | How to build |
|---|---|---|
| x2 Screwdriver |
|
|
| How to deconstruct | ||
| Tools |
|
|
|
Screwdriver |
Security Camera
Electric eyes of the AI or for camera monitors to look through.
Camera upgrades:
- Solid Plasma for EMP-proofing.
- Analyzer for X-ray.
- Proximity Sensor for motion alarm.
See here how to hack a Security Camera.
 Security Camera |
Requires to build | How to build |
|---|---|---|
| x1(400units per camera)x1(250units per camera) Screwdriver |
|
|
| How to deconstruct | ||
| Tools |
The AI will receive a camera alarm upon re-activation of a camera, or if it gets deactivated from brute force. |
|
|
|
Light Fixture
Provides light for the people. Bulb fixture is much dimmer than the tube-one.
 Light Fixture |
Requires to build | How to build |
|---|---|---|
x1/x2 x1 x1Screwdriver |
|
|
| How to deconstruct | ||
| Tools |
|
|
|
Screwdriver |
Requests Console
Can be found in every room where someone is supposed to work. The Requests Consoles can be used to request low/high urgency assistance, request supplies with low/high priority, relay anonymous information or view sent and received messages. All of these produce a message to the selected Request Console and can be swiped with an ID to confirm the identity of the sender. Can be hacked to enable the ‘EXTREME’ priority for your requests.
The Bridge and Heads’ Offices have special Requests Consoles which can send station-wide announcements if swiped with an authorized ID.
 Requests Console |
Requires to build | How to build |
|---|---|---|
| Roundstart only. Can not be constructed. | ||
| How to deconstruct | ||
| Tools |
Can’t be deconstructed without violence. |
|
Newscaster
The newscaster is a widespread type of wall console, thanks to NanoTrasen wanting to keep you up to date with the latest news.
You can view newsfeeds other crewmembers have made, or make your own! You can even attach photos to the news!
Every Newscaster can print out 15 newspapers for people who enjoy reading stuff from the paper.
Security Newscasters can be found in Brig and can make «Wanted» Issues, censor out harmful newsfeed stories, or lock down a whole channel with a D-Notice.
 Newscaster |
Requires to build | How to build |
|---|---|---|
| 1x newscaster frame (from Autolathe) | Attach newscaster frame to wall. | |
| How to deconstruct | ||
| Tools |
|
|
|
|
Bounty Board
Used for players to request favors or items from other players for a price.
To create a bounty: Click the bounty board. Click New Bounty. Write your request in the empty field, then set a price in the next field, then click submit. Your name will show up in a list.
To complete someone elses bounty: Click the name of the requester in the bounty board. Click apply. Your name shows up as Requested Applicant. Deliver the item or complete the request of the issuer.
To pay someone for completing your bounty: Open the bounty console. Click your name. Click the little icon next to name of the person who completed your bounty (under Request Applicants). This will pay that person. You can click multiple times to pay extra. Then remove the bounty with DELETE if it is no longer wanted.
 Bounty Board |
Requires to build | How to build |
|---|---|---|
| 1x bounty board frame (from Autolathe) | Attach bounty board frame to wall. | |
| How to deconstruct | ||
| Tools |
|
|
|
|
Other
Grille
Grilles are usually used in combination with directional windows. They allow gases and energy rounds to pass through them, but stop other objects. They can also be electrified for high security areas by building them on top of a live power wire.
- Keeping people in or out.
- Securing an area with electrified grilles.
 Grille |
Requires to build | How to build |
|---|---|---|
|
||
| How to deconstruct | ||
| Tools |
|
|
|
|
Barricade
The poor man’s barrier, not nearly as strong or cool looking. Useful for:
- Keeping people in or out, for a short while.
 Wooden Barricade |
Requires to build | How to build |
|---|---|---|
|
||
| How to deconstruct | ||
| Tools |
Cannot be neatly deconstructed. Just smash it with anything to get 3 planks. |
|
|
Anything |
||
| How to repair | ||
| Tools |
Use wooden planks to repair. |
|
|
|
Windoor (Window-door)
Like a door, but with access controls. Windoors can’t be hacked or even pried open with jaws of life. They can be pried open with a crowbar if unpowered, and emagging works.
 Windoor |
Requires to build | How to build |
|---|---|---|
| x5x2 Screwdriver |
|
|
| How to deconstruct | ||
| Tools |
|
|
|
Screwdriver |
Button
This is a button — it can remotely control an airlock. You can also put a signaler in one to have it pulse the signaler when pressed.
Button |
Requires to build | How to build |
|---|---|---|
| x1 Screwdriver OPTIONAL |
|
|
| How to deconstruct | ||
| Tools |
|
|
|
|
Firelock
This is a firelock — it locks an area when a fire alarm in the area is triggered. Don’t get squished!
Firelock |
Requires to build | How to build |
|---|---|---|
| x3 OPTIONAL: x2Screwdriver |
|
|
| How to deconstruct | ||
| Tools |
Has 40% chance to drop a frame when destroyed by force. |
|
|
|
Reflector
This is an angular beam reflector. Any energy projectiles hitting it will be reflected at an angle depending on rotation. There are also «box» reflectors that change the direction of struck projectiles to face a single way, regardless of where they impact the reflector. The supermatter engine uses reflectors to make its emitters’ beams go through a single path. Ballistic projectiles will not be reflected!
- You can weld it to anchor it to or unanchor it from the floor, or to repair it.
- Use a screwdriver to lock or unlock its rotation.
- Alt-click it to rotate its angle.
   Reflector |
Requires to build | How to build |
|---|---|---|
x5x5 OR x10 OR  x1 x1
|
|
|
| How to deconstruct | ||
| Tools |
|
|
|
|
Airlock
This is an airlock — it locks air. Everyone just calls them doors, although they are not actual doors. If you want to hack an airlock, see here.
 Airlock |
Requires to build | How to build |
|---|---|---|
| x4 OPTIONAL: x1Screwdriver |
|
|
| How to deconstruct | ||
| Tools |
If the airlock has been emagged, skip to step 4.
|
|
|
|

Turret
To ensure no one trespasses an area. Its options are (first option is the default setting):
- Status: On/Off — wether the turret’s power is on or off.
- Behaviour control are locked/unlocked — can be unlocked with a Security level ID.
- Check for Weapon Authorization: No/Yes — neutralizes people who have a weapon out but are not Heads or Security staff.
- Check Security Records: Yes/No — searches Security Records for criminals.
- Neutralize Identified Criminals: Yes/No — neutralizes crew members set to Arrest on the Security Records.
- Neutralize All Non-Security and Non-Command Personnel: No/Yes — self explanatory.
- Neutralize All Unidentified Life Signs: Yes/No — neutralizes aliens.
 Turret |
Requires to build | How to build |
|---|---|---|
| x7 Screwdriver Any energy-based gun Any energy-based gun x1 |
(use ID and hand to unlock and change turret settings, or turn it off and use wrench to move it) |
|
| How to deconstruct | ||
| Tools |
If the turret is not finished (only works before construction step 9):
If the turret is finished:
|
|
|
|
AI Core
The AI’s house.
 AI Core |
Requires to build | How to build |
|---|---|---|
| x4x2 Screwdriver Optional: |
|
|
| How to deconstruct | ||
| Tools |
|
|
|
|
Solar Panels and Trackers
You can generate power with these things.
 Solar Panel Solar Tracker |
Requires to build | How to build |
|---|---|---|
| x2 orx2 Tracker: |
|
|
| How to deconstruct | ||
| Tools |
|
|
|
|
Disposal Pipes and Machinery
The disposal system of the station.
  Disposal Pipes and Machinery |
Requires to build | How to build |
|---|---|---|
|
|
|
|
| How to deconstruct | ||
| Tools |
|
|
|
(Screwdriver) |
Computers
Computers can have various uses.
 Computer |
Requires to build | How to build |
|---|---|---|
| x5x2 Screwdriver |
|
|
| How to deconstruct | ||
| Tools |
|
|
|
|
Modular Consoles
Modular Consoles are very flexible devices.
 Console |
Requires to build | How to build |
|---|---|---|
| x10 At least: one power source one drive (HDD or SSD) one processing unit access to programs (network cards or datadisks) |
|
|
| How to deconstruct | ||
| Tools |
|
|
|
Screwdriver |
Machines

 A machine frame with wiring and board installed |
Requires to build | How to build |
|---|---|---|
| x5 Components as specified by examining the mounted board |
|
|
| How to deconstruct | ||
| Tools |
|
|
|
Screwdriver |
For detailed information about each machine: machine construction guide.
Robots, Cyborgs and Mechs


Their construction is described at: Robots, Cyborgs and Mechs -pages.
Mineral Door
The actual doors of the game. Nobody ever uses these poor things and they aren’t even airtight. Most ore materials (and wood) can be made into a door.

|
Requires to build | How to build |
|---|---|---|
| The mineral (or wood) of your choice x20 |
|
|
| How to deconstruct | ||
| Tools |
|
|
|
|

Conveyor Belt
The Conveyor Belts seen in Cargo, Disposals, and other places around the station can be set up similar to a floor tile, only they require a bit more setting up to become functional. Clicking a placed conveyor belt with an item will put that item on the belt unless it’s a wrench, screwdriver, crowbar or you are on
.
| Conveyor Belt and Conveyor Belt Switch
|
Requires to build | How to build |
|---|---|---|
| An Autolathe or protolathe/techfab, with enough metal and glass. |
|
|
| How to deconstruct | ||
| Tools |
or attack it with a weapon on Combat Mode Toggle with 4 or F by default. Left-clicking people with an empty hand will Harm . |
|
|
|

Railings
Railings are typically used on maps with extra Z-levels to prevent people from falling down.
 Railings |
Requires to build | How to build |
|---|---|---|
|
||
| How to deconstruct | ||
| Tools |
|
|
|
|
Sink
Allows you to wash things. Have empty hands and click on sink to wash yourself, or have a tool in hand and click on sink to wash it. If you have nothing in your active hand you will wash your face (if targeting the head, eyes or mouth) or your hands (if targeting anywhere else).
Sinks slowly generate water, up to the max capacity of 100u. Click a sink with a liquid container to fill it with water. Sinks can be connected to a plumbing system to fill them with custom reagents instead of just water.

Some sinks have a cosmetically different appearance (e.g. ![]() ) but all of them work identically.
) but all of them work identically.
 Sink |
Requires to build | How to build |
|---|---|---|
| x1
|
|
|
| How to deconstruct | ||
| Tools |
|
|
|
|
Shower
The HS-451. Installed in the 2550s by the Nanotrasen Hygiene Division. Switch the shower on and off with an empty hand. Use a wrench to adjust the shower water temperature from normal to freezing, from freezing to boiling or from boiling to normal. Use an analyzer to identify the shower’s water temperature without risking burns.
Showers slowly generate water, up to the max capacity of 200u. Showers can be connected to a plumbing system to make them spray custom reagents instead of just water. Showering will cause touch reactions.
 Shower |
Requires to build | How to build |
|---|---|---|
| x2
|
|
|
| How to deconstruct | ||
| Tools |
Can only be deconstructed by force. Toggle automatic water regeneration with a multitool. |
|
Furniture
Chairs
Chairs are for sitting down and making the place look nice. The only real use for chairs are to restrain people, building electric chairs or to buckle in when the shuttle is about to take off. Office chairs can also be used to move buckled people around.
 Chair  Stool  Bar Stool  Comfy Chair  Office Chair  Wooden Chair  Winged Wooden Chair |
Requires to build | How to build |
|---|---|---|
| x1 or x2or x5or |
|
|
| How to deconstruct | ||
| Tools |
Wrench a chair to transform it back into the starting material. |
|
|
|
Tables/Reinforced Table
Tables are used to hold objects on. The most common ones are metal, glass and reinforced. You can climb onto tables, though it takes a short while. Tables can also be used for ghetto surgery.
 Table  Wooden Table  Glass Table  Poker Table  Fancy Table (has many types)  Reinforced Table  Operating Table |
Requires to build | How to build |
|---|---|---|
or
|
|
|
| How to deconstruct | ||
| Tools |
|
|
|
( |
Closet
Closet are among the most common and arguably the most useful of containers on the station. Nearly anything can fit inside, barring other closet, crates, and certain especially large objects like racks and MULEbots.
Besides being welded shut, some closet can be, well, locked. Several levels of access exist, such as security-, captain-, and private-level access. These can be opened with the proper level ID, emag item, or with enough damage.
If you don’t want to take out your id to open these every time, you can alt-click them to lock/unlock them.
If you yourself are inside a closet, you can see your surroundings. Normally you can move in any direction to exit the closet, but if the closet is locked or welded, you will be unable to exit and you cannot unweld or unlock your cell from inside — at that point if you try to move around you will instead throw yourself against the sides of the closet, making a BANG BANG sound that can be heard from several squares away. Using the Resist button will allow you to slowly open the locker.
Coffins count as closets.
Different types of closets: ![]()
![]()
![]()
![]()
![]()
![]()
![]()
![]()
![]()
 Closet |
Requires to build | How to build |
|---|---|---|
| x2 or |
|
|
| How to deconstruct | ||
| Tools |
|
|
|
|
Rack
Racks are flat and wide, incapable of being walked over, and bolted together. They can hold any number of items, but they hold them stacked on top of each other like a table. They are most common in maintenance tunnels and the EVA room.
 Rack |
Requires to build | How to build |
|---|---|---|
| x1
|
|
|
| How to deconstruct | ||
| Tools |
|
|
|
|
Beds
Get your mind out of the gutter, they’re for sleeping! Most station’s beds come with a bedsheet, and new beds without sheets can be made with metal. The Medbay’s preferred variation of a bed is the movable and collapsible  Roller Bed, which is extremely useful for transporting patients.
You use a bed by going on top of it and *sleep. To buckle someone, put them on the bed and drag their sprite on it, to release click on the bed.
 Bed |
Requires to build | How to build |
|---|---|---|
| x2
|
|
|
| How to deconstruct | ||
| Tools |
Use a wrench to dismantle it to two sheets of metal. |
|
|
|
Bookcase
Holds any number of books inside.
 Bookcase |
Requires to build | How to build |
|---|---|---|
|
|
|
|
| How to deconstruct | ||
| Tools |
|
|
|
|
Drying Rack
Dries herbs for smoking, meat into jerky and grapes into raisins.
 Drying rack |
Requires to build | How to build |
|---|---|---|
|
||
| How to deconstruct | ||
| Tools |
|
|
|
|
Display Case
Show off an item within a glass case. Use an ID to open a display case.
| Файл:Display.png Display Case |
Requires to build | How to build |
|---|---|---|
| x2
|
|
|
| How to deconstruct | ||
| Tools |
|
|
|
|
Power Wires
Power wires (cable coils) ![]() are available from autolathes, yellow toolboxes, engineering vending machines or scattered about the station’s maintenance-, construction- and storage-areas.
are available from autolathes, yellow toolboxes, engineering vending machines or scattered about the station’s maintenance-, construction- and storage-areas.
- Wires can be electrified if connected to a power net (a charged SMES or APC is attached to the wire), and you will get fried if you place or cut them.
- Insulated gloves negate any electrical shocks to the player.
How Do I Wire?
After a change in the summer 2019, wires will automatically connect to other wires on tiles in cardinal directions. To place, lift any floor tile with a crowbar to reach the plating. Then click the plating while holding cable coil in your hand to place the wire. To remove wires, use wirecutters on them. Powered wires will automatically electrify grilles and power some machines on top of them.
Wire Art
The wire art that was available before June, 2019 can still be made by using an item called «pipe cleaner». See the Guide to wire art.
Connecting Machines
Most machines are connected to powernets wirelessly by being in an arbitrary «area» containing a charged APC. Though some machines must be connected by having a powered wire under them.
With wire knobs now being just what a wire looks like after it’s cut, all grilles on top of a wire that has power are shock grilles.
Please note those machines must also be anchored (generally wrenched down) to be connected.
Special cases :
- APCs are connected to an adjacent powered wire with a special terminal, by doing the cable coil construction step.
- An exception to the cardinal function is SMES, which has an input an output wire next to each other without being connected.
Wire Layers
Since October 2019 you can put cables on different layers. Ctrl-click the stack of cable coil to toggle layer.

Layers do not connect, and can have separate powernets running along the same tile. Machines and terminals only connect to layer 2, yellow. Cable bridges can be crafted by using the cable coil inhand. Bridges link cables across layers on the same tile, or allow APC’s/machines (those that aren’t wireless) to connect to layers other than 2 when placed under them.
Wire-net Reset
This is Byond’s attempt to «reset» the whole power net in order to deal with new/removed wires that shift the power value of a whole system. It will cause APCs to stop charging for a moment, and in huge nets it can shut down the charging of all APCs for a while.
Don’t mess with wires unless you have to, it causes problems to everyone in both OOC (potential lag) and IC (power loss).
Pipes
Pipes are only constructed from Pipe Dispensers in Atmospherics.
To use a Pipe Dispenser, follow these steps:
- Put Dispenser in a powered area.
- Wrench Dispenser to lock it into place.
- Click on the Pipe Dispenser with an empty hand and select the pipes you wish to use.
- You have a pipe to play with now.
- Wrench Dispenser to make it mobile once more.
Placing and Removing Pipes
Disposal Pipes

- Rotate the pipe to the direction you wish the pipe to be in.
- Wrench the pipe to the ground.
- Use a lit welder to fuse the pipe to the ground.
Gas Pipes

- Rotate the pipe to the direction you wish (pay attention to gas pumps as they are direction dependent).
- Wrench into place.
- Turn on the pipe, if necessary.
How to Remove a Pipe
- Perform the step you used to set the pipe into place in reverse (make sure the pipe is powered off).
- Brace for any junk that might blast out of the pipe.
Starter guides
- How Do I get into Skyrat?
- MUST READ
- Tutorial
- The Rules
- Keyboard Shortcuts
- Guide to HUD Icons
- Job Selection and Assignment
- Terminology
- Frequently Asked Questions
- Guide to Avoiding Bans
- Guide to Combat mode
Medical guides
- Guide to Medicine
- Guide to Chemistry
- Guide to Ghetto Chemistry
- Guide to Plumbing
- Guide to Grenade Construction
- Guide to Genetics
- Guide to Diseases
- Guide to Surgery
- Guide to Traumas
- Guide to Wounds
- Guide to Mediguns
Engineering guides
- Guide to Construction
- Guide to Machine Construction
- Guide to the Solars
Guide to the Singularity EngineGuide to the Tesla Engine- Guide to the Supermatter Engine
- Guide to the Gas Turbine
- Guide to Power
- Guide to Atmospherics
- Guide to Telecommunications
Science guides
- Guide to Research and Development
- Guide to Robotics
- Guide to Toxins
- Guide to Xenobiology
- Guide to Cytology
- Guide to Circuits
- Guide to Xenoarchaeology
- Guide to synthetic surgery
Antagonist guides
- How to be a No Good Dirty Traitor
- Makeshift Weapons
- Guide to Hacking
- Guide to Combat
- Syndicate Items
- Guide to Illicit Access
- Guide to Revolution
- Blood Cult
- Top Secret: Nuclear Operative’s Field Guide
- Guide to Malfunction
- How to Play an Alien
- Abductor guide
- Families
- Heretic
Other guides
- Guide to AI Modules
- Critters (Game controlled beings)
- Guide to Races
- Guide to Food and Drinks
- Guide to Drinks
- Guide to food
- Guide to Hydroponics
- Guide to Playing Music
- Guide to Paperwork
- Random Events
- List of Supply Crates
- Makeshift Weapons
- Auxiliary Base Construction
- Guide to Space Exploration
- Guide to Smithing and Reagent Forging
For more guides click here!
| Обратите внимание, данной теме также посвящены следующие статьи: |
|---|
| Строительство для начинающих — Строительные материалы — Продвинутая сборка оборудования |
Инструменты
Прежде, чем вы начнете строительство, вам стоит обзавестись инструментами, необходимыми для постройки/демонтажа той или иной конструкции.
Все предоставленные инструменты можно найти в синих ящиках с инструментами, в инженерных раздатчиках для инструментов, сделать в 3Д-принтере или попросить у ученых.
| Базовый инструмент | Улучшенный инструмент | Использование | Заметки |
| Монтировка
|
Клешни Жизни
|
Для вынимания чего-либо откуда-либо |
|
|---|---|---|---|
| Кусачки
|
Клешни Жизни
|
Перекусывает провода/решетки |
|
| Сварочный аппарат
|
Экспериментальный сварочный аппарат
|
Варит/нарезает метал |
|
| Моток кабеля
|
N/A | Соединяет системы вместе. |
|
| Отвертка
|
Ручная Дрель
|
Открытие/закрытие панелей |
|
| Разводной ключ
|
Ручная Дрель
|
Прикручиваем/откручиваем вещи. |
|
| Мультитул
|
N/A | Балуемся с проводами. |
|
| РЦД
|
N/A | Быстрая постройка/демонтаж. |
|


Строительные материалы
| Materials | ||
|---|---|---|
| Материалы | Ингредиенты | Метод получения |
| 1x |
Переплавьте руду на станции шахтёров. | |
| 2x |
Переплавьте руду на станции шахтёров. | |
| 1x |
Зажарьте уголь на шахте. | |
| 1x |
Зажарьте песок на шахте. | |
|
|
1. Вырастите 2. Срубите его 3. Используйте |
|
| 1x |
Используйте |
|
| 1x |
Используйте |
|
| 1x |
Используйте |
Напольные покрытия
| Полы | |||
|---|---|---|---|
| Объект | Ингредиенты | Инструменты | Способ создания |
| 1x |
Construction
Используется как основа для обшивки Deconstruction
|
||
| 1x |
Construction
Используется как более постоянная структура на открытых пространствах или для того, чтобы оставлять подпольные трубопроводы и проводку видимыми. Deconstruction
|
||
| 1x |
Construction
Герметизирует пол, и используется для постройки всего остального. Deconstruction
Repair
|
||
| 1x |
Construction
Плитка прячет провода и трубы Также вы можете положить деревянные полы, ковры и другие плитки Deconstruction
|
||
| 2x |
Construction
Deconstruction
|
||
| 1 x |
|
Construction
Deconstruction
|
Стены
| Стены | ||
|---|---|---|
| Постройка | Требования | |
| 4x |
Construction
Deconstruction
Repair
|
|
| 2x |
Construction
Deconstruction
|
|
| 2x |
Construction
Deconstruction
Extra
|
Стеклянные панели
| Стекло | ||
|---|---|---|
| Конструкция | Требования | |
| 1x |
Construction
Deconstruction
Extra
|
|
| 2x |
Construction
Deconstruction
|
Шлюзы и двери
| Шлюзы и двери | |||||
|---|---|---|---|---|---|
| Конструкция | Требования | ||||
| 4x |
Construction
Deconstruction
|
||||
| 4x |
Construction
Deconstruction
|
||||
| 5x |
Construction
Deconstruction
|
||||
| 20x или 10x |
Construction
Deconstruction
|
||||
| 4x |
Construction
Deconstruction
Также вы можете разломать стену до держателей, а потом начать постройку двери с этого места |
||||
| 2x |
Construction
Deconstruction
|
Настенные конструкции
| Настенные конструкции | ||
|---|---|---|
| Конструкции | Требования | |
| 2x |
Construction
Deconstruction
Если APC сломана, то вам необходимо сначала разбить крышку чем-то тяжелым, например огнетушителем. |
|
| 2x |
Construction
Deconstruction
|
|
| 2x |
Construction
Deconstruction
|
|
| 2x |
Construction
Deconstruction
|
|
| Camera Assembly, |
Construction
Если камера все же Вас не может обнаружить то:
Deconstruction
|
|
|
Construction
Deconstruction
|
||
| 1x |
Construction
Deconstruction
|
|
| 1x |
Construction
Deconstruction
|
Другое
| Другое | ||
|---|---|---|
| Конструкции | Требования | |
| 5x |
Construction
Deconstruction
|
|
| 5x |
Construction
Deconstruction
|
|
| 7x |
Construction
Deconstruction
|
|
 Ядро ИИ Ядро ИИ |
4x |
Construction
Deconstruction
|
| 1 x |
Construction
Deconstruction
|
|
|
Construction
Deconstruction
|
||
| 5x |
Construction
Deconstruction
|