-
Contents
-
Table of Contents
-
Troubleshooting
-
Bookmarks
Quick Links
Solid-State Memory
Camcorder
Operating Guide
PXW-X70
4-544-242-11(1)
Table of Contents
Getting Started
Recording
Playback
Editing
Using the Menu
Connecting with another
device
Troubleshooting
Additional Information
Related Manuals for Sony XDCAM PXW-X70
Summary of Contents for Sony XDCAM PXW-X70
-
Page 1
4-544-242-11(1) Solid-State Memory Table of Contents Camcorder Getting Started Recording Operating Guide Playback Editing Using the Menu Connecting with another device Troubleshooting Additional Information PXW-X70… -
Page 2: Read This First
Read this first Before operating this unit, please read this • The LCD screen is manufactured using manual thoroughly, and retain it for future extremely high-precision technology, so reference. over 99.99% of the pixels are operational for effective use. However, there may be some tiny black points and/or bright Notes on use points (white, red, blue, or green in color)
-
Page 3
On recording Save all your recorded image data • In order to stabilize memory card • To prevent your image data from being operation, it is recommended that you lost, save all your recorded images on PC format the memory card when you use it periodically. -
Page 4: Identifying Parts And Controls
Identifying parts and controls Body The numbers in ( ) are reference pages. A ASSIGN4/FOCUS MAGNIFIER N Power zoom lever button (64) O Cable clamper B Accessory shoe receptacles P Hook for shoulder strap C XLR handle unit Q Multi Interface Shoe (45) D Microphone fixing clamper Attaching the XLR handle unit E Microphone holder…
-
Page 5
2 Remove the handle shoe cap. 4 Press and turn the handle mounting screws to tighten them. z Tips • When attaching the XLR handle unit, make sure to securely tighten both handle mounting screws. 3 Align the mark on the XLR handle with •… -
Page 6
Identifying parts and controls (Continued) 1 Place the microphone A into the microphone holder B. 2 Connect the plug of the microphone to the INPUT 1 jack C. 3 Place the microphone cable into the cable holder D. Put the cable in the outer cable holder. -
Page 7
A Manual lens ring (33) N LOW CUT (INPUT2) switch (44) B Lens hood O Internal microphone C Lens (ZEISS lens) P ZOOM/FOCUS switch (34) D REC CH SELECT (INPUT1) switch Q AF/MF button (34) (44) R MENU button (81) E ATT (INPUT1) switch (44) S MANUAL dial (39) F INPUT1 (LINE/MIC/MIC+48V) switch… -
Page 8
Identifying parts and controls (Continued) Attaching the lens hood Align the marks on the lens hood to those on the camcorder, and turn the lens hood in the direction of the arrow 2 until it is locked. z Tips • If you attach or remove a 62 mm (2 1/2 in.) PL filter or MC protector, remove the lens hood. -
Page 9
A SDI OUT jack (73) O BATT release lever (21) B Lens adjustment dial (26) C START/STOP button (29) D HDMI OUT jack (73) E DC IN jack (21) F v/V/b/B/EXEC button (81) G Handle zoom lever (33) H Handle record button (29) I INPUT2 jack (44) J INPUT1 jack (44) K ASSIGN6/D.EXTENDER button (64) -
Page 10
Identifying parts and controls (Continued) A Handle zoom switch (33) B Eye sensor C Viewfinder (26) D Large eyecup (26) E AUTO/MANUAL switch (39) F ND FILTER switch (41) G Battery slot (21) (headphones) jack I SHUTTER SPEED button (40) J GAIN button (40) K IRIS button (39) -
Page 11
A SLOT SELECT button (27) B THUMBNAIL button (66) C LCD screen/touch panel (26) D Memory card slot A/Memory card access lamp (27) E Memory card slot B/Memory card access lamp (27) F DISPLAY button (71) G ASSIGN3/PICTURE PROFILE button (64) H ASSIGN2/STATUS CHECK button (64) -
Page 12: Wireless Remote Commander
F STOP button (66) Remote Commander may not function properly. G DISPLAY button (71) In this case, replace the battery with a Sony CR2025 lithium battery. Use of another battery H Transmitter may present a risk of fire or explosion.
-
Page 13: Screen Indicators
Screen indicators Indicator Meaning Center Upper right Relay recording Upper left SDI/HDMI REC CONTROL Upper right Indicator Meaning Bottom 0min Estimated remaining recording time Upper left Recording/playback media Indicator Meaning 00:00:00:00 Time code 100% Remaining battery (hour:minute:second: INTELLIGENT AUTO frame) (face detection/scene detection/camera-shake Bottom…
-
Page 14
Screen indicators (Continued) Indicator Meaning AUTO SLOW SHUTTER AUDIO LEVEL DISPLAY (95) D.EXTENDER (87) REC LEVEL MODE NIGHTSHOT SELECTED MIC ND filter (41) z Tips • Indicators may look different or appear at different positions. Data code during recording The recording date, time and condition are recorded automatically on the recording media. -
Page 15: Table Of Contents
Table of Contents Read this first ……………….2 Identifying parts and controls …………..4 Body…………………. 4 Wireless Remote Commander …………12 Screen indicators ………………13 Getting Started Step 1: Checking supplied accessories ……….19 Step 2: Charging the battery pack …………21 Step 3: Attaching the accessory shoe …………23 Step 4: Turning on the camcorder and setting the date and time ..24 Setting the date and time …………..
-
Page 16
Table of Contents (Continued) Recording sound from an external microphone (sold separately)..45 Adjusting the audio level from the INPUT1 and INPUT2 jacks … 46 Adjusting the audio level from the internal microphone or an external microphone (PLUG IN POWER) …………46 Useful functions ……………… -
Page 17
Using the Menu Operating the menu …………….81 Menu items …………………83 (CAMERA SET) menu …………..86 Settings to adjust your camcorder to the recording conditions ( STEADY SHOT, etc.) (REC/OUT SET) menu …………..90 Recording settings, input and output settings (REC SET/VIDEO OUT, etc.) (AUDIO SET) menu …………….92 Settings for the audio recording (AVCHD AUDIO FORMAT, etc.) (DISPLAY SET) menu …………..93… -
Page 18
Table of Contents (Continued) Specifications ………………125 Index ………………..129… -
Page 19: Getting Started
When the unit is used with a PC Lens hood (1) (p.
 connection, download device drivers, plug- ins, and application software, where applicable, from the Sony Professional products web site. Sony Professional products web site homepage: Lens cap (Attached to lens) (1) U.S.A.
 -
Page 20
Step 1: Checking supplied accessories (Continued) Korea http://bp.sony.co.kr China http://pro.sony.com.cn Although the data regarding recorded materials are stored over multiple files and folders, you can easily handle the clips without considering its data and directory structure, by using the dedicated application… -
Page 21: Step 2: Charging The Battery Pack
Step 2: Charging the battery pack You can charge the “InfoLITHIUM” battery pack (V series) with the supplied AC Adaptor. b Notes • You can use a large capacity battery pack, NP- FV100 (sold separately), with your camcorder. You cannot use NP-FV50. Close the LCD screen and store DC IN jack the viewfinder before attaching…
-
Page 22
Step 2: Charging the battery pack (Continued) To remove the battery pack Turn the power off, then slide the BATT release lever to release the battery. On the battery pack • Turn the power off before changing the battery pack. •… -
Page 23: Step 3: Attaching The Accessory Shoe
Step 3: Attaching the accessory shoe To mount the accessory shoe Mount the accessory shoe on the accessory shoe mount as illustrated. Accessory shoe plate Accessory shoe Accessory shoe Accessory shoe plate 1 Lift the edge of the accessory shoe plate and pull it in the direction opposite to that of the arrow on the accessory shoe plate and remove it from the accessory…
-
Page 24: Step 4: Turning On The Camcorder And Setting The Date And Time
Step 4: Turning on the camcorder and setting the date and time z Tips Turning on the camcorder • If you do not use your camcorder for about 3 months, the built-in rechargeable battery gets Open the LCD screen and turn the discharged and the date and time settings may power on.
-
Page 25
The clock starts. • Set [SUMMERTIME] to [ON] to move the time forward 1 hour. • You can set any year up to the year 2037. • Midnight is indicated as 12:00 AM, and noon as 12:00 PM (when [60i] is selected). z Tips •… -
Page 26: Step 5: Adjusting The Lcd Screen And Viewfinder
Step 5: Adjusting the LCD screen and viewfinder When the picture in the viewfinder is Using the LCD screen hard to see The LCD screen can be rotated in the range If you cannot see the picture in the as illustrated below, allowing a person other viewfinder clearly under bright than the camera operator to see the image.
-
Page 27: Step 6: Preparing The Recording Media
Step 6: Preparing the recording media Types of memory cards you can use in Open the cover, and insert the your camcorder memory card with the notched edge File format Types of media in the direction as illustrated until it clicks into place.
-
Page 28
Step 6: Preparing the recording media (Continued) Selecting the memory card slot to be used for recording Press the SLOT SELECT button to change which slot is selected for recording. You can confirm the selected slot on the screen. SLOT SELECT button b Notes •… -
Page 29: Recording
Recording Recording Handle record button LCD screen START/STOP button Recording movies Your camcorder records movies on a memory card. The factory setting of recording movies is XAVC HD. Do the following steps to record movies. Press the latches on both sides of the lens cap and remove it. Continued ,…
-
Page 30
Recording (Continued) Open the LCD screen, and press the START/STOP button (or the handle record button) to start recording. The recording lamps light up during recording. To stop the movie recording, press the START/STOP button or the handle record button again. -
Page 31
To continue recording on the memory cards, one after another (Relay recording) Insert memory cards each in both slots A and B, so the camcorder switches memory card A (or B) just before space on the other one runs out, and continues recording on the next memory card automatically. -
Page 32: Changing The Setting Of The Start/Stop Button And Handle Record Button
Recording (Continued) Changing the setting of the START/STOP button and handle record button When using SIMULTANEOUS REC, you can start and stop recording on different memory cards by using the START/STOP button and the handle record button. In the default setting, movies are recorded on both the memory card A and B at the same time when either record button is pressed.
-
Page 33: Adjusting The Zoom
z Tips Adjusting the zoom • When focusing, the minimum distance required between the camcorder and the subject is about 1 cm (about 13/32 in.) for wide angle and about 1 meter (about 39 3/8 in.) for telephoto. • The focus may not be adjusted at certain zoom positions if the subject is within 1 meter (about 39 3/8 in.) from your camcorder.
-
Page 34: Adjusting The Focus
Adjusting the focus You can adjust the focus manually for different recording conditions. During recording or standby, Use this function in the following cases. press the AF/MF button C to set – To record a subject behind a window covered the focus to manual.
-
Page 35: Using The Focus Magnifier
Using the Focus magnifier Focusing by touching the LCD screen (Spot focus) The selected area on the LCD screen is magnified and displayed. It is easier to You can focus on the point where you touch confirm the focus setting during manual on the LCD screen.
-
Page 36
Adjusting the focus (Continued) z Tips Select (CAMERA SET) t • You can assign this function to an ASSIGN button (p. 64). [FACE DETECTION] t [ON] or • To make it easy to detect faces, record under the [OFF] with the v/V/b/B/EXEC following conditions: button E. -
Page 37: Changing The Recording Setting
Changing the recording setting Selecting the file format and 720/60p 50Mbps 720/50p 50Mbps recording format For AVCHD You can select the file format in [FILE FORMAT] and the recording format (bit- rate, image size, frame rate, and scanning 1080/60p PS 1080/50p PS system) in [REC FORMAT].
-
Page 38: Setting The Dv Mode (Dv Mode)
Changing the recording setting (Continued) Frame rate when [60i] is selected The following items are available only when DV mode is selected: The frame rate displayed on the LCD screen differs from the actual frame rate. (REC/OUT SET) – WIDE REC Frame rate on the LCD –…
-
Page 39: Adjusting The Brightness
Adjusting the brightness You can adjust the image brightness by adjusting the iris, gain or shutter speed, or Press the IRIS button B. by adjusting the light volume with the ND next to the iris value filter disappears, and the iris value is highlighted.
-
Page 40: Adjusting The Gain
Adjusting the brightness (Continued) Adjusting the gain Adjusting the shutter speed You can use this if you do not want to You can adjust and fix the shutter speed increase the value by AGC (automatic gain manually. You can make a moving subject control).
-
Page 41: Adjusting The Exposure
z Tips b Notes • It is difficult to focus automatically at a lower • When you set AUTO/MANUAL switch to shutter speed. Manual focusing with your AUTO, or press [EXEC] on the [SPOT camcorder attached to a tripod is recommended. METER] or [SPOT METER/FOCUS] screen, the exposure is returned to AUTO.
-
Page 42: Adjusting The Color Tone
Adjusting the color tone Adjusting the white balance Turn the MANUAL dial to select PRESET, A, or B. x Setting the A/B value Select A or B for recording with the white balance setting stored in memory A or B. See page 43 on how to store the adjusted value.
-
Page 43: Audio Setup
Audio setup The jacks, switches and dials shown below allow you to set the sound that is recorded. To save the adjusted white balance See page 5 for details on attaching the microphone. value in memory A or B 1 Set the AUTO/MANUAL switch D to Recording sound from the MANUAL.
-
Page 44
Audio setup (Continued) Audio level controls I: AUTO/MAN (CH1) switch J: AUDIO LEVEL (CH1) dial K: AUTO/MAN (CH2) switch L: AUDIO LEVEL (CH2) dial Wind noise switches G: LOW CUT (INPUT1) switch M: LOW CUT (INPUT2) switch Select the audio input source. Set the INPUT1/INPUT2 (LINE/MIC/ MIC+48V) switch (D or F) based on the device connected to INPUT1 jack… -
Page 45: Recording Sound From A Multi Interface Shoe Compatible Microphone (Sold Separately)
Recording sound from a Multi Set the microphone input level. Interface Shoe compatible When the INPUT1/INPUT2 (LINE/ microphone (sold separately) MIC/MIC+48V) switch (D or F) is set to MIC or MIC+48V, the input level You can record sound in stereo using a can be set using the ATT (INPUT1/ Multi Interface Shoe compatible INPUT2) switch (C or E).
-
Page 46: Adjusting The Audio Level From The Input1 And Input2 Jacks
Audio setup (Continued) This enables you to apply the same audio Adjusting the audio level from level setting to the CH1/CH2 channels. the INPUT1 and INPUT2 jacks To restore automatic adjustment You can adjust the audio level for the sound •…
-
Page 47: Useful Functions
Useful functions Selecting the suitable setting Press the v/V/b/B/EXEC button automatically for the recording C, select [AUTO], [INTELLIGENT AUTO], or [SCENE SELECTION], situation (AUTO MODE setting) and press the button again. You can make optimal recordings in various situations. b Notes •…
-
Page 48: Shooting In Dark Conditions (Nightshot)
Useful functions (Continued) b Notes Setting Recording conditions • NIGHTSHOT can only be used when the Shoots fireworks with AUTO/MANUAL switch is set to AUTO. Fireworks* optimal exposure. • NIGHTSHOT uses infrared light. Make sure ([FIREWORKS]) that your finger does not cover the infrared light emitter when shooting.
-
Page 49: Connecting The Camcorder To An Android Smartphone Equipped With The Nfc Function Using One-Touch
Android OS Search for “Content Browser Mobile” in Google Play, then install it. Set the camcorder to the shooting mode. • You need Android 4.1 or later when you use the NFC One-touch. You can use the NFC function only when (N-Mark) is displayed on the screen.
-
Page 50: Using A Smartphone As A Remote Controller
Useful functions (Continued) b Notes • Cancel the sleep mode and screen lock of the smartphone beforehand. • Continue to touch (1 second-2 seconds) on the camcorder without moving, until “Content Browser Mobile” starts up. • While [CTRL W/SMARTPHONE] is activated, only the START/STOP button and handle record button are available on the camcorder.
-
Page 51: Connecting Without Using The Nfc Function (Android)
Functions operable by [CTRL W/ Input the password displayed on SMARTPHONE] the camcorder (first time only). • Recording start/stop • Touch focus Available when using manual focus. • Zoom • Iris adjustment While the smartphone is connected to the camcorder, CLOSE cannot be selected. b Notes •…
-
Page 52: Connecting Without Using The Nfc Function (Iphone/Ipad)
Useful functions (Continued) Return to the Home screen, then Input the password displayed on tart “Content Browser Mobile.” the camcorder (first time only). Confirm connection to the SSID For details on how to operate “Content displayed on the camcorder. Browser Mobile” after it starts, refer to the Help section in “Content Browser Mobile”.
-
Page 53: Customizing The Picture Quality (Picture Profile)
For details on how to operate “Content b Notes Browser Mobile” after it starts, refer to the • [PP4] is set for the picture profile by default. Help section in “Content Browser Mobile”. Picture profile Example setting number Customizing the picture quality Example settings of a (Picture profile) color tone with…
-
Page 54
Useful functions (Continued) To cancel the picture profile recording Select [OFF] in step 2 with the v/V/b/B/ EXEC button B, then press the button. To change the picture profile You can change the settings stored in [PP1] through [PP6]. 1 Press the ASSIGN3 button A. 2 Press the v/V/b/B/EXEC button B, select the picture profile number that you want to change, then press the… -
Page 55
BLACK LEVEL To set the black level. Item Description and settings Sets the black level. -15 to +15 GAMMA To select a gamma curve. Item Description and settings [STANDARD] Standard gamma curve [STILL] Gamma curve to create the tone of a still image. [CINEMATONE1] Gamma curve 1 for producing tone of film camera images [CINEMATONE2]… -
Page 56
Useful functions (Continued) KNEE To set knee point and slope for video signal compression to prevent over-exposure by limiting signals in high intensity areas of the subject to the dynamic range of your camcorder. When selecting [STANDARD] or [STILL] in [GAMMA], [KNEE] is set to off if [MODE] is set to [AUTO]. -
Page 57
SATURATION To set the color level. Item Description and settings — 32 (light) to +32 (dark) COLOR PHASE To set the color phase. Item Description and settings -7 (greenish) to +7 (reddish) COLOR DEPTH To set the color depth for each color phase. This function is more effective for chromatic colors and less effective for achromatic colors. -
Page 58: Wb Shift
Useful functions (Continued) Item Description and settings MEMORY1 COLOR Sets colors stored in Memory 1. [PHASE] : Sets color phase. 0 (purple) t 8 (red) t 16 (yellow) t 24 (green) t 31 (blue) [PHASE RANGE]: Sets color phase range. 0 (no color selection), 1 (narrow: to select only a single color) to 31 (wide: to select multiple colors in similar color phase)
-
Page 59
Item Description and settings [CC[MG/GR]] Sets a color correct offset value. -9 (greenish) to +9 (magentish) [R GAIN] Sets an R level. -9 (low R level) to +9 (high R level) [B GAIN] Sets a B level. -9 (low B level) to +9 (high B level) DETAIL To set items for the detail. -
Page 60: Setting Time Data
Useful functions (Continued) To copy the picture profile setting to 2 Press the v/V/b/B/EXEC button, select [PRESET], then press the button again. another picture profile number 3 Press the v/V/b/B/EXEC button, select See page 53 for the location of the buttons. the first two digits, then press the button 1 Press the ASSIGN3 button A.
-
Page 61: Recording With The Slow & Quick Motion Function
To reset the user bit When [50i] is selected You can reset the user bit (00 00 00 00). REC FORMAT FRAME Select [RESET] in step 2 of “Presetting RATE 1080/25p 1080/50p the user bit.” 50% slow 100% (standard) 100% (standard) 200% quick Recording with the Slow &…
-
Page 62
Useful functions (Continued) 4 Select [FRAME RATE] with the v/V/ Preparation b/B/EXEC button C, and set a desired frame rate. You must set the recording format and [XAVC HD] frame rate. 1 Press the MENU button A. 60fps 50fps 2 Select (CAMERA SET) t [S&Q MOTION] t [REC FORMAT] with 30fps… -
Page 63: Reviewing The Most Recently Recorded Scene (Last Scene Review)
To change the frame rate setting Reviewing the most recently Hold the ASSIGN button down for about 1 recorded scene (Last Scene second, than change the value with the v/ Review) V/b/B/EXEC button C. Holding the ASSIGN button down again You can review the most recently recorded for about 1 second restores the previous scene on the LCD screen.
-
Page 64: Assigning The Functions To The Assign Buttons
Assigning the functions to the ASSIGN buttons Some functions can be assigned to the • MARKER (p. 94) ASSIGN buttons for use. You can assign a • CAMERA DATA DISPLAY (p. 95) single function to any one of the ASSIGN 1 •…
-
Page 65
Select (OTHERS) t [ASSIGN BUTTON] with the v/V/b/B/EXEC button B. Press the v/V/b/B/EXEC button B, select the ASSIGN button that you want to set, then press the button again. Press the v/V/b/B/EXEC button B, select the function that you want to assign, then press the button again. -
Page 66: Playback
Playback Playback THUMBNAIL button Playing back movies Open the LCD panel.
-
Page 67
Press the THUMBNAIL button. The THUMBNAIL screen appears after a few seconds. Recording media Playback mode Previous Thumbnail (movie) Next Current movie data (p. 67) • You can turn on or off the date and time display on the thumbnails by pressing the DISPLAY button. -
Page 68
Playback (Continued) C Frame rate D Recording mode E Duration F Time code of recording started Time code will not be displayed correctly when you play back recording media with no time code, or recording media with time code that your camcorder does not support. G DOLBY DIGITAL recording Displayed when audio is recorded in Dolby Digital format. -
Page 69: Playing Back Still Images
On playing back movies • Movies recorded using this camcorder may not be played back normally on devices other than this camcorder. Also, movies recorded on other devices may not play back properly on this camcorder. • DV movies recorded on SD memory cards cannot be played on A/V devices of other manufacturers.
-
Page 70
Playback (Continued) Your camcorder displays the selected still image. Next Previous To enlarge Touch (playback zoom) when playing back a still image. You can adjust the zoom with , or with the power zoom lever. When you touch the enlarged image, the touched point will be displayed at the center of the screen. -
Page 71: Changing/Checking The Settings In Your Camcorder
Changing/checking the settings in your camcorder Displaying recording data (Data code) You can display information, including date, time and camera data automatically stored during recording on the screen during playback. Select (DISPLAY SET) t DATA CODE and choose the data that you want to display, or press the ASSIGN button to which the DATA CODE function is assigned, during…
-
Page 72: Checking The Settings In Your Camcorder (Status Check)
Changing/checking the settings in your camcorder (Continued) b Notes • When you play back the memory card on other devices, the camera data may be displayed incorrectly. Confirm the correct camera data on your camcorder. • Data code cannot be displayed for XAVC HD. Checking the settings in your camcorder (Status check) Press the ASSIGN2 button B.
-
Page 73: Connecting A Monitor Or A Tv
Connecting a monitor or a TV Playback image quality depends on the type of monitor or TV, or the jacks used to make the connection. Monitor/TV To SDI jack SDI Cable (sold separately) To HDMI input jack HDMI Cable (sold separately) Signal flow Monitor/TV To video input…
-
Page 74
Connecting a monitor or a TV (Continued) Press the v/V/b/B/EXEC button to select (REC/OUT SET) t [OUTPUT SELECT] t the jack that you want to use for output. The VIDEO OUT and AUDIO OUT jacks are integrated into the Multi/Micro USB jack. To connect to the video input or audio input jack of a monitor or TV, use an AV cable (sold separately). -
Page 75
1080/60p b Notes • It is recommended that you use an authorized cable with HDMI logo or a Sony HDMI cable. • Images are not output from the HDMI OUT jack of your camcorder, if copyright protection signals are recorded in the movies. -
Page 76: Editing
Editing Protecting movies and Dividing a movie still images (Protect) Protect movies and still images to avoid You can divide a movie at a designated deleting them by mistake. point. Press the MENU button when the Press the MENU button while THUMBNAIL screen is displayed.
-
Page 77: Deleting Movies And Still Images
Deleting movies and still images You can free media space by deleting movies and still images from recording Touch the movies or still images media. to be deleted. is displayed on the selected images. b Notes • You cannot restore images once they are deleted.
-
Page 78: Formatting The Recording Media
Formatting the recording media Formatting deletes data from the recording media to recover recordable free space. b Notes • Connect your camcorder to the wall outlet (wall socket) using the supplied AC Adaptor to prevent your camcorder from running out of power during the operation.
-
Page 79: Deleting All Data From The Memory Card Completely
Deleting all data from the memory card completely If a memory card is used repeatedly, garbage data accumulate which may Touch [Empty] t prevent the image data from being written at the fixed speed. In this case, recording may stop suddenly. b Notes If this happens, empty the memory card to avoid the writing error.
-
Page 80: Repairing The Image Database File
Repairing the image database file This function checks the database information and the consistency of movies and still images on the recording media, and repairs if any inconsistencies found. b Notes • Connect your camcorder to the wall outlet (wall socket) using the supplied AC Adaptor to prevent your camcorder from running out of power during the operation.
-
Page 81: Using The Menu
Using the Menu Operating the menu You can change various settings or make detailed adjustments using the menu items Press the v/V/b/B/EXEC button, displayed on the LCD screen. select the desired menu icon, then press the button again. CAMERA SET (p. 86) REC/OUT SET (p.
-
Page 82
Operating the menu (Continued) Press the v/V/b/B/EXEC button, select the desired setting, then press the button again. Press the MENU button to hide the menu screen. To return to the previous screen, select RETURN]. b Notes • The available menu items vary depending on the context of your camcorder during recording or playback. -
Page 83: Menu Items
Menu items The function and setting value of each menu item are as follows. The default settings are marked with B. FRAME RATE 1-60fps (CAMERA SET) (p. 86) (B60fps) AGC LIMIT BOFF, 24dB — 9dB [AVCHD] WB PRESET BOUTDOOR, REC FORMAT INDOOR, MANU WB When [60i] is TEMP…
-
Page 84
Menu items (Continued) 720/50p FH, 720/50p HQ (REC/OUT SET) (p. 90) SIMUL/RELAY REC REC SET FILE FORMAT BOFF, BXAVC HD, AVCHD SIMULTANEOUS REC FORMAT REC, RELAY REC XAVC HD REC BUTTON When [60i] is SETTING selected BREC BUTTON: 1080/60p 50Mbps, 1080/60p 35Mbps, HANDLE REC B1080/60i 50Mbps,… -
Page 85: Audio Set
HDMI TC OUTPUT ASPECT BOFF, ON BOFF, 4:3, 13:9, 14:9, 15:9, 1.66:1, SDI/HDMI REC 1.85:1, 2.35:1 CONTROL BOFF, ON SAFETY ZONE BOFF, 80%, 90% (AUDIO SET) (p. 92) GUIDEFRAME BOFF, ON VOLUME FOCUS MAG RATIO ×4.0, ×8.0, B×4.0/×8.0 AVCHD AUDIO BLINEAR PCM, CAMERA DATA OFF, BON…
-
Page 86: (Camera Set) Menu
(CAMERA SET) Menu items (Continued) menu Settings to adjust your camcorder to the recording conditions ( STEADY SHOT, SSID/PW RESET etc.) (OTHERS) (p. 100) The default settings are marked with B. See page 81 for details on selecting STATUS CHECK menu items.
-
Page 87: Zoom Set
WB SET ZOOM SET ZOOM TYPE See page 43. B OPTICAL ZOOM ONLY AE SHIFT Uses only optical zoom. You can zoom up to 12×. ON/OFF ON[CLEAR IMAGE ZOOM] B OFF You can use the clear image zoom in Does not use the AE SHIFT function. addition to the optical zoom.
-
Page 88: Steady Shot
Press the MENU button t select (CAMERA SET) with the v/V/b/B/EXEC button. STEADY SHOT SPOT METER You can set the camera shake reduction You can adjust the brightness for the when shooting. selected subject automatically. B STANDARD ( z Tips Uses SteadyShot when shooting under •…
-
Page 89: Nightshot Light
TONE NIGHTSHOT LIGHT B OFF You can record clear images with Does not output audio tone signals. NIGHTSHOT (p. 48), which uses an infrared light when shooting. Outputs audio tone signals (1 kHz: full bit B ON -20dB (when [60i] is selected), -18dB Emits infrared light.
-
Page 90: (Rec/Out Set) Menu
(REC/OUT SET) menu Recording settings, input and output B HDMI settings (REC SET/VIDEO OUT, etc.) Outputs from HDMI jack. VIDEO The default settings are marked with B. Outputs from VIDEO jack. See page 81 for details on selecting menu items. SDI/HDMI You can select the resolution of the output Press the MENU button t select…
-
Page 91
DOWN CONVERT TYPE HDMI TC OUTPUT You can select a down convert type when You can set whether to output time code to you down-covert video signal. other professional-use devices, using Use this function for outputting movies and HDMI. still images recorded in 16:9 B OFF B SQUEEZE… -
Page 92: (Audio Set) Menu
(AUDIO SET) menu Settings for the audio recording (AVCHD AUDIO FORMAT, etc.) b Notes • When using a shoe microphone, the setting is The default settings are marked with B. NORMAL. See page 81 for details on selecting menu items. MANUAL REC LEVEL You can set the recording sensitivity when Press the MENU button t select…
-
Page 93: (Display Set) Menu
(DISPLAY SET) menu Display settings (MARKER/DISPLAY MI SHOE MIC ( OUTPUT, etc.) A microphone connected to the XLR handle unit or a Multi Interface Shoe compatible microphone is used to record The default settings are marked with B. audio. See page 81 for details on selecting menu items.
-
Page 94
Press the MENU button t select (DISPLAY SET) with the v/V/b/B/EXEC button. z Tips ZEBRA • You can focus more easily using this function in combination with the expanded focus function You can display a zebra pattern as a guide (p. -
Page 95
CAMERA DATA DISPLAY GUIDEFRAME display the iris, gain and Does not shutter speed settings B OFF Does not display the guide frame. B ON Constantly displays the iris, gain and shutter speed settings on the LCD screen. Displays the guide frame. You can check the horizontal and vertical aspect of a subject. -
Page 96: Zoom Display
Press the MENU button t select (DISPLAY SET) with the v/V/b/B/EXEC button. – With a frame rate of 50 selected in [REC FORMAT], when the shutter speed is 1/ Does not display the audio level meters. 50, the shutter angle is 360 degrees. z Tips –…
-
Page 97: (Tc/Ub Set) Menu
(TC/UB SET) menu Time code settings (TC PRESET/UB PRESET/TC FORMAT, etc.) VF COLOR TEMP. The default settings are marked with B. You can change the color temperature of See page 81 for details on selecting the viewfinder. menu items. Low color temperature makes the Press the MENU button t select viewfinder appear reddish, and high color (TC/UB SET) with the v/V/b/B/EXEC…
-
Page 98: Ub Time Rec
Press the MENU button t select (TC/UB SET) with the v/V/b/B/EXEC button. z Tips UB TIME REC Drop frame B OFF Time code is based on 30 frames per second; however, gaps in the actual time occur during Does not save the actual time in the user extended periods of recording as the actual frame bit code.
-
Page 99: (Network Set) Menu
(NETWORK SET) menu Settings for the Wi-Fi function (CTRL W/ Screen items Functions SMARTPHONE, etc.) 3 Space Enters a space. 4 Input Entered characters are The default settings are marked with B. displayed. See page 81 for details on selecting 5 Move Moves the cursor in the input menu items.
-
Page 100: (Others) Menu
(OTHERS) menu Settings while recording or other basic settings (AREA SET/BEEP, etc.) b Notes • A camera profile saved on a camcorder with The default settings are marked with B. different model name, or edited on a computer See page 81 for details on selecting cannot be loaded.
-
Page 101: Remote Control
z Tips SUMMERTIME • You can assign this function to an ASSIGN button (p. 64). You can change this setting without stopping the clock. Set to [ON] to move the REMOTE CONTROL time forward 1 hour. B OFF B ON Does not set the summertime.
-
Page 102: Repair Image Db File
Press the MENU button t select (OTHERS) with the v/V/b/B/EXEC button. REPAIR IMAGE DB FILE See page 80. USB CONNECT Select this item when [USB CONNECT] does not appear on the LCD screen by connecting the camcorder to another device with the USB cable.
-
Page 103: Connecting With Another Device
Connecting with another device Creating a standard definition image quality (SD) disc with a recorder, etc. You can copy images on your camcorder onto a disc or video cassette, by connecting Connect your camcorder to the your camcorder to a disc recorder with the recording device (a disc recorder, A/V connecting cable (sold separately).
-
Page 104: Troubleshooting
(OTHERS) t INITIALIZE. 3 Select This operation will reset the date, time and area settings. 4 Consult your Sony dealer or local authorized Sony service facility. • Power sources/LCD screen/Wireless Remote Commander···p. 104 • Memory card···p. 105 • Recording···p. 106 •…
-
Page 105
The battery pack discharges too quickly. • Ambient temperature is too high or low, or the battery pack has not been charged enough. This is not a malfunction. • Fully charge the battery again. If the problem persists, the battery may be worn-out. Replace it with a new one (p. -
Page 106
Troubleshooting (Continued) Images on the recording media cannot be deleted. • You can select no more than 100 images to be deleted on the edit screen. • The images are protected. Unprotect the images (p. 76). Recording The recording does not start when you press the START/STOP button. •… -
Page 107
There is a time difference between the point when the START/STOP button is pressed and the point that the recording movie is started or stopped actually. • On your camcorder, there may be a slight time difference between the point where you press the START/STOP button and the actual point that recording movie starts/stops. -
Page 108
Troubleshooting (Continued) Black bands appear when you record a TV screen or computer screen. • This can be improved by adjusting the shutter speed (p. 40). Fine patterns flicker, diagonal lines look jagged. • Adjust [DETAIL] to the negative side (p. 59). The time code is not recorded in sequence. -
Page 109
“—” is displayed on the LCD screen. • Bars will be displayed for the camera data of the movies recorded with [COLOR BAR] set to [ON]. appears on the LCD screen. • This appears when you play back movies recorded with 5.1ch surround sound. 5.1ch surround sound is down-mixed to 2ch stereo and played back on your camcorder. -
Page 110
Troubleshooting (Continued) Sound cannot be added to the recording media after recording. • You cannot add sound to the recording media after recording on your camcorder. Copy cannot be done correctly using the HDMI cable. • You cannot copy movies using the HDMI cable. Connecting to a computer The computer does not recognize the camcorder. -
Page 111: Warning Indicators And Messages
(Warning indicator the symptoms yourself. If the problem pertaining to memory cards) persists even after you have tried a couple of times, contact your Sony dealer or local Slow flashing authorized Sony service facility. • Free spaces for recording images are running out.
-
Page 112
Warning indicators and messages (Continued) — (Warning indicator Buffer overflow. Writing to the media pertaining to the write-protect of the was not completed in time. memory card)* • You have performed recording and erasing operations repeatedly, or a • The write-protect switch is set to lock memory card that has been formatted position on the memory card. -
Page 113
• Use a memory card recommended for your camcorder (p. 27). • Contact your Sony dealer. Do not eject the memory card during writing. Data may be damaged. • Reinsert the memory card, and follow the instructions on the LCD screen. -
Page 114: Additional Information
Additional Information Recording time of movies Estimated time of recording and Estimated recording time of playback with each battery pack movies Approximate time available when you use a XAVC HD fully charged battery pack. (unit: minute) Recording time 1080 50Mbps 35Mbps 25Mbps 50Mbps (unit: minute) 64GB Battery…
-
Page 115
FX: max. 24 Mbps 1,920 × 1,080/16:9, 64 GB 280 (280) 1,280 × 720/16:9 FH: approx. 17 Mbps (ave.) • When using Sony memory card. 1,920 × 1,080/16:9, 1,280 × 720/16:9 b Notes HQ: approx. 9 Mbps (ave.) 1,440 × 1,080/16:9, 1,280 × 720/16:9 •… -
Page 116: Using Your Camcorder Abroad
Using your camcorder abroad Power supply You can use your camcorder in any country/region using the AC Adaptor supplied with your camcorder within the AC 100 V to 240 V, 50 Hz/60 Hz range. Viewing on TV Before recording a movie with your camcorder for viewing on a TV, set [60i/50i SEL] to the appropriate TV system for the country/region in which you intended to…
-
Page 117: File/Folder Structure On The Recording Media
File/folder structure on the recording media The file/folder structure is shown below. You do not usually need to acknowledge the file/ folder structure, when recording/playing back movies and still images on the camcorder. C XAVC HD movie management * “Memory Stick PRO Duo” media information folder **SD memory card, SDHC memory card, SDXC memory card…
-
Page 118
File/folder structure on the recording media (Continued) • When you delete image files, follow the steps on page 77. Do not delete the image files on the camcorder directly from the computer. • Do not format the recording media in the camcorder using a computer. -
Page 119: Maintenance And Precautions
Maintenance and precautions • Because the AVCHD format uses a data About the XAVC HD format compression system, images may be distorted in scenes where the image, angle, or brightness Recording and playback on the changes drastically. This is not a malfunction. camcorder About the memory card Based on the XAVC HD format, your…
-
Page 120: About The «Infolithium» Battery Pack
Maintenance and precautions (Continued) On image data compatibility About the “InfoLITHIUM” • Image data files recorded on a memory card by battery pack your camcorder conform to the “Design rule for Camera File system” universal standard Your camcorder operates only with an established by the JEITA (Japan Electronics and “InfoLITHIUM”…
-
Page 121
About charging the battery pack • Do not expose the battery pack to water. The battery pack is not water resistant. • Use the AC Adaptor (supplied) to charge the designated batteries only. If you charge other About the remaining battery indicator types of batteries, those batteries may leak, heat •… -
Page 122: About Handling Of Your Camcorder
Sony dealer before operating it • When you bring your camcorder from a ski any further.
-
Page 123
How to avoid moisture condensation b Notes When you bring your camcorder from a cold place • If you did not press the right spot, try the into a warm place, put your camcorder in a plastic calibration again. bag and seal it tightly. Remove the bag when the •… -
Page 124: Rechargeable Battery
Maintenance and precautions (Continued) Charging the pre-installed rechargeable battery Your camcorder has a pre-installed rechargeable battery to retain the date, time, and other settings even when the POWER switch is set to OFF. The pre-installed rechargeable battery is always charged while your camcorder is connected to the wall outlet (wall socket) via the AC Adaptor or while the battery pack is attached.
-
Page 125: Specifications
Specifications System Image Stabilizer: ON/OFF selectable, shift lens Video signal Filter Diameter: M62 mm When [60i] is selected: Color temperature NTSC color, EIA standards Preset (Indoor:3200K, HDTV 1080/60i, 1080/60p, 720/60p Outdoor:5600K±7 steps, Color When [50i] is selected: temperature set range:2300-15000K), PAL color, CCIR standards Onepush A, B, Auto selectable HDTV 1080/50i, 1080/50p, 720/50p…
-
Page 126
Specifications (Continued) General Rechargeable battery pack NP-FV70 Power requirements Maximum output voltage: DC 8.4 V DC 6.8 V / 7.2 V (battery pack) Output voltage: DC 6.8 V DC 8.4 V (AC Adaptor) Capacity: Average power consumption* Typical: 14.0 Wh (2 060 mAh) During camera recording using the Minimum: 13.3 Wh (1 960 mAh) viewfinder with normal brightness. -
Page 127
On trademarks • The N Mark is a trademark or registered trademark of NFC Forum, Inc. in the United • “XDCAM” logo is a trademark of Sony States and in other countries. Corporation. • Adobe, the Adobe logo, and Adobe Acrobat are •… -
Page 128
PXW-X70 as the model for your camcorder. THIS PRODUCT IS LICENSED UNDER THE http://www.sony.net/Products/Linux/ AVC PATENT PORTFOLIO LICENSE FOR We would prefer you do not contact us about the THE PERSONAL USE OF A CONSUMER OR contents of source code. -
Page 129
Additional Information Index Connect Handle zoom……33 Recorder…… 103 Handle zoom lever….33 AC Adaptor……21 TV ……… 73 Handle zoom switch …..33 Accessory shoe …..23 CTRL W/SMARTPHONE HDMI ……..90 Accessory shoe plate…..23 ……….50 HDMI TC OUTPUT…..91 AE SHIFT…..87, 107 HISTOGRAM ……93 AGC LIMIT……86 AIRPLANE MODE….99 D.EXTENDER….. -
Page 130
Index (Continued) REC/OUT SET menu..90 REMOTE CONTROL ..101 TC/UB SET menu ..97 REPAIR IMAGE DB FILE UB PRESET ……60 ……….80 Using ……81 UB TIME REC….. 98 Moisture condensation ..122 USB CONNECT ….102 Movie……..29 USB LUN SET….102 S&Q MOTION ….62 Multi Interface Shoe ….4 Using your camcorder abroad SAFETY ZONE…. -
Page 132
© 2014 Sony Corporation Printed in China…
инструкцияSony PXW-X70

4-544-242-11(1)
Solid-State Memory
Camcorder
Operating Guide
PXW-X70
Table of Contents
Getting Started
Recording
Playback
Editing
Using the Menu
Connecting with another
device
Troubleshooting
Additional Information
Посмотреть инструкция для Sony PXW-X70 бесплатно. Руководство относится к категории видеокамеры, 9 человек(а) дали ему среднюю оценку 8.3. Руководство доступно на следующих языках: английский. У вас есть вопрос о Sony PXW-X70 или вам нужна помощь? Задайте свой вопрос здесь
- Read this first
- Identifying parts and controls
- Screen indicators
- Table of Contents
- Getting Started
- Recording
- Playback
- Editing
- Using the Menu
- Connecting with another device
- Troubleshooting
- Additional Information
Камкордер Sony PXW-X70 — это устройство, предназначенное для съемки видео в различных форматах. Он использует CMOS-сенсор для получения высококачественного изображения. Вес камкордера составляет 900 граммов, ширина — 120.7 мм, глубина — 274.3 мм, высота — 103.5 мм. Напряжение батареи составляет 6,8 В, количество батарей, которые можно использовать — 1, максимальное время работы камкордера с одной батареей — 3,333 часа. Камкордер поддерживает различные видеоформаты, такие как AVC, AVCHD, H.264, MPEG4, а также разрешение 4K Ultra HD. Для звукозаписи используется система Dolby Digital 2.0.
Камкордер Sony PXW-X70 отличается компактными размерами и легким весом, что делает его удобным для переноски. Он предназначен для профессионального использования и имеет высокий уровень надежности и долговечности благодаря использованию качественных материалов. Камкордер легко настраивается и обеспечивает высокую качество записи в любых условиях.
Общими словами, камкордер Sony PXW-X70 представляет собой надежный и профессиональный инструмент для съемки видео высокого качества в различных условиях.
Главная
| Sony | |
| PXW-X70 | PXW-X70/4K | |
| видеокамера | |
| английский | |
| Руководство пользователя (PDF) |
Датчик изображения
| Тип сенсора | CMOS |
| Эффективные мегапиксели (видео) | 14.2 MP |
| Всего мегапикселей | 14.2 MP |
Вес и размеры
| Вес | 900 g |
| Ширина | 120.7 mm |
| Глубина | 274.3 mm |
| Высота | 103.5 mm |
Батарея
| Напряжение батареи | 6.8 V |
| Число поддерживаемых батарей | 1 |
| Время работы батареи (макс) | 3.333 h |
| Тип батареек | NP-FV70 |
| Технология батареи | Литий-ионная (Li-Ion) |
Условия эксплуатации
| Диапазон температур при эксплуатации | 0 — 40 °C |
| Диапазон температур при хранении | -20 — 60 °C |
Видео
| Поддерживаемый видеоформат | AVC, AVCHD, H.264, MPEG4 |
| Тип HD | 4K Ultra HD |
| Максимальное разрешение видео | 3840 x 2160 пикселей |
| Разрешение видео | 640 x 360,1280 x 720,1920 x 1080,3840 x 2160 пикселей |
| HD-ready | Да |
| Максимальная частота кадров | 59.94 fps |
| Качество видео при максимальном разрешении | 60 Мбит/с |
| Поддерживаемые видеоформаты | 360p, 720p, 1080p, 2160p |
| Режимы захвата видео | FH, FX, HQ, PS |
Аудио
| Поддерживаемые форматы аудио | LC-AAC, PCM |
| Аудиосистема | Dolby Digital 2.0 |
| PCM цифровой звук | 16-bit/48 kHz, 24-bit/48 kHz |
| Встроенный микрофон | Да |
Объектив
| Оптическое увеличение | 12 x |
| Фокусное расстояние | 9.3 — 111.6 mm |
| Эквивалент расстояния для линз 35мм камеры | 29 — 426 mm |
| Минимальное число установки диафрагмы | 2.8 |
| Максимальное число установки диафрагмы | 4.5 |
| Минимальное фокусное расстояние (эквив. пленки 35 мм) | 29 mm |
| Максимальное фокусное расстояние (эквив. пленки 35 мм ) | 426 mm |
| Стабилизатор изображения | Да |
| Сменные объективы | — |
| Цифровой зум | — x |
| Размер фильтра | 62 mm |
Фокус
| Фокусировка | Автофокус/Ручной |
| Нормальное фокусное расстояние | 0.01 — ∞ m |
Камера
| Минимальное освещение | 1.7 lx |
| Тип камеры | Портативный |
| Поддерживаемые форматные сношения | 4:3, 16:9 |
| 3D | Нет |
Затвор
| Скорость действия затвора | 1/8 — 1/10000 s |
Баланс белого
| Баланс белого | Авто |
| Баланс белого на улице | Да |
| Баланс белого в помещении | Да |
| Установка баланса белого одним нажатием | Да |
Порты и интерфейсы
| XLR вход | Да |
| Композитный видео выход | 1 |
| Линейные выходы наушников | 1 |
| Количество портов USB 2.0 | 0 |
| HDMI | Да |
| Компонентный видео выход (YPbPr/YCbCr) | 0 |
| Выход S-Video | Нет |
| Количество портов USB 3.2 Gen 1 (3.1 Gen 1) Type-A | 0 |
| Гнездо входа постоянного тока (DC) | Да |
| Количество портов Micro-USB 2.0 | 1 |
| Подключение к USB | Да |
| Порт подключения наушников | 3,5 мм |
| PictBridge | Нет |
Видоискатель
| Размер экрана видоискателя | 0.39 « |
| Видоискатель | 1440000 пикселей |
| Тип видоискателя | Электронный |
Экран
| Встроенный экран | Да |
| Дисплей | ЖК |
| Диагональ экрана | 3.5 « |
| Разрешение дисплея (числовое) | 1560000 пикселей |
| Выдвижной экран | — |
Технические характеристики
| Тип микрофона | Всенаправленная |
Устройства хранения данных
| Тип носителя видеокамеры | Карта памяти |
| Совместимые карты памяти | MS PRO Duo, SD, SDHC, SDXC |
| Емкость встроенной памяти | 0 GB |
| Поддерживаемые типы дисков | Нет |
| Тип пленки камеры | Нет |
Сеть
| Wi-Fi | Да |
| Wi-Fi стандартов | 802.11b, 802.11g, Wi-Fi 4 (802.11n) |
| Технология NFC | Да |
Содержимое упаковки
| Бленда объектива | Да |
| Батарейки в комплекте | Да |
| Поставляемые кабели | AC, USB |
| Сетевой адаптер в комплекте | Да |
| Пульт дистанционного управления | Да |
| Гарантийная карточка | Да |
| Краткая инструкция пользователя | Да |
Вспышка
| Башмак | Да |
| Встроенная вспышка | — |
| Встроенная подсветка | — |
Дизайн
Фотоснимок
| Максимальное разрешение изображения | — пикселей |
показать больше
Не можете найти ответ на свой вопрос в руководстве? Вы можете найти ответ на свой вопрос ниже, в разделе часто задаваемых вопросов о Sony PXW-X70.
Что такое мегапиксель?
Количество мегапикселей обозначает количество пикселей в датчике. 1 мегапиксель равен 1 миллиону пикселей. Чем больше пикселей, тем выше потенциальное качество изображения.
Что означает аббревиатура MП?
МП обозначает «мегапиксели».
Какой вес Sony PXW-X70?
Sony PXW-X70 имеет вес 900 g.
Какой размер экрана Sony PXW-X70?
Размер экрана Sony PXW-X70 составляет 3.5 «.
Какая высота Sony PXW-X70?
Sony PXW-X70 имеет высоту 103.5 mm.
Какая ширина Sony PXW-X70?
Sony PXW-X70 имеет ширину 120.7 mm.
Какая толщина Sony PXW-X70?
Sony PXW-X70 имеет толщину 274.3 mm.
Какой объем памяти Sony PXW-X70 имеет?
Sony PXW-X70 имеет 0 GB объем памяти.
Инструкция Sony PXW-X70 доступно в русский?
К сожалению, у нас нет руководства для Sony PXW-X70, доступного в русский. Это руководство доступно в английский.
Не нашли свой вопрос? Задайте свой вопрос здесь
-
Page 1
4-544-242-11(1) Solid-State Memory Table of Contents Camcorder Getting Started Recording Operating Guide Playback Editing Using the Menu Connecting with another device Troubleshooting Additional Information PXW-X70… -
Page 2: Read This First
Read this first Before operating this unit, please read this • The LCD screen is manufactured using manual thoroughly, and retain it for future extremely high-precision technology, so reference. over 99.99% of the pixels are operational for effective use. However, there may be some tiny black points and/or bright Notes on use points (white, red, blue, or green in color)
-
Page 3
On recording Save all your recorded image data • In order to stabilize memory card • To prevent your image data from being operation, it is recommended that you lost, save all your recorded images on PC format the memory card when you use it periodically. -
Page 4: Identifying Parts And Controls
Identifying parts and controls Body The numbers in ( ) are reference pages. A ASSIGN4/FOCUS MAGNIFIER N Power zoom lever button (64) O Cable clamper B Accessory shoe receptacles P Hook for shoulder strap C XLR handle unit Q Multi Interface Shoe (45) D Microphone fixing clamper Attaching the XLR handle unit E Microphone holder…
-
Page 5
2 Remove the handle shoe cap. 4 Press and turn the handle mounting screws to tighten them. z Tips • When attaching the XLR handle unit, make sure to securely tighten both handle mounting screws. 3 Align the mark on the XLR handle with •… -
Page 6
Identifying parts and controls (Continued) 1 Place the microphone A into the microphone holder B. 2 Connect the plug of the microphone to the INPUT 1 jack C. 3 Place the microphone cable into the cable holder D. Put the cable in the outer cable holder. -
Page 7
A Manual lens ring (33) N LOW CUT (INPUT2) switch (44) B Lens hood O Internal microphone C Lens (ZEISS lens) P ZOOM/FOCUS switch (34) D REC CH SELECT (INPUT1) switch Q AF/MF button (34) (44) R MENU button (81) E ATT (INPUT1) switch (44) S MANUAL dial (39) F INPUT1 (LINE/MIC/MIC+48V) switch… -
Page 8
Identifying parts and controls (Continued) Attaching the lens hood Align the marks on the lens hood to those on the camcorder, and turn the lens hood in the direction of the arrow 2 until it is locked. z Tips • If you attach or remove a 62 mm (2 1/2 in.) PL filter or MC protector, remove the lens hood. -
Page 9
A SDI OUT jack (73) O BATT release lever (21) B Lens adjustment dial (26) C START/STOP button (29) D HDMI OUT jack (73) E DC IN jack (21) F v/V/b/B/EXEC button (81) G Handle zoom lever (33) H Handle record button (29) I INPUT2 jack (44) J INPUT1 jack (44) K ASSIGN6/D.EXTENDER button (64) -
Page 10
Identifying parts and controls (Continued) A Handle zoom switch (33) B Eye sensor C Viewfinder (26) D Large eyecup (26) E AUTO/MANUAL switch (39) F ND FILTER switch (41) G Battery slot (21) (headphones) jack I SHUTTER SPEED button (40) J GAIN button (40) K IRIS button (39) -
Page 11
A SLOT SELECT button (27) B THUMBNAIL button (66) C LCD screen/touch panel (26) D Memory card slot A/Memory card access lamp (27) E Memory card slot B/Memory card access lamp (27) F DISPLAY button (71) G ASSIGN3/PICTURE PROFILE button (64) H ASSIGN2/STATUS CHECK button (64) -
Page 12: Wireless Remote Commander
F STOP button (66) Remote Commander may not function properly. G DISPLAY button (71) In this case, replace the battery with a Sony CR2025 lithium battery. Use of another battery H Transmitter may present a risk of fire or explosion.
-
Page 13: Screen Indicators
Screen indicators Indicator Meaning Center Upper right Relay recording Upper left SDI/HDMI REC CONTROL Upper right Indicator Meaning Bottom 0min Estimated remaining recording time Upper left Recording/playback media Indicator Meaning 00:00:00:00 Time code 100% Remaining battery (hour:minute:second: INTELLIGENT AUTO frame) (face detection/scene detection/camera-shake Bottom…
-
Page 14
Screen indicators (Continued) Indicator Meaning AUTO SLOW SHUTTER AUDIO LEVEL DISPLAY (95) D.EXTENDER (87) REC LEVEL MODE NIGHTSHOT SELECTED MIC ND filter (41) z Tips • Indicators may look different or appear at different positions. Data code during recording The recording date, time and condition are recorded automatically on the recording media. -
Page 15: Table Of Contents
Table of Contents Read this first ……………….2 Identifying parts and controls …………..4 Body…………………. 4 Wireless Remote Commander …………12 Screen indicators ………………13 Getting Started Step 1: Checking supplied accessories ……….19 Step 2: Charging the battery pack …………21 Step 3: Attaching the accessory shoe …………23 Step 4: Turning on the camcorder and setting the date and time ..24 Setting the date and time …………..
-
Page 16
Table of Contents (Continued) Recording sound from an external microphone (sold separately)..45 Adjusting the audio level from the INPUT1 and INPUT2 jacks … 46 Adjusting the audio level from the internal microphone or an external microphone (PLUG IN POWER) …………46 Useful functions ……………… -
Page 17
Using the Menu Operating the menu …………….81 Menu items …………………83 (CAMERA SET) menu …………..86 Settings to adjust your camcorder to the recording conditions ( STEADY SHOT, etc.) (REC/OUT SET) menu …………..90 Recording settings, input and output settings (REC SET/VIDEO OUT, etc.) (AUDIO SET) menu …………….92 Settings for the audio recording (AVCHD AUDIO FORMAT, etc.) (DISPLAY SET) menu …………..93… -
Page 18
Table of Contents (Continued) Specifications ………………125 Index ………………..129… -
Page 19: Getting Started
When the unit is used with a PC Lens hood (1) (p.
connection, download device drivers, plug- ins, and application software, where applicable, from the Sony Professional products web site. Sony Professional products web site homepage: Lens cap (Attached to lens) (1) U.S.A.
-
Page 20
Step 1: Checking supplied accessories (Continued) Korea http://bp.sony.co.kr China http://pro.sony.com.cn Although the data regarding recorded materials are stored over multiple files and folders, you can easily handle the clips without considering its data and directory structure, by using the dedicated application… -
Page 21: Step 2: Charging The Battery Pack
Step 2: Charging the battery pack You can charge the “InfoLITHIUM” battery pack (V series) with the supplied AC Adaptor. b Notes • You can use a large capacity battery pack, NP- FV100 (sold separately), with your camcorder. You cannot use NP-FV50. Close the LCD screen and store DC IN jack the viewfinder before attaching…
-
Page 22
Step 2: Charging the battery pack (Continued) To remove the battery pack Turn the power off, then slide the BATT release lever to release the battery. On the battery pack • Turn the power off before changing the battery pack. •… -
Page 23: Step 3: Attaching The Accessory Shoe
Step 3: Attaching the accessory shoe To mount the accessory shoe Mount the accessory shoe on the accessory shoe mount as illustrated. Accessory shoe plate Accessory shoe Accessory shoe Accessory shoe plate 1 Lift the edge of the accessory shoe plate and pull it in the direction opposite to that of the arrow on the accessory shoe plate and remove it from the accessory…
-
Page 24: Step 4: Turning On The Camcorder And Setting The Date And Time
Step 4: Turning on the camcorder and setting the date and time z Tips Turning on the camcorder • If you do not use your camcorder for about 3 months, the built-in rechargeable battery gets Open the LCD screen and turn the discharged and the date and time settings may power on.
-
Page 25
The clock starts. • Set [SUMMERTIME] to [ON] to move the time forward 1 hour. • You can set any year up to the year 2037. • Midnight is indicated as 12:00 AM, and noon as 12:00 PM (when [60i] is selected). z Tips •… -
Page 26: Step 5: Adjusting The Lcd Screen And Viewfinder
Step 5: Adjusting the LCD screen and viewfinder When the picture in the viewfinder is Using the LCD screen hard to see The LCD screen can be rotated in the range If you cannot see the picture in the as illustrated below, allowing a person other viewfinder clearly under bright than the camera operator to see the image.
-
Page 27: Step 6: Preparing The Recording Media
Step 6: Preparing the recording media Types of memory cards you can use in Open the cover, and insert the your camcorder memory card with the notched edge File format Types of media in the direction as illustrated until it clicks into place.
-
Page 28
Step 6: Preparing the recording media (Continued) Selecting the memory card slot to be used for recording Press the SLOT SELECT button to change which slot is selected for recording. You can confirm the selected slot on the screen. SLOT SELECT button b Notes •… -
Page 29: Recording
Recording Recording Handle record button LCD screen START/STOP button Recording movies Your camcorder records movies on a memory card. The factory setting of recording movies is XAVC HD. Do the following steps to record movies. Press the latches on both sides of the lens cap and remove it. Continued ,…
-
Page 30
Recording (Continued) Open the LCD screen, and press the START/STOP button (or the handle record button) to start recording. The recording lamps light up during recording. To stop the movie recording, press the START/STOP button or the handle record button again. -
Page 31
To continue recording on the memory cards, one after another (Relay recording) Insert memory cards each in both slots A and B, so the camcorder switches memory card A (or B) just before space on the other one runs out, and continues recording on the next memory card automatically. -
Page 32: Changing The Setting Of The Start/Stop Button And Handle Record Button
Recording (Continued) Changing the setting of the START/STOP button and handle record button When using SIMULTANEOUS REC, you can start and stop recording on different memory cards by using the START/STOP button and the handle record button. In the default setting, movies are recorded on both the memory card A and B at the same time when either record button is pressed.
-
Page 33: Adjusting The Zoom
z Tips Adjusting the zoom • When focusing, the minimum distance required between the camcorder and the subject is about 1 cm (about 13/32 in.) for wide angle and about 1 meter (about 39 3/8 in.) for telephoto. • The focus may not be adjusted at certain zoom positions if the subject is within 1 meter (about 39 3/8 in.) from your camcorder.
-
Page 34: Adjusting The Focus
Adjusting the focus You can adjust the focus manually for different recording conditions. During recording or standby, Use this function in the following cases. press the AF/MF button C to set – To record a subject behind a window covered the focus to manual.
-
Page 35: Using The Focus Magnifier
Using the Focus magnifier Focusing by touching the LCD screen (Spot focus) The selected area on the LCD screen is magnified and displayed. It is easier to You can focus on the point where you touch confirm the focus setting during manual on the LCD screen.
-
Page 36
Adjusting the focus (Continued) z Tips Select (CAMERA SET) t • You can assign this function to an ASSIGN button (p. 64). [FACE DETECTION] t [ON] or • To make it easy to detect faces, record under the [OFF] with the v/V/b/B/EXEC following conditions: button E. -
Page 37: Changing The Recording Setting
Changing the recording setting Selecting the file format and 720/60p 50Mbps 720/50p 50Mbps recording format For AVCHD You can select the file format in [FILE FORMAT] and the recording format (bit- rate, image size, frame rate, and scanning 1080/60p PS 1080/50p PS system) in [REC FORMAT].
-
Page 38: Setting The Dv Mode (Dv Mode)
Changing the recording setting (Continued) Frame rate when [60i] is selected The following items are available only when DV mode is selected: The frame rate displayed on the LCD screen differs from the actual frame rate. (REC/OUT SET) – WIDE REC Frame rate on the LCD –…
-
Page 39: Adjusting The Brightness
Adjusting the brightness You can adjust the image brightness by adjusting the iris, gain or shutter speed, or Press the IRIS button B. by adjusting the light volume with the ND next to the iris value filter disappears, and the iris value is highlighted.
-
Page 40: Adjusting The Gain
Adjusting the brightness (Continued) Adjusting the gain Adjusting the shutter speed You can use this if you do not want to You can adjust and fix the shutter speed increase the value by AGC (automatic gain manually. You can make a moving subject control).
-
Page 41: Adjusting The Exposure
z Tips b Notes • It is difficult to focus automatically at a lower • When you set AUTO/MANUAL switch to shutter speed. Manual focusing with your AUTO, or press [EXEC] on the [SPOT camcorder attached to a tripod is recommended. METER] or [SPOT METER/FOCUS] screen, the exposure is returned to AUTO.
-
Page 42: Adjusting The Color Tone
Adjusting the color tone Adjusting the white balance Turn the MANUAL dial to select PRESET, A, or B. x Setting the A/B value Select A or B for recording with the white balance setting stored in memory A or B. See page 43 on how to store the adjusted value.
-
Page 43: Audio Setup
Audio setup The jacks, switches and dials shown below allow you to set the sound that is recorded. To save the adjusted white balance See page 5 for details on attaching the microphone. value in memory A or B 1 Set the AUTO/MANUAL switch D to Recording sound from the MANUAL.
-
Page 44
Audio setup (Continued) Audio level controls I: AUTO/MAN (CH1) switch J: AUDIO LEVEL (CH1) dial K: AUTO/MAN (CH2) switch L: AUDIO LEVEL (CH2) dial Wind noise switches G: LOW CUT (INPUT1) switch M: LOW CUT (INPUT2) switch Select the audio input source. Set the INPUT1/INPUT2 (LINE/MIC/ MIC+48V) switch (D or F) based on the device connected to INPUT1 jack… -
Page 45: Recording Sound From A Multi Interface Shoe Compatible Microphone (Sold Separately)
Recording sound from a Multi Set the microphone input level. Interface Shoe compatible When the INPUT1/INPUT2 (LINE/ microphone (sold separately) MIC/MIC+48V) switch (D or F) is set to MIC or MIC+48V, the input level You can record sound in stereo using a can be set using the ATT (INPUT1/ Multi Interface Shoe compatible INPUT2) switch (C or E).
-
Page 46: Adjusting The Audio Level From The Input1 And Input2 Jacks
Audio setup (Continued) This enables you to apply the same audio Adjusting the audio level from level setting to the CH1/CH2 channels. the INPUT1 and INPUT2 jacks To restore automatic adjustment You can adjust the audio level for the sound •…
-
Page 47: Useful Functions
Useful functions Selecting the suitable setting Press the v/V/b/B/EXEC button automatically for the recording C, select [AUTO], [INTELLIGENT AUTO], or [SCENE SELECTION], situation (AUTO MODE setting) and press the button again. You can make optimal recordings in various situations. b Notes •…
-
Page 48: Shooting In Dark Conditions (Nightshot)
Useful functions (Continued) b Notes Setting Recording conditions • NIGHTSHOT can only be used when the Shoots fireworks with AUTO/MANUAL switch is set to AUTO. Fireworks* optimal exposure. • NIGHTSHOT uses infrared light. Make sure ([FIREWORKS]) that your finger does not cover the infrared light emitter when shooting.
-
Page 49: Connecting The Camcorder To An Android Smartphone Equipped With The Nfc Function Using One-Touch
Android OS Search for “Content Browser Mobile” in Google Play, then install it. Set the camcorder to the shooting mode. • You need Android 4.1 or later when you use the NFC One-touch. You can use the NFC function only when (N-Mark) is displayed on the screen.
-
Page 50: Using A Smartphone As A Remote Controller
Useful functions (Continued) b Notes • Cancel the sleep mode and screen lock of the smartphone beforehand. • Continue to touch (1 second-2 seconds) on the camcorder without moving, until “Content Browser Mobile” starts up. • While [CTRL W/SMARTPHONE] is activated, only the START/STOP button and handle record button are available on the camcorder.
-
Page 51: Connecting Without Using The Nfc Function (Android)
Functions operable by [CTRL W/ Input the password displayed on SMARTPHONE] the camcorder (first time only). • Recording start/stop • Touch focus Available when using manual focus. • Zoom • Iris adjustment While the smartphone is connected to the camcorder, CLOSE cannot be selected. b Notes •…
-
Page 52: Connecting Without Using The Nfc Function (Iphone/Ipad)
Useful functions (Continued) Return to the Home screen, then Input the password displayed on tart “Content Browser Mobile.” the camcorder (first time only). Confirm connection to the SSID For details on how to operate “Content displayed on the camcorder. Browser Mobile” after it starts, refer to the Help section in “Content Browser Mobile”.
-
Page 53: Customizing The Picture Quality (Picture Profile)
For details on how to operate “Content b Notes Browser Mobile” after it starts, refer to the • [PP4] is set for the picture profile by default. Help section in “Content Browser Mobile”. Picture profile Example setting number Customizing the picture quality Example settings of a (Picture profile) color tone with…
-
Page 54
Useful functions (Continued) To cancel the picture profile recording Select [OFF] in step 2 with the v/V/b/B/ EXEC button B, then press the button. To change the picture profile You can change the settings stored in [PP1] through [PP6]. 1 Press the ASSIGN3 button A. 2 Press the v/V/b/B/EXEC button B, select the picture profile number that you want to change, then press the… -
Page 55
BLACK LEVEL To set the black level. Item Description and settings Sets the black level. -15 to +15 GAMMA To select a gamma curve. Item Description and settings [STANDARD] Standard gamma curve [STILL] Gamma curve to create the tone of a still image. [CINEMATONE1] Gamma curve 1 for producing tone of film camera images [CINEMATONE2]… -
Page 56
Useful functions (Continued) KNEE To set knee point and slope for video signal compression to prevent over-exposure by limiting signals in high intensity areas of the subject to the dynamic range of your camcorder. When selecting [STANDARD] or [STILL] in [GAMMA], [KNEE] is set to off if [MODE] is set to [AUTO]. -
Page 57
SATURATION To set the color level. Item Description and settings — 32 (light) to +32 (dark) COLOR PHASE To set the color phase. Item Description and settings -7 (greenish) to +7 (reddish) COLOR DEPTH To set the color depth for each color phase. This function is more effective for chromatic colors and less effective for achromatic colors. -
Page 58: Wb Shift
Useful functions (Continued) Item Description and settings MEMORY1 COLOR Sets colors stored in Memory 1. [PHASE] : Sets color phase. 0 (purple) t 8 (red) t 16 (yellow) t 24 (green) t 31 (blue) [PHASE RANGE]: Sets color phase range. 0 (no color selection), 1 (narrow: to select only a single color) to 31 (wide: to select multiple colors in similar color phase)
-
Page 59
Item Description and settings [CC[MG/GR]] Sets a color correct offset value. -9 (greenish) to +9 (magentish) [R GAIN] Sets an R level. -9 (low R level) to +9 (high R level) [B GAIN] Sets a B level. -9 (low B level) to +9 (high B level) DETAIL To set items for the detail. -
Page 60: Setting Time Data
Useful functions (Continued) To copy the picture profile setting to 2 Press the v/V/b/B/EXEC button, select [PRESET], then press the button again. another picture profile number 3 Press the v/V/b/B/EXEC button, select See page 53 for the location of the buttons. the first two digits, then press the button 1 Press the ASSIGN3 button A.
-
Page 61: Recording With The Slow & Quick Motion Function
To reset the user bit When [50i] is selected You can reset the user bit (00 00 00 00). REC FORMAT FRAME Select [RESET] in step 2 of “Presetting RATE 1080/25p 1080/50p the user bit.” 50% slow 100% (standard) 100% (standard) 200% quick Recording with the Slow &…
-
Page 62
Useful functions (Continued) 4 Select [FRAME RATE] with the v/V/ Preparation b/B/EXEC button C, and set a desired frame rate. You must set the recording format and [XAVC HD] frame rate. 1 Press the MENU button A. 60fps 50fps 2 Select (CAMERA SET) t [S&Q MOTION] t [REC FORMAT] with 30fps… -
Page 63: Reviewing The Most Recently Recorded Scene (Last Scene Review)
To change the frame rate setting Reviewing the most recently Hold the ASSIGN button down for about 1 recorded scene (Last Scene second, than change the value with the v/ Review) V/b/B/EXEC button C. Holding the ASSIGN button down again You can review the most recently recorded for about 1 second restores the previous scene on the LCD screen.
-
Page 64: Assigning The Functions To The Assign Buttons
Assigning the functions to the ASSIGN buttons Some functions can be assigned to the • MARKER (p. 94) ASSIGN buttons for use. You can assign a • CAMERA DATA DISPLAY (p. 95) single function to any one of the ASSIGN 1 •…
-
Page 65
Select (OTHERS) t [ASSIGN BUTTON] with the v/V/b/B/EXEC button B. Press the v/V/b/B/EXEC button B, select the ASSIGN button that you want to set, then press the button again. Press the v/V/b/B/EXEC button B, select the function that you want to assign, then press the button again. -
Page 66: Playback
Playback Playback THUMBNAIL button Playing back movies Open the LCD panel.
-
Page 67
Press the THUMBNAIL button. The THUMBNAIL screen appears after a few seconds. Recording media Playback mode Previous Thumbnail (movie) Next Current movie data (p. 67) • You can turn on or off the date and time display on the thumbnails by pressing the DISPLAY button. -
Page 68
Playback (Continued) C Frame rate D Recording mode E Duration F Time code of recording started Time code will not be displayed correctly when you play back recording media with no time code, or recording media with time code that your camcorder does not support. G DOLBY DIGITAL recording Displayed when audio is recorded in Dolby Digital format. -
Page 69: Playing Back Still Images
On playing back movies • Movies recorded using this camcorder may not be played back normally on devices other than this camcorder. Also, movies recorded on other devices may not play back properly on this camcorder. • DV movies recorded on SD memory cards cannot be played on A/V devices of other manufacturers.
-
Page 70
Playback (Continued) Your camcorder displays the selected still image. Next Previous To enlarge Touch (playback zoom) when playing back a still image. You can adjust the zoom with , or with the power zoom lever. When you touch the enlarged image, the touched point will be displayed at the center of the screen. -
Page 71: Changing/Checking The Settings In Your Camcorder
Changing/checking the settings in your camcorder Displaying recording data (Data code) You can display information, including date, time and camera data automatically stored during recording on the screen during playback. Select (DISPLAY SET) t DATA CODE and choose the data that you want to display, or press the ASSIGN button to which the DATA CODE function is assigned, during…
-
Page 72: Checking The Settings In Your Camcorder (Status Check)
Changing/checking the settings in your camcorder (Continued) b Notes • When you play back the memory card on other devices, the camera data may be displayed incorrectly. Confirm the correct camera data on your camcorder. • Data code cannot be displayed for XAVC HD. Checking the settings in your camcorder (Status check) Press the ASSIGN2 button B.
-
Page 73: Connecting A Monitor Or A Tv
Connecting a monitor or a TV Playback image quality depends on the type of monitor or TV, or the jacks used to make the connection. Monitor/TV To SDI jack SDI Cable (sold separately) To HDMI input jack HDMI Cable (sold separately) Signal flow Monitor/TV To video input…
-
Page 74
Connecting a monitor or a TV (Continued) Press the v/V/b/B/EXEC button to select (REC/OUT SET) t [OUTPUT SELECT] t the jack that you want to use for output. The VIDEO OUT and AUDIO OUT jacks are integrated into the Multi/Micro USB jack. To connect to the video input or audio input jack of a monitor or TV, use an AV cable (sold separately). -
Page 75
1080/60p b Notes • It is recommended that you use an authorized cable with HDMI logo or a Sony HDMI cable. • Images are not output from the HDMI OUT jack of your camcorder, if copyright protection signals are recorded in the movies. -
Page 76: Editing
Editing Protecting movies and Dividing a movie still images (Protect) Protect movies and still images to avoid You can divide a movie at a designated deleting them by mistake. point. Press the MENU button when the Press the MENU button while THUMBNAIL screen is displayed.
-
Page 77: Deleting Movies And Still Images
Deleting movies and still images You can free media space by deleting movies and still images from recording Touch the movies or still images media. to be deleted. is displayed on the selected images. b Notes • You cannot restore images once they are deleted.
-
Page 78: Formatting The Recording Media
Formatting the recording media Formatting deletes data from the recording media to recover recordable free space. b Notes • Connect your camcorder to the wall outlet (wall socket) using the supplied AC Adaptor to prevent your camcorder from running out of power during the operation.
-
Page 79: Deleting All Data From The Memory Card Completely
Deleting all data from the memory card completely If a memory card is used repeatedly, garbage data accumulate which may Touch [Empty] t prevent the image data from being written at the fixed speed. In this case, recording may stop suddenly. b Notes If this happens, empty the memory card to avoid the writing error.
-
Page 80: Repairing The Image Database File
Repairing the image database file This function checks the database information and the consistency of movies and still images on the recording media, and repairs if any inconsistencies found. b Notes • Connect your camcorder to the wall outlet (wall socket) using the supplied AC Adaptor to prevent your camcorder from running out of power during the operation.
-
Page 81: Using The Menu
Using the Menu Operating the menu You can change various settings or make detailed adjustments using the menu items Press the v/V/b/B/EXEC button, displayed on the LCD screen. select the desired menu icon, then press the button again. CAMERA SET (p. 86) REC/OUT SET (p.
-
Page 82
Operating the menu (Continued) Press the v/V/b/B/EXEC button, select the desired setting, then press the button again. Press the MENU button to hide the menu screen. To return to the previous screen, select RETURN]. b Notes • The available menu items vary depending on the context of your camcorder during recording or playback. -
Page 83: Menu Items
Menu items The function and setting value of each menu item are as follows. The default settings are marked with B. FRAME RATE 1-60fps (CAMERA SET) (p. 86) (B60fps) AGC LIMIT BOFF, 24dB — 9dB [AVCHD] WB PRESET BOUTDOOR, REC FORMAT INDOOR, MANU WB When [60i] is TEMP…
-
Page 84
Menu items (Continued) 720/50p FH, 720/50p HQ (REC/OUT SET) (p. 90) SIMUL/RELAY REC REC SET FILE FORMAT BOFF, BXAVC HD, AVCHD SIMULTANEOUS REC FORMAT REC, RELAY REC XAVC HD REC BUTTON When [60i] is SETTING selected BREC BUTTON: 1080/60p 50Mbps, 1080/60p 35Mbps, HANDLE REC B1080/60i 50Mbps,… -
Page 85: Audio Set
HDMI TC OUTPUT ASPECT BOFF, ON BOFF, 4:3, 13:9, 14:9, 15:9, 1.66:1, SDI/HDMI REC 1.85:1, 2.35:1 CONTROL BOFF, ON SAFETY ZONE BOFF, 80%, 90% (AUDIO SET) (p. 92) GUIDEFRAME BOFF, ON VOLUME FOCUS MAG RATIO ×4.0, ×8.0, B×4.0/×8.0 AVCHD AUDIO BLINEAR PCM, CAMERA DATA OFF, BON…
-
Page 86: (Camera Set) Menu
(CAMERA SET) Menu items (Continued) menu Settings to adjust your camcorder to the recording conditions ( STEADY SHOT, SSID/PW RESET etc.) (OTHERS) (p. 100) The default settings are marked with B. See page 81 for details on selecting STATUS CHECK menu items.
-
Page 87: Zoom Set
WB SET ZOOM SET ZOOM TYPE See page 43. B OPTICAL ZOOM ONLY AE SHIFT Uses only optical zoom. You can zoom up to 12×. ON/OFF ON[CLEAR IMAGE ZOOM] B OFF You can use the clear image zoom in Does not use the AE SHIFT function. addition to the optical zoom.
-
Page 88: Steady Shot
Press the MENU button t select (CAMERA SET) with the v/V/b/B/EXEC button. STEADY SHOT SPOT METER You can set the camera shake reduction You can adjust the brightness for the when shooting. selected subject automatically. B STANDARD ( z Tips Uses SteadyShot when shooting under •…
-
Page 89: Nightshot Light
TONE NIGHTSHOT LIGHT B OFF You can record clear images with Does not output audio tone signals. NIGHTSHOT (p. 48), which uses an infrared light when shooting. Outputs audio tone signals (1 kHz: full bit B ON -20dB (when [60i] is selected), -18dB Emits infrared light.
-
Page 90: (Rec/Out Set) Menu
(REC/OUT SET) menu Recording settings, input and output B HDMI settings (REC SET/VIDEO OUT, etc.) Outputs from HDMI jack. VIDEO The default settings are marked with B. Outputs from VIDEO jack. See page 81 for details on selecting menu items. SDI/HDMI You can select the resolution of the output Press the MENU button t select…
-
Page 91
DOWN CONVERT TYPE HDMI TC OUTPUT You can select a down convert type when You can set whether to output time code to you down-covert video signal. other professional-use devices, using Use this function for outputting movies and HDMI. still images recorded in 16:9 B OFF B SQUEEZE… -
Page 92: (Audio Set) Menu
(AUDIO SET) menu Settings for the audio recording (AVCHD AUDIO FORMAT, etc.) b Notes • When using a shoe microphone, the setting is The default settings are marked with B. NORMAL. See page 81 for details on selecting menu items. MANUAL REC LEVEL You can set the recording sensitivity when Press the MENU button t select…
-
Page 93: (Display Set) Menu
(DISPLAY SET) menu Display settings (MARKER/DISPLAY MI SHOE MIC ( OUTPUT, etc.) A microphone connected to the XLR handle unit or a Multi Interface Shoe compatible microphone is used to record The default settings are marked with B. audio. See page 81 for details on selecting menu items.
-
Page 94
Press the MENU button t select (DISPLAY SET) with the v/V/b/B/EXEC button. z Tips ZEBRA • You can focus more easily using this function in combination with the expanded focus function You can display a zebra pattern as a guide (p. -
Page 95
CAMERA DATA DISPLAY GUIDEFRAME display the iris, gain and Does not shutter speed settings B OFF Does not display the guide frame. B ON Constantly displays the iris, gain and shutter speed settings on the LCD screen. Displays the guide frame. You can check the horizontal and vertical aspect of a subject. -
Page 96: Zoom Display
Press the MENU button t select (DISPLAY SET) with the v/V/b/B/EXEC button. – With a frame rate of 50 selected in [REC FORMAT], when the shutter speed is 1/ Does not display the audio level meters. 50, the shutter angle is 360 degrees. z Tips –…
-
Page 97: (Tc/Ub Set) Menu
(TC/UB SET) menu Time code settings (TC PRESET/UB PRESET/TC FORMAT, etc.) VF COLOR TEMP. The default settings are marked with B. You can change the color temperature of See page 81 for details on selecting the viewfinder. menu items. Low color temperature makes the Press the MENU button t select viewfinder appear reddish, and high color (TC/UB SET) with the v/V/b/B/EXEC…
-
Page 98: Ub Time Rec
Press the MENU button t select (TC/UB SET) with the v/V/b/B/EXEC button. z Tips UB TIME REC Drop frame B OFF Time code is based on 30 frames per second; however, gaps in the actual time occur during Does not save the actual time in the user extended periods of recording as the actual frame bit code.
-
Page 99: (Network Set) Menu
(NETWORK SET) menu Settings for the Wi-Fi function (CTRL W/ Screen items Functions SMARTPHONE, etc.) 3 Space Enters a space. 4 Input Entered characters are The default settings are marked with B. displayed. See page 81 for details on selecting 5 Move Moves the cursor in the input menu items.
-
Page 100: (Others) Menu
(OTHERS) menu Settings while recording or other basic settings (AREA SET/BEEP, etc.) b Notes • A camera profile saved on a camcorder with The default settings are marked with B. different model name, or edited on a computer See page 81 for details on selecting cannot be loaded.
-
Page 101: Remote Control
z Tips SUMMERTIME • You can assign this function to an ASSIGN button (p. 64). You can change this setting without stopping the clock. Set to [ON] to move the REMOTE CONTROL time forward 1 hour. B OFF B ON Does not set the summertime.
-
Page 102: Repair Image Db File
Press the MENU button t select (OTHERS) with the v/V/b/B/EXEC button. REPAIR IMAGE DB FILE See page 80. USB CONNECT Select this item when [USB CONNECT] does not appear on the LCD screen by connecting the camcorder to another device with the USB cable.
-
Page 103: Connecting With Another Device
Connecting with another device Creating a standard definition image quality (SD) disc with a recorder, etc. You can copy images on your camcorder onto a disc or video cassette, by connecting Connect your camcorder to the your camcorder to a disc recorder with the recording device (a disc recorder, A/V connecting cable (sold separately).
-
Page 104: Troubleshooting
(OTHERS) t INITIALIZE. 3 Select This operation will reset the date, time and area settings. 4 Consult your Sony dealer or local authorized Sony service facility. • Power sources/LCD screen/Wireless Remote Commander···p. 104 • Memory card···p. 105 • Recording···p. 106 •…
-
Page 105
The battery pack discharges too quickly. • Ambient temperature is too high or low, or the battery pack has not been charged enough. This is not a malfunction. • Fully charge the battery again. If the problem persists, the battery may be worn-out. Replace it with a new one (p. -
Page 106
Troubleshooting (Continued) Images on the recording media cannot be deleted. • You can select no more than 100 images to be deleted on the edit screen. • The images are protected. Unprotect the images (p. 76). Recording The recording does not start when you press the START/STOP button. •… -
Page 107
There is a time difference between the point when the START/STOP button is pressed and the point that the recording movie is started or stopped actually. • On your camcorder, there may be a slight time difference between the point where you press the START/STOP button and the actual point that recording movie starts/stops. -
Page 108
Troubleshooting (Continued) Black bands appear when you record a TV screen or computer screen. • This can be improved by adjusting the shutter speed (p. 40). Fine patterns flicker, diagonal lines look jagged. • Adjust [DETAIL] to the negative side (p. 59). The time code is not recorded in sequence. -
Page 109
“—” is displayed on the LCD screen. • Bars will be displayed for the camera data of the movies recorded with [COLOR BAR] set to [ON]. appears on the LCD screen. • This appears when you play back movies recorded with 5.1ch surround sound. 5.1ch surround sound is down-mixed to 2ch stereo and played back on your camcorder. -
Page 110
Troubleshooting (Continued) Sound cannot be added to the recording media after recording. • You cannot add sound to the recording media after recording on your camcorder. Copy cannot be done correctly using the HDMI cable. • You cannot copy movies using the HDMI cable. Connecting to a computer The computer does not recognize the camcorder. -
Page 111: Warning Indicators And Messages
(Warning indicator the symptoms yourself. If the problem pertaining to memory cards) persists even after you have tried a couple of times, contact your Sony dealer or local Slow flashing authorized Sony service facility. • Free spaces for recording images are running out.
-
Page 112
Warning indicators and messages (Continued) — (Warning indicator Buffer overflow. Writing to the media pertaining to the write-protect of the was not completed in time. memory card)* • You have performed recording and erasing operations repeatedly, or a • The write-protect switch is set to lock memory card that has been formatted position on the memory card. -
Page 113
• Use a memory card recommended for your camcorder (p. 27). • Contact your Sony dealer. Do not eject the memory card during writing. Data may be damaged. • Reinsert the memory card, and follow the instructions on the LCD screen. -
Page 114: Additional Information
Additional Information Recording time of movies Estimated time of recording and Estimated recording time of playback with each battery pack movies Approximate time available when you use a XAVC HD fully charged battery pack. (unit: minute) Recording time 1080 50Mbps 35Mbps 25Mbps 50Mbps (unit: minute) 64GB Battery…
-
Page 115
FX: max. 24 Mbps 1,920 × 1,080/16:9, 64 GB 280 (280) 1,280 × 720/16:9 FH: approx. 17 Mbps (ave.) • When using Sony memory card. 1,920 × 1,080/16:9, 1,280 × 720/16:9 b Notes HQ: approx. 9 Mbps (ave.) 1,440 × 1,080/16:9, 1,280 × 720/16:9 •… -
Page 116: Using Your Camcorder Abroad
Using your camcorder abroad Power supply You can use your camcorder in any country/region using the AC Adaptor supplied with your camcorder within the AC 100 V to 240 V, 50 Hz/60 Hz range. Viewing on TV Before recording a movie with your camcorder for viewing on a TV, set [60i/50i SEL] to the appropriate TV system for the country/region in which you intended to…
-
Page 117: File/Folder Structure On The Recording Media
File/folder structure on the recording media The file/folder structure is shown below. You do not usually need to acknowledge the file/ folder structure, when recording/playing back movies and still images on the camcorder. C XAVC HD movie management * “Memory Stick PRO Duo” media information folder **SD memory card, SDHC memory card, SDXC memory card…
-
Page 118
File/folder structure on the recording media (Continued) • When you delete image files, follow the steps on page 77. Do not delete the image files on the camcorder directly from the computer. • Do not format the recording media in the camcorder using a computer. -
Page 119: Maintenance And Precautions
Maintenance and precautions • Because the AVCHD format uses a data About the XAVC HD format compression system, images may be distorted in scenes where the image, angle, or brightness Recording and playback on the changes drastically. This is not a malfunction. camcorder About the memory card Based on the XAVC HD format, your…
-
Page 120: About The «Infolithium» Battery Pack
Maintenance and precautions (Continued) On image data compatibility About the “InfoLITHIUM” • Image data files recorded on a memory card by battery pack your camcorder conform to the “Design rule for Camera File system” universal standard Your camcorder operates only with an established by the JEITA (Japan Electronics and “InfoLITHIUM”…
-
Page 121
About charging the battery pack • Do not expose the battery pack to water. The battery pack is not water resistant. • Use the AC Adaptor (supplied) to charge the designated batteries only. If you charge other About the remaining battery indicator types of batteries, those batteries may leak, heat •… -
Page 122: About Handling Of Your Camcorder
Sony dealer before operating it • When you bring your camcorder from a ski any further.
-
Page 123
How to avoid moisture condensation b Notes When you bring your camcorder from a cold place • If you did not press the right spot, try the into a warm place, put your camcorder in a plastic calibration again. bag and seal it tightly. Remove the bag when the •… -
Page 124: Rechargeable Battery
Maintenance and precautions (Continued) Charging the pre-installed rechargeable battery Your camcorder has a pre-installed rechargeable battery to retain the date, time, and other settings even when the POWER switch is set to OFF. The pre-installed rechargeable battery is always charged while your camcorder is connected to the wall outlet (wall socket) via the AC Adaptor or while the battery pack is attached.
-
Page 125: Specifications
Specifications System Image Stabilizer: ON/OFF selectable, shift lens Video signal Filter Diameter: M62 mm When [60i] is selected: Color temperature NTSC color, EIA standards Preset (Indoor:3200K, HDTV 1080/60i, 1080/60p, 720/60p Outdoor:5600K±7 steps, Color When [50i] is selected: temperature set range:2300-15000K), PAL color, CCIR standards Onepush A, B, Auto selectable HDTV 1080/50i, 1080/50p, 720/50p…
-
Page 126
Specifications (Continued) General Rechargeable battery pack NP-FV70 Power requirements Maximum output voltage: DC 8.4 V DC 6.8 V / 7.2 V (battery pack) Output voltage: DC 6.8 V DC 8.4 V (AC Adaptor) Capacity: Average power consumption* Typical: 14.0 Wh (2 060 mAh) During camera recording using the Minimum: 13.3 Wh (1 960 mAh) viewfinder with normal brightness. -
Page 127
On trademarks • The N Mark is a trademark or registered trademark of NFC Forum, Inc. in the United • “XDCAM” logo is a trademark of Sony States and in other countries. Corporation. • Adobe, the Adobe logo, and Adobe Acrobat are •… -
Page 128
PXW-X70 as the model for your camcorder. THIS PRODUCT IS LICENSED UNDER THE http://www.sony.net/Products/Linux/ AVC PATENT PORTFOLIO LICENSE FOR We would prefer you do not contact us about the THE PERSONAL USE OF A CONSUMER OR contents of source code. -
Page 129
Additional Information Index Connect Handle zoom……33 Recorder…… 103 Handle zoom lever….33 AC Adaptor……21 TV ……… 73 Handle zoom switch …..33 Accessory shoe …..23 CTRL W/SMARTPHONE HDMI ……..90 Accessory shoe plate…..23 ……….50 HDMI TC OUTPUT…..91 AE SHIFT…..87, 107 HISTOGRAM ……93 AGC LIMIT……86 AIRPLANE MODE….99 D.EXTENDER….. -
Page 130
Index (Continued) REC/OUT SET menu..90 REMOTE CONTROL ..101 TC/UB SET menu ..97 REPAIR IMAGE DB FILE UB PRESET ……60 ……….80 Using ……81 UB TIME REC….. 98 Moisture condensation ..122 USB CONNECT ….102 Movie……..29 USB LUN SET….102 S&Q MOTION ….62 Multi Interface Shoe ….4 Using your camcorder abroad SAFETY ZONE…. -
Page 132
© 2014 Sony Corporation Printed in China…
![]()
Solid-State Memory
Camcorder
Operating Guide
4-544-242-13(1)
Table of Contents
Getting Started
Recording
Playback
Editing
Using the Menu
Connecting with another device
Troubleshooting
Additional Information
PXW-X70
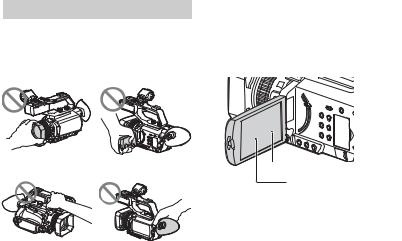
Read this first
Before operating this unit, please read this manual thoroughly, and retain it for future reference.
Notes on use
Using the camcorder
•Do not hold the camcorder by the following parts, and also do not hold the camcorder by the jack covers.
•The LCD screen is manufactured using extremely high-precision technology, so over 99.99% of the pixels are operational for effective use. However, there may be some tiny black points and/or bright points (white, red, blue, or green in color) that appear constantly on the LCD screen. These points are normal results of the manufacturing process and do not affect the recording in any way.
|
Microphone (sold |
Viewfinder |
|
separately) or |
|
|
Microphone holder |
b Notes
•The camcorder is not dustproof, dripproof or waterproof. See “About handling of your camcorder” (p. 122).
•When connecting the camcorder to another device with communication cables, be sure to insert the connector plug in the correct way. Pushing the plug forcibly into the terminal will damage the terminal and may result in a malfunction of the camcorder.
•Use the camcorder in accordance with the regulations of a place where you use it.
On the LCD screen and lens
•A menu item that is grayed out is not available under the current recording or playback conditions.
White, red, blue or green point
Black point
On sunlight
•Do not record the sun or leave the camcorder under the sun for a long time. The internal parts of the camcorder may be damaged. If sunlight is focused on a nearby object, it may cause a fire.
•Do not expose your camcorder’s viewfinder, lens, or LCD screen to the sun or strong light source for extended periods. Doing so may cause a malfunction of the camcorder.
•Do not attempt to record the sun directly. Doing so may cause a malfunction of the camcorder.
On the temperature of your camcorder and battery pack
Your camcorder has a protective function that disables recording or playback if the temperature of your camcorder or battery pack is beyond the safely operable range. In this case, a message appears on the LCD screen or in the viewfinder (p. 111).
2
On recording
•In order to stabilize memory card operation, it is recommended that you format the memory card when you use it with your camcorder for the first time. All data recorded on the memory card will be erased by formatting, and cannot be recovered. Save important data on the memory card on other media such as a computer, before formatting the memory card.
•Before starting to record, test the recording function to make sure the picture and sound are recorded without any problems.
•Compensation for the loss of the content of recordings or the loss of recording opportunities cannot be provided, even if recording or playback is not possible due to a malfunction of the camcorder, storage media, etc., or even if images or sounds are distorted due to the limits of the capabilities of the camcorder.
•TV color systems differ depending on the countries/regions. To view your recordings on a TV, a TV of the appropriate color system for the country/ region is required.
•Television programs, films, video tapes, and other materials may be copyrighted. Unauthorized recording of such materials may be contrary to the copyright laws.
•Because of the way that the image device (CMOS sensor) reads out image signals, the following phenomena may occur.
–The subjects passing by the frame rapidly might appear crooked depending on the recording conditions. (This phenomenon may be notable in displays having high motion resolution.)
–Horizontal lines appear on the LCD screen during recording under fluorescent lights, sodium lamps or mercury lamps. The phenomena can be reduced by adjusting the shutter speed (p. 40).
Save all your recorded image data
•To prevent your image data from being lost, save all your recorded images on PC periodically.
To handle the recorded images on your computer
Download the “Content Browser” software (p. 19).
Format the recording media using [MEDIA FORMAT] if images are not recorded or played back properly
If you continue recording and deleting images on recording media for a long period of time, the files on that recording media may be fragmented. As a result, you may not be able to record and save images properly. If this happens, save images on a PC, then format the recording media
(p. 78).
About the operation of the camcorder
You can operate the camcorder using the v/V/b/B/EXEC buttons (p. 81), and the touch panel. However, you cannot use the touch panel* to make some settings such as the MENU items.
*Some operations are possible only with the touch panel.
About this manual
•The on-screen displays in each local language are used for illustrating the operating procedures. Change the screen language before using your camcorder if necessary (p. 101).
•Design and specifications of recording media and other accessories are subject to change without notice.
•The value you can set in [REC FORMAT], etc., depends on the [60i/50i SEL] setting. In this manual, the values for both [60i] and [50i] settings are described.
3
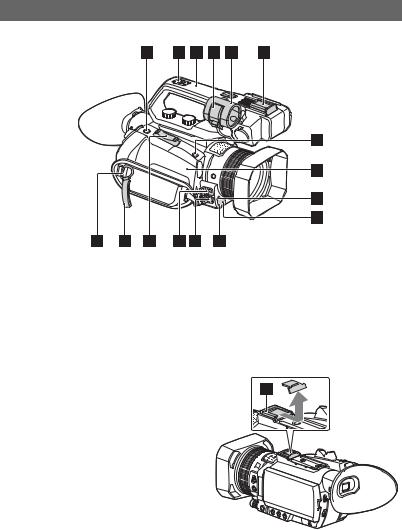
Identifying parts and controls
Body
The numbers in ( ) are reference pages.
AASSIGN4/FOCUS MAGNIFIER button (64)
BAccessory shoe receptacles
CXLR handle unit
DMicrophone fixing clamper
EMicrophone holder
FAccessory shoe
GASSIGN5/IRIS PUSH AUTO button (39)
H  (N mark)
•Touch an NFC-enabled smartphone to the mark to establish a connection with the camcorder.
•Near Field Communication (NFC) is an international standard for short-range wireless communication technology.
IRemote sensor (101)
JRecording lamp (101)
KNIGHTSHOT light (48)
LMulti/Micro USB jack (102) VIDEO OUT jack (73, 90, 103)
MMIC jack (PLUG IN POWER)
NPower zoom lever
OCable clamper
PHook for shoulder strap
QMulti Interface Shoe (45)
Attaching the XLR handle unit
1 Remove the Multi Interface Shoe cap.
4

2 Remove the handle shoe cap.
3Align the mark on the XLR handle with the one on the camcorder, and insert the XLR handle unit in the direction of the arrow.
4Press and turn the handle mounting screws to tighten them.
z Tips
•When attaching the XLR handle unit, make sure to securely tighten both handle mounting screws.
•If you use the XLR handle unit without securely tightening the mounting screws, it may damage the Multi Interface Shoe or cause the camcorder to detach and fall.
Detaching the XLR handle unit
To detach the XLR handle unit, perform the attachment procedure in reverse.
Attaching the microphone (sold separately)
This section explains how to connect an external microphone (sold separately).
Continued , 5
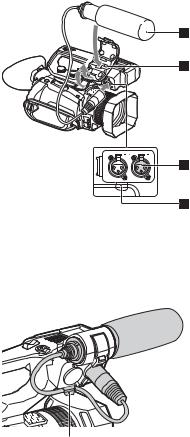
Identifying parts and controls (Continued)
1Place the microphone A into the microphone holder B.
2Connect the plug of the microphone to the INPUT 1 jack C.
3Place the microphone cable into the cable holder D.
Put the cable in the outer cable holder.
6
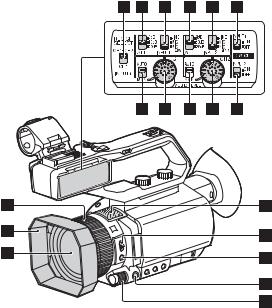
AManual lens ring (33)
BLens hood
CLens (ZEISS lens)
DREC CH SELECT (INPUT1) switch (44)
EATT (INPUT1) switch (44)
FINPUT1 (LINE/MIC/MIC+48V) switch (44)
GATT (INPUT2) switch (44)
HINPUT2 (LINE/MIC/MIC+48V) switch (44)
ILOW CUT (INPUT1) switch (44)
JAUTO/MAN (CH1) switch (44)
KAUDIO LEVEL (CH1) dial (44)
LAUTO/MAN (CH2) switch (44)
MAUDIO LEVEL (CH2) dial (44)
NLOW CUT (INPUT2) switch (44)
OInternal microphone
PZOOM/FOCUS switch (34)
QAF/MF button (34)
RMENU button (81)
SMANUAL dial (39)
Continued , 7

Identifying parts and controls (Continued)
Attaching the lens hood
Align the marks on the lens hood to those on the camcorder, and turn the lens hood in the direction of the arrow 2 until it is locked.
z Tips
•If you attach or remove a 62 mm (2 1/2 in.) PL filter or MC protector, remove the lens hood.
8
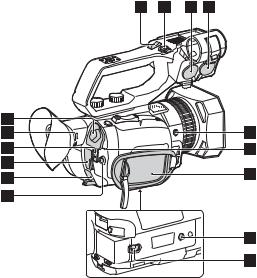
ASDI OUT jack (73)
BLens adjustment dial (26)
CSTART/STOP button (29)
DHDMI OUT jack (73)
EDC IN jack (21)
Fv/V/b/B/EXEC button (81)
GHandle zoom lever (33)
HHandle record button (29)
IINPUT2 jack (44)
JINPUT1 jack (44)
KASSIGN6/D.EXTENDER button (64)
LPOWER/CHG lamp (21)
MGrip belt
NTripod receptacles (1/4 inch)
For 1/4-20UNC screws
For attaching a tripod with a screw shorter than 5.5 mm (sold separately).
Some tripods may not be designed to attach in the proper direction.
OBATT release lever (21)
Continued , 9

Identifying parts and controls (Continued)
AHandle zoom switch (33)
BEye sensor
CViewfinder (26)
DLarge eyecup (26)
EAUTO/MANUAL switch (39)
FND FILTER switch (41)
GBattery slot (21)
Hi (headphones) jack
ISHUTTER SPEED button (40)
JGAIN button (40)
KIRIS button (39)
10
![]()
ASLOT SELECT button (27)
BTHUMBNAIL button (66)
CLCD screen/touch panel (26)
DMemory card slot A/Memory card access lamp (27)
EMemory card slot B/Memory card access lamp (27)
FDISPLAY button (71)
GASSIGN3/PICTURE PROFILE button (64)
HASSIGN2/STATUS CHECK button (64)
IASSIGN1/LAST SCENE PREVIEW button (64)
JWHT BAL button (42)
K  (on/standby) button (24)
Continued , 11
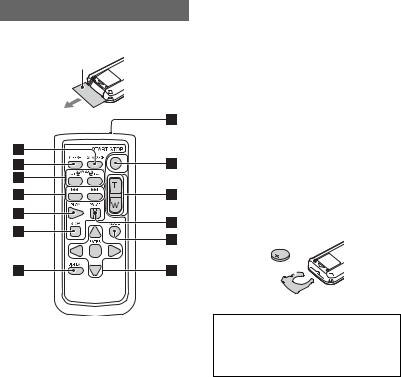
Identifying parts and controls (Continued)
Wireless Remote Commander
Remove the insulation sheet before using the Wireless Remote Commander.
Insulation sheet
•Point the remote sensor away from strong light sources such as direct sunlight or overhead lighting. Otherwise, the Wireless Remote Commander may not function properly.
•When you are operating with the Wireless Remote Commander supplied with your camcorder, your video device may also operate. In that case, select a commander mode other than DVD2 for your video device, or cover the sensor of your video device with black paper.
ADATA CODE button (71)
BTC RESET button (60)
CSCAN/SLOW buttons (66)
D. > (PREV/NEXT) buttons (66)
EPLAY button (66)
FSTOP button (66)
GDISPLAY button (71)
HTransmitter
ISTART/STOP button (29)
JPower zoom lever
KPAUSE button (66)
LMODE button
Mb/B/v/V/ENTER buttons
b Notes
•Aim the Wireless Remote Commander towards the remote sensor to operate your camcorder.
To change the battery of the Wireless Remote Commander
1While pressing on the tab, inset your fingernail into the slit to pull out the battery case.
2Place a new battery with the + side facing up.
3Insert the battery case until it clicks into place.
Tab 


WARNING
Battery may explode if mistreated. Do not recharge, disassemble or dispose of in fire.
•When the lithium battery becomes weak, the operating distance of the Wireless Remote Commander may shorten, or the Wireless Remote Commander may not function properly. In this case, replace the battery with a Sony CR2025 lithium battery. Use of another battery may present a risk of fire or explosion.
12
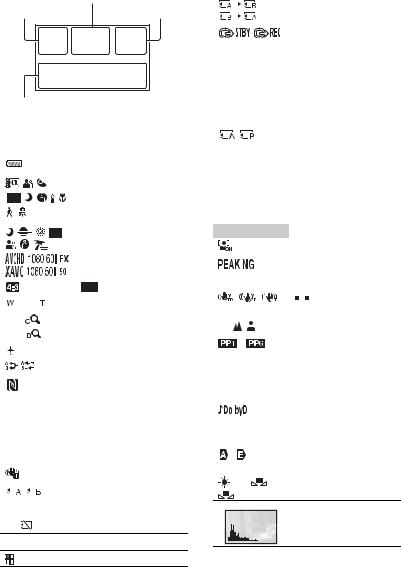
Screen indicators
|
Center |
|
|
Upper left |
Upper right |
Bottom
Upper left
|
Indicator |
Meaning |
||||||||
|
100% |
Remaining battery |
||||||||
|
. |
INTELLIGENT AUTO |
||||||||
|
(face detection/scene |
|||||||||
|
detection/camera-shake |
|||||||||
|
detection) (47) |
|||||||||
|
SCENE SELECTION |
|||||||||
|
(47) |
|||||||||
|
REC FORMAT (37) |
|||||||||
|
WIDE REC (90) |
|||||||||
|
Optical zoom |
|||||||||
|
Z99 |
×1.2 |
Clear image zoom |
|||||||
|
Z99 |
×2.3 |
Digital zoom |
|||||||
|
AIRPLANE MODE (99) |
|||||||||
|
SIMUL/RELAY REC |
|||||||||
|
NFC active |
|||||||||
|
100-0001 |
Playback folder of |
||||||||
|
memory card |
|||||||||
|
Center |
|||||||||
|
Indicator |
Meaning |
||||||||
|
Vibration warning |
|||||||||
|
Recording media |
|||||||||
|
REC STBY |
Recording status (29) |
||||||||
|
E |
Warning (111) |
NPlayback indicator (66)
Processing
|
Indicator |
Meaning |
|||||||||
|
Relay recording |
||||||||||
|
SDI/HDMI REC |
||||||||||
|
CONTROL |
||||||||||
|
Upper right |
||||||||||
|
Indicator |
Meaning |
|||||||||
|
0min |
Estimated remaining |
|||||||||
|
recording time |
||||||||||
|
Recording/playback |
||||||||||
|
media |
||||||||||
|
00:00:00:00 |
Time code |
|||||||||
|
(hour:minute:second: |
||||||||||
|
frame) |
||||||||||
|
Bottom |
||||||||||
|
Indicator |
Meaning |
|||||||||
|
Face detection [ON] |
||||||||||
|
PEAKING (94) |
||||||||||
|
ZEBRA (94) |
||||||||||
|
STEADY SHOT |
||||||||||
|
(88) |
||||||||||
|
9 |
Manual focus (34) |
|||||||||
|
– |
Picture profile (53) |
|||||||||
|
F5.6 |
Iris (39) |
|||||||||
|
9dB |
Gain (40) |
|||||||||
|
100 180° |
Shutter speed (40) |
|||||||||
|
AVCHD AUDIO |
||||||||||
|
FORMAT (92) |
||||||||||
|
-2.0EV |
AE SHIFT (87) |
|||||||||
|
/ |
Auto setting/manual |
|||||||||
|
setting (95) |
||||||||||
|
n |
A |
White balance (42) |
||||||||
|
B |
HISTOGRAM (93)
Continued , 13
Screen indicators (Continued)
Indicator Meaning
AUTO SLOW
SHUTTER
AUDIO LEVEL
DISPLAY (95)
D.EXTENDER (87)
REC LEVEL MODE
NIGHTSHOT
SELECTED MIC
ND filter (41)
z Tips
•Indicators may look different or appear at different positions.
Data code during recording
The recording date, time and condition are recorded automatically on the recording media. They are not displayed while recording. However, you can check them by selecting  (DISPLAY SET) t [DATA CODE] and choosing the data that you want to display, or by pressing the ASSIGN button to which the DATA CODE function is assigned, during playback
(p. 71).
14

Table of Contents |
|
|
Read this first ………………………………………………………………………………. |
2 |
|
Identifying parts and controls …………………………………………………………. |
4 |
|
Body………………………………………………………………………………………… |
4 |
|
Wireless Remote Commander …………………………………………………… |
12 |
|
Screen indicators ………………………………………………………………………… |
13 |
|
Getting Started |
|
|
Step 1: Checking supplied accessories ………………………………………….. |
19 |
|
Step 2: Charging the battery pack …………………………………………………. |
21 |
|
Step 3: Attaching the accessory shoe ……………………………………………. |
23 |
|
Step 4: Turning on the camcorder and setting the date and time ………. |
24 |
|
Setting the date and time………………………………………………………….. |
24 |
|
Step 5: Adjusting the LCD screen and viewfinder ……………………………. |
26 |
|
Step 6: Preparing the recording media …………………………………………… |
27 |
|
Recording |
|
|
Recording ………………………………………………………………………………….. |
29 |
|
Recording movies ……………………………………………………………………. |
29 |
|
Changing the setting of the START/STOP button and handle record |
|
|
button …………………………………………………………………………………….. |
32 |
|
Adjusting the zoom ………………………………………………………………….. |
33 |
|
Adjusting the focus ……………………………………………………………………… |
34 |
|
Using the Focus magnifier ………………………………………………………… |
35 |
|
Focusing by touching the LCD screen (Spot focus)……………………… |
35 |
|
Focusing on a detected face (Face detection)…………………………….. |
35 |
|
Changing the recording setting …………………………………………………….. |
37 |
|
Selecting the file format and recording format……………………………… |
37 |
|
Setting the DV MODE (DV mode) ………………………………………………. |
38 |
|
Adjusting the brightness ………………………………………………………………. |
39 |
|
Adjusting the iris ……………………………………………………………………… |
39 |
|
Adjusting the gain ……………………………………………………………………. |
40 |
|
Adjusting the shutter speed………………………………………………………. |
40 |
|
Adjusting the exposure …………………………………………………………….. |
41 |
|
Adjusting the volume of light (ND filter) ………………………………………. |
41 |
|
Adjusting the color tone ……………………………………………………………….. |
42 |
|
Adjusting the white balance………………………………………………………. |
42 |
|
Audio setup ……………………………………………………………………………….. |
43 |
|
Recording sound from the internal microphone …………………………… |
43 |
|
Recording sound from an external audio device………………………….. |
43 |
|
Recording sound from a Multi Interface Shoe compatible microphone |
|
|
(sold separately) ……………………………………………………………………… |
45 |
Contents of Table
Continued , 15

|
Table of Contents (Continued) |
|
|
Recording sound from an external microphone (sold separately) |
…… 45 |
|
Adjusting the audio level from the INPUT1 and INPUT2 jacks ……….. |
46 |
|
Adjusting the audio level from the internal microphone or an external |
|
|
microphone (PLUG IN POWER) …………………………………………………. |
46 |
|
Useful functions …………………………………………………………………………. |
47 |
|
Selecting the suitable setting automatically for the recording situation |
|
|
(AUTO MODE setting) ………………………………………………………………. |
47 |
|
Shooting in dark conditions (NIGHTSHOT)………………………………….. |
48 |
|
What you can do with the Wi-Fi function of the camcorder…………….. |
48 |
|
Downloading “Content Browser Mobile” ……………………………………… |
48 |
|
Connecting the camcorder to an Android smartphone equipped with |
|
|
the NFC function using One-touch……………………………………………… |
49 |
|
Using a smartphone as a remote controller …………………………………. |
50 |
|
Connecting without using the NFC function (Android)…………………… |
51 |
|
Connecting without using the NFC function (iPhone/iPad) …………….. |
52 |
|
Customizing the picture quality (Picture profile) …………………………… |
53 |
|
Setting time data ……………………………………………………………………… |
60 |
|
Recording with the Slow & Quick Motion function ………………………… |
61 |
|
Reviewing the most recently recorded scene |
|
|
(Last Scene Review)…………………………………………………………………. |
63 |
|
Assigning the functions to the ASSIGN buttons ………………………………. |
64 |
|
Playback |
|
|
Playback …………………………………………………………………………………… |
66 |
|
Playing back movies ………………………………………………………………… |
66 |
|
Playing back still images…………………………………………………………… |
69 |
|
Changing/checking the settings in your camcorder …………………………. |
71 |
|
Changing the screen display …………………………………………………….. |
71 |
|
Displaying recording data (Data code)……………………………………….. |
71 |
|
Checking the settings in your camcorder (Status check) ………………. |
72 |
|
Connecting a monitor or a TV ………………………………………………………. |
73 |
|
Editing |
|
|
Protecting movies and still images (Protect) …………………………………… |
76 |
|
Dividing a movie …………………………………………………………………………. |
76 |
|
Deleting movies and still images …………………………………………………… |
77 |
|
Formatting the recording media ……………………………………………………. |
78 |
|
Deleting all data from the memory card completely …………………………. |
79 |
|
Repairing the image database file ………………………………………………… |
80 |
16

|
Using the Menu |
|
|
Operating the menu …………………………………………………………………….. |
81 |
|
Menu items ………………………………………………………………………………… |
83 |
|
(CAMERA SET) menu …………………………………………………………… |
86 |
|
Settings to adjust your camcorder to the recording conditions ( |
STEADY |
|
SHOT, etc.) |
|
(REC/OUT SET) menu ………………………………………………………….. |
90 |
Recording settings, input and output settings (REC SET/VIDEO OUT, etc.)
|
(AUDIO SET) menu ………………………………………………………………… |
92 |
Settings for the audio recording (AVCHD AUDIO FORMAT, etc.)
|
(DISPLAY SET) menu ……………………………………………………………. |
93 |
|
Display settings (MARKER/DISPLAY OUTPUT, etc.) |
|
|
(TC/UB SET) menu ……………………………………………………………….. |
97 |
|
Time code settings (TC PRESET/UB PRESET/TC FORMAT, etc.) |
|
(NETWORK SET) menu …………………………………………………………. |
99 |
Settings for the Wi-Fi function (CTRL W/SMARTPHONE, etc.)
|
(OTHERS) menu …………………………………………………………………. |
100 |
Settings while recording or other basic settings (AREA SET/BEEP, etc.)
Connecting with another device
Creating a standard definition image quality (SD) disc with a recorder, etc.
……………………………………………………………………………………..103
|
Troubleshooting |
|
|
Troubleshooting ………………………………………………………………………… |
104 |
|
Warning indicators and messages ………………………………………………. |
111 |
|
Additional Information |
Contents of Table
|
Recording time of movies …………………………………………………………… |
114 |
|
Using your camcorder abroad …………………………………………………….. |
116 |
|
File/folder structure on the recording media ………………………………….. |
117 |
|
Maintenance and precautions …………………………………………………….. |
119 |
|
About the XAVC HD format……………………………………………………… |
119 |
|
About the AVCHD format ………………………………………………………… |
119 |
|
About the memory card ………………………………………………………….. |
119 |
|
About the “InfoLITHIUM” battery pack ……………………………………… |
120 |
|
About handling of your camcorder …………………………………………… |
122 |
|
Continued , 17 |
|
Table of Contents (Continued) |
|
|
Specifications …………………………………………………………………………… |
125 |
|
Index ………………………………………………………………………………………. |
129 |
18
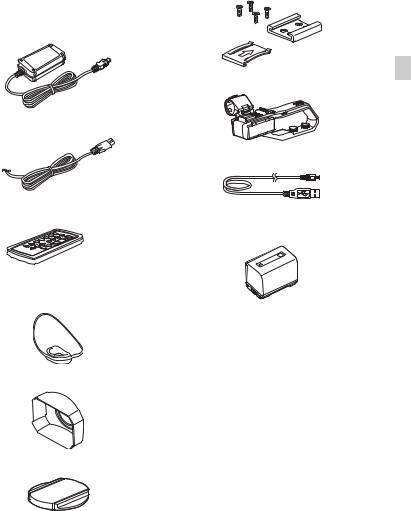
Getting Started
Step 1: Checking supplied accessories
Make sure that you have following items supplied with your camcorder.
The number in the parentheses indicates the number of that item supplied.
Recording media are sold separately.
AC Adaptor (1) (p. 21)
Power cord (mains lead) (1) (p. 21)
Wireless Remote Commander (RMT-845)
(1) (p. 12)
A button-type lithium battery is already installed.
Large eyecup (1) (p. 26)
Lens hood (1) (p. 
Lens cap (Attached to lens) (1)
Accessory shoe kit (Accessory shoe (1), Accessory shoe plate (1), screws (4)) (p. 23)
XLR handle unit (1)
USB cable (1)
Rechargeable battery pack (NP-FV70/ FV70A) (1)
CD-ROM “Manuals for Solid-State Memory Camcorder” (1)
Operating Guide (2)
Software Downloads
When the unit is used with a PC connection, download device drivers, plugins, and application software, where applicable, from the Sony Professional products web site.
Sony Professional products web site
|
homepage: |
|
|
U.S.A. |
http://pro.sony.com |
|
Canada |
http://www.sonybiz.ca |
|
Latin America |
http://sonypro-latin.com |
|
Europe, Middle East and Africa |
|
|
http://www.pro.sony.eu |
|
|
Japan |
http://www.sonybsc.com |
Started Getting
Continued , 19
Step 1: Checking supplied accessories (Continued)
|
Asia Pacific |
http://pro.sony-asia.com |
|
Korea |
http://bp.sony.co.kr |
|
China |
http://pro.sony.com.cn |
Although the data regarding recorded materials are stored over multiple files and folders, you can easily handle the clips without considering its data and directory structure, by using the dedicated application software.
20
![]()
Step 2: Charging the battery pack
You can charge the “InfoLITHIUM” battery pack (V series) with the supplied AC Adaptor.
b Notes
•You can use a large capacity battery pack, NPFV100/FV100A (sold separately), with your camcorder. You cannot use NP-FV50/FV50A.
1 Close the LCD screen and store the viewfinder before attaching the battery.
 Battery
DC IN jack

 DC plug
Power cord (mains lead)
•The CHG lamp lights up and charging starts.
•The CHG lamp turns off when the battery is fully charged. Disconnect the AC Adaptor from the DC IN jack.
z Tips
2 Connect the AC Adaptor and power cord from the camcorder to a outlet.
•You can check the remaining battery life with the status check function (p. 72).
Charging time
Approximate time (minute) required when you charge a fully discharged battery pack.
|
Battery pack |
Full charge time |
NP-FV70/FV70A 205
Using an outside power source
You can use the AC Adaptor to obtain the AC power. While you are using the AC Adaptor, the battery pack will not lose its charge even when it is attached to your camcorder.
Follow the procedure from 1 to 2 as shown in “Step 2: Charging the battery pack” on page 21.
Started Getting
Continued , 21
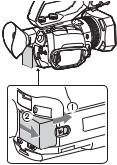
Step 2: Charging the battery pack (Continued)
To remove the battery pack
Turn the power off, then slide the BATT release lever to release the battery.
On the battery pack
•Turn the power off before changing the battery pack.
•The CHG lamp flashes during charging, or the Battery Info (p. 72) will not be correctly displayed under the following conditions.
–The battery pack is not attached correctly.
–The battery pack is damaged.
–The battery pack is worn-out.
On the AC Adaptor
•Do not short-circuit the DC plug of the AC Adaptor or battery terminal with any metallic objects. This may cause a malfunction.
To store the battery pack
If the battery pack is not in use for a while, run down the battery and store it (p. 121).
22

Step 3: Attaching the accessory shoe
To mount the accessory shoe
Mount the accessory shoe on the accessory shoe mount as illustrated.
Accessory shoe plate
Accessory shoe
Accessory shoe
Accessory shoe plate
1Lift the edge of the accessory shoe plate and pull it in the direction opposite to that of the arrow on the accessory shoe plate and remove it from the accessory shoe.
2Place the accessory shoe as its protrusions matches recesses of the accessory shoe mount, then fix it to the mount with four screws.
3Insert the accessory shoe plate in the direction of the arrow on the plate surface until the end of the plate engages the end of the shoe.
To remove the accessory shoe
Remove the shoe plate in the same way as step 1 of “To mount the accessory shoe.” Loosen the 4 screws and remove the accessory shoe from the accessory shoe mount.
Started Getting
23
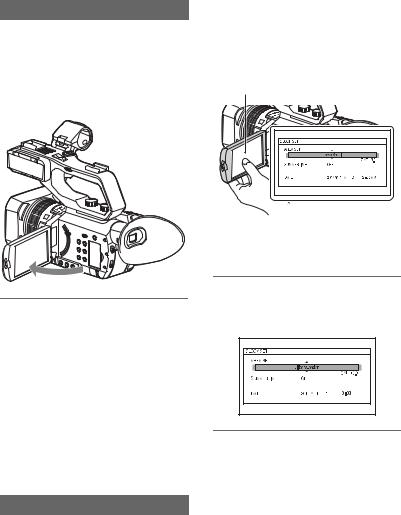
Step 4: Turning on the camcorder and setting the date and time
Turning on the camcorder
Open the LCD screen and turn the power on.
You can also turn on the power by extending the viewfinder or by pressing the POWER button.
When you use your camcorder for the first time, the [CLOCK SET] screen appears.
To turn off the power
Close the LCD screen.
If the viewfinder is extended, return it to its original position.
You can also turn off the power by pressing the POWER button.
b Notes
•If warning messages appear on the LCD screen, follow the instructions.
•When recording movies or when connected to another device via USB, the camcorder does not turn off even if the LCD screen is closed and the viewfinder is returned to its original position.
Setting the date and time
Set the date and time when you use your camcorder for the first time.
z Tips
•If you do not use your camcorder for about 3 months, the built-in rechargeable battery gets discharged and the date and time settings may be cleared from the memory. In that case, charge the rechargeable battery and then set the date and time again (p. 124).
LCD screen
When you set the date and time again, press the MENU button, and select
 (OTHERS) t [CLOCK SET].
1 Select your area by pressing the v/V/b/B/EXEC button, then press the button.
2 Set [SUMMERTIME], [Y] (year), [M] (month), [D] (day), hour and minute, by pressing the v/V/b/B/
EXEC button, then press the button.
24
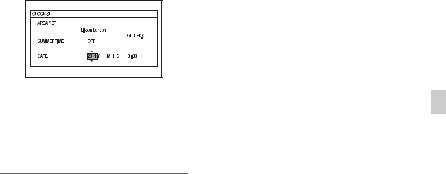
The clock starts.
•Set [SUMMERTIME] to [ON] to move the time forward 1 hour.
•You can set any year up to the year 2037.
•Midnight is indicated as 12:00 AM, and noon as 12:00 PM (when [60i] is selected).
z Tips
•The date and time are automatically recorded on the selected recording media, and can be displayed during playback (ASSIGN button to which [DATA CODE] is assigned, p. 71).
Started Getting
25
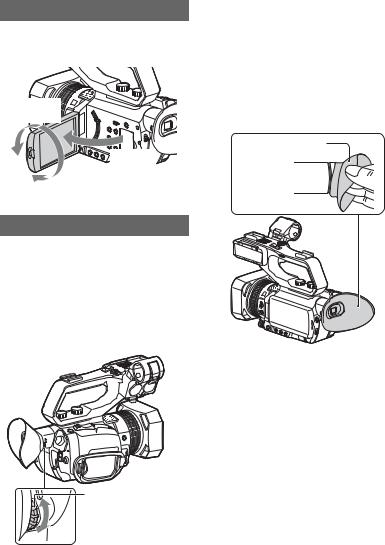
Step 5: Adjusting the LCD screen and viewfinder
Using the LCD screen
The LCD screen can be rotated in the range as illustrated below, allowing a person other than the camera operator to see the image.
180 degrees (max.)
Open 90 degrees.
90 degrees (max.)
When the picture in the viewfinder is hard to see
If you cannot see the picture in the viewfinder clearly under bright circumstances, use the supplied large eyecup. To attach the large eyecup, stretch it slightly and fit it over the groove of the eyecup attached to the camcorder. You can attach the large eyecup facing either the right or left side.
Large eyecup (supplied) 
Adjusting the viewfinder
When using the viewfinder, extend it and position your eye near it. If you extend the viewfinder while the LCD
screen is open, the display switches from
the LCD screen to the viewfinder when you position your eye near the viewfinder.
If the viewfinder image appears blurred, turn the lens adjustment dial next to the viewfinder until the image is sharp.
b Notes
• If the viewfinder is extended while the battery pack NP-FV100/FV100A (sold separately) is attached, the large eyecup and battery pack may interfere with each other slightly. However, this does not affect the functionality of the camcorder.
Lens adjustment dial
Move it until the picture becomes clear.
26
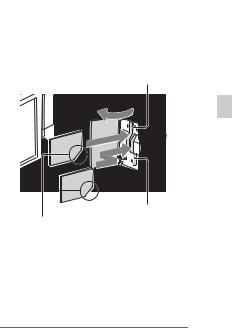
Step 6: Preparing the recording media
Types of memory cards you can use in your camcorder
|
File format |
Types of media |
||
|
AVCHD |
SD, SDHC, SDXC memory |
||
|
card (Class 4 or faster), |
|||
|
Memory Stick PRO Duo, |
|||
|
PRO-HG Duo, XC-HG |
|||
|
DV |
SD, SDHC, SDXC memory |
||
|
card (Class 6 or faster), |
|||
|
Memory Stick PRO-HG |
|||
|
Duo, XC-HG |
|||
|
XAVC HD |
SDXC memory card (Class |
||
|
10 or faster, UHS-I), |
|||
|
Memory Stick XC-HG*1 |
|||
|
S&Q |
SD, SDHC, SDXC memory |
||
|
(AVCHD) |
card (Class 10 or faster) |
||
|
S&Q (XAVC |
SDXC memory card (UHS-I |
||
|
HD) |
U3 (UHS-I Speed Class 3)) |
||
*1 Standard mode only
Open the cover, and insert the memory card with the notched edge in the direction as illustrated until it clicks into place.
Memory card slot A
Started Getting
Memory card slot B
Note the direction of the notched corner.
•If you insert a memory card into the slot in the wrong direction, the memory card, the memory card slot, or image data may be damaged.
b Notes
•Operation with all memory cards is not assured.
•Only “Memory Stick PRO Duo” media, which is half the size of standard “Memory Stick” media, or “Memory Stick XC-HG Duo” media, or standard size SD cards can be used with this camcorder.
•See page 114 for the recordable time of memory cards.
•Movies recorded on “Memory Stick XC-HG Duo” media or SDXC memory cards can be imported to or played back on other equipment, such as a computer or A/V device, by connecting the camcorder to the equipment with the USB cable. However, the equipment must support the exFAT file system used for “Memory Stick XC-HG Duo” media and SDXC memory cards. Confirm in advance that the connecting equipment is supporting the exFAT file system. If you connect equipment not supporting the exFAT file system and the format screen appears, do not perform the format. All the data recorded will be lost.
•Memory card slot A accepts either “Memory Stick PRO Duo” media or an SD card. Memory card slot B accepts an SD card only.
To eject the memory card
Lightly push the memory card once.
b Notes
•If [The image database file is corrupted. The media must be restored to use again.] appears, format the memory card (p. 78).
•When inserting or ejecting the memory card, be careful of the memory card popping out and dropping.
Continued , 27
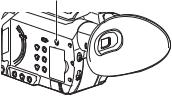
Step 6: Preparing the recording media (Continued)
Selecting the memory card slot to be used for recording
Press the SLOT SELECT button to change which slot is selected for recording. You can confirm the selected slot on the screen.
SLOT SELECT button
b Notes
•You can only select a slot that already has a memory card inserted.
•While movies are being recorded on the memory card, you cannot switch the slot even if you press the SLOT SELECT button.
z Tips
•When only one slot has a memory card inserted, the slot that has the memory card is selected automatically.
28
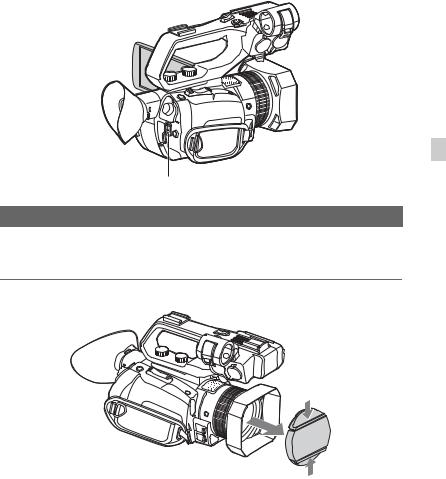
Recording
Recording
Handle record button

LCD screen 
START/STOP button
Recording movies
Your camcorder records movies on a memory card. The factory setting of recording movies is XAVC HD. Do the following steps to record movies.
1 Press the latches on both sides of the lens cap and remove it.
Recording
Continued , 29
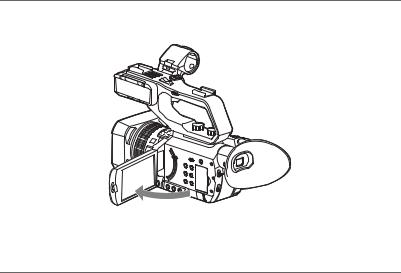
Recording (Continued)
2 Open the LCD screen, and press the START/STOP button (or the handle record button) to start recording.
The recording lamps light up during recording.
To stop the movie recording, press the START/STOP button or the handle record button again.
b Notes
•When [AUTO] is selected in the [MIC SELECT] menu and the XLR handle unit is connected to the camcorder without a microphone attached to the INPUT1 and INPUT2 jacks, the internal microphone is not selected and no audio is recorded. In this case, select [INT MIC]. Refer to page 92.
•When the access lamp is lit or flashing in red, your camcorder is reading or writing data on recording media. Do not shake or apply strong force to your camcorder, do not turn the power off, and do not remove the recording media, battery pack or the AC Adaptor. The image data may be destroyed.
•See page 114 on the recording time of movies.
•If a movie file size exceeds 2 GB while recording in DV or AVCHD format, the camcorder automatically divides the file and creates a new one.
•The menu settings, picture profile settings, and settings made using the AUTO/MANUAL switch are saved when you close the LCD screen and turn off the camcorder. The POWER/CHG lamp flashes while the settings are being stored.
z Tips
•When recording at a setting other than DV, the aspect ratio is fixed to 16:9. When recording in DV mode, you can switch the aspect ratio to 4:3 ([ WIDE REC], p. 90).
•You can change the screen display during recording (p. 71).
•Indicators displayed on the LCD screen during recording are shown on page 13.
•The recording lamps can be set to stay off ([REC LAMP], p. 101).
30
![]()
To continue recording on the memory cards, one after another (Relay recording)
Insert memory cards each in both slots A and B, so the camcorder switches memory card A (or B) just before space on the other one runs out, and continues recording on the next memory card automatically.
Do the following setting before recording.
Press MENU t Select  (REC/OUT SET) t [REC SET] t [SIMUL/RELAY REC] t [RELAY REC] with the v/V/b/B/EXEC button.
Insert a recordable memory card.
Recording
REC: Recording
Small space
b Notes
•Do not eject the memory card that is currently being used for recording. When replacing a memory card while recording, replace only the one in the slot whose access lamp is off.
•Even if you press the SLOT SELECT button, while recording movies, you cannot switch the slot currently being used.
•When the remaining recording time of the memory card being used is less than 1 minute and the other slot
has recordable memory card inserted, [

 ] or [

 ] appears on the camcorder screen. The indicator turns off when the memory card is switched.
•If you start recording on a memory card with the remaining recording time of less than 1 minute, the camcorder may not be able to relay-record. To relay-record without fail, make sure that the memory card has more than 1 minute when you start recording.
•Seamless playback of relay-recorded movies with this camcorder is not possible.
•You can re-combine relay-recorded movies using the application software “Content Browser”.
To record movies using both the memory card A and B (Simultaneous recording)
You can record movies on both of these recording media simultaneously.
Press MENU t select 
 (REC/OUT SET) t [REC SET] t [SIMUL/RELAY REC] t [SIMULTANEOUS REC] with the v/V/b/B/EXEC button.
Continued , 31

Recording (Continued)
Changing the setting of the START/STOP button and handle record button
When using SIMULTANEOUS REC, you can start and stop recording on different memory cards by using the START/STOP button and the handle record button.
In the default setting, movies are recorded on both the memory card A and B at the same time when either record button is pressed.
•REC BUTTON: 


•HANDLE REC BUTTON: 


To change the setting
Press MENU t select 
 (REC/OUT SET) t [REC SET] t [REC BUTTON SET] with the v/V/b/B/EXEC button.
|
[REC BUTTON:] setting |
Button and recording media |
|
REC BUTTON: |
Recording on both the memory card A and the memory card B |
|
HANDLE REC BUTTON: |
starts and stops at the same time when either record button is |
|
pressed. |
|
|
REC BUTTON: |
Recording on the memory card A starts and stops when the |
|
HANDLE REC BUTTON: |
START/STOP button is pressed, and on the memory card B when |
|
the handle record button is pressed. |
|
|
REC BUTTON: |
Recording on the memory card B starts and stops when the |
|
HANDLE REC BUTTON: |
START/STOP button is pressed, and on the memory card A when |
|
the handle record button is pressed. |
|
32

Adjusting the zoom
Adjusting the zoom with the power zoom lever
Press the zoom lever D slightly to zoom slowly, and press it further to zoom more quickly.
|
Wide view: |
Close view: |
|
(Wide angle) |
(Telephoto) |
z Tips
•When focusing, the minimum distance required between the camcorder and the subject is about
1cm (about 13/32 in.) for wide angle and about
1meter (about 39 3/8 in.) for telephoto.
•The focus may not be adjusted at certain zoom positions if the subject is within 1 meter (about
393/8 in.) from your camcorder.
•Be sure to keep your finger on the power zoom lever D. If you move your finger off the power zoom lever D, the operation sound of the power zoom lever D may also be recorded.
•You can increase the zoom speed of the power zoom lever D or the handle zoom A ([SPEED ZOOM], p. 87).
Adjusting the zoom with the handle zoom
1Set the handle zoom switch B to VAR or FIX.
z Tips
•When you set the handle zoom switch B to VAR, you can zoom in or out at variable speed.
•When you set the handle zoom switch B to FIX, you can zoom in or out at fixed speed set in [HANDLE ZOOM] (p. 87).
2Press the handle zoom lever Ato zoom in or out.
b Notes
•You cannot use the handle zoom lever A when the handle zoom switch B is set to OFF.
•You cannot change the zoom speed of the power zoom lever D with the handle zoom switch B.
Adjusting the zoom with the manual lens ring
If you toggle the ZOOM/FOCUS switch to ZOOM, you can zoom at the desired speed by turning the manual lens ring C. Fine adjustment is also possible.
b Notes
•Turn the manual lens ring C at a moderate speed. If you turn it too fast, the zoom speed may lag behind the manual lens ring rotation speed, or the operation sound of the zoom may also be recorded.
Recording
33

Adjusting the focus
You can adjust the focus manually for different recording conditions.
Use this function in the following cases.
–To record a subject behind a window covered with raindrops.
–To record horizontal stripes.
–To record a subject with little contrast between the subject and its background.
–When you want to focus on a subject in the background.
– To record a stationary subject using a tripod.
1 During recording or standby, press the AF/MF button C to set the focus to manual.
9 appears.
2 Move the ZOOM/FOCUS B switch, and turn the manual lens ring A.
•FOCUS: You can manually adjust the focus by turning the manual lens ring.
•ZOOM: You can manually adjust the
zoom by turning the manual lens ring. 9 changes to  when the focus cannot be adjusted any farther. 9 changes to
  when the focus cannot be adjusted any closer.
To restore automatic adjustment
Press the AF/MF button C to set the focus to automatic.
9 disappears and the automatic focus adjustment is restored.
z Tips
•The focal length information (the distance at which the subject is in focus; for when it is dark and hard to adjust the focus) appears for about 3 seconds in the following cases.
–When you press the AF/MF button to set the focus to manual and 9 appears on the LCD screen.
–When you rotate the manual lens ring A while 9 is displayed on the LCD screen.
•You can switch the focal length information between meters and feet ([FOCUS DISPLAY], p. 96).
34

Using the Focus magnifier
The selected area on the LCD screen is magnified and displayed. It is easier to confirm the focus setting during manual focusing.
[FOCUS MAGNIFIER] is assigned to the ASSIGN4 button (p. 64).
Press ASSIGN4 button
The center of the screen is magnified. The setting changes with each press of the button.
Enlarged display position
You can adjust the enlarged display position with the v/V/b/B button on the camcorder. Press the EXEC button to set the enlarged display position back to the center.
b Notes
•Even though the image appears expanded on the LCD screen, the recorded image is not expanded.
z Tips
•You can change the magnification ratio with [FOCUS MAG RATIO] (p. 95).
Focusing by touching the LCD screen (Spot focus)
You can focus on the point where you touch on the LCD screen.
1 Press the MENU button D.
2 Select  (CAMERA SET) t [SPOT FOCUS] with the v/V/b/B/ EXEC button E.
3 Touch the point to be focused on the LCD screen.
b Notes
•[SPOT FOCUS] is available only with manual focus.
z Tips
•You can assign this function to an ASSIGN button (p. 64).
To cancel the spot focus
Press the MENU button D.
Focusing on a detected face (Face detection)
The camcorder detects the face and focuses on it (The default setting is [OFF]). [FACE DETECTION] is available only with automatic focus.
1 Press the MENU button D.
Recording
Continued , 35

Adjusting the focus (Continued)
2 Select 
 (CAMERA SET) t [FACE DETECTION] t [ON] or [OFF] with the v/V/b/B/EXEC button E.
When the faces are detected, frames appear on the LCD screen.
3 Press the v/V/b/B/EXEC button E, move the selection cursor
(orange colored frame) to select the priority face, then press the button again.
Selection cursor (orange colored frame)
Priority face frame (double frame)
The frame on the priority face changes to a double frame.
To cancel the priority face
Move the selection cursor (orange colored frame) onto the frame (double frame) on the priority face, using the v/V/b/B/EXEC button E, then press the dial.
b Notes
•Faces may not be detected depending on the recording environment, the condition of the subject or the settings.
•You may not be able to get the proper effect in some recording environments. If this happens, set [FACE DETECTION] to [OFF].
•The face detection function is disabled when using digital zoom or NIGHTSHOT.
z Tips
•You can assign this function to an ASSIGN button (p. 64).
•To make it easy to detect faces, record under the following conditions:
–Record in a moderately bright place
–Do not obscure the face with a hat, mask, sunglasses, etc.
–Face the front of the camera
36

Changing the recording setting
Selecting the file format and recording format
You can select the file format in [FILE FORMAT] and the recording format (bitrate, image size, frame rate, and scanning system) in [REC FORMAT].
You can select either XAVC HD or AVCHD for the file format on the camcorder. Select the desired file format that best suits the shooting situation and playback equipment.
1 Press the MENU button.
2 Press the v/V/b/B/EXEC button to select  (REC/OUT SET) t [REC SET] t [FILE FORMAT] t the desired format.
3 Select  (REC/OUT SET) t [REC SET] t [REC FORMAT] t a desired format with the v/V/b/ B/EXEC button.
Setting value
For XAVC HD
|
60i |
50i |
|
1080/60p 50Mbps |
1080/50p 50Mbps |
|
1080/60p 35Mbps |
1080/50p 35Mbps |
|
1080/60i 50Mbps |
1080/50i 50Mbps |
|
1080/60i 35Mbps |
1080/50i 35Mbps |
|
1080/60i 25Mbps |
1080/50i 25Mbps |
|
1080/30p 50Mbps |
1080/25p 50Mbps |
|
1080/30p 35Mbps |
1080/25p 35Mbps |
|
1080/24p 50Mbps |
— |
|
1080/24p 35Mbps |
— |
|
60i |
50i |
|
720/60p 50Mbps |
720/50p 50Mbps |
For AVCHD
|
60i |
50i |
||
|
1080/60p PS |
1080/50p PS |
||
|
1080/60i FX |
1080/50i FX |
||
|
1080/60i FH |
1080/50i FH |
||
|
1080/30p FX |
1080/25p FX |
||
|
1080/30p FH |
1080/25p FH |
||
|
1080/24p FX |
— |
Recording |
|
|
1080/24p FH |
— |
||
|
720/60p FX |
720/50p FX |
||
|
720/60p FH |
720/50p FH |
||
|
720/60p HQ |
720/50p HQ |
||
Setting values
•Bit-rate
PS: max. 28 Mbps FX: max. 24 Mbps
FH: approx. 17 Mbps (average) HQ: approx. 9 Mbps (average)
•Image size 1080:1,920×1,080 720:1,280×720
•Frame rate
Either 60, 50, 30, 25, or 24
•Scanning system i: interlace
p: progressive
If you select [1080/60i  ] (when [60i] is selected) or [1080/50i
  ] (when [50i] is selected), for example, movies are recorded with following format.
•1080: Effective scanning lines
•60, 50: Frame rate
•i: Scanning system
•FX: Recording mode
Continued , 37

Changing the recording setting (Continued)
Frame rate when [60i] is selected
The frame rate displayed on the LCD screen differs from the actual frame rate.
|
Frame rate on the LCD |
Actual frame rate |
|
|
screen |
||
|
24 |
23.98 |
|
|
30 |
29.97 |
|
|
60 |
59.94 |
|
z Tips
•When recording in DV, the recording format is fixed to 480/60i HQ (576/50i HQ).
The following items are available only when DV mode is selected:
(REC/OUT SET)
– WIDE REC
–CANCEL DV MODE
b Notes
•When you switch from DV mode to another, settings made in DV mode are initialized.
If a movie file exceeds 2 GB during recording, the camcorder divides the recording into separate files by creating a new file(s) automatically. However, the divided files are displayed as a single movie on the screen of the camcorder.
Setting the DV MODE (DV mode)
You can record/play back in DV mode of standard image quality
1 Press the MENU button.
2 Select  (REC/OUT SET) t [REC SET] t [DV MODE] t [YES] with the v/V/b/B/EXEC button.
The camcorder restarts in DV mode.
Canceling the DV MODE
1 Press the MENU button.
2Select  (REC/OUT SET) t [REC SET] t [CANCEL DV MODE] t [YES] with the v/V/b/B/EXEC button.
When DV mode is canceled, the following settings return to the default.
•S&Q MOTION
•REC SET
•AVCHD AUDIO FORMAT
Functions not available in DV mode
•Slow & Quick Motion recording
•Viewing still images
•Protecting recorded movies and still images (Protect)
–[PROTECT] is not displayed on the [EDIT] menu.
•Dividing a movie
–[DIVIDE] is not displayed on the [EDIT] menu.
b Notes
•When DV mode is selected, the audio format is fixed to LPCM.
38

Adjusting the brightness
You can adjust the image brightness by adjusting the iris, gain or shutter speed, or by adjusting the light volume with the ND filter E.
2 Press the IRIS button B.
The  or
or  next to the iris value disappears, and the iris value is highlighted.
Iris value
3 Turn the MANUAL dial A to adjust the value.
The volume of the light increases the more that you open the aperture (decreasing F value). The volume of the light decreases the more that you close the aperture (increasing F value).
b Notes
•When you set the AUTO/MANUAL switch F to AUTO, iris, gain, shutter speed and white balance are adjusted automatically. You cannot adjust any of them manually.
To temporarily adjust the iris automatically
1. Hold the ASSIGN5/IRIS PUSH AUTO button down.
The iris is adjusted automatically for as long as you hold the button down.
Adjusting the iris
This is handy for making the background blurred or sharp.
1 Set the AUTO/MANUAL switch F to MANUAL.
To adjust the iris automatically
Press the IRIS button B while the iris value is highlighted.
The iris value disappears or  appears next to the iris value. When AE is fixed,
  appears next to the iris value.
Recording
Continued , 39

Adjusting the brightness (Continued)
Adjusting the gain |
Adjusting the shutter speed |
You can use this if you do not want to increase the value by AGC (automatic gain control).
1 Set the AUTO/MANUAL switch F to MANUAL.
2 Press the GAIN button C.
The  or
or  next to the gain value disappears, and the gain value is highlighted.
Gain value
3 Turn the MANUAL dial A to adjust the value.
To adjust the gain automatically
Press the GAIN button C while the gain value is highlighted.
The gain value disappears, or  appears next to the gain value. When AE is fixed,
 appears next to the gain value.
You can adjust and fix the shutter speed manually. You can make a moving subject look still or emphasize the movement of a subject by adjusting the shutter speed.
1 Set the AUTO/MANUAL switch F to MANUAL.
2 Press the SHUTTER SPEED
button D.
Shutter speed value
The  or
or  next to the shutter speed value disappears, and the shutter speed value is highlighted.
3 Turn the MANUAL dial A to adjust the value.
When [60i] is selected: You can select from 1/8 to 1/10000
(1/6 — 1/10000 when shooting with 24p) When [50i] is selected: You can select from 1/6 to 1/10000
The denominator of the set shutter speed appears on the LCD screen. For example, [100] appears on the LCD screen when you set the shutter speed to 1/100 second. The larger the value on the LCD screen is, the faster the shutter speed is.
40
 Loading…

Компания Sony объявила о выпуске новой видеокамеры профессионального класса PXW-X70, которую уже окрестили первым компактным решением в классе XDCAM. Особенностью новинки с ходу также можно назвать её позиционирование как 4K-ready решения, то есть, аппарата с возможностью последующей перепрошивки внутрикамерного ПО до поддержки формата 4K.

Новая камера Sony PXW-X70 ориентирована на документальные съёмки, оперативную работу с новостными эпизодами, компактный аппарат позволит качественно снимать важные мероприятия, находясь даже в окружении толпы других репортёров. Новинка оснащена 1-дюймовым сенсором Exmor R типа CMOS с разрешением 20 Мп и 12-кратной оптикой Carl Zeiss Vario Sonnar T*.
Камера имеет несколько режимов для съёмки High Definition видео, в том числе, с записью файлов в форматах XAVC, AVCHD и DV, при этом в формате XAVC со сжатием Long GOP, 10-битным 4:2:2 сэмплированием видео и битрейтом 50 Мбит/с, используется файловый формат MXF. Кроме того, камера оснащена встроенной поддержкой Wi-Fi для дистанционного управления процессом съёмки с помощью смартфона или планшета через приложение Content Browser Mobile (iOS версий 4.3-7.0, Android версий 2.3-4.3).


Одно из последующих обновлений внутрикамерной прошивки, обещанное в ближайшие месяцы, позволит снимать камерой X70 видео с разрешением 4K/UHD (3840 х 2160), при этом, с поддержкой функций переноса файлов и потокового (streaming) вещания. По предварительным полуофициальным данным, обновление будет опциональным, пользователи X70 смогут приобрести его в отдельном порядке. О цене такой опции, к сожалению, информации пока нет.
| Основные характеристики камеры Sony PXW-X70 | |
| Сенсор | 1-дюймовый Exmor R CMOS, 20 Мп, 14,2 Мп пикселей эфф. |
| Оптика | 29-мм Carl Zeiss Vario Sonnar T*, 12x оптический зум, 24x Clear Image Zoom, 48x с цифровой зум, 3 режима встроенного ND-фильтра (1/4ND, 1/16 и 1/64ND) |
| Процессор | BIONZ X |
| Ручное управление | IRIS (апертура), GAIN/ISO, затвор |
| Сэмплирование видео | 4:2:2, 10-бит |
| Формат записи | XAVC AVCHD DV |
| Режимы записи | XAVC Long GOP 422 10-бит 1920 x 1080 50p/60p/50i/60i/30p/25p/24p с битрейтом 50 Мбит/с и 35 Мбит/с, 1920 x 1080 50i/60i с битрейтом 25 Мбит/с, 1280 x720 50p/60p с битрейтом 50 Мбит. MPEG-4 AVC/H.264 (AVCHD) 420 8-бит 1920 x 1080 и 1280 x720, DV. Для камеры X70 будет доступно обновление до поддержки записи 4K |
| Видоискатель | 0,39-дюймовый OLED, 1,44 млн точек |
| Дисплей | 3,5-дюймовый ЖК-экран, 1,555 млн точек |
| Выходные интерфейсы | 1 x 3G-SDI 1 x HDMI |
| Башмак MI Shoe | Мульти-интерфейсный башмак Multi Interface Shoe (MI Shoe) для гибкого подключения дополнительных опций без применения кабеля XLR |
| Аудио | 2 x 3-контактные XLR (female) |
| Личные настройки | До 99 пользовательских профилей |
| Карты записи | 2 слота, поддержка Memory Stick PRO Duo (Mark 2), Memory Stick PRO-HG Duo, Memory Stick XC-HG Duo, SDXC и SDHC. Поддерживается режим Simul (одновременная запись на оба слота) или режим Relay (автоматический переход записи на карту во втором слоте) |
| Беспроводные технологии | NFC, Wi-Fi |
| Вес | 1,4 кг (камера, модуль XLR, батарея NP-FV70, крышка объектива, резиновая насадка на видоискатель) |
Дополнительные нюансы о новой камере можно увидеть в видеоролике, снятом во время европейской презентации Sony PXW-X70 (английский язык).
К выше сказанному остаётся лишь добавить, что появление камеры Sony PXW-X70 в рознице, по разным данным, ожидается в сентябре или октябре. Пока что совершенно никакой информации о цене новинки, равно как и о цене и доступности её 4K-апгрейда.