-
Contents
-
Table of Contents
-
Bookmarks
Quick Links
RX-V367/HTR-3063
When the following parts are replaced, the model name and the destination MUST be written to the back-up IC
(EEPROM: IC222 of the DIGITAL P.C.B.) to have proper operation. (See No. 22 SOFT SWITCH menu of the self-
diagnostic function.)
•
EEPROM (IC222) of DIGITAL P.C.B.
•
DIGITAL P.C.B.
This manual has been provided for the use of authorized YAMAHA Retailers and their service personnel.
It has been assumed that basic service procedures inherent to the industry, and more specifi cally YAMAHA Products, are already known
and understood by the users, and have therefore not been restated.
WARNING:
IMPORTANT:
The data provided is believed to be accurate and applicable to the unit(s) indicated on the cover. The research, engineering, and service
departments of YAMAHA are continually striving to improve YAMAHA products. Modifications are, therefore, inevitable and
specifi cations are subject to change without notice or obligation to retrofi t. Should any discrepancy appear to exist, please contact the
distributor’s Service Division.
WARNING:
IMPORTANT:
■ CONTENTS
Front Panels …………………………………………………3–4
Rear Panels ………………………………………………… 5–10
Specifications …………………………………………… 12–16
Internal View …………………………………………………. 17
1 0 1 1 6 7
SERVICE MANUAL
IMPORTANT NOTICE
Failure to follow appropriate service and safety procedures when servicing this product may result in personal injury,
destruction of expensive components, and failure of the product to perform as specifi ed. For these reasons, we advise
all YAMAHA product owners that any service required should be performed by an authorized YAMAHA Retailer or
the appointed service representative.
The presentation or sale of this manual to any individual or fi rm does not constitute authorization, certifi cation or
recognition of any applicable technical capabilities, or establish a principle-agent relationship of any form.
Static discharges can destroy expensive components. Discharge any static electricity your body may have
accumulated by grounding yourself to the ground buss in the unit (heavy gauge black wires connect to this buss).
Turn the unit OFF during disassembly and part replacement. Recheck all work before you apply power to the unit.
Display Data ……………………………………………….49–50
Ic Data ………………………………………………………….51–62
Block Diagram ………………………………………………..63
Remote Control ……………………………………… 98–102
Advanced Setup …………………………………….. 103–104
Copyright © 2010
This manual is copyrighted by YAMAHA and may not be copied or
redistributed either in print or electronically without permission.
AV RECEIVER
All rights reserved.
P.O.Box 1, Hamamatsu, Japan
‘10.03
Summary of Contents for Yamaha RX-V367
This manual is also suitable for:
Htr-3063

Инструкция по эксплуатации
AV Receiver Русский для Европы

СОДЕРЖАНИЕ
Использование программ звукового поля…………… 26
ВВЕДЕНИЕ
ПРИЛОЖЕНИЕ
Выбор программ звукового поля и звуковых
Функции и возможности …………..…………..………………..3
декодеров……………….…………..…………..…………..…….. 26
Поиск и устранение неисправностей …………………... 47
О данном руководстве………….…………..…………..……..4
Программы звукового поля……….…………..…………. 28
Неисправности общего характера…………….……… 47
Поставляемые принадлежности …………………..……..4
Настройка FM/AM-приема ……..……..…………..……….. 30
HDMI™……………………..…………..…………..…………..…. 49
Названия компонентов и их функции……..…………..…5
Выбор частоты для приема
Тюнер (FM/AM)………………….………………………..…… 50
(Нормальная установка) ……………………..………….... 30
Пульт ДУ…………………………..…………..…………..……… 51
Передняя панель………………..…………..…………..………..5
Сохранение и вызов частоты
Задняя панель……………….…………..…………..…………..…6
Глоссарий ……………………………..…………..…………..……… 52
(Предустановка)………….…………..…………..………….... 31
Дисплей передней панели…………………..………………..7
Информация об аудиосигнале ……………………..…… 52
Очистка предустановленных станций………………. 32
Пульт ДУ……………….…………..…………..…………..………..8
Информация о программах звукового поля…….. 52
Настройка системы радиоданных …………………….. 32
Информация о видеосигналах ……………..…………... 53
ПОДКЛЮЧЕНИЯ
Информация о HDMI™ ……………..…………..…………... 54
УСТАНОВКА
Подключение колонок ……………..…………..………………..9
О товарных знаках……………….…………..…………..……… 54
Настройка установок, относящихся к каждому
Каналы и функции колонок ….………………..…………..9
Технические характеристики………………..…………..…. 55
источнику входного сигнала (меню Option)………… 34
Расположение колонок…………………….…………..……10
Отображение и установка меню Option…………… 34
Индекс ………………..…………..…………..…………..…………... 56
Подключение колонок ………..…………..…………..……10
Пункты меню Option ……………………..…………..…….. 34
Подключение внешних устройств ………………..………12
Установка различных функций (меню Setup) …….. 36
Штекеры кабелей и гнезда ….………..…………..………12
Отображение и установка меню Setup …………….. 36
Подключение ТВ-монитора ……….…………..…………13
Пункты меню Setup…………………………..…………..….. 36
Подключение BD/DVD-проигрывателей и
Управление установками для колонок …………….. 37
других устройств…………..…………..…………..…………...15
Настройка функции вывода аудиосигнала
Подключение видеокамер и портативных
данного аппарата……………………..…………..………….... 40
аудиоплееров…………..………………………..…………..……19
Настройка ресивера в режим, более удобный
Передача входного аудио/видеосигнала на
для пользования…………….………………………..…………. 42
внешние устройства…..…………..…………..………………19
Установка параметров программы звукового
Подключение FM/AM-антенн ………………………………20
поля …………………………..…………..…………..…………..….. 43
Автоматически установите параметры колонок
Запрет на изменение установок ..…………..…………. 43
(YPAO)……………………..…………..…………..…………..………21
Установка параметров программы звукового
поля ………………………..…………..…………..…………..……….. 44
ВОСПРОИЗВЕДЕНИЕ
Установка параметров звукового поля…………….. 44
Настройка расширенных функций по мере
Основная процедура воспроизведения …………………25
надобности (меню Advanced Setup) …………………….. 46
Регулировка звука высокой/низкой частоты
Отображение/установка меню Advanced
(контроль тональности)…………………………..…………25
Setup…..………………………..…………..…………..………….... 46
Изменение установок входного сигнала с
Предотвращение перекрытия сигналов ДУ при
помощью одной клавиши (функция SCENE) ………26
использовании нескольких ресиверов Yamaha…. 46
Сохранение источников входного сигнала/
Инициализация различных установок для
программы звукового поля….…………..…………..……26
данного аппарата……………………..…………..………….... 46
Ru 2

ВВЕДЕНИЕ
Функции и возможности
■
Встроенный высококачественный 5-канальный усилитель высокой мощности
■
Воспроизведение многоканального, многоформатного сигнала
–
Выбор эффекта звукового поля……………………………………………………………………………………………….…………………..
26
■
Переключение входа/программы звукового поля с помощью 1-й кнопки
–
Воспроизведение без использования эффектов звукового поля……………………………………………………………..….
27
(функция SCENE) …………..……..……………..……………..……………..……………..……………..…...……….
26
–
Стереофоническое воспроизведение …………………………………………………………………………………..……………………….
27
■
Подключение колонок для конфигураций, предусматривающих от 2 до 5.1 каналов
–
Настройка эффектов звукового поля ………………………………………………………………………………….……………………….
44
–
Каналы и функции колонок………………………………………………………………………………………….…………………..…………….
9
–
Воспроизведение сжатых музыкальных файлов…………………………………………………….…………………….……………..
26
–
Расположение колонок ……………………………………………………………………………………………..…………………………………..
10
■
Отображение информации на передней панели
–
Подключение кабеля колонки………………………………………………………………………………………………………………………
10
–
Переключение информации на дисплее передней панели …………………………………………………………………..………..
7
–
Подключение кабеля сабвуфера …………………………………………………………………………………………………………………..
11
–
Регулировка яркости дисплея передней панели <Dimmer> …..…………………………………………………………….…..….
43
■
Регулировка акустических параметров в зависимости от используемых колонок и
–
Отображение информации о цифровом видео/аудиосигнале <Signal Info>…………..……………………………………
35
среды для прослушивания
■
Функции регулировки громкости/качества звука
–
Автоматические настройки для акустических параметров колонок
–
Облегчение прослушивания при низкой громкости <Adaptive DRC> ………………………………………………………..
40
(YPAO — Yamaha Parametric Room Acoustic Optimizer)…………………………………………………………………....…………..
21
–
Установки максимальной громкости …………………………………………………………………………………..……………………….
41
–
Выбор настроек для каждой колонки ……………………………………………………………..……………………………………………
37
–
Установки начальной громкости……………………………………………………………………………..……………………………………
41
–
Регулировка громкости для каждой колонки ……………………………………………………………………………………………….
38
–
Регулировка громкости различных источников входного сигнала <Volume Trim>…………………………………….
34
–
Установки расстояния до колонки ………………………………………………………………………………………………………………..
38
–
Управление качеством звука с помощью эквалайзера <Graphic Equalizer>……………………………………………….
39
■
Управление с помощью пульта ДУ
–
Регулировка колонок с помощью тестовых тональных сигналов …………………………………………………..………..…
39
–
Названия и функции элементов пульта ДУ ……………………………………………………………………………..…………………….
8
–
Настройка уровня басов и высоких частот <контроль тональности> ………………………………………………………...
25
–
Установка батареек в пульт ДУ ……………………………………………………………………………………..………………………………
4
–
Управление несколькими ресиверами Yamaha без помех для сигналов
■
Подключение внешних устройств и воспроизведение с них
<Переключение идентификационного кода ДУ> …………………………………………………………………………..……………
46
–
Кабели и входные/выходные гнезда данного аппарата………………………………………………………………………………..
12
–
Подключение телевизора………………………………………………………………………………………………………………………………
13
■
Другие функции
–
Воспроизведение аудиосигнала телевизора через данный ресивер………………………………………………………….….
14
–
Режим ожидания после длительного перерыва в работе <функция Auto Power Down>…………………………….
43
–
Подключения для BD/DVD-проигрывателей (рекордеров) и других устройств ………………………………………..
15
–
Режим ожидания после заданного интервала времени <Sleep timer>………………………………………………………..….
8
–
Вывод аудиосигнала на телевизор, подключенный через гнездо HDMI …………………………………………………….
41
–
Инициализация различных установок для данного аппарата……………………………………………………………….……..
46
–
Коррекция задержки между аудио и видеосигналом <Lipsync> ……………………………………………………………..……
40
–
Запрет на изменение установки <Memory Guard>…………………………………………………………………..…………………..
43
–
Подключение внешнего аудио и видеомагнитофона……………………………………………………………………….…………..
19
–
Объединение видеовхода HDMI/AV с другим аудиовходом ………………………………………………………………….…….
35
–
Подключения внешних устройств к передней панели (для видеокамер, портативных
музыкальных плееров и т.п.)……………………………………………………………………………………….…………………………………
19
–
Защитная крышка для гнезд передней панели……………………………….………………………………………….…………………..
4
–
Изменение названий источников входного сигнала <Input Rename>………………………………………………………….
42
–
Настройка установок, относящихся к каждому источнику входного сигнала <меню Option>…………………..
34
–
Воспроизведение с внешних устройств ………………………………………………………………………………..……………………….
25
■
FM/AM-тюнер
–
Прослушивание FM/AM-трансляции…………………………………………………………………………………….………………………
30
–
Простая предустановка…………………………………………………………………………………………….……………………………………
31
–
Настройка системы радиоданных……………………………………………………………………………………..…………………………..
32
–
Автоматический прием информации о дорожном движении ………………………………………………………………………
33
Ru
3
ВВЕДЕНИЕ
Функции и возможности
О данном руководстве
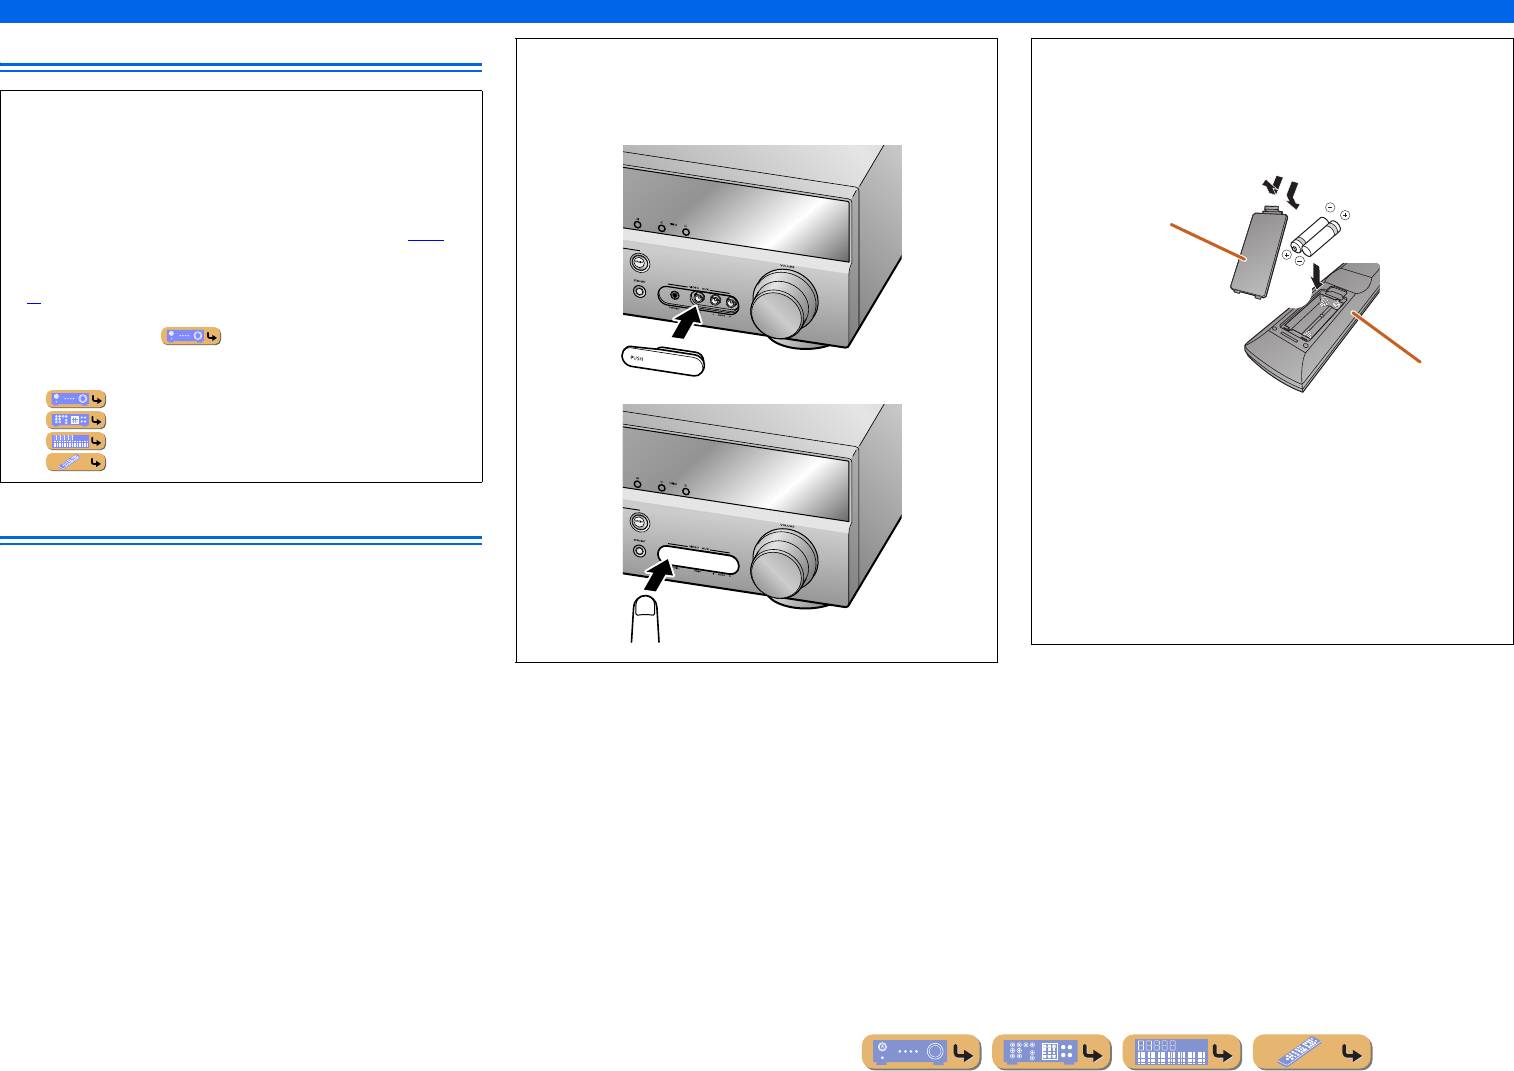
■
Установка крышки входа VIDEO AUX (прилагается)
■
Установка батареек в пульт ДУ
Для защиты от пыли установите поставляемую крышку входа
При установке батареек в пульт ДУ снимите крышку отделения для
•
Данное руководство отпечатано до начала производства. Дизайн и
VIDEO AUX на гнезда VIDEO AUX, если они не используются. Для
батареек с обратной стороны пульта ДУ и вставьте две батарейки
снятия крышки нажмите на ее левую сторону.
AAA в отделение для батареек таким образом, чтобы они совпадали
технические характеристики могут частично измениться в результате
с обозначениями полярности (+ и -).
усовершенствования и т.д. В случае расхождений между руководством и
аппаратом, приоритет отдается аппарату.
•
“
c
HDMI1
” (пример) используется для обозначения названий
a
c
элементов на пульте ДУ. Информация о расположении элементов
Крышка отсека для
батареек
приведена в разделе “Названия компонентов и их функции” (
☞с. 5
).
• J1
указывает на то, что справка размещена в сноске. См.
соответствующие номера внизу страницы.
• ☞
используется для обозначения страницы, на которой приведена
b
относящаяся к данному пункту информация.
•
Нажмите на значок “ ” внизу страницы для отображения
соответствующей страницы в разделе “Названия компонентов и их
Установка крышки
Отсек для батареек
функции”.
Передняя панель
Задняя панель
Замените батарейки новыми при возникновении следующих
Дисплей передней панели
симптомов:
Пульт ДУ
•
Пульт ДУ работает только в узком диапазоне.
• b
TRANSMIT
не загорается или горит очень тускло.
Поставляемые принадлежности
ПРИМЕЧАНИЕ
PUSH
Если для пульта ДУ сохранены коды ДУ для внешних компонентов,
Убедитесь в наличии всех перечисленных ниже деталей.
извлечение батареек более чем на две минуты или оставление в
•
Пульт ДУ
пульте ДУ разряженных батареек может привести к очистке кодов
•
Батарейки (AAA, R03, UM-4) x 2
ДУ. Если это произойдет, замените батарейки новыми и установите
•
Микрофон YPAO
Снятие крышки
коды ДУ.
•
Рамочная AM-антенна
•
Комнатная FM-антенна
•
Крышка входа VIDEO AUX
Ru
4
ВВЕДЕНИЕ
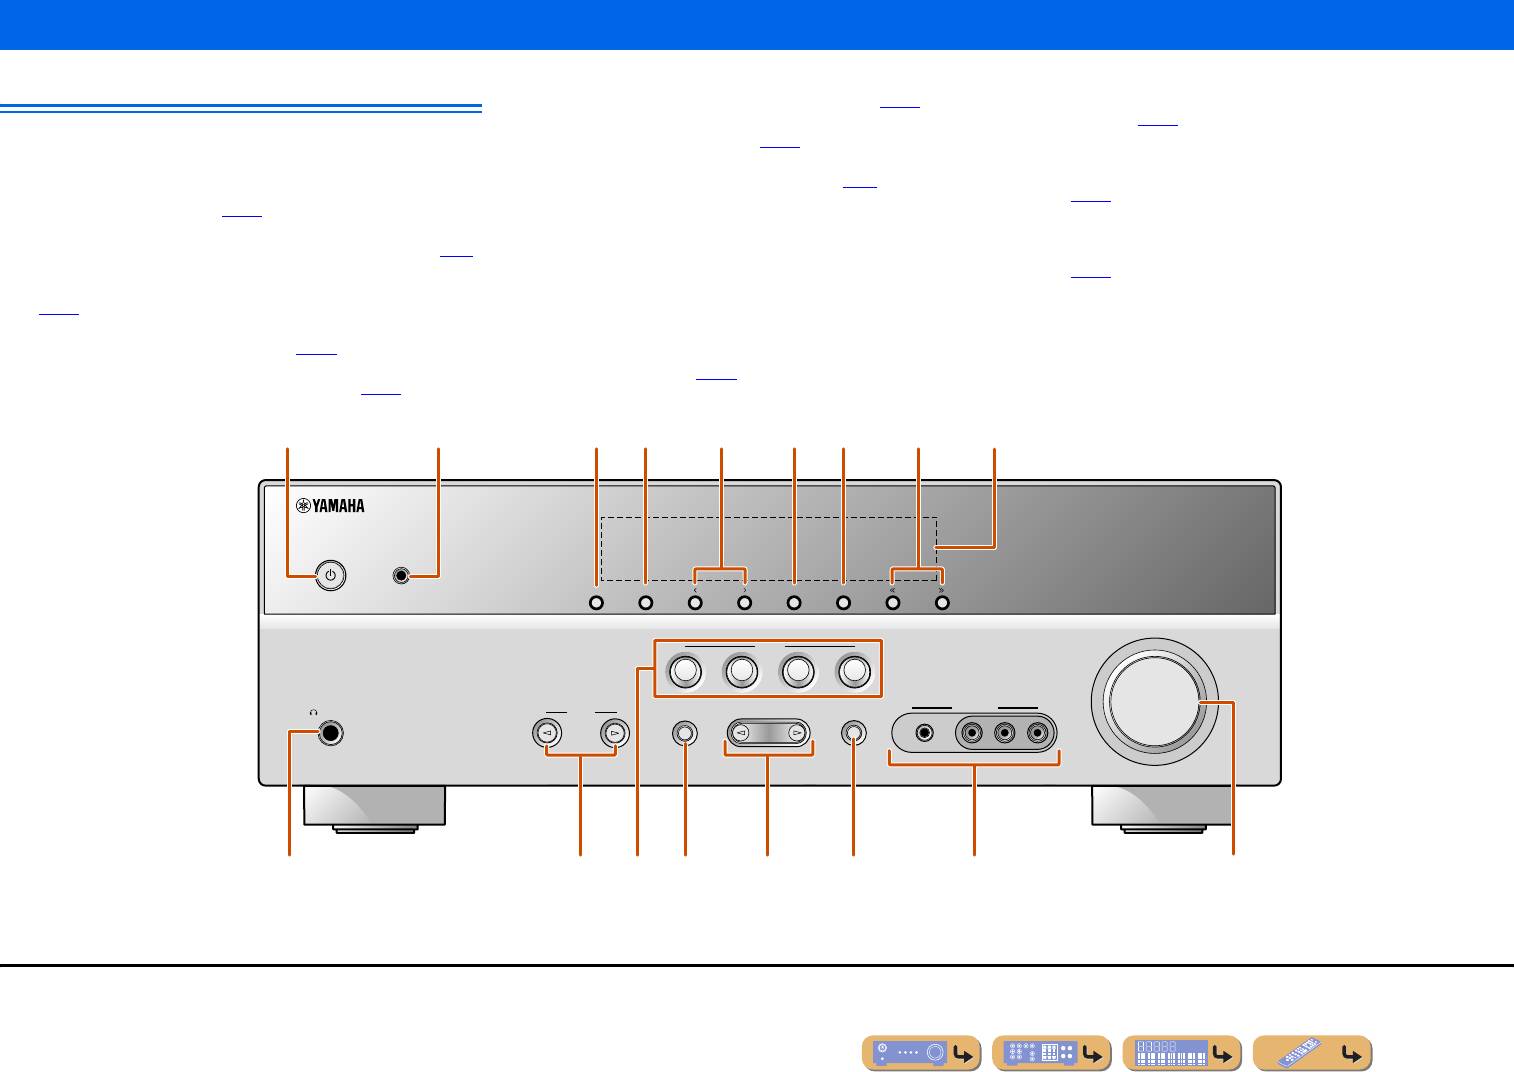
Названия компонентов и их функции
g
AM
m
TONE CONTROL
Передняя панель
Установка диапазона FM/AM-тюнера в положение AM (
☞с. 30
).
J1
Регулировка выходной мощности высоких/низких частот колонок/
h
TUNING
jj
/
ii
наушников (
☞с. 25
).
a A
(Питание)
Изменение частот FM/AM-тюнера (
☞с. 30
).
J1
n
PROGRAM
l
/
h
Переключение данного аппарата между режимами включения и ожидания.
i
Дисплей передней панели
Переключение между используемыми эффектами звукового поля
b
Гнездо YPAO MIC
Отображение информации на данном устройстве (
☞с. 7
).
(программами звукового поля) и декодерами окружающего звучания
Подключите поставляемый микрофон YPAO и автоматически
(
☞с. 26
). Нажимайте повторно левую или правую кнопку для циклического
j
Гнездо PHONES
отрегулируйте баланс колонок (
☞с. 21
).
последовательного переключения между источниками входного сигнала.
Подключение наушников. Звуковые эффекты, применяемые во время
c
INFO
воспроизведения, также будут слышны через наушники.
o
STRAIGHT
Изменение информации, отображаемой на дисплее передней панели (
☞с. 7
).
Переключение программы звукового поля в режим прямого декодирования
k
INPUT
l
/
h
d
MEMORY
(
☞с. 27
).
Выбор источника входного сигнала для воспроизведения. Нажимайте
Сохранение FM/AM-станций в качестве предустановленных станций
повторно левую или правую кнопку для циклического последовательного
p
Гнезда VIDEO AUX
(
☞с. 31
).
J1
переключения между источниками входного сигнала.
Для временного подключения к данному аппарату видеокамер, игровых
e
PRESET
j
/
i
приставок и портативных музыкальных плееров.
l
SCENE
Выбор предустановленной FM/AM-станции (
☞с. 32
).
J1
Установите поставляемую крышку входа VIDEO AUX, когда это гнездо не
Переключение источника входного сигнала и программы звукового поля с
используется.
f
FM
помощью одной кнопки (
☞с. 26
). Для включения данного аппарата нажмите
Установка диапазона FM/AM-тюнера в положение FM (
☞с. 30
).
J1
эту кнопку, когда аппарат находится в режиме ожидания.
q
VOLUME
Регулировка уровня громкости.
a
b
c fe gd h
i
YPAO MIC
INFO
MEMORY
PRESET
FM AM
TUNING
VOLUME
SCENE
BD
DVD
TV
CD
RADIO
PHONES
INPUT
TONE
CONTROL
PROGRAM
STRAIGHT
VIDEO
AUX
SILENT
CINEMA
PORTABLE
VIDEO
LR
AUDI O
lj q
m ok n
p
J
1 :
Используется в случае выбора входного сигнала тюнера.
Ru
5
ВВЕДЕНИЕ
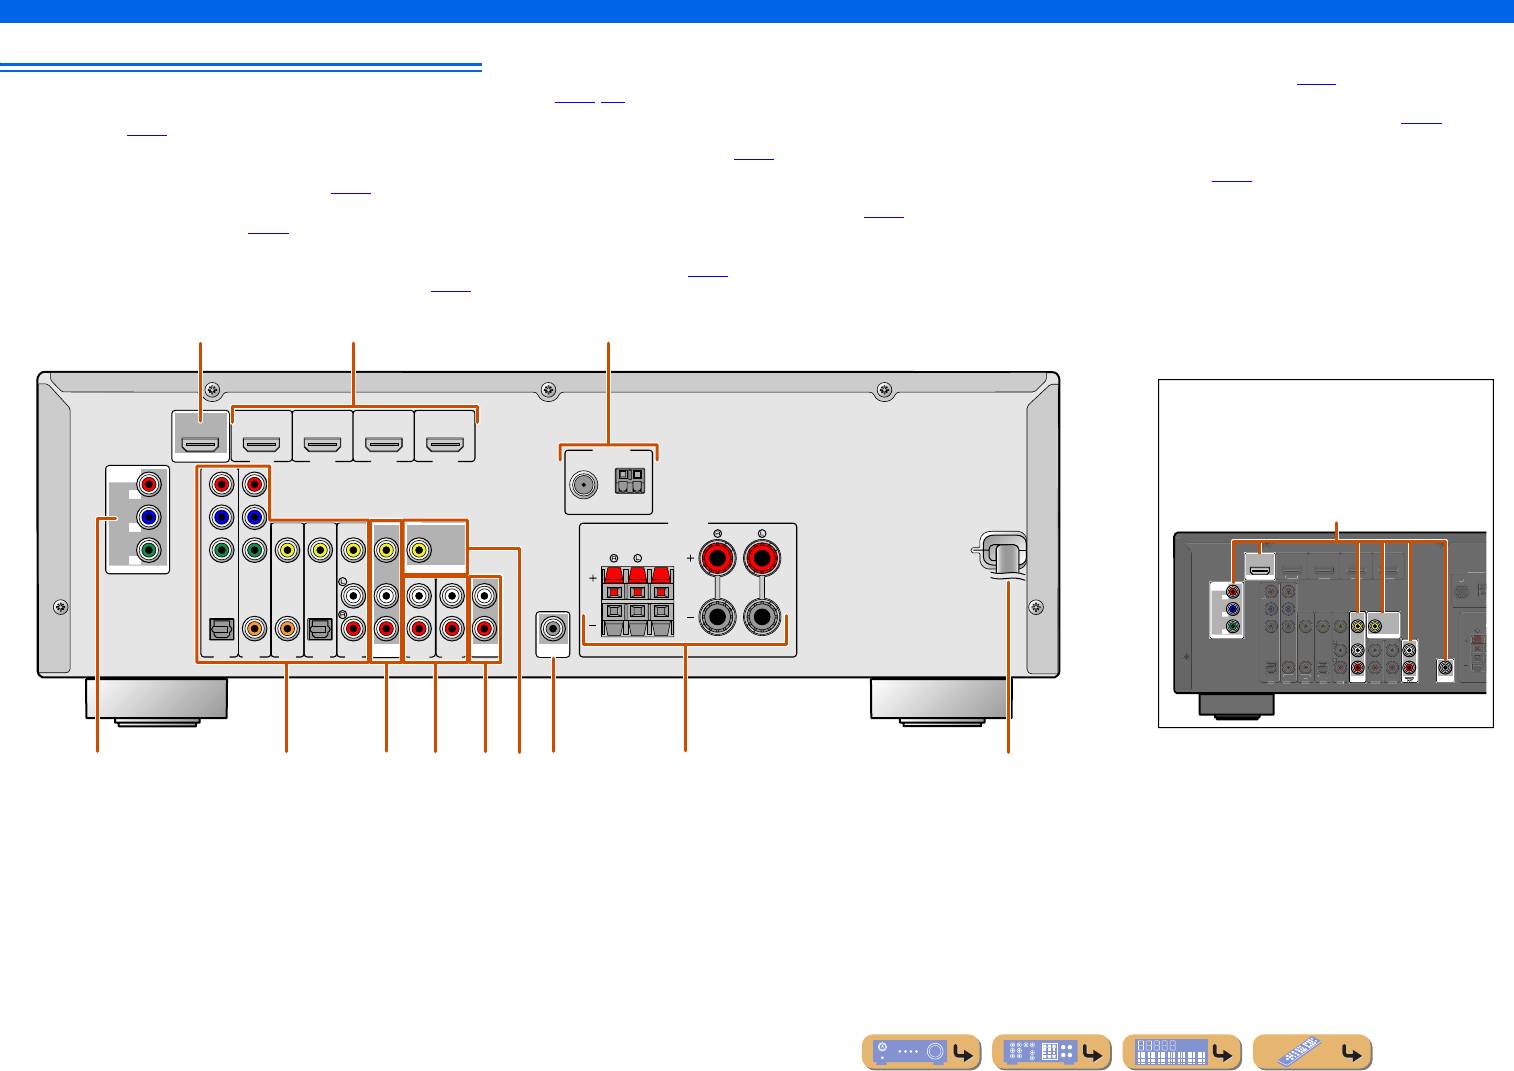
Названия компонентов и их функции
e
Гнезда AV1-5
i
Гнезда AUDIO OUT
Задняя панель
Для подключения к внешним устройствам, оснащенным аудио/
Для вывода аудиосигналов, полученных в случае выбора таких аналоговых
видеовыходами, чтобы этот аппарат мог принимать аудио/видеосигналы
входов, как гнезда AV5 или AUDIO1-2 (
☞с. 19
).
a
Гнездо HDMI OUT
(
☞с. 16
, с. 17).
j
Гнездо SUBWOOFER
Для подключения HDMI-совместимого телевизора для вывода на него аудио/
f
Гнезда AV OUT
Для подключения сабвуфера со встроенным усилителем (
☞с. 11
).
видеосигналов (
☞с. 13
).
Для вывода аудио/видеосигналов, полученных в случае выбора аналоговых
k
Разъемы SPEAKER
b
Гнезда HDMI1-4
входов (AV3-5 или AUDIO1-2) (
☞с. 19
).
Для подключения фронтальных колонок, центральной колонки и колонок
Для подключения внешних компонентов, оснащенных HDMI-совместимыми
g
Гнезда AUDIO1-2
окружающего звучания (
☞с. 11
).
выходами для приема от них аудио/видеосигналов (
☞с. 15
).
Для подключения к внешним компонентам, оснащенным аналоговыми
l
Шнур питания
c
Гнезда ANTENNA
аудиовыходами, для подачи звука на данный аппарат (
☞с. 18
).
Для подключения данного аппарата к настенной розетке переменного тока.
Для подключения AM и FM-антенн (
☞с. 20
).
h
Гнездо MONITOR OUT
d
Гнезда COMPONENT VIDEO
Для подключения телевизора, способного принимать видеосигнал, и вывода
Для подключения телевизоров, совместимых с компонентными
на него видеосигналов (
☞с. 14
).
видеосигналами, для вывода видеосигнала с помощью трех кабелей (
☞с. 13
).
ANTENNA
HDMI
OUT
(
BD/DVD
)
HDMI 1
HDMI 2 HDMI 3
HDMI 4
FM
GND
AM
COMPONENT
VIDEO
P
R
P
R
P
B
P
B
SPEAKERS
FRONT
SURROUND
CENTER
Y
Y
MONITOR OUT
COMPONENT
VIDEO
MONITOR OUT
VIDEO
HDMI
OUT
COMPONENT
VIDEO
P
R
P
B
MONITOR OUT
Y
MONITOR OUT
OPTICAL
COAXIAL
COAXIAL
OPTICAL
(
CD
)
(
TV
)
AV
AUDIO
SUBWOOFER
AV 1
AV 2
AV 3
AV 4
AV 5
OUT
AUDIO 1
AUDIO 2
OUT
OUT
AV
SUBWOOFER
Ru
6
ANTENNA
FM
G
ND
CO
MP
O
VIDE
NENT
O
P
R
P
B
Y
O
PTI
C
A
L
(
TV
)
AV 1
AV 2
AV 3
AV 4
AV 5
AUDIO 1
AUDIO 2
CO
AXIA
L
(
CD
)
COAXIA
L
O
PTI
C
VIDE
AL
O
S
URR
OU
HDMI 1
(
BD/DVD
)
HDMI 2
HDMI
3
HDMI
a
b
c
Выбор входных и выходных гнезд
Область вокруг выходных аудио / видеогнезд
обозначена белым цветом, чтобы предотвратить
ошибочное подключение. Используйте эти гнезда
для вывода аудио/видеосигналов на телевизор или
другие внешние компоненты.
Выходные гнезда
4
d h
ef jgi k
l
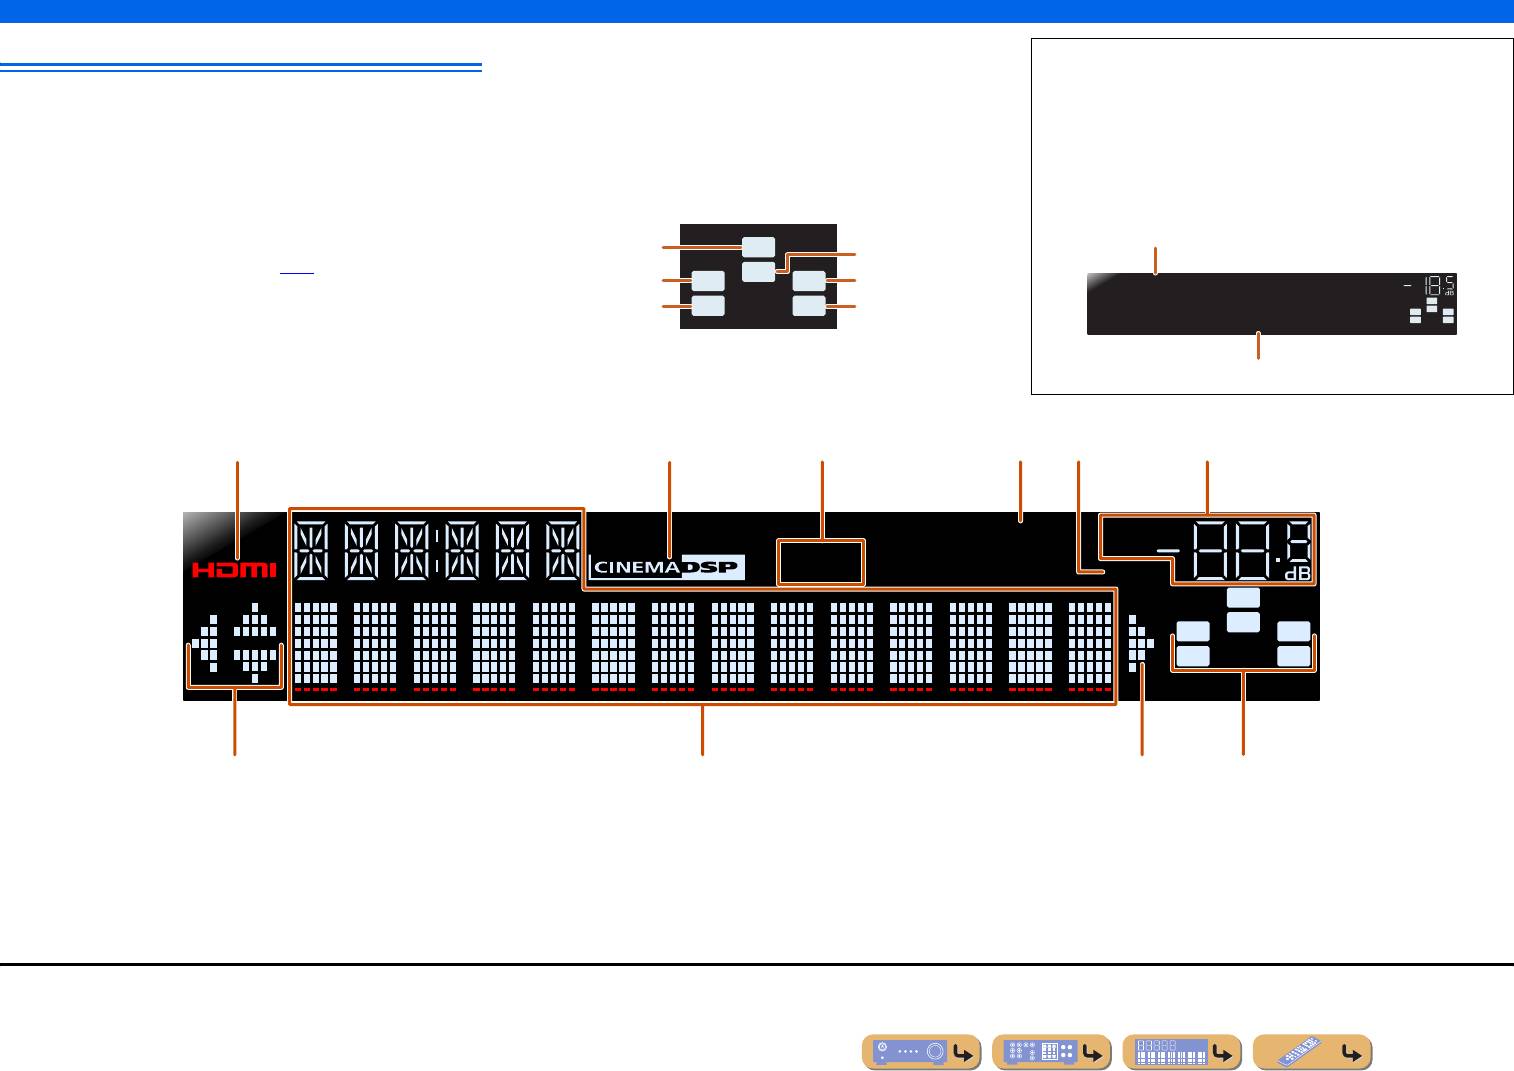
ВВЕДЕНИЕ
Названия компонентов и их функции
g
Индикаторы курсора
Дисплей передней панели
Загораются, если соответствующие курсоры на пульте ДУ доступны для
■
Переключение дисплея на передней панели
управления.
На передней панели могут отображаться программы звукового поля
a
Индикатор HDMI
h
Многофункциональный информационный дисплей
и названия декодеров окружающего звучания, а также активный
Загорается во время нормального обмена данными HDMI в случае выбора
Используется для отображения различной информации о пунктах меню и
источник входного сигнала.
любого из входов HDMI 1-4.
установках.
Нажимайте повторно кнопку
e
INFO
для циклического
b
Индикатор CINEMA DSP
i
Индикаторы колонок
последовательного переключения между источником входного
Загорается в случае выбора эффекта звукового поля, использующего
Используются для обозначения разъемов колонок, через которые выводятся
технологию CINEMA DSP.
сигнала
→
программой звукового поля
→
декодером окружающего
сигналы.
звучания.
J1
c
Индикатор тюнера
Загорается во время приема FM/AM-трансляции.
Название источника входных сигналов
d
Индикатор SLEEP
Сабвуфер
SW
Центральная колонка
Загорается при включенном таймере сна (
☞с. 8
).
Фронтальная левая
C
LR
Фронтальная правая
VOL .
e
Индикатор MUTE
колонка
колонка
HDMI1
SW
Мигает во время приглушения аудиосигнала.
Левая колонка
SL SR
Правая колонка
L
C
R
окружающего звучания
окружающего звучания
SL SR
f
Индикатор VOLUME
Straight
Используется для отображения текущего уровня громкости.
Программа звукового поля (программа DSP)
abcdfe
SLEEP
VOL.
STEREO
TUNED
MUTE
SW
C
LR
SL SR
gh ig
J
1 :
Во время выбора входа тюнера вместо источника входного сигнала будет отображаться FM/AM-частота.
Ru
7
ВВЕДЕНИЕ
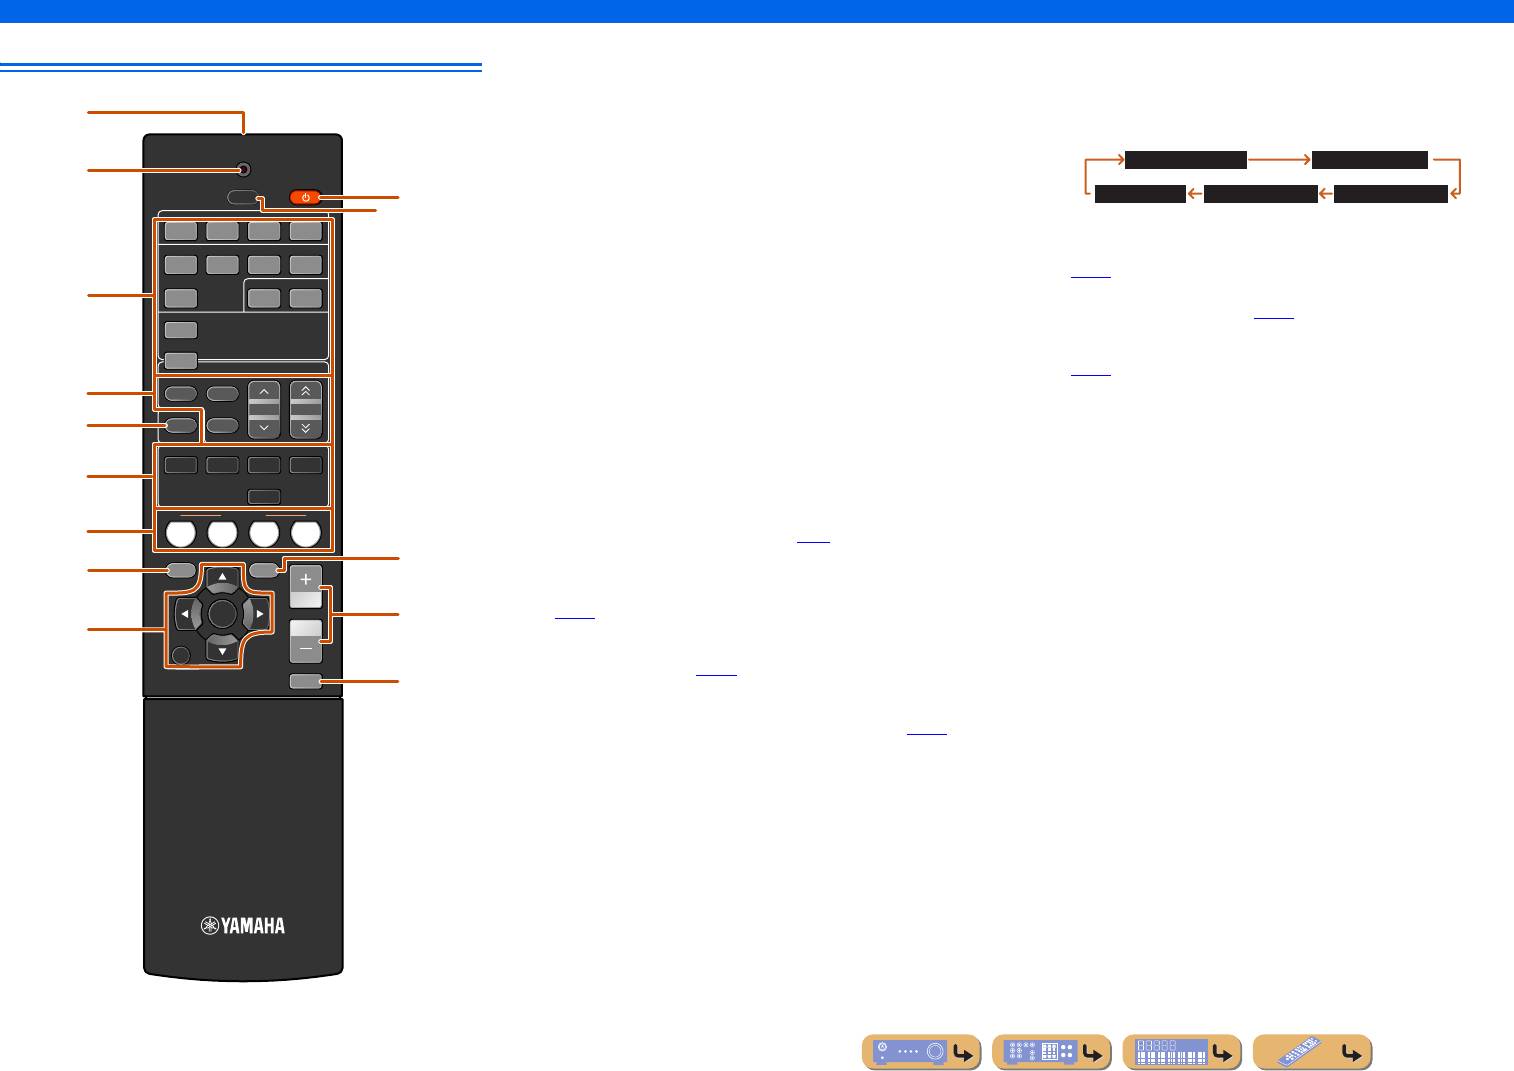
Названия компонентов и их функции
a
Передатчик сигнала ДУ
k
SLEEP
Пульт ДУ
Передача инфракрасных сигналов.
Настройка данного аппарата на автоматический переход в режим ожидания
b
TRANSMIT
через заданный период времени (таймер сна). Нажимайте повторно данную
Загорается во время передачи сигнала с пульта ДУ.
клавишу для установки времени включения функции таймера сна. При
a
включении таймера сна загорится индикатор на дисплее передней панели.
c
Переключатель входных сигналов
Выбор источника входного сигнала для воспроизведения на данном аппарате.
TRANSMIT
Sleep 120min. Sleep 90min.
b
HDMI1-4
Гнезда HDMI1-4
RECEIVER
AV1-5
Гнезда AV1-5
SLEEP
j
Sleep 60min.Sleep 30min.Sleep Off
AUDIO 1-2
Гнезда AUDIO1-2
HDMI
k
V-AUX
Гнезда VIDEO AUX на передней панели
1234
l
OPTION
TUNER
FM/AM-тюнер
AV
Отображение меню Option для каждого источника входного сигнала
1234
d
Клавиши тюнера
(
☞с. 34
).
AUDIO
Управление FM/AM-тюнером. Эти клавиши используются во время работы с
m
VOLUME +/—
c
125
входом тюнера.
Регулировка уровня громкости (
☞с. 25
).
V-AU X
FM
Установка диапазона FM/AM-тюнера в положение
n
MUTE
FM.
Включение и выключение функции приглушения выводимого звука
TUNER
AM
Установка диапазона FM/AM-тюнера в положение
(
☞с. 25
).
AM.
d
FM
AM
MEMORY
Предустановка радиостанций.
PRESET
TUNING
INFO
MEMORY
PRESET
F
/
G
Выбор предустановленной станции.
e
TUNING
H
/
I
Изменение частот настройки.
ENHANCER
SUR. DECODE
MOVIE MUSIC
STEREO
e
INFO
f
STRAIGHT
Циклическое переключение информации, отображаемой на дисплее
передней панели (название выбранного в данный момент источника
SCENE
входного сигнала, программы звукового поля, декодера окружающего
BD
g
DVD
TV
CD
RADIO
звучания, частоты FM/AM-тюнера и т.п.) (
☞с. 7
).
SETUP
OPTION
l
f
Клавиши выбора звука
h
Переключение между используемыми эффектами звукового поля
(программами звукового поля) и декодерами окружающего звучания
ENTER
VOLUME
(
☞с. 26
).
m
i
g
SCENE
RETURN
Переключение источника входного сигнала и программы звукового поля с
помощью одной кнопки (
☞с. 26
). Для включения данного аппарата нажмите
MUTE
n
эту кнопку, когда аппарат находится в режиме ожидания.
h
SETUP
Отображение подробного меню Setup для данного аппарата (
☞с. 36
).
i
Кур со р
B
/
C
/
D
/
E
, ENTER, RETURN
Кур со р
B
/
C
/
D
/
E
Выбор пунктов меню и изменение установок во
время отображения меню установок и т.п.
ENTER
Подтверждение выбранного пункта.
RETURN
Возврат к предыдущему экрану во время
отображения меню установки или завершение
экрана меню.
j
RECEIVER
A
(Питание RECEIVER)
Переключение данного аппарата между режимами включения и ожидания.
Ru
8
Страницы и текст этой инструкции
 Инструкция ресивера и усилителя Yamaha RX-V367
 Информация отображена на картинке
 Информация отображена на картинке
 Информация отображена на картинке
 Информация отображена на картинке
Как использовать наш сайт инструкций OnlineManuals.ru
Наша цель состоит в том, чтобы предоставить вам быстрый доступ к содержанию инструкции для ресивера и усилителя Yamaha RX-V367.
С помощью онлайн просмотра, Вы можете быстро просмотреть содержимое инструкции и найти решение проблемы с ресивера и усилителя Yamaha RX-V367.
Для Вашего удобства
Если листать руководство пользователя ресивера и усилителя Yamaha RX-V367 прямо на сайте, не очень удобно для Вас, есть два возможных решения:
• Просмотр в полноэкранном режиме — легко просмотреть руководство пользователя (без загрузки его на свой компьютер), Вы можете использовать режим полноэкранного просмотра.
Для просмотра инструкции пользователя ресивера и усилителя Yamaha RX-V367 на полном экране, используйте кнопку «Открыть в Pdf-viewer».
• Загрузка на компьютер — Вы можете также скачать Инструкция ресивера и усилителя Yamaha RX-V367 на свой компьютер и сохранить его в файлах.
Многие люди предпочитают читать документы не на экране, а в печатной версии.
Возможность печати руководства пользователя также была предусмотрена на нашем сайте,
и вы можете использовать ее, нажав на иконку «печать» в Pdf-viewer.
Нет необходимости печатать все руководство ресивера и усилителя Yamaha RX-V367, можно выбрать только нужные страницы инструкции.
-
Страница 1
Owner’ s Man ual A V Receiver English f or Eur ope[…]
-
Страница 2
En 2 CONTENTS INTRODUCTION Featur es and capabilities …………… …………………. ………….. 3 About this manual……………. ……………….. …………………. … 4 Supplied accessories …. …………………………………… ……….. 4 Part names and functions .. ………………….. ……………….. […]
-
Страница 3
En 3 INTRODUCTION ■ Built-in high-quality , high-p o wer 5-channel amplifier ■ 1-button input/sound field pr ogra m switching (SCENE function) ………………….. 26 ■ Speaker connections for 2- to 5.1 -channel configurations – Speaker channels and functi ons . ………… ………… ……… ………… ………… ………. …[…]
-
Страница 4
En 4 INTRODUCTION Features and capabilities About this manual Supplied accessories Check that you re ceiv ed all of the follo wing parts. • Remote control • Batteries (AAA, R03, UM-4) x 2 • YP AO micropho ne • AM loop antenna • Indoor FM antenna • VIDEO A UX input cover • This manual is printed prior to production. Design and specif i[…]
-
Страница 5
En 5 INTRODUCTION Front panel a A (P ower) Switches this unit between on and standby modes. b YP AO MIC jac k Connect the supplied YP A O micr ophone and adj ust the speaker balance automatically ( ☞ p. 21 ). c INFO Changes the information sho wn on the front panel display ( ☞ p. 7 ). d MEMOR Y Registers FM/AM stations as preset stations ( ☞ […]
-
Страница 6
En 6 INTRODUCTION Part names and functions Rear panel a HDMI OUT jack For co nnecting an HDMI — compatib le TV to outp ut audio/video signals to ( ☞ p. 13 ). b HDMI1-4 jacks For co nnecting e xternal com ponents equipp ed with HDMI- compatible outputs to receiv e audio/video signals from ( ☞ p. 15 ). c ANTENNA jacks For co nnecting AM and FM an[…]
-
Страница 7
En 7 INTRODUCTION Part names and functions Front panel display a HDMI indicator Lights up during normal HDMI communication when an y of the HDMI 1-4 inputs are selected. b CINEMA DSP indicator Lights up when a sound field eff ect that uses CINEMA DSP technology is selected. c T u ner indicator Lights up when receiving an FM/AM broadcast. d SLEEP in[…]
-
Страница 8
En 8 INTRODUCTION Part names and functions Remote control a Remote control signal transmitter T ransmits infrared signals. b TRANSMIT Lights up when a signal is output from the remote con trol. c Input selector Select an input source on this unit from wh ich to playback. d T uner keys Operates the FM/AM tuner . These ke ys are used when using the t[…]
-
Страница 9
En 9 CONNECTIONS This unit uses acoustic f ield effects and sound decoders to bri ng you the impact of a real movie theater or con cert hall. These effects will be brought to you with ideal speak er positioning and connections in your listening en vironment. Speaker channels and functions ■ Front left and right speaker s The front speaker s are u[…]
-
Страница 10
En 10 CONNECTIONS Connecting speakers Speaker layout 5.1-channel speaker la yout (5 speaker s + subwoofer) Connecting speakers Connect your speakers to their respec tive terminals on th e rear panel. • Connect at least two speaker s (front left and ri ght). • If you cannot connect all f iv e speakers, giv e priority to the surround speakers. ?[…]
-
Страница 11
En 11 CONNECTIONS Connecting speakers ■ Connecting fr ont speakers 1 Remove appr oximately 10mm of insulation from the ends of the speaker cables, and twist the bare wires of the cables together firml y so that the y will not cause short c ircuits. 2 Loosen the speaker te rminals. 3 Insert the bar e wire of the speake r cable into the gap on the […]
-
Страница 12
En 12 CONNECTIONS Cable plugs and jacks The main unit is equipped with the follo wing input/o utput jacks. Use jacks a nd cables appropriate for components that you are going to connect. ■ A udio/Video jacks HDMI jac ks Digital video and digital sound ar e transmitted through a single jack. Only use an H DMI cable. ■ Analog video jac ks ■ A u[…]
-
Страница 13
En 13 CONNECTIONS Connecting external devices Connecting a TV monitor This unit is equipped with the following three types of output jack for connection to a TV . HDMI OUT , COMPONENT VIDEO or VIDEO. Select the proper conn ection according to the input signal format supported b y your TV . This unit will receiv e HD MI, component, or video signals […]
-
Страница 14
En 14 CONNECTIONS Connecting external devices ■ Connecting a video monitor Connect the video pin cable to the VIDEO (MONITOR OUT) jack. ■ Listening to TV audio T o transmit sound from the TV to this unit, conne ct its A V1-5 or A UDIO1-2 jacks to the TV’ s A UDIO O UT jacks. If the TV supports optical digital audio output , we recommend that […]
-
Страница 15
En 15 CONNECTIONS Connecting external devices Connecting BD/DVD play ers and other devices This unit has the follo wing input jacks. Conn ect them to the appropr iate output jack s on the external components. ■ Connecting BD/D VD player s and other devices with HDMI Connect the de vice with an HDMI ca ble to one of the HDMI1-4 jacks. Select the H[…]
-
Страница 16
En 16 CONNECTIONS Connecting external devices ■ Connecting BD/D VD play ers and ot her de vices with component cable s Connect the device with a co mponent vide o cable to one of the A V1-2 input jacks. Using optical digital audio output sources Select the A V1 input that the external device is connected to for playback. Using coaxial digital aud[…]
-
Страница 17
En 17 CONNECTIONS Connecting external devices ■ Connecting BD/D VD play ers and ot her de vices with video cables Connect the external device with a video pin cable to one of the A V3-5 input jacks. Using optical digital audio output sources Select the A V4 input that the external device is connected to for playback. Using coaxial digital audio o[…]
-
Страница 18
En 18 CONNECTIONS Connecting external devices ■ Connecting CD play ers a nd other audio de vices Using analog stereo out put sources Select the audio input (A UDIO1-2) that the exte rnal de vice is connected to for playback. Using optical digital output sources Select the A V input (A V1 or A V4) that the ex ternal device is connected to for play[…]
-
Страница 19
En 19 CONNECTIONS Connecting external devices Connecting video cameras an d portable audio players Use the VIDEO A UX jacks on the front panel to tempor arily conn ect video camera s, game consoles, or portable audio devices to the recei ver . Select the V -A UX input to use these connected devices. T ransmitting input A/V to external devices This […]
-
Страница 20
En 20 CONNECTIONS An indoor FM antenna and an AM loop antenna are in cluded with this recei ver . Connect these antennas properly to their respecti ve jacks. Connecting the FM/AM antennas ■ Impro ving FM reception W e recommend using an outdoor antenna. For more information, consult th e nearest authorized dealer . ■ Impro ving AM reception Con[…]
-
Страница 21
En 21 CONNECTIONS This unit is equipped with a YP A O (Y amaha Parametric Room Ac oustic Optimizer) that adjusts the st atus, size, and volume balance of the speakers in order to pro vide an optimal sound f ield. Using YP A O allows you to automatically conf igure settings for which specialist knowledge is usually needed, such as adjusting speaker […]
-
Страница 22
En 22 CONNECTIONS Set up the speaker paramete r s automatically (YPAO) 5 Press h SETUP to sta rt measurement. The follo wing display appears if measurement finishes without any prob lems. 6 Press i ENTER to apply the results of measurement. 7 Remove the YP A O microphone. YP A O finishes automatically when the YP A O microphone is remov ed. SETUP E[…]
-
Страница 23
En 23 CONNECTIONS Set up the speaker paramete r s automatically (YPAO) ■ When an error message appears during measurement Check the content of the message from the list of messages ( ☞ p. 24 ) to resolve the problem, and carry out the measurement process again. Check the error code tha t a ppears in the display , and carry out YP A O again by p[…]
-
Страница 24
En 24 CONNECTIONS Set up the speaker paramete r s automatically (YPAO) ■ Message list ■ When a warning message appears bef ore measurement ■ Error messa ge ■ W arning messag e NO TE If the follo wing messages appear, re solve the problems tha t have occurred and carry out the measurement process again. Connect MIC! The YP A O mic rophone is[…]
-
Страница 25
En 25 PLA YBACK 1 T urn on external co mponents (TV , D VD play er , etc.) connected to this unit. 2 T urn on this unit and select the input source using c Input selector . The name of the selected i nput source is displayed for a fe w seconds. J 1 3 Play the e xternal component that you have selected as the source input, or select a radio station […]
-
Страница 26
En 26 PLA YBACK This unit has a SCENE function that allo ws you to turn the po we r on and change input sources and sound field programs with one key . Four scenes are a vail able for different uses, such as playing movies or music. The follo w ing input sources and sound field programs are pro vided as the initial factory settings. Registering inp[…]
-
Страница 27
En 27 PLA YBACK Enjoying sound field programs ■ Enjoying unpr ocessed pla yback (Straight decoding mode) Use straight decoding mode when you want to playback sound without sound field processing. Y ou can playback as follo ws in strai ght decoding mode. 2-channel sour ces such as CD Stereo sound plays through the front left and right speakers. Mu[…]
-
Страница 28
En 28 PLA YBACK Enjoying sound field programs Sound field programs ■ Category: MO VIE Sound fi eld programs optimized for viewing video sou rces such as movies, TV programs, and games. ■ Category: MUSIC This sound field is suitable when liste ning to music sources such as CDs. in the table indicates the sound field program for CINEMA DSP . Stan[…]
-
Страница 29
En 29 PLA YBACK Enjoying sound field programs ■ Category: STEREO Suitable for listening to stereo sources. ■ Category: ENHNCR (Compressed music enhancer) Suitable for listening to comp ressed audio, such as MP3. ■ Category: SUR.DEC (Surround decode mode) Select this program to playback s ources with selected decoders. Y ou can playback 2-chan[…]
-
Страница 30
En 30 PLA YBACK The FM/AM tuner of this unit prov ides the following two modes for tuning. Normal tuning Y ou can tune in to a desire d FM/AM station by searching or specifying its frequenc y . Preset tuning ( ☞ p. 31 ) Y ou can preset the frequencies of FM/AM stations by registering them to specific numbers, and late r just select those numbers […]
-
Страница 31
En 31 PLA YBACK FM/AM tuning Registering and recalling a frequency (Preset tuning) Y ou can register up to 40 FM/AM stations as preset stations. There are two met hods of presetting stations, “ Auto Preset” and “Manual Pre set. ” Use one of these methods to register stations. ■ Presetting FM stations automatically (Auto Preset) The tuner […]
-
Страница 32
En 32 PLA YBACK FM/AM tuning ■ Designating a preset number f or registration Press d MEMOR Y once, to display “Manual Preset ” on the front panel display . After a small wait, the preset number that the station has been registered to will appear . Press d PRESET F / G to select the prese t to register the station to, and then press d MEMOR Y […]
-
Страница 33
En 33 PLA YBACK FM/AM tuning 2 Press e INFO repeatedly un til the desired information is displayed. Information on the display changes as you press the key . The kind of information is displayed for a while and then the informatio n is displayed. J 1 Contents of information are as follows. Front panel display (When “P rogram T ype” selected) ?[…]
-
Страница 34
En 34 SETUP This receiv er has a unique option menu specific for each type of in put source, such as volume trim for compatible input sources , audio/video data display for signals from external de vices, and othe r frequently used menu items. Option menu display and setup 1 Use the c Input selector on the rem ote control to select the Option menu […]
-
Страница 35
En 35 SETUP Configuring the settings specific fo r each inpu t source (Opti on menu) ■ Combining HDMI/A V1-2 input source video and audio Input source: HDMI1-4, A V1-2 Combines video from HDMI or A V input sources with analog/ digital audio inputs in situations such as: – an external de vice is connected with an HDMI cable but cannot transmit a[…]
-
Страница 36
En 36 SETUP Y ou can configure v a rious function settings of this unit using the Setup menu. Setup menu display and settings 1 Press h SETUP on the re mote control. 2 Use the i Cursor B / C to select the desired menu and press i ENTER . Setup menu categories Ex: Sound Setup menu 3 Use i Cursor B / C to navigate the submenus to find the desired se […]
-
Страница 37
En 37 SETUP Setting various fun ctions (Setup menu) Manages settings for speakers Speaker Setup submenu ■ Manual speaker setup Adjusts the output charac terist ics of the speakers based on manually set parameters. Subwoofer Confirms the subw oofer . Front Selects the size (s ound reproduction capacity) of the front speakers. J 2 Center Selects th[…]
-
Страница 38
En 38 SETUP Setting various fun ctions (Setup menu) Crossover Sets the lo wer limit of low- frequency component output from speakers set to “S mall. ” Audio with a frequency belo w that limit will be produced from the subwoofer or th e front speakers. J 1 SWFR Phase Sets the phase of the sub woofer if the bass audio is lacking or unclear . Extr[…]
-
Страница 39
En 39 SETUP Setting various fun ctions (Setup menu) ■ Adjusting sound quality with the equalizer Adjusts sound quality of tone us ing a parametric or graphic equalizer . EQ Select Select an equalizer type. ■ Generating test tones T urns the test tone generator on or off. Equalizer PEQ Uses th e parametric equalizer to adjust sound quality . Sel[…]
-
Страница 40
En 40 SETUP Setting various fun ctions (Setup menu) Setting the audio output function of this unit Sound Setup submen u ■ Synchr onizing audio/video output Adjusts the delay betwe en audi o and video output (Lipsync function). HDMI Auto When connecting to a TV via HD MI, automatically adju sts output timing if the TV supports an automatic lipsync[…]
-
Страница 41
En 41 SETUP Setting various fun ctions (Setup menu) ■ A uto-adjusting Dolby Digital and DTS dynamic range Selects the dynamic range adjus tment method for audio bitstream (Dolby Digital and DTS) playback. ■ Setting the maxim um v olume Sets a maximum v olume lev el so th at the audi o is not played too loudly . The default setting of +16.5 dB p[…]
-
Страница 42
En 42 SETUP Setting various fun ctions (Setup menu) Making the receiver easier to use Func. Setup submen u ■ Changing input source names Changes the input source names to be sho wn on the front panel display . Y ou can change an input so urce name b y choosing from a list of te mplates, or make o ne of your o wn. SETUP RETURN ENTER R ECEIVER SC E[…]
-
Страница 43
En 43 SETUP Setting various fun ctions (Setup menu) ■ Goes enter standby mode automaticall y when y ou leave it without operating If you do not operate this unit or use the remote control for an extended period of time, it will au tomati cally go into standby mode (Auto Power Do wn function). This function’ s default setting is “Off. ” When[…]
-
Страница 44
En 44 SETUP Although the sound field programs w ould satisfy you as they are with the default parameters, you can arrange the effect b y sett ing the sound field elements (parameters). T o adjust the sound effects suitable for acoustical conditions of audio/video sources or rooms, perform the following operation s. Setting sound field parameters 1 […]
-
Страница 45
En 45 SETUP Setting sound field program parameter s ■ P arameters usable in certain sound field programs 2ch Stereo only Automatically b ypasses the DSP ci rcuit and tone contro l circuit depending on the condition of tone control etc., when an analog sound source is played back. Y ou can enjoy a higher quality sound. 5ch Stereo only Adjusts the […]
-
Страница 46
En 46 SETUP The Adv anced Setup menu can be used for unit initialization and ot her useful extended functions. The Advanced Setup menu can be opera ted as follows. Displaying/Set ting the Advanced Setup menu 1 Set this unit to the standby mode. 2 Press A wh ile pressin g and holding STRAIGHT on the fr ont panel. Release the ke ys when “ ADV ANCED[…]
-
Страница 47
En 47 APPENDIX Refer to the table below when this unit does not function properly . If the problem you are experiencing is not listed belo w , or if th e instructions below do not help, turn of f this unit, disconne ct the power cable, and con tact the nearest authorized Y amaha dealer or service center . General T r oubleshooting Problem Cause Rem[…]
-
Страница 48
En 48 APPENDIX Troublesho oting No sound. Inco rrect inpu t or output cab le connection s. Connect th e cables properly . If the probl em persists, the cables may be defect ive. 15 If a D VI-HDMI cable is used to connect th e unit with an external component, then it is necessary to use an audio in put jack for a different input to o utput audi o. D[…]
-
Страница 49
En 49 APPENDIX Troublesho oting HDMI™ No sound is heard from the surround speaker s. This unit is in stra ight decodi ng mode and a monaural so urce is being played ba ck. Press f STRAIGHT (o n the remote control) to exit stra ight decodi ng mode. 27 Sound may not be output fr om certain ch annels depe nding on input sour ces or soun d field prog[…]
-
Страница 50
En 50 APPENDIX Troublesho oting T uner (FM/AM) FM AM Problem Cause Remedy See page FM stereo reception is noisy . Y ou are too far from the station transmitter , or the input from the antenna is weak. Check the a ntenna connecti ons. 20 Switch to mona ural mode. 30 Replace the outdoor ant enna with a more sensitive multi-elem ent antenn a. — Ther[…]
-
Страница 51
En 51 APPENDIX Troublesho oting Remote control Problem Cause Remedy See page The remote co ntrol does not work or function p roperl y . Wrong distan ce or angle. T he remote control will function within a maximum rang e of 6 m / 20 ft, and n o more than 30 degrees off-axis from th e front panel. — Direct sunl ight or lighting (from an in verter t[…]
-
Страница 52
En 52 APPENDIX Audio information Audio and video sync hronization (lip sync) Lip sync, an abbrev iation for lip synchr onization, is a technical term that in volves both a problem, and the capab il ity of maintaining audio and video signals synchronized during po st-p roduction and transmission. Whereas the audio and video latency requir es complex[…]
-
Страница 53
En 53 APPENDIX Glossary SILENT CINEMA Y amaha has developed a natural, realistic soun d effect DSP algorithm for headphones. Pa rameters for headphones hav e been set for each sound field program, so that accurate representati ons of all the sound field programs can be enjoyed on headp hones. Virtual CINEMA DSP Y amaha has developed a V irtual CINE[…]
-
Страница 54
En 54 APPENDIX ■ HDMI signal compatibility Audio signals • If the input so urce component can decode the bitstream a udio signal s of audio commen taries, you can play back the audio sources wi th the audi o commentaries mixed down by using the digit al audio inp ut (optica l or coaxial ) connecti ons. • Refer to the supplied i nstructio n ma[…]
-
Страница 55
En 55 APPENDIX ■ HDMI specification • Deep Color • x.v .Color • Auto Lip sync ■ INPUT/OUTPUT Input jacks • HDMI input x 4 • A V input x 5 [Audio] Digita l input (optical) x 2, digi tal input (coaxial) x 2, analog input x 1 [V ideo] Component video jacks x 2, video jacks x 3 • A UDIO input x 2 [Audio] Analog jack x 2 • VIDEO A UX i[…]
-
Страница 56
En 56 APPENDIX ■ FM SECTION • T uning Range [U.S.A. and Canada models] ……….. ………………..87.5 to 107.9 MHz [Asia and General models] ……….. 87.5/87.50 to 108.0/108.00 MHz [Other models] ………………. …………………… ……87.50 to 108.00 MHz • 50 dB Quieting Sensitivity (IHF) Mono …… ………… ……..[…]
-
Страница 57
© 2010 Yamaha Corporation All rights rese rved. YC434B0/OMEN2[…]