-
Contents
-
Table of Contents
-
Troubleshooting
-
Bookmarks
Quick Links
Related Manuals for Yealink SIP-T23G
Summary of Contents for Yealink SIP-T23G
-
Page 1
–––… -
Page 2
Copyright © 2015 YEALINK NETWORK TECHNOLOGY CO., LTD Copyright © 2015 Yealink Network Technology CO., LTD. All rights reserved. No parts of this publication may be reproduced or transmitted in any form or by any means, electronic or mechanical, photocopying, recording, or otherwise, for any purpose, without the express written permission of Yealink Network Technology CO., LTD. -
Page 3
Do not dispose of WEEE as unsorted municipal waste and have to collect such WEEE separately. We are striving to improve our documentation quality and we appreciate your feedback. Email your opinions and comments to DocsFeedback@yealink.com. -
Page 4
Yealink SIP-T23P/T23G IP phone firmware contains third-party software under the GNU General Public License (GPL). Yealink uses software under the specific terms of the GPL. Please refer to the GPL for the exact terms and conditions of the license. The original GPL license, source code of components licensed under GPL and used in Yealink products can be downloaded online: http://www.yealink.com/GPLOpenSource.aspx?BaseInfoCateId=293&NewsCateId=293&CateId=293. -
Page 5
Call Hold, Call Transfer, Busy Lamp Field, Multicast Paging and Conference over an IP network. The difference between the T23P and T23G IP phones is that SIP-T23G supports kilomega network interface. only This guide provides everything you need to quickly use your new phone. First, verify with your system administrator that the IP network is ready for phone configuration. -
Page 6
User Guide for the SIP-T23P/T23G IP Phone Major updates have occurred to the following sections: Web User Interface on page ReCall on page Time & Date on page Anonymous Call Rejection on page Intercom on page … -
Page 7: Table Of Contents
Table of Contents About This Guide …………..v In This Guide ……………………. v Summary of Changes ………………….v Changes for Release 80, Guide Version 80.20 ………….. v Table of Contents …………..vii Overview ……………… 1 Hardware Component Instructions ………………1 Icon Instructions ……………………
-
Page 8: Table Of Contents
User Guide for the SIP-T23P/T23G IP Phone Volume ……………………..27 Ring Tones ……………………27 Contact Management ………………….. 29 Directory……………………… 29 Local Directory …………………… 31 Blacklist ……………………..41 Remote Phone Book ………………….43 Call History Management ………………..45 System Customizations …………………. 47 Logo Customization ………………….
-
Page 9: Table Of Contents
Table of Contents Busy Lamp Field (BLF) ………………… 101 BLF List ……………………..103 Call Recording ……………………105 Hot Desking ……………………107 Intercom ……………………..109 Outgoing Intercom Calls ………………..109 Incoming Intercom Calls ………………..109 Using Intercom ………………….111 Multicast Paging ………………….. 111 Sending RTP Stream …………………
-
Page 10
User Guide for the SIP-T23P/T23G IP Phone… -
Page 11: Overview
Overview This chapter provides the overview of the SIP-T23P/T23G IP phone. Topics include: Hardware Component Instructions Icon Instructions LED Instructions User Interfaces Documentations If you require additional information or assistance with your new phone, contact your system administrator.
-
Page 12
Secures the handset in the handset cradle when the IP phone is mounted vertically. For more information on ⑮ Hookswitch Tab Yealink Wall how to adjust the hookswitch tab, refer to Mount Quick Installation Guide for Yealink IP Phones… -
Page 13
Overview Icons appearing on the LCD screen are described in the following table: Icon Description Network is unavailable Registered successfully Register failed Registering Hands-free speakerphone mode Handset mode Headset mode Multi-lingual lowercase letters input mode Multi-lingual uppercase letters input mode Alphanumeric input mode Numeric input mode Multi-lingual uppercase and lowercase… -
Page 14
User Guide for the SIP-T23P/T23G IP Phone Icon Description Call Mute Received Calls Placed Calls Missed Calls Recording box is full A call cannot be recorded Recording starts successfully Recording cannot be started Recording cannot be stopped The contact icon Power Indicator LED LED Status Description… -
Page 15: User Interfaces
Overview LED Status Description Slow flashing green The call is placed on hold. The line is inactive. Line key LED (configured as a BLF key or BLF List key) LED Status Description Solid green The monitored user is idle. Fast flashing red (200ms) The monitored user receives an incoming call.
-
Page 16: Phone User Interface
User Guide for the SIP-T23P/T23G IP Phone You can customize your phone by pressing the Menu soft key to access the phone user interface. The Advanced Settings option is only accessible to the administrator, and the default administrator password is “admin” (case-sensitive). For more information on customizing your phone with the available options from the phone user interface, refer Customizing Your Phone on page 19.
-
Page 17
Overview Options Phone User Interface Web User Interface —Logo Customization —DSS Keys √ —Account Management √ —Dial Plan —Emergency Number —Live Dialpad —Hotline √ Basic Call Features —Recent Call In Dialing —Auto Answer √ —Auto Redial √ —Call Completion √ —ReCall √… -
Page 18: Documentations
Basic call features and In the Quick Start Guide English phone customizations package Phone/Web user interface settings On the User Guide Basic call features and English website advanced phone features Note You can also download the latest documentations online: http://www.yealink.com/SupportDownloadfiles_detail.aspx?CateId=1243&flag=142.
-
Page 19: Getting Started
Getting Started This chapter provides basic installation instructions and information for obtaining the best performance with the SIP-T23P/T23G IP phone. Topics include: Packaging Contents Phone Installation Phone Initialization Phone Status Basic Network Settings Registration Idle Screen …
-
Page 20: Optional Accessories
User Guide for the SIP-T23P/T23G IP Phone Phone Stand Handset & Handset Cord Ethernet Cable Quick Start Guide Check the list before installation. If you find anything missing, contact your system administrator. The following items are optional accessories for your SIP-T23P/T23G IP phone. You need to purchase them separately if required.
-
Page 21
Getting Started Power Adapter Headset If your phone is already installed, proceed to Phone Initialization on page 13. This section introduces how to install the phone: 1) Attach the stand 2) Connect the handset and optional headset 3) Connect the network and power Attach the stand… -
Page 22: Power Over Ethernet
User Guide for the SIP-T23P/T23G IP Phone Connect the handset and optional headset Connect the network and power You have two options for power and network connections. Your system administrator will advise you which one to use. AC power Power over Ethernet (PoE) …
-
Page 23: Phone Initialization
Getting Started To connect the PoE for the SIP-T23P/T23G IP phone Connect the Ethernet cable between the Internet port on the phone and an available port on the in-line power switch/hub. Note If in-line power is provided, you don’t need to connect the phone to the power adapter. Make sure the switch/hub is PoE-compliant.
-
Page 24
User Guide for the SIP-T23P/T23G IP Phone Phone status (e.g., Product Name, Hardware, Firmware, Product ID, MAC address and Device Cert). Account status (e.g., register status of SIP accounts). Note You can view device certificate status via phone user interface only. To view the phone status via phone user interface: Press , or press Menu->Status. -
Page 25
Getting Started The phone status is displayed on the first page of the web user interface. If your phone cannot contact a DHCP server for any reason, you need to configure network settings manually. The IP phone can support either or both IPv4 and IPv6 addresses. -
Page 26
User Guide for the SIP-T23P/T23G IP Phone Press to select the IPv4 and then press the Enter soft key. Press to select Static IPv4 Client and then press the Enter soft key. Enter the desired values in the IPv4, Subnet Mask, Default Gateway, IPv4 Pri.DNS and IPv4 Sec.DNS fields respectively. -
Page 27: Idle Screen
Getting Started To configure PPPoE via phone user interface: Press Menu->Settings->Advanced Settings (default password: admin) ->Network->WAN Port. Press to select IPv4 and then press the Enter soft key. Press to select PPPoE IPv4 Client and then press the Enter soft key. Enter the user name and password in the corresponding fields.
-
Page 28
User Guide for the SIP-T23P/T23G IP Phone… -
Page 29: Customizing Your Phone
Customizing Your Phone You can customize your SIP-T23P/T23G IP phone by personally configuring certain settings, for example, contrast, language and time & date. You can add contacts to the phone’s local directory manually or from call history. You can also personalize different ring tones for different callers.
-
Page 30: Backlight
User Guide for the SIP-T23P/T23G IP Phone You can configure the backlight to adjust the brightness of the LCD screen. Backlight status on the LCD screen can be configured from the following options: Always On: Backlight is on permanently. Always Off: Backlight is off permanently.
-
Page 31: Time & Date
Customizing Your Phone Text displayed on the phone user interface will change to the selected language. To change the language for the web user interface: Click on Settings->Preference. Select the desired language from the pull-down list of Language. Click Confirm to accept the change. Text displayed on the web user interface will change to the selected language.
-
Page 32
User Guide for the SIP-T23P/T23G IP Phone Daylight Saving field. Press , or the Switch soft key to select the desired time zone name from the Location field. The default time zone name is China(Beijing). Press the Save soft key to accept the change or the Back soft key to cancel. Note Appendix A — Time Zones Please refer to… -
Page 33: Administrator Password
Customizing Your Phone The date formats available: Date Format Example (2015-01-07) WWW MMM DD Wed Jan 07 DD-MMM-YY 07-Jan-15 YYYY-MM-DD 2015-01-07 DD/MM/YYYY 07/01/2015 MM/DD/YY 01/07/15 DD MMM YYYY 07 Jan 2015 WWW DD MMM Wed 07 Jan Time and date are configurable via web user interface at the path Settings->Time & Date.
-
Page 34: Phone Lock
User Guide for the SIP-T23P/T23G IP Phone You can set the “#” or “*” to perform as a send key while dialing. To configure key as send via phone user interface: Press Menu->Features->Key as send. Press , or the Switch soft key to select # or * from the Key as send field, or select Disabled to disable this feature.
-
Page 35
Customizing Your Phone To activate the phone lock via phone user interface: Press Menu->Settings->Advanced Settings (default password: admin) ->Phone Lock. Press , or the Switch soft key to select Enabled from the Lock Enable field. Press , or the Switch soft key to select the desired type from the Lock Type field. -
Page 36
User Guide for the SIP-T23P/T23G IP Phone respectively. Press the Save soft key to accept the change or the Back soft key to cancel. Note The unlock PIN length must be within 15 digits. To unlock the phone via phone user interface: Press any locked key, the LCD screen prompts “Unlock PIN”. -
Page 37: Volume
Customizing Your Phone Phone lock is configurable via web user interface at the path Features->Phone Lock. You can press the Volume key to adjust the ringer volume when the phone is idle. You can also press the Volume key to adjust the receiver volume of currently engaged audio devices (handset, speakerphone or headset) when the phone is in use.
-
Page 38
User Guide for the SIP-T23P/T23G IP Phone To select a ring tone for the phone via phone user interface: Press Menu->Settings->Basic Settings->Sound->Ring Tones->Common. Press to select the desired ring tone. Press the Save soft key to accept the change or the Back soft key to cancel. A ring tone for the phone is configurable via web user interface at the path Settings->Preference->Ring Type. -
Page 39: Directory
Customizing Your Phone To upload a custom ring tone for your phone via web user interface: Click on Settings->Preference. In the Upload Ringtone field, click Browse to locate a ring tone (the file format must be *.wav) file from your local system. Click Upload to upload the file.
-
Page 40
User Guide for the SIP-T23P/T23G IP Phone To configure the directory via web user interface: Click on Directory->Setting. In the Directory block, select the desired list from the Disabled column and then click The selected list appears in the Enabled column. Repeat step 2 to add more lists to the Enabled column. -
Page 41: Local Directory
Customizing Your Phone If there is only one list in the , press the Dir soft key to enter this list directly. directory Note If the remote phone book and LDAP are not configured in advance, you cannot see remote phone book and LDAP lists on the phone user interface. For more information on remote phone book, refer to Remote Phone Book on page 43.
-
Page 42
User Guide for the SIP-T23P/T23G IP Phone Press the Add soft key to accept the change or the Back soft key to cancel. You can also edit or delete any newly added contact groups. To edit a group in the local directory: Press the Dir soft key. -
Page 43: Adding Contacts Manually
Customizing Your Phone To delete a group from the local directory: Press the Dir soft key. The IP phone enters the local directory directly as there is only Local Directory enabled in the directory by default. If Local Directory is removed from the , press Menu->Directory->Local directory Directory to enter the local directory.
-
Page 44
User Guide for the SIP-T23P/T23G IP Phone The IP phone enters the local directory directly as there is only Local Directory enabled in the directory by default. If Local Directory is removed from the , press Menu->Directory->Local directory Directory to enter the local directory. Select the desired contact group and then press the Enter soft key. -
Page 45
Customizing Your Phone Adding Contacts from Call History To add a contact to the local directory from the call history: Press the History soft key. Press to highlight the desired entry. Press the Option soft key, and then select Add to Contacts. Enter the contact name. -
Page 46
User Guide for the SIP-T23P/T23G IP Phone To edit a contact in the local directory: Press the Dir soft key. The IP phone enters the local directory directly as there is only Local Directory enabled in the directory by default. If Local Directory is removed from the , press Menu->Directory->Local directory… -
Page 47
Customizing Your Phone Select the desired contact group and then press the Enter soft key. Press to highlight the desired contact. Press the Option soft key, and then select Delete. The LCD screen prompts the following warning: Press the OK soft key to confirm the deletion or the Cancel soft key to cancel. You can also delete all contacts by pressing the Option soft key, and then select Delete All. -
Page 48
User Guide for the SIP-T23P/T23G IP Phone To search for a contact in the local directory: Press the Dir soft key. The IP phone enters the local directory directly as there is only Local Directory enabled in the directory by default. If Local Directory is removed from the , press Menu->Directory->Local directory… -
Page 49
Customizing Your Phone The LCD screen will display search results in the adjusted order. Click Confirm to accept the change. Note Search source list in dialing is configurable via web user interface only. To search for a contact in the enabled search source lists: Pick up the handset, press the speakerphone or press the line key. -
Page 50
User Guide for the SIP-T23P/T23G IP Phone You can manage your phone’s local directory via phone user interface or web user interface. But you can only import or export the contact list via web user interface. To import an XML file of contact list via web user interface: Click on Directory->Local Directory. -
Page 51: Blacklist
Customizing Your Phone (Optional.) Select the contact information you want to import into the local directory from the pull-down list of Index. Click Import to complete importing the contact list. To export a contact list via web user interface: Click on Directory->Local Directory. Click Export XML (or Export CSV).
-
Page 52
User Guide for the SIP-T23P/T23G IP Phone Enter the name and the office, mobile or other numbers in the corresponding fields. Press , or the Switch soft key to select the desired account from the Account field. If Auto is selected, the phone will use the first available account when placing calls to the contact from the blacklist directory. -
Page 53: Remote Phone Book
Customizing Your Phone You can add new contacts to the local directory, search for a contact, or simply dial a contact number from the remote phone book. You can configure your new phone to access up to 5 remote phone books. For the access URL of the remote phone book, contact your system administrator.
-
Page 54
User Guide for the SIP-T23P/T23G IP Phone Press the Back soft key to back to the previous screen. To search for a contact in the remote phone book: Press Menu->Directory->Remote Phone Book. If Remote Phone Book is added to the directory, press Dir->Remote Phone Book to enter the remote phone book. -
Page 55
Customizing Your Phone Enter the desired refresh period in the Update Time Interval (Seconds) field. The default value is 21600 seconds. Click Confirm to accept the change. The SIP-T23P/T23G IP phone maintains call history lists of Placed calls, Received calls, Missed calls and Forwarded calls. -
Page 56: Contact Management
User Guide for the SIP-T23P/T23G IP Phone Press to select the desired entry. Press the Option soft key, and then select Detail. The detailed information of the entry appears on the LCD screen. To place a call from the call history list: Press the History soft key.
-
Page 57
Customizing Your Phone The LCD screen prompts «Delete all the call records?». Press the OK soft key to confirm the deletion or the Cancel soft key to cancel. You can upload your custom logo which will be shown on the idle screen. To upload a custom logo via web user interface: Click on Features->General Information. -
Page 58: Headset Use
User Guide for the SIP-T23P/T23G IP Phone Click Confirm to accept the change. Note Delete item will appear after you upload a custom logo, you can click Delete to delete the custom logo. The logo file format must be *.dob, contact your system administrator for more information.
-
Page 59
Customizing Your Phone Select Enabled from the pull-down list of Headset Prior. Click Confirm to accept the change. To use headset prior feature, you should activate the headset mode in advance: Physically connect the headset. Press to activate the headset mode. Note If headset prior is enabled, the headset mode will not be deactivated until you press the Headset key again. -
Page 60: Dss Keys
User Guide for the SIP-T23P/T23G IP Phone To enable dual headset via web user interface: Click on Features->General Information. Select Enabled from the pull-down list of Dual-Headset. Click Confirm to accept the change. Note Dual headset is configurable via web user interface only. There are two types of DSS keys: Line Keys and Programmable Keys.
-
Page 61
Customizing Your Phone (Optional.) Select the desired line from the Account ID field. (Optional.) Enter the corresponding value in the Value field. (Optional.) Enter the corresponding value in the Extension field. Press the Save soft key to accept the change or the Back soft key to cancel. Line key is configurable via web user interface at the path DSSKey->Line Key. -
Page 62
User Guide for the SIP-T23P/T23G IP Phone You can use this key feature to accept incoming calls, place active calls on hold or resume a held call. It performs in the same way as a hard line key. Type (Line) Dependencies: Account ID (the account this feature will be applied to) Usage: When the phone receives an incoming call, the DSS key LED flashes green:… -
Page 63
Customizing Your Phone Type (Key Event) Dependencies: Key Type (GPickup) Account ID (the account this feature will be applied to) Value (the group pickup feature code) Usage: Press the DSS key on your phone when a phone number in the group receives an incoming call. -
Page 64
User Guide for the SIP-T23P/T23G IP Phone Type (Key Event) Dependencies: Key Type (XML Group) PhoneBook (the remote group name you want to access if remote phone book is configured) Usage: Press the DSS key to access the remote group specified in the PhoneBook field. XML Browser You can use this key feature to quickly access a XML browser. -
Page 65
Customizing Your Phone Type (Key Event) Dependencies: Key Type (FWD) Value (the number you want to forward to) Usage: Press the DSS key to forward an incoming call to the number specified in the Value field. Note If the Value field is left blank, the DSS key performs the same as the soft key when receiving an incoming call. -
Page 66
User Guide for the SIP-T23P/T23G IP Phone You can use this key feature to activate or deactivate DND. You can also use this key feature to access the custom DND screen. For more information, refer to Do Not Disturb (DND) on page 80. -
Page 67
Customizing Your Phone Zero Touch You can use this key feature to quickly configure auto provision and network parameters. Type (Key Event) Dependencies: Key Type (Zero Touch) Usage: Press the DSS key to access the zero touch screen. Press the OK soft key within a few seconds. Configure the network parameters in the corresponding fields. -
Page 68
User Guide for the SIP-T23P/T23G IP Phone You can customize the soft keys, navigation keys and function keys. To customize the programmable keys via web user interface: Click on DSSKey->Programable Key. Customize specific features for these keys. Click Confirm to accept the change. You can click Reset to default to reset custom settings to defaults. -
Page 69
Customizing Your Phone You can register one or multiple accounts on the SIP-T23P/T23G IP phone. You can also configure each line key to associate with an account or configure multiple line keys to associate with an account. To register an account via phone user interface: Press Menu->Settings->Advanced Settings (default password: admin) ->Accounts. -
Page 70: Dial Plan
User Guide for the SIP-T23P/T23G IP Phone You can configure multiple line keys to associate with an account. This enhances call visualization and simplifies call handling. Incoming calls to this account will be distributed evenly among the available line keys. Outgoing calls will be distributed similarly.
-
Page 71
Customizing Your Phone “$” plus the sequence number means the whole character or characters placed in the parenthesis. The number directs to the right parenthesis when there are more than one. Example: A replace rule configuration, Prefix: «001(xxx)45(xx)», Replace: «9001$145$2». When you dial out «0012354599»… -
Page 72
User Guide for the SIP-T23P/T23G IP Phone When you enter the number “1” using the keypad and then press the Send soft key, the phone will dial out “1234” instead. Note The valid values of Account field can be one or more digits among 1-3. Each digit must be separated by a comma. -
Page 73
Customizing Your Phone For more information on the valid values of Account field, refer to Replace Rule page 61. Click Add to add the dial-now rule. When you enter the number “123” using the keypad, the phone will dial out “123” automatically without pressing any key. -
Page 74
User Guide for the SIP-T23P/T23G IP Phone Click Confirm to accept the change. Note Delay time for dial-now rule is configurable via web user interface only. Area codes are also known as Numbering Plan Areas (NPAs). They usually indicate geographical areas in a country. This feature is necessary when dialing a phone number outside the code area. -
Page 75
Customizing Your Phone For more information on the valid values of Account field, refer to Replace Rule page 61. Click Confirm to accept the change. Note The default values of minimum and maximum length are 1 and 15 respectively. Area code is configurable via web user interface only. You can block some specific numbers (up to 10) from being dialed on your phone. -
Page 76: Emergency Number
User Guide for the SIP-T23P/T23G IP Phone For more information on the valid values of Account field, refer to Replace Rule page 61. Click Confirm to add the block out number. Note Block out number is configurable via web user interface only. Public telephone networks in countries around the world have a single emergency telephone number (emergency services number), that allows a caller to contact local emergency services for assistance when necessary.
-
Page 77: Live Dialpad
Customizing Your Phone For multiple numbers, enter a comma between every two emergency numbers. The default emergency numbers are 112, 911 and 110. Click Confirm to accept the change. Note Emergency number is configurable via web user interface only. You can enable live dialpad on the SIP-T23P/T23G IP phone, which enables the IP phone to automatically dial out a phone number without the pressing of the send key.
-
Page 78: Hotline
User Guide for the SIP-T23P/T23G IP Phone Enter the desired delay time in the Inter Digit Time (1~14s) field. The default delay time is 4 seconds. Click Confirm to accept the change. Note Live dialpad is configurable via web user interface only. You can dial a hotline number immediately upon lifting the handset, pressing the Speakerphone key or the line key.
-
Page 79: Basic Call Features
Basic Call Features The SIP-T23P/T23G IP phone is designed to be easily used like a regular phone on a public switched telephone network (PSTN). You can place calls, answer calls, transfer a call to someone else, or conduct a conference call. This chapter provides basic operating instructions for the SIP-T23P/T23G IP phone.
-
Page 80
User Guide for the SIP-T23P/T23G IP Phone You can place a call in one of three ways using your SIP-T23P/T23G IP phone: Using the handset Using the speakerphone Using the headset You can also dial the number first, and then choose the way you want to speak to the other party. -
Page 81
Basic Call Features Press , or the Send soft key. With the handset on-hook, enter the desired number using the keypad. Press , or the Send soft key. To place a call using the headset: Do one of the following: With the optional headset connected, press to activate the headset mode. -
Page 82
User Guide for the SIP-T23P/T23G IP Phone When you are not in another call, you can answer a call in one of three ways: Using the handset Using the speakerphone Using the headset Note You can reject incoming calls by pressing the Reject soft key or the X key. You can also activate Do Not Disturb mode to ignore all incoming calls without ring on your phone. -
Page 83
Basic Call Features The incoming call is answered and the original call is placed on hold. Press to access the new call. Press or the Answer soft key. The incoming call is answered and the original call is placed on hold. To end a call: Do one of the following: If you are using the handset, press the EndCall soft key or hang up the handset. -
Page 84: Recent Call In Dialing
User Guide for the SIP-T23P/T23G IP Phone To view the placed calls list when the phone is in the pre-dialing screen, you should enable recent call in dialing in advance. To enable recent call in dialing via web user interface: Click on Directory->Setting.
-
Page 85: Auto Answer
Basic Call Features You can use auto answer to automatically answer an incoming call on a line. Auto answer is configurable on a per-line basis. To configure auto answer via phone user interface: Press Menu->Features->Auto Answer. Press , or the Switch soft key to select the desired account from the Line ID field.
-
Page 86
User Guide for the SIP-T23P/T23G IP Phone To configure auto redial via phone user interface: Press Menu->Features->Auto Redial. Press , or the Switch soft key to select Enabled from the Auto Redial field. Enter the desired time (in seconds) in the Redial Interval field. The default time interval is 10 seconds. -
Page 87: Call Completion
Basic Call Features You can use call completion to notify the caller who failed to reach a desired party when the party becomes available to receive a call. To configure call completion via phone user interface: Press Menu->Features->Call Completion. Press , or the Switch soft key to select Enabled from the Call Completion field.
-
Page 88: Recall
User Guide for the SIP-T23P/T23G IP Phone Press the OK soft key to redial the number. Note Call completion is not available on all servers. For more information, contact your system administrator. You can press a recall key to place a call back to the last incoming call. To configure a recall key via phone user interface: Press Menu->Features->DSS Keys.
-
Page 89
Basic Call Features To un-mute a call: Press again to un-mute the call. You can place an active call on hold. Only one active call can be in progress at any time. Other calls can be made and received while placing the original call on hold. When you place a call on hold, your IP PBX may play music to the other party while waiting. -
Page 90: Do Not Disturb
User Guide for the SIP-T23P/T23G IP Phone You can use DND to reject incoming calls automatically on the phone. The prompt message «n New Missed Call(s)» («n» indicates the number of missed calls) will appear on the LCD screen, and callers will receive a busy message. All calls you receive while DND is enabled are logged to your missed calls list.
-
Page 91
Basic Call Features To activate DND in phone mode: Press the DND soft key when the phone is idle. icon on the status bar indicates that DND is enabled. Incoming calls will be rejected automatically and «n New Missed Call(s)» («n» indicates the number of the missed calls) will appear on the LCD screen. -
Page 92
User Guide for the SIP-T23P/T23G IP Phone Incoming calls on the specific line will be rejected automatically, and the LCD screen will prompt «n New Missed Call(s)» («n» indicates the number of missed calls). Note When DND and busy forward are both enabled for a specific account, calls to the specific account will be sent to the configured destination number. -
Page 93: Call Forward
Basic Call Features For multiple numbers, enter a comma between every two numbers. Click Confirm to accept the change. When DND is enabled on the phone, the phone can still receive incoming calls from the numbers specified in the DND Authorized Numbers field. Note DND authorized number is configurable via web user interface only.
-
Page 94
User Guide for the SIP-T23P/T23G IP Phone Custom: Call forward can be configured for each or all accounts. To configure the call forward mode via web user interface: Click on Features->Forward & DND. In the Forward block, mark the desired radio box in the Mode field. Click Confirm to accept the change. -
Page 95
Basic Call Features 3) (Optional.) Enter the always forward on code or off code respectively in the On Code or Off Code field. b.) If you select Busy Forward: 1) Press , or the Switch soft key to select Enabled from the Busy Forward field. -
Page 96
User Guide for the SIP-T23P/T23G IP Phone To enable call forward in custom mode: Press Menu->Features->Call Forward. Press to select the desired account, and then press the Enter soft key. Press to select the desired forwarding type, and then press the Enter soft key. -
Page 97
Basic Call Features 1) Press , or the Switch soft key to select Enabled from the Busy Forward field. 2) Enter the destination number you want to forward all incoming calls to when the phone is busy in the Forward to field. 3) (Optional.) Enter the busy forward on code or off code respectively in the On Code or Off Code field. -
Page 98
User Guide for the SIP-T23P/T23G IP Phone the On Code or Off Code field. You can also enable no answer forward for all accounts. After no answer forward was enabled for a specific account, do the following: 1) Press to highlight the No Answer Forward field. 2) Press the All Lines soft key. -
Page 99: Call Transfer
Basic Call Features soft key. Press , or the Switch soft key to select Disabled to disable the call forward. Press the Save soft key to accept the change. Dynamic Forwarding To forward an incoming call to another party: When the phone is ringing, press the FWD soft key. Enter the number you want to forward the incoming call to.
-
Page 100
User Guide for the SIP-T23P/T23G IP Phone Enter the number you want to transfer the call to. Press the Dir soft key, and then select Local Directory. Select the desired group, and search for the contact (Directory should be configured in advance. Refer to Directory on page for more information). -
Page 101: Call Waiting
Basic Call Features You can enable or disable call waiting on the phone. If call waiting is enabled, you can receive another call while there is already an active call on the phone. Otherwise, another incoming call is automatically rejected by the phone with a busy message when there is an active call on the phone.
-
Page 102: Network Conference
User Guide for the SIP-T23P/T23G IP Phone Place a call to the first party. When the first party answers the call, press the Conf soft key to place a new call. The active call is placed on hold. Enter the number of the second party and press , or the Send soft key.
-
Page 103
Basic Call Features This feature allows you to perform the following: Join two calls together into a conference call. Invite another party into an active conference call. To use this feature, contact your system administrator for the network conference URI in advance. -
Page 104: Call Park
User Guide for the SIP-T23P/T23G IP Phone When the new party answers the call, press the Conf soft key to add the new party to the conference. Repeat steps 5 to 7 until you have added all intended parties. The procedures to set up a network conference call on specific servers may be different from introduced above.
-
Page 105: Call Pickup
Basic Call Features designated as phone C. The user dials the call park retrieve code to retrieve the parked call. The system establishes call between phone C and B. Note The call park code and call park retrieve code are predefined on the system server. Contact your system administrator for more information.
-
Page 106
User Guide for the SIP-T23P/T23G IP Phone To configure the directed call pickup code on a per-line basis via web user interface: Click on Account. Select the desired account from the pull-down list of Account. Click on Advanced. Enter the directed call pickup code in the Directed Call Pickup Code field. Click Confirm to accept the change. -
Page 107: Group Call Pickup
Basic Call Features You can also configure a DSS key as a direct pickup key via phone user interface or web user interface. Once configured, you can pick up a call by pressing the directed pickup key directly. Group Call Pickup To enable group call pickup and configure the group call pickup code on a global basis via web user interface: Click on Features->Call Pickup.
-
Page 108
User Guide for the SIP-T23P/T23G IP Phone Enter the group call pickup code in the Group Call Pickup Code field. Click Confirm to accept the change. To pick up a call in the group: Pick up the handset, press the speakerphone or press the line key. The GPickup soft key appears on the LCD screen. -
Page 109: Anonymous Call
Basic Call Features You can use anonymous call to block your identify and phone number from appearing to the called party when you call someone. For example, you want to call to consult some services, but don’t want to be harassed. Anonymous call is configurable on a per-line basis.
-
Page 110: Anonymous Call Rejection On
User Guide for the SIP-T23P/T23G IP Phone The LCD screen of phone B prompts an incoming call from anonymity. You can use anonymous call rejection to reject incoming calls from anonymous callers. Anonymous call rejection automatically rejects incoming calls from callers who deliberately block their identities and numbers from being displayed.
-
Page 111: Advanced Phone Features
Advanced Phone Features This chapter provides operating instructions for the advanced features of the SIP-T23P/T23G IP phone. Topics include: Busy Lamp Field (BLF) BLF List Call Recording Hot Desking Intercom Multicast Paging Music on Hold …
-
Page 112
User Guide for the SIP-T23P/T23G IP Phone Press , or the Switch soft key to select the desired line from the Account ID field. Enter the phone number or extension you want to monitor in the Value field. (Optional.) Enter the Directed Call Pickup Code in the Extension field. Press the Save soft key to accept the change or the Back soft key to cancel. -
Page 113: Blf List
Advanced Phone Features In the following figure, the LCD screen shows an incoming call from 2500 on the monitored line. Note If your phone is locked and the type of the phone lock is configured as Function Keys or All Keys, you cannot use the DPickup, Send, NewCall and Cancel soft keys until unlocked. When there is an active call on the IP phone, you can transfer the active call to the monitored phone number directly by pressing the BLF key.
-
Page 114
User Guide for the SIP-T23P/T23G IP Phone an active call of the monitored user when you press the BLF List key. When a call is being parked against the monitored phone, press the BLF List key to retrieve the parked call from the monitored user. Before retrieving the parked call, ensure that the BLF List Retrieve call parked Code has been configured in advance. -
Page 115: Call Recording
Advanced Phone Features You can receive a visual or/and an audio alert (if enabled) on your phone when the monitored user receives an incoming call. For more information, refer to Busy Lamp Field (BLF) on page Note The pickup code is used in the following order of preference: BLF List code (Account->Advanced)>Directed Call Pickup Code (Account->Advanced)>Directed Call Pickup Code (Features->Call Pickup).
-
Page 116
User Guide for the SIP-T23P/T23G IP Phone Press , or the Switch soft key to select Record from the Key Type field. Press the Save soft key to accept the change or the Back soft key to cancel. To configure a URL record key via phone user interface: Press Menu->Features->DSS Keys. -
Page 117: Hot Desking
Advanced Phone Features Press the Record or URL Record key again to stop recording. The recording icon disappears from the LCD screen and the Record or URL Record key LED goes out. Recording status indications you need to know: Circumstance Icons on the LCD screen A recording is started appears on the LCD screen…
-
Page 118
User Guide for the SIP-T23P/T23G IP Phone field. Press the Save soft key to accept the change or the Back soft key to cancel. Hot desking key is configurable via web user interface at the path DSSKey->Line Key. To use hot desking: Press the hot desking key when the phone is idle. -
Page 119: Intercom
Advanced Phone Features Intercom is a useful feature in an office environment to quickly connect with the operator or the secretary. You can press the intercom key to automatically connect with a preconfigured target extension for outgoing intercom calls, and the target extension will automatically answer incoming intercom calls by default.
-
Page 120
User Guide for the SIP-T23P/T23G IP Phone Intercom features you need to know: Intercom Feature Description Enable or disable the IP phone to automatically Accept Intercom answer an incoming intercom call. Enable or disable the IP phone’s microphone for Intercom Mute intercom calls. -
Page 121: Multicast Paging
Advanced Phone Features To configure intercom features via phone user interface: Press Menu->Features->Intercom. Make the desired changes. Press the Save soft key to accept the change or the Back soft key to cancel. These specific parameters are configurable via web user interface at the path Features->Intercom.
-
Page 122
User Guide for the SIP-T23P/T23G IP Phone Press , or the Switch soft key to select Multicast Paging from the Key Type field. Enter the multicast IP address and port number (e.g., 224.5.6.20:10008) in the Value field. The valid multicast IP addresses range from 224.0.0.0 to 239.255.255.255. Press the Save soft key to accept the change or the Back soft key to cancel. -
Page 123
Advanced Phone Features Press the Option soft key and then press the Edit soft key. Enter the multicast IP address and port number (e.g., 224.5.6.20:10008) in the Address field. The valid multicast IP addresses range from 224.0.0.0 to 239.255.255.255. Enter the group name in the Label field. Press the Save soft key to accept the change. -
Page 124
User Guide for the SIP-T23P/T23G IP Phone The default codec is G722. Click Confirm to accept the change. Note If G722 codec is used for multicast paging, the LCD screen will display the icon to indicate that it is providing high definition voice. Default codec for multicast paging is configurable via web user interface only. -
Page 125
Advanced Phone Features calls. Paging Priority Active The paging priority active parameter decides how the phone handles incoming multicast paging calls when there is already a multicast paging call on the phone. If enabled, the phone will ignore incoming multicast paging calls with lower priorities, otherwise, the phone will answer incoming multicast paging calls automatically and place the previous multicast paging call on hold. -
Page 126
User Guide for the SIP-T23P/T23G IP Phone To send RTP stream via a multicast paging key when the receiver’s phone is idle: Press the multicast paging key when the phone is idle. The phone sends RTP to a preconfigured multicast address (IP: Port). Both the sender’s and receiver’s phones play a warning tone and the receiver automatically answers the multicast RTP session in the speakerphone mode. -
Page 127: Music On Hold
Advanced Phone Features releases the session. To resume the held multicast RTP session, press the Resume soft key. The multicast RTP session is established again. To end the multicast RTP session, press the multicast paging key again or press the EndCall soft key.
-
Page 128
User Guide for the SIP-T23P/T23G IP Phone ACD is often used in offices for customer service, such as call center. The ACD system handles large volumes of incoming calls from callers who have no need to talk to a specific person but who require assistance from any of multiple persons at the earliest opportunity. -
Page 129: Messages
Advanced Phone Features After configuring an ACD key, you can press the ACD key to log into the ACD system After logging in, you are ready to receive calls from the . You can press the ACD system ACD key to show your current ACD user status. You can press the Avail/Unavail soft key to change your ACD user status.
-
Page 130
User Guide for the SIP-T23P/T23G IP Phone To read a text message: Press Menu-> Message->Text Message->Inbox. Select the desired message and press the View soft key. Note If the phone prompts receiving new text messages, you can also press the View soft key to read the new messages directly. -
Page 131
Advanced Phone Features To reply a text message: Press Menu->Message->Text Message->Inbox. Select the desired message and press the Reply soft key. Compose the new text message. You can press the abc soft key to change the input mode. Press the Send soft key after completing the content. Check the From and To fields, and then press the Send soft key. -
Page 132: Voice Mail
User Guide for the SIP-T23P/T23G IP Phone You can leave voice mails for someone else using the SIP-T23P/T23G IP phone. You can also listen to voice mails that are stored in a voice mailbox. When receiving a new voice mail, the phone will play a warning tone, and the power indicator LED will slow flash red. The LCD screen will prompt that the phone receives a new message with the number of waiting voice mails (e.g., 51 new Voice Mail) and display an icon.
-
Page 133: Message Waiting Indicator (Mwi)
Advanced Phone Features To listen to voice mails: When the LCD screen prompts that the phone receives a new voice mail and the power indicator LED slow flashes red, press or the Connect soft key to dial out the voice mail access code. Follow the voice prompt to listen to your voice mails.
-
Page 134
User Guide for the SIP-T23P/T23G IP Phone The MWI subscription parameters you need to know: Options Description Subscribe for MWI Enable or disable a subscription for MWI service. Period of MWI subscription. The IP phone sends a MWI Subscription Period refresh SUBSCRIBE request before initial SUBSCRIBE expiration. -
Page 135
Advanced Phone Features Enter the period time in the MWI Subscription Period (Seconds) field. Click Confirm to accept the change. The IP phone will subscribe to the account number for MWI service by default. To enable subscribe MWI to voice mail via web user interface: Click on Account. -
Page 136
User Guide for the SIP-T23P/T23G IP Phone The IP phone will subscribe to the voice mail number for MWI service using Subscribe MWI to Voice Mail. Note MWI subscription is configurable via web user interface only. -
Page 137: Troubleshooting
Troubleshooting This chapter provides general troubleshooting information to help you solve the problems you might encounter when using your SIP-T23P/T23G IP phone. If you require additional information or assistance with your new phone, contact your system administrator. Why is the LCD screen blank? Ensure that the phone is properly plugged into a functional AC outlet.
-
Page 138: Phone Installation
User Guide for the SIP-T23P/T23G IP Phone How to obtain the MAC address of a phone when the phone is not powered on? Three ways to obtain the MAC address of a phone: You can ask your supplier for the shipping information sheet which includes MAC …
-
Page 139
Troubleshooting Activation/Deactivation on page 48. Check that the headset volume is adjusted to an appropriate level. Refer to Volume on page 27. What is the difference between user name, register name and display name? Both user name and register name are defined by the server. A user name is used to identify the account while a register name matched with a password is used for authentication if the server requires. -
Page 140
User Guide for the SIP-T23P/T23G IP Phone Why can’t I send an SMS to any other phone? depends on support from a SIP server. Contact your system administrator for more information. How to change the user password? To change the user password via web user interface: Click on Security->Password. -
Page 141
Troubleshooting Select the desired value (Optional or Compulsory) from the pull-down list of RTP Encryption (SRTP). Click Confirm to accept the change. Note SRTP is not available on all servers. Contact your system administrator for more information. SRTP is configurable via web user interface only. How to reboot the phone? To reboot the phone via web user interface: Click on Settings->Upgrade. -
Page 142
User Guide for the SIP-T23P/T23G IP Phone How to export PCAP trace? We may need you to provide a PCAP trace to help analyze your problem. To export a PCAP trace via web user interface: Click on Settings->Configuration. Click Start to begin capturing signal traffic. Recreate the error to be documented in the trace. -
Page 143
Troubleshooting Mark the Local radio box in the Export System Log field. Click Export to open file download window, and then save the file to your local system. You can also export the system log to the syslog server. Contact your system administrator for more information. -
Page 144
User Guide for the SIP-T23P/T23G IP Phone How to reset the phone? Reset the phone to factory configurations after you have tried all troubleshooting suggestions but do not solve the problem. You need to note that all customized settings will be overwritten after reset. To reset the phone via phone user interface: Press Menu->Settings->Advanced Settings (default password: admin) ->Reset to Factory. -
Page 145: Regulatory Notices
Without prior written consent, no organization or individual is permitted to make any change to the structure or the safety design of the device. Yealink is under no circumstance liable to consequences or legal issues caused by such changes.
-
Page 146
User Guide for the SIP-T23P/T23G IP Phone Please place no heavy objects on the device in case of damage and deformation caused by the heavy load. Keep at least 10 cm between the device and the closest object for heat … -
Page 147: Appendix A — Time Zones
Appendix A-Time Zones Time Zone Time Zone Name Samoa US-Hawaii-Aleutian, US-Alaska-Aleutian -9:30 French Polynesia US-Alaska Time Canada(Vancouver,Whitehorse), Mexico(Tijuana,Mexicali), US-Pacific Time Canada(Edmonton,Calgary), Mexico(Mazatlan,Chihuahua), US-MST no DST, US-Mountain Time Canada-Manitoba(Winnipeg), Chile(Easter Islands), Mexico(Mexico City,Acapulco), US-Central Time Bahamas(Nassau), Canada(Montreal,Ottawa,Quebec), Cuba(Havana), US-Eastern Time -4:30 Venezuela(Caracas) Canada(Halifax,Saint John), Chile(Santiago), Paraguay(Asuncion), UK(Falkland Islands),…
-
Page 148
User Guide for the SIP-T23P/T23G IP Phone Time Zone Time Zone Name +9:30 Australia(Adelaide), Australia(Darwin) Australia(Brisbane), Australia(Hobart), Australia(Sydney,Melboume,Canberra), Russia(Vladivostok) +10:30 Australia(Lord Howe Islands) New Caledonia(Noumea), Russia(Srednekolymsk Time) +11:30 Norfolk Island New Zealand(Wellington,Auckland), Russia(Kamchatka Time) +12:45 New Zealand(Chatham Islands) Tonga(Nukualofa) +13:30 Chatham Islands Kiribati… -
Page 149: Basic Network Settings
Index Directory About This Guide Dual Headset Account Management Do Not Disturb (DND) Account Registration Documentations Adding Contacts DSS Keys Adding Groups Administrator password Anonymous Call Anonymous Call Rejection Editing Contacts Answering Calls Editing Groups Area Code Emergency Number Attaching Stand Ending Calls Audio Settings Auto Answer…
-
Page 150: System Customizations
User Guide for the SIP-T23P/T23G IP Phone Messages Time Zones Message Waiting Indicator Troubleshooting Multicast Paging Music on Hold Voice Mail Volume Network Conference Network Connection No answer Forward Warranty Web User Interface WEEE Warning Outgoing Intercom Calls Overview Optional Accessories Packaging Contents Phone Initialization Phone Installation…
This manual is also suitable for:
Sip-t23p
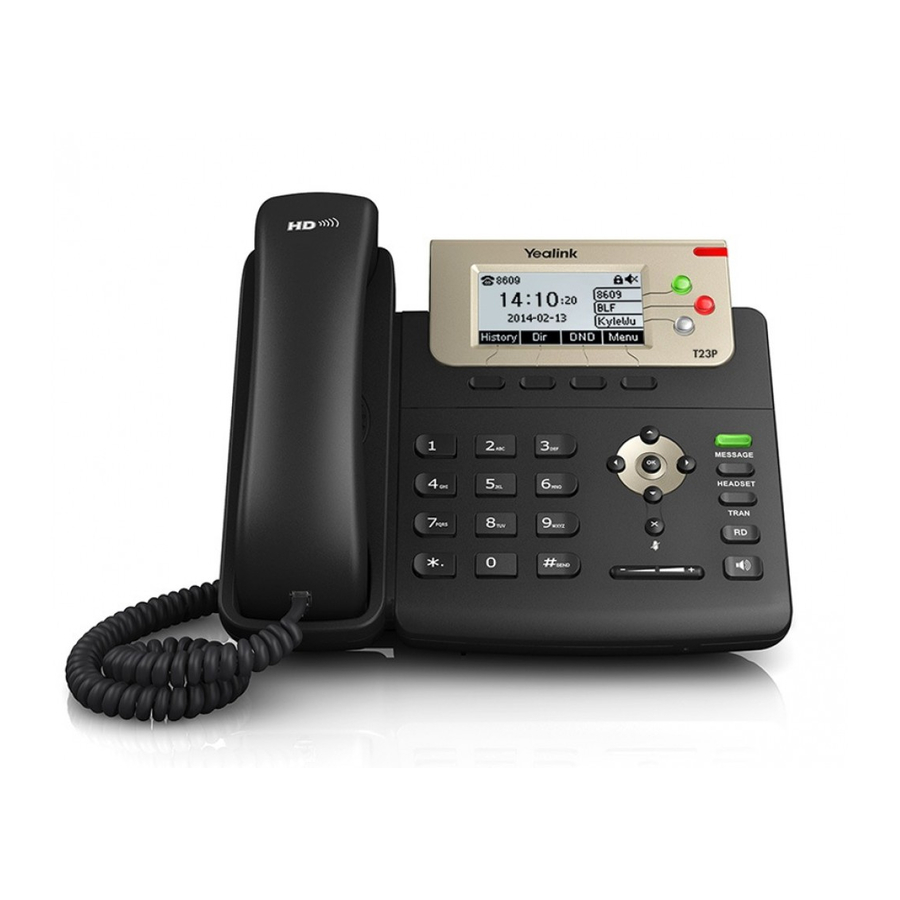
Руководство пользователя телефона Yealink

Руководство пользователя телефона Yealink
Комплект поставки
Следующие предметы включены в ваш пакет. Если вы обнаружите, что чего-то не хватает, обратитесь к системному администратору.

Примечание: Мы рекомендуем использовать аксессуары, предоставленные или одобренные Yealink. Неутвержденные аксессуары сторонних производителей могут снизить производительность.
Сборка вашего телефона
1. Прикрепите подставку:

2. Дополнительно: прикрепите настенный кронштейн:

Примечание: Сначала вам нужно прикрепить кнопку настенного крепления к настенному кронштейну, чтобы зацепить трубку и предотвратить ее соскальзывание.
3. Подключите телефонную трубку и дополнительную гарнитуру.

Примечание: Гарнитуру необходимо приобретать отдельно.
4. Подключите питание переменного тока или PoE.

Примечание: IP-телефон следует использовать только с оригинальным адаптером питания Yealink (5 В / 1.2 А). Использование адаптера питания стороннего производителя может повредить телефон.
5. Подключитесь к сети.

Инструкции по аппаратным компонентам

- Светодиодный индикатор питания
- Сенсорный экран
- ГАРНИТУРА Клавиша
- Клавиша MUTE
- Клавиша громкой связи
- Клавиша громкости
- СООБЩЕНИЕ Клавиша
- Динамик
- Клавиатура
- Порт USB2.0

Стартап
После подключения телефона Teams к сети и подачи питания он автоматически начинает процесс инициализации. После запуска выберите нужный язык, а затем телефон отобразит экран входа в систему.

Войдите или выйдите из своей учетной записи Microsoft Online
Вы можете войти в свою учетную запись Microsoft в Интернете или выйти из нее по телефону.
Чтобы войти в свою учетную запись Microsoft в Интернете:
- Нажмите Войти.
Вы автоматически подключитесь к корпоративному порталу. - Следуйте инструкциям на экране.
Если вы выберете общий режим, вы сможете совершать звонки, принимать звонки и присоединяться к запланированным командам.
встречи.
Чтобы выйти из своей учетной записи Microsoft в Интернете:
- Нажмите
 в верхнем левом углу сенсорного экрана.
 - Нажмите «Настройки» -> «Выйти».
Блокировка телефона
Вы можете включить функцию блокировки телефона, чтобы предотвратить его несанкционированное использование.
Чтобы включить функцию блокировки телефона:
- Коснитесь в верхнем левом углу сенсорного экрана.
- Перейдите в Настройки-> Настройки устройства-> Блокировка телефона.
- Включите Lock Enable.
- Введите PIN-код блокировки в поле Новый PIN-код.
- Введите PIN-код блокировки еще раз в поле Подтвердите PIN-код.
- Выберите желаемое значение в поле Тайм-аут простоя.
- Нажмите, чтобы принять изменение.
Телефон автоматически блокируется, если он не используется в течение определенного времени.
Чтобы разблокировать телефон:
- Коснитесь, когда телефон заблокирован.
- Введите PIN-код разблокировки.
Измените свой статус присутствия
Информация о вашем присутствии — это быстрый способ другим людям увидеть ваш статус доступности. Ты можешь
измените его вручную, если хотите.
Чтобы изменить свой статус присутствия:
- Нажмите в верхнем левом углу сенсорного экрана.
- Коснитесь поля статуса присутствия, чтобы выбрать желаемый статус.
Основные функции вызова


Встреча команд
Чтобы запланировать встречу:
- Нажмите Встречи на сенсорном экране.
- Нажмите
 .
. - Введите название, добавьте участников и выберите время начала и время окончания.
Вы можете включить Весь день назначить встречу на целый день. - Введите местоположение и выберите период повторения.
- Чтобы показать другим, что вы доступны в это время, коснитесь Показать как поле, а затем выберите Занято, Свободно, предварительный or Вне офиса.
- Необязательно: введите описание встречи.
- Нажмите
 запланировать встречу.
 .
.Чтобы присоединиться к запланированной встрече:
- Коснитесь «Встречи» на сенсорном экране.
- Нажмите «Присоединиться» рядом с встречей.
Нормативные уведомления
Температура окружающей среды при эксплуатации
- Рабочая температура: от +32 до 104 ° F (от 0 до 40 ° C)
- Относительная влажность: от 5% до 90%, без конденсации
- Температура хранения: от -22 до + 160 ° F (от -30 до + 70 ° C)
Гарантия
Наша гарантия на продукт ограничивается только самим устройством при нормальном использовании в соответствии с инструкциями по эксплуатации и системной средой. Мы не несем ответственности за ущерб или убытки, возникшие в результате использования этого продукта, а также за любые претензии третьих лиц. Мы не несем ответственности за проблемы с устройством Yealink, возникшие в результате использования этого продукта; мы не несем ответственности за финансовые убытки, упущенную выгоду, претензии третьих лиц и т. д., возникшие в результате использования этого продукта.
Пояснение к символам
- Символ постоянного тока это постоянный токtagсимвол е.
- Символ предупреждения WEEE
 Чтобы избежать потенциального воздействия на окружающую среду и здоровье человека в результате присутствия опасных веществ в электрическом и электронном оборудовании, конечные пользователи электрического и электронного оборудования должны понимать значение символа перечеркнутого мусорного бака на колесах. Не выбрасывайте WEEE вместе с несортированными бытовыми отходами, их необходимо собирать отдельно.
 - Директива об ограничении использования опасных веществ (RoHS)
Это устройство соответствует требованиям директивы ЕС RoHS. Заявления о соответствии можно получить, связавшись с support@yealink.com.
 Чтобы избежать потенциального воздействия на окружающую среду и здоровье человека в результате присутствия опасных веществ в электрическом и электронном оборудовании, конечные пользователи электрического и электронного оборудования должны понимать значение символа перечеркнутого мусорного бака на колесах. Не выбрасывайте WEEE вместе с несортированными бытовыми отходами, их необходимо собирать отдельно.
Инструкции по технике безопасности
Сохраните эти инструкции. Перед использованием прочтите эти инструкции по технике безопасности! общие требования
- Перед установкой и использованием устройства внимательно прочтите инструкции по технике безопасности и проследите за ситуацией во время эксплуатации.
- Во время хранения, транспортировки и эксплуатации всегда содержите устройство в сухом и чистом состоянии, избегайте столкновений и столкновений.
- Постарайтесь не разбирать устройство самостоятельно. В случае каких-либо расхождений, пожалуйста, обратитесь в назначенный сервисный центр для ремонта.
- Пожалуйста, соблюдайте соответствующие законы и нормативные акты при использовании устройства. Также следует уважать законные права других лиц. требования к окружающей среде
- Установите устройство в хорошо проветриваемом месте. Не подвергайте устройство воздействию прямых солнечных лучей.
- Следите за тем, чтобы устройство было сухим и защищенным от пыли.
- Не ставьте устройство на легковоспламеняющиеся или огнеупорные предметы, например на резиновые материалы, или рядом с ними.
- Держите устройство вдали от источников тепла или открытого огня, например свечей или электрических обогревателей. Требования к эксплуатации
- Не позволяйте детям управлять устройством без присмотра.
- Не позволяйте детям играть с устройством или какими-либо аксессуарами в случае случайного проглатывания.
- Используйте только аксессуары, предоставленные или разрешенные производителем.
- Источник питания устройства должен соответствовать требованиям входного напряжения.tagе устройства. Используйте только прилагаемую розетку для защиты от перенапряжения.
- Перед подключением или отключением любого кабеля убедитесь, что ваши руки полностью сухие.
- Не проливайте какие-либо жидкости на изделие и не используйте оборудование рядом с водой, напримерample, рядом с ванной, умывальником, кухонной раковиной, влажным подвалом или около бассейна.
- Во время грозы прекратите использование устройства и отключите его от электросети. Отключите вилку кабеля питания и витую пару асимметричной цифровой абонентской линии (ADSL) (радиочастотный кабель), чтобы избежать удара молнии.
- Если устройство не используется в течение длительного времени, отключите его от источника питания и выньте вилку из розетки.
- При появлении дыма, исходящего от устройства, ненормального шума или запаха, отключите устройство от источника питания и немедленно выньте вилку из розетки.
- Обратитесь в указанный сервисный центр для ремонта.
- Не вставляйте в слоты оборудования какие-либо предметы, которые не являются частью продукта или вспомогательного продукта.
- Перед подключением кабеля сначала подключите заземляющий кабель устройства. Не отсоединяйте заземляющий кабель, пока не отсоедините все остальные кабели. Требования к эксплуатации
- Перед очисткой устройства отключите его от источника питания.
- Для очистки устройства используйте кусок мягкой сухой антистатической ткани.
- Следите за тем, чтобы вилка шнура питания была чистой и сухой.
Решение Проблем
Устройство не может подавать питание на другое устройство, кроме устройства Yealink.
Плохое соединение с вилкой.
1. Протрите вилку сухой тканью.
2. Подключите его к другой розетке.
Условия эксплуатации вне диапазона рабочих температур.
1. Используйте в диапазоне рабочих температур.
Кабель между устройством и устройством Yealink подключен неправильно.
1. Подключите кабель правильно.
Невозможно правильно подключить кабель.
1. Возможно, вы подключили не то устройство Yealink.
2. Используйте правильный блок питания.
В порту может быть пыль и т. Д.
1. Очистите порт.
По любым дополнительным вопросам обращайтесь к своему дилеру или в авторизованный сервисный центр.
Заявление FCC
Это устройство соответствует части 15 правил FCC. Эксплуатация возможна при соблюдении следующих двух условий: (1) это устройство не может создавать вредных помех, и (2) это устройство должно принимать любые принимаемые помехи, включая помехи, которые могут вызвать нежелательную работу. Любые изменения или модификации, прямо не одобренные стороной, ответственной за соответствие, могут лишить пользователя права на эксплуатацию оборудования.
Заявление IC
Это устройство соответствует требованиям RSS Министерства промышленности Канады. Эксплуатация возможна при соблюдении следующих двух условий:
(1) это устройство не должно вызывать помех; а также
(2) это устройство должно принимать любые помехи, включая помехи, которые могут вызвать нежелательную работу устройства. БАНКА ICES-3 (B)
Заявление о радиационном воздействии
Это оборудование соответствует ограничениям на радиационное воздействие FCC и IC, установленным для неконтролируемой среды. Это оборудование следует устанавливать и эксплуатировать на минимальном расстоянии 20 см между радиатором и вашим телом.
Контактная информация
YEALINK NETWORK TECHNOLOGY CO., LTD.
309, 3-й этаж, № 16, Yun Ding North Road, район Хули, город Сямынь, Фуцзянь, КНР
YEALINK (ЕВРОПА) NETWORK TECHNOLOGY BV
Strawinskylaan 3127, здание Атриум, 8-й этаж, 1077ZX Амстердам, Нидерланды
YEALINK (США) NETWORK TECHNOLOGY CO., LTD.
999 Peachtree Street Suite 2300, Фултон, Атланта, Джорджия, 30309, США
Сделано в Китае
О Yealink
Yealink — ведущий мировой поставщик решений для корпоративной связи и совместной работы, предлагающий услуги видеоконференцсвязи предприятиям по всему миру. Сосредоточившись на исследованиях и разработках, Yealink также настаивает на инновациях и творчестве. Обладая выдающимися техническими патентами на облачные вычисления, технологию обработки аудио, видео и изображений, Yealink создала панорамное решение для совместной работы в области аудио- и видеоконференций, объединив свои облачные сервисы с рядом продуктов для конечных точек. Как один из лучших провайдеров в более чем 140 странах и регионах, включая США, Великобританию и Австралию, Yealink занимает первое место на мировом рынке поставок SIP-телефонов.
Техподдержка
Посетите Yealink WIKI (http://support.yealink.com/) для получения последней версии прошивки, руководств, часто задаваемых вопросов, документации по продуктам и т. д. Для лучшего обслуживания мы искренне рекомендуем вам использовать систему Yealink Ticketing (https://ticket.yelink.com) для отправки всех ваших технических вопросов.
FAQS
Будет ли этот телефон работать с Zoom Phone?
мы не работаем с брендом Zoom и никогда не тестировали телефон с брендом, с которым мы не работаем.
IP-телефон yealink t57w разлочен? я хотел бы использовать его с сервисом callcentric.
Если вы покупаете у TelephoneKing, все наши телефоны поставляются разблокированными и имеют гарантию производителя. Уточните у своего провайдера, можете ли вы принести свое устройство и совместимо ли оно с их услугами.
Нужно ли платить за услугу voip, чтобы этот телефон работал?
Для использования по назначению этот телефон должен подключаться к серверу VoIP. Вы можете подключить телефон к собственному серверу VoIP. Существуют услуги VoIP с открытым исходным кодом, но, вероятно, потребуются некоторые затраты на покупку оборудования и обслуживание сервера. Также потребуются затраты на получение рабочего номера телефона и т. д. Если вы не знакомы с этими элементами, скорее всего, будет предложено использовать услугу VoIP. Есть много переменных, но большинство бизнес-решений стоят около 20-40 долларов в месяц за линию.
Можно ли использовать его с Google Voice?
Голос Google не совместим ни с одним SIP-телефоном.
Будет ли это работать с командами Microsoft?
Отличный телефон, сенсорный экран, заставка, приятная графика, много функций.
В чем разница между т57в и т57в прайм бизнес
просто дубликат листинга на амазоне.
Можно ли назначить другой добавочный номер беспроводным телефонам (w56h), подключенным к этому t57w через ключ dect dd10k?
Да, вы можете назначить любую из 16 учетных записей на YT57W любому из 4 возможных подключенных телефонов DECT, например W56H. Я просто проверил это, чтобы убедиться, прежде чем ответить на ваш вопрос. Получайте удовольствие!
Есть ли способ сделать экран тусклым или спать, когда он не используется или не принимает звонки?
Да, в настройках телефона есть «Время ожидания подсветки», которое можно установить на разное время.
Работает ли это с бизнесом xfinity? не sip линия
Yealink T57W — это SIP-телефон, который работает с услугой VoIP, которую вы получаете от поставщика услуг. Обычно поставщики услуг предоставляют своим клиентам список телефонов, сертифицированных для работы в их сетях.
Как я могу изменить DNS-сервер моего телефона Yealink?
Вы можете изменить DNS-сервер вашего телефона Yealink с помощью меню «Настройки».
Как я могу добавить пользователя в свою учетную запись Teams?
Вы можете добавить пользователя в свою учетную запись Teams, выполнив следующие действия:
1. Откройте Teams и войдите в свою учетную запись Microsoft. 2. Нажмите на свой профессиональныйfile фотографию и выберите «Люди и группы» в раскрывающемся списке. 3. Выберите «Добавить кого-то еще в эту группу», введите его адрес электронной почты и нажмите «Добавить». 4. Выберите Пригласить кого-то еще присоединиться к этой группе, введите его адрес электронной почты и нажмите Отправить приглашение. 5. Новый пользователь получит электронное письмо с приглашением и должен будет принять его, прежде чем он будет добавлен в вашу учетную запись Teams. 6. Если вы хотите создать новую группу Office 365, вам потребуется использовать Outlook на web или другое устройство, имеющее доступ к группам Office 365, например устройство iPhone или Android с Outlook Mobile или компьютер Mac с Outlook для Mac 2011 или более поздних версий (требуется Outlook для Mac 2016). 7. После создания новой группы Office 365 вам потребуется пригласить пользователей присоединиться к ней из Teams или Outlook на web (Outlook для Mac 2011 или более поздних версий). 8. Дополнительные сведения об управлении пользователями в группах Office 365 см. на странице https://support2.microsoft.com/en-us/help/121907/manage-users-in-office-365-groups. 9 . Чтобы узнать больше о том, как создать группу Office 365 из Teams, см. https://support2. майкрософт . com / en — нас / help / 121906 / создать — офис — 365 — группа — изнутри — команды . 10 . Чтобы узнать больше о том, как создать группу Office 365 из Outlook на web, пожалуйста, обратитесь к https: //support2. майкрософт . com / en — нас / help / 121905 / создать — офис — 365 — группа — изнутри — Outlook . 11 . Чтобы узнать больше о том, как создать группу Office 365 из Outlook для
Yealink хороший телефон?
Качество звука как в телефонной трубке, так и в громкой связи отличное., как мы и ожидали от Yealink. Звук трубки особенно хорош во время разговора по VoIP, кристально чистый и в высоком разрешении.
Является ли Yealink IP-телефоном?
Yealink занимает первое место. 1 место на мировом рынке IP-телефонов и входит в пятерку лидеров рынка видеоконференцсвязи (Frost & Sullivan, 5).
Йелинк китайская компания?
Yealink — китайская компания. и они производят свои телефоны в Китае.
Где находится Yealink?
Yealink Network Technology Corporation Limited является Китайоснованная компания, в основном занимающаяся исследованиями, разработками, продажами и сопутствующими услугами терминального оборудования для корпоративных коммуникаций. Компания работает в двух основных сегментах.
Какие услуги yealink предлагает партнерам yealink?
Платформа управления устройствами.
Облачная служба управления.
Управление USB-подключением.
Облачное управление ВК.
Как мне связаться со службой поддержки Yealink?
Выделенная техническая поддержка. С командой поддержки Yealink ваши технические проблемы будут решены быстро, в то же время вы можете получить доступ к нашим ресурсам поддержки 24 × 7 и самостоятельно искать ответы в Центре поддержки Yealink (http://support.yealink.com ).
Какой пароль по умолчанию для телефонов Yealink?
Пароль по умолчанию для входа в Yealink Phone:Администратор‘, который не является безопасным, рекомендуется изменить пароль на более безопасный. У вас также может возникнуть необходимость сбросить настройки всего телефона, если вы столкнетесь с какой-либо программной ошибкой телефона или забудете свой пароль.
Почему мой телефон Yealink говорит об отсутствии обслуживания?
Когда на IP-телефоне Yealink отображается надпись «Нет обслуживания», это означает устройству не удалось успешно зарегистрироваться в нашей сети. В случаях, когда телефон исправно работал в течение длительного времени и только внезапно появляется сообщение об ошибке, перезагрузка устройства обычно устраняет проблему.
Документы / Ресурсы
Рекомендации
1. Регистрация трубки на базе
Для регистрации дополнительной трубки на базовом блоке зажмите кнопку сопряжения до появления мигающей индикации, как это показано на рисунке 1, сразу после этого на привязываемой трубке нажмите кнопку регистрации (она будет показана как «Рег.» на экране трубки в левом нижнем углу). При регистрации базовый блок может запросить пароль. Пароль по умолчанию: 0000.
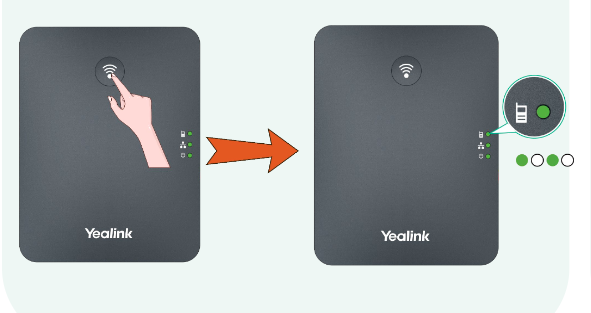
Рис. 1
Чтобы отменить регистрацию трубки на базовом блоке, необходимо зайти в меню и выбрать: «Настройки» → «Регистрация трубки» → «Отменить регистрацию трубки».
2. Подключение к веб-интерфейсу
Для настройки телефона необходимо зайти на его веб-интерфейс. Подключите базовый блок к вашей локальной сети. Если в вашей сети IP-адреса выдаются автоматически (по DHCP), зайдите в меню трубки, перейдите в меню «Статус» → «База». В поле «IPv4» будет указан IP-адрес (например 192.168.0.100). Отобразившийся адрес введите в адресную строку веб-браузера («Microsoft Edge», «Mozilla Firefox», «Google Chrome», «Яндекс Браузер» и др. ) и нажмите «Enter».
Откроется веб-интерфейс аппарата (Рис. 2) с просьбой ввести логин и пароль для входа в его меню. Логин по умолчанию — admin, пароль по умолчанию — admin.
Примечание: В случае, если базовый блок с трубкой приобретался у компании «Телфин» и был настроен ее сотрудниками, пароль будет иметь следующий формат: 8357446КОД_КЛИЕНТА (например 8357446XYZ12345).
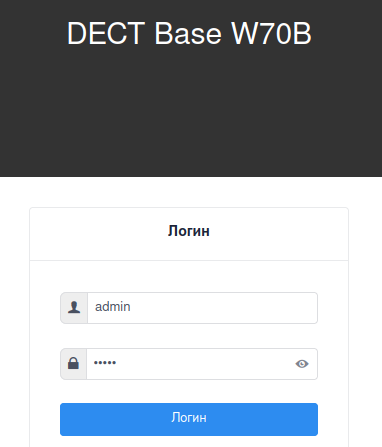
Рис. 2
3. Настройка регистрации аккаунта
Для настройки SIP-аккаунта откройте вкладку «Аккаунт» → «Регистрация» (Рис. 3, Рис. 4).
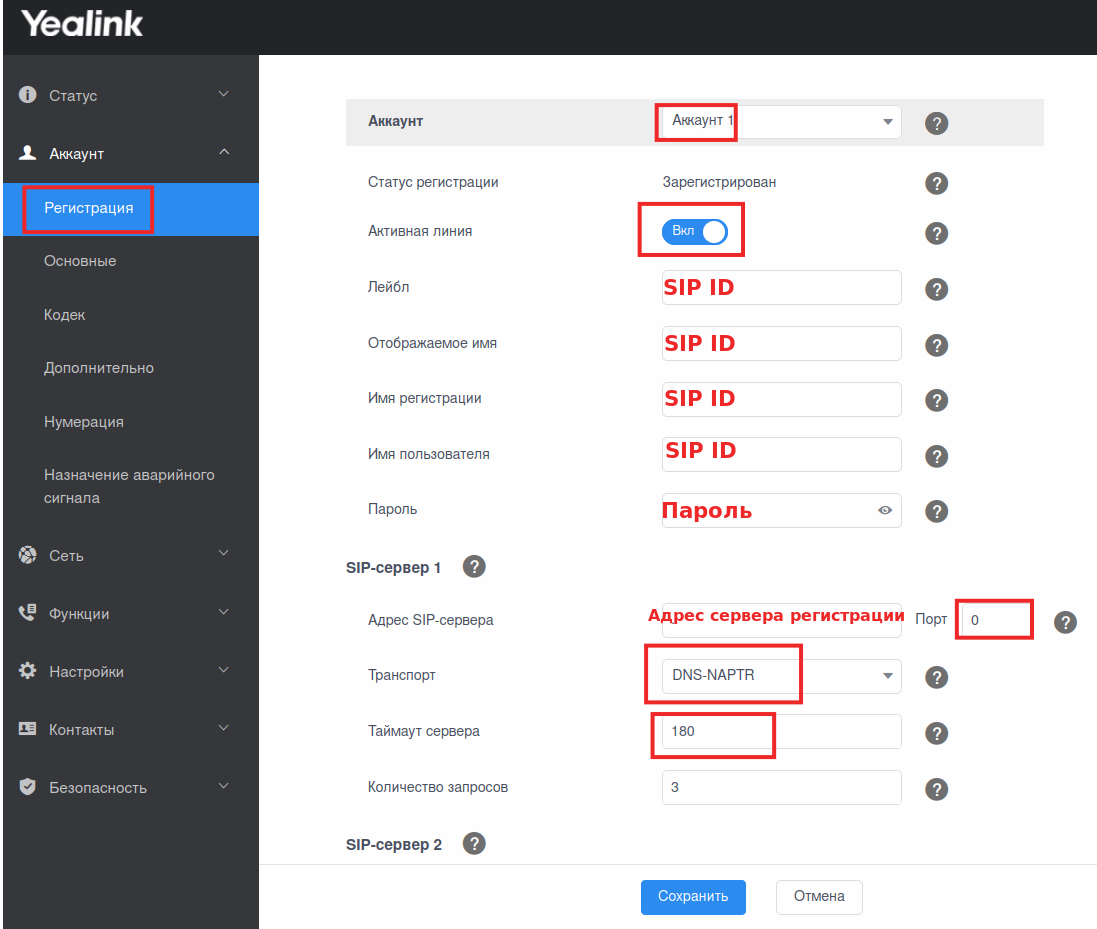
Рис. 3
При настройке телефона на добавочный виртуальной АТС «Телфин.Офис»*:
«Лейбл» / «Отображаемое имя» / «Имя регистрации» / «Имя пользователя» — SIP ID добавочного, вида «xxxx*номер_добавочного».
«Пароль» — пароль добавочного виртуальной АТС «Телфин.Офис».
«Адрес SIP-сервера» / «Адрес сервера регистрации» — адрес вашего «Телфин.Офиса», указанный в высланном вам на эл.почту файле PDF с данными по АТС.
«Порт SIP-сервера» / «Порт» — 0 (Ноль — для корректной работы резервирования связи)
«Транспорт» — DNS-NAPTR
«Таймаут сервера» — 180.
* — Логин (SIP ID) вида «xxxx*номер_добавочного» для настройки оборудования находится в разделе АТС Телфин «Сотрудники и Очереди», в меню добавочного «Логины и пароли» > «Данные для настройки SIP-оборудования и ПО».
Также в этом же меню добавочного («Логины и пароли» > «Данные для настройки SIP-оборудования и ПО») вы можете задать пароль.
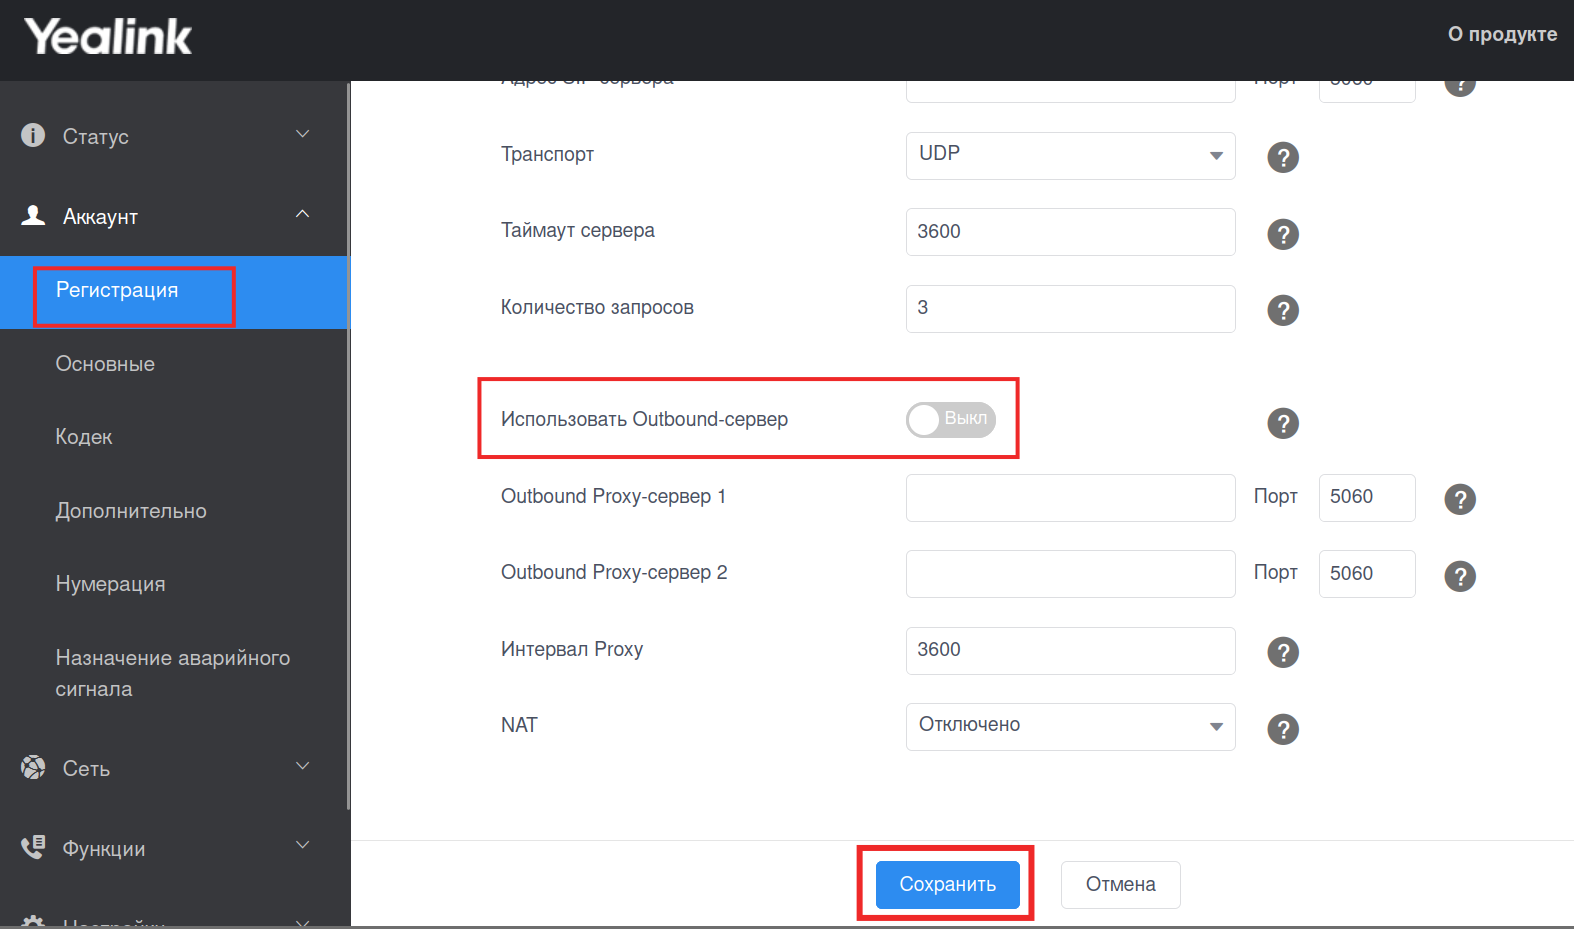
Рис. 4
Важно!
«Использовать Outbound-сервер» — Выкл. (для корректной работы резервирования связи)
Выполнив все действия по настройке, согласно описанным выше инструкциям, нажмите кнопку «Сохранить».
4. Кодеки
На вкладке «Аккаунт» в меню «Кодеки» выберите кодеки согласно рисунку 5. Чтобы применить изменения, нажмите кнопку «Сохранить».
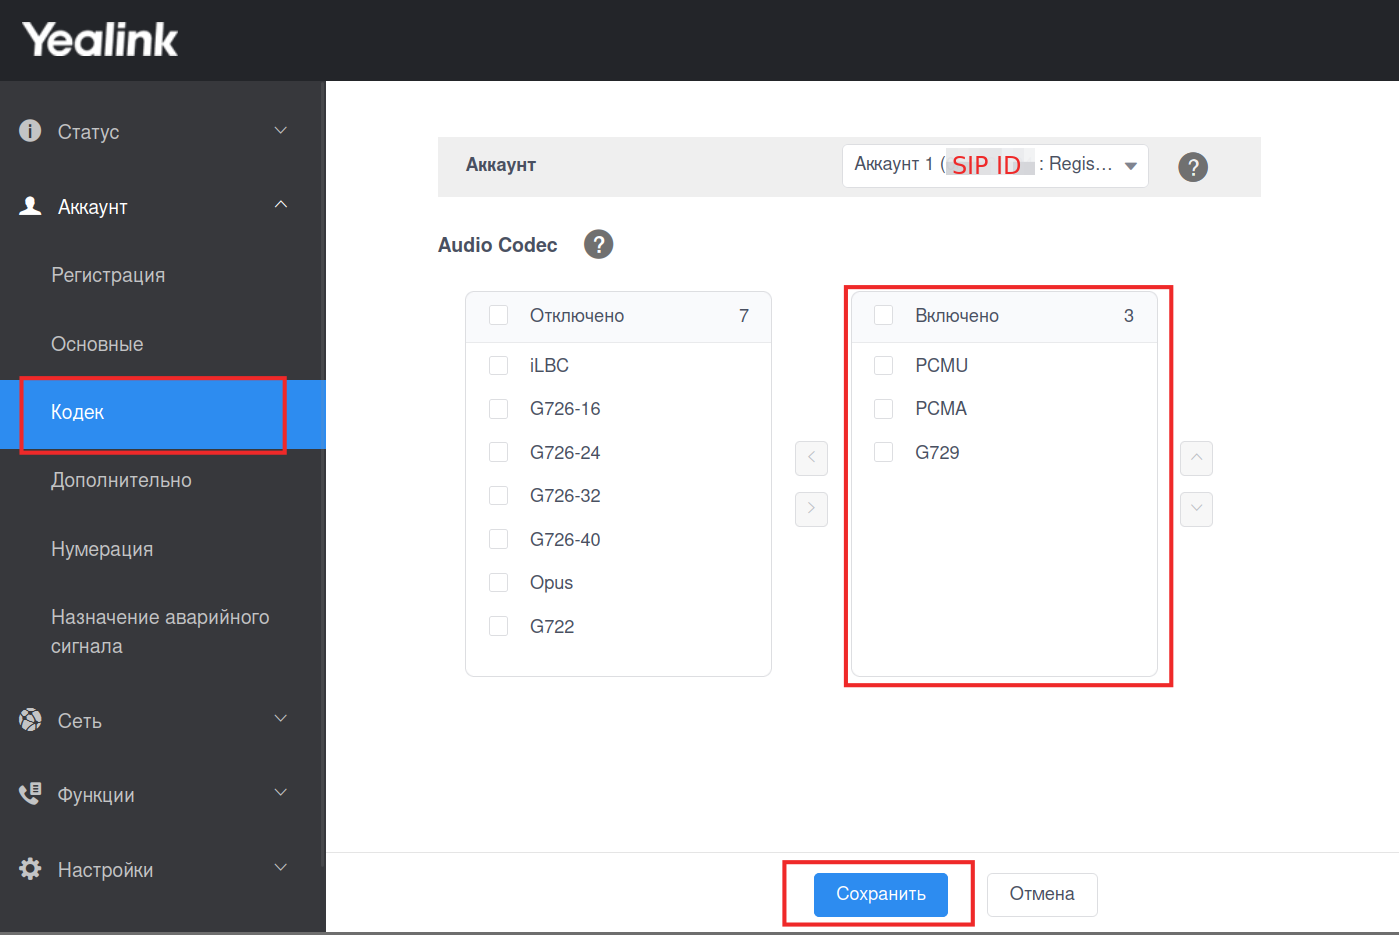
Рис. 5
5. Диапазон RTP-портов
Во вкладке «Сеть» → «Дополнительно» задайте диапазон RTP портов.
Рекомендация: Диапазон RTP портов на разных SIP-программах / SIP-устройствах, работающих в одной локальной сети , не должен совпадать. Задавать при этом рекомендуется любой диапазон, превышающий значение 10000.
Также проверьте настройки раздела «Веб-сервер». Чтобы применить изменения, нажмите кнопку «Сохранить». После этого базовый блок перезагрузится.
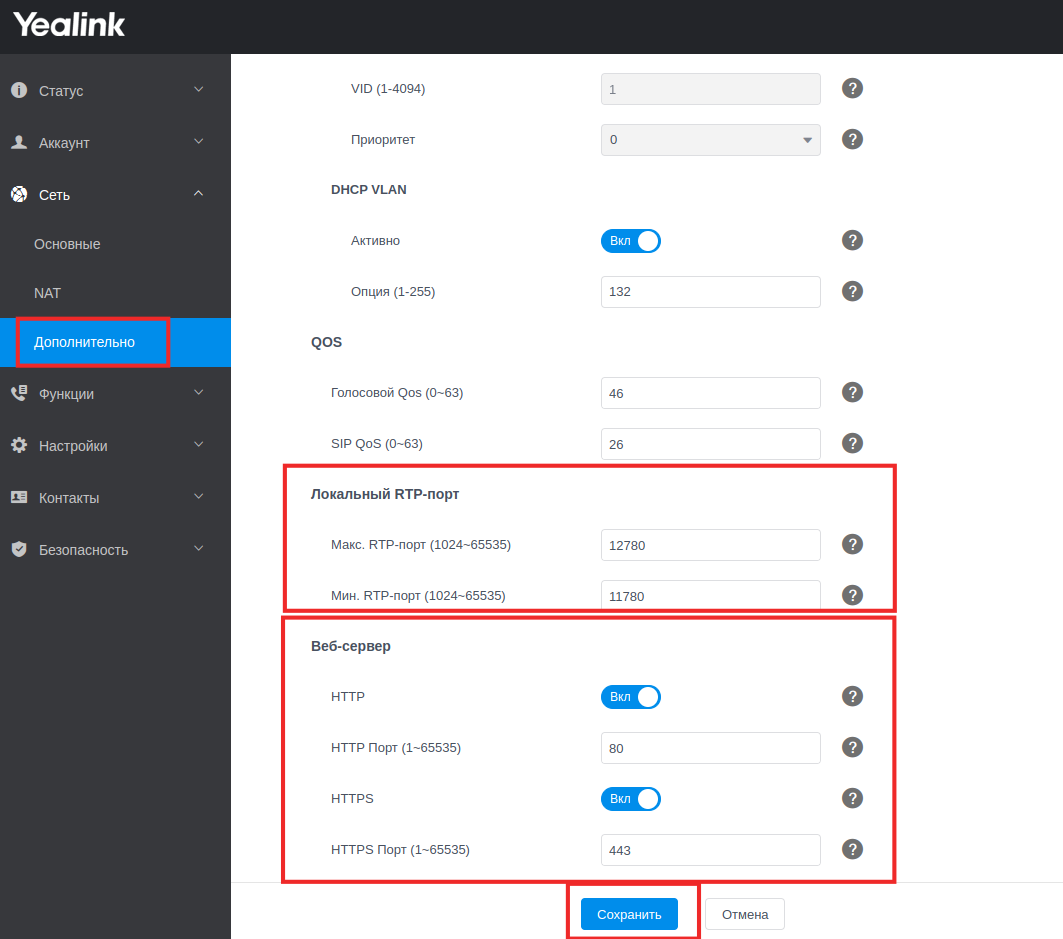
Рис. 6
6. Вкладка «Функции»
Во вкладке «Функции» → «Основные параметры» (Рис. 7) отключите «Режим ожидания» и выберите в поле «SIP-ответ при отклонении вызова» значение «603 (Отклонено)» . Чтобы применить изменения, нажмите кнопку «Сохранить».
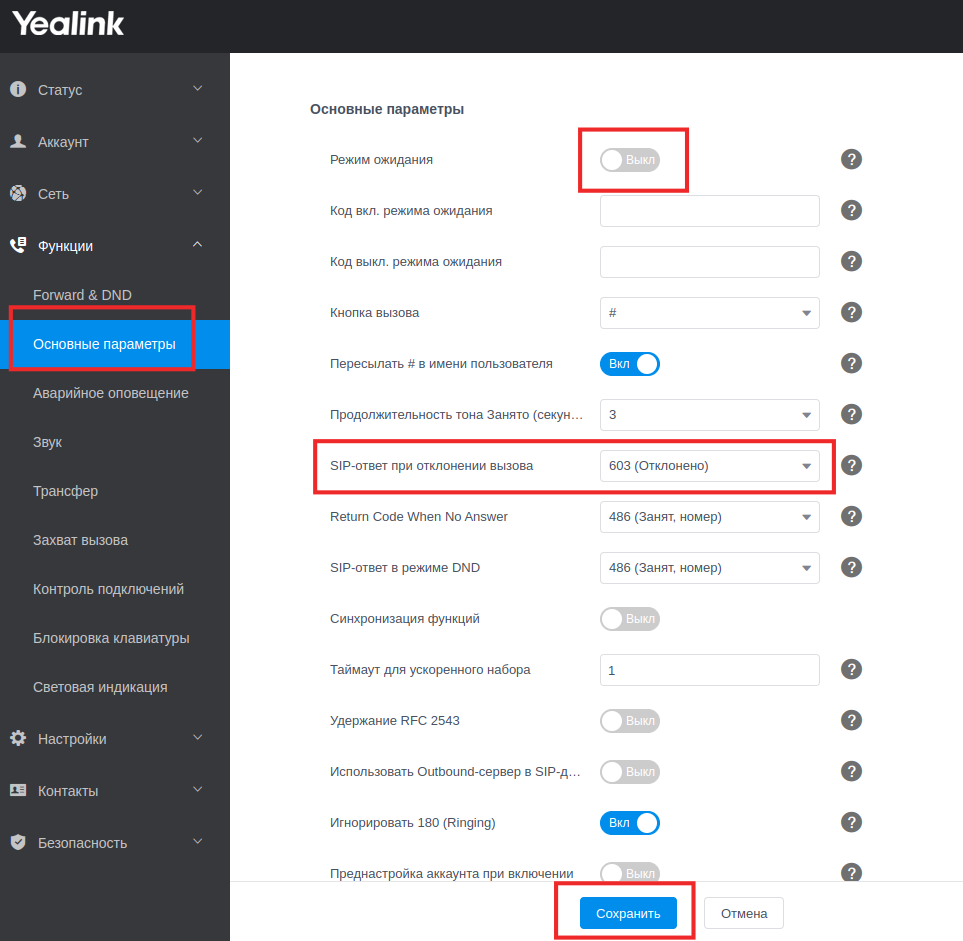
Рис. 7
7. Настройка локального SIP-порта
Во вкладке «Настройки» → «SIP» измените значение в поле «Локальный SIP-порт».
Рекомендация: Значение «Local SIP port» на SIP-программах / SIP-устройствах, работающих в одной локальной сети, не должно совпадать. Задавать при этом можно любой порт, превышающий значение 5062.
Чтобы применить изменения, нажмите кнопку «Сохранить»
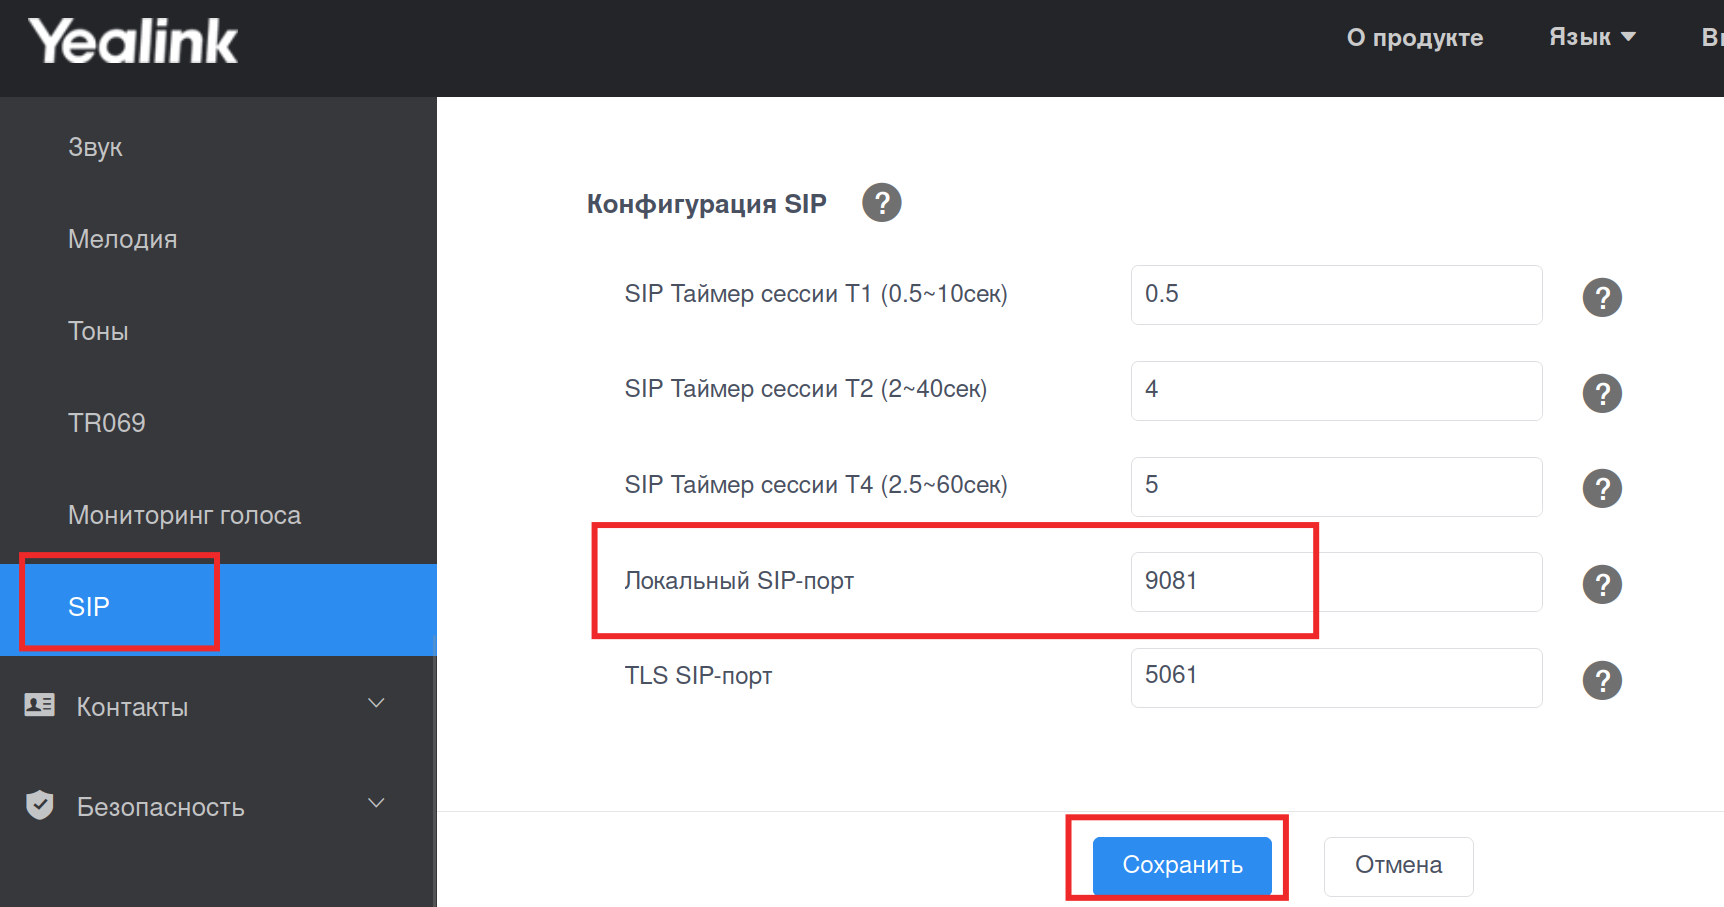
Рис. 8
8. Настройка имени трубки
Во вкладке «Статус» → «Handset & Voip» (Рис. 9) имеется возможность задать имена используемым трубкам, которые будут отображаться на дисплее трубок. Чтобы внесенные изменения применились, необходимо нажать на кнопку «Сохранить».

Рис. 9
9. Вкладка «Обновление ПО»
Во вкладке «Настройки» → «Обновление ПО» (Рис. 10) вы можете произвести сброс настроек как базового блока, так и трубки. Также здесь имеется возможность обновить программное обеспечение как базового блока, так и трубки.
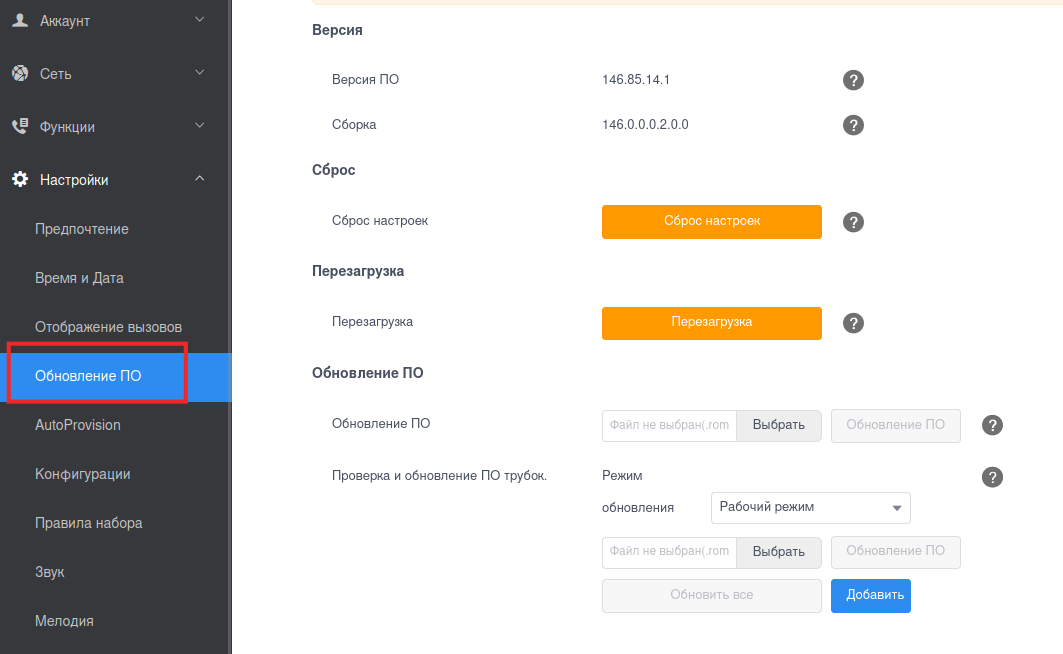
Рис. 10
10. Настройка безопасности
Во вкладке «Безопасность» → «Пароль» (Рис. 11) есть возможность изменить пароль для доступа к веб-интерфейсу базового блока (по умолчанию пароль доступа admin).
Примечание: В случае, если базовый блок с трубкой приобретался у компании «Телфин» и был настроен ее сотрудниками, пароль будет иметь следующий формат: 8357446КОД_КЛИЕНТА (например 8357446KNK12345).
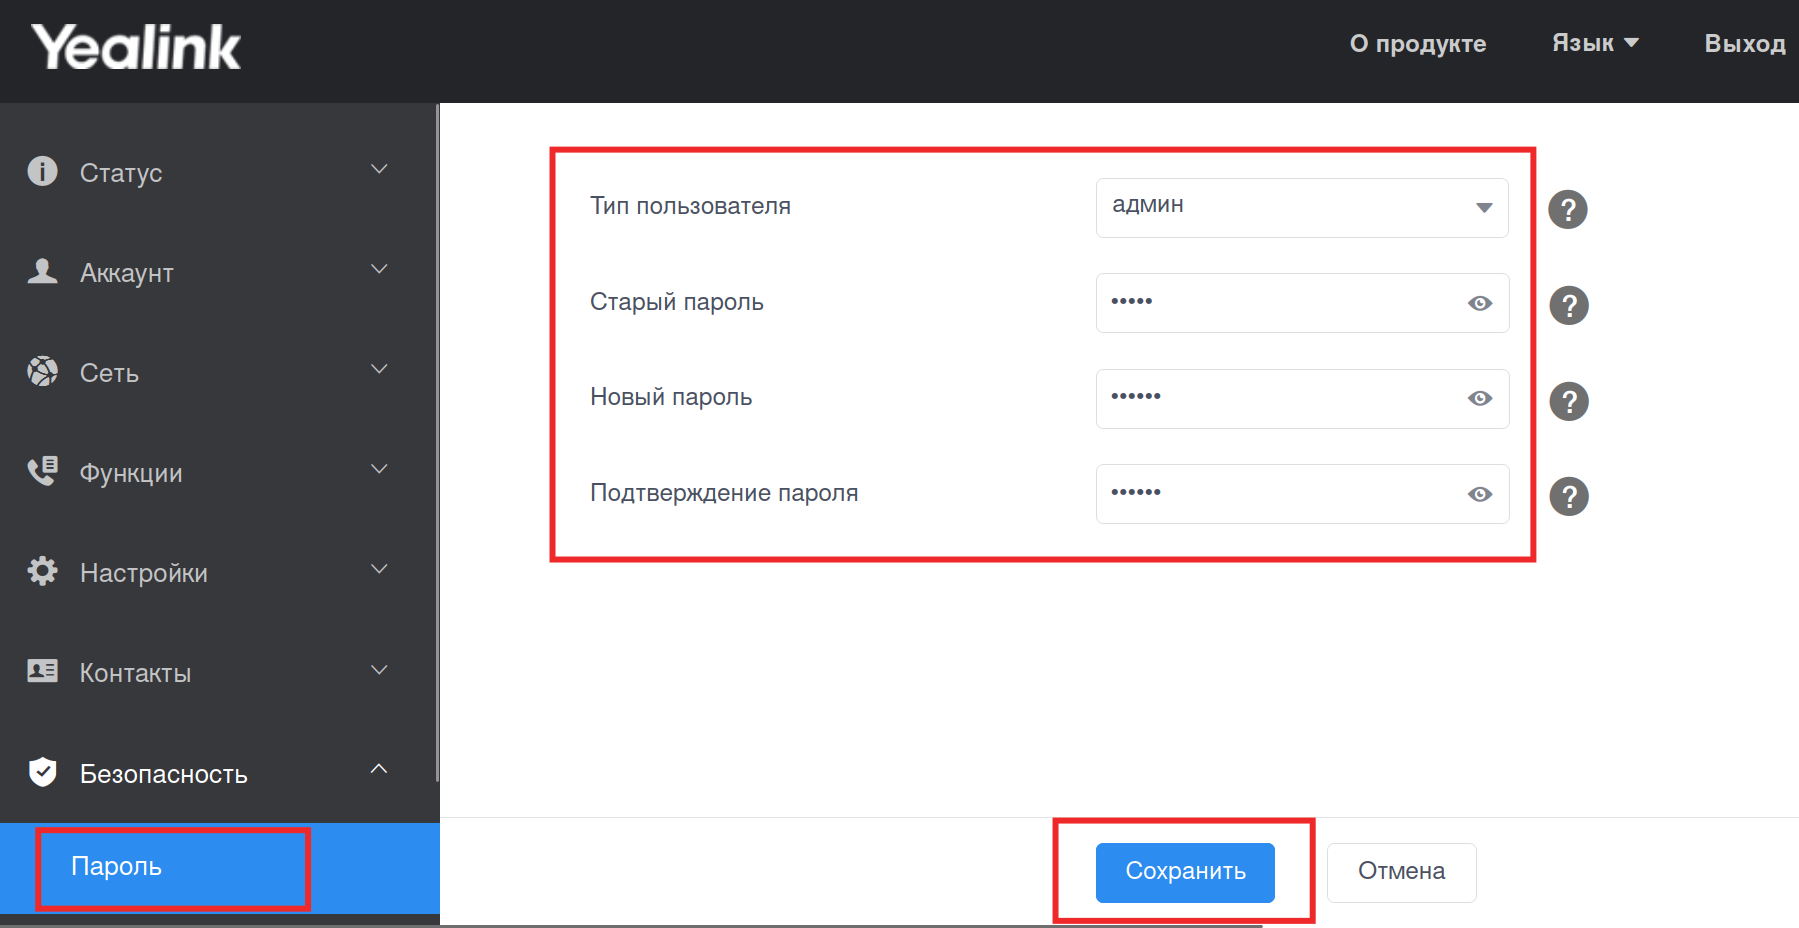
Рис. 11
Также можно задать пароль сопряжения трубки и базового блока, перейдя по вкладке «Безопасность» → «Стандартный пароль» (Рис. 12). PIN-код по умолчанию — 0000.
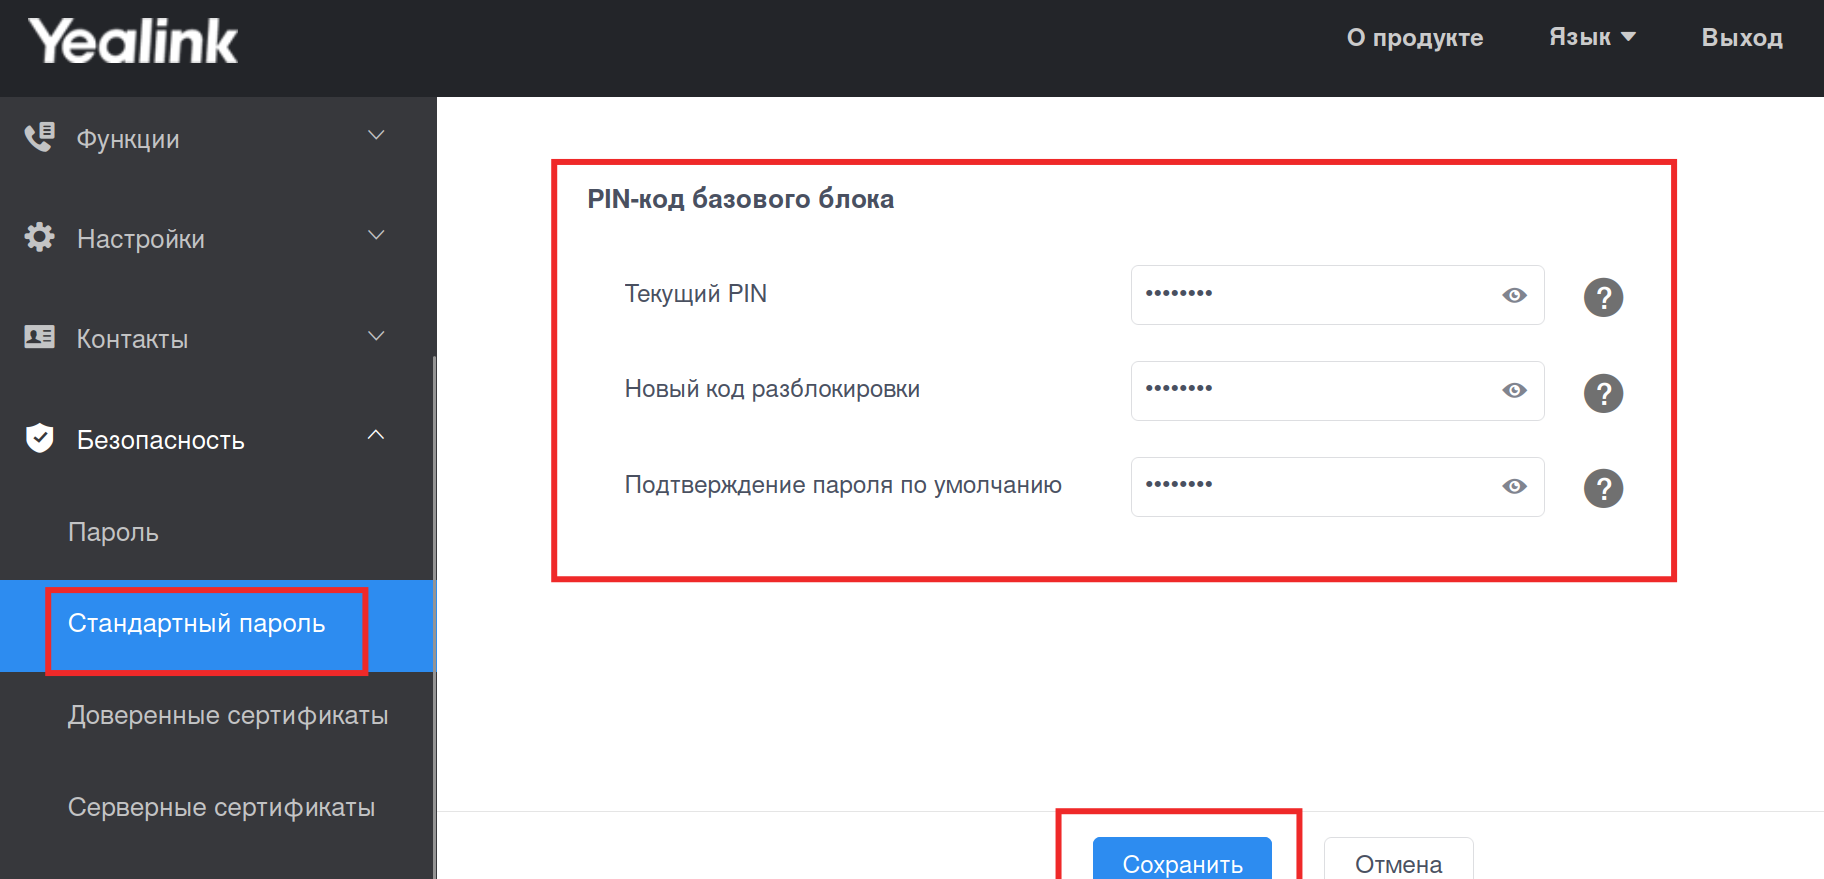
Рис. 12