-
Contents
-
Table of Contents
-
Bookmarks
Quick Links
IPTV MAG-200 High resolution device
Operator Guide
©Informir, 2009
Related Manuals for Infomir MAG-200
Summary of Contents for Infomir MAG-200
-
Page 1
IPTV MAG-200 High resolution device Operator Guide ©Informir, 2009… -
Page 2: Table Of Contents
MAG-200 Operator Guide Rev 1.05. Contents Definitions ……………………4 Boot loader for the device ……………….4 Boot loader menu………………..4 Description of the menu………………5 Bootloader upgrade………………..8 Setting operator key and logo……………..9 Preparation of the logo ………………9 Installation of the logo………………9 Actions after the device is switched on…………..10 Basic program loading from “NAND”…
-
Page 3
MAG-200 Operator Guide Rev 1.05. Re-start of the device with changing loading regime……….32 Supplements ……………………33 Location of sections innor-flash и nand-flash –memory……….33 Connectors on the back panel ………………33 Description of vendor-specific options …………..34 Example of the file dhcpd.conf………………35 Example of the file mcast.conf ………………37… -
Page 4: Definitions
MAG-200 Operator Guide Rev 1.05. Definitions Bootloader – Bootloader allows loading and starting the basic program. Basic program – the complex of software and hardware, which allows rendering services to the user. Bootstrap – Specially prepared image for the basic program upgrade. It consists of the Linux core and RAM root file system signed with a digital signature.
-
Page 5: Description Of The Menu
MAG-200 Operator Guide Rev 1.05. Menu description TV System It sets the mode of video outputs in the basic program. The basic program checks the value set in this item and correspondingly initializes the video output. This menu item sets the variable “tvsystem”. The following values are possible: •…
-
Page 6
MAG-200 Operator Guide Rev 1.05. Boot Mode Sets the mode of the basic program loading. The following values are possible. • DHCP; • NAND. Device Info Information of the device. The same information of the device and current IP can be obtained by issuing the command “/usr/bin/info.sh”… -
Page 7
MAG-200 Operator Guide Rev 1.05. Possible values: • Yes; • No. This menu item sets the variable “Ver_Forced” Upgrade Tools Use upgrade If the value “Yes” is chosen, the second image of the bootloader is set and the digital signature is checked; the second image shall be automatically started when the device is switched on. -
Page 8: Bootloader Upgrade
MAG-200 Operator Guide Rev 1.05. Exit & Discard Exit from the menu without saving the changes. Booloader upgrade The manufacturer installs the bootloader to the device but there is a possibility to install another copy of the bootloader prepared by the manufacturer. The second copy is stored in the section mtd2 nor- of the flash memory.
-
Page 9: Setting Operator Key And Logo
MAG-200 Operator Guide Rev 1.05. According to the protocol tftp the device loads the flash located on the route filename («mag200/Sboot») from the server specified in the next-server (192.168.1.1) and performs upgrading. If the option “Use upgrade” is set to “Yes”, it shall contain the following items when entering the bootloader menu: “Upgrade Tools”, “Def.
-
Page 10: Actions After The Device Is Switched On
MAG-200 Operator Guide Rev 1.05. vendor-option-space TeleTec; option TeleTec.logo_x 0; option TeleTec.logo_y 0; option TeleTec.bg_color 0x00006498; option TeleTec.fg_color 0x00FFFFFF; option TeleTec.oppubfile «mag200/op_stb_pub_sign.key»; According to the protocol tftp the device loads («mag200/ STB-bootlogo.bmp.gz «) from the server specified in the next-server located on the route filename, performs check, displays the logo on the screen and saves the logo.
-
Page 11: Basic Program Loading From «Nand
MAG-200 Operator Guide Rev 1.05. Basic program loading mode “NAND” If the basic program loading mode is set to “NAND”, the bootloader attempts to load the Linux core. The Linux core must be stored in the section mtd4, where the file system jffs2 must be installed and it should be called uImage.
-
Page 12: Indication Of Basic Program Loading
MAG-200 Operator Guide Rev 1.05. • To load Bootstrap from multicast group 224.10.0.50:9000: class «MAG200_boot» { match if (( option vendor-class-identifier=»TeleTecMAG200boot»)); vendor-option-space TeleTec; option TeleTec.mcip 224.10.0.50; option TeleTec.mcport 9000; • To load bootstrap according to protocol tftp: class «MAG200_boot» { match if (( option vendor-class-identifier=»TeleTecMAG200boot»));…
-
Page 13: Bootstrap
MAG-200 Operator Guide Rev 1.05. Basic program loading stages Front panel Messages on the TV screen Ethernet cable not connected Erln «No link detected!!!» Dhcp request sent dHCP “DHCP” Repeated dhcp request (together with dHCP «DHCP Retry#» the number of the attempt)
-
Page 14
MAG-200 Operator Guide Rev 1.05. results of its work. This report can be obtained by issuing, for example the command: nc –l ip_port from the server with с IP — TeleTec.ip_log. Bootstrap performs the check of the digital signature of image received using the operator key, if set, otherwise the check is performed with the generally accessible key. -
Page 15
MAG-200 Operator Guide Rev 1.05. option TeleTec.ip_log 192.168.1.2; option TeleTec.port_log 10000; The stages of upgrading the basic program on the device: • Starting the device in the “DHCP” mode; • Bootstrap loading from a multicast group or by fttp; • Digital signature check;… -
Page 16: Configuring And Organizing The Process Of Program Upgrade Using Cyclic Multicast Groups
MAG-200 Operator Guide Rev 1.05. Configuration and organization of the upgrading process using cyclic multicast group To configure the system of upgrading images on the device using a cyclic multicast group perform the following steps: • Adjust DHCP-server; • Adjust the utility…
-
Page 17: Preparation Of Bootstrap
MAG-200 Operator Guide Rev 1.05. Bootstrap preparing For preparing Bootstrap use the file./images/Bootstrap.clean. Perform the command: ./bootstrap_sign.sh It shall result in forming the Bootstrap prepared for starting on the device with the operator key as specified in the USER_ID installed.
-
Page 18: Cyclic Multicast Server Configuration
MAG-200 Operator Guide Rev 1.05. The example of dhcpd server configuration is shown in the dhcpd.conf file. The options transferred by the information element vendor-specific are described in the section “Description of vendor specifics options”. The configuration of cyclic multi-cast server.
-
Page 19
MAG-200 Operator Guide Rev 1.05. of the program upgrade process using fixed cyclic The description multicast groups. To upgrade the program using “fixed” cyclic multicast groups it is necessary to organize cyclic multicast groups with the utility mcsend (for example). In this situation the device expects the group 224.50.0.50: 9000 to broadcast Bootstrap, while the… -
Page 20: Work With Keys
MAG-200 Operator Guide Rev 1.05. Operation with keys Protecting system prohibiting the start of any programs unauthorized by the operator is realized in the device. For this purpose the algorithm DSA (digital signature) with the key length equal to 2048 bits is used, as well as manufacturer keys, operator key and the key for controlling the device.
-
Page 21: Default Operator Key
MAG-200 Operator Guide Rev 1.05. Select: (5) RSA (sign only) What keysize do you want? (2048) 2048 Key is valid for? (0) 0 Is this correct? (y/N) y Real name: Email address: Enter passphrase: 2. Export of the key to the file: gpg -o oppubbin.KEY —export “key ID ”…
-
Page 22: Remarks Concerning The Work With Gpg Program
MAG-200 Operator Guide Rev 1.05. Notes concerning gpg program operation The program gpg .is used for working with keys and creating the digital signature of images. To transfer the key from one device to another you may use the following commands: gpg -o opsecbin.KEY —export-secret-keys “key ID ”…
-
Page 23: Variants Of The Device Control
MAG-200 Operator Guide Rev 1.05. Device control variants The device offers the possibility to the operator to realize various algorithms of the device control. Among them: sending commands to the device via a multicast group, sending commands via JavaScript API. Because the system is open there is a possibility of adapting various own control and monitoring systems.
-
Page 24: Format Of The File Containing Operator Commands
MAG-200 Operator Guide Rev 1.05. rm -f $cmd echo » TestComand «>$cmd echo «####### END COMMAND #######»>>$cmd ./cmd_send.sh $cmd rm -f $cmd and the addition of this command analysis in the file cmd_parse.sh in the device: TestComand) echo “steps for receiving TestComand”…
-
Page 25: Control From Browser
MAG-200 Operator Guide Rev 1.05. File nameqИмя файла Description reboot.sh Device restart Rebootdhcp.sh Device restart with further start in the “DHCP” mode Control from the browser The function stb.E xecAction (“parameter EA”) can be called from the browser using JavaSript API. This results in starting the file /home/default/action.sh with the parameter “parameters EA”.
-
Page 26: Utilities Description
MAG-200 Operator Guide Rev 1.05. Utilities description Utility fw_printenv The utility allows learning the value of the bootstrap variable. It c an be used by integrators and operators for creating various algorithms of the basic program operation. Use: fw_printenv ‘variable name’…
-
Page 27: Utility Mcsend
MAG-200 Operator Guide Rev 1.05. The utility mcsend The utility mcsend serves for broadcasting the set files to the set multicast address, each broadcast containing descriptive information, including identifier (serial number). The following format is used: mcsend [-ip addr:port] [-f filename] [-once] [-c config_file] [-s speed] [-sn…
-
Page 28
MAG-200 Operator Guide Rev 1.05. parameter_1=value1 parameter_2=value2 [Section name_2] parameter_1=value1 parameter_2=value2 [section name_3] parameter_1=value1 parameter_2=value2 The section [Server] serves to set common parameter for all sections. The following sections describe the broadcast of a concrete file with its own parameters. The section [Server] may contain the following parameters: •… -
Page 29: Utility Mcrec
MAG-200 Operator Guide Rev 1.05. Utility mcrec The utility mcrecv serves to receive the file broiadcast by the utility mcsend. It has the following format: mcrecv -ip addr:port -f filename -m maxsize where • addr – the address of the multicast group from which the file is received •…
-
Page 30: Program Lirc
MAG-200 Operator Guide Rev 1.05. • colon-off – colon off. Program lirc. The program lirc is used for operation with remote control. The program has 3 operating modes: 1. Standard mode – when the key is pressed the pressings are repeated while the key is pressed;…
-
Page 31: Handling The Keys On The Front Panel
MAG-200 Operator Guide Rev 1.05. Otherwise lirc operates as a standard program lirc, described at the address http://lirc.org/. Processing the keys located on the front panel To receive the pressings of front panel keys start the utility fpxevent forя FireFox using the configuration file /etc/lirc/lircrc, or fpqevent for WebKit, which uses the configuration file /etc/lirc/lircrc.wk.
-
Page 32: Re-Start Of The Device With Changing Loading Regime
MAG-200 Operator Guide Rev 1.05. • fp_vol+ • fp_ch- • fp_ch+ If the key is not released during the period of time set by option–t, the pressing is considered long and after the expiry of this period it is translated into pressing the keys on the keyboard corresponding to the keys: •…
-
Page 33: Supplements
MAG-200 Operator Guide Rev 1.05. Supplements Location of sections in nor-flash and nand-flash memory. Section Designation Size Purpose mtd0 BootLoader 256Kb Boot loader mtd1 Upgrade Boot 256Kb Second copy of boot loader mtd2 User’s FS Available to the user mtd3…
-
Page 34: Description Of Vendor-Specific Options
Description of vendor-specific options Name code Type Description Used by mcip Ip-address IP address of multicast group for receiving the core or bootstrap Boolloader mcport integer 16 Port of multicas6t group for receiving ten core or bootstrap Boolloader oppubfile Text Contains the name of the file with the prepared operator key for the Bootstrap installation in the device…
-
Page 35: Example Of The File Dhcpd.conf
Example of the file dhcpd.conf option domain-name-servers 192.168.1.1; option routers 192.168.1.1; max-lease-time 7200; ddns-upgrade-style none; ddns-upgrades off; log-facility local7; default-lease-time 600; not authoritative; allow booting; ############################################################# # Option for TeleTecMAG ############################################################# option space TeleTec; option TeleTec.mcip code 3 = ip-address; option TeleTec.mcport code 4 = integer 16;…
-
Page 36
MAG-200 Operator Guide Rev 1.05. class «MAG200_upgboot» { match if (( option vendor-class-identifier=»TeleTecMAG200upgboot»)); filename «mag200/Sboot»; next-server 192.168.1.2; option ntp-servers pool.ntp.org; class «MAG200_upglogo» { match if (( option vendor-class-identifier=»TeleTecMAG200upglogo»)); filename «mag200/STB-bootlogo.bmp.gz»; next-server 192.168.1.2; option ntp-servers pool.ntp.org; vendor-option-space TeleTec; option TeleTec.logo_x 0;… -
Page 37: Example Of The File Mcast.conf
MAG-200 Operator Guide Rev 1.05. subnet 192.168.1.0 netmask 255.255.255.0 { option subnet-mask 255.255.255.0; next-server 192.168.1.2; pool { range 192.168.1.20 192.168.1.200; allow members of «MAG200_boot»; allow members of «MAG200_upgboot»; allow members of «MAG200_upglogo»; allow members of «MAG200_upgrade»; allow members of «MAG200_vendor»;…
-
Page 38
MAG-200 Operator Guide Rev 1.05. [Stream: Image bootstrap.signed] MulticastIPAddress=224.50.0.50 MulticastUDPPort=9000 FileName=Bootstrap Description=Bootstrap Image ImageType=1 SerialNumber=1 PacketSize=1456 CycleTime=1000 DataRate=500000 [Stream: Image for upgrade filesytem ] MulticastIPAddress=224.50.0.51 MulticastUDPPort=9001 ImageName=imageupgrade Description=upgrade filesystem SerialNumber=2 DirsPerCycle=128 DataRate=1000000 CycleTime=0 Example of configuration file for adjusting the front panel keys… -
Page 39
MAG-200 Operator Guide Rev 1.05. button=fp_vol+ config=Key Right Web begin repeat=10 delay=20 prog=fpxevent button=fp_power config=Key alt-KeySym:0x75 Web begin repeat=2 delay=4 prog=fpxevent button=fp_long_vol+ config=Key ctrl-Space Web begin repeat=2 delay=4 prog=fpxevent button=fp_long_vol- config=Key Escape Web List of changes The following items were added to the document version 1.05: •…
Подключение и настройка
- Схема подключения устройств к просмотру цифрового ТВ
- ТВ-приставка
- Подключение приставки к телевизору
- Подключение приставки к роутеру
- Подключение к приставке
- Подключение приставки по беспроводной сети wi-fi
- Меню BIOS, информация об устройстве и версия ПО, сброс до заводских установок
- Обновление ПО приставки
Схема подключения устройств к просмотру цифрового ТВ
К приставке по wi-fi можно подключить до трех устройств для просмотра ТВ одновременно (это может быть телевизор, ноутбук, домашний компьютер, планшет или смартфон):

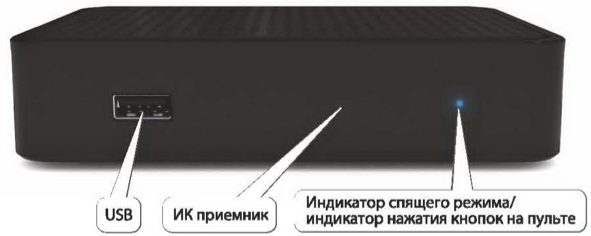
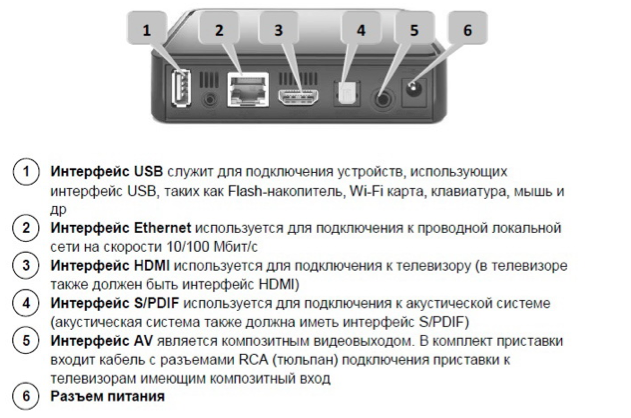
ТВ-приставка
Передняя панель
Задняя панель
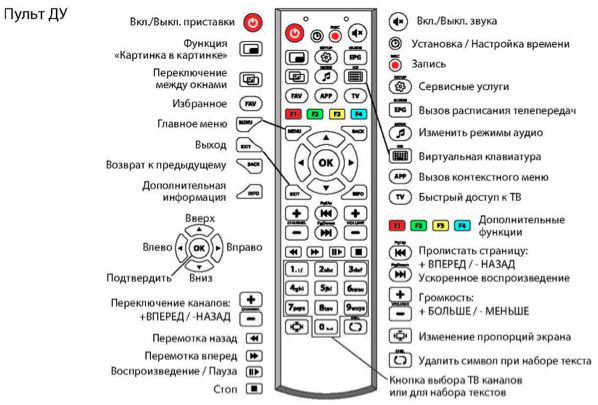
Пульт дистанционного управления
Подключение приставки к телевизору
Предупреждение! Перед подключением и отключением любых кабелей, отключите все устройства (ТВ, усилитель и т.д.) и отключите питание из розетки.
Подключение видео
Приставка позволяет подключать следующие видеокабели:
— HDMI — предоставляет наилучшее качество изображения и звука, позволяет воспроизводить цифровое видео высокой четкости (HD). Кабель HDMI (M) — HDMI (M) приобретается отдельно.
— композитный — дает стандартное качество изображения (этот кабель идет в стандартной комплектации).
Внимание! Соблюдайте цветность коннекторов и гнезд на вашем оборудовании. Используйте подключение с наивысшим качеством HDMI, которое позволяет Ваше оборудование.
Подключение аудио
Приставка позволяет провести аудиоподключение левого и правого каналов для воспроизведения стереозвука (выходы L и R). Стандартный кабель обеспечивает хорошее качество звука.
Подключение приставки к роутеру
Подключение приставки к роутеру возможно двумя способами: с помощью патч-корда (сетевого кабеля) и беспроводной сети WI-FI.
У Вас в роутере должна быть поддержка мультикаст и которая должна быть включена, (соответственно роутер настроен для работы в интернете), а роутер включен. Поддерживает роутер IPTV или нет, смотрите на сайте производителя роутера.
При самостоятельном подключении отдельно приобретается патч-корд (сетевой кабель, 7-10 метров):
1. С помощью патч-корда (сетевого кабеля) соедините в свободный порт роутера с разъемом Ethernet 10/100 приставки MAG250 Micro.
2. Подключите HDMI-кабель в разъем HDMI приставки и в HDMI вход телевизора.
Если в телевизоре нет HDMI входа, то для подключения приставки к телевизору используйте входящий в комплект кабель AV (выход AV) приставки (разъем minijack 3.5mm, похожий на разъем для наушников) и AV вход телевизора (три разъема типа «тюльпан», желтого, красного и белого цветов)
3. Подключите источник питания в разъем питания приставки.
4. Включите телевизор и на пульте управления телевизором выберите источник сигнала (кнопка TV/AV, SOURCE, INPUT или HDMI, в зависимости от модели телевизора).
Если приставка подключена к телевизору через кабель HDMI, при нажатии на кнопку TV/AV, SOURCE или INPUT на пульте управления телевизором, необходимо выбрать источник сигнала HDMI.
Если подключено через AV-кабель («тюльпаны»), то на пульте управления телевизором необходимо нажать кнопку TV/AV, SOURCE или INPUT.
Информация ориентировочная, т.к. пульты управления телевизором отличаются в зависимости от марки телевизора (см. инструкцию телевизора).
Подключение к приставке

|
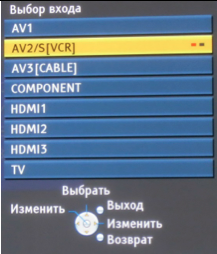
Подключение с композитным кабелем Включите телевизор. Если вы подключили к телевизору стандартный кабель приставки, на пульте от телевизора нажмите сверху кнопку TV/AV, SOURCE или INPUT и выберите AV1, AV2 или AV3, в зависимости от того, куда был подключен стандартный кабель. |
 |
|
Подключение по HDMI Включите телевизор. Если вы подключили к телевизору приставку по HDMI кабелю, включите приставку в розетку, нажмите на пульте (ПДУ) от телевизора кнопку TV/AV, SOURCE или INPUT и выберите HDMI1, HDMI2 или HDMI3 в зависимости от того, куда был подключен HDMI кабель. |
 |
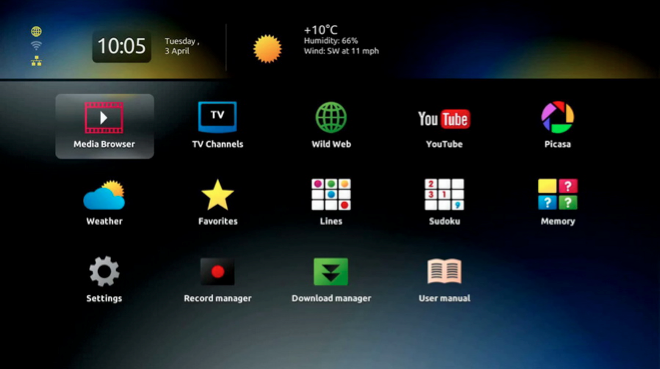
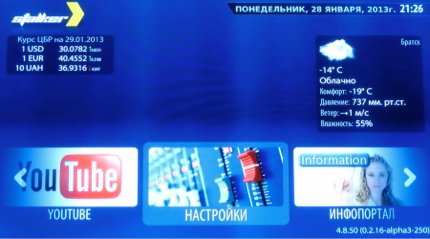
Если все подключено верно, то приставка загрузится, и вы увидите Меню внутреннего портала:
Подключение приставки по беспроводной сети Wi-Fi
Для работы приставки через Wi-Fi роутер, у вас предварительно должен быть настроен и включен Wi-Fi на роутере, сам роутер должен иметь поддержу IPTV. Поддерживает ли роутер IPTV по Wi-Fi, смотрите на сайте производителя.
Поддерживаемые Wi-Fi адаптеры
Производитель приставки поддерживает несколько производителей Wi-Fi адаптеров, с определенным чипсетом и ревизией (это очень важно).
Список поддерживаемых адаптеров и ревизий
| Модель | Чипсет | Ревизия/Примечания | |
|---|---|---|---|
| ASUS USBN13 | Ralink RT3072 | ревизия B1 не поддерживается |  |
| DLink DWA125 | Ralink RT3070 Ralink RT5370 |
H/W Ver.: A1, A2, B1 (A3 — начиная с версии release-0.2.12) |
 |
| Edimax EW-7711UAN | Ralink RT3070 |  |
|
| Tenda W311MI | Ralink RT5370 | начиная с версии release-0.2.12 |  |
| TPLINK TLWN727N | Ralink RT3070 | начиная с версии release-0.2.12 |  |
| Dune HD Air | Ralink RT3070 | начиная с версии release-0.2.12 |  |
Порядок установки/подключения устройств
Отсоедините патч-корд (сетевой кабель), если он был подключен к приставке. Приставка поддерживает горячую установку USB-устройств. Подключите устройство в один из доступных USB разъемов. Спустя какое‐то время (20‐30 секунд) устройство готово к работе. Состояние устройства можно проконтролировать на закладке «Состояние сети».
Подключение приставки по сети Wi-Fi
Способ №1. Подключение приставки во внутреннем портале
1. Войдите во внутренний портал (из портала «Stalker» Настройки — Переход во внутренний портал)
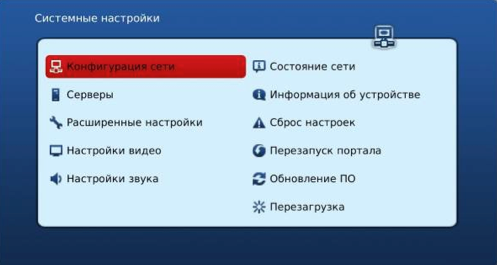
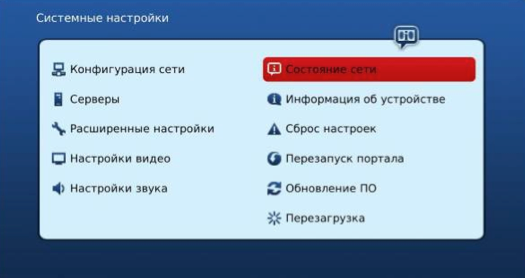
2. Войдите в меню конфигурации STB «Системные настройки» нажатием кнопки «SETUP» на ПДУ, наведя на «Конфигурация сети», нажмите ОК.
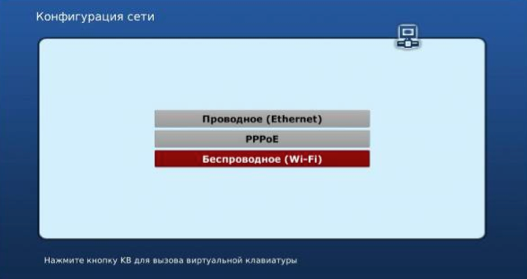
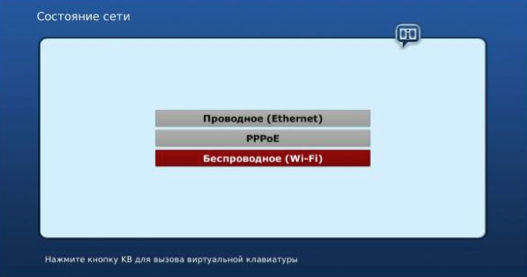
3. Наведите курсором вниз на Беспроводное (Wi-Fi) и нажмите ОК на ПДУ.
4. Нажмите ОК на ПДУ.
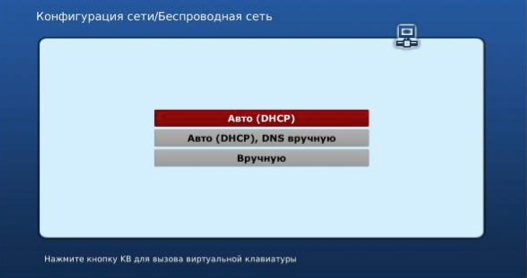
5. Нажмите курсор вправо наведя на Сканировать и нажмите ОК на ПДУ.
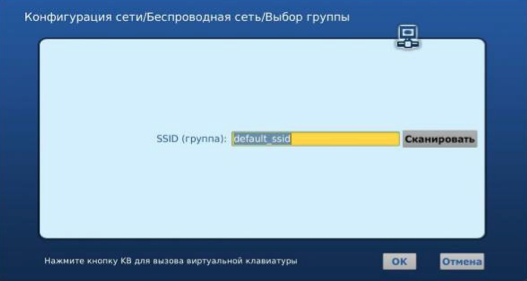
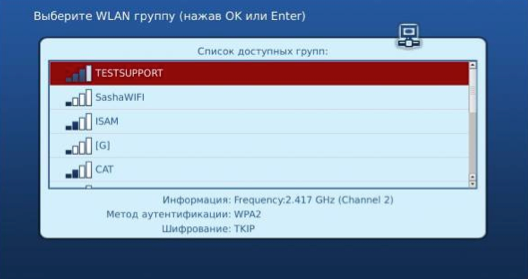
6. Откроется список с точками доступа, перемещая курсор вверх-вниз, найдите свою точку и нажмите ОК.
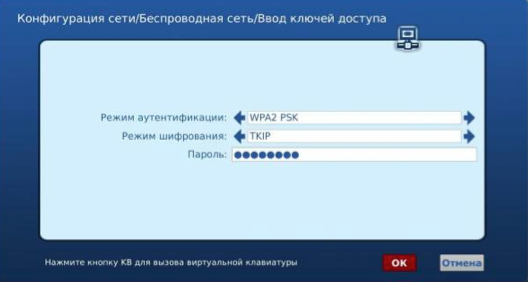
7. Наводя курсором на Режим аутентификации и шифрования, выберите тот режим аутентификации и шифрования, который стоит в роутере.
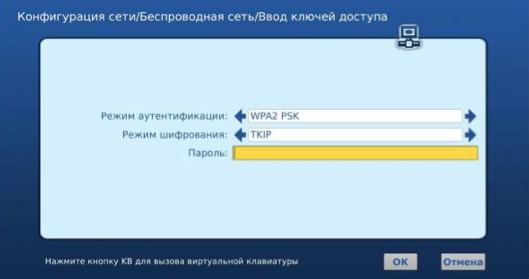
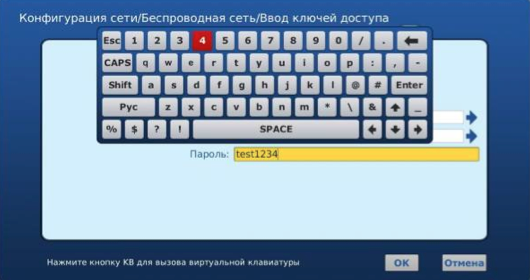
Затем нажмите на ПДУ кнопку КВ (Виртуальная клавиатура) и введите пароль, который стоит в роутере для вашей точки доступа.
Наведите курсором на ОК и нажмите ОК на ПДУ.
8. В Меню «Системные настройки» наведите курсором на «Состояние сети» и нажмите ОК.
9. Нажмите курсором вниз, наведя на «Беспроводное (Wi-Fi)» и нажмите ОК.
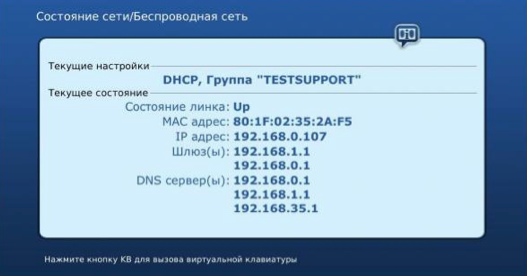
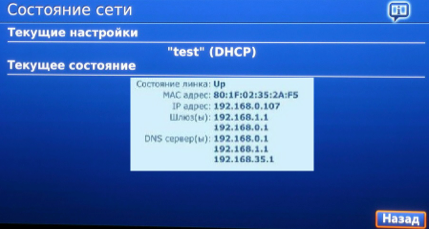
10. Здесь будет показано, подключилась ли приставка к роутеру и присвоен ли IP адрес. Если вы увидите подобную информацию, то приступайте к основным настройкам.
Способ №2. Подключение приставки в портале Stalker
1. Отсоедините патч-корд (сетевой кабель), если он был подключен к приставке. Приставка поддерживает горячую установку USB-устройств. Подключите Wi-Fi устройство в один из доступных USB-разъемов. Спустя какое‐то время (20‐30 секунд) устройство будет готово к работе. Состояние устройства можно проконтролировать на закладке «Состояние сети»
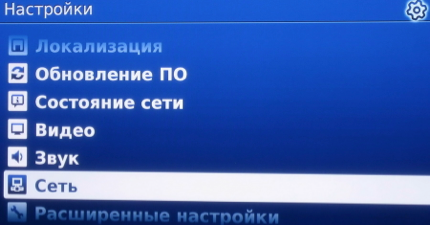
Нажмите на ПДУ влево или вправо курсор, чтобы в центре были «Настройки». Наведя на «Настройки» нажмите на ПДУ, ОК.

Наведите курсором на «Сеть» и нажмите ОК.
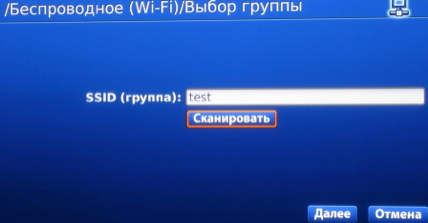
Наведите курсором на «Беспроводное (WiFi)» и нажмите ОК.

Нажмите ОК.

Наведите курсором на «Сканировать» и нажмите ОК.
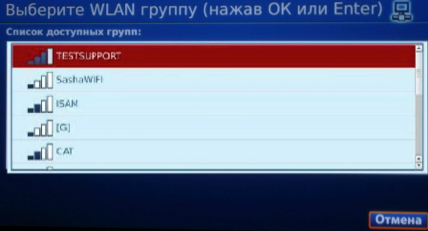
Откроется список с точками доступа, перемещая курсор вверх-вниз, найдите свою точку и нажмите ОК.
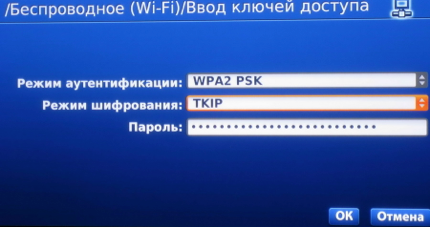
Наводя курсором на «Режим аутентификации и шифрования», выберите тот режим аутентификации и шифрования, который стоит в роутере. Нажмите на ПДУ кнопку КВ (Виртуальная клавиатура) и введите пароль, который стоит в роутере для вашей точки доступа. Наведите курсором на ОК и нажмите ОК на ПДУ.
В меню «Настройки» наведите курсором на «Состояние сети» и нажмите ОК.

Нажмите курсором вниз, наведя на «Беспроводное (Wi-Fi)» и нажмите ОК.
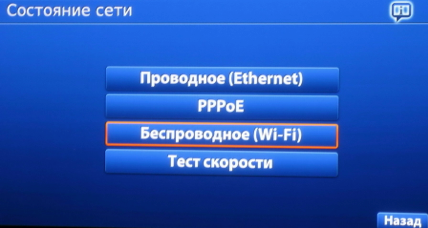
Здесь будет показано, подключилась ли ваша приставка к роутеру и присвоен ли IP адрес. Если вы увидите подобную информацию, то приступайте к основным настройкам.
Меню BIOS, информация об устройстве и версия ПО, сброс до заводских установок
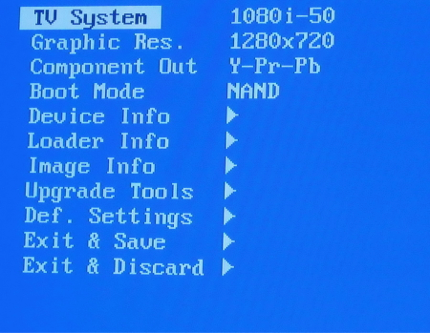
Чтобы зайти в меню BIOS приставки, нужно:
- Выключить питание устройства.
- Нажать и держать зажатой кнопку «Menu» на пульте ДУ.
- Не отпуская кнопки «Menu», включить питание устройства.
Как посмотреть версию ПО и информацию об устройстве?
- Зайти в меню **BIOS**
- Выбрать «Device info» и нажать вправо на пульте ДУ:
- «Vendor» — Идентификатор производителя
- «Model» — Идентификатор модели
- «Ver. Hardware» — Версия реализации системной платы
- «Serial Number» — Серийный номер
- «MAC address» — Физический адрес сетевого интерфейса
- «Loader Info» нажать вправо на пульте ДУ:
- «Version Number» — Версия загрузчика (если включен второй загрузчик, то Вы увидите версию второго загрузчика)
- «Date & Time» — Дата и время версии загрузчика
- «Image info» нажать вправо на пульте ДУ:
- «Version» — Версия программного обеспечения
- «Description» — Подробное описание версии
Как сбросить BIOS приставки на заводские настройки?
- Зайти в меню **BIOS**
- Выбрать «Def. Settings»
- Нажать вправо
- Подтвердить нажатием кнопки «ОК»
- Выбрать «Exit & Save» для сохранения изменений и выхода. STB автоматически перезагрузится.
Возможно, понадобится выбрать необходимый режим загрузки «NAND», «DHCP». Для этого необходимо после сброса на заводские настройки, повторно, зайти в BIOS и выполнить нижеописанные действия.
Переключение режима загрузки DHCP/NAND/NAND2
- Зайти в меню **BIOS**
- Выбрать «Boot Mode» и путем нажатия на пульте ДУ вправо установить режим загрузки DHCP, NAND или NAND2
- Выбрать «Exit & Save» и нажать на пульте ДУ вправо
- Подтвердить нажатием «OK».
Обновление ПО приставки
Обновление ПО нужно проводить время от времени, после обновления возможно появление новых функций.
Способ №1. Обновление приставки во внутреннем портале
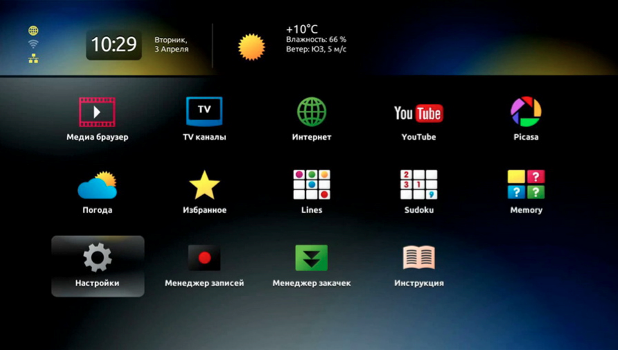
Если не появлялось сообщение авто обновления, то зайдя в меню Внутреннего портала, курсором вниз наведите на Настройки и нажмите ОК.
Откроется окно с Настройками:
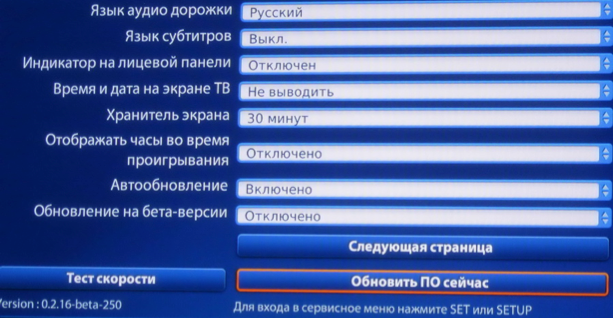
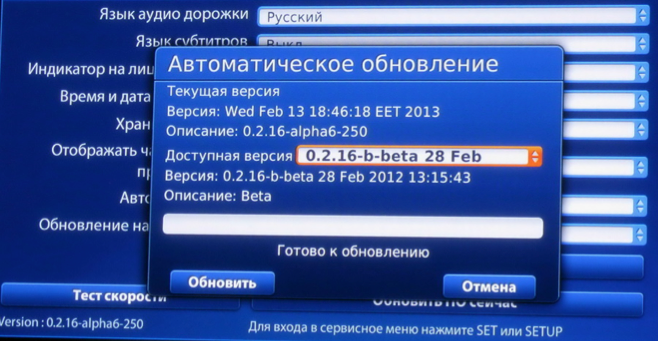
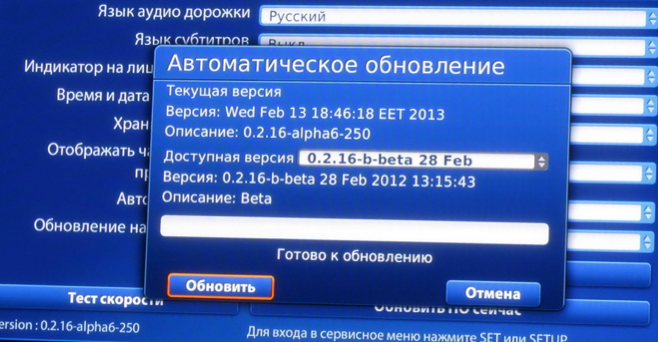
Нажмите на пульте ДУ курсор вниз до Обновить ПО сейчас, нажмите ОК на пульте ДУ. Откроется окно с Автоматическим обновлением:

Нажмите на пульте ДУ кнопку ОК. Откроется вкладка с выбором версий прошивок:

Курсором на пульте нажмите вниз для выбора прошивки, затем нажмите ОК
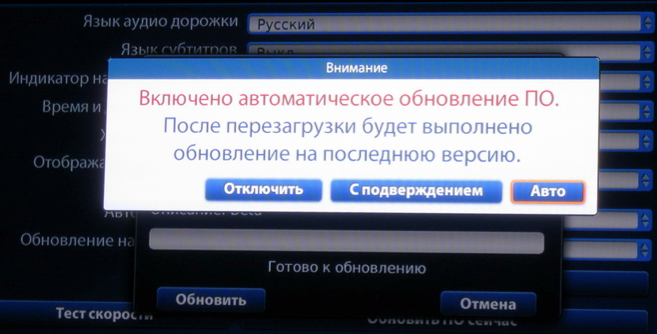
Нажмите курсором вниз до «Обновить», нажмите на ПДУ кнопку ОК.

Откроется окно с подтверждением автоматического обновления, на ПДУ нажмите ОК. Начнется обновление.
Обновляться и перегружаться приставка будет 10 минут.
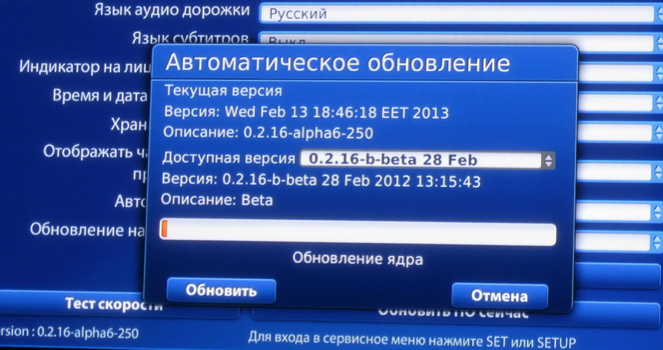
После перезагрузки откроется меню Внутреннего портала.
Способ №2. Обновление приставки в портале Stalker
Выйдите в Меню, наведите на «Настройки» и нажмите ОК на ПДУ.
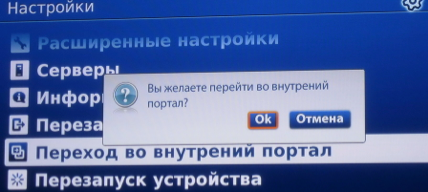
Откроется меню с настройками, нажмите на ПДУ курсор вниз до пункта «Переход во внутренний портал», нажмите ОК.

Появится окно «Вы желаете перейти во внутренний портал?» Наведите на ОК и нажмите ОК на ПДУ.
Приставка начнет перегружаться, и откроется Внутренний портал приставки. Зайдя в меню Внутреннего портала, курсором вниз наведите на Настройки и нажмите ОК.

Откроется окно с Настройками:

Нажмите на пульте ДУ курсор вниз до Обновить ПО сейчас, нажмите ОК на пульте ДУ. Откроется окно с Автоматическим обновлением:
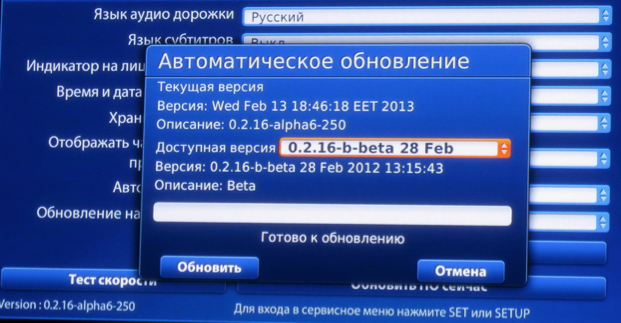
Нажмите на пульте ДУ кнопку ОК. Откроется вкладка с выбором версий прошивок:
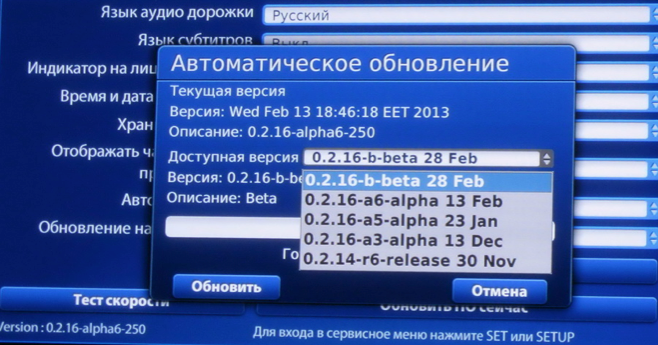
Курсором на пульте нажмите вниз для выбора прошивки, затем нажмите ОК

Нажмите курсором вниз до «Обновить», нажмите на ПДУ кнопку ОК.
Откроется окно с подтверждением автоматического обновления, на ПДУ нажмите ОК. Начнется обновление.

Обновляться и перегружаться приставка будет 10 минут.

После перезагрузки откроется меню Внутреннего портала.
(Ocr-Read Summary of Contents of some pages of the Infomir MAG-200 Document (Main Content), UPD: 17 September 2023)
-
17, MAG-200 Operator Guide Rev 1.05. Bootstrap preparing For preparing Bootstrap use the file./images/Bootstrap.clean. Perform the command: ./bootstrap_sign.sh It shall result in forming the Bootstrap prepared for starting on the device with the operator key as specified in the USER_ID installed. Preparing uImage, uImzlib_null.img, uImzlib.img For preparing uImage, uImzlib_null.img, uImzlib.img use the file./images/vmlinux.bin. Perform …
-
14, MAG-200 Operator Guide Rev 1.05. results of its work. This report can be obtained by issuing, for example the command: nc –l ip_port from the server with с IP — TeleTec.ip_log. Bootstrap performs the check of the digital signature of image received using the operator key, if set, otherwise the check is performed with the generally accessible key. Each image subject to upgrading is associate…
-
27, MAG-200 Operator Guide Rev 1.05. The utility mcsend The utility mcsend serves for broadcasting the set files to the set multicast address, each broadcast containing descriptive information, including identifier (serial number). The following format is used: mcsend [-ip addr:port] [-f filename] [-once] [-c config_file] [-s speed] [-sn SerialNumber] [-t time] [-i interface] where • filename – the name of the file to be broadcast; • addr �…
-
9, MAG-200 Operator Guide Rev 1.05. According to the protocol tftp the device loads the flash located on the route filename («mag200/Sboot») from the server specified in the next-server (192.168.1.1) and performs upgrading. If the option “Use upgrade” is set to “Yes”, it shall contain the following items when entering the bootloader menu: “Upgrade Tools”, “Def. Settings”, “Exit & Sav…
-
3, MAG-200 Operator Guide Rev 1.05. Re-start of the device with changing loading regime………………………………………32 Supplements ………………………………………………………………………………………………….33 Location of sections innor-flash и nand-flash –memory……………………………………..33 Connectors on the back panel ……………………………………………………………………….33 Desc…
-
2, MAG-200 Operator Guide Rev 1.05. Contents Definitions …………………………………………………………………………………………………….4 Boot loader for the device ……………………………………………………………………………….4 Boot loader menu……………………………………………………………………………………….4 Description of the menu……………………………………………
-
16, Infomir MAG-200 MAG-200 Operator Guide Rev 1.05. Configuration and organization of the upgrading process using cyclic multicast group To configure the system of upgrading images on the device using a cyclic multicast group perform the following steps: • Adjust DHCP-server; • Adjust the utility mcsend for cyclic broadcasting bootstrap and the image to upgrade to multicast group; • Prepare images for broadcasting; • Start the utility mcsend The files Bootstrap…
-
15, MAG-200 Operator Guide Rev 1.05. option TeleTec.ip_log 192.168.1.2; option TeleTec.port_log 10000; } The stages of upgrading the basic program on the device: • Starting the device in the “DHCP” mode; • Bootstrap loading from a multicast group or by fttp; • Digital signature check; • Bootstrap start; • Receiving the image from a multicast group for refreshing; • Checking the digital signature of the image r…
-
1, IPTV MAG-200 High resolution device Operator Guide ©Informir, 2009
… -
22, MAG-200 Operator Guide Rev 1.05. Notes concerning gpg program operation The program gpg 1 .is used for working with keys and creating the digital signature of images. To transfer the key from one device to another you may use the following commands: gpg -o opsecbin.KEY —export-secret-keys “key ID ” for preserving the information of the key in the file and gpg —import opsecbin.KEY for adding this key to gpg and gpg –list-keys for viewing currently available keys. T…
-
20, Infomir MAG-200 MAG-200 Operator Guide Rev 1.05. Operation with keys Protecting system prohibiting the start of any programs unauthorized by the operator is realized in the device. For this purpose the algorithm DSA (digital signature) with the key length equal to 2048 bits is used, as well as manufacturer keys, operator key and the key for controlling the device. • Manufacturer key This key is used for check…
-
37, MAG-200 Operator Guide Rev 1.05. subnet 192.168.1.0 netmask 255.255.255.0 { option subnet-mask 255.255.255.0; next-server 192.168.1.2; pool { range 192.168.1.20 192.168.1.200; allow members of «MAG200_boot»; allow members of «MAG200_upgboot»; allow members of «MAG200_upglogo»; allow members of «MAG200_upgrade»; allow members of «MAG200_vendor»; } } } Example of file m…
-
11, Infomir MAG-200 MAG-200 Operator Guide Rev 1.05. Basic program loading mode “NAND” If the basic program loading mode is set to “NAND”, the bootloader attempts to load the Linux core. The Linux core must be stored in the section mtd4, where the file system jffs2 must be installed and it should be called uImage. After the core is loaded, its digital signature is checked using the operator key installed. (The operator key must be installed earlie…
-
13, MAG-200 Operator Guide Rev 1.05. Basic program loading stages Front panel Messages on the TV screen Ethernet cable not connected Erln «No link detected!!!» Dhcp request sent dHCP “DHCP” Repeated dhcp request (together with the number of the attempt) dHCP «DHCP Retry#» Dhcp request failed Er10 «DHCP Error» Loading the core from mtd4 nand «Load from nand» Error when loading the core from mtd4 Er20 «Error loading im…
-
32, MAG-200 Operator Guide Rev 1.05. • fp_vol+ • fp_ch- • fp_ch+ If the key is not released during the period of time set by option–t, the pressing is considered long and after the expiry of this period it is translated into pressing the keys on the keyboard corresponding to the keys: • fp_long_power • fp_long_vol- • fp_long_vol+ • fp_long_ch- • fp_long_ch+ Standard program is adjusted to use the second mode with the time period 500m…
-
21, MAG-200 Operator Guide Rev 1.05. Select: (5) RSA (sign only) What keysize do you want? (2048) 2048 Key is valid for? (0) 0 Is this correct? (y/N) y Real name: Email address: Enter passphrase: 2. Export of the key to the file: gpg -o oppubbin.KEY —export “key ID ” after performing this command the public part of the key shall be contained in the file oppubbin.KEY ; 3. Send the file oppubbin.KEY to the manufacturer for creating a digital signature of …
Обновление прошивки IPTV-приставки Infomir MAG 200.
В одном из предыдущих постов я уже рассказывал о STB приставке Infomir MAG 200 для просмотра IPTV тогда ещё от Волгателекома, а сейчас уже от Ростелекома.

Рассмотрим подробнее процедуру перепрошивки приставки через мультикаст. Во-первых — почему через мультикаст? Потому, что: Раз — таким образом организована перепрошивка через оборудование самого провайдера, Два — это самый простой на мой взгляд способ обновления программного обеспечения.
Во-вторых — зачем обновляться? Ну если не брать в расчёт стандартные тирады о том что: «производитель постоянно совершенствует программное обеспечение», трудолюбивые индийские программеры денно и нощно ищут и исправляют ошибки и всё становиться лучше и быстрее, то останутся голые факты, а именно: в последней (на момент написания статьи) прошивке реализована поддержка wi-fi модулей (ASUS USB-N13, D-Link DWA-125, Edimax EW-7711UAN), добавлена возможность просмотра видео YouTube, интегрированы новые кодеки, полностью изменён интерфейс настройки приставки.
Итак, для перепрошивки MAG 200 нам понадобится сама прошивка(берем отсюда), какой-нибудь DHCP-сервер (например этот) и утилита для мультикастовой рассылки (ссылка). Приступим.
Шаг 1. В свойствах подключения по локальной сети прописываем IP-адрес, например 192.168.1.2 маска 255.255.255.0 шлюз 192.168.1.1.
Шаг 2. Запускаем DHCP-сервер. В случае используемого мной сервера это выполняется следующим образом: запускаем командную консоль, заходим в папку с сервером и запускаем его командой:
DualServer.exe -v
Выглядит это так:

Шаг 3. Включаем STB Infomir MAG 200 клавишей включения питания за задней стенке, при этом держим нажатой кнопку «stand-by» на лицевой панели устройства (это самая большая круглая кнопка, крайняя справа). Таким образом мы попадаем в сервисное меню приставки. Заходим в раздел «Upgrade Tools»:

Шаг 4. Запускаем утилиту mcast.exe. Если вдруг не запускается — проверьте установлен ли у Вас платформа «.net framework» версии не ниже v.2. Нажимаем обе кнопки Start:

Шаг 5. В сервисном меню приставки выбираем пункт «MC Upgrade»:

Ну а далее ждём пока образ прошивки загрузиться в приставку и затем приставка сама перезагрузиться. Если всё прошло нормально, автоматически будет загружен внутренний портал приставки.