Разбираем все настройки Serato DJ. Эта одна из самых важных статей для начинающих диджеев. Настройка делается один раз, и больше к ней вы не возвращаетесь.
Если не хотите заморачиваться, можете просто скопировать все настройки со скриншотов.
При подключении контроллера или звуковой карты, в Serato DJ отображаются дополнительные настройки. Для начала мы разберем общие настройки Serato DJ для всех девайсов. Отключите все совместимое оборудование и погнали.
Чтобы открыть меню настроек Serato DJ нужно нажать на шестеренку ⚙️ в правом верхнем углу экрана.
Слева внизу находится кнопка проверки обновлений ПО «Check for Updates». Рядом с ней написана версия Serato DJ.
Справа в нижнем углу находятся настройки языка интерфейса — Language (язык). 7 языков, но русского пока не завезли.
Вкладка DJ Preferences
Вкладка Audio
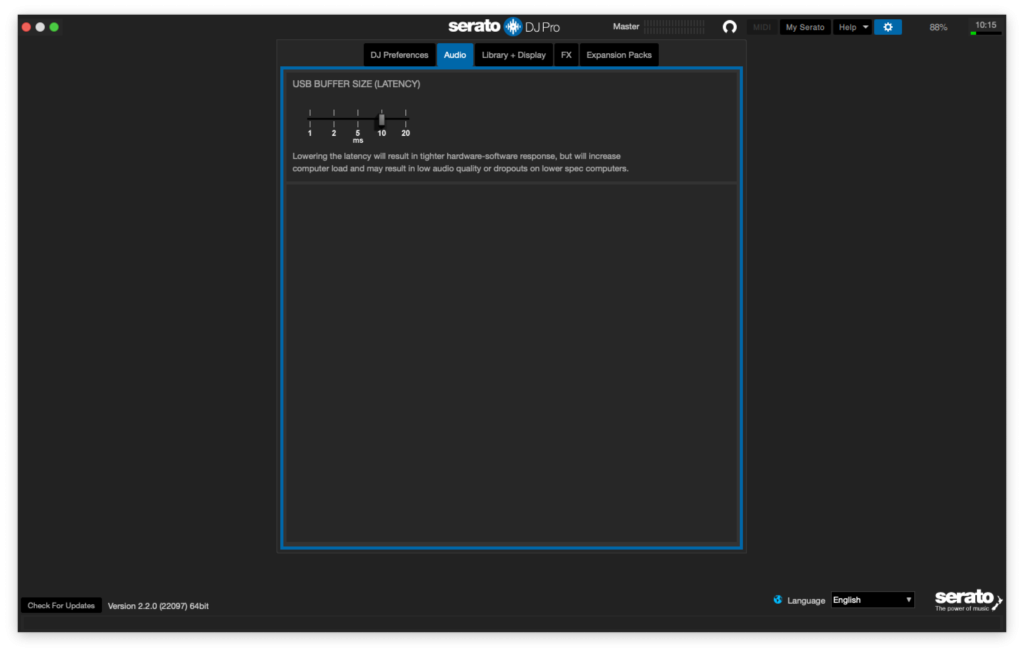
В этом разделе находится всего одна настройка задержки, но она очень важна. Если поставить ползунок в крайнее левое положение, то во время игры могут появляться щелчки, глюки и т.п. Поэтому я рекомендую ставить USB BUFFER SIZE не меньше 5 ms (5 миллисекунд). Если у вас слабый ноутбук, или одновременно с Serato открыты еще какие-либо «тяжелые» программы, то лучше ставить 10 или 20 ms.
Чем меньше задержка (USB BUFFER SIZE), тем больше нагрузки на процессор.
Если даже при настройках в 20 ms звук трещит или заикается, то рекомендую прочитать статью по оптимизации Serato DJ.
Вкладка Library + Display
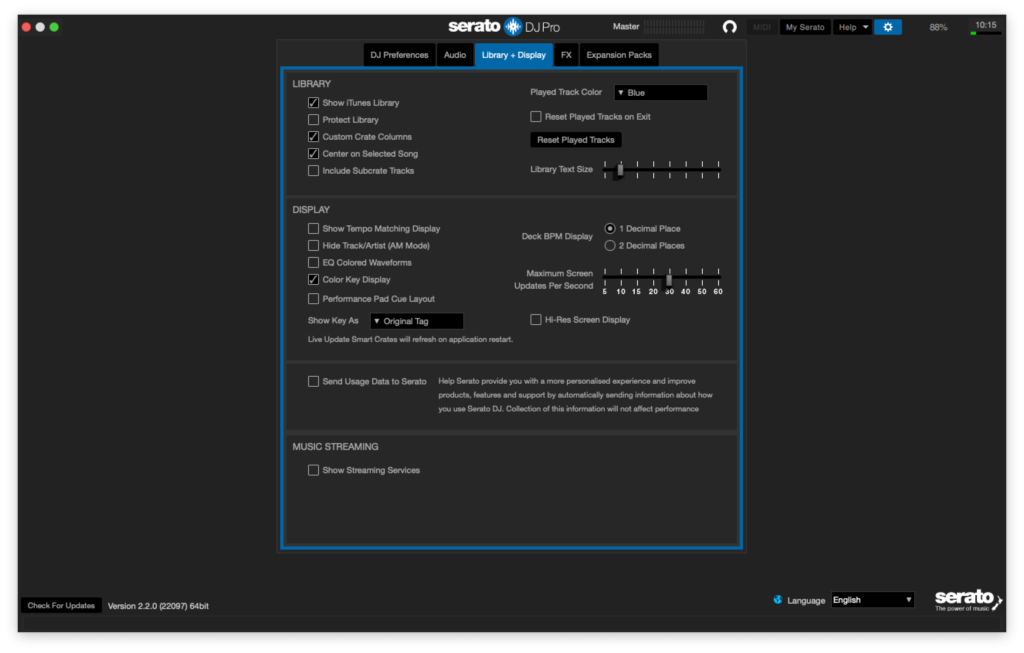
Library
Show iTunes Library (показывать библиотеку iTunes)
Отображает библиотеку iTunes в окне с папками Serato DJ. Если у вас есть плейлисты в iTunes, они также будут отображаться и в Serato DJ Pro.
Я включаю эту опцию и регулярно ей пользуюсь. Подробнее о работе с библиотекой можно прочитать здесь.
Protect Library (защитить библиотеку от изменений)
Блокирует вашу библиотеку чтобы предотвратить случайное изменение или удаление папок. Включение этого параметра также блокирует все теги файлов и имена папок.
Эту опцию имеет смысл включать в случаях, когда вы даете кому-нибудь «поиграть» с вашего ноутбука. У меня по-умолчанию она, разумеется, выключена.
Custom Crate Columns (ручная настройка отображения папок)
Если эта опция отключена, то во всех папках с музыкой будет один и тот же набор столбцов. Изменения столбцов в одной папке повлияет на их отображение во всех папках.
Я не пользуюсь этой опцией, и предпочитаю настраивать папки вручную.
Center on Selected Song (центр на выбранной песне)
Если эта опция включена, то во время прокрутки вверх и вниз в вашей библиотеке выбранная дорожка будет в центре.
Это удобно, я включаю.
Include Subcrate Tracks (отображать треки из вложенных папок)
При выборе папки отображает все содержимое из вложенных папок.
Я выключаю, чтобы не путаться.
Played Track Color (цвет проигранного трека)
После проигрывания трека он станет серого или синего цвета. Я включаю эту опцию, чтобы было проще ориентироваться в треках, которые ты уже ставил.
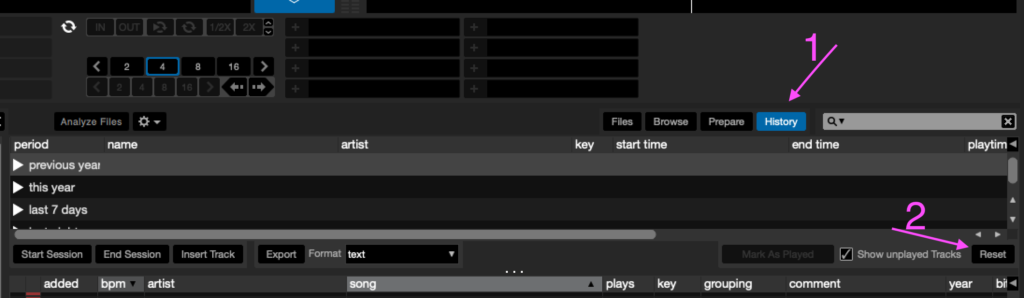
Чтобы сбросить цвет проигранных треков можно зайти во окно History и нажать кнопку Reset.
Reset Played Tracks on Exit
После закрытия Serato DJ все проигранные треки будут автоматически сброшены. Я эту опцию не включаю, но в принципе это удобно.
Reset Played Tracks (сбросить выделение проигранных треков)
Кнопка, аналогичная кнопке Reset в History. Сброс цвета проигранных треков.
Library Text Size
Настройка размера шрифта в библиотеке. На свой вкус, у меня стоит значение по-умолчанию — второе деление слева.
Вы можете поменять размер шрифта в библиотеке клавишами Ctrl + и Ctrl -.
Display
Show Tempo Matching Display (показать дисплей соответствия темпов)
Визуальное отображение темпа треков в виде пиков. Если пики сходятся, то темп треков одинаковый.
Совершенно неудобная функция, я ее отключаю.
Hide Track/Artist (AM Mode)
Скрывает имя исполнителя и название трека. Нажмите в области отображения информации о дорожке, чтобы временно показать имя исполнителя / название песни. Вы можете быстро включить и выключить эту функцию с помощью сочетания клавиш Alt + M.
Я не включаю эту опцию. Страна должна знать своих Героев 
EQ Colored Waveforms (окрашивание вэйвформ эквализацией)
При игре на контроллере, или Midi-совместимом оборудовании, вэйвформы будут изменять цвет в зависимости от настроек эквалайзера. Низкочастотный эквалайзер добавляет или понижает красный, средний эквалайзер изменяет зеленый, а регулятор высокого эквалайзера изменяет синий цвет.
Эта опция для меня не удобна, потому что становится тяжелее ориентироваться в треках.
Color Key Display (отображение цвета Тональности)
Выделяет разными цветами тональности песен. Удобная функция, включаем ее.
Deck BPM Display (отображение BPM)
Точность отображения BPM (ударов в минуту): 1 знак после запятой или 2 знака после запятой. Одного знака вполне хватает.
Show Key As (отображать Тональность в формате)
Выбор отображения тональности песен. Существует несколько стандартов:
- Camelot Wheel (Колесо Камелота)
- Classical Key (классическое отображение)
- Open Key
- Original Tag (оригинальный тэг)
Легче всего ориентироваться в тональностях с помощью Колеса Камелота (Camelot Wheel).
Hi-Res Screen Display (экран с высоким разрешением)
⚠️ Внимание! Этот параметр влияет на производительность!
Повышение четкости картинки для дисплеев Retina, 4K и аналогичных.
У меня отключен, чтобы не нагружать процессор.
Maximum Screen Updates (максимальное количество кадров в секунду)
⚠️ Внимание! Этот параметр влияет на производительность!
Для «гладкой картинки» достаточно поставить 30 кадров в секунду. Это стандарт. Если у вас мощный процессор, то можно поставить 60 кадров в секунду, картинка станет еще плавнее.
Лучше поставить 30 чтобы не нагружать процессор.
Anonymous Usage Data (Анонимные данные об использовании)
Отправлять анонимную информацию об использовании программы (ошибки, статистику и др.) в компанию Serato. Эта информация в последствии используется для разработки новых продуктов и улучшения существующих.
Music Streaming (стриминг музыки)
Отображает настройки стриминг сервисов SoundCloud Go или Tidal.
Настройки Serato Fx
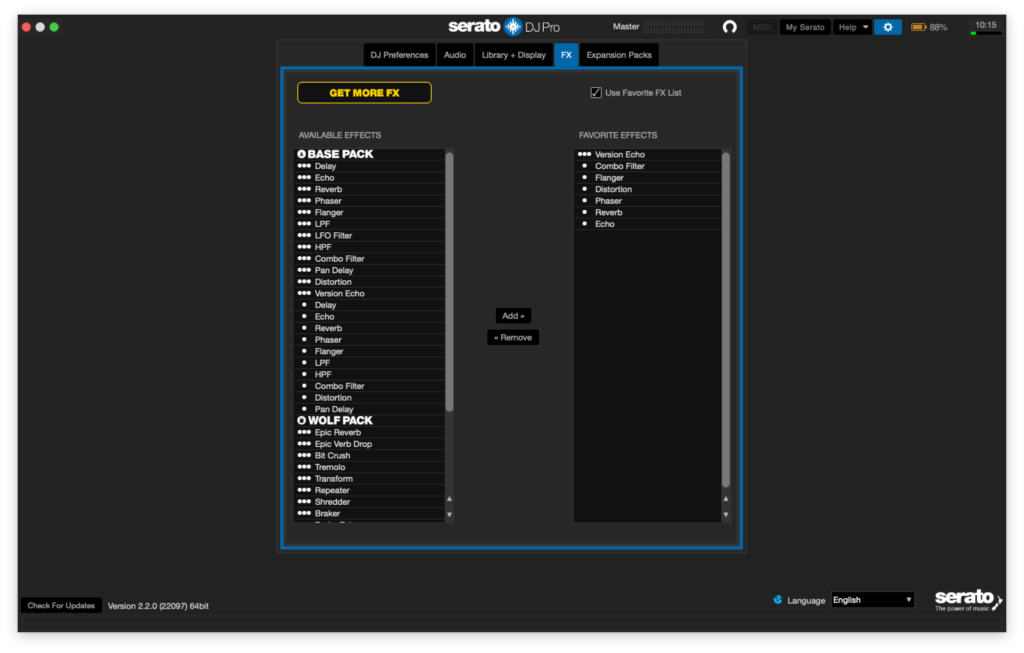
В этом меню можно выбрать «любимые» эффекты, которые будут отображаться в выпадающем меню с эффектами.
AVAILABLE EFFECTS — список всех доступных эффектов.
FAVORITE EFFECTS — список избранных эффектов.
Посередине находятся кнопки Add (добавить) и Remove (удалить).
Для того, чтобы отобразить только избранные эффекты необходимо поставить галочку напротив Use Favorites FX List.
Рекомендую прочитать статью 5 лучших эффектов в Serato DJ.
Вкладка Expansion Packs
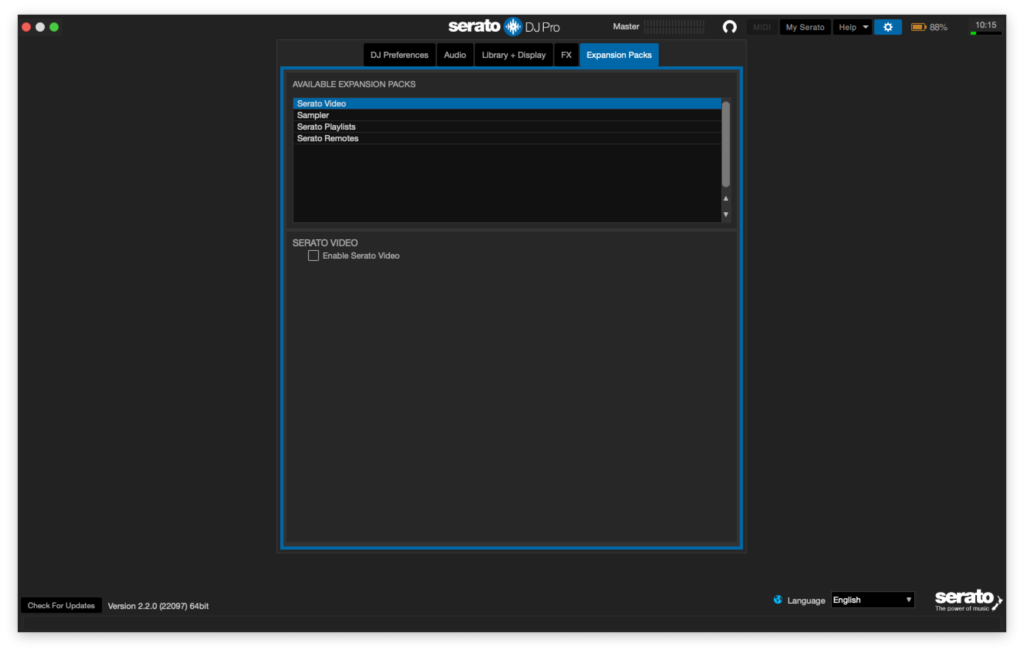
Отключите ненужные дополнения, чтобы снизить нагрузку на процессор и упростить интерфейс.
Остались вопросы?
Более подробно все настройки я разбираю в рамках одного урока по Serato DJ Pro.
-
Bookmarks
Quick Links
Reloop
Ready
Quick-Start Guide
1
Related Manuals for Serato DJ Lite
Summary of Contents for Serato DJ Lite
-
Page 1
Reloop Ready Quick-Start Guide… -
Page 2: Driver Software
The Reloop Ready is a “Serato DJ Lite hardware unlocked” device, meaning it works with Serato DJ Lite out of the box. It is also a “paid upgrade to Serato DJ Pro device”, meaning it requires the purchase & activation of a Serato DJ Pro license, in order to be used with Serato DJ Pro.
-
Page 3
CHANNEL EQ Adjust channel EQ LOAD CHANNEL 2 Load currently highlighted track to deck 2 JOG WHEEL Control the waveform within Serato DJ Pro Platter skip PARAMETER LEFT Adjust the pad mode parameters PARAMETER RIGHT Adjust the pad mode parameters… -
Page 4: Performance Pads
HOT CUE mode: Hold the MODE button and press PAD 1 to select HOT CUE mode. In this mode pads 1-4 trigger Serato DJ Lite Cue points, and if no Cue point is present on that slot/pad, pressing that pad will set a Cue point.
-
Page 5: Show Tooltips
Serato DJ Lite, then to launch your default internet browser and navigate to the Serato DJ Lite knowledge base, where you can find helpful articles and guides on Serato DJ Lite. Alternatively, type in the box, with keywords, to search the Serato DJ Lite knowledge base for specific, related topics.
DJ CONTENT

DJ CONTENT
Getting Started With Serato DJ
Serato DJ Tutorial For Beginners
In this Serato tutorial, we look at the basics to get you up and running with the software. Whether you use a Pioneer DJ DDJ-REV1, a Numark Mixtrack Pro or a Roland DJ 808, the essentials to get started in Serato DJ Lite or Serato DJ Pro remain the same.
Before we can start DJing, we need to ensure our music is loaded into Serato correctly and that we have analysed it for the best results. Below, we will break down the various ways to import your music into Serato DJ.
If you haven’t downloaded any music just yet, click this link and download our FREE starter pack, as used in our tutorial video.
Serato DJ Crates
Serato DJ uses a crate system to store music in its library. To create a new crate, simply click the New Crate button. You can rename crates by double-clicking on their names and stack them by dragging one on top of another. This creates subcrates which can help with organisation. To add music to a crate, you can simply navigate to your music files with Finder on a Mac or Windows Explorer on a PC and drag them in. Alternatively, you can use Serato’s inbuilt navigation system by pressing Files and dragging your chosen tracks into a crate.
iTunes in Serato DJ
Using iTunes in Serato couldn’t be easier. Simply click the gear icon to access Settings, then navigate to Library and View Settings. You will see the Show iTunes Library option. Simply check this to show your iTunes library above the crates section. Serato will need restarting before any changes made in your iTunes library appear, so avoid adding to your playlists in iTunes whilst Serato is running..
Streaming Services – TIDAL, Beatport Streaming, Beatsource and SoundCloud Go+
The integration of streaming into Serato DJ allows DJs to stream tracks straight into Serato. You will need a valid subscription to a compatible provider to access streamed music.
To link a streaming provider to Serato, navigate to the Library and click View Settings. Now log in to your streaming service account. Once logged in, your playlists will show above the crates. You can also add playlists that have been created in the SoundCloud Go+ or TIDAL websites and apps.
You currently cannot drag streaming tracks into local crates. You also can’t record your mixes whilst using streamed tracks and you must be connected to the internet to play them. However, Beatport Streaming and Beatsource offer an offline locker for local playback of 1,000 tracks with selected plans.
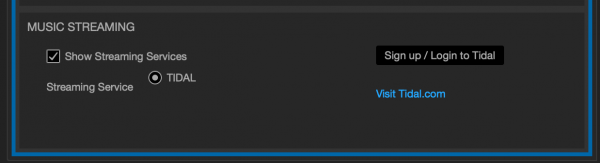
Music Streaming is now within Serato’s preferences.
Music Analysis
Once your tracks are loaded into your Serato library via any of the above methods, you will need to analyse them. Analysing a track gives your Serato library important information such as volume, BPM and the key it’s in. Track analysis will happen the first time you play a song in Serato DJ; however, this can slow down your workflow as you wait for the BPM information etc, to be displayed. For this reason, we recommend you pre-analyse your library before sets.
How to Analyse Music In Serato DJ
Launch Serato DJ without any hardware plugged in to enter Preparation Mode. From here, all the tracks in the library can be selected by pressing CMD+A on a Mac or CTRL+A on Windows. Once all the tracks in the library or crate are highlighted, simply drag them over the Analyse Tracks button and analysis will begin. Once the Analyse window automatically closes, you’re ready to plug in some decks and begin DJing!
In the Analysis Settings window, you will have the option to Set Key and Set Beat Grid/ BPM, ensure that both options are checked to have this data written to your music library.
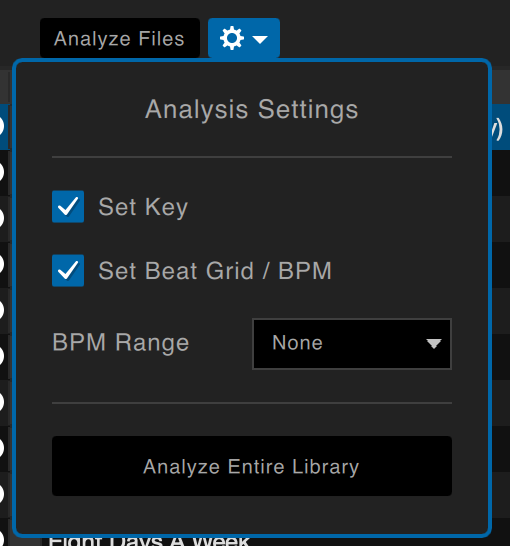
Make sure you tick the Set Key box in the Analysis Settings in Serato
Setting Up Your DJ Controller
Now that your library is set up and ready, it’s time to plug in some decks. This varies for each piece of equipment, so if you are unsure please check your owner’s manual. However, for the majority of hardware it’s as simple as plugging in your USB cable and, if necessary, the power adaptor. Once the decks are plugged in and turned on, Serato should change view slightly with the on-screen crossfader disappearing.
Now that we are all set up and ready to play we need to connect some speakers to the ‘Master Out’ on the rear of the decks. The connectors will vary depending on the speakers you have but the vast majority of beginner controllers use red and white RCA connectors which are commonplace with most home-grade AV equipment.

The RCA connections on the back of the DDJ-REV1
Preparing your controller for Serato DJ 3
Serato DJ 3 has arrived, and with it comes the amazing ability to mix with stems. DJs can isolate vocals, drums, melodies and basslines to create smoother mixes and get creative by quickly and easily remixing tracks live!
In order to update an older Serato controller with the new stems feature, check our guide.
Your First Serato DJ Mix
We are now fully set up and ready to perform our first mix in Serato DJ! Click here to watch our DJ tutor, Jamie Hartley, show you how to perform your first basic mix within Serato DJ Lite on the Pioneer DJ DDJ-SB3 controller. If you enjoyed this quick getting started guide and want to learn more, make sure to check out our dedicated Serato DJ Beginner course in the link below. Best of luck and happy mixing!
Want to learn more about DJing with Serato?
Comment
Join The Discussion
Latest
Recent DJ Content
Get Involved
DJ Education & Community
Online DJ Courses
Learn how to DJ with your equipment by following our software and hardware specific courses! From Rekordbox to Traktor, Serato DJ to Denon DJ & more!
The DJ Hub
The DJ Hub features advanced techniques, career advice, DJ challenges & an inclusive community. Learn anywhere, any time.