Поддержка
Драйверы и загрузки
Пользовательская документация
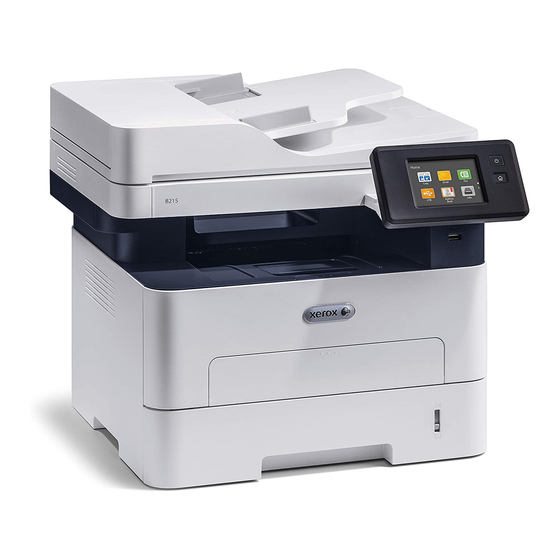
Многофункциональный принтер Xerox® B215 Руководство пользователя
-
Released:
28.01.2021
-
Размер:
11.57 MB
-
Filename:
Xerox_B215_mfp_ug_ru.pdf
-
Tags:
User Guides
Supported languages
-
Russian
Supported products
-
Xerox B215 Multifunction Printer
Видео
Contact
- Manuals
- Brands
- Xerox Manuals
- All in One Printer
- B215
- User manual
-
Contents
-
Table of Contents
-
Troubleshooting
-
Bookmarks
Related Manuals for Xerox B215
Summary of Contents for Xerox B215
-
Page 1
Version 1.0 august 2019 702P07580 Xerox B215 ® Multifunction Printer User Guide… -
Page 2
, Xerox Secure Access Unified ID System , Xerox Extensible Interface Platform , Global Print ® ® Driver , and Mobile Express Driver are trademarks of Xerox Corporation in the United States and / or other countries. ® ® ® ® ® ®… -
Page 3: Table Of Contents
Accessing Xerox® CentreWare® Internet Services……..
-
Page 4
General Setup Using the Printer Control Panel ……… 55 ® ® General Setup Using Xerox CentreWare Internet Services ……57 Network Connectivity. -
Page 5
Scanning to a USB Drive …………146 ® Xerox B215 Multifunction Printer User Guide… -
Page 6
Xerox Easy Printer Manager…….. -
Page 7
Paper Curl…………….218 ® Xerox B215 Multifunction Printer User Guide… -
Page 8
Viewing Current Errors on the Control Panel ……… . 244 ® ® Viewing Alerts Using Xerox CentreWare Internet Services ……244 Using the Integrated Troubleshooting Tools . -
Page 9
Material Safety Data …………..297 ® Xerox B215 Multifunction Printer User Guide… -
Page 10
Other Countries …………… . 304 ® Xerox B215 Multifunction Printer User Guide… -
Page 11
® Xerox B215 Multifunction Printer User Guide… -
Page 12: Safety
Environmental, Health, and Safety Contact Information …………….23 Your printer and the recommended supplies have been designed and tested to meet strict safety requirements. Attention to the following information ensures the continued safe operation of your Xerox printer. Xerox B215 Multifunction Printer ® User Guide…
-
Page 13: Notices And Safety
These ® include safety agency evaluation and certification, and compliance with electromagnetic regulations and established environmental standards. The safety and environment testing and performance of this product have been verified using Xerox ® materials only. Note: Unauthorized alterations, which can include the addition of new functions or connection of external devices, can affect the product certification.
-
Page 14: Electrical Safety
The printer causes a circuit breaker, fuse, or other safety device to activate. If any of these conditions occur, do the following: Power off the printer immediately. Disconnect the power cord from the electrical outlet. Call an authorized service representative. Xerox B215 Multifunction Printer ® User Guide…
-
Page 15: Power Cord
The power cord is attached to the printer as a plug-in device on the back of the printer. If it is necessary to disconnect all electrical power from the printer, disconnect the power cord from the electrical outlet. Xerox B215 Multifunction Printer ® User Guide…
-
Page 16: Emergency Power Off
Electrical Safety Emergency Power Off If any of the following conditions occur, power off the printer immediately and disconnect the power cord from the electrical outlet. Contact an authorized Xerox service representative to correct the problem if: • The equipment emits unusual odors or makes unusual noises.
-
Page 17: Operational Safety
Ozone is heavier than air and is not produced in amounts large enough to harm anyone. Install the printer in a well-ventilated room. For more information in the United States and Canada, go to www.xerox.com/environment. In other markets, please contact your local Xerox representative or go to www.xerox.com/environment_europe.
-
Page 18: Printer Location
Use of non-Xerox supplies is not recommended. The Xerox Warranty or Service Agreement do not cover damage, malfunction, or degradation of performance caused by use of non-Xerox supplies, or the use of Xerox supplies not specified for this printer. Xerox B215 Multifunction Printer ®…
-
Page 19: Maintenance Safety
Do not attempt any maintenance procedure that is not specifically described in the documentation supplied with your printer. • Clean with a dry lint-free cloth only. • Do not burn any consumables or routine maintenance items. For information on Xerox supplies ® recycling programs, go to www.xerox.com/gwa. WARNING: Do not use aerosol cleaners.
-
Page 20: Printer Symbols
This warning symbol alerts users to areas where there is the possibility of personal injury. Do not burn the item. Do not touch the part or area of the printer. Do not load envelopes. Do not touch. Xerox B215 Multifunction Printer ® User Guide…
-
Page 21
Do not insert the unit in a different orientation. Toner Clean the areas indicated. Register the original document to the corner indicated, and load face down. Load media face down and in the direction indicated. Load media face up. Xerox B215 Multifunction Printer ® User Guide… -
Page 22
Printer Symbols Symbol Description Push down. Push to open. Home Button Local Area Network Universal Serial Bus This item can be recycled. For details, see Recycling and Disposal. Xerox B215 Multifunction Printer ® User Guide… -
Page 23: Environmental, Health, And Safety Contact Information
Environmental, Health, and Safety Contact Information Environmental, Health, and Safety Contact Information For more information on Environment, Health, and Safety in relation to this Xerox product and supplies, contact: • United States and Canada: 1-800-ASK-XEROX (1-800-275-9376) • Europe: EHS-Europe@xerox.com For product safety information in the United States and Canada, go to www.xerox.com/environment.
-
Page 24
Environmental, Health, and Safety Contact Information Xerox B215 Multifunction Printer ® User Guide… -
Page 25: Getting Started
Accessing the Printer …………………………34 • Introduction to Services …………………………. 35 • Information Pages …………………………… 37 • Xerox® CentreWare® Internet Services ………………….. 39 • Xerox Easy Printer Manager ……………………….43 • Printer Software …………………………..44 • More Information …………………………..46…
-
Page 26: Parts Of The Printer
Manual Feed Slot USB Memory Port Output Tray Front Cover Automatic Document Feeder Cover Paper Level Indicator Automatic Document Feeder Input Tray Output Tray Extension Automatic Document Feeder Output Tray Paper Width Guides Xerox B215 Multifunction Printer ® User Guide…
-
Page 27: Automatic Document Feeder
Adjust the paper guides so that they fit against the original documents. • Insert paper in the automatic document feeder only when ink on the paper is dry. • Do not load original documents above the MAX fill line. Xerox B215 Multifunction Printer ® User Guide…
-
Page 28
The default document size is 8.5 x 11 in. or For other sized documents, change the Original Size option. Note: Documents are only scanned once even when several copies are selected. Xerox B215 Multifunction Printer ® User Guide… -
Page 29: Media Output Locations
Duplex printing with the rear door open will cause paper jams. CAUTION: The fuser area inside the rear cover of your device becomes very hot when in use. Take care when you access this area. Xerox B215 Multifunction Printer ® User Guide…
-
Page 30: Rear View
Parts of the Printer Rear View Network Port Rear Cover Telephone Line Socket (Line) Power Receptacle Extension Telephone Socket (EXT) USB Port Xerox B215 Multifunction Printer ® User Guide…
-
Page 31: Control Panel
Home Button This button provides access to the Home screen to access printer services such as Copy, ID Card Copy, Scan to PC, Scan to Network, Scan to WSD, Email and Fax. Xerox B215 Multifunction Printer ® User Guide…
-
Page 32: Power Options
When the printer does not receive data for an extended period of time, the Power Saver mode becomes active and power consumption is automatically lowered. To enter Power Saver mode: Press the Power On/Off button. Touch Enter Power Saver. The printer enters power saver mode. Xerox B215 Multifunction Printer ® User Guide…
-
Page 33: Powering Off The Printer
The Power On/Off button is a single multifunction button on the control panel. To power off the printer: Press the Power On/Off button. Touch Power Down. The printer powers off. CAUTION: Do not unplug the power cord while the printer powers down. Xerox B215 Multifunction Printer ® User Guide…
-
Page 34: Accessing The Printer
Touch Log In. Type the User Name using the keypad, then touch Confirm. Type the Password using the keypad, then touch Confirm. Note: For information about logging in as system administrator, refer to Security. Xerox B215 Multifunction Printer ® User Guide…
-
Page 35: Introduction To Services
Services are a gateway to the features and functions of your device. Services are already installed on the device and appear on the Home screen. Available services can be hidden or rearranged on the Home screen using Xerox CentreWare Internet Services. For more information, refer to Setting Up the ®…
-
Page 36
To configure services for your device, refer to Installation and Setup. For more information about using the services and the options available, refer to Using the Services. Xerox B215 Multifunction Printer ® User Guide… -
Page 37: Information Pages
This report provides information about your device setup, including the serial number, IP Address and the software version. Call for Assistance The Call for Assistance Report provides a summary of relevant information that you can provide to a Xerox support representative. ® Email Sent The Email Sent Report provides a record of emails sent, including From, To, Date &…
-
Page 38: Printing Information Pages
Note: If you are prompted to enter the Administrator account user name and password, refer to Accessing the Xerox® CentreWare® Internet Services Administrator Account. Click Reports. To print a report, for the required report, click Print. Click OK.
-
Page 39: Xerox® Centreware® Internet Services
Accessing Xerox® CentreWare® Internet Services and Changing the Default System Administrator Password. For printers connected using a USB connection, use Xerox Easy Printer manager to configure, manage and use your printer from a computer. For more information, refer to Xerox Easy Printer Manager.
-
Page 40: Accessing Xerox® Centreware® Internet Services
Finding the IP Address of Your Printer To install the print driver for a network-connected printer, it is often necessary to know the IP address of your printer. Also, the IP address is used to access the settings of your printer through Xerox ®…
-
Page 41: Certificates For Xerox® Centreware® Internet Services
® message that the security certificate is not trusted. This configuration does not lessen the security of the communications between your computer and the Xerox device. • To eliminate the connection warning in your Web browser, you can replace the self-signed certificate with a signed certificate from a Certificate Authority.
-
Page 42: Using Xerox® Centreware® Internet Services
The Contents tab displays a table of contents for Xerox CentreWare Internet Services. ® ® • Help: Use this option to go directly to the Xerox website for additional help and information. Xerox B215 Multifunction Printer ® User Guide…
-
Page 43: Xerox Easy Printer Manager
Xerox Easy Printer Manager is is available for Windows and Macintosh operating systems. Xerox Easy Printer Manager conveniently provides access to device settings as well as functions such as scanning, faxing and printing. The Xerox Easy Printer Manger allows you to view the status and manage your device at your computer.
-
Page 44: Printer Software
® ® Note: Login is required to change Printer Settings. • Xerox Easy Wireless Setup: When installing the printer you can use the wireless setup program that was automatically installed with the print driver to configure the wireless settings. Printer Linux •…
-
Page 45
® Internet Services in one location. • Xerox Easy Document Creator: Used to adjust scan settings and start the scanning process directly from your Macintosh. The preview window allows you to view the scan and make adjustments as necessary and preferred settings can be preserved as favorites and added to a pre-defined list. -
Page 46: More Information
Technical support information for your www.xerox.com/office/B215support printer, including online technical support, Online Support Assistant and print driver downloads Information Pages Print reports from the control panel or using Xerox CentreWare ® ® Internet Services. For details, refer to Information Pages.
-
Page 47
More Information Xerox B215 Multifunction Printer ® User Guide… -
Page 48: Installation And Setup
CentreWare Internet Services ……………………50 ® ® • Initial Setup …………………………….53 • General Setup…………………………….55 • Network Connectivity…………………………64 • Installing Printer Software ……………………….83 • Setting Up the Services …………………………90 Xerox B215 Multifunction Printer ® User Guide…
-
Page 49: Installation And Setup Overview
For instructions on unpacking and installing your printer, refer to the Installation Guide packaged with your printer. You can also access the Online Support Assistant at www.xerox.com/office/B215support. When you configure the printer for the first time, complete the following tasks: Connect your printer to a network using a wired or wireless connection, or to a computer using a USB cable connection.
-
Page 50: Xerox ® Centreware ® Internet Services
Note: The serial number is located on the data label at the rear of the printer. Finding the IP Address of Your Printer The IP address is used to access the settings of your printer through Xerox CentreWare Internet ®…
-
Page 51: Administrator Password
Special Characters: @ / . ‘ & + — # * , _ % ( ) ! To verify the password, enter the password again in the Verify Password field. To save the new password, click Save. The Administrator Account password is updated and access to Xerox CentreWare Internet ®…
-
Page 52: Changing The System Administrator Password
When you select an option which requires Administrator Account access, a security login window appears. For User Name, enter Admin. For Password, enter the administrator account password that was Internet Services. Click OK. set during initial access to Xerox CentreWare ® ®…
-
Page 53: Initial Setup
Password. • Xerox Easy Printer Manager is is available for Windows and Macintosh operating systems and conveniently provides access to device settings as well as functions. To change settings using Xerox Easy Printer Manager, at your computer, open Xerox Easy Printer Manager. Select the printer, then click Advanced Setting or Machine Settings and configure the settings required.
-
Page 54: Usb Direct Connection
If your printer is connected to your computer directly, using a USB AB cable, configure settings using Xerox Easy Printer Manager. Connect the one end of the USB AB cable to the USB B port on the back of the printer. Connect the other end to a standard USB A connection on your computer.
-
Page 55: General Setup
Before you switch off Power Saver modes or set a longer activation times, consider the increase in printer power consumption. At the printer control panel, press the Home button. Touch Device General Power Saver Timer. Xerox B215 Multifunction Printer ® User Guide…
-
Page 56
1000 m (3280 ft.), to improve print quality, you can use Altitude Adjustment. At the printer control panel, press the Home button. Touch Device General Altitude Adjustment. Select an option: Xerox B215 Multifunction Printer ® User Guide… -
Page 57: Internet Services
For Machine Name, type a name for the printer. For Location, type the location of the printer. For Xerox Asset Tag Number and Customer Asset Tag Number, type unique identifiers as needed. In the Geographic Location area, for Latitude and Longitude, type coordinates in decimal form.
-
Page 58
Web is suited for large enterprise businesses. For details, refer to ® ® www.xerox.com/centrewareweb. Note: SMart eSolutions is not available in all countries. Refer to your Xerox representative for details. Before You Begin • If your network uses an HTTP proxy server, provide information about your proxy server on the HTTP Proxy Server page. -
Page 59
SuppliesAssistant monitors the remaining life of the toner or ink, and other printer consumables. When SMart eSolutions is configured to communicate with Xerox, SuppliesAssistant also monitors the usage of consumables. The data reported to Xerox is used to replenish supplies. -
Page 60
General Setup Maintenance Assistant Settings Maintenance Assistant provides options for troubleshooting your printer. You can send detailed diagnostic information to Xerox , start online troubleshooting sessions with Xerox , and download ® ® usage information to your computer in .csv format. -
Page 61
Power Saver Mode 2 Timer: Specify how long the printer remains in Low Power Save mode before it goes into Very Low Power Save mode. Note: The sum of the two timers cannot exceed 119 minutes. Click Apply. Click OK. Xerox B215 Multifunction Printer ® User Guide… -
Page 62
Click Tray Settings. For Manual Feed Slot: Select a Mode. To enable the tray confirmation screen, click Enable. For Tray 1, to enable the tray confirmation screen, click Enable. Click Apply. Click OK. Xerox B215 Multifunction Printer ® User Guide… -
Page 63
Performing this procedure will delete all network settings and network connection to the printer will be lost immediately. In Xerox CentreWare Internet Services, click Status General. ® ® Click Network Factory Default. A warning message is displayed. To confirm, click OK. Xerox B215 Multifunction Printer ® User Guide… -
Page 64: Network Connectivity
When configuring settings in Properties, you will be prompted to enter the Administrator account user name and password. For information about logging in as an administrator, refer to Accessing the Xerox® CentreWare® Internet Services Administrator Account. Configuring TCP/IP Settings Using the Printer Control Panel…
-
Page 65
To return to the home screen, press the Home button. Configuring TCP/IP Settings Using Xerox CentreWare Internet Services ® ® If your printer has a valid network address, you can configure TCP/IP settings in Xerox CentreWare ® ® Internet Services. For details, refer to Assigning a Network Address. -
Page 66: Slp
Note: When configuring settings in Properties, you will be prompted to enter the Administrator account user name and password. For information about logging in as an administrator, refer to Accessing the Xerox® CentreWare® Internet Services Administrator Account. Xerox B215 Multifunction Printer ®…
-
Page 67: Snmp
Click Apply. SNMP Simple Network Management Protocol (SNMP) is a set of network protocols designed to allow you to manage and monitor devices on your network. You can use the SNMP configuration pages in Xerox CentreWare Internet Services to: ®…
-
Page 68: Snmpv3
Network Connectivity Configuring SNMP Trap Destination Address Using Xerox CentreWare ® ® Internet Services You can add, edit, or delete IP addresses for Network Management workstations that receive traps from the device. Internet Services, click Properties Connectivity Protocols. In Xerox CentreWare …
-
Page 69: Wins
When configuring settings in Properties, you will be prompted to enter the Administrator account user name and password. For information about logging in as an administrator, refer to Accessing the Xerox® CentreWare® Internet Services Administrator Account. Configuring WINS Using Xerox…
-
Page 70: Raw Tcp/Ip Printing
When configuring settings in Properties, you will be prompted to enter the Administrator account user name and password. For information about logging in as an administrator, refer to Accessing the Xerox® CentreWare® Internet Services Administrator Account. Configuring Raw TCP/IP Printing Using the Printer Control Panel…
-
Page 71: Ldap Server
When configuring settings in Properties, you will be prompted to enter the Administrator account user name and password. For information about logging in as an administrator, refer to Accessing the Xerox® CentreWare® Internet Services Administrator Account. Adding or Editing an LDAP Server Using Xerox CentreWare Internet ®…
-
Page 72: Http
When configuring settings in Properties, you will be prompted to enter the Administrator account user name and password. For information about logging in as an administrator, refer to Accessing the Xerox® CentreWare® Internet Services Administrator Account. Configuring HTTP Settings Using the Printer Control Panel…
-
Page 73: Google Cloud Print
For HTTP Security Mode, select a security option. Note: To allow connections to the Xerox device using HTTPS only, select Require HTTPS. To enable one or more TLS versions, for TLSv 1.0, TLSv 1.1, or TLSv 1.2, select Enable. Click Apply.
-
Page 74
Note: Cloud Job Conversion uses both Google Cloud Printing and Local Printing. Currently, only specialized third-party apps require conversion. Xerox recommends that you leave Cloud Job Conversion disabled unless you use an app that requires it. To allow Printer Working Group (PWG) printing, for Enable PWG, select Enable. -
Page 75: Proxy Server
From the Google Cloud Print window in Xerox CentreWare Internet Services, click Apply. ® ® To update the Registration Status displayed in your Web browser, refresh the Xerox CentreWare ® ® Internet Services Web page. 10. To access the Google Cloud Print feature, in your Google account, click Manage Your Printer. The default printer name appears in this format: Model name (MAC address).
-
Page 76: Connecting To A Wireless Network
(SSID), a passphrase, and security protocols. You can use the Wireless Wizard to connect to a wireless network at the printer control panel. If the device is connected to a wired network, you can configure wireless settings using Xerox CentreWare ®…
-
Page 77
Before starting, you must get the setup and configuration information, such as name and passphrase, from the router. After you collect the network information, you can set up the printer from the printer control panel or from Xerox CentreWare Internet Services. -
Page 78
• For Security Type, select Open System. For Address Acquisition, select a protocol option. If you select Static, you can change the IP Address, Subnet Mask, and Gateway Mask, as needed. Click Apply. Xerox B215 Multifunction Printer ® User Guide… -
Page 79: Wi-Fi Directtm
When configuring settings in Properties, you will be prompted to enter the Administrator account user name and password. For information about logging in as an administrator, refer to Accessing the Xerox® CentreWare® Internet Services Administrator Account. Configuring Wi-Fi Direct Using Xerox…
-
Page 80: Wsd
When configuring settings in Properties, you will be prompted to enter the Administrator account user name and password. For information about logging in as an administrator, refer to Accessing the Xerox® CentreWare® Internet Services Administrator Account. Enabling WSD Using Xerox…
-
Page 81: Sntp
When configuring settings in Properties, you will be prompted to enter the Administrator account user name and password. For information about logging in as an administrator, refer to Accessing the Xerox® CentreWare® Internet Services Administrator Account. Configuring SNTP Using Xerox…
-
Page 82: Mopria
When configuring settings in Properties, you will be prompted to enter the Administrator account user name and password. For information about logging in as an administrator, refer to Accessing the Xerox® CentreWare® Internet Services Administrator Account. Configuring Mopria Using Xerox…
-
Page 83: Installing Printer Software
All applications should be closed on your PC before beginning installation. You can install the printer software for a local, networked or wireless printer using the recommended or custom method. Xerox B215 Multifunction Printer ® User Guide…
-
Page 84
After you have assigned and verified the TCP/IP settings, you are ready to install the software on each computer on the network. Make sure that the printer is connected to your computer and powered on. Xerox B215 Multifunction Printer ® User Guide… -
Page 85
After you have assigned and verified the TCP/IP settings, you are ready to install the software on each computer on the network. To install the printer software and connect to a printer on a wireless network using the Xerox Easy Wireless Setup program, refer to Using the Xerox Easy Wireless Setup Program. -
Page 86
Troubleshooting chapter of this guide. Using the Xerox Easy Wireless Setup Program When installing the printer, you can use the Xerox Easy Wireless Setup program that was automatically installed with the printer driver to configure the wireless settings. Note: Make sure the Xerox Easy Wireless Setup Program is installed on your computer, for… -
Page 87: Installing Macintosh Drivers
Instructions may vary depending on your operating system version. Installing Macintosh Drivers Make sure that the printer is connected to your computer and powered on. From the Xerox web site, download the required driver .dmg package to your computer. Note: Print, Scan and Fax drivers are available.
-
Page 88: Installing Linux Drivers
Select Close. Installing Linux Drivers To print from a Linux workstation, install either a Xerox print driver for Linux or a CUPS (Common UNIX Printing System) print driver. Xerox recommends that you install the Unified Linux Driver for your printer.
-
Page 89
Installing Printer Software To uninstall the scanner, type: sudo ./uninstall-scanner.sh, then press Enter. Note: The printer and scanner can be uninstalled together by typing sudo ./uninstall.sh. Xerox B215 Multifunction Printer ® User Guide… -
Page 90: Setting Up The Services
To rearrange the services on the control panel touch screen, select a service, then click the Move Top, Move Up, Move Down, or Move Bottom arrow buttons to move the service to the required location. Click Apply. Printing Settings Configuring Printing Settings Using Xerox CentreWare Internet ® ®…
-
Page 91
Managing Banner Page Printing You can set the printer to print a banner page with each print job. The banner page contains information identifying the user and job name. You can set this option in the print driver, in Xerox ®… -
Page 92: Copy Settings
Reports. Note: If you are prompted to enter the Administrator account user name and password, refer to Accessing the Xerox® CentreWare® Internet Services Administrator Account. To print a report, next to the report name, click Print. Copy Settings If your printer is connected to your computer through a wired or wireless network connection, use…
-
Page 93: Email Settings
Setting Up the Services Configuring Copy Settings Using Xerox CentreWare Internet Services ® ® Changing the Default Copy Settings The printer uses the default copy settings on all copy jobs unless you change them for an individual job. You can modify the default copy settings.
-
Page 94
To allow users to modify the email message body text, click Always. To change the message body text, edit the text shown in the Message Body box. To add signature text, type the text in the Signature box. Click Save. Xerox B215 Multifunction Printer ® User Guide… -
Page 95
Internet Services, click Properties Services. In Xerox CentreWare ® ® Click Email. For From Edit Policies, to edit a setting, click the Pencil icon. Select the editing policies and display name options required. Click Save. Xerox B215 Multifunction Printer ® User Guide… -
Page 96
Always On; Not editable by user: Use this option to restrict users from enabling or disabling Email Encryption at the control panel. For Encryption Algorithm, select the algorithm used by your email server. For From Field Display, select an option. Xerox B215 Multifunction Printer ® User Guide… -
Page 97: Fax Settings
To return to the home screen, press the Home button. Setup Fax Reports At the printer control panel, Device App Defaults Fax Setup. Touch Setup Fax Reports. Select the settings required: • Activity Report • Confirmation Report Xerox B215 Multifunction Printer ® User Guide…
-
Page 98
Setting Up the Services • Broadcast Report Touch X. To return to the home screen, press the Home button. Xerox B215 Multifunction Printer ® User Guide… -
Page 99
Enable this option to set the device to correct errors. This helps in areas with poor line quality. Sending a fax in this mode may take more time. Touch X. To return to the home screen, press the Home button. Xerox B215 Multifunction Printer ® User Guide… -
Page 100
Select Reduce to Fit to reduce the image, or Discard Bottom to crop the image at the bottom of the page. Touch X. To return to the home screen, press the Home button. Xerox B215 Multifunction Printer ® User Guide… -
Page 101
Internet Services to configure the Fax settings. ® ® If your printer is connected to your computer using a USB cable connection, configure fax settings at the device or using Xerox Easy Printer Manager. Configuring Fax Line Settings Internet Services, click Properties Services… -
Page 102
If an LDAP network address book is configured, to allow users to locate email addresses in the Network Address Book, select Yes. To hide the address book from users, select No. Click Save. Xerox B215 Multifunction Printer ® User Guide… -
Page 103
Receive mode is deactivated, any faxes stored in memory are automatically printed. Secure Receive Passcode Use this option to enter a passcode which is then used to release received faxes at the printer. Enter a numeric passcode from 1–6 characters. Xerox B215 Multifunction Printer ® User Guide… -
Page 104
For Fax To PC, to edit a setting, click the Pencil icon. To enable a document to be sent from the PC to the printer for faxing to a remote fax machine, click Enable. Click Save. Xerox B215 Multifunction Printer ® User Guide… -
Page 105: Scan To Network Settings
Accessing the Xerox® CentreWare® Internet Services Administrator Account. If your printer is connected to your computer using a USB cable connection, configure Scan to Network settings at the device or using Xerox Easy Printer Manager. Configuring Scan to Network Settings Using Xerox CentreWare ®…
-
Page 106
Click Scan to Network. For Confirmation Report, to edit a setting, click the Pencil icon. For Confirmation Report, select an option: • • • Error Only Click Save. A modification confirmation window is displayed, click OK. Xerox B215 Multifunction Printer ® User Guide… -
Page 107: Usb Settings
When configuring settings in Properties, you will be prompted to enter the Administrator account user name and password. For information about logging in as an administrator, refer to Accessing the Xerox® CentreWare® Internet Services Administrator Account. Configuring USB Settings Using Xerox…
-
Page 108: Id Card Copy Settings
When configuring settings in Properties, you will be prompted to enter the Administrator account user name and password. For information about logging in as an administrator, refer to Accessing the Xerox® CentreWare® Internet Services Administrator Account. Configuring ID Card Copy Settings Using the Printer Control Panel…
-
Page 109
Setting Up the Services Click Save. A modification confirmation window is displayed, click OK. Click Close. Xerox B215 Multifunction Printer ® User Guide… -
Page 110
Setting Up the Services Xerox B215 Multifunction Printer ® User Guide… -
Page 111: Using The Services
ID Card Copy ……………………………. 117 • Email ………………………………118 • Scan To ………………………………. 122 • Fax………………………………… 138 • USB ………………………………145 • Device ………………………………147 • Address Book …………………………… 150 • Jobs ………………………………155 Xerox B215 Multifunction Printer ® User Guide…
-
Page 112: Overview
Overview Overview Xerox Services are a gateway to the features and functions of your device. There are standard Services already installed and displayed on the Home screen. There are also services that are installed as standard but are hidden when your device is used for the first time.
-
Page 113: Copy
To use the touch screen keypad to enter the number of copies, touch the quantity, then touch the numbers required. To amend the number of copies entered, touch the X button. Touch Confirm. Adjust copy settings as needed. Xerox B215 Multifunction Printer ® User Guide…
-
Page 114: Using The N-Up Option
Touch Start. If you placed documents in the automatic document feeder, scanning continues until the feeder is empty. To return to the home screen, press the Home button. The device prints multiple images on one sheet of paper. Xerox B215 Multifunction Printer ® User Guide…
-
Page 115: Copy Options
Works well with dark originals. • Normal: This setting works well with standard typed or printed originals. • Darken: To darken the image, touch the settings to the right of the scale. Works well with light print. Xerox B215 Multifunction Printer ® User Guide…
-
Page 116
• 4 Up: This feature is used to copy four documents, in a reduced size, onto one sheet of paper. Collation Places printed pages in • On: Defines the page sequence for printing. order. • Off: Select if collation is not required. Xerox B215 Multifunction Printer ® User Guide… -
Page 117: Id Card Copy
To scan the second side of the original document and print the copies, touch Scan. To return to the home screen, press the Home button. The device prints both sides of the original on one side of the paper. Xerox B215 Multifunction Printer ® User Guide…
-
Page 118: Email
Insert the original documents face up in the document feeder, with the top of the page entering the feeder first. Adjust the paper guides so that they fit against the original documents. Touch Email. Enter recipients: Xerox B215 Multifunction Printer ® User Guide…
-
Page 119
Use the scroll function to access all feature screens. To start the scan, touch Send. If you placed documents in the automatic document feeder, scanning continues until the feeder is empty. To return to the home screen, press the Home button. Xerox B215 Multifunction Printer ® User Guide… -
Page 120: Email Options
Works well with dark originals. • Normal: This setting works well with standard typed or printed originals. • Darken: To darken the image, touch the settings to the right of the scale. Works well with light print. Xerox B215 Multifunction Printer ® User Guide…
-
Page 121
To include a From email address, using the keypad, enter address that you want the the email address of the sender. recipient to reply to, use the From option. Note: This option can be enabled or disabled. Xerox B215 Multifunction Printer ® User Guide… -
Page 122: Scan To
USB drive, refer to USB. You can adjust the default settings for Scan jobs. For information about customizing the Scan settings, refer to Scan to Network Settings. Xerox B215 Multifunction Printer ® User Guide…
-
Page 123: Scan To Pc
For instructions on setting up and configuring the Scan function, refer to Scan to Network Settings. For Windows and Macintosh scanning, the Printer Driver with Xerox Easy Printer Manager must be installed on your computer prior to use. Note: If you have not set up scan in Easy Printer Manager from your computer, your computer will not appear as a destination in the Scan to PC service.
-
Page 124
If scanning from the document glass, to scan another page touch Yes. Load an original and touch Scan. Otherwise, touch No. The images are scanned and sent to the destination selected in the job. To return to the home screen, press the Home button. Xerox B215 Multifunction Printer ® User Guide… -
Page 125
At your computer, open Xerox Easy Printer Manager. Click the Printer menu, then from the list, select the printer required. At the top of the Xerox Easy Printer Manager window, select Advanced Setting or Machine Settings. Click Scan to PC Settings. The Scan to PC Settings screen appears. -
Page 126: Scan To Network
Adjust the paper guides so that they fit against the original documents. Touch Scan to Network. A list of address book contacts setup with Scan To Destinations appears. Xerox B215 Multifunction Printer ® User Guide…
-
Page 127
If scanning from the document glass, to scan another page touch Yes. Load an original and touch Scan. Otherwise, touch No. The images are scanned and sent to the destination selected in the job. To return to the home screen, press the Home button. Xerox B215 Multifunction Printer ® User Guide… -
Page 128: Scan To Wsd
From the list, select a WSD scan profile. To start the scan, touch Scan. The images are scanned and sent to the destination selected in the job. To return to the home screen, press the Home button. Xerox B215 Multifunction Printer ® User Guide…
-
Page 129
You can forward scanned images to an email address or a network folder automatically. To choose a forwarding option, click Tools, then click Scan Routing. Select your preferred option, enter the destination details, then click Save. The scanned images are forwarded to the specified destination. Xerox B215 Multifunction Printer ® User Guide… -
Page 130: Scan Options
• Grayscale: Use if output is to be in shades of gray. color output. • Black and White: Use to select black and white output regardless of the color of your original. Xerox B215 Multifunction Printer ® User Guide…
-
Page 131
Works well with dark originals. • Normal: This setting works well with standard typed or printed originals. • Darken: To darken the image, touch the settings to the right of the scale. Works well with light print. Xerox B215 Multifunction Printer ® User Guide… -
Page 132: Scan Using Twain And Wia
The printer scans your original documents and saves the images to the output destination specified in the software application. Note: Different software applications have different default settings for the output. For details, refer to the documentation provided with your application. Xerox B215 Multifunction Printer ® User Guide…
-
Page 133: Macintosh Scanning
Select Scan, then click Open Scanner. Select the features for the scan job. For information about the scan options, refer to Macintosh Scan Options. Click Scan. The original document is scanned and saved to the specified folder. Xerox B215 Multifunction Printer ® User Guide…
-
Page 134
• Use Other to select additional folders. Name Use to create a name for the scanned Enter a name for the scanned file. The document. file name is appended with a number for subsequent scans. Xerox B215 Multifunction Printer ® User Guide… -
Page 135
Determines the type of file created. JPEG, TIFF, PNG, JPEG 2000, GIF, BMP, Image Correction Use to adjust the image quality settings • None used when scanning the original • Manual: Brightness, Tint, documents. Temperature Xerox B215 Multifunction Printer ® User Guide… -
Page 136: Linux Scanning
Use this option to scan a multi-page job using the document glass. Load original documents one at a time. Text or Photo Use this option to select the type of originals being scanned. Xerox B215 Multifunction Printer ® User Guide…
-
Page 137
To save the file, click the Download icon, then navigate to the file location required. 10. To select a different file type, choose the file type required from the File Format menu. 11. To change the file name, type the file name required, then click Save. Xerox B215 Multifunction Printer ® User Guide… -
Page 138: Fax
Insert the original documents face up in the document feeder, with the top of the page entering the feeder first. Adjust the paper guides so that they fit against the original documents. Xerox B215 Multifunction Printer ® User Guide…
-
Page 139
Use the scroll function to access all feature screens. To start the scan, touch Send. If you placed documents in the automatic document feeder, scanning continues until the feeder is empty. To return to the home screen, press the Home button. Xerox B215 Multifunction Printer ® User Guide… -
Page 140: Sending A Delayed Fax
Use the scroll function to access all feature screens. Touch Send. The fax is scanned and saved, then sent at the time that you specified. To return to the home screen, press the Home button. Xerox B215 Multifunction Printer ® User Guide…
-
Page 141: Sending A Fax From Your Computer
Select Print from the File menu. The Print window is displayed. It may look slightly different depending on your application. Select Xerox MFP PC Fax from your printer list in the Name drop-down list box. Select Printer Properties, then select OK.
-
Page 142
Click OK to send the document from your PC to your fax device, which will fax the document to the destination fax or faxes listed. Sending a Fax Using Xerox Easy Printer Manager At your computer, open Xerox Easy Printer Manager. -
Page 143: Fax Options
• Auto: Select to optimize the background. background resulting from • Enhance: Select a higher number for a more vivid scanning colored paper or background. newspaper originals. • Erase: Select a higher number for a lighter background. Xerox B215 Multifunction Printer ® User Guide…
-
Page 144
• Send Time: Select the time to send the fax and the send your fax job. You can clock format. delay the send of your fax job for up to 24 hours. Xerox B215 Multifunction Printer ® User Guide… -
Page 145: Usb
To select more files, touch +, then select additional files. • To remove a file name from the list, touch the file name. Select the quantity, and 2-sided printing options. Touch Print. When you are finished, remove the USB Flash drive. Xerox B215 Multifunction Printer ® User Guide…
-
Page 146: Scanning To A Usb Drive
Use the scroll function to access all feature screens. To begin the scan, touch Scan. The printer scans your images to the folder that you specified. When you are finished, remove the USB Flash drive. Xerox B215 Multifunction Printer ® User Guide…
-
Page 147: Device
General Use the General option to customize settings such as the power-saver modes, date and time, and control panel brightness. You can configure the General settings using the device control panel, or by using Xerox CentreWare Internet Services. ® ®…
-
Page 148: About
® warning alerts appear on the control panel. You can customize the alerts that appear on the control panel and configure email alert notifications. To check the supplies status and set up alerts using Xerox CentreWare Internet Services, refer to ®…
-
Page 149: Billing Meter Information
If you provide regular billing information for your device, you can use SMart eSolutions to simplify the process. You can enable SMart eSolutions to send billing meter readings to Xerox automatically so that you do not have to collect the readings manually. For more information,…
-
Page 150: Address Book
Fax: To enter a fax number for the contact, touch Fax, then use the touch screen keypad. Touch Confirm. • Scan to Network: To enter a scan to network location for the contact, use Xerox CentreWare ® ® Internet Services. For details, refer to…
-
Page 151
Adding or Editing Contacts in the Address Book Using Xerox CentreWare Internet Services ® ® Adding Contacts in the Address Book Using Xerox CentreWare ® ® Internet Services At your computer, open a Web browser, and in the address field, type the IP address of the printer, then press Enter or Return. -
Page 152
If authentication is required for scan locations, enter a valid login name and password. To save the new password, click Select to save new password. To add another contact, click Add Another Contact After Saving. Click Save. Adding Groups in the Address Book Using Xerox CentreWare Internet ®… -
Page 153: Centreware ® Internet Services
Address Book Editing or Deleting Contacts in the Address Book Using Xerox ® CentreWare Internet Services ® At your computer, open a Web browser, and in the address field, type the IP address of the printer, then press Enter or Return.
-
Page 154
For Existing Content Management, click Add new contacts to the existing Device Address Book or Replace existing Device Address Book with the new contacts. Click Upload File. Verify the information in the address book fields. 10. Click Import. Exporting Contacts from the Address Book Using Xerox CentreWare ® ® Internet Services At your computer, open a Web browser, and in the address field, type the IP address of the printer, then press Enter or Return. -
Page 155: Jobs
Jobs service. For more information, refer to Deleting at Job at the Control Panel. From the Jobs window in Xerox CentreWare Internet Services, you can view a list of active and ®…
-
Page 156
Managing Jobs Using Xerox CentreWare Internet ® ® Services You can view a list of active jobs and delete print jobs from the Active Jobs list in Xerox CentreWare ® ® Internet Services. You can use Xerox CentreWare Internet Services to submit jobs for printing at the ®… -
Page 157
Jobs Xerox B215 Multifunction Printer ® User Guide… -
Page 158: Printing
Printing This chapter includes: • Printing Overview …………………………… 159 • Printing Using Windows ……………………….160 • Xerox Easy Printer Manager ………………………. 169 • Printing Using Macintosh ……………………….170 • Printing Using Linux …………………………173 • Printing Using Xerox CentreWare Internet Services ……………… 176 ®…
-
Page 159: Printing Overview
To access the many print drivers which can be used with your printer, refer to the Software and Documentation CD delivered with your printer, or download the latest versions from www.xerox.com/office/B215drivers. Xerox B215 Multifunction Printer ®…
-
Page 160: Printing Using Windows
• Favorites Tab • Basic Tab • Paper Tab • Graphics Tab • Advanced Tab • Xerox Tab Select OK to confirm your selections. Select Print or OK to print your document. Xerox B215 Multifunction Printer ® User Guide…
-
Page 161: Print Options
Additional options are available on some tabs which provide information about your device. Paper Tab The Paper tab, in the right panel, is visible on each main tab except for the Favorites and Xerox tabs. It displays a graphical summary of your selections.
-
Page 162
The Preview tab, in the right panel, is visible only on the Favorites tab. It displays a graphical summary of your selections. Details Tab The Details tab, in the right panel, is visible only on the Favorites tab. It displays a summary of the selected Favorite and notes incompatible options. Xerox B215 Multifunction Printer ® User Guide… -
Page 163
Page images are reordered to enable you to fold the paper after printing to make a booklet. Page Border: Use this option to select from a variety of borders for your output. Xerox B215 Multifunction Printer ® User Guide… -
Page 164
• • Short Edge: This is the type often used with calendars. The second side images are rotated 180 degrees. Smart Duplexing If the Smart Duplexing mode has been enabled in Xerox CentreWare Internet Services, 2-Sided ® ® printing is selected or deselected automatically. Use Smart Duplexing to reduce the amount of energy and paper used in the printing process. -
Page 165
Edge Enhancement: Use this option to improve image definition. • Advanced: Use this option to adjust the brightness and contrast levels. Select OK to save your selections. Toner Saver Select On to save toner. • Xerox B215 Multifunction Printer ® User Guide… -
Page 166
Select Edit from the Watermark drop-down list. The Edit Watermarks window appears. Select the watermark you want to delete from the Current Watermarks list and click Delete. Click Yes to confirm the deletion. Click OK. Xerox B215 Multifunction Printer ® User Guide… -
Page 167
Select Edit from the Overlay drop-down list. The Edit Overlay window appears. Select the Overlay you want to delete from the Overlay List box. Click Delete. When a confirming message window appears, click Yes. Click OK. Xerox B215 Multifunction Printer ® User Guide… -
Page 168
To add a binding margin, select the Manual Margin check box and select Details to select the margin position and width. Xerox Tab This tab provides version and copyright information as well as links to drivers and downloads, supplies ordering, and the Xerox Web site. Xerox B215 Multifunction Printer ®… -
Page 169: Xerox Easy Printer Manager
Xerox Easy Printer Manager is is available for Windows and Macintosh operating systems. Xerox Easy Printer Manager conveniently provides access to device settings as well as functions such as scanning, faxing and printing. The Xerox Easy Printer Manger allows you to view the status and manage your device at your computer.
-
Page 170: Printing Using Macintosh
Copies: This allows you to choose the number of copies to be printed. You can select 1 to 999 • copies. • Pages: Select the pages or range of pages to print. Show Quick Preview: Select this option to display a graphical summary of your selections. • Xerox B215 Multifunction Printer ® User Guide…
-
Page 171
Page images are reordered to enable you to fold the paper after printing to make a booklet. • Reverse page orientation: Your printer prints all pages from the last page to the first page. Flip horizontally: Use this option to rotate all pages 180 degrees. • Xerox B215 Multifunction Printer ® User Guide… -
Page 172: Using Airprint
Using Google Cloud Print Google Cloud Print is a service that allows you to print to a printer using your smart phone, tablet, or any other web-connected devices. For more information, refer to Google Cloud Print. Xerox B215 Multifunction Printer ® User Guide…
-
Page 173: Printing Using Linux
Printing Using Linux Printing Using Linux To print from a Linux workstation, install either a Xerox print driver for Linux or a CUPS (Common UNIX Printing System) print driver. Xerox recommends that you install the Unified Linux Driver for your printer.
-
Page 174: Printer Options
URL, print a test page and view status information. • Policies: This tab provides access to the printing policies for the device. You can set sharing options, Error and Operation policies. Use the Banner options to configure the printer banner sheet. Xerox B215 Multifunction Printer ® User Guide…
-
Page 175
Jobs: This option shows the list of Print jobs. Select Cancel job to cancel the selected job and select the Show completed jobs check box to see previous jobs on the job list. Click OK to apply the changes and close the Printer Properties window. Xerox B215 Multifunction Printer ® User Guide… -
Page 176: Printing Using Xerox ® Centreware ® Internet Services
Internet ® ® Services You can print .pdf, .ps, .pcl, .txt, .prn, .tif, .tiff, .jpg, .jpeg and .xps files directly from Xerox CentreWare ® ® Internet Services without having to open another application or the print driver. The files can be stored on a local computer hard drive, mass storage device, or network drive.
-
Page 177
Auto, the printer automatically selects the paper type based on the printer settings. Delivery To print the job now, click the Immediate print option. To restore the default values of any print job, click the Restore Default Values button. Xerox B215 Multifunction Printer ® User Guide… -
Page 178
Printing Using Xerox CentreWare Internet Services ® ® Xerox B215 Multifunction Printer ® User Guide… -
Page 179
This chapter includes: • Supported Paper…………………………..180 • Loading Paper …………………………..184 • Setting Paper Size and Type ………………………. 189 • Media Output Locations ……………………….192 Xerox B215 Multifunction Printer ® User Guide… -
Page 180: Supported Paper
Your printer is designed to use various paper and other media types. To ensure the best print quality and to avoid jams, follow the guidelines in this section. For best results, use Xerox paper and media recommended for your printer.
-
Page 181
Padded envelopes • Plastic media CAUTION: The Xerox Warranty or Service Agreement does not cover damage caused by using unsupported paper or specialty media. Coverage could vary outside these areas. Please contact your local representative for details. Paper Storage Guidelines Storing your paper and other media properly contributes to optimum print quality. -
Page 182
C5 Envelopes 6.38 x 9.02 inches (162.0 x 229 mm) C6 Envelopes 4.49 x 6.38 inches (114 x 162 mm) No.10 Envelopes 4.12 x 9.5 inches (105 x 241 mm) Key: Supported Not Supported Xerox B215 Multifunction Printer ® User Guide… -
Page 183
Postcard 32 to 43 lb (121 to 163 g/m²) card stock Envelopes g/m² 20 to 24 lb (75 to 90 Key: Supported Not Supported Xerox B215 Multifunction Printer ® User Guide… -
Page 184: Loading Paper
For more media specifications, refer to Supported Paper. Pull out tray 1 and load paper into the tray, print side down. Do not fill above the Maximum Fill line indicated by the symbol Xerox B215 Multifunction Printer ® User Guide…
-
Page 185
For information about setting the paper type and size on the control panel, refer to Setting Paper Size and Type. Note: The settings made from the print driver on your computer override the settings on the control panel. Xerox B215 Multifunction Printer ® User Guide… -
Page 186
Press to open the manual feed slot, located on the front of the printer. Note: The manual feed slot holds 1 sheet of the following media: 20 lb (80 g/m²) plain paper, transparency, label, envelope, or cardstock. Xerox B215 Multifunction Printer ® User Guide… -
Page 187
The settings made from the print driver on your computer override the settings on the control panel. Envelope Mode Press to open the manual feed slot, located on the front of the printer. Xerox B215 Multifunction Printer ® User Guide… -
Page 188
For information about setting the paper type and size on the control panel, refer to Setting Paper Size and Type. Note: The settings made from the print driver on your computer override the settings on the control panel. Xerox B215 Multifunction Printer ® User Guide… -
Page 189: Setting Paper Size And Type
After loading paper in the paper tray, set the paper size and type using the control panel. These settings will apply to Copy and Fax modes. To change the paper tray settings on your computer, use Xerox Easy Printer Manager or Xerox ®…
-
Page 190
If your device is directly connected to your computer using a USB direct connection, the paper settings can be set using Xerox Easy Print Manager. If your device is Ethernet or Wireless connected, the Xerox Easy Printer Manager connects to Xerox CentreWare Internet Services for configuring device settings. -
Page 191
Select the printer. Click Advanced Setting or Machine Settings. If using Windows, click Device Settings. Note: If your device is Ethernet or Wireless connected, device settings are configured using Xerox ® CentreWare Internet Services. Refer to Changing Tray Settings Using Xerox CentreWare ®… -
Page 192: Media Output Locations
Note: The rear cover output can only be used for simplex jobs. Duplex printing with the rear door open will cause paper jams. Xerox B215 Multifunction Printer ® User Guide…
-
Page 193
Duplex printing with the rear cover open causes paper jams. CAUTION: The fuser area inside the rear cover of your device becomes very hot when in use. Take care when you access this area. Xerox B215 Multifunction Printer ® User Guide… -
Page 194
Maintenance This chapter includes: • General Precautions …………………………195 • Cleaning the Printer …………………………196 • Supplies………………………………. 200 • Managing the Printer …………………………208 • Moving the Printer …………………………. 210 Xerox B215 Multifunction Printer ® User Guide… -
Page 195: General Precautions
Do not touch the electrical contacts or gears. Doing so could damage the printer and cause the print quality to deteriorate. • Ensure any parts removed during cleaning are replaced before you plug in the printer. Xerox B215 Multifunction Printer ® User Guide…
-
Page 196: Cleaning The Printer
Wipe the surfaces of the document glass and Constant Velocity Transport (CVT) glass until they are clean and dry. Note: For best results, to remove marks and streaks, use Xerox Glass Cleaner. ® Xerox B215 Multifunction Printer ® User Guide…
-
Page 197
Wipe clean the entire area of the control panel, including the display. Wipe clean the automatic document feeder, output tray, paper tray, and other outside areas of your printer. Remove any residue with a clean cloth or paper towel. Xerox B215 Multifunction Printer ® User Guide… -
Page 198
While cleaning the inside of the printer, be careful not to damage any inside parts. Do not use solvents such as benzene or thinner to clean. Printing quality problems can occur and damage can be caused to the printer. Xerox B215 Multifunction Printer ® User Guide… -
Page 199
Tabs on the sides of the cartridge and corresponding grooves within the printer will guide the cartridge into the correct position until each locks into place Close the front cover. Plug in the power cord and power on the printer. Xerox B215 Multifunction Printer ® User Guide… -
Page 200: Supplies
Use of toner other than genuine Xerox Toner can affect print quality and printer ® reliability. Xerox Toner is the only toner designed and manufactured under strict quality controls ® by Xerox for specific use with this printer. Xerox B215 Multifunction Printer ® User Guide…
-
Page 201
At your computer, open a Web browser. In the address field, type the IP address of the printer, then press Enter or Return. Click Support. Click the link to go to the Xerox website to order supplies online, or use the Supplies contact details shown to place a telephone order. Xerox B215 Multifunction Printer ®… -
Page 202
You can check the status and percentage of life remaining for your printer supplies at the control panel, using Xerox CentreWare Internet Services, or using Xerox Easy Printer Manager. When printer ® ® supplies near their replacement time, warning alerts appear on the control panel. You can customize alerts and configure email alert notifications. -
Page 203
• White streaks on prints or light printing occurs. • The low toner status indicator appears if the Low Toner Alert feature was enabled in Xerox ® CentreWare Internet Services. An error message will also appear on the user interface. -
Page 204
Replace the toner cartridge using the following instructions. Open the front cover. Pull out the toner cartridge. Remove the new toner cartridge from the packaging. Remove the protective materials from the cartridge as directed in the packaging labels. Xerox B215 Multifunction Printer ® User Guide… -
Page 205
Close the front cover. Make sure that the door is securely closed. Xerox B215 Multifunction Printer ® User Guide… -
Page 206
Cover it with a piece of paper, if necessary. • Do not touch the green surface on the underside of the cartridge. Use the handle on the cartridge to avoid touching this area. Xerox B215 Multifunction Printer ® User Guide… -
Page 207
Hold the drum cartridge by the handle and insert it into the printer until it locks into place. Re-install the toner cartridge. Close the printer front cover. Recycling Supplies For information on Xerox supplies recycling programs, go to www.xerox.com/gwa. Xerox B215 Multifunction Printer ® User Guide… -
Page 208: Managing The Printer
If you provide regular billing information for your device, you can use SMart eSolutions to simplify the process. You can enable SMart eSolutions to send billing meter readings to Xerox automatically so that you do not have to collect the readings manually. For more information,…
-
Page 209
Managing the Printer Software Updates Xerox is continually seeking to improve its products. A software revision may become available to improve the functionality of your printer. The Software Upgrade feature allows the customer to upgrade the printer software without needing a Customer Service Representative to be present. -
Page 210: Moving The Printer
CAUTION: Failure to repackage the printer properly for shipment can result in damage not covered by the Xerox Warranty or Service Agreement The Xerox Warranty or Service Agreement do not cover damage to the printer caused by improper moving. After moving the printer: Reinstall any parts that you removed.
-
Page 211
General Troubleshooting ……………………….213 • Paper Jams …………………………….219 • Printing Problems …………………………… 229 • Print-Quality Problems …………………………. 236 • Copy and Scan Problems ……………………….241 • Fax Problems ……………………………. 242 • Getting Help ……………………………. 244 Xerox B215 Multifunction Printer ® User Guide… -
Page 212: Troubleshooting Overview
If the problem persists, call for service. When you call for service, provide the service representative with the device serial number, IP address, and the contents of the display message. For information about locating the printer serial number, refer to Locating the Serial Number. Xerox B215 Multifunction Printer ® User Guide…
-
Page 213: General Troubleshooting
Restarting the Printer To restart the printer, refer to Power Options. Note: If restarting the printer does not resolve the problem, refer to Printer Fails to Power On Printer Resets or Powers Off Frequently. Xerox B215 Multifunction Printer ® User Guide…
-
Page 214
Access the application from which you are printing, then go to the page setup or printer settings. Set the paper source to match the tray selected in the print driver, or set the paper source to Auto Select. Xerox B215 Multifunction Printer ® User Guide… -
Page 215
The job is complex. Wait for the document to finish printing. The print-quality mode in the print In the print driver, change the print-quality mode to Standard. driver is set to High Resolution Xerox B215 Multifunction Printer ® User Guide… -
Page 216
Check supplies status, for details refer to Supply Status life. Information. If the drum cartridge has reached end of life, open the front cover, then replace the drum cartridge. For instructions, refer to Replacing the Drum Cartridge. Xerox B215 Multifunction Printer ® User Guide… -
Page 217
The relative humidity of the room is too • Reduce the humidity in the room. high. • Move the printer to a location where the temperature and relative humidity are within the operating specifications. For details, refer to Environmental Specifications. Xerox B215 Multifunction Printer ® User Guide… -
Page 218
Leave the rear cover open. Prints will be delivered face up. Note: The rear cover output can only be used for simplex jobs one sheet at a time. Do not leave rear cover open for duplex jobs. Xerox B215 Multifunction Printer ® User Guide… -
Page 219: Paper Jams
Paper Jams Paper Jams Minimizing Paper Jams The printer is designed to function with minimal paper jams using Xerox supported paper. Other paper ® types can cause jams. If supported paper is jamming frequently in one area, clean that area of the paper path.
-
Page 220
The following illustration shows where paper jams can occur: Paper Tray 1 Automatic Document Feeder Manual Feed Slot Document Glass Inside the Printer Duplex and Rear Exit Areas Xerox B215 Multifunction Printer ® User Guide… -
Page 221
Close the cover. Lift the automatic document feeder and gently pull out any jammed original. Close the automatic document feeder. Reload the originals into the automatic document feeder and touch Start to resume the job. Xerox B215 Multifunction Printer ® User Guide… -
Page 222
Clearing Paper Jams from Inside the Printer. Pull out the paper tray. Remove any jammed paper by gently pulling it straight out. Release the two green latches positioned above where the paper tray sits. Xerox B215 Multifunction Printer ® User Guide… -
Page 223
Clearing Paper Jams at the Manual Feed Slot To resolve the error that appears on the control panel, clear all paper from the manual feed slot. If the paper is not feeding properly, pull the paper out of the printer. Xerox B215 Multifunction Printer ® User Guide… -
Page 224
To resolve the error that appears on the control panel, clear all paper from inside the printer. CAUTION: Some areas of the printer are hot. Take care when removing paper from the printer. Open the front cover. Pull the toner cartridge out. Xerox B215 Multifunction Printer ® User Guide… -
Page 225
Clearing Paper Jams from the Duplex and Rear Exit Areas To resolve the error that appears on the control panel, clear all paper from the duplex and rear exit areas. Open the rear cover of the printer. Xerox B215 Multifunction Printer ® User Guide… -
Page 226
Remove any paper you see, working slowly so that you don’t tear any pieces or damage printer parts. After removing the paper you see, pull the baffle up until the latches click into place. Xerox B215 Multifunction Printer ® User Guide… -
Page 227
Remove the paper from the tray, then replace it with new, dry paper. Too much static electricity is present. Load new paper into the printer. Using unsupported paper. Use only Xerox-approved paper. For details, refer to Supported Paper. Xerox B215 Multifunction Printer ®… -
Page 228
The paper is moist from humidity. Remove the moist paper, then replace it with new, dry paper. Using paper of the wrong size, thickness Use only Xerox-approved paper. For details, refer to Supported or type. Paper. -
Page 229: Printing Problems
Reduce the complexity of the page or slow. try adjusting the print quality settings. After 100 consecutive prints the device print speed will slow down until the current job completes. The next job will return to rated speed. Xerox B215 Multifunction Printer ® User Guide…
-
Page 230
The resolution of the photo is very low. Reduce the photo size. If you increase photos is not good. the photo size in the software Images are not clear. application, the resolution will be reduced. Xerox B215 Multifunction Printer ® User Guide… -
Page 231
The print job may not be PostScript. Make sure that the print job is a prints. PostScript job. Check to see whether the software application expected a setup or PostScript header file to be sent to the printer. Xerox B215 Multifunction Printer ® User Guide… -
Page 232
If the message appears in standby mode or after printing has been completed, check the connection and/or whether an error has occurred. Note: Refer to the Microsoft Windows User Guide supplied with your computer for further information on Windows error messages. Xerox B215 Multifunction Printer ® User Guide… -
Page 233
For detailed information, refer to the ‘Help for Linux’ distribution CD or the Gimp Front-end application. • If you wish to use another kind of scan application, refer to the application’s Help files. Xerox B215 Multifunction Printer ® User Guide… -
Page 234
Ensure a document is loaded into the printer, ensure your printer is connected to the computer. Note: Refer to the Linux User Guide supplied with your computer for further information on Linux error messages. Xerox B215 Multifunction Printer ® User Guide… -
Page 235
English alphabet and numbers are displayed normally on the cover page. Note: Refer to the Macintosh User Guide supplied with your computer for further information on Macintosh error messages. Xerox B215 Multifunction Printer ® User Guide… -
Page 236: Print-Quality Problems
Adjust the print resolution and turn the Toner Save mode off. See the help screen of the print driver. • A combination of faded or smeared defects may indicate that the toner cartridge needs replacing. For details, refer to Replacing the Toner Cartridge. Xerox B215 Multifunction Printer ® User Guide…
-
Page 237
• Check the environmental conditions: very dry conditions or a high level of humidity (higher than 80% RH) can increase the amount of background shading. • Remove the old toner cartridge and install a new one, refer to Replacing the Toner Cartridge. Xerox B215 Multifunction Printer ® User Guide… -
Page 238
• Check the paper type and quality. For details, refer to Supported Paper. • Ensure that the guides are not too tight or too loose against the paper stack, refer to Loading Paper. Xerox B215 Multifunction Printer ® User Guide… -
Page 239
• Check the paper type and quality. For details, refer to Supported Paper. • Remove the toner cartridge and install a new one, refer to Replacing the Toner Cartridge. • The printer may require repair. Contact a service representative. Xerox B215 Multifunction Printer ® User Guide… -
Page 240
• The high altitude may affect the print quality, such as loose toner or light a few sheets or loose imaging. Change the altitude setting for your printer. For details, refer to Setting toner, light print, or Altitude Adjustment. contamination occurs. Xerox B215 Multifunction Printer ® User Guide… -
Page 241: Copy And Scan Problems
• The automatic document feeder may be left open while copies are being made. • Power off the printer, and then power on. Xerox B215 Multifunction Printer ® User Guide…
-
Page 242: Fax Problems
Fax Problems If your printer cannot send or receive faxes correctly, refer to the following tables. Note: If your Xerox device cannot send and receive faxes, ensure that the printer is connected to an approved analog or digital telephone line. Symptom Solutions No dial tone.
-
Page 243
You may have chosen the wrong paper settings in the print options. For details, refer the bottom of each Settings. page or on other pages, with a small strip of text at the top. Xerox B215 Multifunction Printer ® User Guide… -
Page 244: Getting Help
Warning alerts inform you about printer conditions, such as low supplies or low paper supply that require your attention. If more than one warning condition occurs, only one warning message appears on the control panel at a time. Information about current errors and printer status can also be viewed using Xerox CentreWare ®…
-
Page 245
The Online Support Assistant provides instructions and troubleshooting help to solve your printer problems. For example, you can find solutions for print-quality problems, paper jams, and software installation issues. To access the Online Support Assistant, go to www.xerox.com/office/B215support. Xerox B215 Multifunction Printer ®… -
Page 246
Technical support information for your www.xerox.com/office/B215support printer, including online technical support, Online Support Assistant and print driver downloads Information Pages Print reports from the control panel or using Xerox CentreWare ® ® Internet Services. For details, refer to Information Pages. -
Page 247
Getting Help Xerox B215 Multifunction Printer ® User Guide… -
Page 248
Displaying or Hiding Network Settings ………………….. 263 • System Timeout …………………………..264 • USB Port Security …………………………… 265 • Restricting Access to the Web User Interface ………………..266 • Software Verification Test ……………………….267 Xerox B215 Multifunction Printer ® User Guide… -
Page 249: Xerox ® Centreware ® Internet Services
Finding the IP Address of Your Printer To install the print driver for a network-connected printer, it is often necessary to know the IP address of your printer. Also, the IP address is used to access the settings of your printer through Xerox ®…
-
Page 250
When you select an option which requires Administrator Account access, a security login window appears. For User Name, enter Admin. For Password, enter the administrator account password that was set during initial access to Xerox CentreWare Internet Services. Click OK. -
Page 251
To prevent unauthorized changes to printer settings, ensure the Administrator Account password is changed regularly. Be sure to store the password in a secure location. Note: If you are accessing Xerox CentreWare Internet Services for the first time after printer ®… -
Page 252: Setting Access Rights
• Network Authentication: This option enables network authentication. To prove their identity, users type their user name and password at the control panel or in Xerox CentreWare Internet ®…
-
Page 253
To enable the log out confirmation screen, select Show at Log Out. To show the log out confirmation screen after every job, select Show After Every Job. To disable the log out confirmation screen, select Don’t Show. Xerox B215 Multifunction Printer ® User Guide… -
Page 254: Setting Print Permissions
If prompted to enter a user name and password, for information about logging in as an administrator, refer to Accessing the Xerox CentreWare Internet Services Administrator Account. ® ® For 2-Sided Printing Policy, for Always Require 2-Sided Printing, select On or Off. Click Save. Xerox B215 Multifunction Printer ® User Guide…
-
Page 255: Device User Database
To edit a user, for the user, click the Pencil icon. Edit the fields required, then click Save. To delete a user, for the user, click the X icon. To confirm the deletion, click OK. Xerox B215 Multifunction Printer ® User Guide…
-
Page 256: Secure Http
Ensure that the date and time configured on the printer is correct. The time that is set on the printer is used to set the start time for the Xerox Device Certificate. A Xerox Device Certificate is installed when you enable HTTP. After you enable HTTP, check the device certificate.
-
Page 257: Ip Filtering
® ® To enable IP filtering, select IPv4 Filtering Enabled, IPv6 Filtering Enabled, or both. To permit access to the device, type the IP Address and Port or Prefix as needed. Click Apply. Xerox B215 Multifunction Printer ® User Guide…
-
Page 258: Ipsec
To remove IPSec connections, click Flush All IPSec Connections. For Shared Secret, enter the shared key value. For Verify Shared Secret, re-enter the shared key value. To save the new shared key, select Select to save new Shared Secret. Click Apply. Xerox B215 Multifunction Printer ® User Guide…
-
Page 259: Security Certificates
Internet Services Administrator Account. ® ® Click Create New Certificate, then select an option: • Self Signed Certificate • Certificate Signing Request (CSR) Click Continue. For the selected certificate type, complete the fields. Click Apply. Xerox B215 Multifunction Printer ® User Guide…
-
Page 260
Security Certificates Installing a Trusted Certificate Authority Certificate If the printer uses the Xerox Device Certificate, and a user attempts to access the printer using Xerox ® ® CentreWare Internet Services, an error message can appear in their Web browser. To avoid error ®… -
Page 261: Concealing Or Showing Job Names
Concealing or Showing Job Names Concealing or Showing Job Names You can conceal job names from displaying on the control panel, and in the Active Jobs and Completed Jobs lists in Xerox CentreWare Internet Services. ® ® In Xerox CentreWare Internet Services, click Properties Security.
-
Page 262: 262
To locate and select the Client Certificate, for Upload Client Certificate, click Browse or Choose File. To assign a private password, for Private Key Password, type a password. Click Upload. 8. Click Apply. Xerox B215 Multifunction Printer ® User Guide…
-
Page 263: Displaying Or Hiding Network Settings
Accessing the Xerox CentreWare Internet Services Administrator Account. ® ® To show network information, select Show IPv4 Address or Show Host Name. To hide network information, select Hide Network Information. Click Apply. Xerox B215 Multifunction Printer ® User Guide…
-
Page 264: System Timeout
Local User Interface. For Web System Timer, type the amount of time the system waits before it resets settings to the default options and logs out inactive users from the Web User Interface. Click Apply. Xerox B215 Multifunction Printer ® User Guide…
-
Page 265: Usb Port Security
Accessing the Xerox CentreWare Internet Services Administrator Account. ® ® To enable a port, for the port, select the check box. To disable a port, for the port, clear the check box. Click Apply. Xerox B215 Multifunction Printer ® User Guide…
-
Page 266: Restricting Access To The Web User Interface
Internet Services Administrator Account. ® ® To restrict access to the Web User Interface, for Lock WebUI, select the check box. To allow access to the Web interface, clear the check box. Click Apply. Xerox B215 Multifunction Printer ® User Guide…
-
Page 267: Software Verification Test
You can test the printer software to confirm that it is operating correctly. The test checks software files to confirm that they are not corrupt. If the printer software appears to function improperly, a Xerox representative can ask you to perform this test.
-
Page 268
Software Verification Test Xerox B215 Multifunction Printer ® User Guide… -
Page 269
This chapter includes: • Printer Specifications …………………………270 • Feature Specifications …………………………. 274 • Network Environment …………………………277 • System Requirements …………………………278 • Electrical Specifications ……………………….279 • Environmental Specifications ……………………..280 Xerox B215 Multifunction Printer ® User Guide… -
Page 270: Printer Specifications
Up to 15 images per minute on Letter (215 x 279 mm) and A4 (210 x 297 mm) First Print Out Time As fast as 8.5 seconds from Ready status Warm Up Time Less than 32 seconds from Sleep mode Xerox B215 Multifunction Printer ® User Guide…
-
Page 271
25.24 lb (11.45 kg) Clearance Requirements 69 cm 27.2 in 10 cm 10 cm (3.9 in.) (3.9 in.) 36 cm 10 cm (14.2 in.) 90.2 cm (3.9 in.) (35.5 in) 60.1 cm (23.7 in) Xerox B215 Multifunction Printer ® User Guide… -
Page 272
• Envelope Monarch, Com-10, DL, C5, C6, Postcard 4 x 6 Custom Sizes: • Minimum Size: 3 x 5 inch (76 x 127 mm) • Maximum Size: 8.5 x 14 inch (216 x 356 mm) Xerox B215 Multifunction Printer ® User Guide… -
Page 273
• A4: 20 color images per minute • Letter: 21 color images per minute Media Output Feature Specification Output Tray Capacity 120 sheets of 20 lb (80 g/m²) face down Rear Cover Capacity 1 sheet face up Xerox B215 Multifunction Printer ® User Guide… -
Page 274: Feature Specifications
• Starter Toner Cartridge: 1500 standard prints for 220V devices and 1000 standard prints for 110V devices Standard Printer Memory 256 MB Compatibility Windows PC / MAC / Linux PDL / PCL PCL5e, PCL6, Postscript 3 Xerox B215 Multifunction Printer ® User Guide…
-
Page 275
• Document Glass: Up to 1200 x 1200 dpi Multi Copy 1 — 99 Copy Speeds Single Original, Multiple Copies: • 31 cpm Letter • 30 cpm A4 Multiple Original, Single Copy: • 21 cpm Letter • 20 cpm A4 Xerox B215 Multifunction Printer ® User Guide… -
Page 276
Scan to PC via USB or network connection Scan Speeds 30 — 17 images per minute depending on scan mode Scan Send Modes Black and White, Grayscale, and Color Grayscale 256 levels Compatibility TWAIN Standard, WIA Standard Xerox B215 Multifunction Printer ® User Guide… -
Page 277: Network Environment
• Mac OS X 10.9 ~ 10.14 Network protocols • TCP/IPv4, TPC/IPv6 • DHCP, BOOTP • DNS, WINS, DDNS, Bonjour, SLP, UPnP • Standard TCP/IP Printing (RAW), LPR, IPP, WSD • SNMPv1/v2c/v3, HTTP, IPSec Xerox B215 Multifunction Printer ® User Guide…
-
Page 278: System Requirements
16.10, 17.04, 17.10, 18.04, 18.10 • Debian 6, 7, 8, 9 • Redhat Enterprise Linux 5, 6, 7 ® • SuSE Linux Enterprise Desktop 10, 11, 12 • Mint 15, 16, 17, 17.1 Xerox B215 Multifunction Printer ® User Guide…
-
Page 279: Electrical Specifications
• Power Save mode: 1.1 Watts • Stand By mode: Less than 50 Watts • Sleep mode: 1.4 Wh • Ready mode: 55 Wh • Average Operation — Continuous Printing: less than 500 Wh Xerox B215 Multifunction Printer ® User Guide…
-
Page 280: Environmental Specifications
Note: Under extreme environmental conditions, such as 10 C and 90% relative humidity, issues can occur due to condensation. Elevation For optimum performance, use the printer at elevations below 3100 M (10,170 ft.). Xerox B215 Multifunction Printer ® User Guide…
-
Page 281
Environmental Specifications Xerox B215 Multifunction Printer ® User Guide… -
Page 282
Regulatory Information This appendix contains: • Basic Regulations …………………………… 283 • Copy Regulations …………………………… 289 • Fax Regulations …………………………..292 • Safety Certification …………………………296 • Material Safety Data …………………………297 Xerox B215 Multifunction Printer ® User Guide… -
Page 283: Basic Regulations
• Consult the dealer or an experienced radio/television technician for help. Changes or modifications to this equipment not approved by Xerox can void the authority of the user to operate this equipment. Note: To ensure compliance with Part 15 of the FCC rules, use shielded interface cables.
-
Page 284
Basic Regulations European Union The CE mark applied to this printer symbolizes a declaration of conformity by Xerox with the following applicable Directives of the European Union as of April 16, 2014: Radio Equipment Directive 2014/53/EU. Hereby, Xerox declares that the radio equipment model B215 is in compliance with Directive 2014/53/EU. -
Page 285
Basic Regulations Environmental Benefits of Duplex Printing Most Xerox devices have duplex printing, also known as 2-sided printing, capability. This enables you to print on both sides of the paper automatically, and therefore helps to reduce the use of valuable resources by reducing your paper consumption. -
Page 286
Changing the default Power Saver activation times can result in an overall higher energy consumption of the device. Before you turn off Power Saver modes or set a long activation time, consider the increase in device power consumption. To learn more about Xerox participation in sustainability initiatives, go to: www.xerox.com/environment Xerox B215 Multifunction Printer ®… -
Page 287
Eco Certified to Office Machines CCD-035 This product is certified to EcoLogo standard for office machines, meeting all requirements for reduced environmental impact. As part of achieving certification, Xerox Corporation has proven this product meets the EcoLogo criteria for energy efficiency. Certified copier, printer, multifunctional device, and fax products must also meet criteria such as reduced chemical emissions and demonstrate compatibility with recycled supplies. -
Page 288
This device may not cause harmful interference, and (2) this device must accept any interference received, including interference that may cause undesired operation. Changes or modifications to this device not specifically approved by the Xerox Corporation may void the user’s authority to operate this equipment. -
Page 289: Copy Regulations
Further information about these provisions may be obtained from the Copyright Office, Library of Congress, Washington, D.C. 20559. Ask for Circular R21. Certificate of Citizenship or Naturalization. Foreign Naturalization Certificates may be photographed. Xerox B215 Multifunction Printer ® User Guide…
-
Page 290
Canada. • Impressed or adhesive stamps used for the purpose of revenue by the Government of Canada or of a province or by the government of a state other than Canada. Xerox B215 Multifunction Printer ® User Guide… -
Page 291
Copyright material or trademarks without the consent of the owner • Postage stamps and other negotiable instruments This list is not inclusive and no liability is assumed for either its completeness or accuracy. In case of doubt, contact your legal counsel. Xerox B215 Multifunction Printer ® User Guide… -
Page 292: Fax Regulations
To order the correct service from the local telephone company, you may also have to quote the codes listed below: • Facility Interface Code (FIC) = 02LS2 • Service Order Code (SOC) = 9.0Y Xerox B215 Multifunction Printer ® User Guide…
-
Page 293
You, not Xerox, assume all responsibility and/or liability for any damage caused by the connection of this machine to an unauthorized jack. If this Xerox device causes harm to the telephone network, the Telephone Company will notify you in advance that temporary discontinuance of service may be required. But if advance notice is not practical, the Telephone Company will notify the customer as soon as possible. -
Page 294
Malta United Kingdom If you have problems with your product, contact your local Xerox representative. This product can be configured to be compatible with other country networks. Before reconnecting the device to a network in another country, contact your Xerox representative for assistance. -
Page 295
For correct operation, total of the RENs of all devices connected to a single line at any time should not exceed five. Xerox B215 Multifunction Printer ® User Guide… -
Page 296: Safety Certification
Underwriters Laboratories Inc. (US/Canada) UL 60950-1, 2nd Edition, 2014-10-14 CAN/CSA C22.2 No. 60950-1-07, 2nd Edition, 2014-10 Underwriters Laboratories Inc. (Europe) IEC 60950-1:2005 + A1:2009 + A2:2013 EN 60950-1:2006 + A11:2009 + A1:2010 + A12:2011 + A2:2013 Xerox B215 Multifunction Printer ® User Guide…
-
Page 297: Material Safety Data
Material Safety Data Material Safety Data For Material Safety Data information regarding your printer, go to: • North America: www.xerox.com/msds • European Union: www.xerox.com/environment_europe For the Customer Support Center phone numbers, go to www.xerox.com/office/worldcontacts Xerox B215 Multifunction Printer ® User Guide…
-
Page 298
Material Safety Data Xerox B215 Multifunction Printer ® User Guide… -
Page 299
Recycling and Disposal This appendix contains: • All Countries …………………………….. 300 • North America …………………………..301 • European Union …………………………..302 • Other Countries …………………………..304 ® Xerox B215 Multifunction Printer User Guide… -
Page 300
All Countries All Countries If you are managing the disposal of your Xerox product, please note that the printer may contain lead, mercury, perchlorate, and other materials whose disposal may be regulated due to environmental considerations. The presence of these materials is fully consistent with global regulations applicable at the time that the product was placed on the market. -
Page 301
North America Xerox operates an equipment take-back and reuse/recycle program. Contact your Xerox representative (call 1-800-ASK-XEROX) to determine if this Xerox product is part of the program. For more information about Xerox environmental programs, visit www.xerox.com/environment, or for local recycling and disposal information, contact your local authorities. -
Page 302
In accordance with European legislation, end of life electrical and electronic equipment subject to disposal must be managed within agreed procedures. Prior to disposal, please contact your local reseller or Xerox representative for end of life take-back information. Collection and Disposal of Equipment and Batteries… -
Page 303
This wheeled bin symbol may be used in combination with a chemical symbol. This establishes compliance with the requirements set out by the Directive. Battery Removal Batteries should only be replaced by a MANUFACTURER-approved service facility. ® Xerox B215 Multifunction Printer User Guide… -
Page 304
Other Countries Other Countries Please contact your local waste management authority to request disposal guidance. ® Xerox B215 Multifunction Printer User Guide… -
Page 305
Other Countries ® Xerox B215 Multifunction Printer User Guide…

Версия 1.0
Август 2019 г.
702P07580
Многофункциональный принтер
Xerox
®
B215
Руководство пользователя

© Xerox Corporation, 2019 г. Все права защищены. Xerox
®
, Xerox и фигуративный знак
®
, VersaLink
®
, FreeFlow
®
, SMARTsend
®
,
Scan to PC Desktop
®
, MeterAssistant
®
, SuppliesAssistant
®
, Xerox Secure Access Unified ID System
®
, Xerox Extensible Interface
Platform
®
, Global Print Driver
®
и Mobile Express Driver
®
являются товарными знаками корпорации Xerox Corporation в США
идругих странах.
Adobe
®
, эмблема Adobe PDF, Adobe
®
Reader
®
, Adobe
®
Typ e Manager
®
, ATM™, Flash
®
, Macromedia
®
, Photoshop
®
и PostScript
®
являются товарными знаками или зарегистрированными товарными знаками корпорации Adobe Systems, Inc.
Apple
®
, Bonjour
®
, EtherTalk™, TrueType
®
, iPad
®
, iPhone
®
, iPod
®
, iPod touch
®
, AirPrint
®
и логотип AirPrint
®
, Mac
®
, macOS
®
и Macintosh
®
являются товарными знаками компании Apple Inc., зарегистрированными в США и других странах.
Служба веб—печати Google Cloud Print™, служба веб—почты Gmail™ и мобильная платформа Android™ являются товарными
знаками компании Google, Inc.
HP-GL
®
, HP-UX
®
, and PCL
®
являются товарными знаками Hewlett-Packard Corporation, зарегистрированными в США и (или)
других странах.
IBM
®
и AIX
®
являются товарными знаками International Business Machines Corporation в США и (или) других странах.
McAfee
®
, ePolicy Orchestrator
®
и McAfee ePO™ являются товарными знаками или зарегистрированными товарными знаками
компании McAfee, Inc. в США и других странах.
Microsoft
®
, Windows Vista
®
, Windows
®
, Windows Server
®
и OneDrive
®
являются товарными знаками Microsoft Corporation
вСША и других странах.
Mopria является товарным знаком Mopria Alliance.
Novell
®
, NetWare
®
, NDPS
®
, NDS
®
, IPX™ и Novell Distributed Print Services™ являются товарными знаками Novell, Inc. в США
идругих странах.
PANTONE
®
и другие товарные знаки Pantone, Inc. являются собственностью компании Pantone Inc. SGI
®
и IRIX
®
являются
товарными знаками Silicon Graphics International Corp. или ее филиалов, зарегистрированными в США и (или) других странах.
Sun, Sun Microsystems и Solaris являются товарными знаками или зарегистрированными товарными знаками компании Oracle
и (или) ее дочерних компаний в США и других странах.
UNIX
®
является товарным знаком, зарегистрированным в США и других странах, и предоставляется по лицензии только
через посредничество компании X/Open Limited.
Wi-Fi CERTIFIED Wi-Fi Direct
®
является товарным знаком ассоциации Wi-Fi Alliance.

Многофункциональный принтер Xerox
®
B215
Руководство пользователя
3
1 Безопасность
Уведомления по технике безопасности . . . . . . . . . . . . . . . . . . . . . . . . . . . . . . . . . . . . . . . . . . . . . . . . . 12
Электробезопасность . . . . . . . . . . . . . . . . . . . . . . . . . . . . . . . . . . . . . . . . . . . . . . . . . . . . . . . . . . . . . . . . . . 13
Общие инструкции . . . . . . . . . . . . . . . . . . . . . . . . . . . . . . . . . . . . . . . . . . . . . . . . . . . . . . . . . . . . . . . . . 13
Шнур питания . . . . . . . . . . . . . . . . . . . . . . . . . . . . . . . . . . . . . . . . . . . . . . . . . . . . . . . . . . . . . . . . . . . . . . 14
Аварийное отключение электропитания . . . . . . . . . . . . . . . . . . . . . . . . . . . . . . . . . . . . . . . . . . . . 14
Лазерная безопасность. . . . . . . . . . . . . . . . . . . . . . . . . . . . . . . . . . . . . . . . . . . . . . . . . . . . . . . . . . . . . 15
Телефонный шнур . . . . . . . . . . . . . . . . . . . . . . . . . . . . . . . . . . . . . . . . . . . . . . . . . . . . . . . . . . . . . . . . . . 15
Техника безопасности при эксплуатации . . . . . . . . . . . . . . . . . . . . . . . . . . . . . . . . . . . . . . . . . . . . . . . 16
Указания по эксплуатации. . . . . . . . . . . . . . . . . . . . . . . . . . . . . . . . . . . . . . . . . . . . . . . . . . . . . . . . . . 16
Выделение озона . . . . . . . . . . . . . . . . . . . . . . . . . . . . . . . . . . . . . . . . . . . . . . . . . . . . . . . . . . . . . . . . . . . 16
Размещение принтера . . . . . . . . . . . . . . . . . . . . . . . . . . . . . . . . . . . . . . . . . . . . . . . . . . . . . . . . . . . . . . 17
Расходные материалы для принтера. . . . . . . . . . . . . . . . . . . . . . . . . . . . . . . . . . . . . . . . . . . . . . . . 18
Техника безопасности при обслуживании . . . . . . . . . . . . . . . . . . . . . . . . . . . . . . . . . . . . . . . . . . . . . . 19
Символы на принтере . . . . . . . . . . . . . . . . . . . . . . . . . . . . . . . . . . . . . . . . . . . . . . . . . . . . . . . . . . . . . . . . . . 20
Контактные сведения для обращения по вопросам охраны труда, техники безопасности и
охраны окружающей среды . . . . . . . . . . . . . . . . . . . . . . . . . . . . . . . . . . . . . . . . . . . . . . . . . . . . . . . . . . . . 23
2 Начало работы
Части принтера . . . . . . . . . . . . . . . . . . . . . . . . . . . . . . . . . . . . . . . . . . . . . . . . . . . . . . . . . . . . . . . . . . . . . . . . 26
Вид спереди . . . . . . . . . . . . . . . . . . . . . . . . . . . . . . . . . . . . . . . . . . . . . . . . . . . . . . . . . . . . . . . . . . . . . . . . 26
Автоподатчик оригиналов . . . . . . . . . . . . . . . . . . . . . . . . . . . . . . . . . . . . . . . . . . . . . . . . . . . . . . . . . . 27
Места вывода готовых отпечатков. . . . . . . . . . . . . . . . . . . . . . . . . . . . . . . . . . . . . . . . . . . . . . . . . . 29
Вид сзади . . . . . . . . . . . . . . . . . . . . . . . . . . . . . . . . . . . . . . . . . . . . . . . . . . . . . . . . . . . . . . . . . . . . . . . . . . 30
Панель управления. . . . . . . . . . . . . . . . . . . . . . . . . . . . . . . . . . . . . . . . . . . . . . . . . . . . . . . . . . . . . . . . . 31
Параметры электропитания . . . . . . . . . . . . . . . . . . . . . . . . . . . . . . . . . . . . . . . . . . . . . . . . . . . . . . . . . . . . 32
Включение электропитания принтера. . . . . . . . . . . . . . . . . . . . . . . . . . . . . . . . . . . . . . . . . . . . . . . 32
Режим энергосбережения . . . . . . . . . . . . . . . . . . . . . . . . . . . . . . . . . . . . . . . . . . . . . . . . . . . . . . . . . . 32
Выключение электропитания принтера . . . . . . . . . . . . . . . . . . . . . . . . . . . . . . . . . . . . . . . . . . . . . 33
Доступ к принтеру. . . . . . . . . . . . . . . . . . . . . . . . . . . . . . . . . . . . . . . . . . . . . . . . . . . . . . . . . . . . . . . . . . . . . . 34
Вход в систему. . . . . . . . . . . . . . . . . . . . . . . . . . . . . . . . . . . . . . . . . . . . . . . . . . . . . . . . . . . . . . . . . . . . . . 34
Краткая информация о сервисах . . . . . . . . . . . . . . . . . . . . . . . . . . . . . . . . . . . . . . . . . . . . . . . . . . . . . . . 35
Информационные страницы. . . . . . . . . . . . . . . . . . . . . . . . . . . . . . . . . . . . . . . . . . . . . . . . . . . . . . . . . . . . 37
Печать информационных страниц . . . . . . . . . . . . . . . . . . . . . . . . . . . . . . . . . . . . . . . . . . . . . . . . . . 38
Печать отчета о конфигурации с помощью панели управления. . . . . . . . . . . . . . . . . . . . . . 38
Печать
отчетов с помощью приложения Xerox
®
CentreWare
®
Internet Services . . . . . . . . 39
Xerox® CentreWare® Internet Services . . . . . . . . . . . . . . . . . . . . . . . . . . . . . . . . . . . . . . . . . . . . . . . . . . 40
Доступ к Xerox® CentreWare® Internet Services . . . . . . . . . . . . . . . . . . . . . . . . . . . . . . . . . . . . . 41
Сертификаты для Xerox® CentreWare® Internet Services . . . . . . . . . . . . . . . . . . . . . . . . . . . . 42
Использование приложения Xerox® CentreWare® Internet Services. . . . . . . . . . . . . . . . . . 43
Xerox Easy Printer Manager. . . . . . . . . . . . . . . . . . . . . . . . . . . . . . . . . . . . . . . . . . . . . . . . . . . . . . . . . . . . . . 44
Функция Xerox Easy Document Creator. . . . . . . . . . . . . . . . . . . . . . . . . . . . . . . . . . . . . . . . . . . . . . . 44
ПО принтера . . . . . . . . . . . . . . . . . . . . . . . . . . . . . . . . . . . . . . . . . . . . . . . . . . . . . . . . . . . . . . . . . . . . . . . . . . . 45
Дополнительные сведения . . . . . . . . . . . . . . . . . . . . . . . . . . . . . . . . . . . . . . . . . . . . . . . . . . . . . . . . . . . . . 47

Многофункциональный принтер Xerox
®
B215
Руководство пользователя
4
3 Установка и настройка
Обзор установки и настройки. . . . . . . . . . . . . . . . . . . . . . . . . . . . . . . . . . . . . . . . . . . . . . . . . . . . . . . . . . . 50
Xerox
®
CentreWare
®
Internet Services . . . . . . . . . . . . . . . . . . . . . . . . . . . . . . . . . . . . . . . . . . . . . . . . . . . . 51
Определение IP-адреса принтера . . . . . . . . . . . . . . . . . . . . . . . . . . . . . . . . . . . . . . . . . . . . . . . . . . . 51
Доступ к приложению Xerox
®
CentreWare
®
Internet Services и изменение пароля
системного администратора по умолчанию . . . . . . . . . . . . . . . . . . . . . . . . . . . . . . . . . . . . . . . . . 52
Доступ к учетной записи администратора Xerox
®
CentreWare
®
Internet Services . . . . . . 52
Изменение пароля системного администратора. . . . . . . . . . . . . . . . . . . . . . . . . . . . . . . . . . . . . 53
Начальная настройка . . . . . . . . . . . . . . . . . . . . . . . . . . . . . . . . . . . . . . . . . . . . . . . . . . . . . . . . . . . . . . . . . . 54
Физическое подключение принтера. . . . . . . . . . . . . . . . . . . . . . . . . . . . . . . . . . . . . . . . . . . . . . . . . 54
Назначение сетевого адреса. . . . . . . . . . . . . . . . . . . . . . . . . . . . . . . . . . . . . . . . . . . . . . . . . . . . . . . . 54
Доступ к настройкам администрирования и конфигурации. . . . . . . . . . . . . . . . . . . . . . . . . . 54
Прямое подключение через USB . . . . . . . . . . . . . . . . . . . . . . . . . . . . . . . . . . . . . . . . . . . . . . . . . . . . 55
Мастер установки . . . . . . . . . . . . . . . . . . . . . . . . . . . . . . . . . . . . . . . . . . . . . . . . . . . . . . . . . . . . . . . . . . 55
Общие настройки . . . . . . . . . . . . . . . . . . . . . . . . . . . . . . . . . . . . . . . . . . . . . . . . . . . . . . . . . . . . . . . . . . . . . . 56
Общие настройки с использованием панели управления принтера. . . . . . . . . . . . . . . . . . 56
Общие настройки с использованием приложения Xerox
®
CentreWare
®
Internet Services .
59
Сетевое подключение . . . . . . . . . . . . . . . . . . . . . . . . . . . . . . . . . . . . . . . . . . . . . . . . . . . . . . . . . . . . . . . . . . 67
TCP/IP . . . . . . . . . . . . . . . . . . . . . . . . . . . . . . . . . . . . . . . . . . . . . . . . . . . . . . . . . . . . . . . . . . . . . . . . . . . . . . 67
SLP . . . . . . . . . . . . . . . . . . . . . . . . . . . . . . . . . . . . . . . . . . . . . . . . . . . . . . . . . . . . . . . . . . . . . . . . . . . . . . . . . 70
SNMP . . . . . . . . . . . . . . . . . . . . . . . . . . . . . . . . . . . . . . . . . . . . . . . . . . . . . . . . . . . . . . . . . . . . . . . . . . . . . . . 71
SNMPv3 . . . . . . . . . . . . . . . . . . . . . . . . . . . . . . . . . . . . . . . . . . . . . . . . . . . . . . . . . . . . . . . . . . . . . . . . . . . . 73
WINS . . . . . . . . . . . . . . . . . . . . . . . . . . . . . . . . . . . . . . . . . . . . . . . . . . . . . . . . . . . . . . . . . . . . . . . . . . . . . . . 74
LPR/LPD. . . . . . . . . . . . . . . . . . . . . . . . . . . . . . . . . . . . . . . . . . . . . . . . . . . . . . . . . . . . . . . . . . . . . . . . . . . . . 74
Raw TCP/IP Printing . . . . . . . . . . . . . . . . . . . . . . . . . . . . . . . . . . . . . . . . . . . . . . . . . . . . . . . . . . . . . . . . . 75
IPP . . . . . . . . . . . . . . . . . . . . . . . . . . . . . . . . . . . . . . . . . . . . . . . . . . . . . . . . . . . . . . . . . . . . . . . . . . . . . . . . . 76
Сервер LDAP . . . . . . . . . . . . . . . . . . . . . . . . . . . . . . . . . . . . . . . . . . . . . . . . . . . . . . . . . . . . . . . . . . . . . . . . 76
HTTP . . . . . . . . . . . . . . . . . . . . . . . . . . . . . . . . . . . . . . . . . . . . . . . . . . . . . . . . . . . . . . . . . . . . . . . . . . . . . . . 78
Google Cloud Print. . . . . . . . . . . . . . . . . . . . . . . . . . . . . . . . . . . . . . . . . . . . . . . . . . . . . . . . . . . . . . . . . . . 79
Прокси—сервер . . . . . . . . . . . . . . . . . . . . . . . . . . . . . . . . . . . . . . . . . . . . . . . . . . . . . . . . . . . . . . . . . . . . . . 81
Подключение к беспроводной сети . . . . . . . . . . . . . . . . . . . . . . . . . . . . . . . . . . . . . . . . . . . . . . . . . 83
Wi-Fi DirectTM . . . . . . . . . . . . . . . . . . . . . . . . . . . . . . . . . . . . . . . . . . . . . . . . . . . . . . . . . . . . . . . . . . . . . . 87
WSD . . . . . . . . . . . . . . . . . . . . . . . . . . . . . . . . . . . . . . . . . . . . . . . . . . . . . . . . . . . . . . . . . . . . . . . . . . . . . . . . 88
AirPrint. . . . . . . . . . . . . . . . . . . . . . . . . . . . . . . . . . . . . . . . . . . . . . . . . . . . . . . . . . . . . . . . . . . . . . . . . . . . . . 89
SNTP . . . . . . . . . . . . . . . . . . . . . . . . . . . . . . . . . . . . . . . . . . . . . . . . . . . . . . . . . . . . . . . . . . . . . . . . . . . . . . . 90
Mopria . . . . . . . . . . . . . . . . . . . . . . . . . . . . . . . . . . . . . . . . . . . . . . . . . . . . . . . . . . . . . . . . . . . . . . . . . . . . . . 91
Установка программного обеспечения принтера. . . . . . . . . . . . . . . . . . . . . . . . . . . . . . . . . . . . . . . . 92
Установка драйверов для Windows . . . . . . . . . . . . . . . . . . . . . . . . . . . . . . . . . . . . . . . . . . . . . . . . . 92
Установка драйверов для Macintosh . . . . . . . . . . . . . . . . . . . . . . . . . . . . . . . . . . . . . . . . . . . . . . . . 97
Установка драйверов для Linux . . . . . . . . . . . . . . . . . . . . . . . . . . . . . . . . . . . . . . . . . . . . . . . . . . . . . 98

Многофункциональный принтер Xerox
®
B215
Руководство пользователя
5
Настройка сервисов . . . . . . . . . . . . . . . . . . . . . . . . . . . . . . . . . . . . . . . . . . . . . . . . . . . . . . . . . . . . . . . . . . . . 99
Отображение служб на начальном экране . . . . . . . . . . . . . . . . . . . . . . . . . . . . . . . . . . . . . . . . . . 99
Настройки печати . . . . . . . . . . . . . . . . . . . . . . . . . . . . . . . . . . . . . . . . . . . . . . . . . . . . . . . . . . . . . . . . . 100
Настройки копирования . . . . . . . . . . . . . . . . . . . . . . . . . . . . . . . . . . . . . . . . . . . . . . . . . . . . . . . . . . . 101
Настройки эл. почты . . . . . . . . . . . . . . . . . . . . . . . . . . . . . . . . . . . . . . . . . . . . . . . . . . . . . . . . . . . . . . . 102
Настройки факса . . . . . . . . . . . . . . . . . . . . . . . . . . . . . . . . . . . . . . . . . . . . . . . . . . . . . . . . . . . . . . . . . . 106
Настройки сканирования по сети . . . . . . . . . . . . . . . . . . . . . . . . . . . . . . . . . . . . . . . . . . . . . . . . . . 114
Настройки USB . . . . . . . . . . . . . . . . . . . . . . . . . . . . . . . . . . . . . . . . . . . . . . . . . . . . . . . . . . . . . . . . . . . . 117
Настройки режима копирования удостоверений . . . . . . . . . . . . . . . . . . . . . . . . . . . . . . . . . . . 118
4 Использование сервисов
Обзор . . . . . . . . . . . . . . . . . . . . . . . . . . . . . . . . . . . . . . . . . . . . . . . . . . . . . . . . . . . . . . . . . . . . . . . . . . . . . . . . . 122
Копирование . . . . . . . . . . . . . . . . . . . . . . . . . . . . . . . . . . . . . . . . . . . . . . . . . . . . . . . . . . . . . . . . . . . . . . . . . . 123
Обзор копирования . . . . . . . . . . . . . . . . . . . . . . . . . . . . . . . . . . . . . . . . . . . . . . . . . . . . . . . . . . . . . . . 123
Изготовление копии . . . . . . . . . . . . . . . . . . . . . . . . . . . . . . . . . . . . . . . . . . . . . . . . . . . . . . . . . . . . . . . 123
Использование печати блоком. . . . . . . . . . . . . . . . . . . . . . . . . . . . . . . . . . . . . . . . . . . . . . . . . . . . . 124
Параметры копирования . . . . . . . . . . . . . . . . . . . . . . . . . . . . . . . . . . . . . . . . . . . . . . . . . . . . . . . . . . 125
Копирование удостоверения . . . . . . . . . . . . . . . . . . . . . . . . . . . . . . . . . . . . . . . . . . . . . . . . . . . . . . . . . . 128
Краткие сведения о копировании удостоверений . . . . . . . . . . . . . . . . . . . . . . . . . . . . . . . . . . 128
Копирование удостоверения . . . . . . . . . . . . . . . . . . . . . . . . . . . . . . . . . . . . . . . . . . . . . . . . . . . . . . 128
Эл. почта . . . . . . . . . . . . . . . . . . . . . . . . . . . . . . . . . . . . . . . . . . . . . . . . . . . . . . . . . . . . . . . . . . . . . . . . . . . . . . 130
Обзор эл. почты . . . . . . . . . . . . . . . . . . . . . . . . . . . . . . . . . . . . . . . . . . . . . . . . . . . . . . . . . . . . . . . . . . . 130
Отправка отсканированного изображения по эл. почте . . . . . . . . . . . . . . . . . . . . . . . . . . . . 130
Настройки эл. почты . . . . . . . . . . . . . . . . . . . . . . . . . . . . . . . . . . . . . . . . . . . . . . . . . . . . . . . . . . . . . . . 132
Сканировать в. . . . . . . . . . . . . . . . . . . . . . . . . . . . . . . . . . . . . . . . . . . . . . . . . . . . . . . . . . . . . . . . . . . . . . . . . 135
Обзор сканирования . . . . . . . . . . . . . . . . . . . . . . . . . . . . . . . . . . . . . . . . . . . . . . . . . . . . . . . . . . . . . . 135
Сканирование на ПК . . . . . . . . . . . . . . . . . . . . . . . . . . . . . . . . . . . . . . . . . . . . . . . . . . . . . . . . . . . . . . 136
Сканирование по сети . . . . . . . . . . . . . . . . . . . . . . . . . . . . . . . . . . . . . . . . . . . . . . . . . . . . . . . . . . . . . 139
Сканирование на
WSD. . . . . . . . . . . . . . . . . . . . . . . . . . . . . . . . . . . . . . . . . . . . . . . . . . . . . . . . . . . . . 141
Параметры сканирования . . . . . . . . . . . . . . . . . . . . . . . . . . . . . . . . . . . . . . . . . . . . . . . . . . . . . . . . . 143
Сканирование с помощью TWAIN и WIA . . . . . . . . . . . . . . . . . . . . . . . . . . . . . . . . . . . . . . . . . . . 146
Сканирование в среде Macintosh . . . . . . . . . . . . . . . . . . . . . . . . . . . . . . . . . . . . . . . . . . . . . . . . . . 147
Сканирование в Linux. . . . . . . . . . . . . . . . . . . . . . . . . . . . . . . . . . . . . . . . . . . . . . . . . . . . . . . . . . . . . . 150
Факс . . . . . . . . . . . . . . . . . . . . . . . . . . . . . . . . . . . . . . . . . . . . . . . . . . . . . . . . . . . . . . . . . . . . . . . . . . . . . . . . . . 152
Обзор функций факса . . . . . . . . . . . . . . . . . . . . . . . . . . . . . . . . . . . . . . . . . . . . . . . . . . . . . . . . . . . . . 152
Отправка факса . . . . . . . . . . . . . . . . . . . . . . . . . . . . . . . . . . . . . . . . . . . . . . . . . . . . . . . . . . . . . . . . . . . 152
Отправка отложенного факса. . . . . . . . . . . . . . . . . . . . . . . . . . . . . . . . . . . . . . . . . . . . . . . . . . . . . . 154
Отправка факса с компьютера. . . . . . . . . . . . . . . . . . . . . . . . . . . . . . . . . . . . . . . . . . . . . . . . . . . . . 155
Параметры факса . . . . . . . . . . . . . . . . . . . . . . . . . . . . . . . . . . . . . . . . . . . . . . . . . . . . . . . . . . . . . . . . . 157
USB . . . . . . . . . . . . . . . . . . . . . . . . . . . . . . . . . . . . . . . . . . . . . . . . . . . . . . . . . . . . . . . . . . . . . . . . . . . . . . . . . . . 160
Обзор USB. . . . . . . . . . . . . . . . . . . . . . . . . . . . . . . . . . . . . . . . . . . . . . . . . . . . . . . . . . . . . . . . . . . . . . . . . 160
Печать с USB-накопителя . . . . . . . . . . . . . . . . . . . . . . . . . . . . . . . . . . . . . . . . . . . . . . . . . . . . . . . . . . 160
Сканирование с USB-накопителя . . . . . . . . . . . . . . . . . . . . . . . . . . . . . . . . . . . . . . . . . . . . . . . . . . 161

Многофункциональный принтер Xerox
®
B215
Руководство пользователя
6
Аппарат . . . . . . . . . . . . . . . . . . . . . . . . . . . . . . . . . . . . . . . . . . . . . . . . . . . . . . . . . . . . . . . . . . . . . . . . . . . . . . . 162
Общее описание аппарата. . . . . . . . . . . . . . . . . . . . . . . . . . . . . . . . . . . . . . . . . . . . . . . . . . . . . . . . . 162
Опции устройства. . . . . . . . . . . . . . . . . . . . . . . . . . . . . . . . . . . . . . . . . . . . . . . . . . . . . . . . . . . . . . . . . . 162
Об аппарате . . . . . . . . . . . . . . . . . . . . . . . . . . . . . . . . . . . . . . . . . . . . . . . . . . . . . . . . . . . . . . . . . . . . . . . 163
Состояние расходных материалов . . . . . . . . . . . . . . . . . . . . . . . . . . . . . . . . . . . . . . . . . . . . . . . . . 163
Информация о счетчиках учета . . . . . . . . . . . . . . . . . . . . . . . . . . . . . . . . . . . . . . . . . . . . . . . . . . . . 165
Адресная книга. . . . . . . . . . . . . . . . . . . . . . . . . . . . . . . . . . . . . . . . . . . . . . . . . . . . . . . . . . . . . . . . . . . . . . . . 166
Обзор адресной книги . . . . . . . . . . . . . . . . . . . . . . . . . . . . . . . . . . . . . . . . . . . . . . . . . . . . . . . . . . . . . 166
Использование и изменение адресной книги с панели управления . . . . . . . . . . . . . . . . . 166
Добавление или изменение контактов в адресной книге с помощью приложения Xerox
®
CentreWare
®
Internet Services. . . . . . . . . . . . . . . . . . . . . . . . . . . . . . . . . . . . . . . . . . . . . . . . . . . . . . . 167
Работы . . . . . . . . . . . . . . . . . . . . . . . . . . . . . . . . . . . . . . . . . . . . . . . . . . . . . . . . . . . . . . . . . . . . . . . . . . . . . . . . 172
Краткие сведения о работах . . . . . . . . . . . . . . . . . . . . . . . . . . . . . . . . . . . . . . . . . . . . . . . . . . . . . . . 172
Управление работами . . . . . . . . . . . . . . . . . . . . . . . . . . . . . . . . . . . . . . . . . . . . . . . . . . . . . . . . . . . . . 172
Управление работами с помощью приложения Xerox
®
CentreWare
®
Internet Services 173
5 Печать
Обзор печати. . . . . . . . . . . . . . . . . . . . . . . . . . . . . . . . . . . . . . . . . . . . . . . . . . . . . . . . . . . . . . . . . . . . . . . . . . 176
Печать в системе Windows . . . . . . . . . . . . . . . . . . . . . . . . . . . . . . . . . . . . . . . . . . . . . . . . . . . . . . . . . . . . .177
Процедура печати . . . . . . . . . . . . . . . . . . . . . . . . . . . . . . . . . . . . . . . . . . . . . . . . . . . . . . . . . . . . . . . . .177
Опции печати. . . . . . . . . . . . . . . . . . . . . . . . . . . . . . . . . . . . . . . . . . . . . . . . . . . . . . . . . . . . . . . . . . . . . . 178
Xerox Easy Printer Manager . . . . . . . . . . . . . . . . . . . . . . . . . . . . . . . . . . . . . . . . . . . . . . . . . . . . . . . . . . . . . 187
Печать в системе Macintosh. . . . . . . . . . . . . . . . . . . . . . . . . . . . . . . . . . . . . . . . . . . . . . . . . . . . . . . . . . . .188
Процедура печати . . . . . . . . . . . . . . . . . . . . . . . . . . . . . . . . . . . . . . . . . . . . . . . . . . . . . . . . . . . . . . . . .188
Опции печати. . . . . . . . . . . . . . . . . . . . . . . . . . . . . . . . . . . . . . . . . . . . . . . . . . . . . . . . . . . . . . . . . . . . . . 188
Использование AirPrint. . . . . . . . . . . . . . . . . . . . . . . . . . . . . . . . . . . . . . . . . . . . . . . . . . . . . . . . . . . . . 190
Использование Google Cloud Print. . . . . . . . . . . . . . . . . . . . . . . . . . . . . . . . . . . . . . . . . . . . . . . . . . 190
Печать в системе Linux. . . . . . . . . . . . . . . . . . . . . . . . . . . . . . . . . . . . . . . . . . . . . . . . . . . . . . . . . . . . . . . . . 191
Печать из приложений Linux . . . . . . . . . . . . . . . . . . . . . . . . . . . . . . . . . . . . . . . . . . . . . . . . . . . . . . . 191
Печать с помощью системы CUPS . . . . . . . . . . . . . . . . . . . . . . . . . . . . . . . . . . . . . . . . . . . . . . . . . . 191
Опции принтера . . . . . . . . . . . . . . . . . . . . . . . . . . . . . . . . . . . . . . . . . . . . . . . . . . . . . . . . . . . . . . . . . . . 193
Печать с помощью приложения Xerox
®
CentreWare
®
Internet Services . . . . . . . . . . . . . . . . . . . 195
Процедура печати . . . . . . . . . . . . . . . . . . . . . . . . . . . . . . . . . . . . . . . . . . . . . . . . . . . . . . . . . . . . . . . . .195
Опции печати. . . . . . . . . . . . . . . . . . . . . . . . . . . . . . . . . . . . . . . . . . . . . . . . . . . . . . . . . . . . . . . . . . . . . . 195
6 Бумага и материалы
Поддерживаемые виды бумаги . . . . . . . . . . . . . . . . . . . . . . . . . . . . . . . . . . . . . . . . . . . . . . . . . . . . . . . . 198
Заказ бумаги . . . . . . . . . . . . . . . . . . . . . . . . . . . . . . . . . . . . . . . . . . . . . . . . . . . . . . . . . . . . . . . . . . . . . . 198
Общие указания по вкладыванию бумаги в лотки . . . . . . . . . . . . . . . . . . . . . . . . . . . . . . . . . . 198
Бумага, которая может повредить принтер . . . . . . . . . . . . . . . . . . . . . . . . . . . . . . . . . . . . . . . . 199
Рекомендации по хранению бумаги. . . . . . . . . . . . . . . . . . . . . . . . . . . . . . . . . . . . . . . . . . . . . . . . 199
Поддерживаемые стандартные форматы бумаги. . . . . . . . . . . . . . . . . . . . . . . . . . . . . . . . . . . 201
Поддерживаемые типы и плотность бумаги . . . . . . . . . . . . . . . . . . . . . . . . . . . . . . . . . . . . . . . . 202

Многофункциональный принтер Xerox
®
B215
Руководство пользователя
7
Загрузка бумаги. . . . . . . . . . . . . . . . . . . . . . . . . . . . . . . . . . . . . . . . . . . . . . . . . . . . . . . . . . . . . . . . . . . . . . . 203
Подготовка бумаги к загрузке . . . . . . . . . . . . . . . . . . . . . . . . . . . . . . . . . . . . . . . . . . . . . . . . . . . . . 203
Загрузка в лоток 1. . . . . . . . . . . . . . . . . . . . . . . . . . . . . . . . . . . . . . . . . . . . . . . . . . . . . . . . . . . . . . . . . 203
Использование лотка ручной подачи . . . . . . . . . . . . . . . . . . . . . . . . . . . . . . . . . . . . . . . . . . . . . . 205
Задание формата и типа бумаги. . . . . . . . . . . . . . . . . . . . . . . . . . . . . . . . . . . . . . . . . . . . . . . . . . . . . . . 208
Изменение настроек лотка 1 с панели управления . . . . . . . . . . . . . . . . . . . . . . . . . . . . . . . . . 208
Изменение настроек лотка ручной подачи с панели управления . . . . . . . . . . . . . . . . . . . 208
Изменение настроек лотка на компьютере . . . . . . . . . . . . . . . . . . . . . . . . . . . . . . . . . . . . . . . . 209
Места вывода готовых отпечатков . . . . . . . . . . . . . . . . . . . . . . . . . . . . . . . . . . . . . . . . . . . . . . . . . . . . 211
Использование выходного лотка . . . . . . . . . . . . . . . . . . . . . . . . . . . . . . . . . . . . . . . . . . . . . . . . . . 212
Использование задней дверцы . . . . . . . . . . . . . . . . . . . . . . . . . . . . . . . . . . . . . . . . . . . . . . . . . . . . 212
7 Обслуживание
Общие меры предосторожности . . . . . . . . . . . . . . . . . . . . . . . . . . . . . . . . . . . . . . . . . . . . . . . . . . . . . . . 214
Очистка принтера . . . . . . . . . . . . . . . . . . . . . . . . . . . . . . . . . . . . . . . . . . . . . . . . . . . . . . . . . . . . . . . . . . . . . 215
Очистка наружных поверхностей . . . . . . . . . . . . . . . . . . . . . . . . . . . . . . . . . . . . . . . . . . . . . . . . . . 215
Очистка внутренних поверхностей . . . . . . . . . . . . . . . . . . . . . . . . . . . . . . . . . . . . . . . . . . . . . . . . . 216
Расходные материалы. . . . . . . . . . . . . . . . . . . . . . . . . . . . . . . . . . . . . . . . . . . . . . . . . . . . . . . . . . . . . . . . . 219
Расходные материалы. . . . . . . . . . . . . . . . . . . . . . . . . . . . . . . . . . . . . . . . . . . . . . . . . . . . . . . . . . . . . 219
Заказ расходных материалов. . . . . . . . . . . . . . . . . . . . . . . . . . . . . . . . . . . . . . . . . . . . . . . . . . . . . . 220
Информация о состоянии расходных материалов . . . . . . . . . . . . . . . . . . . . . . . . . . . . . . . . . . 221
тонер—картридж . . . . . . . . . . . . . . . . . . . . . . . . . . . . . . . . . . . . . . . . . . . . . . . . . . . . . . . . . . . . . . . . . . . 222
Принт—картридж. . . . . . . . . . . . . . . . . . . . . . . . . . . . . . . . . . . . . . . . . . . . . . . . . . . . . . . . . . . . . . . . . . . 225
Переработка расходных материалов . . . . . . . . . . . . . . . . . . . . . . . . . . . . . . . . . . . . . . . . . . . . . . 226
Управление принтером. . . . . . . . . . . . . . . . . . . . . . . . . . . . . . . . . . . . . . . . . . . . . . . . . . . . . . . . . . . . . . . . 227
Информация о счетчиках учета . . . . . . . . . . . . . . . . . . . . . . . . . . . . . . . . . . . . . . . . . . . . . . . . . . . . 227
Обновления программного обеспечения . . . . . . . . . . . . . . . . . . . . . . . . . . . . . . . . . . . . . . . . . . . 228
Перемещение принтера . . . . . . . . . . . . . . . . . . . . . . . . . . . . . . . . . . . . . . . . . . . . . . . . . . . . . . . . . . . . . . . 230
8 Поиск и устранение неисправностей
Обзор процедуры поиска и устранения неисправностей . . . . . . . . . . . . . . . . . . . . . . . . . . . . . . . 234
Решение проблем . . . . . . . . . . . . . . . . . . . . . . . . . . . . . . . . . . . . . . . . . . . . . . . . . . . . . . . . . . . . . . . . . 234
Устранение распространенных неисправностей . . . . . . . . . . . . . . . . . . . . . . . . . . . . . . . . . . . . . . . 235
Перезапуск принтера. . . . . . . . . . . . . . . . . . . . . . . . . . . . . . . . . . . . . . . . . . . . . . . . . . . . . . . . . . . . . . 235
Принтер не включается . . . . . . . . . . . . . . . . . . . . . . . . . . . . . . . . . . . . . . . . . . . . . . . . . . . . . . . . . . . . 236
Частый сброс или отключение принтера . . . . . . . . . . . . . . . . . . . . . . . . . . . . . . . . . . . . . . . . . . . 236
Документ печатается из другого лотка. . . . . . . . . . . . . . . . . . . . . . . . . . . . . . . . . . . . . . . . . . . . . 237
Проблемы при автоматической двусторонней печати . . . . . . . . . . . . . . . . . . . . . . . . . . . . . . 237
Лоток бумаги не закрывается. . . . . . . . . . . . . . . . . . . . . . . . . . . . . . . . . . . . . . . . . . . . . . . . . . . . . . 237
Печать занимает слишком много времени . . . . . . . . . . . . . . . . . . . . . . . . . . . . . . . . . . . . . . . . . 237
Не удается выполнить работу печати . . . . . . . . . . . . . . . . . . . . . . . . . . . . . . . . . . . . . . . . . . . . . . 239
Принтер издает необычный шум. . . . . . . . . . . . . . . . . . . . . . . . . . . . . . . . . . . . . . . . . . . . . . . . . . . 240
Внутри
принтера образовался конденсат . . . . . . . . . . . . . . . . . . . . . . . . . . . . . . . . . . . . . . . . . . 240
Скручивание бумаги. . . . . . . . . . . . . . . . . . . . . . . . . . . . . . . . . . . . . . . . . . . . . . . . . . . . . . . . . . . . . . . 241

Многофункциональный принтер Xerox
®
B215
Руководство пользователя
8
Застревание бумаги . . . . . . . . . . . . . . . . . . . . . . . . . . . . . . . . . . . . . . . . . . . . . . . . . . . . . . . . . . . . . . . . . . . 242
Предотвращение застревания бумаги . . . . . . . . . . . . . . . . . . . . . . . . . . . . . . . . . . . . . . . . . . . . . 242
Поиск застрявшей бумаги. . . . . . . . . . . . . . . . . . . . . . . . . . . . . . . . . . . . . . . . . . . . . . . . . . . . . . . . . . 243
Извлечение застрявшей бумаги . . . . . . . . . . . . . . . . . . . . . . . . . . . . . . . . . . . . . . . . . . . . . . . . . . . . 244
Устранение неисправностей в связи с застрявшей бумагой. . . . . . . . . . . . . . . . . . . . . . . . . 251
Неполадки при печати. . . . . . . . . . . . . . . . . . . . . . . . . . . . . . . . . . . . . . . . . . . . . . . . . . . . . . . . . . . . . . . . .254
Типичные проблемы при использовании PostScript . . . . . . . . . . . . . . . . . . . . . . . . . . . . . . . . . 258
Типичные проблемы в операционной системе Windows . . . . . . . . . . . . . . . . . . . . . . . . . . . . 258
Типичные проблемы в операционной системе Linux . . . . . . . . . . . . . . . . . . . . . . . . . . . . . . . . 259
Типичные проблемы в операционной системе Macintosh . . . . . . . . . . . . . . . . . . . . . . . . . . . 261
Дефекты качества печати. . . . . . . . . . . . . . . . . . . . . . . . . . . . . . . . . . . . . . . . . . . . . . . . . . . . . . . . . . . . . . 262
Контроль качества печати . . . . . . . . . . . . . . . . . . . . . . . . . . . . . . . . . . . . . . . . . . . . . . . . . . . . . . . . . 262
Устранение проблем с качеством
печати. . . . . . . . . . . . . . . . . . . . . . . . . . . . . . . . . . . . . . . . . . . 263
Проблемы копирования и сканирования. . . . . . . . . . . . . . . . . . . . . . . . . . . . . . . . . . . . . . . . . . . . . . . 269
Проблемы при работе с факсом . . . . . . . . . . . . . . . . . . . . . . . . . . . . . . . . . . . . . . . . . . . . . . . . . . . . . . . 270
Получение помощи . . . . . . . . . . . . . . . . . . . . . . . . . . . . . . . . . . . . . . . . . . . . . . . . . . . . . . . . . . . . . . . . . . . . 273
Просмотр предупредительных сообщений на панели управления . . . . . . . . . . . . . . . . . . 273
Просмотр текущих ошибок на панели управления . . . . . . . . . . . . . . . . . . . . . . . . . . . . . . . . . 273
Просмотр предупреждений с помощью приложения Xerox
®
CentreWare
®
Internet Services
273
Использование интегрированного инструмента поиска неисправностей . . . . . . . . . . . 274
Страницы с полезной информацией. . . . . . . . . . . . . . . . . . . . . . . . . . . . . . . . . . . . . . . . . . . . . . . . 274
Online Support Assistant (Онлайновый ассистент поддержки) . . . . . . . . . . . . . . . . . . . . . . . 275
Определение серийного номера . . . . . . . . . . . . . . . . . . . . . . . . . . . . . . . . . . . . . . . . . . . . . . . . . . . 276
Дополнительные сведения. . . . . . . . . . . . . . . . . . . . . . . . . . . . . . . . . . . . . . . . . . . . . . . . . . . . . . . . . 276
9 Защита
Xerox
®
CentreWare
®
Internet Services . . . . . . . . . . . . . . . . . . . . . . . . . . . . . . . . . . . . . . . . . . . . . . . . . . . 278
Доступ к учетной записи администратора Xerox
®
CentreWare
®
Internet Services . . . . . 279
Изменение пароля системного администратора. . . . . . . . . . . . . . . . . . . . . . . . . . . . . . . . . . . . 280
Установка прав доступа . . . . . . . . . . . . . . . . . . . . . . . . . . . . . . . . . . . . . . . . . . . . . . . . . . . . . . . . . . . . . . . 281
Идентификация. . . . . . . . . . . . . . . . . . . . . . . . . . . . . . . . . . . . . . . . . . . . . . . . . . . . . . . . . . . . . . . . . . . . 281
Настройка разрешений на печать . . . . . . . . . . . . . . . . . . . . . . . . . . . . . . . . . . . . . . . . . . . . . . . . . . . . . 283
База данных о пользователях аппарата . . . . . . . . . . . . . . . . . . . . . . . . . . . . . . . . . . . . . . . . . . . . . . . 284
Уравление базой данных пользователей аппарата. . . . . . . . . . . . . . . . . . . . . . . . . . . . . . . . . 284
Безопасный HTTP. . . . . . . . . . . . . . . . . . . . . . . . . . . . . . . . . . . . . . . . . . . . . . . . . . . . . . . . . . . . . . . . . . . . . . 285
Фильтрация IP-адресов. . . . . . . . . . . . . . . . . . . . . . . . . . . . . . . . . . . . . . . . . . . . . . . . . . . . . . . . . . . . . . . . 286
Включение фильтрации IP-адресов . . . . . . . . . . . . . . . . . . . . . . . . . . . . . . . . . . . . . . . . . . . . . . . . 286
IPSec . . . . . . . . . . . . . . . . . . . . . . . . . . . . . . . . . . . . . . . . . . . . . . . . . . . . . . . . . . . . . . . . . . . . . . . . . . . . . . . . . . 287
Настройка IPSec . . . . . . . . . . . . . . . . . . . . . . . . . . . . . . . . . . . . . . . . . . . . . . . . . . . . . . . . . . . . . . . . . . . 287
Сертификаты безопасности. . . . . . . . . . . . . . . . . . . . . . . . . . . . . . . . . . . . . . . . . . . . . . . . . . . . . . . . . . . . 288
Создание цифрового сертификата устройства. . . . . . . . . . . . . . . . . . . . . . . . . . . . . . . . . . . . . . 288
Установка сертификата доверенного центра сертификации . . . . . . . . . . . . . . . . . . . . . . . . 289
Скрытие или отображение имен работ . . . . . . . . . . . . . . . . . . . . . . . . . . . . . . . . . . . . . . . . . . . . . . . . 290

Многофункциональный принтер Xerox
®
B215
Руководство пользователя
9
802.1x. . . . . . . . . . . . . . . . . . . . . . . . . . . . . . . . . . . . . . . . . . . . . . . . . . . . . . . . . . . . . . . . . . . . . . . . . . . . . . . . . 291
Настройка протокола 802.1x . . . . . . . . . . . . . . . . . . . . . . . . . . . . . . . . . . . . . . . . . . . . . . . . . . . . . . 291
Отображение или скрытие сетевых настроек . . . . . . . . . . . . . . . . . . . . . . . . . . . . . . . . . . . . . . . . . . 292
Тайм—аут системы . . . . . . . . . . . . . . . . . . . . . . . . . . . . . . . . . . . . . . . . . . . . . . . . . . . . . . . . . . . . . . . . . . . . . 293
Настройка значений тайм—аута системы . . . . . . . . . . . . . . . . . . . . . . . . . . . . . . . . . . . . . . . . . . . 293
Безопасность порта USB. . . . . . . . . . . . . . . . . . . . . . . . . . . . . . . . . . . . . . . . . . . . . . . . . . . . . . . . . . . . . . . 294
Активация или деактивация портов USB . . . . . . . . . . . . . . . . . . . . . . . . . . . . . . . . . . . . . . . . . . . 294
Ограничение доступа к веб—интерфейсу пользователя . . . . . . . . . . . . . . . . . . . . . . . . . . . . . . . . . 295
Тест для проверки программного обеспечения . . . . . . . . . . . . . . . . . . . . . . . . . . . . . . . . . . . . . . . . 296
A Технические характеристики
Характеристики принтера . . . . . . . . . . . . . . . . . . . . . . . . . . . . . . . . . . . . . . . . . . . . . . . . . . . . . . . . . . . . . 298
Стандартная конфигурация. . . . . . . . . . . . . . . . . . . . . . . . . . . . . . . . . . . . . . . . . . . . . . . . . . . . . . . . 298
Физические характеристики . . . . . . . . . . . . . . . . . . . . . . . . . . . . . . . . . . . . . . . . . . . . . . . . . . . . . . . 299
Характеристики материалов. . . . . . . . . . . . . . . . . . . . . . . . . . . . . . . . . . . . . . . . . . . . . . . . . . . . . . . 300
Характеристики режимов . . . . . . . . . . . . . . . . . . . . . . . . . . . . . . . . . . . . . . . . . . . . . . . . . . . . . . . . . . . . . 302
Функции печати . . . . . . . . . . . . . . . . . . . . . . . . . . . . . . . . . . . . . . . . . . . . . . . . . . . . . . . . . . . . . . . . . . . 302
Функции факса . . . . . . . . . . . . . . . . . . . . . . . . . . . . . . . . . . . . . . . . . . . . . . . . . . . . . . . . . . . . . . . . . . . . 303
Режимы сканир. . . . . . . . . . . . . . . . . . . . . . . . . . . . . . . . . . . . . . . . . . . . . . . . . . . . . . . . . . . . . . . . . . . . 304
Сетевая среда . . . . . . . . . . . . . . . . . . . . . . . . . . . . . . . . . . . . . . . . . . . . . . . . . . . . . . . . . . . . . . . . . . . . . . . . . 305
Системные требования . . . . . . . . . . . . . . . . . . . . . . . . . . . . . . . . . . . . . . . . . . . . . . . . . . . . . . . . . . . . . . . . 306
Характеристики электропитания . . . . . . . . . . . . . . . . . . . . . . . . . . . . . . . . . . . . . . . . . . . . . . . . . . . . . . 307
Требования к окружающей среде . . . . . . . . . . . . . . . . . . . . . . . . . . . . . . . . . . . . . . . . . . . . . . . . . . . . . 308
B Соответствие нормативным требованиям
Основные нормативные требования. . . . . . . . . . . . . . . . . . . . . . . . . . . . . . . . . . . . . . . . . . . . . . . . . . . 310
Правила Федеральной комиссии связи США . . . . . . . . . . . . . . . . . . . . . . . . . . . . . . . . . . . . . . . 310
Канада . . . . . . . . . . . . . . . . . . . . . . . . . . . . . . . . . . . . . . . . . . . . . . . . . . . . . . . . . . . . . . . . . . . . . . . . . . . . 310
Европейский союз . . . . . . . . . . . . . . . . . . . . . . . . . . . . . . . . . . . . . . . . . . . . . . . . . . . . . . . . . . . . . . . . . 311
Соглашение ЕС по оборудованию для создания изображений (группа 4). Экологическая
информация . . . . . . . . . . . . . . . . . . . . . . . . . . . . . . . . . . . . . . . . . . . . . . . . . . . . . . . . . . . . . . . . . . . . . . . 311
Германия. . . . . . . . . . . . . . . . . . . . . . . . . . . . . . . . . . . . . . . . . . . . . . . . . . . . . . . . . . . . . . . . . . . . . . . . . . 314
Правила ограничения содержания опасных веществ (Турция) . . . . . . . . . . . . . . . . . . . . . 315
Сертификация Евразийского экономического сообщества . . . . . . . . . . . . . . . . . . . . . . . . . 315
Нормативная информация для модуля беспроводной локальной сети 2,4 ГГц . . . . . . 315
Выделение озона . . . . . . . . . . . . . . . . . . . . . . . . . . . . . . . . . . . . . . . . . . . . . . . . . . . . . . . . . . . . . . . . . . 316
Ограничения на копирование . . . . . . . . . . . . . . . . . . . . . . . . . . . . . . . . . . . . . . . . . . . . . . . . . . . . . . . . . 317
США. . . . . . . . . . . . . . . . . . . . . . . . . . . . . . . . . . . . . . . . . . . . . . . . . . . . . . . . . . . . . . . . . . . . . . . . . . . . . . . 317
Канада . . . . . . . . . . . . . . . . . . . . . . . . . . . . . . . . . . . . . . . . . . . . . . . . . . . . . . . . . . . . . . . . . . . . . . . . . . . . 318
Другие страны. . . . . . . . . . . . . . . . . . . . . . . . . . . . . . . . . . . . . . . . . . . . . . . . . . . . . . . . . . . . . . . . . . . . . 319
Ограничения на передачу факсов . . . . . . . . . . . . . . . . . . . . . . . . . . . . . . . . . . . . . . . . . . . . . . . . . . . . . 320
США. . . . . . . . . . . . . . . . . . . . . . . . . . . . . . . . . . . . . . . . . . . . . . . . . . . . . . . . . . . . . . . . . . . . . . . . . . . . . . . 320
Канада . . . . . . . . . . . . . . . . . . . . . . . . . . . . . . . . . . . . . . . . . . . . . . . . . . . . . . . . . . . . . . . . . . . . . . . . . . . . 322
Европейский союз . . . . . . . . . . . . . . . . . . . . . . . . . . . . . . . . . . . . . . . . . . . . . . . . . . . . . . . . . . . . . . . . . 322
Новая Зеландия . . . . . . . . . . . . . . . . . . . . . . . . . . . . . . . . . . . . . . . . . . . . . . . . . . . . . . . . . . . . . . . . . . . 323
Сертификация безопасности . . . . . . . . . . . . . . . . . . . . . . . . . . . . . . . . . . . . . . . . . . . . . . . . . . . . . . . . . . 325

Многофункциональный принтер Xerox
®
B215
Руководство пользователя
10
Сведения о безопасности материалов . . . . . . . . . . . . . . . . . . . . . . . . . . . . . . . . . . . . . . . . . . . . . . . . . 326
C Вторичная переработка иутилизация
Все страны . . . . . . . . . . . . . . . . . . . . . . . . . . . . . . . . . . . . . . . . . . . . . . . . . . . . . . . . . . . . . . . . . . . . . . . . . . . . 328
Северная Америка . . . . . . . . . . . . . . . . . . . . . . . . . . . . . . . . . . . . . . . . . . . . . . . . . . . . . . . . . . . . . . . . . . . . 329
Европейский союз . . . . . . . . . . . . . . . . . . . . . . . . . . . . . . . . . . . . . . . . . . . . . . . . . . . . . . . . . . . . . . . . . . . . . 330
Бытовое использование . . . . . . . . . . . . . . . . . . . . . . . . . . . . . . . . . . . . . . . . . . . . . . . . . . . . . . . . . . . 330
Коммерческое использование . . . . . . . . . . . . . . . . . . . . . . . . . . . . . . . . . . . . . . . . . . . . . . . . . . . . . 330
Сбор и утилизация оборудования и аккумуляторов . . . . . . . . . . . . . . . . . . . . . . . . . . . . . . . . 331
Символ предупреждения для аккумуляторов . . . . . . . . . . . . . . . . . . . . . . . . . . . . . . . . . . . . . . 331
Извлечение аккумуляторов . . . . . . . . . . . . . . . . . . . . . . . . . . . . . . . . . . . . . . . . . . . . . . . . . . . . . . . . 331
Другие страны. . . . . . . . . . . . . . . . . . . . . . . . . . . . . . . . . . . . . . . . . . . . . . . . . . . . . . . . . . . . . . . . . . . . . . . . . 332

Многофункциональный принтер Xerox
®
B215
Руководство пользователя
11
1
Безопасность
В данном разделе рассматриваются следующие вопросы:
• Уведомления по технике безопасности……….…………..……………………..…………..…………..………..…………..…… 12
• Электробезопасность …….…………..…………..………..…………..…………..…………..……………………..…………..…………..… 13
• Техника безопасности при эксплуатации …….………..…………..…………..……………………..…………..…………..… 16
• Техника безопасности при обслуживании ……………………..…………..…………..………..…………..…………..……… 19
• Символы на принтере …………..………..………………………..…………..………..…………..…………..…………..…..……………… 20
• Контактные сведения для обращения по вопросам охраны труда, техники безопасности и
охраны окружающей среды ……….…………..…………..…………..………..…………..…………..…………..…………………….. 23
Данный принтер и рекомендуемые расходные материалы разработаны с учетом строгих
требований
обеспечения безопасности и прошли проверку на соответствие этим требованиям.
Точное соблюдение следующих правил обеспечит длительную и безопасную работу принтера
Xerox.

Уведомления по технике безопасности
Многофункциональный принтер Xerox
®
B215
Руководство пользователя
12
Уведомления по технике безопасности
Прежде чем приступить к эксплуатации принтера, внимательно ознакомьтесь с приведенными
ниже указаниями. Соблюдение перечисленных указаний позволит обеспечить длительную
ибезопасную эксплуатацию принтера.
Принтер Xerox
®
и расходные материалы разработаны с учетом строгих требований техники
безопасности и прошли проверку на соответствие этим требованиям. Эти проверки включают
проводимые агентствами по безопасности испытания, утверждение и подтверждение
соответствия установленным стандартам по электромагнитной совместимости и охране
окружающей среды.
Проверки безопасности и функционирования данного аппарата выполнялись только
сиспользованием материалов Xerox
®
.
Примечание. Любое несанкционированное изменение, включая добавление новых функций
или подключение внешних устройств, может повлиять на соответствие аппарата
сертификационным требованиям. Дополнительную информацию можно получить
в представительстве Xerox.

Электробезопасность
Многофункциональный принтер Xerox
®
B215
Руководство пользователя
13
Электробезопасность
Общие инструкции
ПРЕДУПРЕЖДЕНИЕ. A
• Не вставляйте никаких предметов в щели и отверстия принтера. Прикосновение
к электрическим контактам или короткое замыкание могут привести к пожару или
поражению электрическим током.
• Не снимайте крышки и ограждения, закрепленные винтами, за исключением случаев
установки дополнительного оборудования и выполнения специальных указаний.
При выполнении таких операций отключайте питание принтера. Устанавливая
дополнительное
оборудование, выньте шнур питания из розетки. Кроме
устанавливаемого дополнительного оборудования, под этими крышками
нет компонентов, подлежащих обслуживанию пользователем.
Угроза вашей безопасности возникает в следующих случаях:
• Шнур питания поврежден или изношен.
• В принтер попала жидкость.
• Принтер намок.
• Принтер дымится или поверхность нагревается больше обычного.
• Принтер издает необычный шум или запах.
• Из—за принтера срабатывает автоматический выключатель, предохранитель или другое
защитное устройство.
При возникновении любой из перечисленных ситуаций выполните следующие действия:
1. Сразу отключите питание принтера.
2. Выньте шнур питания из розетки.
3. Обратитесь в уполномоченное сервисное представительство.

Электробезопасность
Многофункциональный принтер Xerox
®
B215
Руководство пользователя
14
Шнур питания
Используйте шнур питания, поставляемый с принтером.
• Подключайте шнур питания напрямую к правильно заземленной электрической розетке.
Убедитесь, что шнур надежно подключен с обоих концов. Если вы не знаете, заземлена
ли розетка, попросите специалиста проверить ее.
ПРЕДУПРЕЖДЕНИЕ. Во избежание возгорания или поражения электрическим током не
используйте удлинители, сетевые разветвители и переходники более 90 дней. Если
невозможно установить постоянную розетку, используйте только соответствующий
удлинитель заводского изготовления для каждого принтера или МФУ. Длина шнура,
сечение проводника, заземление и защита должны соответствовать действующим
строительным нормам и правилам, нормам пожарной безопасности и
правилам устройства
электроустановок.
• Не используйте вилку адаптера с заземлением для подключения принтера к сетевой
розетке без контакта заземления.
• Убедитесь, что принтер подключен к розетке, обеспечивающей соответствующее
напряжение питания и мощность. В случае необходимости обсудите со специалистом
режимы питания принтера.
• Не размещайте принтер в таком месте, где на шнур питания
могут случайно наступить.
• Не ставьте предметы на шнур питания.
• Не вынимайте вилку шнура питания из розетки, когда выключатель питания находится
вположении «включено».
• При повреждении или износе шнура питания замените его.
• Во избежание поражения электрическим током и повреждения шнура питания
при отсоединении его от розетки держитесь за вилку.
Шнур питания
подключается через розетку на задней панели принтера. Если требуется
полностью отключить электропитание принтера, выньте вилку шнура питания из розетки.
Аварийное отключение электропитания
При возникновении любого из следующих условий немедленно отключите питание принтера
ивыньте вилку шнура питания от розетки. В следующих случаях необходимо обращаться
в авторизованный сервисный центр Xerox:
• Аппарат издает необычные шумы или запахи.
• Шнур питания поврежден или изношен.
• Сработал настенный автоматический выключатель, предохранитель или другие
защитные устройства.
• В принтер попала жидкость.
• Принтер
намок.
• Произошло повреждение любого компонента принтера.
Электробезопасность
Многофункциональный принтер Xerox
®
B215
Руководство пользователя
15
Лазерная безопасность
Данный лазерный принтер соответствует стандартам для лазерных устройств, установленным
правительственными, государственными и международными организациями, и сертифицирован
как лазерное устройство класса 1. Принтер не является источником опасного излучения,
поскольку лазерный луч находится в полностью закрытом пространстве во всех режимах
работы и обслуживания.
ПРЕДУПРЕЖДЕНИЕ. Использование не указанных в этом руководстве средств управления,
настроек и процедур может привести к опасному воздействию лазерного излучения.
Телефонный шнур
ПРЕДУПРЕЖДЕНИЕ.
Чтобы уменьшить риск возгорания, используйте для телекоммуникационной линии провод
калибра не меньше 26 по системе AWG (American Wire Gauge).

Техника безопасности при эксплуатации
Многофункциональный принтер Xerox
®
B215
Руководство пользователя
16
Техника безопасности при эксплуатации
Принтер и расходные материалы разработаны с учетом строгих требований техники
безопасности и прошли проверку на соответствие этим требованиям. Это включает проверку
иутверждение агентствами по технике безопасности, а также соответствие установленным
стандартам охраны окружающей среды. Соблюдение вами перечисленных условий обеспечит
длительную и безопасную работу принтера.
Указания по эксплуатации
• Не извлекайте бумагу из лотков в процессе печати.
• Не открывайте дверцы во время печати.
• Не перемещайте принтер во время печати.
• Следите за тем, чтобы руки, волосы, галстук и т. п. не попадали между роликами
вывода и подачи.
• Опасные участки принтера закрыты крышками, которые снимаются с помощью
инструмента. Не снимайте защитные
крышки.
• Запрещается блокировать устройства электрической и механической блокировки.
• Не пытайтесь извлечь бумагу, застрявшую глубоко внутри принтера. Немедленно
выключите принтер и обратитесь в местное представительство Xerox.
ПРЕДУПРЕЖДЕНИЕ.
• Металлические поверхности в зоне фьюзера нагреваются. Извлекая застрявшую бумагу
на этом участке, соблюдайте осторожность, чтобы не коснуться металлической
поверхности.
• Во избежание опрокидывания не двигайте аппарат, когда выдвинуты все лотки.
Выделение озона
В процессе нормальной эксплуатации данный принтер выделяет озон. Количество выделяемого
озона зависит от объемов печати. Озон тяжелее воздуха и выделяется в количествах,
недостаточных для причинения вреда здоровью. Установите принтер в хорошо проветриваемом
помещении.
Дополнительные сведения для США и Канады см. на веб—сайте www.xerox.com/environment.
Вдругих регионах обратитесь в местное представительство Xerox или
посетите веб—сайт
www.xerox.com/environment_europe.

Техника безопасности при эксплуатации
Многофункциональный принтер Xerox
®
B215
Руководство пользователя
17
Размещение принтера
• Размещайте принтер на ровной, прочной и устойчивой поверхности, которая может
выдержать его вес. Сведения о весе принтера см. в разделе Физические характеристики
Руководства пользователя.
• Не блокируйте и не закрывайте щели и отверстия принтера. Эти отверстия предназначены
для вентиляции и предотвращения перегрева принтера.
• Размещайте принтер таким образом, чтобы оставалось достаточно
свободного места для
работы и обслуживания.
• Принтер не следует устанавливать в пыльных помещениях и пространствах.
• Принтер нельзя хранить и эксплуатировать в условиях высоких и низких температур
или влажности.
• Не размещайте принтер рядом с источником тепла.
• Не размещайте принтер в местах, где он может подвергнуться воздействию прямых
солнечных лучей, во избежание
повреждения чувствительных к свету компонентов.
• Не размещайте принтер на пути потока холодного воздуха из кондиционера.
• Не устанавливайте принтер в местах, подверженных вибрации.
• Наилучшая производительность обеспечивается на высоте, указанной в разделе
Требования к окружающей среде Руководства пользователя.

Техника безопасности при эксплуатации
Многофункциональный принтер Xerox
®
B215
Руководство пользователя
18
Расходные материалы для принтера
• Используйте расходные материалы, предназначенные для этой модели принтера.
Использование неподходящих материалов может привести к ухудшению работы принтера
ипредставлять угрозу вашей безопасности.
• Следуйте предупреждениям на маркировке и инструкциям, поставляемым с продуктом,
дополнительными узлами и расходными материалами.
• Храните все расходные материалы, соблюдая указания, изложенные на упаковке.
• Храните все расходные материалы в
недоступном для детей месте.
• Избегайте контакта тонера, тонер— и принт—картриджей или сборников тонера с
отрытым огнем.
• При обращении с картриджами соблюдайте осторожность – берегите глаза и
незащищенные участки тела. При попадании содержимого в глаза может возникать
раздражение ивоспаление. Не пытайтесь разбирать картридж – содержимое при этом
может попасть вглаза или на
незащищенные участки тела.
ВНИМАНИЕ. Не рекомендуется использовать расходные материалы других
производителей. Гарантийные обязательства, соглашение об обслуживании и гарантия
Total Satisfaction Guarantee (Общая гарантия качества) не распространяются на поломки,
неправильную работу или снижение качества, вызванные использованием расходных
материалов других производителей или использованием расходных материалов Xerox,
не предназначенных для этого принтера. Гарантия Total Satisfaction Guarantee (Общая
гарантия качества) действует в США и Канаде.
В других регионах могут действовать иные
гарантийные условия. За дополнительной информацией обращайтесь в региональное
представительство компании Xerox.

Техника безопасности при обслуживании
Многофункциональный принтер Xerox
®
B215
Руководство пользователя
19
Техника безопасности при обслуживании
• Не выполняйте никакие действия по обслуживанию, не описанные в документации
принтера.
• Для чистки используйте только сухую безворсовую ткань.
• Не сжигайте расходные материалы и компоненты, подлежащие регулярной замене.
Информацию о программах утилизации расходных материалов Xerox
®
см. на веб—сайте
www.xerox.com/gwa.
ПРЕДУПРЕЖДЕНИЕ. Не применяйте аэрозольные очистители. Аэрозольные очистители при
контакте с электромеханическим оборудованием могут быть взрыво— и пожароопасны. При
установке аппарата в проходе или другом похожем месте, кпространству вокруг аппарата
могут применяться дополнительные требования. Следует убедиться, что выполняются все
действующие требования к безопасности на рабочем месте, строительные и
противопожарные нормативы.
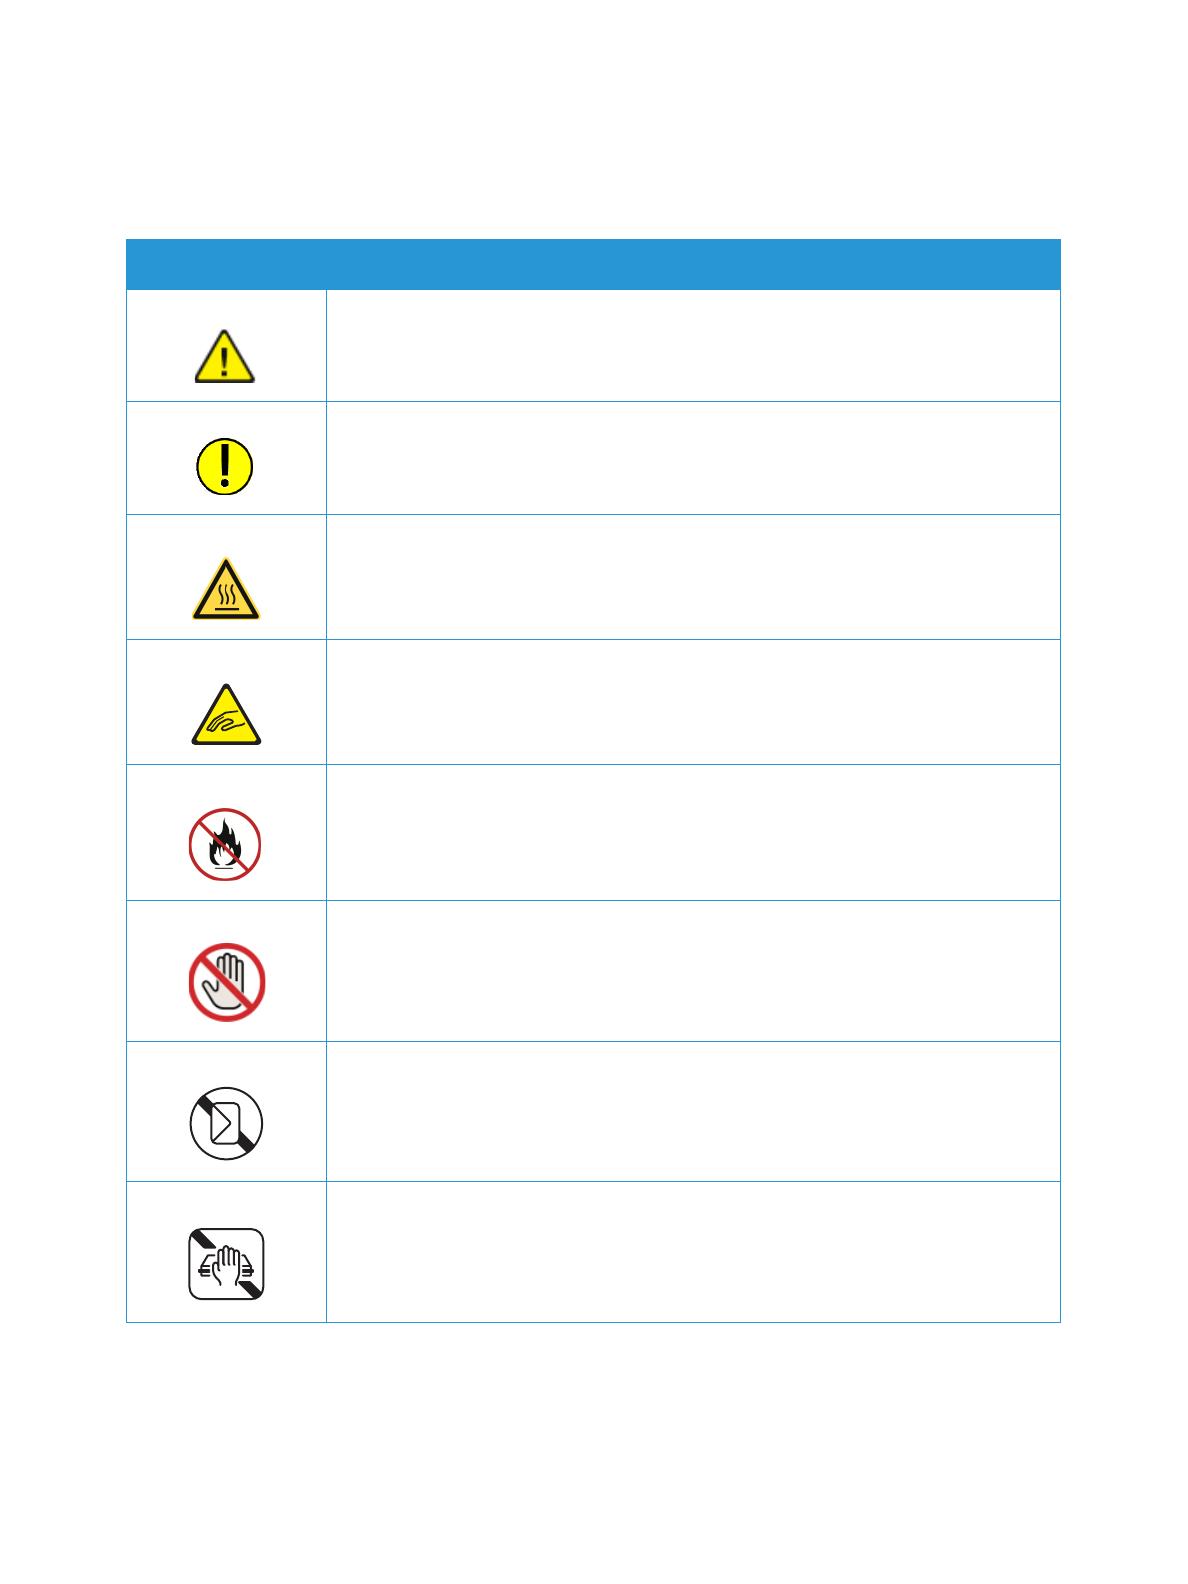
Символы на принтере
Многофункциональный принтер Xerox
®
B215
Руководство пользователя
20
Символы на принтере
Значок Описание
Предупреждение.
Указывает опасность, которая в случае неосторожности может привести
к тяжелой травме или даже гибели.
Внимание!
Показывает обязательное действие, которое необходимо выполнить
для предотвращения материального ущерба.
Наружная или внутренняя поверхность принтера может нагреваться.
Во избежание травм соблюдайте осторожность.
Опасность защемления.
Этот предупреждающий символ указывает на зоны аппарата,
при работе в которых возможно
получение травмы.
Не сжигайте данный компонент.
Не касайтесь данной детали или участка принтера.
Не вкладывайте конверты.
Не прикасайтесь.
(Ocr-Read Summary of Contents of some pages of the Xerox B215 Document (Main Content), UPD: 24 August 2023)
-
125, Xerox B215 Scan To Xerox ® B215 Multifunction Printer User Guide 125 Scanning to PC Using Xerox Easy Printer Manager Xerox Easy Printer Manager is available for Windows and Macintosh operating systems and conveniently combines device settings as well as use of functions such as scanning, faxing and printing. 1. At the printer, load originals face up into the automatic document feeder, or place a single original face down on the document glass.…
-
164, Printing Using Windows Xerox ® B215 Multifunction Printer User Guide 164 2-Sided Printing You can print on both sides of a sheet of paper. Before printing, decide how you want your document oriented. • Printer Default: If you select this option, this feature is determined by the settings made on the control panel of the printer. • None: The document is printed single-sided. • Long Edge: This is the conventional layout used in book binding. • Short Edge: This is the type often used …
-
14, Xerox B215 Electrical Safety Xerox ® B215 Multifunction Printer User Guide 14 Electrical Safety General Guidelines WARNING: • Do not push objects into slots or openings on the printer. Touching a voltage point or shorting out a part could result in fire or electric shock. • Do not remove the covers or guards that are fastened with screws unless you are installing optional equipment and are instructed to do so. Power off the printer when performing the…
-
296, Safety Certification Xerox ® B215 Multifunction Printer User Guide 296 Safety Certification This device is certified by the following agencies using the following safety standards. Agency Standard Underwriters Laboratories Inc. (US/Canada) UL 60950-1, 2nd Edition, 2014-10-14 CAN/CSA C22.2 No. 60950-1-07, 2nd Edition, 2014-10 Underwriters Laboratories Inc. (Europe) IEC 60950-1:2005 + A1:2009 + A2:2013 EN 60950-1:2006 + A11:2009 + A1:2010 + A12:2011 + A2:2013 …
-
217, General Troubleshooting Xerox ® B215 Multifunction Printer User Guide 217 Printer Makes Unusual Noises Condensation has Formed Inside the Printer Moisture can condense inside a printer when the humidity is above 85% or when a cold printer is in a warm room. Condensation can form in a printer after it has been sitting in a cold room that is heated quickly. Probable Causes Solutions There is an obstruction or debri…
-
87, Installing Printer Software Xerox ® B215 Multifunction Printer User Guide 87 The Wireless Network Security screen displays. 7. Enter your Network Password and select Next. 8. When the Wireless Network Setup Complete page displays, select Finish. Uninstalling the Windows Drivers 1. From the Start menu, select Xerox Printers Uninstall Xerox Printer Software. The Uninstall Xerox Printer Software window display…
-
209, Managing the Printer Xerox ® B215 Multifunction Printer User Guide 209 Software Updates Xerox is continually seeking to improve its products. A software revision may become available to improve the functionality of your printer. The Software Upgrade feature allows the customer to upgrade the printer software without needing a Customer Service Representative to be present. The software can be upgrade…
-
150, Address Book Xerox ® B215 Multifunction Printer User Guide 150 Address Book Address Book Overview The device can also be configured to use a network address book if the LDAP function has been set up. For details about setting up a network Address Book, refer to Email Settings. Using and Editing the Address Book at the Control Panel Adding Contacts in the Address Book at the Control Panel 1. At the printer control panel, press the Home button. 2. To…
-
18, Operational Safety Xerox ® B215 Multifunction Printer User Guide 18 Printer Location • Place the printer on a level, solid, non-vibrating surface with adequate strength to hold its weight. To find the weight for your printer configuration, refer to Physical Specifications. • Do not block or cover the slots or openings on the printer. These openings are provided for ventilation and to prevent overheating of the printer. • Place the printer in …
-
6, Xerox ® B215 Multifunction Printer User Guide 6 Device . . . . . . . . . . . . . . . . . . . . . . . . . . . . . . . . . . . . . . . . . . . . . . . . . . . . . . . . . . . . . . . . . . . . . . . . . . . . . . . . . 147 Device Overview . . . . . . . . . . . . . . . . . . . . . . . . . . . . . . . . . . . . . . . . . . . . . . . . . . . . . . . . . . . . . . . . . . . . 147 Device Options . . . . . . . . . . . …
-
202, Supplies Xerox ® B215 Multifunction Printer User Guide 202 Supply Status Information You can check the status and percentage of life remaining for your printer supplies at the control panel, using Xerox ® CentreWare ® Internet Services, or using Xerox Easy Printer Manager. When printer supplies near their replacement time, warning alerts appear on the control panel. You can customize alerts and configure email alert notifications. For information…
-
203, Supplies Xerox ® B215 Multifunction Printer User Guide 203 Toner Cartridge General Precautions WARNING: • When replacing the toner cartridge, be careful not to spill the toner. If any toner spills, avoid contact with clothes, skin, eyes, and mouth. Do not inhale the toner dust. • Keep toner cartridges out of the reach of children. If a child accidentally swallows toner, have the child spit out the toner, and rinse the mouth with water. Consult a physician immediat…
-
162, Printing Using Windows Xerox ® B215 Multifunction Printer User Guide 162 Default Favorites The printer provides a set of regularly used favorites. • Last Used Setting: This favorite enables you to print with the last used settings. • Normal Printing: This favorite enables you to print with all factory default settings. • 2-Sided Printing: This favorite enables you to save paper by printing on 2-sides of a sheet. • 2…
-
91, Setting Up the Services Xerox ® B215 Multifunction Printer User Guide 91 3. To enable the Startup page, for Device Start-Up Page, select Enabled. 4. Click Apply. Managing Banner Page Printing You can set the printer to print a banner page with each print job. The banner page contains information identifying the user and job name. You can set this option in the print driver, in Xerox ® CentreWare ® Internet Services, or at the control panel. Note: Enable banner pag…
-
59, Xerox B215 General Setup Xerox ® B215 Multifunction Printer User Guide 59 Enabling SMart eSolutions 1. In Xerox ® CentreWare ® Internet Services, click Status SMart eSolutions. 2. For SMart eSolutions, click Settings. 3. For Enrollment, select Enrolled. 4. For Daily Transaction Time, type the time of day that you want the printer to communicate with Xerox. 5. If your network uses an HTTP proxy server, provide information about y…
-
85, Installing Printer Software Xerox ® B215 Multifunction Printer User Guide 85 2. Insert the Software and Documentation disc into the appropriate drive on your computer. The installer starts automatically. If the installer does not start automatically, navigate to the drive, then double-click the Setup.exe installer file. 3. Select Yes in the User Account Control window. 4. Select Install Software. A Printer Connection Type window displays. …
-
206, Supplies Xerox ® B215 Multifunction Printer User Guide 206 Drum Cartridge General Precautions WARNING: • Keep drum cartridges out of the reach of children. • Never throw a drum cartridge into an open flame. • Do not touch the surface of the photosensitive drum in the drum cartridge. • Do not expose the cartridge to unnecessary vibrations or shock. • Never manually rotate the drum in the drum cartridge, especially in the reverse direction; this can cause internal …
Displayed below is the user manual for B215 by Xerox which is a product in the Multifunctionals category.
This manual has pages.

Xerox® B205
Multifunction Printer
•
Imprimante multifonction
•
Stampante multifunzione
•
Multifunktionsdrucker
•
Equipo multifunción
•
Impressora multifuncional
•
Quick Use Guide
Guide d’utilisation rapide
Italiano
Deutsch
Español
Português
Guida rapida
Kurzübersicht
Guía de uso rápido
Guia de utilização rápida
IT
DE
ES
PT
607E31840 Rev A
© 2019 Xerox Corporation. All Rights Reserved.
Xerox
®
is a trademark of Xerox Corporation in the United States and/or other countries. BR27273
www.xerox.com/office/B205support
www.xerox.com/msds
www.xerox.com/office/B205supplies
www.xerox.com/office/businessresourcecenter
More Information
Informations supplémentaires
Ulteriori informazioni
Weitere Informationen
Más información
Mais informações
EN
FR
IT
DE
ES
PT
www.xerox.com/office/
businessresourcecenter
Templates, tips, and tutorials
Modèles, conseils et didacticiels
Modelli, suggerimenti ed esercitazioni
Profile, Tipps und Lehrgänge
Plantillas, consejos y lecciones prácticas
Modelos, dicas e tutoriais
EN
FR
IT
DE
ES
PT
ES Antes de utilizar la impresora, lea los capítulos sobre
seguridad y normativas en la Guía del usuario
disponible en Xerox.com, o bien, la Guía de referencia
de seguridad, normativa, reciclaje y eliminación de
productos en el disco de Software and
Documentation (Software y documentación).
Encontrará Fichas de datos de seguridad e
información medioambiental en el disco y en
Internet.
FR Avant d’utiliser votre imprimante, lisez les chapitres
relatifs à la sécurité et aux réglementations du Guide
de l’utilisateur disponible sur Xerox.com ou le Guide
de référence sur la sécurité, la réglementation, le
recyclage et la mise au rebut sur le CD-ROM Software
and Documentation (Logiciel et documentation).
Les fiches de données de sécurité et les informations
environnementales sont disponibles sur le disque et
en ligne.
PT Antes de operar a impressora, leia os capítulos sobre
segurança e regulamentação no Guia do Usuário
disponível em Xerox.com ou no Guia de referência
sobre segurança, regulamentação, reciclagem e
descarte no Software and Documentation disc (CD de
software e documentação). (Software e
Documentação).
Folhas de dados de segurança e informações
ambientais estão disponíveis no disco e on-line.
IT Prima di utilizzare la stampante, leggere i capitoli
relativi alla normativa e alla sicurezza nella Guida per
l’utente disponibile su Xerox.com oppure la Guida
relativa a sicurezza, normative, riciclaggio e
smaltimento sul disco Software and Documentation
(Software e documentazione).
Le schede di sicurezza e le informazioni ambientali
sono disponibili sul disco e online.
EN Before operating your printer, read the safety and
regulatory chapters in the User Guide available on
Xerox.com, or the Safety, Regulatory, Recycling, and
Disposal Reference Guide on the Software and
Documentation disc.
Safety Data Sheets and environmental information
are available on the disc and online.
DE Vor der Inbetriebnahme des Druckers die Kapitel zu
Sicherheit und gesetzlichen Bestimmungen im
Benutzerhandbuch unter Xerox.com bzw. im
Referenzhandbuch zu Sicherheit, gesetzlichen
Bestimmungen, Recycling und Entsorgung auf der
Software and Documentation (Datenträger mit
Software und Dokumentation) lesen.
Sicherheitsdatenblätter und Umweltinformationen
sind auf dem Datenträger und online verfügbar.
Printer supplies
Consommables pour l’imprimante
Materiali di consumo della stampante
Druckerverbrauchsmaterial
Suministros de la impresora
Suprimentos da impressora
EN
FR
IT
DE
ES
PT
www.xerox.com/office/B205supplies
2
www.xerox.com/office/B205support
FR
IT
DE
ES
PT
EN
FR
IT
DE
ES
PT
EN
Contents
Sommaire
Indice generale
Inhalt
Índice
Conteúdo
Printer Basics ……………………………………………………… 3
Présentation de l’imprimante
Nozioni di base sulla stampante
Grundlagen
Aspectos básicos de la impresión
Noções básicas da impressora
Copying.………………………………………………………………9
Copie
Copia
Kopieren
Copia
Cópia
Printing………………………………………………………………. 6
Impression
Stampa
Impresión
Impressão
Printer Tour………………………………………………………….3
Découverte de l’imprimante
Presentazione della stampante
Druckerübersicht
Recorrido por la impresora
Roteiro da impressora
Control Panel……………………………………………………….4
Panneau de commande
Pannello di controllo
Bedienfeld
Panel de control
Painel de controle
Supported Papers………………………………………………..6
Papiers pris en charge
Carta supportata
Geeignetes Druckmaterial
Papeles admitidos
Papéis suportados
Basic Printing …………………………………………………….. 7
Impression de base
Stampa di base
Einfaches Drucken
Impresión básica
Impressão básica
Basic Copying…………………………………………………….. 9
Copie de base
Nozioni di base sulla copiatura
Einfaches Kopieren
Copia básica
Cópia básica
Scanning………………………………………………………….. 10
Numérisation
Scansione
Scannen
Escaneado
Digitalização
Troubleshooting ………………………………………………..14
Dépannage
Risoluzione dei problemi
Problembehandlung
Solución de problemas
Solução de problemas
Paper Jams………………………………………………………..14
Bourrages papier
Inceppamenti della carta
Papierstaus
Atascos de papel
Atolamentos de papel
Scanning from a Computer……………………………… 13
Numérisation à partir d’un ordinateur
Scansione da un computer
Scannen vom Computer aus
Escaneado desde un ordenador
Digitalização a partir de um computador
Scanning to a Computer………………………………….. 12
Numérisation vers un ordinateur
Scansione su un computer
Scanausgabe an einen Computer
Escaneado a PC
Digitalização para um computador
FR
IT
DE
ES
PT
EN
FR
IT
DE
ES
PT
EN
FR
IT
DE
ES
PT
EN
FR
IT
DE
ES
PT
EN
FR
IT
DE
ES
PT
EN
FR
IT
DE
ES
PT
EN
FR
IT
DE
ES
PT
EN
FR
IT
DE
ES
PT
EN
FR
IT
DE
ES
PT
EN
FR
IT
DE
ES
PT
EN
FR
IT
DE
ES
PT
EN
FR
IT
DE
ES
PT
EN
Xerox® Easy Printer Manager……………………………..5
Xerox® Easy Printer Manager
Xerox® Easy Printer Manager
Xerox® Easy Printer Manager
Xerox® Easy Printer Manager
Xerox® Easy Printer Manager
FR
IT
DE
ES
PT
EN
Xerox® CentreWare® Internet Services………………5
Services Internet CentreWare® Xerox®
Xerox® CentreWare® Internet Services
Xerox® CentreWare® Internet Services
Xerox® CentreWare® Internet Services
Xerox® CentreWare® Internet Services
FR
IT
DE
ES
PT
EN
Printing from USB Flash Drive …………………………… 8
Impression à partir d’un lecteur Flash USB
Stampa da un’unità flash USB
Drucken von einem USB-Flashlaufwerk
Impresión desde unidad Flash USB
Impressão de uma unidade flash USB
FR
IT
DE
ES
PT
EN
FR
IT
DE
ES
PT
EN Scanning to a USB Flash Drive.…………………………11
Numérisation vers une clé USB
Scansione su un’unità flash USB
Scanausgabe: USB
Escaneado a una unidad Flash USB
Digitalização para uma unidade flash USB

3
www.xerox.com/office/B205support
Printer Basics
Généralités
Jam Access
Accès aux bourrages
Accesso per inceppamento
Staubeseitigung
Acceso al atasco
Acesso ao atolamento
Printer Tour
Découverte de l’imprimante
Presentazione della stampante
Druckerübersicht
Recorrido por la impresora
Roteiro da impressora
For ordering supplies, contact your local reseller, or visit the Xerox
®
Supplies website.
Pour commander des consommables, contactez votre revendeur local ou visitez le site Web des consommables
Xerox
®
.
Per ordinare materiali di consumo, contattare il rivenditore locale oppure visitare il sito Web per i materiali di
consumo Xerox
®
.
Bestellung von Verbrauchsmaterial beim örtlichen Händler oder über die Xerox
®
-Website.
Para solicitar suministros, póngase en contacto con su distribuidor local o visite el sitio Web de Consumibles
Xerox
®
.
Para solicitar suprimentos, entre em contato com o revendedor local ou visite o site de Suprimentos da Xerox
®
.
Main Tray
Bac principal
Vassoio principale
Hauptbehälter
Bandeja principal
Bandeja principal
Manual Feed Slot
Fente d’alimentation manuelle
Slot alimentazione manuale
Manueller Einzug
Ranura de alimentación manual
Slot de alimentação manual
Scanner
Scanner
Scanner
Scanner
Escáner
Scanner
Automatic Document Feeder (ADF)
Chargeur automatique de documents
Alimentatore automatico documenti
Automatischer Vorlageneinzug
Alimentador automático de documentos
Alimentador automático de originais
Exit Tray
Bac de sortie
Vassoio di ricezione
Ausgabefach
Bandeja de salida
Bandeja de saída Toner Cartridge
Cartouche de toner
Cartuccia toner
Tonerkartusche
Cartucho de tóner
Cartucho de toner
Drum Cartridge
Module photorécepteur
Cartuccia fotoricettore
Trommeleinheit
Cartucho del tambor
Cartucho do fotorreceptor
FR
IT
DE
ES
PT
EN
FR
IT
DE
ES
PT
EN
FR
IT
DE
ES
PT
EN
FR
IT
DE
ES
PT
EN
FR
IT
DE
ES
PT
EN
FR
IT
DE
ES
PT
EN
FR
IT
DE
ES
PT
EN
FR
IT
DE
ES
PT
EN
FR
IT
DE
ES
PT
EN
FR
IT
DE
ES
PT
EN
www.xerox.com/office/B205supplies

4
www.xerox.com/office/B205support
Printer Basics
Généralités
Xerox B205
System menus
Menus de systèmes
Menu di sistema
Systemmenüs
Menús de sistema
Menus do sistema
Feature menus
Menus de fonctions
Menu funzione
Funktionsmenüs
Menús de función
Menus de funções
Clear or delete
Corriger ou supprimer
Cancella o elimina
Leeren oder Löschen
Borrar o eliminar
Limpar ou excluir
Cancel job
Annuler le travail
Annulla il lavoro
Auftrag abbrechen
Cancelar trabajo
Cancelar trabalho
Start job
Démarrer le travail
Avvia il lavoro
Auftrag starten
Iniciar trabajo
Iniciar trabalho
Scroll menus
Menus déroulants
Scorri i menu
Scroll-Menüs
Menús de desplazamiento
Rolar menus
Accept selection
Accepter la sélection
Accetta selezione
Auswahl übernehmen
Aceptar la selección
Aceitar seleção
Go up one level in the menu
Remonter d’un niveau dans le menu
Sali di un livello nel menu
Eine Menüebene nach oben
Subir un nivel en el menú
Subir um nível no menu
Copy and scan modes
Copier et numériser des modes
Modalità di copia e scansione
Kopier- und Scanmodus
Modos de copia y escaneado
Modos de cópia e digitalização
Power Saver on, off
Activer/Désactiver Economie d’énergie
Risparmio energetico (Sì/No)
Energiesparbetrieb Ein/Aus
Ahorro de energía sí/no
Economia de energia ligado/desligado
Power On, Off
Mise sous/hors tension
Accensione/spegnimento
Betrieb Ein/Aus
Encender/Apagar
Ligar/Desligar
FR
IT
DE
ES
PT
EN
FR
IT
DE
ES
PT
EN
FR
IT
DE
ES
PT
EN
FR
IT
DE
ES
PT
EN
FR
IT
DE
ES
PT
EN
FR
IT
DE
ES
PT
EN
FR
IT
DE
ES
PT
EN
FR
IT
DE
ES
PT
EN
FR
IT
DE
ES
PT
EN
FR
IT
DE
ES
PT
EN
FR
IT
DE
ES
PT
EN
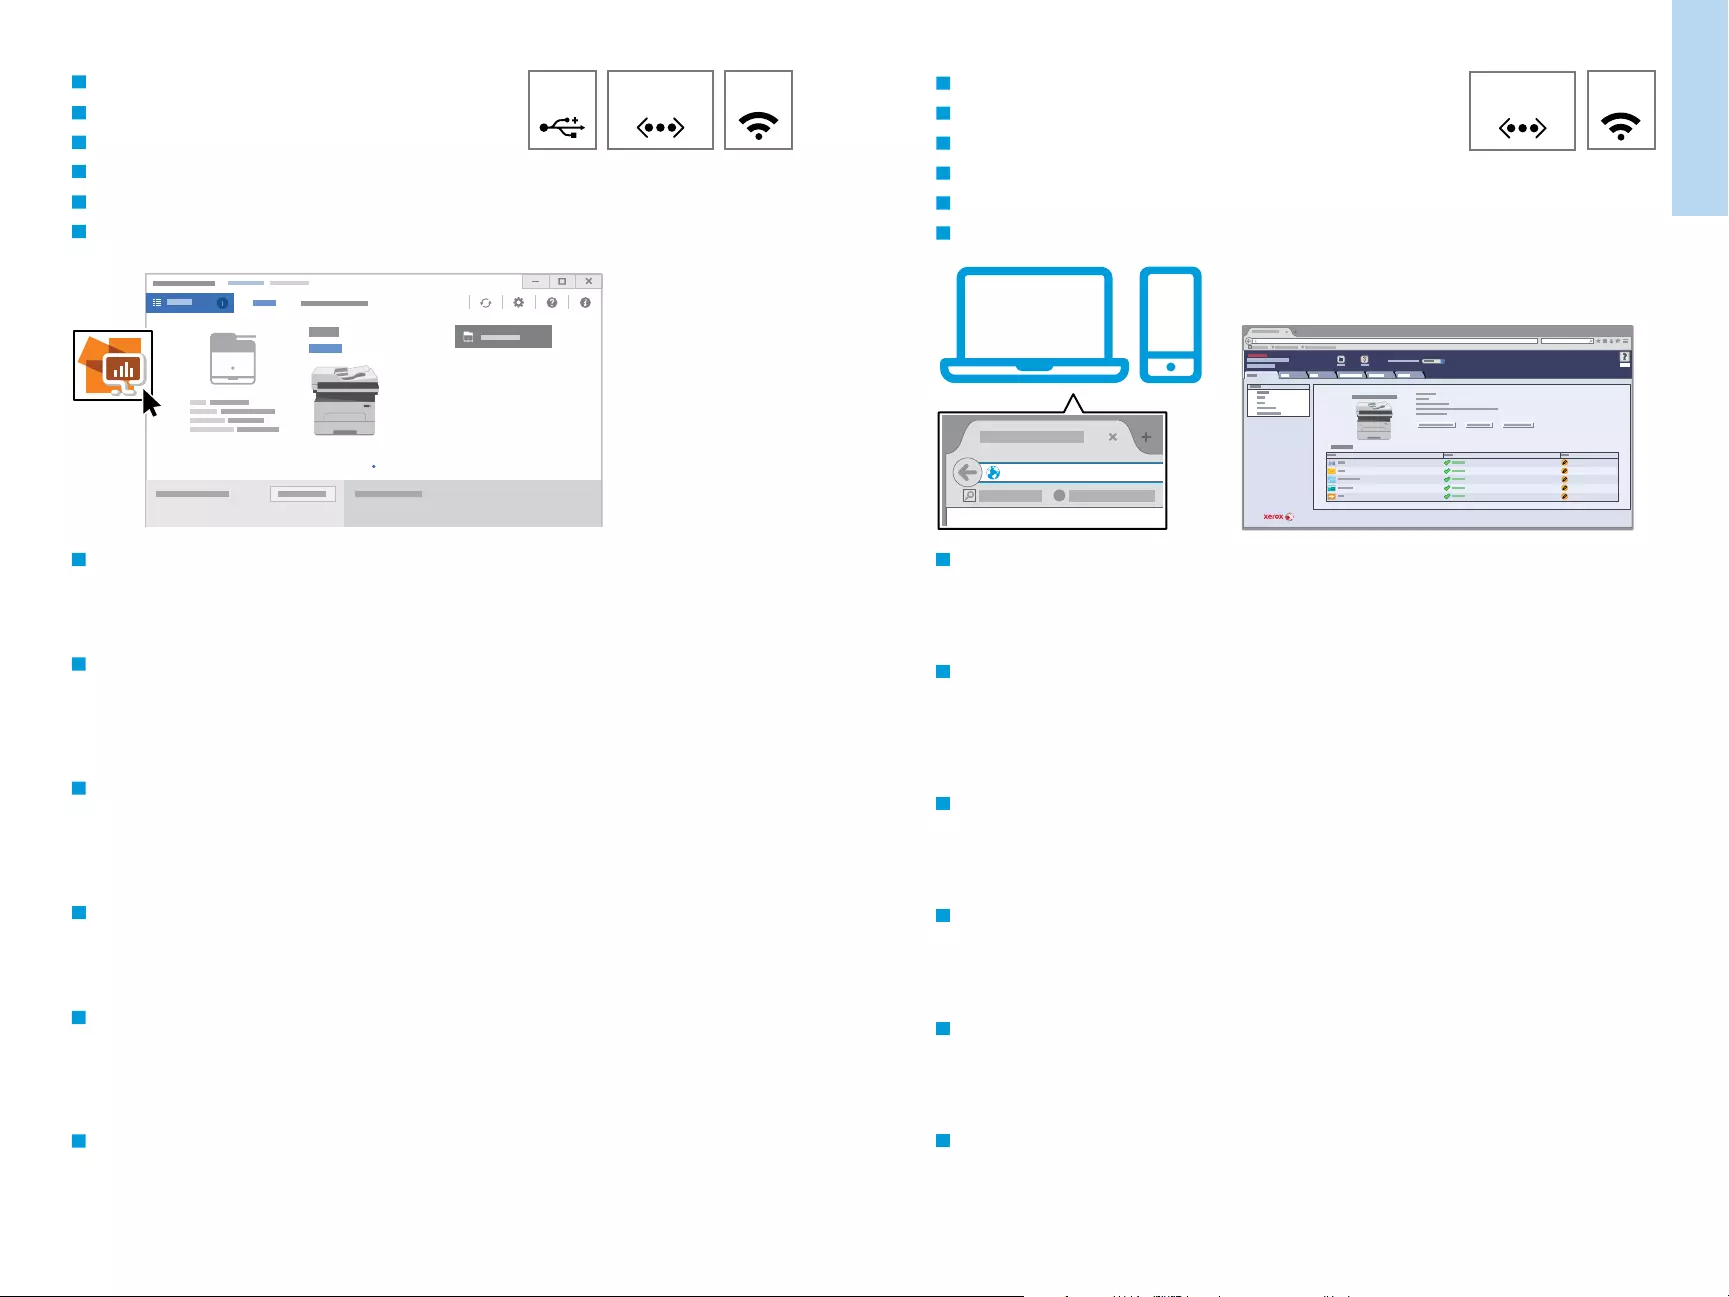
5
www.xerox.com/office/B205support
Printer Basics
Généralités
Ethernet Wi-Fi
EthernetUSB Wi-Fi
http://xxx.xxx.xxx.xxx
??
KWWS[[[[[[[[[[[[
Xerox Easy Printer Manager
Xerox Easy Printer Manager
Xerox Easy Printer Manager
Xerox Easy Printer Manager
Xerox Easy Printer Manager
Xerox Easy Printer Manager
CentreWare Internet Services
Services Internet Xerox CentreWare
CentreWare Internet Services
CentreWare Internet Services
CentreWare Internet Services
CentreWare Internet Services
EN
FR
IT
DE
ES
PT
FR
IT
DE
ES
PT
EN
FR Pour accéder aux paramètres de l’imprimante, aux informations de diagnostic et d’entretien, ainsi qu’au Guide de
l’utilisateur : Dans le menu Démarrer de Windows ou dans le dossier Applications Macintosh, sélectionnez Xerox®
Easy Printer Manager.
IT Accesso alle impostazioni della stampante, alle informazioni di diagnostica e manutenzione e alla Guida per
l’utente: Dal menu Start di Windows o dalla cartella Applicazioni Macintosh, selezionare Xerox® Easy Printer
Manager.
DE Zugang zu Druckereinstellungen, Diagnose- und Wartungsinformationen sowie Benutzerhandbuch: Im
Windows-Startmenü bzw. im Macintosh-Ordner „Anwendungen“ Xerox® Easy Printer Manager auswählen.
ES Para acceder a información sobre configuración, diagnóstico y mantenimiento de la impresora y a la Guía del
usuario: Desde el menú Inicio de Windows o desde la carpeta Aplicaciones de Macintosh, seleccione Xerox® Easy
Printer Manager.
PT Para acessar as informações sobre configurações, diagnóstico e manutenção da impressora, e o Guia do Usuário: A
partir do menu Iniciar do Windows, ou da pasta Aplicações do Macintosh, selecione Xerox® Easy Printer Manager.
EN To access printer settings, diagnostic and maintenance information, and the User Guide: From the Windows Start
menu, or from the Macintosh Applications folder, select Xerox® Easy Printer Manager.
To access printer configuration details, tray defaults, paper and supplies status, job status, and diagnostic functions,
use CentreWare Internet Services over a TCP/IP network. In a Web browser, type the printer IP address that is on the
Configuration page.
EN
Pour accéder aux détails de configuration de l’imprimante, aux défauts du bac, à l’état du papier et des
consommables, à l’état des travaux et aux fonctions de diagnostic, utilisez les Services Internet CentreWare à partir
d’un réseau TCP/IP. Dans un navigateur Web, saisissez l’adresse IP de l’imprimante qui se trouve sur la page
Configuration.
FR
Per accedere ai dettagli di configurazione della stampante, ai valori predefiniti dei vassoi, allo stato della carta e dei
materiali di consumo, allo stato dei lavori e alle funzioni di diagnostica, usare CentreWare Internet Services tramite
una rete TCP/IP. In un browser Web, digitare l’indirizzo IP della stampante nella Pagina di configurazione.
IT
Para acceder a los detalles de la configuración, valores predeterminados de las bandejas, estado de papel y
consumibles, estado del trabajo y funciones de diagnóstico, utilice CentreWare Internet Services a través de una red
TCP/IP. En un navegador web, escriba la dirección IP de la impresora en la página de configuración.
ES
Para acessar os detalhes de configuração da impressora, padrões da bandeja, status de papéis e suprimentos, status
do trabalho e funções de diagnóstico, use o CentreWare Internet Services através da rede TCP/IP. Em um navegador
da Web, digite o endereço IP da impressora que está na Página de configuração.
PT
Für den Zugriff auf die Druckerkonfiguration, die Standardwerte, Papier- und Verbrauchsmaterialstatus,
Auftragsstatus und Diagnosefunktionen CentreWare Internet Services über ein TCP/IP-Netzwerk verwenden. In
einem Webbrowser die auf der Konfigurationsseite angegebene IP-Adresse des Druckers eingeben.
DE
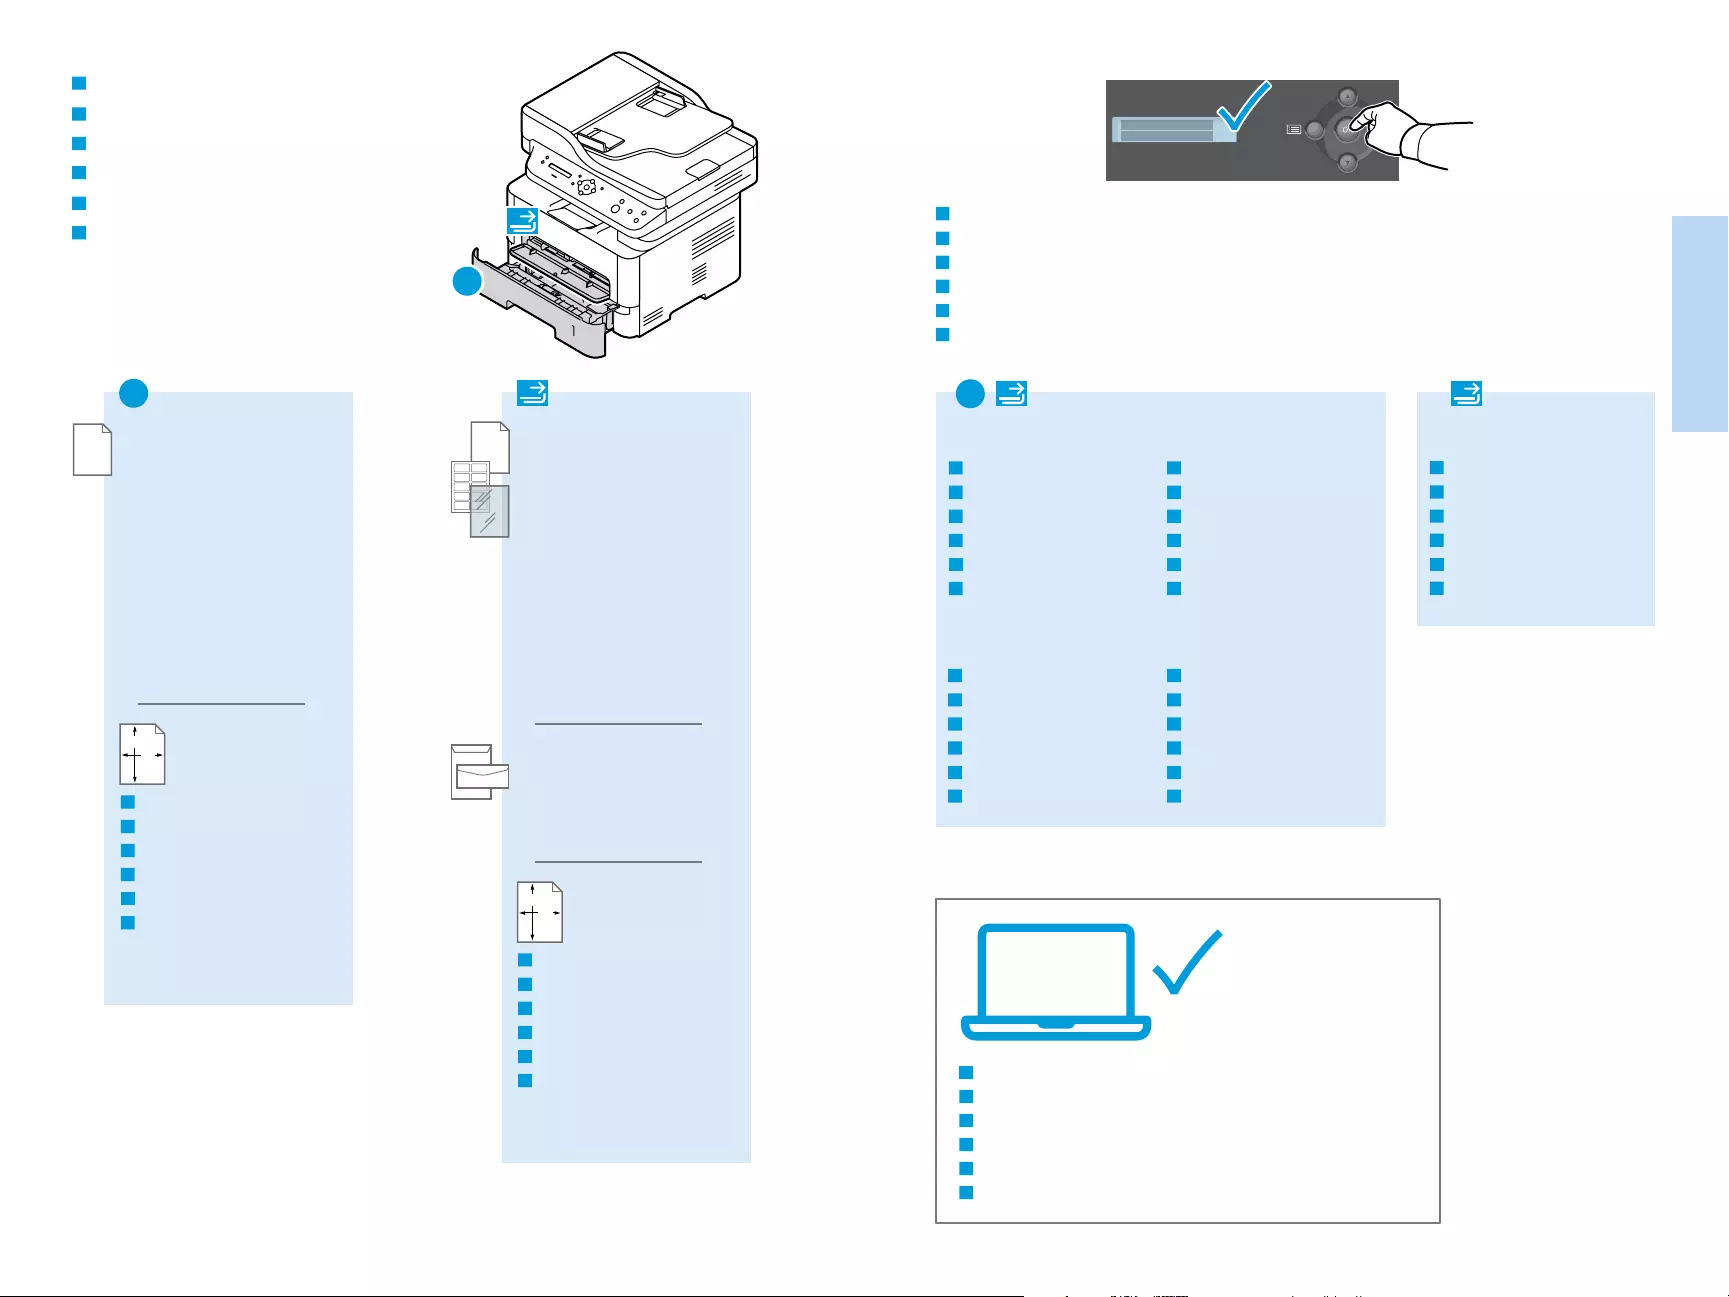
6
www.xerox.com/office/B205support
Printing
Impression
1
60–163 g/m2
(16 lb. Bond–60 lb. Cover)
1
60–220 g/m2
(16 lb. Bond–80 lb. Cover)
Letter……………………….8.5 x 11 in.
Legal………………………..8.5 x 14 in.
Executive…………………7.25 x 10.5 in.
Folio…………………………8.5 x 13 in.
Oficio……………………….8.5 x 13.5 in.
Postcard…………………..4.0 x 6.0 in.
A4…………………………….210 x 297 mm
A5…………………………….148 x 210 mm
A6…………………………….105 x 148 mm
B5 ISO……………………..176 x 250 mm
B5 JIS ………………………182 x 257 mm
Monarch………………….3.9 x 7.5 in.
Commercial No. 10…4.1 x 9.5 in.
DL …………………………….110 x 220 mm
C5 …………………………….162 x 229 mm
C6 …………………………….114 x 162 mm
WW
LL
W: 105–216 mm (4.1–8.5 in.)
L: 148.5–355.5 mm (5.8–14 in.)
WW
LL
W: 76–216 mm (3–8.5 in.)
L: 127–356 mm (5–14 in.)
Letter……………………….8.5 x 11 in.
Legal………………………..8.5 x 14 in.
Executive…………………7.25 x 10.5 in.
Folio…………………………8.5 x 13 in.
Oficio……………………….8.5 x 13.5 in.
A4…………………………….210 x 297 mm
A5…………………………….148 x 210 mm
A6…………………………….105 x 148 mm
B5 ISO……………………..176 x 250 mm
B5 JIS ………………………182 x 257 mm
70–90 g/m2
(20–24 lb. Bond)
164–220 g/m2
(60–80 lb. Cover)
91–105 g/m2
(24–28 lb. Bond)
60–69 g/m2
(16–20 lb. Bond)
106–163 g/m2
(28 lb. Bond–60 lb. cover)
1
Supported Papers
Papiers pris en charge
Carta supportata
Geeignetes Druckmaterial
Papeles admitidos
Papéis suportados When loading paper, from the control panel, select the correct paper type and size.
Lors du chargement du papier à partir du panneau de contrôle, sélectionnez le type et le format de papier corrects.
Quando si carica la carta, selezionare il formato e il tipo di carta corretti dal pannello comandi.
Beim Einlegen von Druckmaterial am Steuerpult die richtige Druckmaterialart und das richtige Format auswählen.
Al cargar papel, seleccione el tipo y tamaño adecuados desde el panel de control.
Ao colocar papel, selecione no painel de controle o tipo e o tamanho corretos do papel.
FR
IT
DE
ES
PT
EN
FR
IT
DE
ES
PT
EN
In the print driver, select the paper size and type.
Dans le pilote d’impression, sélectionnez le format et le type de papier.
Nel driver della stampante, selezionare il formato e il tipo di carta.
Im Druckertreiber Druckmaterialart und -format auswählen.
En el controlador de la impresora, seleccione el tamaño y tipo de papel.
No driver de impressão, selecione o tamanho e o tipo do papel.
EN
FR
IT
DE
ES
PT
Plain
Standard
Normale
Normalpapier
Normal
Comum
Heavyweight
Épais
Carta pesante
Schwer
Cartulina
Alta gramatura
Cardstock
Papier cartonné
Cartoncino
Karton
Tarjetas
Cartão
Lightweight
Léger
Carta leggera
Dünnes Papier
Papel ligero
Baixa gramatura
Thicker
Plus épais
Più spessa
Dicker
Más grueso
Mais grosso
FR
IT
DE
ES
PT
EN
FR
IT
DE
ES
PT
EN
FR
IT
DE
ES
PT
EN
FR
IT
DE
ES
PT
EN
FR
IT
DE
ES
PT
EN
Custom
Personnalisé
Personalizzato
Benutzerdefiniert
Personalizado
Personalizado
Custom
Personnalisé
Personalizzato
Benutzerdefiniert
Personalizado
Personalizado
FR
IT
DE
ES
PT
EN
FR
IT
DE
ES
PT
EN
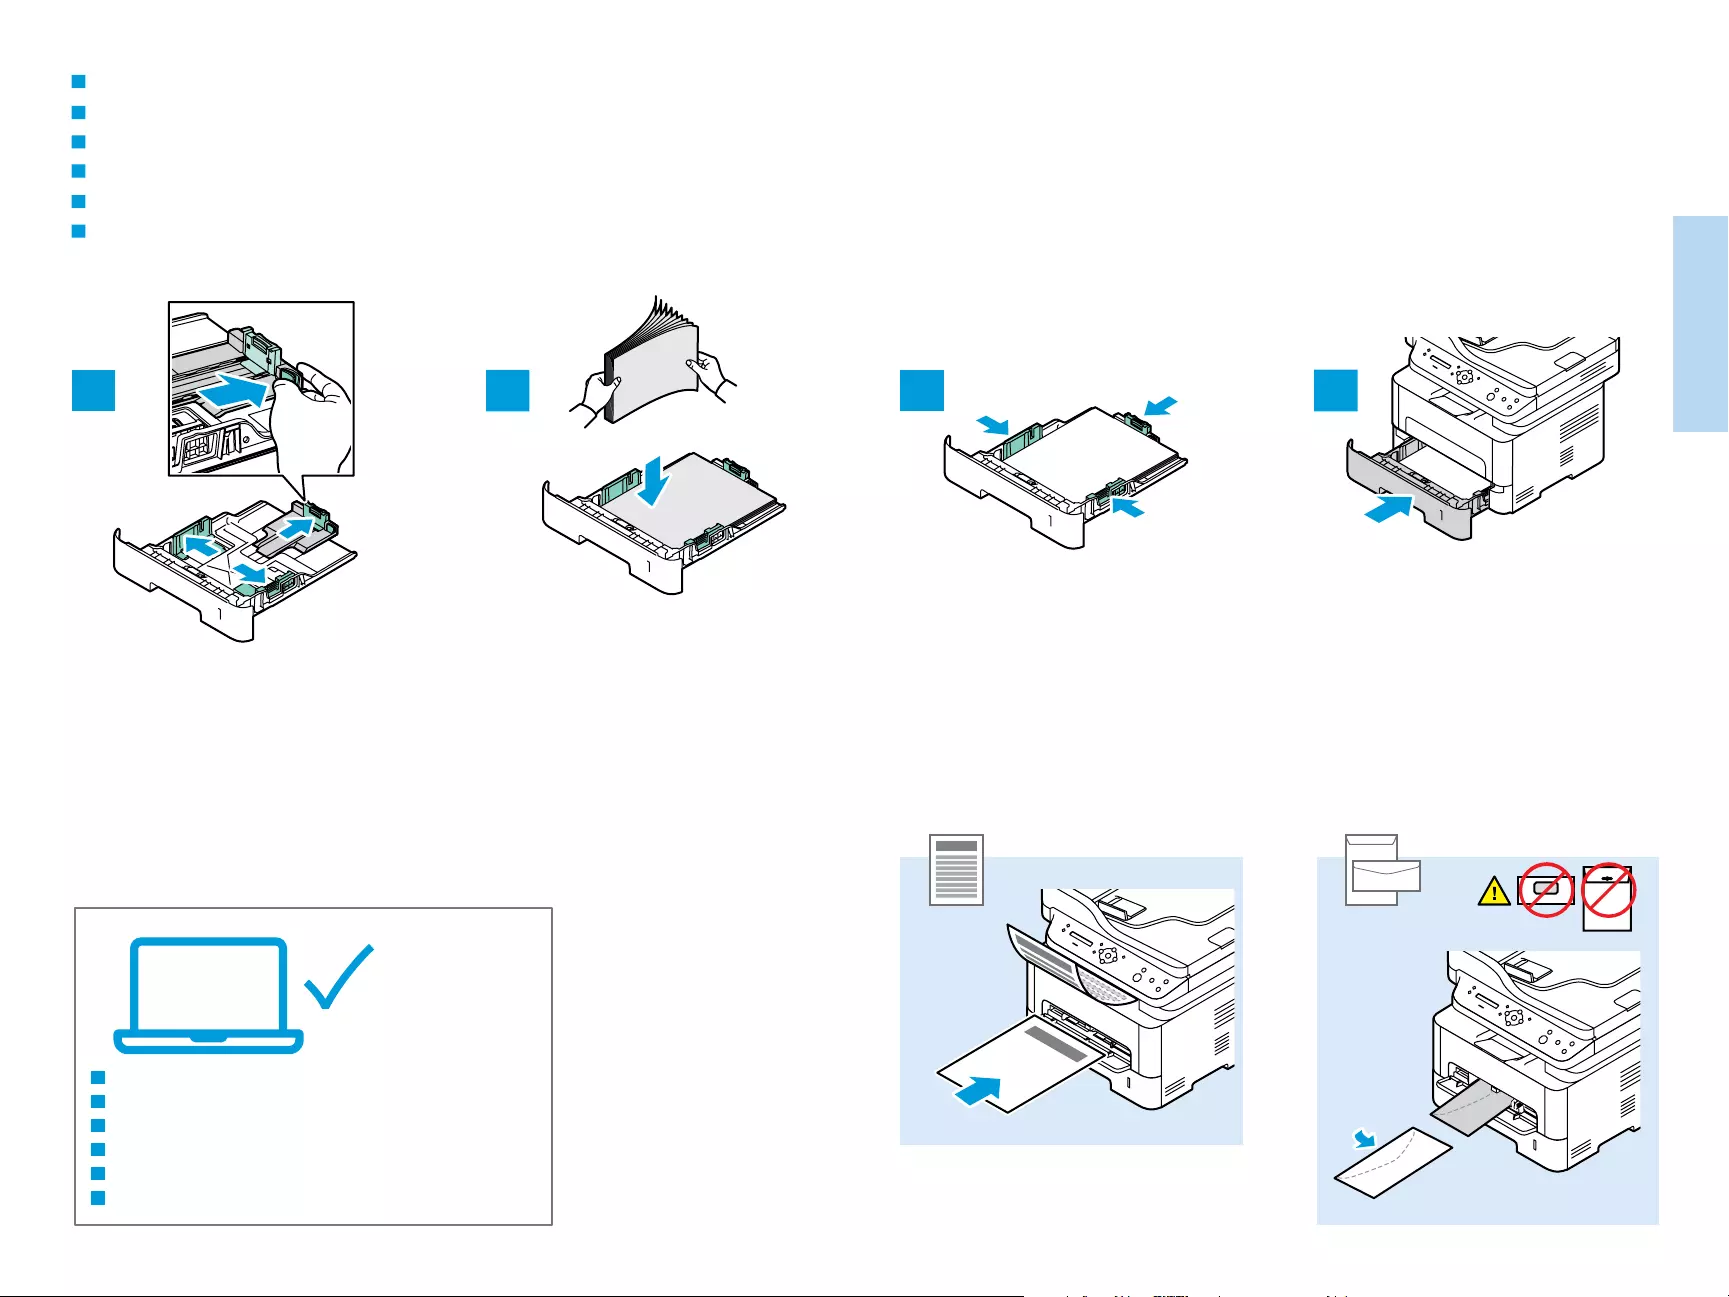
7
www.xerox.com/office/B205support
Printing
Impression
143
2
Basic Printing
Impression de base
Stampa di base
Einfaches Drucken
Impresión básica
Impressão básica
FR
IT
DE
ES
PT
EN
EN
FR
IT
DE
ES
PT
In the print driver, select the paper size and type.
Dans le pilote d’impression, sélectionnez le format et le type de papier.
Nel driver della stampante, selezionare il formato e il tipo di carta.
Im Druckertreiber Druckmaterialart und -format auswählen.
En el controlador de la impresora, seleccione el tamaño y tipo de papel.
No driver de impressão, selecione o tamanho e o tipo do papel.
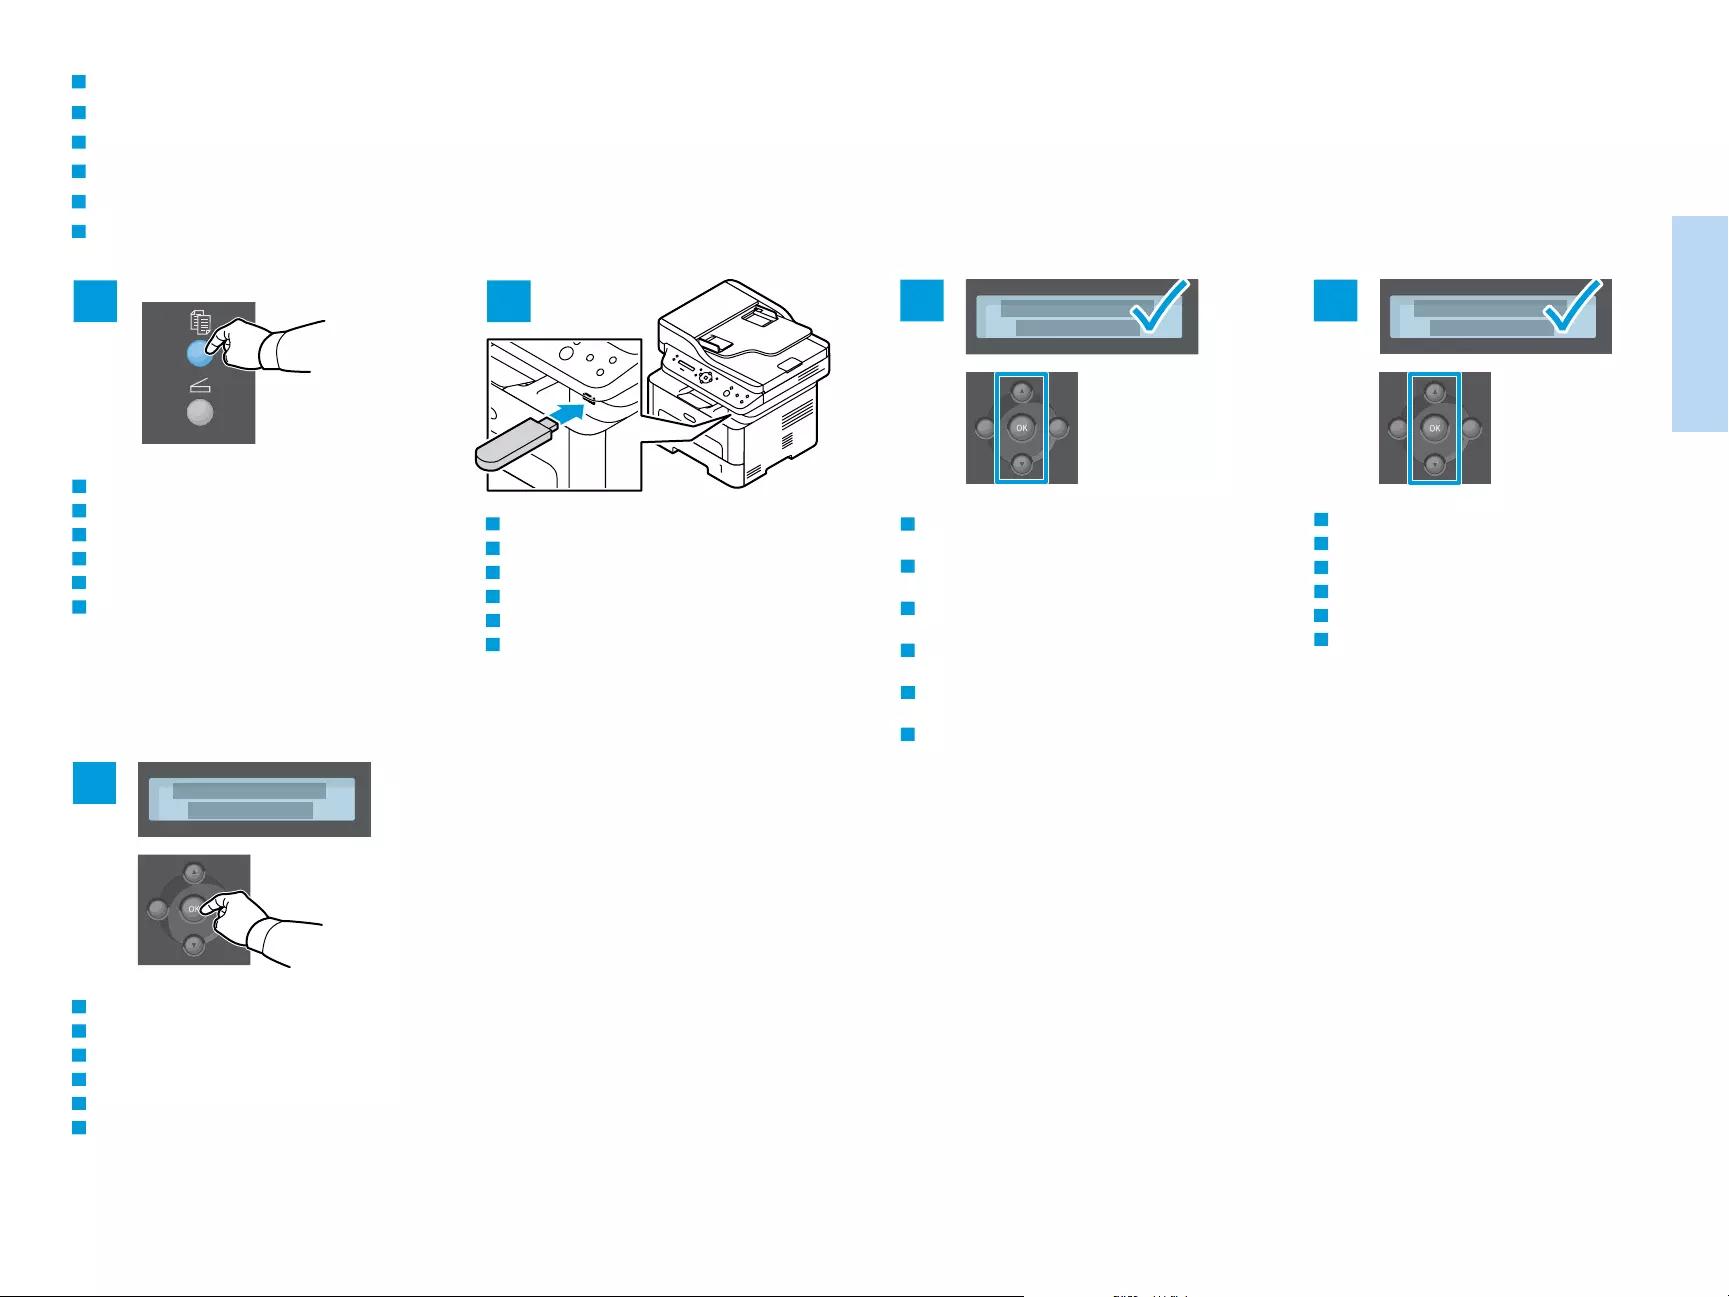
8
www.xerox.com/office/B205support
Printing
Impression
1 2 3
5
4
Printing from a USB Flash Drive
Impression à partir d’un lecteur Flash USB
Stampa da un’unità flash USB
Drucken von einem USB-Flashlaufwerk
Impresión desde unidad Flash USB
Impressão de uma unidade flash USB
Navigate to a file, then press OK. To open a folder,
press OK.
Accédez à un fichier, puis appuyez sur OK. Pour ouvrir
un dossier, appuyez sur OK.
Passare a un file, quindi premere OK. Per aprire una
cartella, premere OK.
Eine Datei ansteuern und OK drücken. Zum Öffnen
eines Ordners OK drücken.
Desplácese hasta un archivo y a continuación pulse
OK. Para abrir una carpeta, pulse OK.
Navegue até um arquivo, e então pressione OK. Para
abrir uma pasta, pressione OK.
Select the number of copies.
Sélectionnez le nombre de copies.
Selezionare il numero di copie.
Auflage auswählen.
Seleccione el número de copias.
Selecione o número de cópias.
To start printing, press OK.
Pour démarrer l’impression, appuyez sur OK.
Per avviare la stampa, premere OK.
Zum Starten des Druckvorgangs OK drücken.
Para comenzar a imprimir, pulse OK.
Para iniciar a impressão, pressione OK.
FR
IT
DE
ES
PT
EN
FR
IT
DE
ES
PT
EN
FR
IT
DE
ES
PT
EN
FR
IT
DE
ES
PT
EN
Press the Copy button.
Appuyez sur le bouton Copier.
Premere il pulsante Copia.
Taste Kopieren drücken.
Pulse el botón Copiar.
Pressione o botão Copiar.
FR
IT
DE
ES
PT
EN
Insert the USB Flash Drive.
Insérez le lecteur USB.
Inserire l’unità flash USB.
USB-Flashlaufwerk an das Gerät anschließen.
Inserte la unidad Flash USB.
Insira a unidade flash USB.
FR
IT
DE
ES
PT
EN

9
www.xerox.com/office/B205support
Copying
Copie
12 3
45
60–105 g/m2
(16–28 lb. Bond)
X: 148–216 mm (5.8–8.5 in.)
Y: 148–356 mm (5.8–14.0 in.)
Y
X
www.xerox.com/office/B205docs
Load the original document.
Mettez en place le document.
Caricare l’originale.
Vorlagen einlegen.
Coloque el documento original.
Coloque o original.
Press the Copy button.
Appuyez sur le bouton Copier.
Premere il pulsante Copia.
Taste Kopieren drücken.
Pulse el botón Copiar.
Pressione o botão Copiar.
Select the number of copies.
Sélectionnez le nombre de copies.
Selezionare il numero di copie.
Auflage auswählen.
Seleccione el número de copias.
Selecione o número de cópias.
To select copying options, navigate the menus.
Accédez aux menus pour sélectionner les options
de copie.
Per selezionare le opzioni di copia, spostarsi
all’interno dei menu.
Die Kopieroptionen über die Menüs auswählen.
Para seleccionar opciones de copia, desplácese
por los menús.
Para selecionar as opções de cópia, navegue
pelos menus.
Refer to: User Guide > Copying
Reportez-vous à : Guide de l’utilisateur > Copie
Consultare: Guida per l’utente > Copia
Siehe: Benutzerhandbuch > Kopieren
Consulte: Guía del usuario > Copia
Consulte: Guia do Usuário > Cópia
Basic Copying
Copie de base
Nozioni di base sulla copiatura
Einfaches Kopieren
Copia básica
Cópia básica
The Clear All button restores default settings.
Le bouton Tout effacer restaure les paramètres
par défaut.
Il pulsante Cancella tutto ripristina le
impostazioni predefinite.
Über die Taste «Alles löschen» werden die
Standardeinstellungen wiederhergestellt.
El botón Borrar todos restaura las opciones
prefijadas.
O botão Limpar tudo restaura as configurações
padrão.
Press the Start button.
Appuyez sur le bouton Démarrer.
Premere il pulsante Avvio.
Taste Start drücken.
Pulse el botón Comenzar.
Pressione o botão Iniciar.
FR
IT
DE
ES
PT
EN
FR
IT
DE
ES
PT
EN
FR
IT
DE
ES
PT
EN
FR
IT
DE
ES
PT
EN
FR
IT
DE
ES
PT
EN
FR
IT
DE
ES
PT
EN
FR
IT
DE
ES
PT
EN
FR
IT
DE
ES
PT
EN

10
www.xerox.com/office/B205support
Scanning
Numérisation
Ethernet
USB Wi-Fi
60–105 g/m2
(16–28 lb. Bond)
X: 142–216 mm (5.8–8.5 in.)
Y: 148–356 mm (5.8–14.0 in.)
Y
X
www.xerox.com/office/B205docs www.xerox.com/office/B205driver
Scanning
Numérisation
Scansione
Scannen
Escaneado
Digitalização
Quando si è connessi tramite USB, Ethernet o Wi-Fi è possibile inviare i file scansiti dal pannello comandi della
stampante a un computer collegato. È anche possibile eseguire la scansione da un computer collegato. Per
impostare la scansione per la connessione, vedere Guida per l’utente > Installazione e impostazione > Impostazione
Scansione su PC. I driver di scansione sono disponibili nel sito Web Xerox.
IT
Avec une connexion USB, Ethernet ou Wi-Fi, vous pouvez envoyer des fichiers numérisés depuis le panneau de
commande de l’imprimante vers un ordinateur connecté. Vous pouvez aussi numériser depuis un ordinateur
connecté. Pour configurer la numérisation pour votre connexion, voir le Guide de l’utilisateur > Installation et
configuration > Configuration de la numérisation vers un PC. Les pilotes de numérisation sont disponibles sur le site
Web de Xerox.
FR
When connected with USB, Ethernet, or Wi-Fi you can send scanned files from the printer control panel to a
connected computer. You can also scan from a connected computer. To set up scanning for your connection, see the
User Guide > Installation and Setup > Scan to PC Setup. Scan drivers are available the Xerox Website.
EN
Bei USB-, Ethernet- oder WiFi-Anschluss können die Scandateien direkt vom Drucker an einen angeschlossenen
Computer gesendet werden. Die Scansteuerung kann auch über einen angeschlossenen Computer erfolgen. Zum
Einrichten der Scanfunktion siehe Benutzerhandbuch > Installation und Einrichtung > Einrichten der Scanausgabe
an PC. Die Scantreiber sind auf der Xerox-Website verfügbar.
DE
Si está conectado mediante USB, Ethernet o Wi-Fi, puede enviar archivos escaneados desde el panel de control de la
impresora a un PC conectado. También puede escanear desde un PC conectado. Para configurar el escaneado para
su conexión, consulte la Guía de usuario > Instalación y configuración >Configuración de Escanear a PC. Los
controladores de escáner están disponibles en el sitio web de Xerox.
ES
Quando conectado com USB, Ethernet ou Wi-Fi, você pode enviar arquivos digitalizados do painel de controle da
impressora ao computador conectado. É possível também digitalizar de um computador conectado. Para configurar
a digitalização para a sua conexão, consulte o Guia do Usuário > Instalação e Configuração > Configuração de
Digitalização para PC. Os drivers de digitalização estão disponíveis no site da Xerox.
PT
FR
IT
DE
ES
PT
EN
Load the original document on the document glass or in the document feeder.
Placez le document sur la glace d’exposition ou dans le chargeur de documents.
Caricare l’originale sulla lastra di esposizione o nell’alimentatore di documenti.
Die Vorlage auf das Vorlagenglas oder in den Vorlageneinzug legen.
Cargue el documento original en el cristal de exposición o en el alimentador de documentos.
Coloque o original sobre o vidro de originais ou no alimentador de originais.
EN
FR
IT
DE
ES
PT
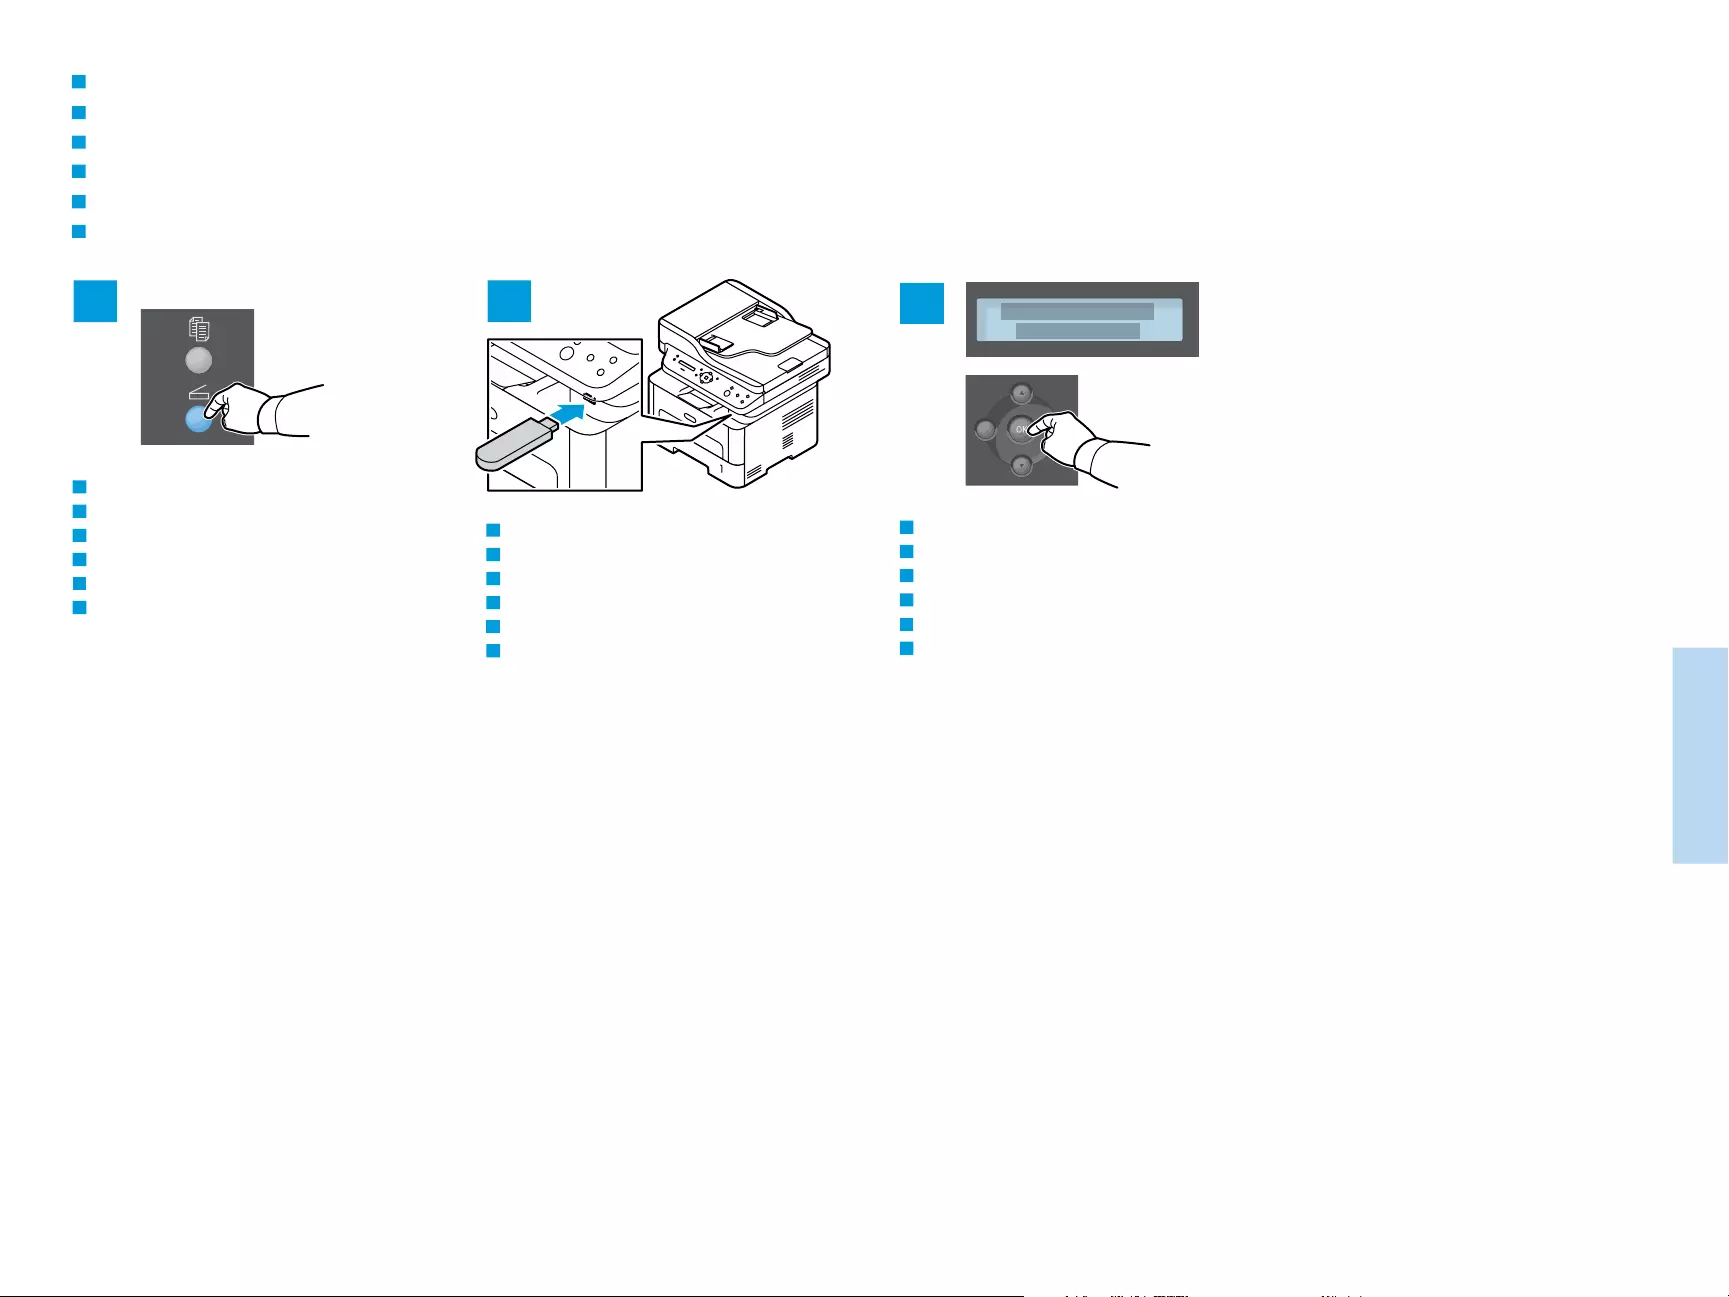
11
www.xerox.com/office/B205support
Scanning
Numérisation
23
1
Scanning to a USB Flash Drive
Numérisation vers une clé USB
Scansione su un’unità flash USB
Scanausgabe: USB
Escaneado a una unidad flash USB
Digitalização para uma unidade flash USB
FR
IT
DE
ES
PT
EN
To start scanning, press OK.
Pour démarrer la numérisation, appuyez sur OK.
Per avviare la scansione, premere OK.
Zum Starten des Scanvorgangs OK drücken.
Para comenzar a escanear, pulse OK.
Para iniciar a digitalização, pressione OK.
FR
IT
DE
ES
PT
EN
Insert the USB Flash Drive.
Insérez le lecteur USB.
Inserire l’unità flash USB.
USB-Flashlaufwerk an das Gerät anschließen.
Inserte la unidad Flash USB.
Insira a unidade flash USB.
FR
IT
DE
ES
PT
EN
Press the Scan button.
Appuyez sur le bouton Numériser.
Premere il pulsante Scansione.
Taste Scannen drücken.
Pulse el botón Escanear.
Pressione o botão Digitalizar.
FR
IT
DE
ES
PT
EN
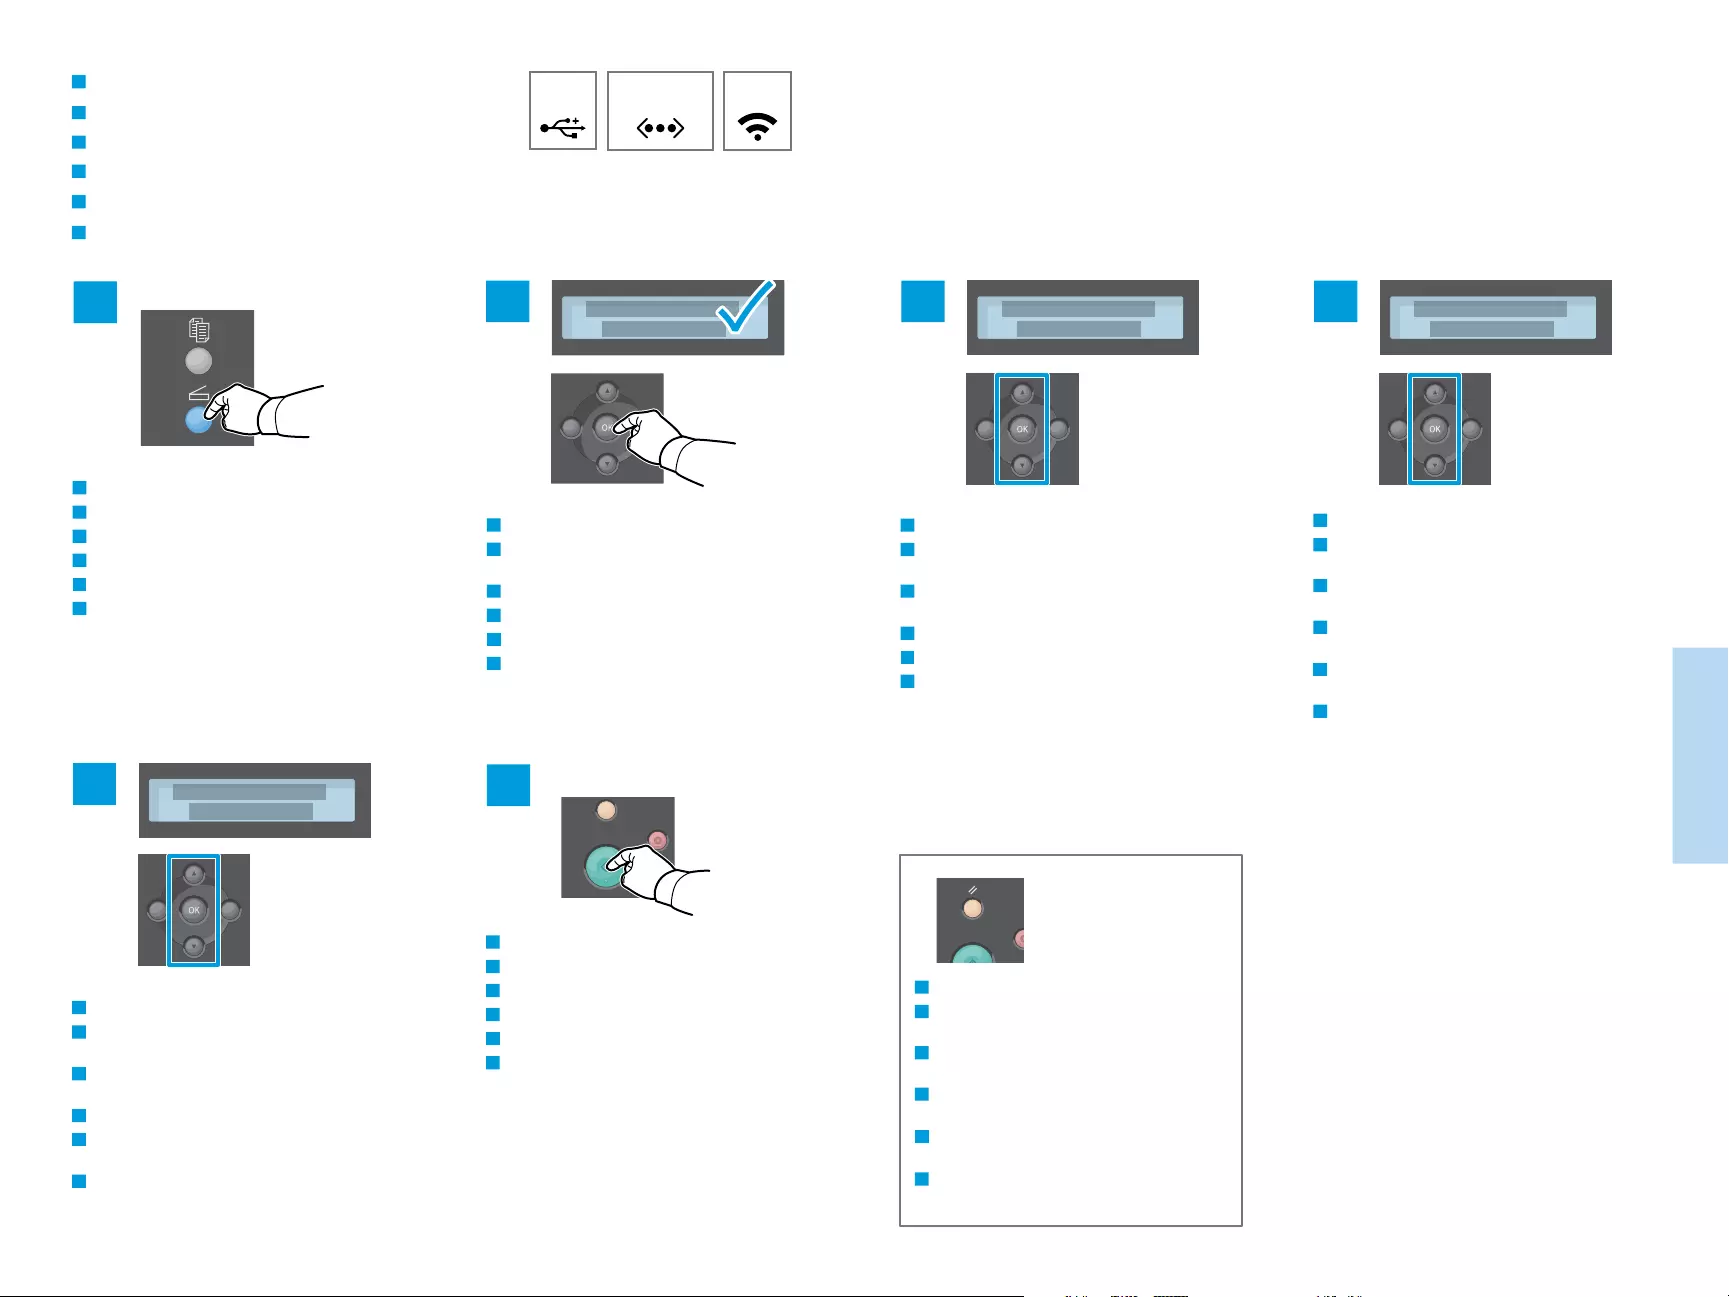
12
www.xerox.com/office/B205support
Scanning
Numérisation
2
6
Wi-Fi
Ethernet
3
5
4
USB
1
Scanning to a Computer
Numérisation vers un ordinateur
Scansione su un computer
Scanausgabe an einen Computer
Escaneado a PC
Digitalização para um computador
Select Scan to PC, then press OK.
Sélectionnez Numérisation vers un PC, puis appuyez
sur OK.
Selezionare Digit. su PC, quindi premere OK.
An PC scannen auswählen, dann OK drücken.
Seleccione Escanear a PC y pulse OK.
Selecione Digitalizar para PC e pressione OK.
Scroll to select a destination, then press OK.
Faites défiler pour sélectionner une destination,
puis appuyez sur OK.
Scorrere per selezionare una destinazione, quindi
premere OK.
Ausgabeziel ansteuern, dann OK drücken.
Desplácese para seleccionar un destino y pulse OK.
Role para selecionar um destino e pressione OK.
Scroll to select a profile if needed, then press OK.
Faites défiler pour sélectionner un profil si
nécessaire, puis appuyez sur OK.
Se necessario, scorrere per selezionare un profilo,
quindi premere OK.
Falls gewünscht, ein Profil auswählen, dann OK
drücken.
Desplácese para seleccionar un perfil si lo necesita
y pulse OK.
Role para selecionar um perfil, se necessário, e
pressione OK.
To select scanning options, navigate the menus.
Accédez aux menus pour sélectionner les options de
numérisation.
Per selezionare le opzioni di scansione, spostarsi
all’interno dei menu.
Die Scanoptionen über die Menüs auswählen.
Para seleccionar opciones de escaneado, desplácese
por los menús.
Para selecionar as opções de digitalização, navegue
pelos menus.
Press the Start button.
Appuyez sur le bouton Démarrer.
Premere il pulsante Avvio.
Taste Start drücken.
Pulse el botón Comenzar.
Pressione o botão Iniciar
The Clear All button restores default settings.
Le bouton Tout effacer restaure les paramètres
par défaut.
Il pulsante Cancella tutto ripristina le
impostazioni predefinite.
Über die Taste «Alles löschen» werden die
Standardeinstellungen wiederhergestellt.
El botón Borrar todos restaura las opciones
prefijadas.
O botão Limpar tudo restaura as configurações
padrão.
FR
IT
DE
ES
PT
EN
FR
IT
DE
ES
PT
EN
FR
IT
DE
ES
PT
EN
FR
IT
DE
ES
PT
EN
FR
IT
DE
ES
PT
EN
FR
IT
DE
ES
PT
EN
FR
IT
DE
ES
PT
EN
Press the Scan button.
Appuyez sur le bouton Numériser.
Premere il pulsante Scansione.
Taste Scannen drücken.
Pulse el botón Escanear.
Pressione o botão Digitalizar.
FR
IT
DE
ES
PT
EN
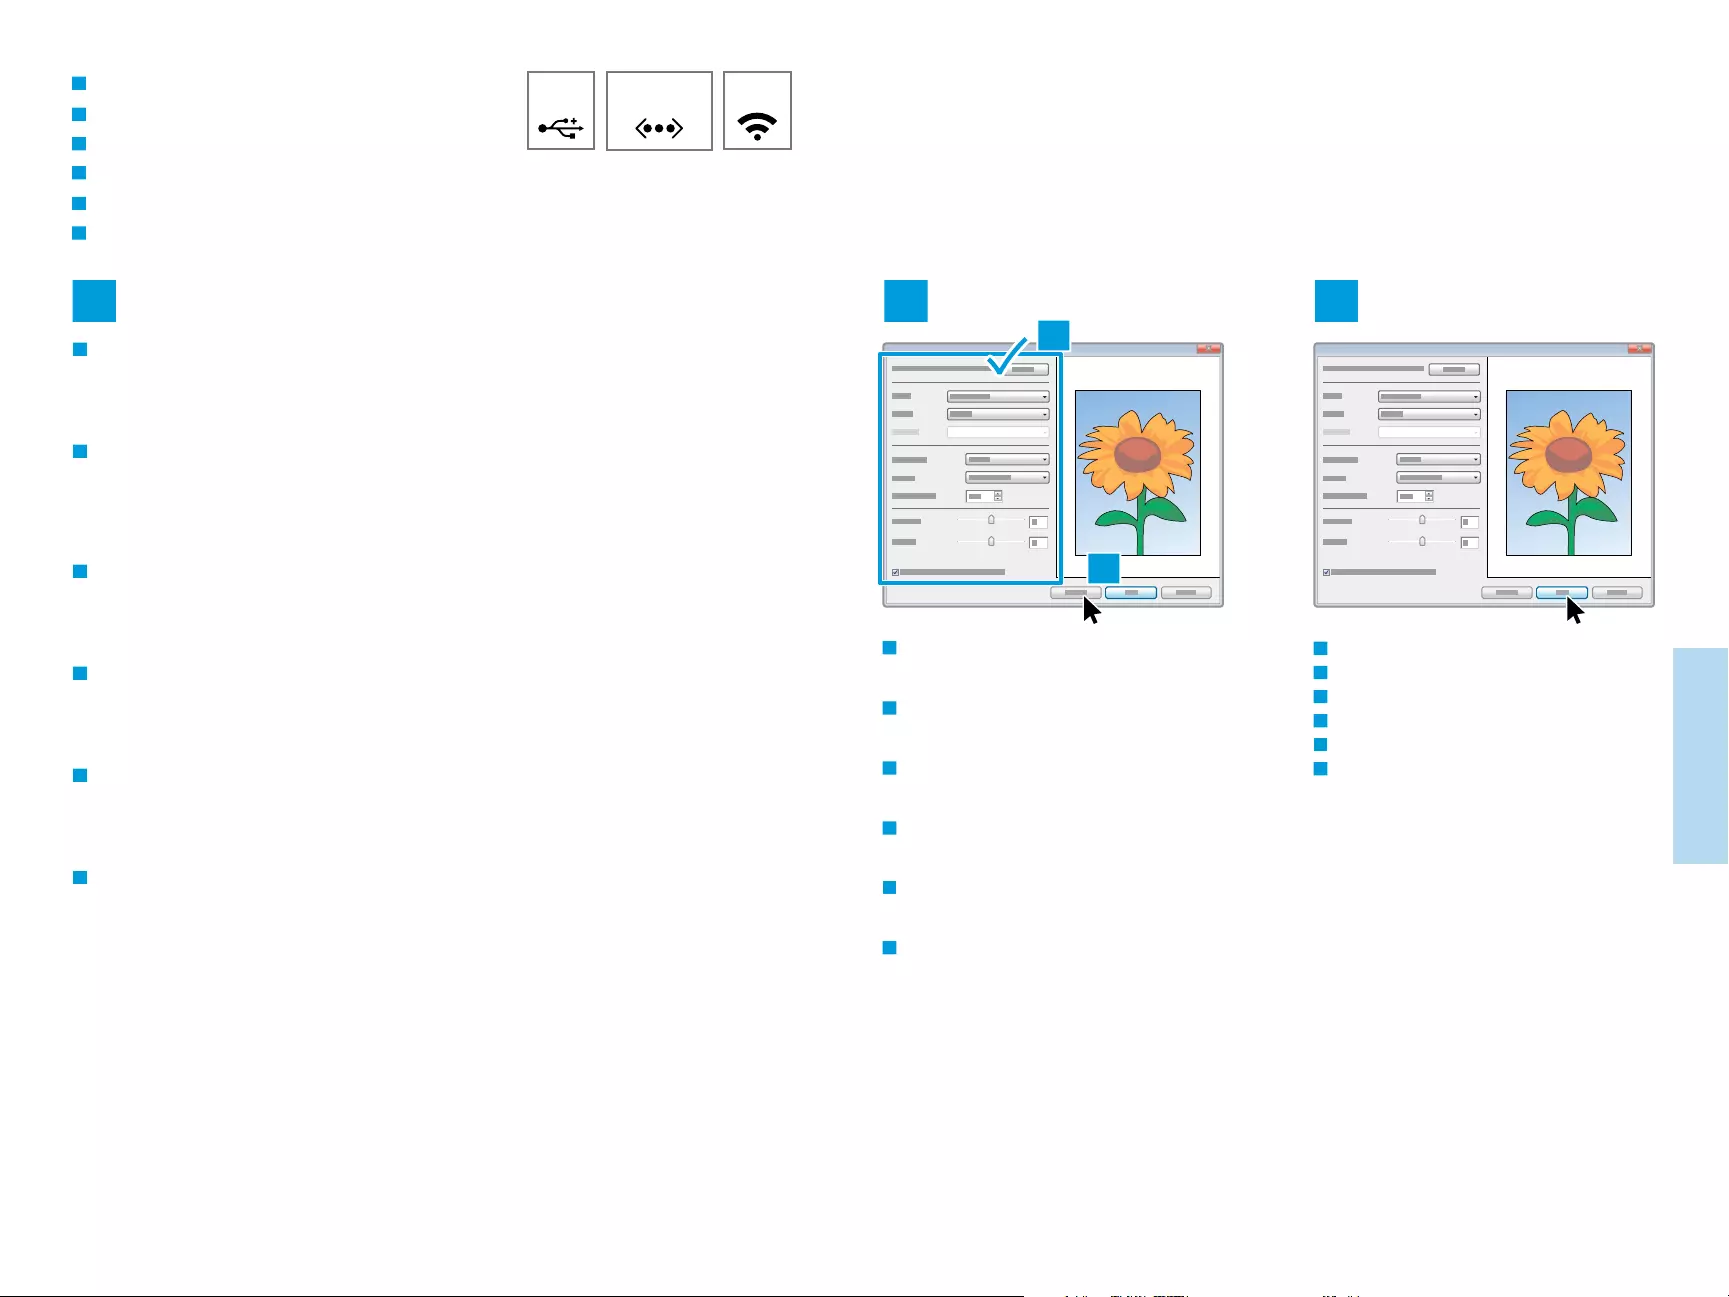
13
www.xerox.com/office/B205support
Scanning
Numérisation
1 2 3
2.1
2.2
Ethernet
USB Wi-Fi
Scanning from a Computer
Numérisation à partir d’un ordinateur
Scansione da un computer
Scannen vom Computer aus
Escaneado desde un ordenador
Digitalização a partir de um computador
On your computer, launch the scan application. From Windows: Select Start > All Programs, then select the scan
application. From Macintosh: Open the Applications folder, then select the Image Capture app, or from System
Preferences, select Printers and Scanners.
Click New Scan or Scan, and confirm the appropriate scanner if required. If detailed settings are hidden, click Show
Details button or similar.
Lancer l’application de numérisation sur votre ordinateur. Sous Windows : Sélectionnez Démarrer > Tous les
programmes, puis sélectionnez l’application de numérisation. Sous Macintosh : Ouvrez le dossier Applications, puis
sélectionnez l’application Capture d’image, ou dans les préférences système, sélectionnez Imprimantes et
appareils de numérisation.
Cliquez sur Nouvelle numérisation ou Numériser, et confirmez l’appareil de numérisation approprié si nécessaire. Si
les détails des paramètres sont masqués, cliquez sur le bouton Afficher les détails ou un bouton semblable.
Dal computer, avviare l’applicazione di scansione. Da Windows: selezionare Start > Tutti i programmi, quindi
selezionare l’applicazione di scansione. Da Macintosh: Aprire la cartella Applicazioni, quindi selezionare l’app
Acquisizione immagini oppure, dalle Preferenze di sistema, selezionare Stampanti e scanner.
Fare clic su Nuova scansione o Scansione e confermare lo scanner da usare, se necessario. Se le impostazioni
dettagliate sono nascoste, fare clic sul pulsante Mostra dettagli o equivalente.
Am Computer die Scananwendung starten. Windows: Start > Programme und dann die Scananwendung auswählen.
Macintosh: Im Ordner „Anwendungen“ die Bilderfassungs-App oder in den Systemeinstellungen Drucker und
Scanner auswählen.
Auf Neuer Scan oder Scannen klicken und ggf. den Scanner bestätigen. Werden die detaillierten Einstellungen nicht
angezeigt, auf Details anzeigen (oder ähnlich lautend) klicken.
En el ordenador, inicie la aplicación de escaneado. En Windows: Seleccione Inicio > Todos los programas y a
continuación seleccione la aplicación de escaneado. En Macintosh: Abra la carpeta Aplicaciones y seleccione la
aplicación Digitalizar imagen, o bien en Preferencias del sistema, seleccione Impresoras y escáneres.
Haga clic en Nuevo escaneado o Escanear y confirme el escáner si es preciso. Si los ajustes detallados están ocultos,
haga clic en el botón Mostrar detalles o similar.
No seu computador, abra o aplicativo de digitalização. No Windows: Selecione Iniciar > Todos os programas, depois
selecione o aplicativo de digitalização. No Macintosh: Abra a pasta Aplicações, depois selecione a aplicação Captura
de Imagem, ou em Preferências do Sistema, selecione Impressoras e Scanners.
Clique em Nova digitalização ou Digitalizar, e confirme o scanner apropriado, se necessário. Se as configurações
detalhadas estiverem ocultas, clique no botão Exibir detalhes ou similar.
Click Scan.
Cliquez sur Numériser.
Fare clic su Digitalizza.
Auf Scannen klicken.
Haga clic en Digitalizar.
Clique em Digitalizar.
FR
IT
DE
ES
PT
EN
FR
IT
DE
PT
ES
To create a preview, from Windows, click Preview.
From a Mac, click Overview. Change settings as
needed.
Pour générer un aperçu sous Windows, cliquez sur
Aperçu. Sous Mac, cliquez sur Présentation. Modifiez
les paramètres selon vos besoins.
Per generare un’anteprima da Windows, fare clic su
Anteprima. Da un Mac, fare clic su Panoramica.
Modificare le impostazioni in base alla necessità.
Zum Erstellen einer Vorschau unter Windows auf
Vorschau klicken. Auf einem Mac auf Übersicht
klicken. Die Einstellungen nach Bedarf ändern.
Para crear una vista previa, en Windows haga clic en
Vista previa. En un Mac, haga clic en Información
general. Cambie la configuración según precise.
Para criar uma visualização, no Windows, clique em
Visualização. No Mac, clique em Visão geral. Altere
as configurações, como necessário.
FR
IT
DE
ES
PT
EN
FR
IT
DE
ES
PT
EN
EN

14
www.xerox.com/office/B205support
Troubleshooting
Dépannage
21 3
21 4 53
21 4
3
5.15.2
www.xerox.com/office/B205docs
Paper Jams
Bourrages papier
Inceppamenti della carta
Papierstaus
Atascos de papel
Atolamentos de papel
Refer to: User Guide > Troubleshooting
Reportez-vous à : Guide de l’utilisateur >
Dépannage
Consultare: Guida per l’utente > Risoluzione dei
problemi
Siehe: Benutzerhandbuch > Problembehandlung
Consulte: Guía del usuario > Solución de
problemas
Consulte: Guia do Usuário > Solução de
problemas
FR
IT
DE
ES
PT
EN
FR
IT
DE
ES
PT
EN