MICRODRAW
USER
MANUAL
Version:
By:
For MicroDraw version 1.07
25 Mar 2012
Torben Dam Jensen
CONTENT
Introduction ……………………………………………………………………………………………… 3
Main Program Window ………………………………………………………………………………. 4
Basic Functions – Quick Overview ………………………………………………………………… 5
Working with Fixed Objects ………………………………………………………………………… 8
Add a Fixed Object ………………………………………………………………………………….. 11
Add a text …………………………………………………………………………………………………………………………. 11
Add a barcode …………………………………………………………………………………………………………………… 12
Add a Logo ……………………………………………………………………………………………………………………….. 14
Working with Variable Objects ………………………………………………………………….. 15
Add a Variable Object ………………………………………………………………………………. 17
Add a Counter …………………………………………………………………………………………………………………… 17
Add a date / time ……………………………………………………………………………………………………………….. 19
Edit Variable Fonts ………………………………………………………………………………….. 22
Program Settings …………………………………………………………………………………….. 24
Layout settings ……………………………………………………………………………………….. 28
Cost calculation ………………………………………………………………………………………. 31
Create new language ………………………………………………………………………………. 32
Support …………………………………………………………………………………………………. 33
Page 3 of 33
MICRODRAW USER MANUAL
Introduction
Welcome to MicroDraw
MicroDraw is the design software for the Micron printer.
Important features:
Multiple Language support
Fully Unicode compatible and support for non-Western characters
Variable Resolution Setting from 50 dpi to 600 dpi
Cost calculation feature included
Both linear and 2D barcodes supported
Please also refer to the following documents
Manual
Micron Quick Guide
Micron User manual
Content
Technician’s guide to setting up this product
Printer user manual.
Page 4 of 33
MICRODRAW USER MANUAL
Main Program Window
1. Main toolbar
Access commands and submenu’s here.
2. Layout window
Place your content here.
3. Settings menu
Change object settings and program settings here. Settings menu changes according to what you are working on.
4. Help window
Help texts are displayed here. The help window is context sensitive.
5. Layout panel
Load/Save layouts here. When not in load/save mode, the object list is shown here.
Page 5 of 33
MICRODRAW USER MANUAL
Basic Functions – Quick Overview
Create a new Layout
To create a new layout, select «new layout» in the upper left corner. You will be asked to save if you have modified the layout.
The Micron memory can contain a layout of approx. 2500 pixel in print direction. This is equal to around
20cm in 300 dpi or 10 cm in 600 dpi. If the following message is displayed, the layout is too wide. Maximum length depends on variable font size and resolution.
At all times a memory bar shows in percentage the load on the Micron.
Page 6 of 33
MICRODRAW USER MANUAL
Load a Layout
To load a layout, select «open» in the tool bar(1). Select a layout from the list (2). A preview will be shown on the canvas (3).Press accept to load the layout (4)
Only one layout can be edited at any time.
Save a Layout
To save the layout, select the red disc button in the toolbar. The layout will be saved under the default filename in the layout menu. For more information, please refer to the chapter «Layout settings».
To save the layout under a different name, select «save as» in the tool bar (1). Enter a name for your layout (2) and press accept to save the layout (3)
If your “Files” directory contains subdirectories, these will be listed in brackets like [subdir].
Page 7 of 33
MICRODRAW USER MANUAL
Transfer to USB for Micron use
Select the USB button to transfer the layout to a USB key.
It is only possible to store ONE layout on the USB key, which is used for temporary data transport to the
Micron.
Before you can save, you must have selected the drive letter for the USB key. Insert the USB key and
use Windows File Explorer to learn drive letter. This is done in settings menu.
To save date and time to a USB, select the USB clock icon. The date/time is written as an absolute
timestamp (+ 5 minutes by default to give you time to update)
Insert the USB in the Micron printer to update date and time on the unit. Please refer to Micron user manual.
Exit the program
Select the exit button to terminate program.
Page 8 of 33
MICRODRAW USER MANUAL
Working with Fixed Objects
Fixed objects are used to create the «static» part of your message
Not changing with every print
Placeable anywhere
Can be stretched and rotated freely
Resize / Rotate / Position
You can resize the object in two ways.
1. Change the width and height in the menu.
2. Select a snap point, hold down the left mouse button and drag.
You can rotate the object in two ways.
1. Enter an angle in the rotation box.
2. Place the cursor over the center snap point, hold down left mouse button and turn.
TEXT objects rotate freely. Other fixed objects rotate in 90 degrees steps.
You can position the text object in two ways.
1. Change the values in the boxes «Left» and «Top»
2. Place the cursor on the object, hold down left mouse button and drag
Page 9 of 33
MICRODRAW USER MANUAL
«Left» is the distance from the left border of the canvas to the object. «Top» is the distance from the top border of canvas to the object.
Delete Object
To delete an object, highlight the object and select the delete button, or press DEL on the keyboard.
Page 10 of 33
MICRODRAW USER MANUAL
Transparency
By default the text is transparent. Uncheck the box «Transparent» in the object panel to make the background white in the text field.
Transparent off
Transparent on
Page 11 of 33
MICRODRAW USER MANUAL
Add a Fixed Object
Add a text
To create a text object, select the text object button in the toolbar (1). Place the cursor on the canvas, left click and drag (2). Change text object settings in the menu on the left (3).
Edit text
Select a font from the drop down menu and adjust font style if necessary.
Next, enter a text string in the content box. You can enter any character or glyph supported by the font.
Page 12 of 33
MICRODRAW USER MANUAL
Add a barcode
To create a barcode object, select the barcode object button in the toolbar (1). Place the cursor on the canvas, left click and drag (2). Change text object settings in the menu on the left (3).
Symbology type
Select a barcode symbology from the drop down menu. MicroDraw allows you to use almost every type of barcode symbology.
Select human readable to show numbers below the barcode. Select a font from the drop down menu and adjust font style if necessary.
Adjust width of side frame and top/bottom frame if necessary.
With some barcode types, composite mode is possible which allows a 2D barcode to be printed on a linear barcode.
Page 13 of 33
MICRODRAW USER MANUAL
Select a composite mode and enter content of the 2D barcode in the box «composite text»
Composite mode must be set to A for EAN8, EAN13, UPCA, UPCE, or GS1 DataBar barcodes,.
Composite mode must be set to C for EAN/UCC-128 barcodes.
Notice that in some cases, you can use special codes in the barcode content.
Known as ESCAPE CODES, these typically are x where “x” is a character.
Example for GS1 structured DataMatrix code
To create a GS1 structured DataMatrix code, enter identifiers and data directly after each other, and put the special escape code F first, and after each variable length data – except the last last.
Thus, the string
F011234567890123717110507
Will encode
(01)12345678901237(17)110517
Finally also make sure that you have selected “GS1” under “Structure”, as GS1 isn’t the only way to encode DataMatrix.
Page 14 of 33
MICRODRAW USER MANUAL
Add a Logo
To create a logo object, select the logo object button in the toolbar (1). Place the cursor on the canvas, left click and drag (2). Change text object settings in the menu on the left (3).
The micron can print 300 dpi in the vertical direction. This means that a picture should be exactly 150
pixel in the height to fit within the printhead (using no resize).
Maximum image size approx 150 x 2400 pixel.
Select logo file
1. Select a graphic file from your harddrive.(*.bmp, *.ico, *.emf, *vmf) HSA systems logo is default.
2. Select «stretch» to resize the logo. If Stretch is unchecked the original size will be kept.
3. Select «mirror» to mirror the image horizontally.
Page 15 of 33
MICRODRAW USER MANUAL
Working with Variable Objects
Variable objects are able to change with every print, depending on settings.
There are two different kinds of variable objects:
Counters, which change every time you release the photo cell
Date/time, which change depending on the time of day. A date/time can be displayed in different formats.
Font
c h o
There are three types of fonts you can use for the variable objects:
T
Top font exists in the upper part of the layout a n g e
Bottom font exists in the lower part of the layout
T o c
Full font exists anywhere in the layout, and does not have to be full height. h
To change font properties, please refer to the chapter «edit fixed fonts».
The variable font sizes are set to default on new layouts you create, but you can change them for each layout.
You can also save change font sizes as new default.
To pick a font for variable objects, select a font from the drop down menu.
Page 16 of 33
MICRODRAW USER MANUAL
Position
You can position the variable horizontally in two ways.
1. Change the values in the box «Left».
2. Place cursor on the object, hold down left mouse button and drag
By default the object is transparent. Uncheck the box «Transparent» to remove the background in the text field.
Page 17 of 33
MICRODRAW USER MANUAL
Add a Variable Object
Add a Counter
To create a counter, select the counter button (1) and click on the canvas (2).
Change counter object settings in the menu on the left (3).
The size of the counter is determined by the font type and the number of digits.
Properties
To setup your counter, select it and adjust the following settings.
Page 18 of 33
MICRODRAW USER MANUAL
Setting
Current
Minimum
Maximum
Digits
Repeat
Step
Direction
Reset on start
Lead-in zeros
What it does
Current counter value
Minimum counter value
Maximum counter value.
Number of digits
Number of times the same value is repeated.
How much counter increments after each sensor signal.
Count min..max (UP) or max..min (DOWN)
This option will reset counter when print mode is activated. If off, the controller will continue until max/min/ reset is performed.
Lead in will be displayed as zeros.
Otherwise spaces.
Restaints
Must be in range
Minimum<= current <= maximum
Must be less than or equal to max
Must be more than or equal to min
Maximum 9
0..255
0..65535
Page 19 of 33
Add a date / time
MICRODRAW USER MANUAL
To create a date stamp, select the date button (1) and click on the canvas (2).
Change text object settings in the menu on the left (3).
Properties
To setup your date stamp, please adjust the following settings
Select a format. Please refer to below table for available format codes. Anything apart from these codes and anything in quotes is output literally.
Example:
“MHD:” yy-mm-dd
prints
MHD: 13-02-15
Without quotes, MHD is interpreted (hour equal to 13):
MHD: yy-mm-dd
prints
21315: 13-02-15
Page 20 of 33
MICRODRAW USER MANUAL
dd d hh h nn n
Format string yyyy yyy yy y mm m
Format string
W w
J j
Meaning
Year (4 digits)
Year (3 digits)
Year (2 digits)
Year (1 digit)
Month (2 digits)
Month (1 digit)
Day (2 digits)
Day (1 digit)
Hour (2 digits)
Hour (1 digit)
Minute (2 digits)
Minute (1 digit)
Meaning
Week (0 lead in)
Week (space lead in)
Day No (0 lead in)
Day No (space lead in)
Example
2009
009
09
9
05
5
09
9
03
3
02
2
Example
02 for week 02
_2 for week 02
001 for first day
__1 for first day
The format codes shown below will display month and weekday. However, unlike the format codes shown above, weekdays and month names will only update when the layout is loaded in MicroDraw and will not update on Micron controller automatically. To update weekdays and months on the unit, upload the layout again
Special cases ddd dddd ddddd mmm mmmm mmmmm
Day name
Month name
Sa
Sat
Saturday
Ma
May
May
Page 21 of 33
MICRODRAW USER MANUAL
Offsets on dates
Enter a number in the appropriate box to offset each element in your time date stamp
The following values are allowed:
Element
Year
Month
Day
Hour
Minute
Offset allowed
+/- 125
+/- 12
+/- 30000
+/- 24
+/- 60
Invalid dates will not be shown. If month offset results in invalid dates (such as 31 Feb), the next valid date will be shown.
Page 22 of 33
MICRODRAW USER MANUAL
Edit Variable Fonts
To change font properties, click the font button in the toolbar (1), select a font in the window to the right(2) and change the settings in the font menu(3)
The illustrations below show the use of a different script for digits.
Other scripts as illustrated are only available if you have fonts with
Unicode support. Typically Arial Unicode MS will have the characters required.
If you don’t have the proper font, selecting other languages will display squares instead of digits.
You can get license free Unicode fonts at gnu.org/software/freefont/
Select a font from the drop down menu (1). Next select a language (2). Characters will be shown if the language is supported by the selected font (3). Adjust font style if needed.
Select Upside/down (1) to display the font upside down (2).
Page 23 of 33
MICRODRAW USER MANUAL
Enter a distance (mm) in the offset box to adjust the vertical position of the font.
…or simply place the cursor on the font, hold down the left mouse button and drag.
Crop the fonts by adjusting the two blue dotted lines. There is one line at the bottom and one at the top of the character field. Place the cursor on the line, hold down the left mouse button and drag
.
… or adjust the distance in the boxes “Cutting (top)” and “Cutting (bottom)”. The cutting is adjusted proportionally when the font size is changed, to reveal same portion of the font.
You can now go back to edit the layout.
If you wish to have the variable font changes be used with next layout you create, click the “Save font” button lower right in screen (bottom of list panel).
Otherwise, the font changes are for this file only.
Page 24 of 33
MICRODRAW USER MANUAL
Program Settings
Select the tool button (1) to change program settings (2).
In this menu, the following settings can be changed:
Language
Change the settings menu language. If your language is not included with MicroDraw you can make a translation of your own. Please refer to the chapter «Make new language file».
Help language
Translate the messages displayed in the help window.
Unit
Select the unit of measure to be displayed on the canvas and in the object settings menus.
Page 25 of 33
MICRODRAW USER MANUAL
Resizable panels
When «Resizable panels» is enabled, panel width can be adjusted. Place the cursor on the panel border, hold down the left mouse button and drag.
Fast drag
With fast drag enabled, you can relocate an object on the canvas without highlighting it first. Just left click on the object and drag.
Auto help
Check «Autohelp» to display help messages in the bottom window.
If unchecked, the last help message will be displayed.
Page 26 of 33
MICRODRAW USER MANUAL
Log level
Select a log level to save program events to a log file.
Currency
Please select the currency sign to be displayed in the cost menu.
Custom character set
Please enter the characters to be used, when you select custom language in the font menu. The first 10 characters are used to replace 0,1,2,…9 in that order. (ABC.. will replace 0=>A, 1=>B etc). Only first 10 positions will be used.
Page 27 of 33
MICRODRAW USER MANUAL
USB drive
Select USB key drive letter. MicroDraw will save the layout at this location when «save to usb» is selected in the main toolbar.
USB time offset
Enter a number of minutes to offset time information saved to USB. This is intended to get a more accurate time on the Micron when the unit and the pc are not in close proximity.
Confirmations
Turn confirmation messages on or off.
Page 28 of 33
MICRODRAW USER MANUAL
Layout settings
Layout settings determine HOW your print will look, and must be corresponding to the physical installation of the controller.
It is not always necessary to change all settings.
Page 29 of 33
MICRODRAW USER MANUAL
Unit
Print direction
Print direction is the travel direction of your media.
Upside Down
Select this if your printer is mounted in a 180 degree rotation, or to print all layout rotated 180 degrees.
Sensor distance
An important part of setting up your system is to measure the distance between the start sensor and the head. This is to ensure the product is printed at the right spot. Remember the value must correspond to the physical setup.
Sensor edge
Set the sensor settings to positive or negative edge, depending on the type of sensor you are using. Refer to installation manual and wiring diagram.
Ink
A dropdown with selection of ink types. These are taken from the text file settings/inks.dat, and help to preselect drop size, voltage and supply size
Pen Voltage and Fire pulse width
These settings can greatly influence the quality of your printout. Please refer to the documentation for your ink.
Print mode
Select encoder if an encoder is installed on your system or velocity if you want to enter the printing speed manually.
Velocity
Please enter your printing speed if «print mode» is set to «velocity»
Encoder resolution
Encoder resolution must be set if «encoder» has been selected under «print mode». Resolution is calculated by dividing the circumference of the measuring wheel by the number of pulses per revolution generated from the encoder.
Spit Interval
Automatically shoot a row on all nozzles every nn miliseconds. If this value is set to 0 then function is disabled
Burst size
The number of rows to fire at every spit interval
Sensor spit active
Automatically shoot a row on all nozzles when the sensor is activated
Sensor spit distance
If sensor spit is ON, how long time after sensor is spit actually activated. In distance — by either fixed speed or encoder.
Page 30 of 33
MICRODRAW USER MANUAL
Spit delay
How long distance to keep the spit active.
Start block distance
The distance from start sensor in which no further start signals can be received. This will prevent unwanted sensor signals.
End block distance
Distance after print in which no further start signals can be received
Layout
Filename
Enter a layout name. This is the default layout name that will be used when you select the «save button».
Length
The length of your layout. Maximum length depends on the size of variable fonts and resolution. As a rule-ofthumb, you have in 300 dpi in 600 dpi approx 20 cm print length approx 10 cm print length
You can see the memory meter display how much you use of the resources available. Smaller fonts means more print length.
The maximum avialable length is 2400 pixel or around 8 inches.
Resolution (Horizontal)
Select a horizontal resolution from the drop down menu.
75×300 dpi
150×300 dpi
300×300 dpi
600×300 dpi
The possible resolution is not limited to the 3 options above. To enter a different resolution, enter a number between 50 and 600.
The maximum speed is affected by selection of horizontal resolution, since the frequency of the printhead remains the same.
75 dpi Max 302 m/min to
600 dpi Max 38 m/min
Resolution (Vertical)
The vertical resolution is created by removing lines from the printed image, in order to save ink costs.
Available options are 300, 225, 200, and 150 DPI (0%, 25%, 33%, 50% ink reduction). Notice that because of print height being just ½», the number of active dots are 150 to 75.
Page 31 of 33
MICRODRAW USER MANUAL
Cost calculation
Select the cost button to enter the cost calculation menu.
The default supply size and drop size are already filled in, these are taken from the ink type in unit settings
You should enter the cost for each supply in your currency. The result will be in the same currency. By default cost is set to arbitrary value of «100» per unit.
MicroDraw will calculate
1. Coverage, based on 300 x 300 dpi canvas
2. Cost/1000 prints
3. Ink supply lifetime
Although the calculations are often close to the actual costs, notice that:
Even the slightest change in font size can greatly influence the consumption of ink.
It is rarely possible to empty an ink cartridge 100%.
Please also notice that the coverage is the same regardless of resolution. The cost of printing is what is changing with resolution.
Ink warning level
Notice setting for «Ink Warning Level». This is the level on which Micron will give an alarm on the hardware output. You can set this level freely, and you can continue production after the alarm. Adjust to your needs, depending on how soon you can change ink versus your production intensity.
Page 32 of 33
MICRODRAW USER MANUAL
Create new language
If your language is not included with MicroDraw, you can make a language file of your own.
The language files are stored in the subdirectory language of the program directory, normally found at c:program filesMicroDrawLanguage
Make a copy of the file English, rename it and open it with a text editor.
Every line in a section is made up by two parts separated by an equal sign. Translate the content on the right hand side, example:
Start position=
开始位置
Save the file when translation is complete. Load the new language file from the program settings (see page
24).
Page 33 of 33
MICRODRAW USER MANUAL
Support
For product support, please contact HSA SYSTEMS Customer Service department
HSA SYSTEMS CUSTOMER SERVICE
Phone: +45 66103401
Email: [email protected]
Низкая цена Принтер этикеток HSAJET MICRON MCHP1 и доставка по городу Москва осуществляется в рабочее время с 9 утра до 18 вечера. Наш магазин располагается по адресу Москва, Большая Никитская улица, 17с2 офис 102 и предлагает покупателю только сертифицированный товар на который распространяется гарантия. Желающим оформить товар в рассрочку, магазин предлагает оформить онлайн кредит без первоначального взноса и переплаты от банка Тинькофф.
Купить Принтер этикеток HSAJET MICRON MCHP1, характеристики которого удовлетворят запросы клиента, а стоимость приятно порадует, покупатель может на оформить на данной странице сайте магазина. Продажа осуществляется по всем действующим законам РФ, а наши опытные менеджеры помогут Вам выбрать дополнительные аксессуары. Кредит оформляется не выходя из дома без предоплаты, а товар доставит клиенту курьер компании. Продажа осуществляется с возможностью возврата или обмена. Так же перед покупкой Вы можете прочитать отзывы реальных клиентов которые уже пользуется данной моделью.
Доставка выбранных товаров осуществляется по всей России. Отправка в регионы осуществляется в рабочие дни.
- Москва ,Московская область — БЕСПЛАТНО.(с 09:00 до 21:00)
Товар можно забрать самостоятельно со склада: г.Москва Большая Никитская улица, 17с2
офис 102
Наш интернет магазин осуществляет отправку купленной у нас оргтехники во все города России. Мы сотрудничаем с транспортными компаниями «Деловые Линии», «Major», «CДЭК», «ПЭК» . Вы можете выбрать любую удобную для Вас транспортную компанию. Стоимость доставки будет рассчитана в зависимости от выбранной Вами транспортной компании.
При отправке товара транспортной компанией возможна доставка:
- до терминала ТК в вашем городе для дальнейшего самостоятельного самовывоза
- по указанному вами адресу в пределах города
Внимание! Если оператор не сможет дозвониться по указанному вами телефону в течение 2-х дней, Ваш заказ будет аннулирован. Поэтому, если по каким-либо причинам в этот период времени вы не сможете принять звонок, пожалуйста, свяжитесь с оператором по электронной почте
Выбранный товар, Вы можете оплатить несколькими способами: наличным и безналичным расчетом.
| Вид оплаты | Документы | |
|---|---|---|
|
Оплата наличными для физических лиц. Оплата наличными производится в рублях при получении заказа у курьера или на пункте самовывоза. За наличный расчёт, мы предоставляем дополнительную скидку на выбранный товар,в случае отказа от бесплатной доставки. |
Скидка 2 % |
Накладная, Счет-фактура |
|
Оплата безналичным расчётом для Юридических лиц. Для оплаты товара по безналичному расчету Вам необходимо выслать реквизиты Вашей компании на нашу электронную почту. Мы отправим Вам коммерческое предложение для ознакомления и согласования. |
Предоплата 100% |
Счет, счет-фактура, накладная (торг 12) |
Порядок резервирования товара
Уважаемые клиенты! Обращаем ваше внимание на порядок и сроки резервирования товара.
Для Физических лиц:
Срок резерва составляет три календарных дня, по истечению которых, товар автоматически снимается с резерва и поступает в свободную продажу (если заказ не был предварительно оплачен).
Для Юридических лиц:
Срок резерва, при выставлении счета юридическому лицу, составляет пять календарных дней, по истечении которых, товар автоматически снимается с резерва.
Мы оставляем за собой право снять товар с резерва, в случае, если отдел продаж или отдел доставки не может с вами связаться в назначенный день отгрузки.
Оплата банковскими картами осуществляется через АО «АЛЬФА-БАНК».

К оплате принимаются карты VISA, MasterCard, Платежная система «Мир».

Услуга оплаты через интернет осуществляется в соответствии с Правилами международных платежных систем Visa, MasterCard и Платежная система «Мир» на принципах соблюдения конфиденциальности и безопасности совершения платежа, для чего используются самые современные методы проверки, шифрования и передачи данных по закрытым каналам связи. Ввод данных банковской карты осуществляется на защищенной платежной странице АО «АЛЬФА-БАНК».
На странице для ввода данных банковской карты потребуется ввести номер карты, имя владельца карты, срок действия карты, трёхзначный код безопасности (CVV2 для VISA или CVC2 для MasterCard). Все необходимые данные пропечатаны на самой карте.
Трёхзначный код безопасности — это три цифры, находящиеся на обратной стороне карты.
Далее вы будете перенаправлены на страницу Вашего банка для ввода 3DSecure кода, который придет к Вам в СМС. Если 3DSecure код к Вам не пришел, то следует обратится в банк выдавший Вам карту.

Случаи отказа в совершении платежа:
- банковская карта не предназначена для совершения платежей через интернет, о чем можно узнать, обратившись в Ваш Банк;
- недостаточно средств для оплаты на банковской карте. Подробнее о наличии средств на банковской карте Вы можете узнать, обратившись в банк, выпустивший банковскую карту;
- данные банковской карты введены неверно;
- истек срок действия банковской карты. Срок действия карты, как правило, указан на лицевой стороне карты (это месяц и год, до которого действительна карта). Подробнее о сроке действия карты Вы можете узнать, обратившись в банк, выпустивший банковскую карту;
Предоставляемая вами персональная информация (имя, адрес, телефон, e-mail, номер банковской карты) является конфиденциальной и не подлежит разглашению. Данные вашей кредитной карты передаются только в зашифрованном виде и не сохраняются на нашем Web-сервере.
Мы находимся по адресу:
Россия, Москва, Большая Никитская улица, 17с2 офис 102 на проходной сказать в компанию Эледен
Режим работы: Будни с 9:00 — 18:00
Приём заказов через корзину: 24 часа / 7 дней в неделю
Памятка покупателю
- Перед покупкой ознакомьтесь с некоторыми условиями продажи:
- В магазинах представлен не весь товар, сделайте резерв или уточните информацию о наличии.
- Самовывоз не осуществляется: телевизоры, диагональю свыше 43 дюймов; товар, вес которого превышает 25 кг; товар, размеры которого превышают 60x60x60 см; товар, один размер которого превышает 100 см. Для таких товаров возможна только доставка!
- При самовывозе при себе необходимо иметь паспорт или водительское удостоверение!

HSAJET MICRON
MICRODRAW USER
MANUAL
Version: 25 Mar 2012 By: Torben Dam Jensen For MicroDraw version 1.07

CONTENT
Introduction ……………………………………………………………………………………………… 3
Main Program Window ………………………………………………………………………………. 4
Basic Functions – Quick Overview ………………………………………………………………… 5
Working with Fixed Objects ………………………………………………………………………… 8
Add a Fixed Object ………………………………………………………………………………….. 11
Add a text …………………………………………………………………………………………………………………………. 11
Add a barcode …………………………………………………………………………………………………………………… 12
Add a Logo ……………………………………………………………………………………………………………………….. 14
Working with Variable Objects ………………………………………………………………….. 15
Add a Variable Object ………………………………………………………………………………. 17
Add a Counter …………………………………………………………………………………………………………………… 17
Add a date / time ……………………………………………………………………………………………………………….. 19
Edit Variable Fonts ………………………………………………………………………………….. 22
Program Settings …………………………………………………………………………………….. 24
Layout settings ……………………………………………………………………………………….. 28
Cost calculation ………………………………………………………………………………………. 31
Create new language ………………………………………………………………………………. 32
Support …………………………………………………………………………………………………. 33

Page 3 of 33 MICRODRAW USER MANUAL
Introduction
Welcome to MicroDraw MicroDraw is the design software for the Micron printer. Important features:
Multiple Language support Fully Unicode compatible and support for non-Western characters Variable Resolution Setting from 50 dpi to 600 dpi Cost calculation feature included Both linear and 2D barcodes supported
Please also refer to the following documents
Manual Content
Micron Quick Guide Technician’s guide to setting up this product Micron User manual Printer user manual.

Page 4 of 33 MICRODRAW USER MANUAL
Main Program Window
1. Main toolbar Access commands and submenu’s here.
2. Layout window Place your content here.
3. Settings menu Change object settings and program settings here. Settings menu changes according to what you are working on.
4. Help window Help texts are displayed here. The help window is context sensitive.
5. Layout panel Load/Save layouts here. When not in load/save mode, the object list is shown here.

Page 5 of 33 MICRODRAW USER MANUAL
Basic Functions – Quick Overview
Create a new Layout
To create a new layout, select «new layout» in the upper left corner. You will be asked to save if you have modified the layout.
The Micron memory can contain a layout of approx. 2500 pixel in print direction. This is equal to around 20cm in 300 dpi or 10 cm in 600 dpi. If the following message is displayed, the layout is too wide. Maximum length depends on variable font size and resolution. At all times a memory bar shows in percentage the load on the Micron.

Page 6 of 33 MICRODRAW USER MANUAL
Load a Layout
To load a layout, select «open» in the tool bar(1). Select a layout from the list (2). A preview will be shown on the canvas (3).Press accept to load the layout (4) Only one layout can be edited at any time.
Save a Layout
To save the layout, select the red disc button in the toolbar. The layout will be saved under the default filename in the layout menu. For more information, please refer to the chapter «Layout settings».
To save the layout under a different name, select «save as» in the tool bar (1). Enter a name for your layout (2) and press accept to save the layout (3) If your “Files” directory contains subdirectories, these will be listed in brackets like [subdir].

Page 7 of 33 MICRODRAW USER MANUAL
Transfer to USB for Micron use
Select the USB button to transfer the layout to a USB key. It is only possible to store ONE layout on the USB key, which is used for temporary data transport to the Micron. Before you can save, you must have selected the drive letter for the USB key. Insert the USB key and use Windows File Explorer to learn drive letter. This is done in settings menu.
To save date and time to a USB, select the USB clock icon. The date/time is written as an absolute timestamp (+ 5 minutes by default to give you time to update) Insert the USB in the Micron printer to update date and time on the unit. Please refer to Micron user manual.
Exit the program
Select the exit button to terminate program.

Page 8 of 33 MICRODRAW USER MANUAL
Working with Fixed Objects
Fixed objects are used to create the «static» part of your message Not changing with every print Placeable anywhere Can be stretched and rotated freely
Resize / Rotate / Position
You can resize the object in two ways. 1. Change the width and height in the menu. 2. Select a snap point, hold down the left mouse button and drag.
You can rotate the object in two ways. 1. Enter an angle in the rotation box. 2. Place the cursor over the center snap point, hold down left mouse button and turn. TEXT objects rotate freely. Other fixed objects rotate in 90 degrees steps.
You can position the text object in two ways. 1. Change the values in the boxes «Left» and «Top» 2. Place the cursor on the object, hold down left mouse button and drag

Page 9 of 33 MICRODRAW USER MANUAL
«Left» is the distance from the left border of the canvas to the object. «Top» is the distance from the top border of canvas to the object.
Delete Object
To delete an object, highlight the object and select the delete button, or press DEL on the keyboard.

Page 10 of 33 MICRODRAW USER MANUAL
Transparency
By default the text is transparent. Uncheck the box «Transparent» in the object panel to make the background white in the text field.
Transparent off
Transparent on

Page 11 of 33 MICRODRAW USER MANUAL
Add a Fixed Object
Add a text
To create a text object, select the text object button in the toolbar (1). Place the cursor on the canvas, left click and drag (2). Change text object settings in the menu on the left (3).
Edit text
Select a font from the drop down menu and adjust font style if necessary.
Next, enter a text string in the content box. You can enter any character or glyph supported by the font.

Page 12 of 33 MICRODRAW USER MANUAL
Add a barcode
To create a barcode object, select the barcode object button in the toolbar (1). Place the cursor on the canvas, left click and drag (2). Change text object settings in the menu on the left (3).
Symbology type
Select a barcode symbology from the drop down menu. MicroDraw allows you to use almost every type of barcode symbology.
Select human readable to show numbers below the barcode. Select a font from the drop down menu and adjust font style if necessary.
Adjust width of side frame and top/bottom frame if necessary.
With some barcode types, composite mode is possible which allows a 2D barcode to be printed on a linear barcode.

Page 13 of 33 MICRODRAW USER MANUAL
Select a composite mode and enter content of the 2D barcode in the box «composite text»
Composite mode must be set to A for EAN8, EAN13, UPCA, UPCE, or GS1 DataBar barcodes,. Composite mode must be set to C for EAN/UCC-128 barcodes.
Notice that in some cases, you can use special codes in the barcode content. Known as ESCAPE CODES, these typically are x where “x” is a character. Example for GS1 structured DataMatrix code To create a GS1 structured DataMatrix code, enter identifiers and data directly after each other, and put the special escape code F first, and after each variable length data – except the last last. Thus, the string F011234567890123717110507 Will encode (01)12345678901237(17)110517 Finally also make sure that you have selected “GS1” under “Structure”, as GS1 isn’t the only way to encode DataMatrix.

Page 14 of 33 MICRODRAW USER MANUAL
Add a Logo
To create a logo object, select the logo object button in the toolbar (1). Place the cursor on the canvas, left click and drag (2). Change text object settings in the menu on the left (3). The micron can print 300 dpi in the vertical direction. This means that a picture should be exactly 150 pixel in the height to fit within the printhead (using no resize).
Maximum image size approx 150 x 2400 pixel.
Select logo file
1. Select a graphic file from your harddrive.(*.bmp, *.ico, *.emf, *vmf) HSA systems logo is default.
2. Select «stretch» to resize the logo. If Stretch is unchecked the original size will be kept.
3. Select «mirror» to mirror the image horizontally.

Page 15 of 33 MICRODRAW USER MANUAL
Working with Variable Objects
Variable objects are able to change with every print, depending on settings. There are two different kinds of variable objects: Counters, which change every time you release the photo cell Date/time, which change depending on the time of day. A date/time can
be displayed in different formats.
Font
There are three types of fonts you can use for the variable objects: To changeTo ch To change font properties, please refer to the chapter «edit fixed fonts». The variable font sizes are set to default on new layouts you create, but you can change them for each layout. You can also save change font sizes as new default. To pick a font for variable objects, select a font from the drop down menu.
Top font exists in the upper part of the layout
Bottom font exists in the lower part of the layout
Full font exists anywhere in the layout, and does not have to be full height.

Page 16 of 33 MICRODRAW USER MANUAL
Position
You can position the variable horizontally in two ways. 1. Change the values in the box «Left». 2. Place cursor on the object, hold down left mouse button and drag
By default the object is transparent. Uncheck the box «Transparent» to remove the background in the text field.

Page 17 of 33 MICRODRAW USER MANUAL
Add a Variable Object
Add a Counter
To create a counter, select the counter button (1) and click on the canvas (2). Change counter object settings in the menu on the left (3). The size of the counter is determined by the font type and the number of digits.
Properties
To setup your counter, select it and adjust the following settings.

Page 18 of 33 MICRODRAW USER MANUAL
Setting What it does Restaints
Current Current counter value Must be in range Minimum<= current <= maximum
Minimum Minimum counter value Must be less than or equal to max Maximum Maximum counter value. Must be more than or equal to min Digits Number of digits Maximum 9
Repeat Number of times the same value is repeated. 0..255
Step How much counter increments after each sensor signal.
0..65535
Direction Count min..max (UP) or max..min (DOWN)
Reset on start
This option will reset counter when print mode is activated. If off, the controller will continue until max/min/ reset is performed.
Lead-in zeros Lead in will be displayed as zeros. Otherwise spaces.

Page 19 of 33 MICRODRAW USER MANUAL
Add a date / time
To create a date stamp, select the date button (1) and click on the canvas (2). Change text object settings in the menu on the left (3).
Properties
To setup your date stamp, please adjust the following settings
Select a format. Please refer to below table for available format codes. Anything apart from these codes and anything in quotes is output literally. Example:
“MHD:” yy-mm-dd prints MHD: 13-02-15 Without quotes, MHD is interpreted (hour equal to 13):
MHD: yy-mm-dd prints 21315: 13-02-15

Page 20 of 33 MICRODRAW USER MANUAL
Format string Meaning Example yyyy Year (4 digits) 2009 yyy Year (3 digits) 009 yy Year (2 digits) 09 y Year (1 digit) 9 mm Month (2 digits) 05 m Month (1 digit) 5 dd Day (2 digits) 09 d Day (1 digit) 9 hh Hour (2 digits) 03 h Hour (1 digit) 3 nn Minute (2 digits) 02 n Minute (1 digit) 2
Format string Meaning Example W Week (0 lead in) 02 for week 02 w Week (space lead in) _2 for week 02 J Day No (0 lead in) 001 for first day j Day No (space lead in) __1 for first day
The format codes shown below will display month and weekday. However, unlike the format codes shown above, weekdays and month names will only update when the layout is loaded in MicroDraw and will not update on Micron controller automatically. To update weekdays and months on the unit, upload the layout again
Special cases ddd dddd ddddd
Day name Sa Sat Saturday
mmm mmmm mmmmm
Month name Ma May May

Page 21 of 33 MICRODRAW USER MANUAL
Offsets on dates
Enter a number in the appropriate box to offset each element in your time date stamp
The following values are allowed:
Element Offset allowed Year +/- 125 Month +/- 12 Day +/- 30000 Hour +/- 24 Minute +/- 60
Invalid dates will not be shown. If month offset results in invalid dates (such as 31 Feb), the next valid date will be shown.

Page 22 of 33 MICRODRAW USER MANUAL
Edit Variable Fonts
To change font properties, click the font button in the toolbar (1), select a font in the window to the right(2) and change the settings in the font menu(3)
The illustrations below show the use of a different script for digits. Other scripts as illustrated are only available if you have fonts with Unicode support. Typically Arial Unicode MS will have the characters required. If you don’t have the proper font, selecting other languages will display squares instead of digits. You can get license free Unicode fonts at gnu.org/software/freefont/
Select a font from the drop down menu (1). Next select a language (2). Characters will be shown if the language is supported by the selected font (3). Adjust font style if needed.
Select Upside/down (1) to display the font upside down (2).

Page 23 of 33 MICRODRAW USER MANUAL
Enter a distance (mm) in the offset box to adjust the vertical position of the font.
…or simply place the cursor on the font, hold down the left mouse button and drag.
Crop the fonts by adjusting the two blue dotted lines. There is one line at the bottom and one at the top of the character field. Place the cursor on the line, hold down the left mouse button and drag.
… or adjust the distance in the boxes “Cutting (top)” and “Cutting (bottom)”. The cutting is adjusted proportionally when the font size is changed, to reveal same portion of the font. You can now go back to edit the layout.
If you wish to have the variable font changes be used with next layout you create, click the “Save font” button lower right in screen (bottom of list panel). Otherwise, the font changes are for this file only.

Page 24 of 33 MICRODRAW USER MANUAL
Program Settings
Select the tool button (1) to change program settings (2). In this menu, the following settings can be changed:
Language Change the settings menu language. If your language is not included with MicroDraw you can make a translation of your own. Please refer to the chapter «Make new language file».
Help language Translate the messages displayed in the help window.
Unit Select the unit of measure to be displayed on the canvas and in the object settings menus.

Page 25 of 33 MICRODRAW USER MANUAL
Resizable panels When «Resizable panels» is enabled, panel width can be adjusted. Place the cursor on the panel border, hold down the left mouse button and drag.
Fast drag With fast drag enabled, you can relocate an object on the canvas without highlighting it first. Just left click on the object and drag.
Auto help Check «Autohelp» to display help messages in the bottom window. If unchecked, the last help message will be displayed.

Page 26 of 33 MICRODRAW USER MANUAL
Log level Select a log level to save program events to a log file.
Currency Please select the currency sign to be displayed in the cost menu.
Custom character set Please enter the characters to be used, when you select custom language in the font menu. The first 10 characters are used to replace 0,1,2,…9 in that order. (ABC.. will replace 0=>A, 1=>B etc). Only first 10 positions will be used.

Page 27 of 33 MICRODRAW USER MANUAL
USB drive Select USB key drive letter. MicroDraw will save the layout at this location when «save to usb» is selected in the main toolbar.
USB time offset Enter a number of minutes to offset time information saved to USB. This is intended to get a more accurate time on the Micron when the unit and the pc are not in close proximity.
Confirmations Turn confirmation messages on or off.

Page 28 of 33 MICRODRAW USER MANUAL
Layout settings
Layout settings determine HOW your print will look, and must be corresponding to the physical installation of the controller. It is not always necessary to change all settings.

Page 29 of 33 MICRODRAW USER MANUAL
Unit
Print direction Print direction is the travel direction of your media.
Upside Down Select this if your printer is mounted in a 180 degree rotation, or to print all layout rotated 180 degrees.
Sensor distance An important part of setting up your system is to measure the distance between the start sensor and the head. This is to ensure the product is printed at the right spot. Remember the value must correspond to the physical setup.
Sensor edge Set the sensor settings to positive or negative edge, depending on the type of sensor you are using. Refer to installation manual and wiring diagram.
Ink A dropdown with selection of ink types. These are taken from the text file settings/inks.dat, and help to pre-select drop size, voltage and supply size
Pen Voltage and Fire pulse width These settings can greatly influence the quality of your printout. Please refer to the documentation for your ink.
Print mode Select encoder if an encoder is installed on your system or velocity if you want to enter the printing speed manually.
Velocity Please enter your printing speed if «print mode» is set to «velocity»
Encoder resolution Encoder resolution must be set if «encoder» has been selected under «print mode». Resolution is calculated by dividing the circumference of the measuring wheel by the number of pulses per revolution generated from the encoder.
Spit Interval Automatically shoot a row on all nozzles every nn miliseconds. If this value is set to 0 then function is disabled
Burst size The number of rows to fire at every spit interval
Sensor spit active Automatically shoot a row on all nozzles when the sensor is activated
Sensor spit distance If sensor spit is ON, how long time after sensor is spit actually activated. In distance — by either fixed speed or encoder.

Page 30 of 33 MICRODRAW USER MANUAL
Spit delay How long distance to keep the spit active.
Start block distance The distance from start sensor in which no further start signals can be received. This will prevent unwanted sensor signals.
End block distance Distance after print in which no further start signals can be received
Layout
Filename Enter a layout name. This is the default layout name that will be used when you select the «save button».
Length The length of your layout. Maximum length depends on the size of variable fonts and resolution. As a rule-of-thumb, you have in 300 dpi approx 20 cm print length in 600 dpi approx 10 cm print length You can see the memory meter display how much you use of the resources available. Smaller fonts means more print length. The maximum avialable length is 2400 pixel or around 8 inches.
Resolution (Horizontal) Select a horizontal resolution from the drop down menu. 75×300 dpi 150×300 dpi 300×300 dpi 600×300 dpi The possible resolution is not limited to the 3 options above. To enter a different resolution, enter a number between 50 and 600. The maximum speed is affected by selection of horizontal resolution, since the frequency of the printhead remains the same. 75 dpi Max 302 m/min to 600 dpi Max 38 m/min
Resolution (Vertical) The vertical resolution is created by removing lines from the printed image, in order to save ink costs. Available options are 300, 225, 200, and 150 DPI (0%, 25%, 33%, 50% ink reduction). Notice that because of print height being just ½», the number of active dots are 150 to 75.

Page 31 of 33 MICRODRAW USER MANUAL
Cost calculation
Select the cost button to enter the cost calculation menu. The default supply size and drop size are already filled in, these are taken from the ink type in unit settings You should enter the cost for each supply in your currency. The result will be in the same currency. By default cost is set to arbitrary value of «100» per unit. MicroDraw will calculate 1. Coverage, based on 300 x 300 dpi canvas 2. Cost/1000 prints 3. Ink supply lifetime Although the calculations are often close to the actual costs, notice that:
Even the slightest change in font size can greatly influence the consumption of ink. It is rarely possible to empty an ink cartridge 100%.
Please also notice that the coverage is the same regardless of resolution. The cost of printing is what is changing with resolution.
Ink warning level Notice setting for «Ink Warning Level». This is the level on which Micron will give an alarm on the hardware output. You can set this level freely, and you can continue production after the alarm. Adjust to your needs, depending on how soon you can change ink versus your production intensity.

Page 32 of 33 MICRODRAW USER MANUAL
Create new language
If your language is not included with MicroDraw, you can make a language file of your own. The language files are stored in the subdirectory language of the program directory, normally found at c:program filesMicroDrawLanguage Make a copy of the file English, rename it and open it with a text editor. Every line in a section is made up by two parts separated by an equal sign. Translate the content on the right hand side, example:
Start position=开始位置
Save the file when translation is complete. Load the new language file from the program settings (see page 24).

Page 33 of 33 MICRODRAW USER MANUAL
Support
For product support, please contact HSA SYSTEMS Customer Service department
HSA SYSTEMS CUSTOMER SERVICE Phone: +45 66103401 Email: [email protected]
ОПИСАНИЕ
Уникальное сочетание небольшого контроллера и принтера идеально подходит для многократной и непрерывной печати.
Технология HP TIJ 2.5
HSAJET® Micron разработан на основе надежной технологии HP TIJ 2.5, что обеспечивает удобство использования, скорость и неизменно высокое качество печати по очень выгодной цене. Micron идеально подходит для печати этикеток, а также картонных упаковок пищевых продуктов и медикаментов. Возможности использования безграничны.
Чтобы загрузить задания на печать с USB-накопителя:
Создайте задание на печать на компьютере с помощью бесплатной программы MicroDraw, входящей в комплект поставки принтера. Скопируйте его на USB-накопитель, подключите к принтеру Micron и распечатайте. Можно сохранить распечатываемый файл во внутренней памяти устройства и отсоединить USB-накопитель.
Простая интеграция и использование:
Micron готов к работе в момент поставки. Вставьте чернильный картридж, включите питание и печатайте одним нажатием кнопки. Принтер занимает очень мало места. Устройство немного больше самого чернильного картриджа. Благодаря небольшому размеру этот принтер очень легко интегрировать в рабочую среду. Печатайте горизонтально или просто поверните принтер на 90º, чтобы печатать вертикально.
Встроенный датчик:
Принтер Micron имеет встроенный внутренний датчик. Если необходим внешний датчик, его можно удобно подключить к принтеру. Можно просто установить необходимую высоту печати при создании задания на печать.
Высота печати 12,7 мм:
Принтер HSAJET® Micron использует чернильный картридж 1 HP и может печатать на высоте 12,7 мм.
ПЕЧАТЬ
Разрешение печати 300 x 300 точек на дюйм
- ИЗОБРАЖЕНИЯ
- ЧИСЛА
- ТЕКСТ (БУКВЕННО-ЦИФРОВОЙ)
- ЛИНЕЙНЫЕ И 2D ШТРИХ-КОДЫ
- ДАТА и ВРЕМЯ (РЕАЛЬНОЕ ВРЕМЯ и УСТАНОВЛЕННОЕ ВРЕМЯ)
- 3 ШРИФТА TRUE TYPE WINDOWS
- Manuals
- Brands
- HS Automatic Manuals
- Controller
- HSAjet-CU
- User manual
-
Bookmarks
Quick Links
HS Automatic
HSAjet-CU
User Manual
Summary of Contents for HS Automatic HSAjet-CU
-
Page 1
Artisan Technology Group is your source for quality new and certified-used/pre-owned equipment SERVICE CENTER REPAIRS WE BUY USED EQUIPMENT • FAST SHIPPING AND DELIVERY Experienced engineers and technicians on staff Sell your excess, underutilized, and idle used equipment at our full-service, in-house repair center We also offer credit for buy-backs and trade-ins •… -
Page 2
HS Automatic ApS Side 1 af 41 17-11-2005 HSAjet-CU user manual HSAjet CU MANUAL A guide to operating and managing the HSAjet CU print controller Last update September 29, 2005 Last saved Fejl! Ukendt argument for parameter. -
Page 3
HP is a registered trademark of the Hewlett-Packard Corporation This and other litterature on HSAjet products is © HS Automatic ApS 2005. You may freely use this instruction and translate it, as long as you do not change the content. -
Page 4
HS Automatic ApS Side 3 af 41 17-11-2005 HSAjet-CU user manual Features of the CU Print using normal printers, xaar- or HP based. Messages stored on standard Compact Flash cards. Uses 80x compact flash cards for improved read speed Very simple to use… -
Page 5
HS Automatic ApS Side 4 af 41 17-11-2005 HSAjet-CU user manual The CU keyboard Used to start print activity Enter the setup menu Enter the previous menu or go to main menu. Stop print Arrow keys, use with enter to… -
Page 6
HS Automatic ApS Side 5 af 41 17-11-2005 HSAjet-CU user manual Designing CU pictures The CU pictures are designed using the OBJ INKdraw software. Please see OBJ INKdraw manual for help on installing. Concept of CU objects vs background In a CU image, you have both fixed and variable content. The fixed content has no limitation, which means that you can design using any font size and have all the barcodes available. -
Page 7
HS Automatic ApS Side 6 af 41 17-11-2005 HSAjet-CU user manual Once you have clicked OK, you are presented with the edit screen for CU files. Most of the screen is identical to normal OBJ INKdraw pictures, but there are some differences. -
Page 8
HS Automatic ApS Side 7 af 41 17-11-2005 HSAjet-CU user manual Working with font types / anchors The variable CU objects, except the logos and barcodes, display textual information. Because of it’s resources, the CU is not able to place and scale fonts freely. That is why the font anchors were made. -
Page 9
HS Automatic ApS Side 8 af 41 17-11-2005 HSAjet-CU user manual To edit the anchor definitions, click the «A» button next to the anchor selector. This will open the font editor. Select the anchor you wish to edit, and change the font as needed. -
Page 10
HS Automatic ApS Side 9 af 41 17-11-2005 HSAjet-CU user manual CU Objects The CU has 6 different variable objects. All of them are editable directly on the unit itself by pressing the corresponding object type key. Dates You can have a total of 10 different date objects, each with a user-defineable format and individual offset. -
Page 11
HS Automatic ApS Side 10 af 41 17-11-2005 HSAjet-CU user manual Compiling / saving files (to CF) When you are done editing your image, you need to compile the ink file to use it in the CU. As this is a one-way process (i.e. you can not edit CU files later in OBJ INKdraw) it is a good idea to save the .ink file along with the CU files. -
Page 12
The idea of the CU is a unit that will allow the user to select messages and print them using the standard HS Automatic printers – xaar or HP. The messages are stored on the compact flash, and can be recalled by simply selecting the filename from the main menu and pressing enter to load. -
Page 13: Print Function
HS Automatic ApS Side 12 af 41 17-11-2005 HSAjet-CU user manual Print function Activate the print function with the key. The red LED in the key will turn on if the print mode is active. Use ESC to stop print mode.
-
Page 14
HS Automatic ApS Side 13 af 41 17-11-2005 HSAjet-CU user manual Main menu You reach the main menu from any menu by pressing ESC. The main menu is where you select the message to print. Orangesxxxxxx Choose file. or, if the current file is the active:… -
Page 15
HS Automatic ApS Side 14 af 41 17-11-2005 HSAjet-CU user manual Editing object / message content With the CU, there is a separation between content and design. While it is possible to change the size and position of objects in the design phase, this is not possible on the CU unit itself. Only the following can be changed. -
Page 16
HS Automatic ApS Side 15 af 41 17-11-2005 HSAjet-CU user manual Text 1 < fox jumps ove> Text 1 <r the lazy dog After a change, you are informed about the change. Value accepted (ENTER) Enter returns you to the object list. -
Page 17
HS Automatic ApS Side 16 af 41 17-11-2005 HSAjet-CU user manual Preventing object editing Sometimes it is necessary to prevent objects in the CU from being edited. This is possible by locking the object in OBJ INKdraw before you compile the CU file. -
Page 18
HS Automatic ApS Side 17 af 41 17-11-2005 HSAjet-CU user manual Input of special characters To enter special characters like ‘ä’ and ‘ü’ you hold down the space key (Labelled «Alt») and press the key where the character is printed. -
Page 19
HS Automatic ApS Side 18 af 41 17-11-2005 HSAjet-CU user manual Keyboard layout, extended characters ! ¿ ¡ » & < > á Á ä Ä æ Æ å Å à À â Â ã Ã \ { } [ ] | ç… -
Page 20: Setup Menu
HS Automatic ApS Side 19 af 41 17-11-2005 HSAjet-CU user manual Setup menu Press the setup button to change settings that affect mainly the current file. In setup you have a series of menus that can be navigated with the arrow keys. At any point, press ESC to return to the main menu.
-
Page 21
HS Automatic ApS Side 20 af 41 17-11-2005 HSAjet-CU user manual Basic setup functions On the CU, hardware settings like start, offset, direction and encoder settings are generally not taken from the design software, but used from the machine’s own settings. You can load a Hardware setup, but until you do that, all settings are as set on the CU unit. -
Page 22: Printer Settings
HS Automatic ApS Side 21 af 41 17-11-2005 HSAjet-CU user manual Printer settings (1) Setup menu 2 is the most basic settings for the printer, that will have affect on this message. Qad = Quadrature Lin = Linear Direction <…
-
Page 23
HS Automatic ApS Side 22 af 41 17-11-2005 HSAjet-CU user manual Date / Time The CU has a real-time clock built-in. The time and date of this determines the output for date objects. You can set the current date / time in this menu, in the format YYYY-MM-DD HH:MM (24-hour clock). -
Page 24
HS Automatic ApS Side 23 af 41 17-11-2005 HSAjet-CU user manual System setup (shift + Tool Button) In system setup, you change the settings that are not related to the individual message, but are more hardware related. MAIN MENU Head setup Load HW parameters. -
Page 25
HS Automatic ApS Side 24 af 41 17-11-2005 HSAjet-CU user manual Head <>000.00Inc Adj Ups N Oths N 000.00 Offset for the head. Notice that maximum value is 65.535 mm equal to 25.80 inch. Press Enter to adjust the engine offset(s). Only available if the head has more than one print engine. -
Page 26
HS Automatic ApS Side 25 af 41 17-11-2005 HSAjet-CU user manual Manage HW parameters / Ink size/usage and Ethernet Setup On the CU, all printing parameters (except resolution) are stored on the controller, not the message that you load. This ensures that you only have to focus on layout, once the parameters are correct. -
Page 27: Output Configuration
HS Automatic ApS Side 26 af 41 17-11-2005 HSAjet-CU user manual Monitor ink menu 1: 42ml 2:—ml 3:—ml 4:—ml You can see the approx. remaining ink for each defined cartridge. Press ENTER on the number to reset. Load Hardware settings If you have saved a hardware setup file from INKdraw, you can load it by selecting «Load HW settings».
-
Page 28
HS Automatic ApS Side 27 af 41 17-11-2005 HSAjet-CU user manual Password It is possible to protect the CU so that no-one without the password can access the parameters. If there already is a password set, you need to enter it to change it. Otherwise, you just need to change it, and confirm it afterwards. -
Page 29
HS Automatic ApS Side 28 af 41 17-11-2005 HSAjet-CU user manual Remote communication with the CU The CU is an ideal unit for solutions where remote communication can be used to change message content. Typically behind weighing / measuring stations, or simply in complete factory automation. -
Page 30
HS Automatic ApS Side 29 af 41 17-11-2005 HSAjet-CU user manual Example of communication with CU You Transmit You Receive Description CMD:C;# Remote connect with password = no password. RES:10# Password accepted. CMD:R# Start print mode. RES:0# Command accepted. OBJ:1;1;CUR;0# Set counter object 1 current value to 0. -
Page 31
Upgrades to the CU, typically new features, are released through the dealer’s area of HS Automatic webpage. You can download the upgrades in the form of firmware files. Simply place the new firmware files on the compact flash card and start up your unit. -
Page 32: Reference Section
HS Automatic ApS Side 31 af 41 17-11-2005 HSAjet-CU user manual Reference section Language update It is possible to change the language of the CU display, with the limitation that you are have fixed length of the texts. The editing of the language file happens with the free tool «Language File Editor» available from HS Automatic.
-
Page 33: Error Messages
HS Automatic ApS Side 32 af 41 17-11-2005 HSAjet-CU user manual Error Messages File Error: There are no CU files on the card. CU file missing No more room to write on the card. File Error: CF card full File Error: You forgot to transfer the FNT file.
-
Page 34
HS Automatic ApS Side 33 af 41 17-11-2005 HSAjet-CU user manual Connectors The table below shows the CU as viewed from the back, with the keyboard upwards. Encoder I/O (start) HEAD 1 COM1 COM2 HEAD 2 (serial comm.) POWER PC Network… -
Page 35: Connector Wiring
HS Automatic ApS Side 34 af 41 17-11-2005 HSAjet-CU user manual Connector Wiring Connectors (start, encoder, etc) wiring. Start sensor connections As a start sensor, you can use a simple switch, or a photo cell. PIN…………DESCRIPTION 1………….. V I/O 2…………..
-
Page 36
HS Automatic ApS Side 35 af 41 17-11-2005 HSAjet-CU user manual 12 Volt PNP sensor. VCC to pins 1,7 Signal to pin 4 GND to pin 5 1 K resistor between pin 4 and 5 External power source, +3-36V, using NPN /… -
Page 37
HS Automatic ApS Side 36 af 41 17-11-2005 HSAjet-CU user manual Encoder connections For the encoder, you can use either a single or double channel. If you have both channels connected, you need to activate “Quadrature”, and divide distance / pulse by 4. -
Page 38
HS Automatic ApS Side 37 af 41 17-11-2005 HSAjet-CU user manual 12 VOLT encoder double channel NPN / PUSH/PULL encoder 12 VOLT encoder double channel PNP encoder External power source, 3-36V, encoder single channel NPN/ PUSH/PULL encoder External power source, 3-36V, encoder… -
Page 39
HS Automatic ApS Side 38 af 41 17-11-2005 HSAjet-CU user manual Complete remote connection reference As previously mentioned, the CU remote commands is based on a dialog protocol, where you send commands and receive response back from the CU. Each command and response is always separated by «#». -
Page 40
HS Automatic ApS Side 39 af 41 17-11-2005 HSAjet-CU user manual CHANGE OBJECT OBJ:<object type>; <object nr>; <parameter>; <value># Set object is used to manipulate objects in the loaded message. For object type, please see above. Parameters Description Allowed Values (Response =… -
Page 41
HS Automatic ApS Side 40 af 41 17-11-2005 HSAjet-CU user manual OBJECT DATA RESPONSE This is the response you get on REQ:object data Object type Responses parameters active, name, font, prompt, locked, layer Text text DAT:<parameters>;<value># Counter decimals, counter, direction, leadin, maxcount, …… -
Page 42
HS Automatic ApS Side 41 af 41 17-11-2005 HSAjet-CU user manual CU property sheet (TO-DO) Electrical • Power consumption Xaar / HP max • Available voltages • Fuses Physical • Size • Weight • Brackets / mounting etc • Display Printing •… -
Page 43
Artisan Technology Group is your source for quality new and certified-used/pre-owned equipment SERVICE CENTER REPAIRS WE BUY USED EQUIPMENT • FAST SHIPPING AND DELIVERY Experienced engineers and technicians on staff Sell your excess, underutilized, and idle used equipment at our full-service, in-house repair center We also offer credit for buy-backs and trade-ins •…
Уникальный компактный контролер и принтер в одном корпусе (2 в 1), идеален для печати однотипной информации
Технология печати HP TIJ 2.5
Печать принтером HSAJET® Micron основана на надежной технологии TIJ 2.5 компании Неwlеtt Packard, которая обеспечивает стабильную печать высокого качества на больших скоростях, низкую стоимость и простоту использования. Micron идеально подходит для печати на этикетках и на всех картонных упаковках для пищевой и фармацевтической промышленности. Возможности безграничны!
Легкий в установке и удобный в использовании
Micron представляет собой устройство, которое уже готово к использованию. Вставьте картридж в печатающую головку, включите в розетку, и немедленно начните печатать, нажав на кнопку. Принтер занимает очень мало места. Ненамного больше, чем сам картридж. Поэтому, его установка очень удобна.
Встроенный датчик объекта
У принтера Micron есть встроенный датчик объекта. Если необходим внешний датчик, подключите его к принтеру через разъем. Расстояние датчика легко выбирается при проектировании сообщения на печать.
Чернильные картриджи
HSAJET® Micron работает с 1 картриджем HP с допустимой высотой печати 12.7 мм. Доступен широкий ассортимент чернил для любого применения: чернила различных цветов, ультрафиолетовые или быстросохнущие чернила. Для каждого вида чернил принтер позволяет применять параметры, чтобы достичь максимальной производительности в любой ситуации.
Печать 300 x 300 точек на дюйм
• ГРАФИКА
• СЧЕТЧИКИ
• ТЕКСТ (БУКВЕННО-ЦИФРОВОЙ)
• ШТРИХ-КОДЫ (ФИКСИРОВАННЫЕ)
• ДАТА и ВРЕМЯ
• 3 ШРИФТА WINDOWS TRUE TUPE
Технология
HP TIJ 2.5
Высота печати
12.7 мм / ½ дюйма
Печатающие головки
Одно-картриджная встроенная печатающая головка
Дистанция печати
0.5-2.0 мм (от сопла до поверхности печати)
Напряжение
15 В (включая блок питания)
Память
1 (одно) сообщение в устройстве
Программное обеспечение
MicroDraw (для Windows ПК)
Функции печати
Влево/ Вправо, Вверх-вниз, Зеркально
Особенности макета
Макс. длина 2400 пикселей (~10 см в 600 точках на дюйм, ~20 см в 300 точках на дюйм) Поддерживает кодировку UNICODE в тексте
Вращение объекта (фиксированное):
свободно
Вращение объекта (вариабельное): на 180
градусов
Работает в мм/дюймах/точках/пикселях
Интерфейс
USB 2.0
Вход датчика 3-33 V (SUB D 9)
Вход/Выход 3-33 V (SUB D 9)
Оповещение
Низкий уровень чернил (диод)
Сигнал печати (диод)
Встроенный датчик
Корпус
Нержавеющая сталь
Вес 0.53 кг / 1.17 фунтов
Разрешение (по горизонтали)
Можно выбирать от 50 до 600 точек на дюйм. максимальная скорость печати зависит от выбора горизонтального разрешения, поскольку частота печатающей головки остается той же. 75 точек на дюйм макс 302 м / мин до 600 точек на дюйм макс 38 м / мин.
Разрешение (по вертикали)
Экономьте расход чернил путем уменьшения верт. разрешения. Доступные разрешения: 300, 225, 200 и 150 точек на дюйм. (0%, 25%, 33%, 50% сокращение расхода чернил). обратите внимание, потому что макс. высота печати равна ½ дюйма. Число активных точек от 150 до 75.
Аксессуары
• USB-накопитель (входит в комплект)
• Внешний датчик
• Энкодер
• Кронштейны и крепления
• Крепление (Inocon FL K18 мм входит в комплект)
- Manuals
- Brands
- HS Automatic Manuals
- Controller
- HSAjet-CU
- User manual
-
Bookmarks
Quick Links
HS Automatic
HSAjet-CU
User Manual
Summary of Contents for HS Automatic HSAjet-CU
-
Page 1
Artisan Technology Group is your source for quality new and certified-used/pre-owned equipment SERVICE CENTER REPAIRS WE BUY USED EQUIPMENT • FAST SHIPPING AND DELIVERY Experienced engineers and technicians on staff Sell your excess, underutilized, and idle used equipment at our full-service, in-house repair center We also offer credit for buy-backs and trade-ins •… -
Page 2
HS Automatic ApS Side 1 af 41 17-11-2005 HSAjet-CU user manual HSAjet CU MANUAL A guide to operating and managing the HSAjet CU print controller Last update September 29, 2005 Last saved Fejl! Ukendt argument for parameter. -
Page 3
HP is a registered trademark of the Hewlett-Packard Corporation This and other litterature on HSAjet products is © HS Automatic ApS 2005. You may freely use this instruction and translate it, as long as you do not change the content. -
Page 4
HS Automatic ApS Side 3 af 41 17-11-2005 HSAjet-CU user manual Features of the CU Print using normal printers, xaar- or HP based. Messages stored on standard Compact Flash cards. Uses 80x compact flash cards for improved read speed Very simple to use… -
Page 5
HS Automatic ApS Side 4 af 41 17-11-2005 HSAjet-CU user manual The CU keyboard Used to start print activity Enter the setup menu Enter the previous menu or go to main menu. Stop print Arrow keys, use with enter to… -
Page 6
HS Automatic ApS Side 5 af 41 17-11-2005 HSAjet-CU user manual Designing CU pictures The CU pictures are designed using the OBJ INKdraw software. Please see OBJ INKdraw manual for help on installing. Concept of CU objects vs background In a CU image, you have both fixed and variable content. The fixed content has no limitation, which means that you can design using any font size and have all the barcodes available. -
Page 7
HS Automatic ApS Side 6 af 41 17-11-2005 HSAjet-CU user manual Once you have clicked OK, you are presented with the edit screen for CU files. Most of the screen is identical to normal OBJ INKdraw pictures, but there are some differences. -
Page 8
HS Automatic ApS Side 7 af 41 17-11-2005 HSAjet-CU user manual Working with font types / anchors The variable CU objects, except the logos and barcodes, display textual information. Because of it’s resources, the CU is not able to place and scale fonts freely. That is why the font anchors were made. -
Page 9
HS Automatic ApS Side 8 af 41 17-11-2005 HSAjet-CU user manual To edit the anchor definitions, click the «A» button next to the anchor selector. This will open the font editor. Select the anchor you wish to edit, and change the font as needed. -
Page 10
HS Automatic ApS Side 9 af 41 17-11-2005 HSAjet-CU user manual CU Objects The CU has 6 different variable objects. All of them are editable directly on the unit itself by pressing the corresponding object type key. Dates You can have a total of 10 different date objects, each with a user-defineable format and individual offset. -
Page 11
HS Automatic ApS Side 10 af 41 17-11-2005 HSAjet-CU user manual Compiling / saving files (to CF) When you are done editing your image, you need to compile the ink file to use it in the CU. As this is a one-way process (i.e. you can not edit CU files later in OBJ INKdraw) it is a good idea to save the .ink file along with the CU files. -
Page 12
The idea of the CU is a unit that will allow the user to select messages and print them using the standard HS Automatic printers – xaar or HP. The messages are stored on the compact flash, and can be recalled by simply selecting the filename from the main menu and pressing enter to load. -
Page 13: Print Function
HS Automatic ApS Side 12 af 41 17-11-2005 HSAjet-CU user manual Print function Activate the print function with the key. The red LED in the key will turn on if the print mode is active. Use ESC to stop print mode.
-
Page 14
HS Automatic ApS Side 13 af 41 17-11-2005 HSAjet-CU user manual Main menu You reach the main menu from any menu by pressing ESC. The main menu is where you select the message to print. Orangesxxxxxx Choose file. or, if the current file is the active:… -
Page 15
HS Automatic ApS Side 14 af 41 17-11-2005 HSAjet-CU user manual Editing object / message content With the CU, there is a separation between content and design. While it is possible to change the size and position of objects in the design phase, this is not possible on the CU unit itself. Only the following can be changed. -
Page 16
HS Automatic ApS Side 15 af 41 17-11-2005 HSAjet-CU user manual Text 1 < fox jumps ove> Text 1 <r the lazy dog After a change, you are informed about the change. Value accepted (ENTER) Enter returns you to the object list. -
Page 17
HS Automatic ApS Side 16 af 41 17-11-2005 HSAjet-CU user manual Preventing object editing Sometimes it is necessary to prevent objects in the CU from being edited. This is possible by locking the object in OBJ INKdraw before you compile the CU file. -
Page 18
HS Automatic ApS Side 17 af 41 17-11-2005 HSAjet-CU user manual Input of special characters To enter special characters like ‘ä’ and ‘ü’ you hold down the space key (Labelled «Alt») and press the key where the character is printed. -
Page 19
HS Automatic ApS Side 18 af 41 17-11-2005 HSAjet-CU user manual Keyboard layout, extended characters ! ¿ ¡ » & < > á Á ä Ä æ Æ å Å à À â Â ã Ã { } [ ] | ç… -
Page 20: Setup Menu
HS Automatic ApS Side 19 af 41 17-11-2005 HSAjet-CU user manual Setup menu Press the setup button to change settings that affect mainly the current file. In setup you have a series of menus that can be navigated with the arrow keys. At any point, press ESC to return to the main menu.
-
Page 21
HS Automatic ApS Side 20 af 41 17-11-2005 HSAjet-CU user manual Basic setup functions On the CU, hardware settings like start, offset, direction and encoder settings are generally not taken from the design software, but used from the machine’s own settings. You can load a Hardware setup, but until you do that, all settings are as set on the CU unit. -
Page 22: Printer Settings
HS Automatic ApS Side 21 af 41 17-11-2005 HSAjet-CU user manual Printer settings (1) Setup menu 2 is the most basic settings for the printer, that will have affect on this message. Qad = Quadrature Lin = Linear Direction <…
-
Page 23
HS Automatic ApS Side 22 af 41 17-11-2005 HSAjet-CU user manual Date / Time The CU has a real-time clock built-in. The time and date of this determines the output for date objects. You can set the current date / time in this menu, in the format YYYY-MM-DD HH:MM (24-hour clock). -
Page 24
HS Automatic ApS Side 23 af 41 17-11-2005 HSAjet-CU user manual System setup (shift + Tool Button) In system setup, you change the settings that are not related to the individual message, but are more hardware related. MAIN MENU Head setup Load HW parameters. -
Page 25
HS Automatic ApS Side 24 af 41 17-11-2005 HSAjet-CU user manual Head <>000.00Inc Adj Ups N Oths N 000.00 Offset for the head. Notice that maximum value is 65.535 mm equal to 25.80 inch. Press Enter to adjust the engine offset(s). Only available if the head has more than one print engine. -
Page 26
HS Automatic ApS Side 25 af 41 17-11-2005 HSAjet-CU user manual Manage HW parameters / Ink size/usage and Ethernet Setup On the CU, all printing parameters (except resolution) are stored on the controller, not the message that you load. This ensures that you only have to focus on layout, once the parameters are correct. -
Page 27: Output Configuration
HS Automatic ApS Side 26 af 41 17-11-2005 HSAjet-CU user manual Monitor ink menu 1: 42ml 2:—ml 3:—ml 4:—ml You can see the approx. remaining ink for each defined cartridge. Press ENTER on the number to reset. Load Hardware settings If you have saved a hardware setup file from INKdraw, you can load it by selecting «Load HW settings».
-
Page 28
HS Automatic ApS Side 27 af 41 17-11-2005 HSAjet-CU user manual Password It is possible to protect the CU so that no-one without the password can access the parameters. If there already is a password set, you need to enter it to change it. Otherwise, you just need to change it, and confirm it afterwards. -
Page 29
HS Automatic ApS Side 28 af 41 17-11-2005 HSAjet-CU user manual Remote communication with the CU The CU is an ideal unit for solutions where remote communication can be used to change message content. Typically behind weighing / measuring stations, or simply in complete factory automation. -
Page 30
HS Automatic ApS Side 29 af 41 17-11-2005 HSAjet-CU user manual Example of communication with CU You Transmit You Receive Description CMD:C;# Remote connect with password = no password. RES:10# Password accepted. CMD:R# Start print mode. RES:0# Command accepted. OBJ:1;1;CUR;0# Set counter object 1 current value to 0. -
Page 31
Upgrades to the CU, typically new features, are released through the dealer’s area of HS Automatic webpage. You can download the upgrades in the form of firmware files. Simply place the new firmware files on the compact flash card and start up your unit. -
Page 32: Reference Section
HS Automatic ApS Side 31 af 41 17-11-2005 HSAjet-CU user manual Reference section Language update It is possible to change the language of the CU display, with the limitation that you are have fixed length of the texts. The editing of the language file happens with the free tool «Language File Editor» available from HS Automatic.
-
Page 33: Error Messages
HS Automatic ApS Side 32 af 41 17-11-2005 HSAjet-CU user manual Error Messages File Error: There are no CU files on the card. CU file missing No more room to write on the card. File Error: CF card full File Error: You forgot to transfer the FNT file.
-
Page 34
HS Automatic ApS Side 33 af 41 17-11-2005 HSAjet-CU user manual Connectors The table below shows the CU as viewed from the back, with the keyboard upwards. Encoder I/O (start) HEAD 1 COM1 COM2 HEAD 2 (serial comm.) POWER PC Network… -
Page 35: Connector Wiring
HS Automatic ApS Side 34 af 41 17-11-2005 HSAjet-CU user manual Connector Wiring Connectors (start, encoder, etc) wiring. Start sensor connections As a start sensor, you can use a simple switch, or a photo cell. PIN…………DESCRIPTION 1………….. V I/O 2…………..
-
Page 36
HS Automatic ApS Side 35 af 41 17-11-2005 HSAjet-CU user manual 12 Volt PNP sensor. VCC to pins 1,7 Signal to pin 4 GND to pin 5 1 K resistor between pin 4 and 5 External power source, +3-36V, using NPN /… -
Page 37
HS Automatic ApS Side 36 af 41 17-11-2005 HSAjet-CU user manual Encoder connections For the encoder, you can use either a single or double channel. If you have both channels connected, you need to activate “Quadrature”, and divide distance / pulse by 4. -
Page 38
HS Automatic ApS Side 37 af 41 17-11-2005 HSAjet-CU user manual 12 VOLT encoder double channel NPN / PUSH/PULL encoder 12 VOLT encoder double channel PNP encoder External power source, 3-36V, encoder single channel NPN/ PUSH/PULL encoder External power source, 3-36V, encoder… -
Page 39
HS Automatic ApS Side 38 af 41 17-11-2005 HSAjet-CU user manual Complete remote connection reference As previously mentioned, the CU remote commands is based on a dialog protocol, where you send commands and receive response back from the CU. Each command and response is always separated by «#». -
Page 40
HS Automatic ApS Side 39 af 41 17-11-2005 HSAjet-CU user manual CHANGE OBJECT OBJ:<object type>; <object nr>; <parameter>; <value># Set object is used to manipulate objects in the loaded message. For object type, please see above. Parameters Description Allowed Values (Response =… -
Page 41
HS Automatic ApS Side 40 af 41 17-11-2005 HSAjet-CU user manual OBJECT DATA RESPONSE This is the response you get on REQ:object data Object type Responses parameters active, name, font, prompt, locked, layer Text text DAT:<parameters>;<value># Counter decimals, counter, direction, leadin, maxcount, …… -
Page 42
HS Automatic ApS Side 41 af 41 17-11-2005 HSAjet-CU user manual CU property sheet (TO-DO) Electrical • Power consumption Xaar / HP max • Available voltages • Fuses Physical • Size • Weight • Brackets / mounting etc • Display Printing •… -
Page 43
Artisan Technology Group is your source for quality new and certified-used/pre-owned equipment SERVICE CENTER REPAIRS WE BUY USED EQUIPMENT • FAST SHIPPING AND DELIVERY Experienced engineers and technicians on staff Sell your excess, underutilized, and idle used equipment at our full-service, in-house repair center We also offer credit for buy-backs and trade-ins •…
Уникальный компактный контролер и принтер в одном корпусе (2 в 1), идеален для печати однотипной информации
Технология печати HP TIJ 2.5
Печать принтером HSAJET® Micron основана на надежной технологии TIJ 2.5 компании Неwlеtt Packard, которая обеспечивает стабильную печать высокого качества на больших скоростях, низкую стоимость и простоту использования. Micron идеально подходит для печати на этикетках и на всех картонных упаковках для пищевой и фармацевтической промышленности. Возможности безграничны!
Легкий в установке и удобный в использовании
Micron представляет собой устройство, которое уже готово к использованию. Вставьте картридж в печатающую головку, включите в розетку, и немедленно начните печатать, нажав на кнопку. Принтер занимает очень мало места. Ненамного больше, чем сам картридж. Поэтому, его установка очень удобна.
Встроенный датчик объекта
У принтера Micron есть встроенный датчик объекта. Если необходим внешний датчик, подключите его к принтеру через разъем. Расстояние датчика легко выбирается при проектировании сообщения на печать.
Чернильные картриджи
HSAJET® Micron работает с 1 картриджем HP с допустимой высотой печати 12.7 мм. Доступен широкий ассортимент чернил для любого применения: чернила различных цветов, ультрафиолетовые или быстросохнущие чернила. Для каждого вида чернил принтер позволяет применять параметры, чтобы достичь максимальной производительности в любой ситуации.
Печать 300 x 300 точек на дюйм
• ГРАФИКА
• СЧЕТЧИКИ
• ТЕКСТ (БУКВЕННО-ЦИФРОВОЙ)
• ШТРИХ-КОДЫ (ФИКСИРОВАННЫЕ)
• ДАТА и ВРЕМЯ
• 3 ШРИФТА WINDOWS TRUE TUPE
Технология
HP TIJ 2.5
Высота печати
12.7 мм / ½ дюйма
Печатающие головки
Одно-картриджная встроенная печатающая головка
Дистанция печати
0.5-2.0 мм (от сопла до поверхности печати)
Напряжение
15 В (включая блок питания)
Память
1 (одно) сообщение в устройстве
Программное обеспечение
MicroDraw (для Windows ПК)
Функции печати
Влево/ Вправо, Вверх-вниз, Зеркально
Особенности макета
Макс. длина 2400 пикселей (~10 см в 600 точках на дюйм, ~20 см в 300 точках на дюйм) Поддерживает кодировку UNICODE в тексте
Вращение объекта (фиксированное):
свободно
Вращение объекта (вариабельное): на 180
градусов
Работает в мм/дюймах/точках/пикселях
Интерфейс
USB 2.0
Вход датчика 3-33 V (SUB D 9)
Вход/Выход 3-33 V (SUB D 9)
Оповещение
Низкий уровень чернил (диод)
Сигнал печати (диод)
Встроенный датчик
Корпус
Нержавеющая сталь
Вес 0.53 кг / 1.17 фунтов
Разрешение (по горизонтали)
Можно выбирать от 50 до 600 точек на дюйм. максимальная скорость печати зависит от выбора горизонтального разрешения, поскольку частота печатающей головки остается той же. 75 точек на дюйм макс 302 м / мин до 600 точек на дюйм макс 38 м / мин.
Разрешение (по вертикали)
Экономьте расход чернил путем уменьшения верт. разрешения. Доступные разрешения: 300, 225, 200 и 150 точек на дюйм. (0%, 25%, 33%, 50% сокращение расхода чернил). обратите внимание, потому что макс. высота печати равна ½ дюйма. Число активных точек от 150 до 75.
Аксессуары
• USB-накопитель (входит в комплект)
• Внешний датчик
• Энкодер
• Кронштейны и крепления
• Крепление (Inocon FL K18 мм входит в комплект)
- Информация
- Товар на сайте компании «RePack — Упаковочное, стреппинг, фасовочное и маркировочное оборудование»
-
Москва
- Просмотров: 1298
- ID: 20237322
Хит продаж

Производитель: HSAJET
Micron — каплеструйный принтер, уникальный и компактный с встроенным контроллером. Принтер МИКРОН — революция c высоким разрешением печати; идеально подходит для интеграции на различных поточных линиях, где требуется решение задачи с низкими затратами
Загрузка сообщений для печати с USB флешкарты. Файлы для печати создаются на стандартном компьютере с помощью прилагаемого программного обеспечения и передаются на контроллер через USВ- ключ. Сообщение можно сохранить на внутреннюю память принтера и извлечь флешкарту.
Характеристики
Технология
HP TIJ 2.5
Высота печати
12.7мм / ½”
Печатающая головка
Одно картриджная печатающая головка
Печатающая дистанция
0,5-2мм (от сопла до поверхности продукта)
Память 1 собщение (загружаемое с флешкарты)
Сторонность печати
Лево/Право, Верх/Низ, поворот текста на 360°
ПО MicroDraw для Windows
Возможности печати
— текст, графика, штрих-коды, разнообразные счетчики и даты
— программное обеспечение поддерживает кодировку UNICODE
— счетчики и даты с римскими, арабскими и фарси цифрами или выбранными пользователем
— сигнализация низкого уровня чернил с уровнем определяемым пользователем
— разрешение печати выбираемое пользователем: 300х300 DPI, 300х150 DPI, 150х150 DPI, 150х75 DPI и 75х75 DPI
— разделение между созданием сообщений и эксплуатацией. Ничего в макете не может быть уничтожено оператором
— функция spit позволяет использовать быстросохнущие чернила.
— функция очистки может быть активирована дистанционно, используя цифровой вход.
Интерфейс USB
Разъемы: вход/выход 5-24V (SUB-D 9)
Оповещение
— низкий уровень чернил (диод)
— сигнал печати (диод)
— встроенный датчик
Крепление Нержавеющая сталь
Вес 0,53 кг
Габариты 112 х 72 х 88 мм
8-495-233-13-08
8-968-398-87-68
mail@repack.one
https://repack.one
- Маркираторы каплеструйные
- Каплеструйный принтер
- Подъемник канавный П-263
- Модуль для подносов
- Комбинезон для работы
- Мотокосы DDE
- Лодки НДНД
- Лопаты искробезопасные
- Миникамера
- Кресло шар
- Наборы посуды черного цвета
- Наборы противней
- Свежая рыба
- Каучук самоклеющийся
- Тестомес ERGO HS20
- Рубанок электрический dewalt
- Подшипник 60018
Маркираторы в вашем регионе
- Московская область
- Москва
- Подольск
- Белая Дача
- Видное-2
- Горки
- Дмитров
- Долгопрудный
- Домодедово
Низкая цена Принтер этикеток HSAJET MICRON MCHP1 и доставка по городу Москва осуществляется в рабочее время с 9 утра до 18 вечера. Наш магазин располагается по адресу Москва, Большая Никитская улица, 17с2 офис 102 и предлагает покупателю только сертифицированный товар на который распространяется гарантия. Желающим оформить товар в рассрочку, магазин предлагает оформить онлайн кредит без первоначального взноса и переплаты от банка Тинькофф.
Купить Принтер этикеток HSAJET MICRON MCHP1, характеристики которого удовлетворят запросы клиента, а стоимость приятно порадует, покупатель может на оформить на данной странице сайте магазина. Продажа осуществляется по всем действующим законам РФ, а наши опытные менеджеры помогут Вам выбрать дополнительные аксессуары. Кредит оформляется не выходя из дома без предоплаты, а товар доставит клиенту курьер компании. Продажа осуществляется с возможностью возврата или обмена. Так же перед покупкой Вы можете прочитать отзывы реальных клиентов которые уже пользуется данной моделью.
Доставка выбранных товаров осуществляется по всей России. Отправка в регионы осуществляется в рабочие дни.
- Москва ,Московская область — БЕСПЛАТНО.(с 09:00 до 21:00)
Товар можно забрать самостоятельно со склада: г.Москва Большая Никитская улица, 17с2
офис 102
Наш интернет магазин осуществляет отправку купленной у нас оргтехники во все города России. Мы сотрудничаем с транспортными компаниями «Деловые Линии», «Major», «CДЭК», «ПЭК» . Вы можете выбрать любую удобную для Вас транспортную компанию. Стоимость доставки будет рассчитана в зависимости от выбранной Вами транспортной компании.
При отправке товара транспортной компанией возможна доставка:
- до терминала ТК в вашем городе для дальнейшего самостоятельного самовывоза
- по указанному вами адресу в пределах города
Внимание! Если оператор не сможет дозвониться по указанному вами телефону в течение 2-х дней, Ваш заказ будет аннулирован. Поэтому, если по каким-либо причинам в этот период времени вы не сможете принять звонок, пожалуйста, свяжитесь с оператором по электронной почте
Выбранный товар, Вы можете оплатить несколькими способами: наличным и безналичным расчетом.
| Вид оплаты | Документы | |
|---|---|---|
|
Оплата наличными для физических лиц. Оплата наличными производится в рублях при получении заказа у курьера или на пункте самовывоза. За наличный расчёт, мы предоставляем дополнительную скидку на выбранный товар,в случае отказа от бесплатной доставки. |
Скидка 2 % |
Накладная, Счет-фактура |
|
Оплата безналичным расчётом для Юридических лиц. Для оплаты товара по безналичному расчету Вам необходимо выслать реквизиты Вашей компании на нашу электронную почту. Мы отправим Вам коммерческое предложение для ознакомления и согласования. |
Предоплата 100% |
Счет, счет-фактура, накладная (торг 12) |
Порядок резервирования товара
Уважаемые клиенты! Обращаем ваше внимание на порядок и сроки резервирования товара.
Для Физических лиц:
Срок резерва составляет три календарных дня, по истечению которых, товар автоматически снимается с резерва и поступает в свободную продажу (если заказ не был предварительно оплачен).
Для Юридических лиц:
Срок резерва, при выставлении счета юридическому лицу, составляет пять календарных дней, по истечении которых, товар автоматически снимается с резерва.
Мы оставляем за собой право снять товар с резерва, в случае, если отдел продаж или отдел доставки не может с вами связаться в назначенный день отгрузки.
Оплата банковскими картами осуществляется через АО «АЛЬФА-БАНК».
К оплате принимаются карты VISA, MasterCard, Платежная система «Мир».
Услуга оплаты через интернет осуществляется в соответствии с Правилами международных платежных систем Visa, MasterCard и Платежная система «Мир» на принципах соблюдения конфиденциальности и безопасности совершения платежа, для чего используются самые современные методы проверки, шифрования и передачи данных по закрытым каналам связи. Ввод данных банковской карты осуществляется на защищенной платежной странице АО «АЛЬФА-БАНК».
На странице для ввода данных банковской карты потребуется ввести номер карты, имя владельца карты, срок действия карты, трёхзначный код безопасности (CVV2 для VISA или CVC2 для MasterCard). Все необходимые данные пропечатаны на самой карте.
Трёхзначный код безопасности — это три цифры, находящиеся на обратной стороне карты.
Далее вы будете перенаправлены на страницу Вашего банка для ввода 3DSecure кода, который придет к Вам в СМС. Если 3DSecure код к Вам не пришел, то следует обратится в банк выдавший Вам карту.
Случаи отказа в совершении платежа:
- банковская карта не предназначена для совершения платежей через интернет, о чем можно узнать, обратившись в Ваш Банк;
- недостаточно средств для оплаты на банковской карте. Подробнее о наличии средств на банковской карте Вы можете узнать, обратившись в банк, выпустивший банковскую карту;
- данные банковской карты введены неверно;
- истек срок действия банковской карты. Срок действия карты, как правило, указан на лицевой стороне карты (это месяц и год, до которого действительна карта). Подробнее о сроке действия карты Вы можете узнать, обратившись в банк, выпустивший банковскую карту;
Предоставляемая вами персональная информация (имя, адрес, телефон, e-mail, номер банковской карты) является конфиденциальной и не подлежит разглашению. Данные вашей кредитной карты передаются только в зашифрованном виде и не сохраняются на нашем Web-сервере.
Мы находимся по адресу:
Россия, Москва, Большая Никитская улица, 17с2 офис 102 на проходной сказать в компанию Эледен
Режим работы: Будни с 9:00 — 18:00
Приём заказов через корзину: 24 часа / 7 дней в неделю
Памятка покупателю
- Перед покупкой ознакомьтесь с некоторыми условиями продажи:
- В магазинах представлен не весь товар, сделайте резерв или уточните информацию о наличии.
- Самовывоз не осуществляется: телевизоры, диагональю свыше 43 дюймов; товар, вес которого превышает 25 кг; товар, размеры которого превышают 60x60x60 см; товар, один размер которого превышает 100 см. Для таких товаров возможна только доставка!
- При самовывозе при себе необходимо иметь паспорт или водительское удостоверение!

от 98 000 руб.
Micron уникальный компактный принтер с встроенным контроллером. Принтер Micron — революция c высоким разрешением печати; идеально подходит для интеграции на различных поточных линиях, где требуется решение задачи с низкими затратами. Micron использует надежную технологию TIJ 2.5 – это печать высокого качества на больших скоростях.
Загрузка сообщений для печати с USB флешкарты. Файлы для печати создаются на стандартном компьютере с помощью прилагаемого программного обеспечения и передаются на контроллер через USВ-ключ. Сообщение можно сохранить на внутреннюю память принтера и извлечь флешкарту. Легкий в установке и использовании. Micron – это «принтер из ящика». Вставьте картридж в печатающую головку, включите в розетку, и принтер готов к печати после нажатия всего 1 кнопки. Принтер занимает очень мало места – немного больше, чем сам картридж. Поэтому установка очень удобная.
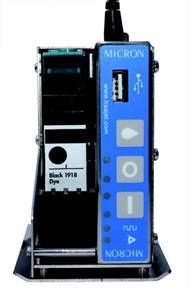
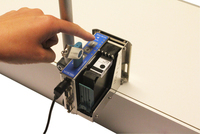
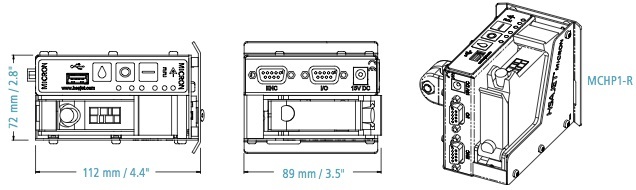
Печать с разрешением 300 х 300 dpi. Графика, счетчики, текст, цифры, штрихкоды (фиксированные), дата и время (постоянные и реальные), 3 шрифта True Type.
Высота печати 12,7мм. Micron работает на 1 картридже с высотой печати до 12,7мм. У принтера нет понятия «количество строк». Маркиратор напечатает все, что вы сможете вместить в 12,7мм.
Большой выбор чернил. Вы можете выбрать чернила разных цветов, ультрафиолетовые или быстросохнущие чернила. Расход чернил зависит от выбранного разрешения печати.
|
Характеристика |
Принтер Micron |
|
Технология |
TIJ 2.5 |
|
Высота печати |
12.7мм / ½” |
|
Печатающая головка |
Одно картриджная печатающая головка |
|
Печатающая дистанция |
0,5-2мм (от сопла до поверхности продукта) |
|
Память |
1 собщение (загружаемое с флешкарты) |
|
Сторонность печати |
Лево/Право, Верх/Низ, поворот текста на 360° |
|
ПО |
MicroDraw для Windows |
|
Возможности печати |
— текст, графика, штрих-коды, разнообразные счетчики и даты — счетчики и даты с римскими, арабскими и фарси цифрами или выбранными пользователем — функция spit позволяет использовать быстросохнущие чернила. — функция очистки может быть активирована дистанционно, используя цифровой вход. |
|
Интерфейс |
USB |
|
Разъемы: вход/выход |
5-24V (SUB-D 9) |
|
Оповещение |
— низкий уровень чернил (диод) — сигнал печати (диод) — встроенный датчик |
|
Крепление |
Нержавеющая сталь |
|
Вес |
0,53 кг |
|
Габариты |
112 х 72 х 88 мм |
|
Скорость печати в зависимости от разрешения печати: |
|
|
Разрешение, DPI (горизонталь х вертикаль) |
Макс. скорость, м/мин |
|
300 x 300 150 x 150 75 x 150 |
76 152 304 |
Для оформления Вашего запроса, просьба открыть форму «Оформить заказ», или связаться с нами по телефону или электронной почте.