The HP Officejet 4500 All-in-One printer is designated for home or small offices, or it can serve as a personal multifunctional printer in a large office, that is, it is for those who need an inexpensive device capable of scanning, copying, and faxing with a built-in interface for the network. Having an affordable price ($99.99), the 4500 is rather economical in prospect, as it offers a low cost for a page wherein providing a professional color printing. In many aspects the HP Officejet 4500 resembles the Canon Pixma MX340, but it lacks the MX340 option to print from memory cards or cameras.
Being capable to fulfill its functions over a network, the All-in-One 4500 can also operate as an autonomous fax or copy machine. It is possible to scan directly to e-mail with attaching a scanned document to your message. Scanning performance is excellent and results are clear-cut and tidy. It should be noted that scanning is one of the appealing feature for the 4500.
The automatic document feeder (ADF) for 20 sheets is one more attractive feature of the device. It can easily handle your multipage papers even of legal size, not matching the printer’s flatbed. The ADF is driven by a carriage motor as it does not have its own driving motor. This unusual but sufficiently elegant solution is unlikely to affect the overall reliability of the device, although this increases the load on the carriage motor that theoretically reduces its resource.
There is the paper input tray in the 4500 with the capacity of 100 pages. It is quite enough if your daily norm of printed pages does not exceed 20 sheets, so that you can reload paper only once a week.
The Officejet 4500 does not have four cartridges, as it is now accepted, but only two ones: black and tri-color. The only advantage of such a decision is the price reduction of the printing system. The main drawback is a significant increase in the running cost of the device. The combined cartridge means that, if one or more colors dominate in the color range, their consumption increases, and you have to dispose non-empty cartridges as one of the colors is sure to end earlier.
The quality of the printed documents meets the required level to solve business tasks and can be defined as acceptable. In draft mode you can notice slight irregularity of some characters. When printing in laser-quality mode, such problem does not occur. The printing speed is significantly below the promised one. In draft mode it is 12 and 10 pages per minute for document monochrome and color printing respectively, in laser-quality mode the speed is 4 and 2 pages per minute. The quality of photo printing is a pleasant surprise. The inexpensive office multifunction HP Officejet 4500, as it appeared can produce photos qualified at a decent level.
In general, if you are not too picky about the main features of the HP Officejet 4500 (the quality and speed of printing), but you wish to get an All-in-One for all occasions, the HP Office-jet 4500 is a good opportunity to implement this desire into reality at low cost.
HP Officejet 4500 All in One Printer PDF User Guides and Manuals for Free Download: Found (6) Manuals for HP Officejet 4500 Device Model (Specifications, Technical Specifications)
More All in One Printer Device Models:
-
Muratec
MFX-1200
A good overall performer in BLI’s three-month evaluation, the Muratec MFX-1200is a 12-page-per-minute, Segment 1 multi-functional unit offering exceptionalmultitasking capabilities, allowing users toreserve up to 10 copy jobs in advance. Incontrast, with other Segment 1 productstested, users cannot reserve even one c …
MFX-1200 All in One Printer, 18
-
Sharp
AL-1651CS
CONTENTSParts marked with “ ” are important for maintaining the safety of the machine. Be sure to replace these partswith the replacement parts specified to maintain the safety and performance of the machine.SHARP CORPORATIONThis document has been published to be usedfor after sales service only.The contents are su …
AL-1651CS Copier, 160
-
Kyocera
TASKalfa 8000i
QUICKGuide 6500i/8000iENGPrinted in China 302LF56080 First edition 2011.2E-Mail operationSending ❶ Place the originals on the platen or in the document processor.❷ Press the Send key.❸ Enter the destination address.From the address book:Press [Address Book]. Press the checkbox to select the desired destination f …
TASKalfa 8000i All in One Printer, 16
-
Xerox
WorkCentre 3655
WorkCentre® 3655Multifunction PrinterService ManualWorkCentre® 3655Multifunction Printer Service ManualXerox Internal-Use OnlySampleFault Code Structure:71-101-00Updated 11/16/15 DAWwww MK-Electronic de …
WorkCentre 3655 All in One Printer, 32
Recommended Documentation:
![]()
OFFICEJET 4500
OFFICEJET ADVANTAGE 4500
User Guide
K710

HP Officejet 4500 (G510)/ HP Officejet 4575 (K710)/HP Officejet Advantage 4500 (K710) All-in-One series
User Guide

Copyright information
© 2011 Copyright Hewlett-Packard Development Company, L.P.
Hewlett-Packard Company notices
The information contained in this document is subject to change without notice.
All rights reserved. Reproduction, adaptation, or translation of this material is prohibited without prior written permission of Hewlett-Packard, except as allowed under copyright laws.
The only warranties for HP products and services are set forth in the express warranty statements accompanying such products and services. Nothing herein should be construed as constituting an additional warranty. HP shall not be liable for technical or editorial errors or omissions contained herein.
Acknowledgements
Windows, Windows XP, and Windows Vista are U.S. registered trademarks of Microsoft Corporation.
ENERGY STAR and the ENERGY STAR mark are registered U.S. marks.
Safety information
Always follow basic safety precautions when using this product to reduce risk of injury from fire or electric shock.
1.Read and understand all instructions in the documentation that comes with the device.
2.Observe all warnings and instructions marked on the product.
3.Unplug this product from wall outlets before cleaning.
4.Do not install or use this product near water, or when you are wet.
5.Install the product securely on a stable surface.
6.Install the product in a protected location where no one can step on or trip over the line cord, and the line cord cannot be damaged.
7.If the product does not operate normally, see Solve a problem.
8.There are no user-serviceable parts inside. Refer servicing to qualified service personnel.
Accessibility
The device provides a number of features that make it accessible for people with disabilities.
Visual
The device software is accessible for users with visual impairments or low
vision through the use of your operating system’s accessibility options and features. It also supports most assistive technology such as screen readers, Braille readers, and voice-to-text applications. For users who are color blind, colored buttons and tabs used in the software and on the device control panel have simple text or icon labels that convey the appropriate action.
Mobility
For users with mobility impairments, the device software functions can be executed through keyboard commands. The software also supports Windows accessibility options such as StickyKeys, ToggleKeys, FilterKeys, and MouseKeys. The device doors, buttons, paper trays, and paper guides can be operated by users with limited strength and reach.
Support
For more details about the accessibility of this product and HP’s commitment to product accessibility, visit HP’s Web site at www.hp.com/accessibility.
For accessibility information for the Mac OS X, visit the Apple Web site at www.apple.com/accessibility.

Contents
|
1 |
Get started |
|
|
Accessibility……………………………………………………………………………………………………………….. |
9 |
|
|
Eco-Tips…………………………………………………………………………………………………………………… |
10 |
|
|
Understand the device parts……………………………………………………………………………………….. |
10 |
|
|
Front view…………………………………………………………………………………………………………… |
10 |
|
|
Printing supplies area…………………………………………………………………………………………… |
11 |
|
|
Back view……………………………………………………………………………………………………………. |
11 |
|
|
Use the product control panel……………………………………………………………………………………… |
12 |
|
|
Overview of buttons and lights………………………………………………………………………………. |
12 |
|
|
Change product settings……………………………………………………………………………………….. |
13 |
|
|
Select the mode……………………………………………………………………………………………… |
13 |
|
|
Change product settings………………………………………………………………………………….. |
14 |
|
|
Types of messages………………………………………………………………………………………………. |
14 |
|
|
Status messages……………………………………………………………………………………………. |
14 |
|
|
Warning messages…………………………………………………………………………………………. |
14 |
|
|
Error messages……………………………………………………………………………………………… |
14 |
|
|
Critical error messages……………………………………………………………………………………. |
15 |
|
|
Finding the device model number……………………………………………………………………………….. |
15 |
|
|
Select print media……………………………………………………………………………………………………… |
15 |
|
|
Recommended papers for printing and copying……………………………………………………….. |
15 |
|
|
Recommended papers for photo printing………………………………………………………………… |
17 |
|
|
Tips for selecting and using media…………………………………………………………………………. |
17 |
|
|
Load an original on the scanner glass………………………………………………………………………….. |
18 |
|
|
Load an original in the automatic document feeder (ADF)………………………………………………. |
19 |
|
|
Load media………………………………………………………………………………………………………………. |
19 |
|
|
Maintain the device……………………………………………………………………………………………………. |
21 |
|
|
Clean the scanner glass……………………………………………………………………………………….. |
21 |
|
|
Clean the exterior ……………………………………………………………………………………………….. |
22 |
|
|
Clean the automatic document feeder (ADF) (Some models only)……………………………… |
22 |
|
|
Turn off the device…………………………………………………………………………………………………….. |
24 |
|
|
2 |
|
|
|
Print documents………………………………………………………………………………………………………… |
25 |
|
|
Print documents (Windows)…………………………………………………………………………………… |
25 |
|
|
Print documents (Mac OS X)…………………………………………………………………………………. |
26 |
|
|
Print brochures…………………………………………………………………………………………………………. |
26 |
|
|
Print brochures (Windows)……………………………………………………………………………………. |
26 |
|
|
Print brochures (Mac OS X)…………………………………………………………………………………… |
26 |
|
|
Print on envelopes…………………………………………………………………………………………………….. |
27 |
|
|
Print on envelopes (Windows)……………………………………………………………………………….. |
27 |
|
|
Print on envelopes (Mac OS X)……………………………………………………………………………… |
27 |
|
|
Print a Web page………………………………………………………………………………………………………. |
28 |
|
|
Print a Web page (Windows)…………………………………………………………………………………. |
28 |
|
|
Print a Web page (Mac OS X)……………………………………………………………………………….. |
28 |
1
|
Print photos……………………………………………………………………………………………………………… |
29 |
|
|
Print photos on photo paper (Windows)………………………………………………………………….. |
29 |
|
|
Print photos on photo paper (Mac OS X)………………………………………………………………… |
29 |
|
|
Print on special and custom-sized paper………………………………………………………………………. |
30 |
|
|
Print on special or custom-sized paper (Windows)…………………………………………………… |
30 |
|
|
Print on special or custom-sized paper (Mac OS X)………………………………………………….. |
31 |
|
|
Print borderless documents………………………………………………………………………………………… |
31 |
|
|
Print borderless documents (Windows)…………………………………………………………………… |
32 |
|
|
Print borderless documents (Mac OS X)…………………………………………………………………. |
32 |
|
|
3 |
Scan |
|
|
Scan an original………………………………………………………………………………………………………… |
34 |
|
|
Scan an original from the product control panel……………………………………………………….. |
34 |
|
|
Edit a scanned document using optical character recognition (OCR) software………………….. |
35 |
|
|
4 |
Copy |
|
|
Copy documents……………………………………………………………………………………………………….. |
36 |
|
|
Change copy settings………………………………………………………………………………………………… |
36 |
|
|
5 |
Fax |
|
|
Send a fax……………………………………………………………………………………………………………….. |
38 |
|
|
Send a basic fax………………………………………………………………………………………………….. |
38 |
|
|
Send a fax manually from a phone…………………………………………………………………………. |
39 |
|
|
Send a fax using monitor dialing……………………………………………………………………………. |
40 |
|
|
Send a fax from memory………………………………………………………………………………………. |
41 |
|
|
Schedule a fax to send later………………………………………………………………………………….. |
41 |
|
|
Send a fax to multiple recipients…………………………………………………………………………….. |
42 |
|
|
Send a fax in Error Correction Mode………………………………………………………………………. |
42 |
|
|
Receive a fax……………………………………………………………………………………………………………. |
43 |
|
|
Receive a fax manually………………………………………………………………………………………… |
43 |
|
|
Set up backup fax………………………………………………………………………………………………… |
44 |
|
|
Reprint received faxes from memory………………………………………………………………………. |
45 |
|
|
Poll to receive a fax……………………………………………………………………………………………… |
45 |
|
|
Forward faxes to another number………………………………………………………………………….. |
46 |
|
|
Set the paper size for received faxes……………………………………………………………………… |
46 |
|
|
Set automatic reduction for incoming faxes……………………………………………………………… |
47 |
|
|
Block junk fax numbers………………………………………………………………………………………… |
47 |
|
|
Add numbers to the junk fax list……………………………………………………………………….. |
48 |
|
|
Remove numbers from the junk fax list……………………………………………………………… |
48 |
|
|
Print a Junk Fax Report…………………………………………………………………………………… |
48 |
|
|
Receive faxes to your computer (Fax to PC and Fax to Mac)…………………………………….. |
49 |
|
|
Fax to PC and Fax to Mac requirements……………………………………………………………. |
49 |
|
|
Activate Fax to PC and Fax to Mac…………………………………………………………………… |
49 |
|
|
Modify Fax to PC or Fax to Mac settings……………………………………………………………. |
50 |
|
|
Turn off Fax to PC or Fax to Mac……………………………………………………………………… |
50 |
2
|
Contents |
|
|
Change fax settings…………………………………………………………………………………………………… |
50 |
|
Configure the fax header………………………………………………………………………………………. |
51 |
|
Set the answer mode (Auto answer)………………………………………………………………………. |
51 |
|
Set the number of rings before answering……………………………………………………………….. |
51 |
|
Change the answer ring pattern for distinctive ring…………………………………………………… |
52 |
|
Set the fax error correction mode…………………………………………………………………………… |
52 |
|
Set the dial type…………………………………………………………………………………………………… |
53 |
|
Set the redial options……………………………………………………………………………………………. |
53 |
|
Set the fax speed…………………………………………………………………………………………………. |
53 |
|
Set the fax sound volume……………………………………………………………………………………… |
54 |
|
Fax over Internet Protocol (FoIP)………………………………………………………………………………… |
54 |
|
Use reports………………………………………………………………………………………………………………. |
55 |
|
Print fax confirmation reports…………………………………………………………………………………. |
55 |
|
Print fax error reports……………………………………………………………………………………………. |
56 |
|
Print and view the fax log……………………………………………………………………………………… |
56 |
|
Clear the fax log………………………………………………………………………………………………….. |
57 |
|
Print the details of the last fax transaction……………………………………………………………….. |
57 |
|
Print a Caller ID History Report……………………………………………………………………………… |
58 |
|
6 Work with ink cartridges |
|
|
Information about ink cartridges………………………………………………………………………………….. |
59 |
|
Check the estimated ink levels……………………………………………………………………………………. |
60 |
|
Handle the ink cartridges……………………………………………………………………………………………. |
61 |
|
Replace the ink cartridges………………………………………………………………………………………….. |
61 |
|
Store printing supplies……………………………………………………………………………………………….. |
65 |
|
Advanced ink cartridge maintainance…………………………………………………………………………… |
65 |
|
Align the ink cartridges…………………………………………………………………………………………. |
65 |
|
Clean the ink cartridges………………………………………………………………………………………… |
67 |
|
7 Solve a problem |
|
|
HP support……………………………………………………………………………………………………………….. |
69 |
|
Obtain electronic support………………………………………………………………………………………. |
70 |
|
HP support by phone……………………………………………………………………………………………. |
70 |
|
Before you call……………………………………………………………………………………………….. |
70 |
|
Phone support period……………………………………………………………………………………… |
71 |
|
Telephone support numbers…………………………………………………………………………….. |
71 |
|
After the phone support period…………………………………………………………………………. |
73 |
|
General troubleshooting tips and resources………………………………………………………………….. |
73 |
|
Solve printing problems……………………………………………………………………………………………… |
74 |
|
The device shuts down unexpectedly……………………………………………………………………… |
74 |
|
Error message appears on control-panel display……………………………………………………… |
74 |
|
Alignment fails…………………………………………………………………………………………………….. |
74 |
|
The device is not responding (nothing prints)…………………………………………………………… |
74 |
|
Device takes a long time to print……………………………………………………………………………. |
75 |
|
Blank or partial page printed………………………………………………………………………………….. |
75 |
|
Something on the page is missing or incorrect…………………………………………………………. |
76 |
|
Placement of the text or graphics is wrong………………………………………………………………. |
76 |
|
The device prints half a page, then ejects the paper…………………………………………………. |
77 |
3
|
Poor print quality and unexpected printouts………………………………………………………………….. |
77 |
|
Solution 1: Use genuine HP cartridges……………………………………………………………………. |
77 |
|
Solution 2: Check the paper………………………………………………………………………………….. |
77 |
|
Solution 3: Wait a short period of time (if possible)…………………………………………………… |
78 |
|
Solution 4: Check the print settings………………………………………………………………………… |
78 |
|
Step 1: Check the print quality settings……………………………………………………………… |
79 |
|
Step 2: Check the Print in Grayscale setting………………………………………………………. |
79 |
|
Solution 5: Check estimated ink levels and replace low or empty ink cartridges…………… |
80 |
|
Solution 6: Print and evaluate a diagnostic report and troubleshoot defects…………………. |
80 |
|
Print Quality Diagnostic Report………………………………………………………………………… |
81 |
|
Self-Test Report……………………………………………………………………………………………… |
85 |
|
Solution 7: Clean the ink cartridges………………………………………………………………………… |
87 |
|
Solution 8: Align the ink cartridges…………………………………………………………………………. |
88 |
|
Solution 9: Replace the problem ink cartridge………………………………………………………….. |
88 |
|
Solution 10: Service the product…………………………………………………………………………….. |
88 |
|
Clean the area around the ink nozzles…………………………………………………………………………. |
89 |
|
Solve paper-feed problems………………………………………………………………………………………… |
91 |
|
Solve copy problems…………………………………………………………………………………………………. |
92 |
|
No copy came out………………………………………………………………………………………………… |
93 |
|
Copies are blank………………………………………………………………………………………………….. |
93 |
|
Documents are missing or faded……………………………………………………………………………. |
93 |
|
Size is reduced……………………………………………………………………………………………………. |
94 |
|
Copy quality is poor …………………………………………………………………………………………….. |
94 |
|
Copy defects are apparent……………………………………………………………………………………. |
94 |
|
The device prints half a page, then ejects the paper…………………………………………………. |
95 |
|
Paper mismatch…………………………………………………………………………………………………… |
95 |
|
Solve scan problems…………………………………………………………………………………………………. |
95 |
|
Scanner did nothing……………………………………………………………………………………………… |
95 |
|
Scan takes too long……………………………………………………………………………………………… |
96 |
|
Part of the document did not scan or text is missing…………………………………………………. |
96 |
|
Text cannot be edited…………………………………………………………………………………………… |
97 |
|
Error messages appear………………………………………………………………………………………… |
97 |
|
Scanned image quality is poor ……………………………………………………………………………… |
97 |
|
Scan defects are apparent……………………………………………………………………………………. |
98 |
|
Solve fax problems……………………………………………………………………………………………………. |
99 |
|
The fax test failed………………………………………………………………………………………………… |
99 |
|
Solve wired (Ethernet) network problems (some models only)………………………………………. |
111 |
|
General network troubleshooting………………………………………………………………………….. |
111 |
|
Network port created does not match device IP address (Windows)…………………………. |
112 |
4
|
Contents |
|
|
Solve wireless problems (some models only)……………………………………………………………… |
112 |
|
Basic wireless troubleshooting…………………………………………………………………………….. |
112 |
|
Advanced wireless troubleshooting………………………………………………………………………. |
113 |
|
Step 1: Make sure your computer is connected to your network………………………….. |
113 |
|
Step 2: Make sure that the HP device is connected to your network……………………. |
114 |
|
Step 3: Check to see if the firewall software is blocking communication……………….. |
115 |
|
Step 4: Make sure the HP device is online and ready………………………………………… |
116 |
|
Step 5: Make sure the wireless version of the HP device is set as the default printer |
|
|
driver (Windows only)……………………………………………………………………………………. |
116 |
|
Step 6: Make sure the HP Network Devices Support service is running (Windows |
|
|
only)……………………………………………………………………………………………………………. |
117 |
|
Add hardware addresses to a wireless access point (WAP)……………………………….. |
117 |
|
Configure your firewall to work with HP devices…………………………………………………………… |
118 |
|
Solve device management problems…………………………………………………………………………. |
119 |
|
Embedded Web server cannot be opened…………………………………………………………….. |
120 |
|
The EWS is only available in English……………………………………………………………………. |
120 |
|
Troubleshoot installation issues………………………………………………………………………………… |
121 |
|
Hardware installation suggestions………………………………………………………………………… |
121 |
|
Software installation suggestions…………………………………………………………………………. |
122 |
|
Understand the Printer Status Report and Self-Test Report………………………………………….. |
122 |
|
Understand the network configuration page (some models only)…………………………………… |
124 |
|
Clear jams………………………………………………………………………………………………………………. |
125 |
|
Clear paper jams……………………………………………………………………………………………….. |
126 |
|
Avoid paper jams……………………………………………………………………………………………….. |
127 |
|
A Technical information |
|
|
Warranty information……………………………………………………………………………………………….. |
128 |
|
Hewlett-Packard limited warranty statement………………………………………………………….. |
129 |
|
Ink cartridge warranty information………………………………………………………………………… |
130 |
|
Device specifications……………………………………………………………………………………………….. |
131 |
|
Physical specifications………………………………………………………………………………………… |
131 |
|
Product features and capacities…………………………………………………………………………… |
131 |
|
Processor and memory specifications…………………………………………………………………… |
131 |
|
System requirements………………………………………………………………………………………….. |
132 |
|
Network protocol specifications (Some models only)………………………………………………. |
132 |
|
Embedded Web server specifications (some models only)………………………………………. |
133 |
|
Media specifications…………………………………………………………………………………………… |
133 |
|
Understand supported sizes…………………………………………………………………………… |
133 |
|
Understand supported media types and weights………………………………………………. |
135 |
|
Set minimum margins……………………………………………………………………………………. |
136 |
|
Guidelines for two-sided (duplex) printing…………………………………………………… |
137 |
|
Print resolution…………………………………………………………………………………………………… |
137 |
|
Print specifications……………………………………………………………………………………………… |
137 |
|
Copy specifications…………………………………………………………………………………………….. |
137 |
|
Fax specifications………………………………………………………………………………………………. |
138 |
|
Scan specifications…………………………………………………………………………………………….. |
139 |
|
Operating environment……………………………………………………………………………………….. |
139 |
|
Electrical requirements……………………………………………………………………………………….. |
139 |
|
Acoustic emission specification……………………………………………………………………………. |
139 |
5
|
Regulatory information…………………………………………………………………………………………….. |
140 |
|
FCC statement…………………………………………………………………………………………………… |
141 |
|
Notice to users in Korea……………………………………………………………………………………… |
141 |
|
VCCI (Class B) compliance statement for users in Japan………………………………………… |
141 |
|
Notice to users in Japan about the power cord………………………………………………………. |
142 |
|
Noise emission statement for Germany………………………………………………………………… |
142 |
|
LED indicator statement……………………………………………………………………………………… |
142 |
|
Notice to users of the U.S. telephone network: FCC requirements……………………………. |
143 |
|
Notice to users of the Canadian telephone network………………………………………………… |
143 |
|
Notice to users in the European Economic Area…………………………………………………….. |
145 |
|
Notice to users of the German telephone network………………………………………………….. |
145 |
|
Australia wired fax statement………………………………………………………………………………. |
145 |
|
Regulatory information for wireless products…………………………………………………………. |
145 |
|
Exposure to radio frequency radiation……………………………………………………………… |
146 |
|
Notice to users in Brazil…………………………………………………………………………………. |
146 |
|
Notice to users in Canada……………………………………………………………………………… |
146 |
|
Notice to users in Taiwan………………………………………………………………………………. |
146 |
|
European Union regulatory notice…………………………………………………………………… |
147 |
|
Regulatory model number…………………………………………………………………………………… |
147 |
|
Declaration of conformity…………………………………………………………………………………….. |
148 |
|
Environmental product stewardship program………………………………………………………………. |
151 |
|
Paper use…………………………………………………………………………………………………………. |
151 |
|
Plastics…………………………………………………………………………………………………………….. |
151 |
|
Material safety data sheets………………………………………………………………………………….. |
151 |
|
Recycling program……………………………………………………………………………………………… |
151 |
|
HP inkjet supplies recycling program……………………………………………………………………. |
151 |
|
Disposal of waste equipment by users in private households in the European |
|
|
Union……………………………………………………………………………………………………………….. |
152 |
|
Power consumption……………………………………………………………………………………………. |
152 |
|
Chemical Substances…………………………………………………………………………………………. |
153 |
|
RoHS notices (China only)………………………………………………………………………………….. |
153 |
|
Third-party licenses…………………………………………………………………………………………………. |
154 |
|
HP Officejet 4500 Desktop………………………………………………………………………………….. |
155 |
|
HP Officejet 4500 / HP Officejet 4575 / HP Officejet Advantage 4500……………………….. |
158 |
|
HP Officejet 4500 Wireless………………………………………………………………………………….. |
165 |
|
B HP supplies and accessories |
|
|
Order printing supplies online……………………………………………………………………………………. |
172 |
|
Supplies…………………………………………………………………………………………………………………. |
172 |
|
Supported ink cartridges……………………………………………………………………………………… |
172 |
|
HP media………………………………………………………………………………………………………….. |
173 |
6
|
Contents |
||
|
C |
Additional fax setup |
|
|
Set up faxing (parallel phone systems)………………………………………………………………………. |
174 |
|
|
Choose the correct fax setup for your home or office………………………………………………. |
175 |
|
|
Case A: Separate fax line (no voice calls received)………………………………………………… |
177 |
|
|
Case B: Set up the device with DSL……………………………………………………………………… |
178 |
|
|
Case C: Set up the device with a PBX phone system or an ISDN line………………………. |
179 |
|
|
Case D: Fax with a distinctive ring service on the same line…………………………………….. |
179 |
|
|
Case E: Shared voice/fax line……………………………………………………………………………… |
180 |
|
|
Case F: Shared voice/fax line with voice mail………………………………………………………… |
181 |
|
|
Case G: Fax line shared with computer modem (no voice calls received)………………….. |
182 |
|
|
Set up the device with a computer dial-up modem…………………………………………….. |
183 |
|
|
Set up the device with a computer DSL/ADSL modem………………………………………. |
184 |
|
|
Case H: Shared voice/fax line with computer modem……………………………………………… |
185 |
|
|
Shared voice/fax with computer dial-up modem………………………………………………… |
185 |
|
|
Shared voice/fax with computer DSL/ADSL modem………………………………………….. |
187 |
|
|
Case I: Shared voice/fax line with answering machine……………………………………………. |
188 |
|
|
Case J: Shared voice/fax line with computer modem and answering machine……………. |
189 |
|
|
Shared voice/fax line with computer dial-up modem and answering machine……….. |
190 |
|
|
Shared voice/fax line with computer DSL/ADSL modem and answering |
||
|
machine………………………………………………………………………………………………………. |
192 |
|
|
Case K: Shared voice/fax line with computer dial-up modem and voice mail……………… |
193 |
|
|
Serial-type fax setup………………………………………………………………………………………………… |
195 |
|
|
Test fax setup…………………………………………………………………………………………………………. |
196 |
|
|
D Network setup (some models only) |
||
|
Change basic network settings………………………………………………………………………………….. |
197 |
|
|
View and print network settings……………………………………………………………………………. |
197 |
|
|
Turn the wireless radio on and off (some models only)……………………………………………. |
197 |
|
|
Change advanced network settings…………………………………………………………………………… |
197 |
|
|
Set link speed……………………………………………………………………………………………………. |
198 |
|
|
To View IP settings…………………………………………………………………………………………….. |
198 |
|
|
To Change IP settings………………………………………………………………………………………… |
198 |
|
|
Set up the device for wireless communication (some models only)………………………………… |
199 |
|
|
Understand 802.11 wireless network settings………………………………………………………… |
199 |
|
|
To set up wireless communication using the device control panel with wireless setup |
||
|
wizard………………………………………………………………………………………………………………. |
200 |
|
|
To set up wireless communication using the installer (Windows)……………………………… |
201 |
|
|
To set up wireless communication using the installer (Mac OS X)…………………………….. |
201 |
|
|
Connect the device using an ad hoc wireless network connection……………………………. |
201 |
|
|
To turn off wireless communication………………………………………………………………………. |
202 |
|
|
To print a wireless test page………………………………………………………………………………… |
202 |
|
|
Reset wireless settings……………………………………………………………………………………….. |
202 |
|
|
Change the connection method……………………………………………………………………………. |
202 |
|
|
Guidelines for ensuring wireless network security…………………………………………………… |
203 |
|
|
To add hardware addresses to a WAP…………………………………………………………….. |
203 |
|
|
Other guidelines…………………………………………………………………………………………… |
203 |
|
|
Guidelines for reducing interference on a wireless network……………………………………… |
203 |
|
|
Uninstall and reinstall the software…………………………………………………………………………….. |
203 |
|
|
E |
Device management tools |
|
|
Toolbox (Windows)………………………………………………………………………………………………….. |
206 |
7
|
Use the HP Solution Center (Windows)……………………………………………………………………… |
206 |
|
HP Utility (Mac OS X)………………………………………………………………………………………………. |
206 |
|
Embedded Web server (some models only)……………………………………………………………….. |
207 |
|
F Errors (Windows) |
|
|
Fax Memory Full……………………………………………………………………………………………………… |
209 |
|
Device Disconnected……………………………………………………………………………………………….. |
209 |
|
Ink Alert………………………………………………………………………………………………………………….. |
209 |
|
Cartridge Problem…………………………………………………………………………………………………… |
210 |
|
Solution 1: Install the ink cartridges correctly…………………………………………………………. |
210 |
|
Solution 2: Turn the product off and on…………………………………………………………………. |
212 |
|
Solution 3: Clean the electrical contacts………………………………………………………………… |
212 |
|
Solution 4: Replace the ink cartridge…………………………………………………………………….. |
212 |
|
Paper Mismatch………………………………………………………………………………………………………. |
212 |
|
The cartridge cradle cannot move……………………………………………………………………………… |
212 |
|
Paper Jam……………………………………………………………………………………………………………… |
212 |
|
Paper Jam……………………………………………………………………………………………………………… |
212 |
|
The printer is out of paper………………………………………………………………………………………… |
213 |
|
Printer Offline………………………………………………………………………………………………………….. |
213 |
|
Printer Paused………………………………………………………………………………………………………… |
213 |
|
Document failed to print……………………………………………………………………………………………. |
213 |
|
General printer error………………………………………………………………………………………………… |
213 |
|
Align cartridge…………………………………………………………………………………………………………. |
214 |
|
Index………………………………………………………………………………………………………………………….. |
215 |
8

1 Get started
This guide provides details about how to use the device and to resolve problems.
•Accessibility
•Eco-Tips
•Understand the device parts
•Use the product control panel
•Finding the device model number
•Select print media
•Load an original on the scanner glass
•Load an original in the automatic document feeder (ADF)
•Load media
•Maintain the device
•Turn off the device
 NOTE: If you are using the device with a computer running Windows XP Starter Edition, Windows Vista Starter Edition, or Windows 7 Starter Edition, some features might not be available. For more information, see Operating system compatibility.
Accessibility
The device provides a number of features that make it accessible for people with disabilities.
Visual
The device software is accessible for users with visual impairments or low vision through the use of your operating system’s accessibility options and features. It also supports most assistive technology such as screen readers, Braille readers, and voice-to-text applications. For users who are color blind, colored buttons and tabs used in the software and on the device control panel have simple text or icon labels that convey the appropriate action.
Mobility
For users with mobility impairments, the device software functions can be executed through keyboard commands. The software also supports Windows accessibility options such as StickyKeys, ToggleKeys, FilterKeys, and MouseKeys. The device doors, buttons, paper trays, and paper guides can be operated by users with limited strength and reach.
Support
For more details about the accessibility of this product and HP’s commitment to product accessibility, visit HP’s Web site at www.hp.com/accessibility.
For accessibility information for Mac OS X, visit the Apple Web site at www.apple.com/ accessibility.
Chapter 1
Eco-Tips
HP is committed to helping customers reduce their environmental footprint. HP has provided the Eco-Tips below to help you focus on ways to assess and reduce the impact of your printing choices. In addition to specific features in this product, please visit the HP Eco Solutions Web site for more information on HP’s environmental initiatives.
www.hp.com/hpinfo/globalcitizenship/environment/
•Duplex printing: Use Paper-saving Printing to print two-sided documents with multiple pages on same sheet to reduce paper usage. For more information, see Two-sided printing (duplexing).
•Smart Web printing (Windows): The HP Smart Web Printing interface includes a Clip Book and Edit Clips window where you can store, organize, or print clips you have gathered from the Web. For more information, see Print a Web page.
•Energy Savings Information: To determine the ENERGY STAR® qualification status for this product, see Power consumption.
•Recycled Materials: For more information regarding recycling of HP products, please visit:
www.hp.com/hpinfo/globalcitizenship/environment/recycle/
Understand the device parts
This section contains the following topics:
•Front view
•Printing supplies area
•Back view
Front view
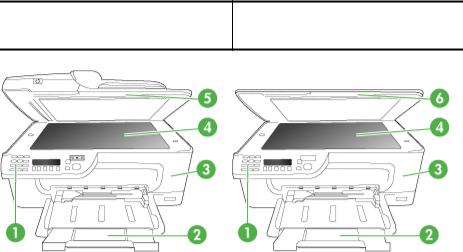
HP Officejet 4500 / HP Officejet 4575 /
HP Officejet 4500 Wireless / HP Officejet HP Officejet 4500 Desktop Advantage 4500
10 Get started

1Control panel
2Main tray
3Cartridge access door
4Scanner glass
5Automatic document feeder
6Scanner lid
Printing supplies area
HP Officejet 4500 / HP Officejet 4575 /
HP Officejet 4500 Wireless / HP Officejet HP Officejet 4500 Desktop Advantage 4500
1Cartridge access door
2Ink cartridges
Back view
HP Officejet 4500 / HP Officejet 4575 /
HP Officejet 4500 Wireless / HP Officejet HP Officejet 4500 Desktop Advantage 4500
|
Understand the device parts |
11 |
Chapter 1
|
1 |
Universal serial bus (USB) port |
|
2 |
Ethernet port (HP Officejet 4500 / HP Officejet 4575 / HP Officejet Advantage 4500 only) |
|
3 |
Power input |
|
4 |
1-LINE (fax) |
|
5 |
2-EXT (phone) |
Use the product control panel
This section contains the following topics:
•Overview of buttons and lights
•Change product settings
•Types of messages
Overview of buttons and lights
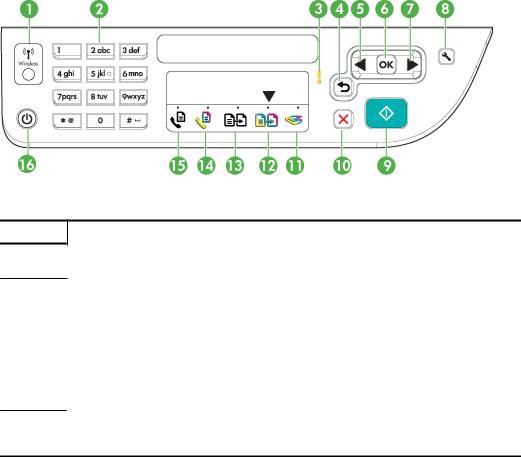
The following diagram and related table provide a quick reference to the device control panel features.
|
Label |
Name and Description |
1Wireless button (HP Officejet 4500 Wireless): Turns the 802.11 wireless feature on or off. The button is lit when the wireless feature is on.
|
2 |
Keypad: Enters values. |
|
3 |
Attention light: Indicates an error condition. |
|
4 |
Back button: Reverts back to its previous setting or upper level menu. |
|
5 |
Left arrow button: Navigates forward through settings in the menus. |
|
6 |
OK button: Selects the current menu or setting. |
|
7 |
Right arrow button: Navigates in reverse through settings in the menus. |
8Setup: Presents the Setup menu for generating reports and other maintenance settings, and for accessing the Help menu. The topic that you select from the Help menu opens a help window on your computer screen.
12 Get started
(continued)
|
Label |
Name and Description |
|
9 |
Start: Initiates a copy, fax, or scan job. Pressing Start processes the job according to the function |
|
selected. |
|
|
10 |
Cancel: Stops a job, exits a menu, or exits settings. |
|
11 |
Scan function indicator |
|
12 |
Copy Color function indicator |
|
13 |
Copy B&W function indicator |
|
14 |
Fax Color function indicator |
|
15 |
Fax B&W function indicator |
16Power: Turns the device on or off. The Power button is lit when the device is on. The light blinks while performing a job.
When the device is turned off, a minimal amount of power is still supplied. To completely disconnect the power supply, turn the device off, and then unplug the power cord.
Change product settings
You use the control panel to change the product’s mode and settings, print reports, or get help for the product.
TIP: If the product is connected to a computer, you can also change the product settings using software tools available on your computer, such as the Toolbox (Windows), the HP Utility (Mac OS X), or the embedded Web server (EWS). For more information about these tools, see Device management tools.
This section contains the following topics:
•Select the mode
•Change product settings
Select the mode
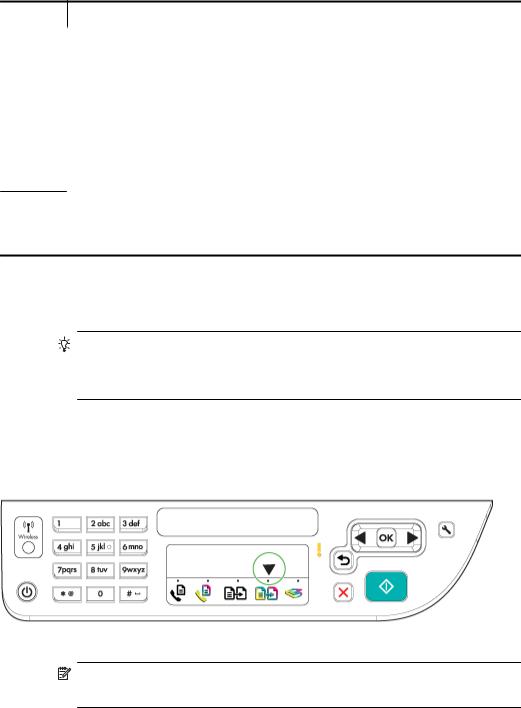
The mode indicator arrow on the control panel shows the mode currently selected for the product.
NOTE: After selecting a mode and changing settings, press  (Start button) to start the job.
|
Use the product control panel |
13 |

Chapter 1
To select a different mode
Press left arrow  or right arrow
  to select the desired mode, and then press OK.
To change settings for a mode
1.After selecting a mode, press the arrow buttons to scroll through the available settings available, and then press OK to select the setting you want to change.
2.Press the arrow buttons to change the settings, and then press OK.
 NOTE: Use the left arrow
  button or
  button when you want to delete an incorrect entry on the display.
Change product settings
To change the product settings or print reports, use the options available in the Setup menu:
1.Press the  (Setup) button
2.Press the arrow buttons to scroll through the menus.
3.Press OK to select menus or options.
 NOTE: Use the left arrow
  button or
  button when you want to delete an incorrect entry on the display.
Types of messages
While using the product, messages will appear on the control panel display. These messages provide information about the product’s activity. While some types of messages just provide information about the product’s status, other types of messages might require that you take the appropriate action (often specified in the message itself) before the product can continue functioning.
Status messages
Status messages reflect the current state of the device. They inform you of normal operation and require no action to clear them. They change as the state of the device changes. Whenever the device is ready, not busy, and has no pending warning messages, the status message READY appears if the device is turned on.
Warning messages
Warning messages inform you of events that require your attention, but they do not prevent the device from operating. An example of a warning message is a low ink warning. These messages appear until you resolve the condition.
Error messages
Error messages communicate that some action must be performed, such as adding media or clearing a media jam. These messages are usually accompanied by a blinking red Attention light. Take the appropriate action to continue printing.
14 Get started

If the error message shows an error code, press the Power button to turn off the device, and then turn it on again. In most situations, this action solves the problem. If the message persists, your device might need service. For more information, see Solve a problem.
Critical error messages
Critical error messages inform you of a device failure. Some of these messages can be cleared by pressing the Power button to turn off the device, and then turning it on again. If a critical error persists, service is required. For more information, see Solve a problem.
Finding the device model number
In addition to the model name that appears on the front of the device, this device has a specific model number. You can use this number to help determine which supplies or accessories are available for your product, as well as when obtaining support.
The model number is printed on a label located inside the device, near the ink cartridges area.
Select print media
The device is designed to work well with most types of office media. It is best to test a variety of print media types before buying large quantities. Use HP media for optimum print quality. Visit the HP Web site at www.hp.com for more information about HP media.
HP recommends plain papers with the ColorLok logo for printing and copying of everyday documents. All papers with the ColorLok logo are independently tested to meet high standards of reliability and print quality, and produce documents with crisp, vivid color, bolder blacks & dry faster than ordinary plain papers. Look for papers with the ColorLok logo in a variety of weights and sizes from major paper manufacturers.
This section contains the following topics:
•Recommended papers for printing and copying
•Recommended papers for photo printing
•Tips for selecting and using media
Recommended papers for printing and copying
If you want the best print quality, HP recommends using HP papers that are specifically designed for the type of project you are printing.

Chapter 1
Depending on your country/region, some of these papers might not be available.
|
HP Brochure Paper |
These papers are glossy-coated or matte-coated on both sides for two- |
|
|
HP Superior Inkjet |
sided use. They are the perfect choice for near-photographic |
|
|
reproductions and business graphics for report covers, special |
||
|
Paper |
||
|
presentations, brochures, mailers, and calendars. |
||
|
HP Bright White Inkjet |
HP Bright White Inkjet Paper delivers high-contrast colors and sharp |
|
|
Paper |
text. It is opaque enough for two-sided color usage with no show- |
|
|
through, which makes it ideal for newsletters, reports, and flyers. It |
||
|
features ColorLok Technology for less smearing, bolder blacks and |
||
|
vivid colors. |
||
|
HP Printing Paper |
HP Printing Paper is a high-quality multifunction paper. It produces |
|
|
documents that look and feel more substantial than documents printed |
||
|
on standard multipurpose or copy paper. It features ColorLok |
||
|
Technology for less smearing, bolder blacks and vivid colors. It is acid- |
||
|
free for longer lasting documents. |
||
|
HP Office Paper |
HP Office Paper is a high-quality multifunction paper. It is suitable for |
|
|
copies, drafts, memos and other everyday documents. It features |
||
|
ColorLok Technology for less smearing, bolder blacks and vivid colors. |
||
|
It is acid-free for longer lasting documents |
||
|
HP Office Recycled |
HP Office Recycled Paper is a high-quality multifunction paper made |
|
|
Paper |
with 30% recycled fiber. It features ColorLok Technology for less |
|
|
smearing, bolder blacks and vivid colors. It is acid-free for longer lasting |
||
|
documents. |
||
|
HP Premium |
These papers are heavy two-sided matte papers perfect for |
|
|
Presentation Paper |
presentation, proposals, reports and newsletters. They are |
|
|
HP Professional Paper |
heavyweight for an impressive look and feel. |
|
|
HP Premium Inkjet |
HP Premium Inkjet Transparency Film makes your color presentations |
|
|
Transparency Film |
vivid and even more impressive. This film is easy to use and handle and |
|
|
dries quickly without smudging. |
||
|
HP Advanced Photo |
This thick photo paper features an instant-dry finish for easy handling |
|
|
Paper |
without smudging. It resists water, smears, fingerprints, and humidity. |
|
|
Your prints have a look and feel comparable to a store processed photo. |
||
|
It is available in several sizes, including A4, 8.5 x 11 inch, 10 x 15 cm |
||
|
(4 x 6 inch), 13×18 cm (5 x7 inch) and two finishes – glossy or soft gloss |
||
|
(satin matte). It is acid-free for longer lasting documents. |
||
|
HP Everyday Photo |
Print colorful, everyday snapshots at a low cost, using paper designed |
|
|
Paper |
for casual photo printing. This affordable, photo paper dries quickly for |
|
|
easy handling. Get sharp, crisp images when you use this paper with |
||
|
any inkjet printer. Available in semi-gloss finish in 8.5 x11 inch, A4, 4 x |
||
|
6 inch and 10 x 15 cm. It is acid-free for longer lasting documents. |
||
|
HP Iron-On Transfers |
HP Iron-on Transfers (for color fabrics or for light or white fabrics) are |
|
|
the ideal solution for creating custom T-shirts from your digital photos. |
||
To order HP papers and other supplies, go to www.hp.com/buy/supplies. If prompted, choose your country/region, follow the prompts to select your product, and then click one of the shopping links on the page.
 NOTE: At this time, some portions of the HP Web site are available in English only.
HP Photo Value Packs:
16 Get started
![]()
HP Photo Value Packs conveniently package Original HP ink cartridges and HP Advanced Photo Paper to save you time and take the guesswork out of printing affordable professional photos with your HP printer. Original HP inks and HP Advanced Photo Paper have been designed to work together so your photos are long lasting and vivid, print after print. Great for printing out an entire vacation’s worth of photos or multiple prints to share.
Recommended papers for photo printing
If you want the best print quality, HP recommends using HP papers that are specifically designed for the type of project you are printing.
Depending on your country/region, some of these papers might not be available.
HP Advanced Photo Paper
This thick photo paper features an instant-dry finish for easy handling without smudging. It resists water, smears, fingerprints, and humidity. Your prints have a look and feel comparable to a store processed photo. It is available in several sizes, including A4, 8.5 x 11 inch, 10 x 15 cm (4 x 6 inch), 13 x 18 cm (5 x 7 inch) and two finishes – glossy or soft gloss (satin matte). It is acid-free for longer lasting documents.
HP Everyday Photo Paper
Print colorful, everyday snapshots at a low cost, using paper designed for casual photo printing. This affordable, photo paper dries quickly for easy handling. Get sharp, crisp images when you use this paper with any inkjet printer. Available in semi-gloss finish in 8.5 x 11 inch, A4, 4 x 6 inch and 10 x 15 cm. It is acid-free for longer lasting documents.
HP Photo Value Packs:
HP Photo Value Packs conveniently package Original HP ink cartridges and HP Advanced Photo Paper to save you time and take the guesswork out of printing affordable professional photos with your HP printer. Original HP inks and HP Advanced Photo Paper have been designed to work together so your photos are long lasting and vivid, print after print. Great for printing out an entire vacation’s worth of photos or multiple prints to share.
To order HP papers and other supplies, go to www.hp.com/buy/supplies. If prompted, choose your country/region, follow the prompts to select your product, and then click one of the shopping links on the page.
 NOTE: At this time, some portions of the HP Web site are available in English only.
Tips for selecting and using media
For the best results, observe the following guidelines.
•Always use media that conforms to the device specifications. For more information, see Media specifications.
•Load only one type of media at a time into a tray or automatic document feeder (ADF) (some models only).
•When loading the trays and ADF (some models only), make sure the media is properly loaded. For more information, see Load media or Load an original in the automatic document feeder (ADF).
Chapter 1
•Do not overload the tray or ADF (some models only). For more information, see Media specifications.
•To prevent jams, poor print quality, and other printing problems, avoid loading the following media in the trays or ADF (some models only):
◦Multipart forms
◦Media that is damaged, curled, or wrinkled
◦Media with cutouts or perforations
◦Media that is heavily textured, embossed, or does not accept ink well
◦Media that is too lightweight or stretches easily
◦Media that contains staples or clips
 NOTE: To scan, copy, or fax documents that contain pages that do not conform to these guidelines, use the scanner glass. For more information, see Load an original on the scanner glass.
Load an original on the scanner glass
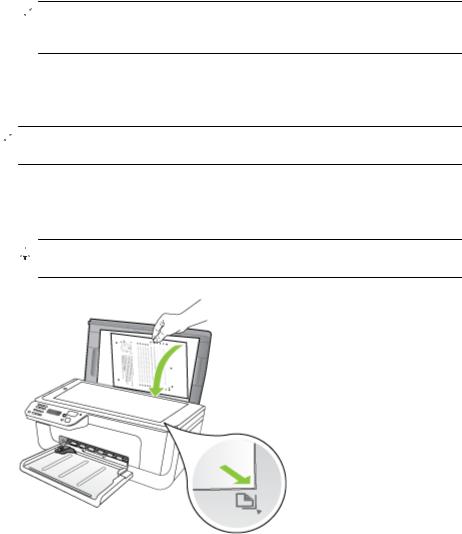
You can copy, scan, or fax up to letteror A4-size originals by loading them on the glass.
 NOTE: Many of the special features will not work correctly if the glass and lid backing are not clean. For more information, see Maintain the device.
To load an original on the scanner glass
1.Lift the scanner lid.
2.Load your original print side down.

 TIP: For more help on loading an original, refer to the engraved guides along the edge of the glass.
18 Get started
3. Close the lid.
Load an original in the automatic document feeder (ADF)
 NOTE: The ADF is available for some models only.
You can copy, scan, or fax a one-sided, singleor multiple-page, A4or letter-size document by placing it in the document feeder tray.
 CAUTION: Do not load photos in the ADF; this might cause damage to your photos.
 NOTE: Two-sided legal-size documents cannot be scanned, copied, or faxed using the ADF.
NOTE: Some features, such as the Fit to Page copy feature, do not work when you load your originals in the ADF. You must load your originals on the glass.
The document feeder tray holds a maximum of 50 sheets of plain paper.
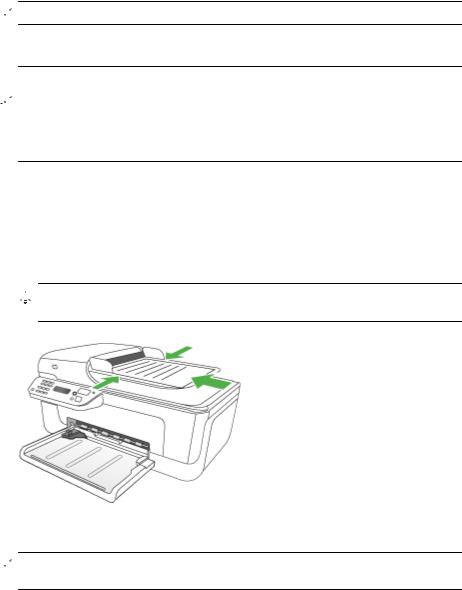
To load an original in the document feeder tray
1.Load your original, with the print side up, into the document feeder tray. Place the pages so that the top edge of the document goes in first. Slide the media into the automatic document feeder until you hear a beep or see a message on the display indicating that the loaded pages were detected.

 TIP: For more help on loading originals in the automatic document feeder, refer to the diagram engraved in the document feeder tray.
2. Slide the width guides inward until they stop at the left and right edges of the media.
 NOTE: Remove all originals from the document feeder tray before lifting the lid on the device.
Load media
This section provides instructions for loading media into the device.
Chapter 1
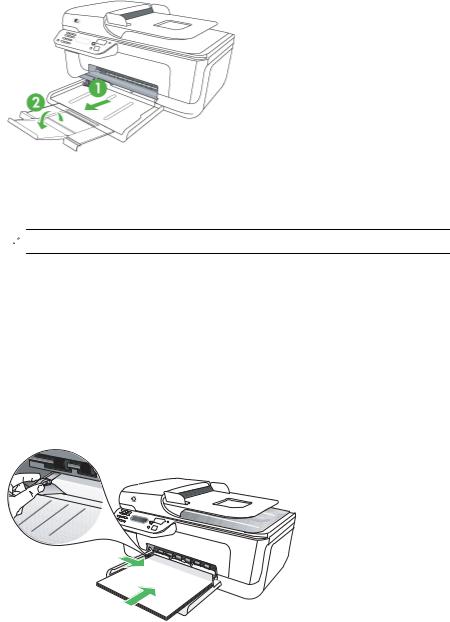
To load media
1. Pull out the tray extender.
2.Insert the media print-side down along the right of the main tray. Make sure the stack of media aligns with the right and back edges of the tray, and does not exceed the line marking in the tray.
 NOTE: Do not load paper while the device is printing.
•Envelopes: Load envelopes with the flaps facing up to the right or the back of the tray. Depending on the type of envelope you are loading, the flap hinge should be on the left or towards the back of the tray.
•Photo paper: If the photo paper has a tab along one edge, make sure the tab is pointing towards the back of the product.
•Transparencies: Insert transparencies with the rough side down and the adhesive strip pointing towards the back of the product.
•Custom-sized media: Use only custom-sized media that is supported by the device. For more information, see Media specifications.
3.Slide the media guides in the tray to adjust them for the media size that you have loaded.
20 Get started
Maintain the device
This section provides instructions for keeping the device in top working condition. Perform these maintenance procedures as necessary.
•Clean the scanner glass
•Clean the exterior
•Clean the automatic document feeder (ADF) (Some models only)
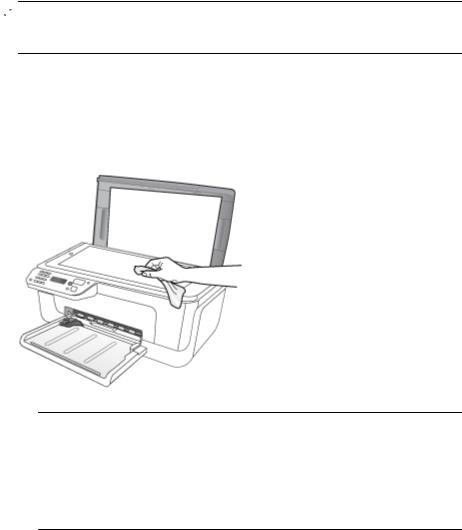
Clean the scanner glass
 NOTE: Dust or dirt on the scanner glass, scanner lid backing, or scanner frame can slow down performance, degrade the quality of scans, and affect the accuracy of special features such as fitting copies to a certain page size.
To clean the scanner glass
1.Turn off the device.
2.Lift the scanner lid.
3.Clean the glass by using a soft, lint-free cloth that has been sprayed with a mild glass cleaner. Dry the glass with a dry, soft, lint-free cloth.
 CAUTION: Use only glass cleaner to clean the scanner glass. Avoid cleaners that contain abrasives, acetone, benzene, and carbon tetrachloride, all of which can damage the scanner glass. Avoid isopropyl alcohol because it can leave streaks on the glass.
CAUTION: Do not spray the glass cleaner directly on the glass. If too much glass cleaner is applied, the cleaner could leak under the glass and damage the scanner.
4. Close the scanner lid, and turn on the device.
Chapter 1
Clean the exterior
 WARNING! Before cleaning the device, turn off the power and unplug the power cord from the electrical socket.
Use a soft, damp, lint-free cloth to wipe dust, smudges, and stains off of the case. The exterior of the device does not require cleaning. Keep fluids away from the interior of the device, as well as from the device control panel.
Clean the automatic document feeder (ADF) (Some models only)
 NOTE: The ADF is available for some models only.
If the automatic document feeder picks up multiple pages or if it does not pick up plain paper, you can clean the rollers and separator pad. Lift the automatic document feeder cover to access the pick assembly inside the automatic document feeder, clean the rollers or separator pad, and then close the cover.
If you have lines or dust appearing on scanned documents or faxes, clean the plastic strip in the ADF.
To clean the rollers or separator pad
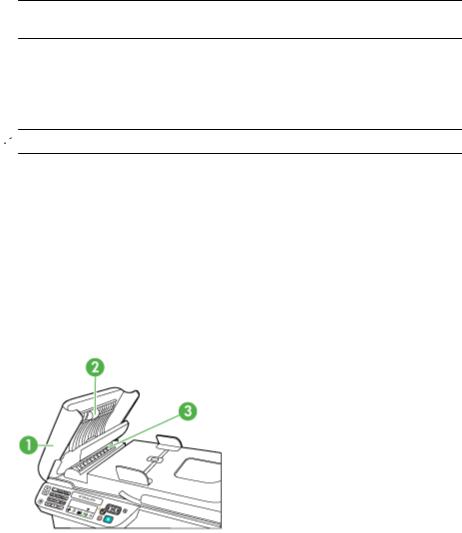
1.Remove all originals from the document feeder tray.
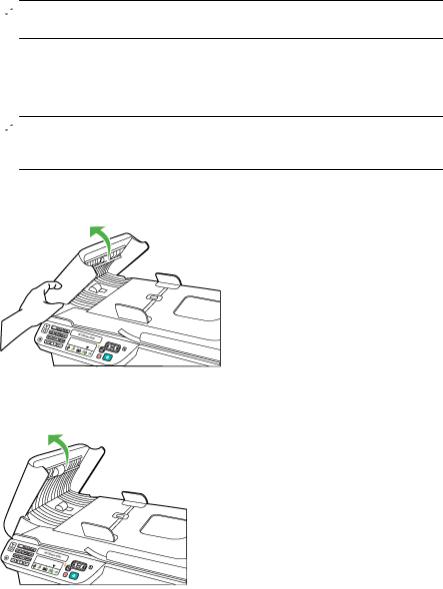
2.Lift the automatic document feeder cover (1).
This provides easy access to the rollers (2) and separator pad (3), as shown below.
|
1 |
Automatic document feeder cover |
|
2 |
Rollers |
|
3 |
Separator pad |
3.Lightly dampen a clean lint-free cloth with distilled water, then squeeze any excess liquid from the cloth.
22 Get started
4.Use the damp cloth to wipe any residue off the rollers or separator pad.
 NOTE: If the residue does not come off using distilled water, try using isopropyl (rubbing) alcohol.
5.Close the cover of the automatic document feeder.
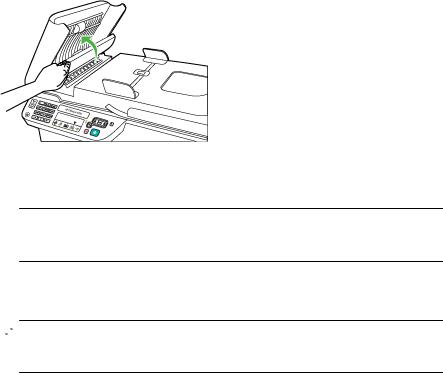
To clean the plastic strip inside the automatic document feeder
1.Turn off the device and unplug the power cord.
 NOTE: Depending how long the device is unplugged, the date and time might be erased. You might need to reset the date and time later, when you plug the power cord back in.
2.Lift the cover of the automatic document feeder until it stops, and then gently pry the cover to release the catch.
3. Continue lifting the automatic document feeder cover to the vertical position.
Chapter 1
4. Lift the automatic document feeder mechanism.
5.Clean the plastic strip with a soft cloth or sponge slightly moistened with a nonabrasive glass cleaner.
 CAUTION: Do not use abrasives, acetone, benzene, or carbon tetrachloride on the plastic strip, since they can damage it. Do not place or spray liquid directly on the plastic strip. The liquid might seep under the glass and damage the device.
6.Gently lower the automatic document feeder mechanism to avoid dislodging the plastic strip, and then close the cover of the automatic document feeder.
7.Plug in the power cord, and then turn on the device.
 NOTE: If you still see dust or lines on scans after cleaning the plastic strip, you may need to order a new plastic strip. For more information, see Solve a problem.
Turn off the device
Turn off the product by pressing the  (power) button located on the product. Wait until the power light turns off before unplugging the power cord or turning off a power strip. If you improperly turn off the product, the print carriage might not return to the correct position causing problems with the ink cartridges and print quality issues.
24 Get started

2 Print
Most print settings are automatically handled by the software application. You need to change the settings manually only when you want to change print quality, print on specific types of paper, or use special features. For more information about selecting the best print media for your documents, see Select print media.
This section contains the following topics:
•Print documents
•Print brochures
•Print on envelopes
•Print a Web page
•Print photos
•Print on special and custom-sized paper
•Print borderless documents
Print documents
 NOTE: With certain types of paper, you can print on both sides of a sheet of paper (called “two-sided printing” or “duplex printing”). For more information, see Two-sided printing (duplexing).
Follow the instructions for your operating system.
•Print documents (Windows)
•Print documents (Mac OS X)
Print documents (Windows)
1.Load paper in the tray. For more information, see Load media.
2.On the File menu in your software application, click Print.
3.Select the product you want to print to.
4.If you need to change settings, click the button that opens the Properties dialog box. Depending on your software application, this button might be called Properties,
Options, Printer Setup, Printer, or Preferences.
5.Click a type of print task in the Printing Shortcuts list. The preset default settings for the shortcuts are displayed.
6.If you change any settings on the Printing Shortcuts tab, you can save your custom settings as a new printing shortcut:
a. Select the shortcut, and then click Save As.
b. To delete a shortcut, select the shortcut, and then click Delete.

 TIP: You can change more options for the print job by using the features available on the other tabs in the dialog box.
7.Click OK.
8.Click Print or OK to begin printing.
Print 25

Chapter 2
Print documents (Mac OS X)
1.Load paper in the tray. For more information, see Load media.
2.From the File menu in your software application, choose Print.
3.Make sure the product you want to use is selected.
4.Change the print settings for the option provided in the pop-up menus, as appropriate for your project.
 NOTE: Click the blue disclosure triangle next to the Printer selection to access these options.
5.Click Print to begin printing.
Print brochures
Follow the instructions for your operating system.
 NOTE: To set print settings for all print jobs, make the changes in the printer driver.
For more information about the features of the Windows printer driver, see the online help for the driver. For more information about printing from a specific application, see the documentation that came with the application.
•Print brochures (Windows)
•Print brochures (Mac OS X)
Print brochures (Windows)
1.Load paper in the tray. For more information, see Load media.
2.On the File menu in your software application, click Print.
3.Select the product you want to print to.
4.If you need to change settings, click the button that opens the Properties dialog box. Depending on your software application, this button might be called Properties,
Options, Printer Setup, Printer, or Preferences.
5.Select Brochure Printing – Borderless in the Printing Shortcuts list. The default settings are displayed.
6.Change any other print settings.

 TIP: You can change more options for the print job by using the features available on the other tabs in the dialog box.
7.Click Print to begin printing.
Print brochures (Mac OS X)
1.Load paper in the tray. For more information, see Load media.
2.From the File menu in your software application, choose Print.
3.Make sure the product you want to use is selected.
26 Print
![]()
4.Choose Paper Type/Quality from the pop-up menu, and then choose the following settings:
•Paper Type: the appropriate brochure paper type
•Quality: Normal or Best
 NOTE: Click the blue disclosure triangle next to the Printer selection to access these options.
5. Select any other print settings that you want, and then click Print to begin printing.
Print on envelopes
When choosing envelopes, avoid envelopes that have a very slick finish, self-stick adhesives, clasps, or windows. Also, avoid envelopes with thick, irregular, or curled edges, or areas that are wrinkled, torn, or otherwise damaged.
Make sure the envelopes you load in the product are tightly constructed and that the folds are sharply creased.
 NOTE: For more information about printing on envelopes, see the documentation available with the software program you are using.
Follow the instructions for your operating system.
•Print on envelopes (Windows)
•Print on envelopes (Mac OS X)
Print on envelopes (Windows)
1.Load paper in the tray. For more information, see Load media.
2.On the File menu in your software application, click Print.
3.Select the product you want to print to.
4.If you need to change settings, click the button that opens the Properties dialog box. Depending on your software application, this button might be called Properties,
Options, Printer Setup, Printer, or Preferences.
5.On the Features tab, change the orientation to Landscape.
6.In the Basic Options area, from the Size drop-down list, select More. Then, select the appropriate envelope type.

 TIP: You can change more options for the print job by using the features available on the other tabs in the dialog box.
7.Click OK, and then click Print or OK to begin printing.
Print on envelopes (Mac OS X)
1.Load paper in the tray. For more information, see Load media.
2.From the File menu in your software application, choose Print.
3.Make sure the product you want to use is selected.
4.Choose the appropriate envelope size in the Paper Size pop-up menu.

Chapter 2
5.Select the landscape or horizontal Orientation option.
 NOTE: Click the blue disclosure triangle next to the Printer selection to access these options.
6.Select any other print settings that you want, and then click Print to begin printing.
Print a Web page
TIP: To print Web pages correctly, you might need to set your print orientation to Landscape.
If you are using a computer running Windows and Internet Explorer 6.0 or higher for Web browsing, you can use HP Smart Web Printing to ensure simple, predictable web printing with control over what you want and how you want it printed. You can access HP Smart Web Printing from the toolbar in Internet Explorer. For more information about HP Smart Web Printing, see the help file provided with it.
 NOTE: With certain types of paper, you can print on both sides of a sheet of paper (called “two-sided printing” or “duplex printing”). For more information, see Two-sided printing (duplexing).
Follow the instructions for your operating system.
•Print a Web page (Windows)
•Print a Web page (Mac OS X)
Print a Web page (Windows)
1.Load paper in the tray. For more information, see Load media.
2.On the File menu in your software application, click Print.
3.Select the product you want to print to.
4.If your Web browser supports it, select the items on the Web page that you want to include in the printout.
For example, in Internet Explorer, click the Options tab to select options such as As laid out on screen, Only the selected frame, and Print all linked documents.
5.Click Print or OK to begin printing.
Print a Web page (Mac OS X)
1.Load paper in the tray. For more information, see Load media.
2.From the File menu in your software application, choose Print.
3.Make sure the product you want to use is selected.
4.Some Web browsers include special options for printing Web pages. If available, choose the option for your Web browser from the pop-up menu in the Print dialog. For more information, see the documentation provided with your Web browser.
 NOTE: Click the blue disclosure triangle next to the Printer selection to access these options.
5.Select any other print settings that you want, and then click Print to begin printing.
28 Print

Print photos
Do not leave unused photo paper in the input tray. The paper might start to curl, which could reduce the quality of your printout. Photo paper should be flat before printing.
Follow the instructions for your operating system.
•Print photos on photo paper (Windows)
•Print photos on photo paper (Mac OS X)
Print photos on photo paper (Windows)
1.Load paper in the tray. For more information, see Load media.
2.On the File menu in your software application, click Print.
3.Select the product you want to print to.
4.If you need to change settings, click the button that opens the Properties dialog box. Depending on your software application, this button might be called Properties,
Options, Printer Setup, Printer, or Preferences.
5.Click Photo Printing – Borderless or Photo Printing with white borders in the
Printing Shortcuts list. The default settings are displayed.
 NOTE: To achieve the highest dpi resolution, you can use the Maximum dpi setting with supported types of photo paper. If Maximum dpi is not listed in the Print quality drop-down list, you can enable it from the Advanced tab.
6.If you change any settings on the Printing Shortcuts tab, you can save your custom settings as a new printing shortcut:
•Select the shortcut, and then click Save As.
•To delete a shortcut, select the shortcut, and then click Delete.
TIP: You can change more options for the print job by using the features available on the other tabs in the dialog box.
7.If you want to print the photo in black and white, click the Advanced tab and, in the
Color Options area, select the Print in grayscale check box.
8.Click OK, and then click Print or OK to begin printing.
Print photos on photo paper (Mac OS X)
1.Load paper in the tray. For more information, see Load media.
2.From the File menu in your software application, choose Print.
3.Make sure the product you want to use is selected.
4.Choose Paper Type/Quality from the pop-up menu, and then choose the following settings:
•Paper Type: The appropriate photo paper type
•Quality: Best or Maximum dpi
 NOTE: Click the blue disclosure triangle next to the Printer selection to access these options.

Chapter 2
5.If necessary, click the disclosure triangle next to Color Options.
Select any other print settings that you want, and then click Print to begin printing.
6.Select the appropriate Photo Fix options:
•Off: applies no HP Real Life Technologies to the image.
•Basic: automatically focuses the image; moderately adjusts image sharpness.
7.If you want to print the photo in black and white, choose the Grayscale from the Color pop-up menu, and then choose one of the following options:
•High Quality: uses all the available colors to print your photo in grayscale. This creates smooth and natural shades of gray.
•Black Print Cartridge Only: uses black ink to print your photo in grayscale. The gray shading is created by varying patterns of black dots, which might result in a grainy image.
Print on special and custom-sized paper
If your application supports custom-sized paper, set the size in the application before printing the document. If not, set the size in the print driver. You might need to reformat existing documents to print them correctly on custom-sized paper.
Use only custom-sized paper that is supported by the device. For more information, see Media specifications.
 NOTE: With certain types of paper, you can print on both sides of a sheet of paper (called “two-sided printing” or “duplex printing”). For more information, see Two-sided printing (duplexing).
Follow the instructions for your operating system.
•Print on special or custom-sized paper (Windows)
•Print on special or custom-sized paper (Mac OS X)
Print on special or custom-sized paper (Windows)
1.Load paper in the tray. For more information, see Load media.
2.On the File menu in your software application, click Print.
3.Select the product you want to print to.
4.If you need to change settings, click the button that opens the Properties dialog box. Depending on your software application, this button might be called Properties,
Options, Printer Setup, Printer, or Preferences.
5.If necessary, set up the custom size in the printer driver:
a. On the Features tab, click Custom in the Size drop-down list. b. Type a name for the new custom size.
c. In the Width and Height boxes, type the dimensions, and then click Save. d. Click OK.
 NOTE: To achieve the highest dpi resolution, you can use the Maximum dpi setting with supported types of photo paper. If Maximum dpi is not listed in the Print quality drop-down list, you can enable it from the Advanced tab.
6.Make sure the custom size is selected in the Size drop-down list.
30 Print

7.Select the paper type:
a. Click More in the Paper type drop-down list. b. Click the desired paper type, and then click OK.
8.Click OK, and then click Print or OK to begin printing.
Print on special or custom-sized paper (Mac OS X)
 NOTE: Before you can print on custom-sized paper, you must set up the custom size in the printing software. For instructions, see Set up custom sizes (Mac OS X).
1.Load the appropriate paper in the tray. For more information, see Load media.
2.From the File menu in your software application, choose Print.
3.Make sure the product you want to use is selected.
4.Choose Paper Handling from the pop-up menu.
 NOTE: Click the blue disclosure triangle next to the Printer selection to access these options.
5.Under Destination Paper Size, click Scale to fit paper size, and then select the custom size.
Select any other print settings that you want, and then click Print to begin printing.
6.Change any other settings, and then click Print to begin printing.
Set up custom sizes (Mac OS X)
1.From the File menu in your software application, choose Print.
2.Choose the desired printer in the Format for pop-up menu.
3.Choose Manage Custom Sizes in the Paper Size pop-up menu.
4.Click the + on the left side of the screen, double-click Untitled, and type a name for the new, custom size.
5.In the Width and Height boxes, type the dimensions, and then set the margins, if desired.
6.Choose Paper Handling from the pop-up menu.
7.Click OK.
Print borderless documents
Borderless printing lets you print to the edges of certain photo media types and a range of standard media sizes.
 NOTE: You cannot print a borderless document if the paper type is set to Plain paper.
NOTE: Before printing a borderless document, open the file in a software application and assign the image size. Make sure the size corresponds to the media size on which you are printing the image.
NOTE: Not all applications support borderless printing.
|
Print borderless documents |
31 |

Chapter 2
Follow the instructions for your operating system.
•Print borderless documents (Windows)
•Print borderless documents (Mac OS X)
Print borderless documents (Windows)
1.Load paper in the tray. For more information, see Load media.
2.On the File menu in your software application, click Print.
3.Select the product you want to print to.
4.If you need to change settings, click the button that opens the Properties dialog box. Depending on your software application, this button might be called Properties,
Options, Printer Setup, Printer, or Preferences.
5.Click the Features tab.
6.In the Size list, click More, and then select the borderless size loaded in the tray. If a borderless image can be printed on the specified size, the Borderless check box is selected.
7.In the Paper type drop-down list, click More, and then select the appropriate paper type.
8.Select the Borderless check box if it is not already checked.
If the borderless paper size and paper type are not compatible, the product software displays an alert and allows you to select a different type or size.
9.Click OK, and then click Print or OK to begin printing.
Print borderless documents (Mac OS X)
1.Load paper in the tray. For more information, see Load media.
2.From the File menu in your software application, choose Print.
3.Make sure the product you want to use is selected.
4.Choose Paper Type/Quality from the pop-up menu, and then choose the following settings:
•Paper Type: The appropriate paper type
•Quality: Best or Maximum dpi
 NOTE: Click the blue disclosure triangle next to the Printer selection to access these options.
5.If necessary, select the appropriate Photo Fix options:
•Off: applies no HP Real Life Technologies to the image.
•Basic: automatically focuses the image; moderately adjusts image sharpness.
6.Select any other print settings that you want, and then click Print to begin printing.
Two-sided printing (duplexing)
With certain types of paper, you can print on both sides of a sheet of paper (called “twosided printing” or “duplex printing”).
•Perform two-sided printing (Windows)
•Perform two-sided printing (Mac OS X)
32 Print

Perform two-sided printing (Windows)
1.Load paper in the tray. For more information, see Load media and Guidelines for twosided (duplex) printing.
2.On the File menu in your software application, click Print.
3.Select the Two-sided (Duplex) Printing option in the Printing Shortcuts list.
4.Click OK, and then click Print or OK to begin printing.
5.Follow any onscreen instructions.
Perform two-sided printing (Mac OS X)
1.Load paper in the tray. For more information, see Load media and Guidelines for twosided (duplex) printing.
2.From the File menu in your software application, choose Print.
3.Make sure the product you want to use is selected.
4.Choose Paper Handling from the pop-up menu, and then choose Odd numbered pages or Odd only.
5.Change any other settings, and then click Print.
6.After the odd-numbered pages have printed, rotate the printed pages 180 degrees and reload them in the tray.
 NOTE: Make sure the freshly printed text is face up.
7.From the File menu, choose Print.
8.Choose Paper Handling from the pop-up menu, and then choose Even numbered pages or Even only.
9.Click Print to begin printing.
|
Two-sided printing (duplexing) |
33 |

3 Scan
Using the product’s control panel, you can scan originals and send them to a variety of destinations, such as a folder or a program on a computer. You can also scan originals using the HP software provided with the product and TWAIN-compliant or WIA-compliant programs on a computer.
You can use the HP software to convert the text in scanned documents into a format that you can search, copy, paste, and edit.
 NOTE: Scan functions are only available after you install the software.
This section contains the following topics:
•Scan an original
•Edit a scanned document using optical character recognition (OCR) software
Scan an original
You can start a scan from a computer or from the device control panel.
To use the scan features, your device and computer must be connected and turned on. The HP software must also be installed and running on your computer prior to scanning. To verify that the HP software is running on a computer running Windows, look for the device icon in the system tray at the lower-right side of the screen, near the clock.
 NOTE: Closing the HP Digital Imaging Monitor icon in your Windows system tray can cause your device to lose some of its scan functionality and result in the No Connection error message. If this happens, you can restore full functionality by restarting your computer or by starting the HP Digital Imaging Monitor.
NOTE: If you are using a computer running Windows, you can also use the
HP Solution Center to scan an image. Using this software, you can edit a scanned image and create special projects using a scanned image. For more information, see the onscreen help that came with your software.
This section contains the following topics:
•Scan an original from the product control panel
Scan an original from the product control panel
You can send a scan to a computer connected directly to the device. You can also send a scan to a program installed on a computer.
 NOTE: If you are scanning a borderless original, load the original on the scanner glass, not the ADF.
To scan from the product control panel
1.Load the original. For more information, see Load an original on the scanner glass.
2.Press left arrow  or right arrow to select the Scan function, and then press OK.
 or right arrow
  to select the
 34 Scan
3.Press right arrow  to select what to do with the scan, and then press OK.
4.Press Start.
Edit a scanned document using optical character recognition (OCR) software
You can use OCR software to import scanned text into your preferred word-processing program for editing. This allows you to edit letters, newspaper clippings, and many other documents.
You can specify the word-processing program that you want to use for editing. If the wordprocessing icon is not present or active, either you do not have word-processing software installed on your computer, or the scanner software did not recognize the program during the installation. See the onscreen Help for the HP Solution Center for information about how to create a link to the word-processing program.
The OCR software does not support scanning colored text. Colored text is always converted to black-and-white text before being sent to OCR. Thus, all text in the final document is in black and white, regardless of the original color.
Because of the complexity of some word-processing programs and their interaction with the device, it is sometimes preferable to scan to a text editor, such as Wordpad (Windows) or TextEdit (Mac OS X), and then cut and paste the text into the preferred wordprocessing program.
|
Edit a scanned document using optical character recognition (OCR) software |
35 |

4 Copy
You can produce high-quality color and grayscale copies on a variety of paper types and sizes.
 NOTE: If you are copying a document when a fax arrives, the fax is stored in the device memory until the copying finishes. This can reduce the number of fax pages stored in memory.
This section contains the following topics:
•Copy documents
•Change copy settings
Copy documents
You can make quality copies from the device control panel.
 NOTE: If you are copying a borderless original, load the original on the scanner glass, not the ADF.
To copy documents
1.Make sure you have paper loaded in the main tray.
2.Place your original face down on the scanner glass. If you are copying a borderless original, load the original on the scanner glass, not the ADF. For more information, see Load an original on the scanner glass.
3.Use the left arrow  or right arrow
  to select one of the following functions:
•Copy B&W: To select a black-and-white copy job.
•Copy Color : To select a color copy job.
 NOTE: If you have a color original, selecting the Copy B&W function produces a black-and-white copy of the color original, while selecting the Copy Color function produces a full-color copy of the color original.
4.Press OK.
5.Change any additional settings. For more information, see Change copy settings
6.Press Start.
Change copy settings
You can customize copy jobs using the various settings available from the product’s control panel, including the following:
•Number of copies
•Copy paper size
•Copy paper type
•Copy speed or quality
36 Copy
•Lighter/Darker settings
•Resizing originals to fit on different paper sizes
You can use these settings for single copy jobs, or you can save settings to be used as defaults for future jobs.
To change copy settings for a single job
1.Press left arrow  or right arrow
  to navigate between different copy options.
2.Make any changes to the copy function settings, and then press OK to accept the changes.
To save the current settings as defaults for future jobs
1.Press left arrow  or right arrow
  to navigate between different copy options.
2.Make any changes to the copy function settings, and then press OK to accept the changes.
3.Press right arrow  until Set As Default appears, and then press OK.
4.Press right arrow  to select Yes, and then press OK.

5 Fax
You can use the device to send and receive faxes, including color faxes. You can schedule faxes to be sent at a later time and set up speed-dials to send faxes quickly and easily to frequently used numbers. From the device control panel, you can also set a number of fax options, such as resolution and the contrast between lightness and darkness on the faxes you send.
 NOTE: Before you begin faxing, make sure you have set up the device properly for faxing. You might have already done this as part of the initial setup, by using either the control panel or the software that came with the device. You can verify the fax is set up correctly by running the fax setup test from the control panel. To run the fax test, press
  (Setup), select Tools, select Run fax test, and then press OK.
This section contains the following topics:
•Send a fax
•Receive a fax
•Change fax settings
•Fax over Internet Protocol (FoIP)
•Use reports
Send a fax
You can send a fax in a variety of ways. Using the device control panel, you can send a black-and-white or color fax. You can also send a fax manually from an attached phone. This allows you to speak with the recipient before sending the fax.
This section contains the following topics:
•Send a basic fax
•Send a fax manually from a phone
•Send a fax using monitor dialing
•Send a fax from memory
•Schedule a fax to send later
•Send a fax to multiple recipients
•Send a fax in Error Correction Mode
Send a basic fax
You can easily send a singleor multiple-page black-and-white or color fax by using the device control panel.
 NOTE: If you need printed confirmation that your faxes were successfully sent, enable fax confirmation before sending any faxes.
38 Fax

TIP: You can also send a fax manually from a phone or by using monitor dialing. These features allow you to control the pace of your dialing. They are also useful when you want to use a calling card to charge the call and you have to respond to tone prompts while dialing.
To send a basic fax from the device control panel
1.Load your originals. If you are faxing a borderless original, load the original on the scanner glass, not the ADF. For additional information, see Load an original on the scanner glass.
2.Press the left arrow  or right arrow
  to select Fax B&W or Fax Color , and then press OK.
3.Enter the fax number by using the keypad.

 TIP: To add a pause in the fax number you are entering, press the * button repeatedly, until a dash (—) appears on the display.
4.Press Start.
If the device detects an original loaded in the automatic document feeder, it sends the document to the number you entered.

 TIP: If the recipient reports issues with the quality of the fax you sent, you can try changing the resolution or contrast of your fax.
Send a fax manually from a phone
Sending a fax manually allows you to make a phone call and talk with the recipient before you send the fax. This is useful if you want to inform the recipient that you are going to send them a fax before sending it. When you send a fax manually, you can hear the dial tones, telephone prompts, or other sounds through the handset on your telephone. This makes it easy for you to use a calling card to send your fax.
Depending on how the recipient has their fax machine set up, the recipient might answer the phone, or the fax machine might take the call. If a person answers the phone, you can speak with the recipient before sending the fax. If a fax machine answers the call, you can send the fax directly to the fax machine when you hear the fax tones from the receiving fax machine.
To send a fax manually from an extension phone
1.Load your originals. If you are copying a borderless original, load the original on the scanner glass, not the ADF. For additional information, see Load an original on the scanner glass.
2.Press the left arrow  or right arrow
  to select Fax B&W or Fax Color , and then press OK.
3.Dial the number by using the keypad on the phone that is connected to the device.
 NOTE: Do not use the keypad on the control panel of the device when manually sending a fax. You must use the keypad on your phone to dial the recipient’s number.

 TIP: To switch between Fax B&W or Fax Color , press the Back button.

Chapter 5
4.If the recipient answers the telephone, you can engage in a conversation before sending your fax.
 NOTE: If a fax machine answers the call, you will hear fax tones from the receiving fax machine. Proceed to the next step to transmit the fax.
5.When you are ready to send the fax, press Start.
 NOTE: If prompted, select Send Fax.
If you were speaking with the recipient before sending the fax, inform the recipient that they should press Start on their fax machine after they hear fax tones.
The telephone line is silent while the fax is transmitting. At this point, you can hang up the telephone. If you want to continue speaking with the recipient, remain on the line until the fax transmission is complete.
Send a fax using monitor dialing
Monitor dialing allows you to dial a number from the device control panel as you would dial a regular telephone. When you send a fax using monitor dialing, you can hear the dial tones, telephone prompts, or other sounds through the speakers on the device. This enables you to respond to prompts while dialing, as well as control the pace of your dialing.
TIP: If you do not enter your calling card PIN fast enough, the device might start sending fax tones too soon and cause your PIN not to be recognized by the calling card service. If this is the case, you can create a speed dial entry to store the PIN for your calling card.
 NOTE: Make sure the volume is turned on, or you will not hear a dial tone.
To send a fax using monitor dialing from the device control panel
1.Load your originals. For additional information, see Load an original on the scanner glass or Load an original in the automatic document feeder (ADF).
 NOTE: The ADF is available for some models only.
2.Press the left arrow  or right arrow
  to select Fax B&W or Fax Color , and then press Start.
If the device detects an original loaded in the automatic document feeder, you will hear a dial tone.
3.When you hear the dial tone, enter the number by using the keypad on the device control panel.
4.Follow any prompts that might occur.

 TIP: If you are using a calling card to send a fax and you have your calling card PIN stored as a speed dial, when prompted to enter your PIN, press Speed Dial to select the speed dial entry where you have your PIN stored.
Your fax is sent when the receiving fax machine answers.
40 Fax

Send a fax from memory
You can scan a black-and-white fax into memory and then send the fax from memory. This feature is useful if the fax number you are trying to reach is busy or temporarily unavailable. The device scans the originals into memory and sends them once it is able to connect to the receiving fax machine. After the device scans the pages into memory, you can immediately remove the originals from the document feeder tray.
 NOTE: You can only send a black-and-white fax from memory.
To send a fax from memory
1.Load your originals. For additional information, see Load an original on the scanner glass or Load an original in the automatic document feeder (ADF).
 NOTE: The ADF is available for some models only.
2.Press the left arrow  or right arrow
  to select Fax B&W or Fax Color , and then press OK.
3.Enter the fax number by using the keypad, press Speed Dial to select a speed dial, or press Redial/Pause to redial the last number dialed.
4.Press right arrow  until Fax Method appears, and then press OK.
5.Press right arrow  until Scan & Fax appears, and then press OK.
6.Press Start.
The device scans the originals into memory and sends the fax when the receiving fax machine is available.
Schedule a fax to send later
You can schedule a black-and-white fax to be sent within the next 24 hours. This enables you to send a black-and-white fax late in the evening, when phone lines are not as busy or phone rates are lower, for example. The device automatically sends your fax at the specified time.
You can only schedule one fax to be sent at a time. You can continue to send faxes normally, however, while a fax is scheduled.
 NOTE: You can only send faxes in black and white due to memory limitations.
To schedule a fax from the device control panel
1.Load your originals. For additional information, see Load an original on the scanner glass or Load an original in the automatic document feeder (ADF).
 NOTE: The ADF is available for some models only.
2.Press the left arrow  or right arrow
  to select Fax B&W or Fax Color , and then press OK.
3.Press right arrow  until Fax Method appears, and then press OK.
4.Press right arrow  until Send Fax Later appears, and then press OK.
5.Enter the send time by using the numeric keypad, and then press OK. If prompted, press 1 for AM, or 2 for PM.

Chapter 5
6.Enter the fax number by using the keypad, press Speed Dial to select a speed dial, or press Redial/Pause to redial the last number dialed.
7.Press Start.
The device scans all pages and the scheduled time appears on the display. The fax is sent at the scheduled time.
To cancel a scheduled fax
1.Press the left arrow  or right arrow
  to select Fax B&W or Fax Color , and then press OK.
2.Press right arrow  until Fax Method appears, and then press OK.
3.Press right arrow  until Send Fax Later appears, and then press OK.
If there is a fax already scheduled, the Cancel prompt appears on the display.
4.Press 1 to select Yes.
 NOTE: You can also cancel the scheduled fax by pressing Cancel on the device control panel when the scheduled time is visible on the display.
Send a fax to multiple recipients
You can send a fax to multiple recipients at once by grouping individual speed dial entries into group speed dial entries.
To send a fax to multiple recipients using group speed dial
1.Load your originals. For additional information, see Load an original on the scanner glass or Load an original in the automatic document feeder (ADF).
 NOTE: The ADF is available for some models only.
2.Press the left arrow  or right arrow
  to select Fax B&W, and then press OK.
3.Press the left arrow  or right arrow
  until the appropriate group speed dial entry appears.

 TIP: You can also select a speed dial entry by entering its speed dial code using the keypad on the device control panel.
4.Press Start.
If the device detects an original loaded in the automatic document feeder, it sends the document to each number in the group speed dial entry.
 NOTE: You can only use group speed dial entries to send faxes in black and white, because of memory limitations. The device scans the fax into memory then dials the first number. When a connection is made, it sends the fax and dials the next number. If a number is busy or not answering, the device follows the settings for Busy Redial and No Answer Redial. If a connection cannot be made, the next number is dialed and an error report is generated.
Send a fax in Error Correction Mode
Error Correction Mode (ECM) prevents loss of data due to poor phone lines by detecting errors that occur during transmission and automatically requesting retransmission of the erroneous portion. Phone charges are unaffected, or might even be reduced, on good
42 Fax

phone lines. On poor phone lines, ECM increases sending time and phone charges, but sends the data much more reliably. The default setting is On. Turn ECM off only if it increases phone charges substantially, and you can accept poorer quality in exchange for reduced charges.
Before turning the ECM setting off, consider the following. If you turn ECM off
•The quality and transmission speed of faxes you send and receive are affected.
•The Fax Speed is automatically set to Medium.
•You will no longer be able to send or receive faxes in color.
To change the ECM setting from the control panel
1.Press Setup.
2.Press right arrow  until Fax Settings appears, and then press OK.
3.Press right arrow  until Error Correction Mode appears, and then press OK.
4.Press right arrow  to select On or Off, and then press OK.
Receive a fax
You can receive faxes automatically or manually. If you turn off the Auto Answer option, you must receive faxes manually. If you turn on the Auto Answer option (the default setting), the device automatically answers incoming calls and receives faxes after the number of rings that are specified by the Rings to Answer setting. (The default Rings to Answer setting is five rings.)
If you receive a legal-size fax and the device is not currently set to use legal-size paper, the device reduces the fax so that it fits on the paper that is loaded. If you have disabled the Automatic Reduction feature, the device prints the fax on two pages.
 NOTE: If you are copying a document when a fax arrives, the fax is stored in the device memory until the copying finishes. This can reduce the number of fax pages stored in memory.
•Receive a fax manually
•Set up backup fax
•Reprint received faxes from memory
•Poll to receive a fax
•Forward faxes to another number
•Set the paper size for received faxes
•Set automatic reduction for incoming faxes
•Block junk fax numbers
•Receive faxes to your computer (Fax to PC and Fax to Mac)
Receive a fax manually
When you are on the phone, the person you are speaking with can send you a fax while you are still connected. This is referred to as manual faxing. Use the instructions in this section to receive a manual fax.
 NOTE: You can pick up the handset to talk or listen for fax tones.
Chapter 5
You can receive faxes manually from a phone that is:
•Directly connected to the device (on the 2-EXT port)
•On the same phone line, but not directly connected to the device
To receive a fax manually
1.Make sure the device is turned on and you have paper loaded in the main tray.
2.Remove any originals from the document feeder tray.
3.Set the Rings to Answer setting to a high number to allow you to answer the incoming call before the device answers. Or, turn off the Auto Answer setting so that the device does not automatically answer incoming calls.
4.If you are currently on the phone with the sender, instruct the sender to press Start on their fax machine.
5.When you hear fax tones from a sending fax machine, do the following:
a. Press left arrow  or right arrow
  to select Black-and-white fax or Color fax. b. Press Start.
c. After the device begins to receive the fax, you can hang up the phone or remain on the line. The phone line is silent during fax transmission.
Set up backup fax
Depending on your preference and security requirements, you can set up the device to store all the faxes it receives, only the faxes it receives while the device is in an error condition, or none of the faxes it receives.
The following Backup fax modes are available:
|
On |
The default setting. When Backup fax is On, the device stores all received |
|
faxes in memory. This enables you to reprint up to eight of the most recently |
|
|
printed faxes if they are still saved in memory. |
|
|
NOTE: When device memory is low, it overwrites the oldest, printed faxes |
|
|
as it receives new faxes. If the memory becomes full of unprinted faxes, the |
|
|
device stops answering incoming fax calls. |
|
|
NOTE: If you receive a fax that is too large, such as a very detailed color |
|
|
photo, it might not be stored in memory due to memory limitations. |
|
|
On Error Only |
Causes the device to store faxes in memory only if an error condition exists |
|
that prevents the device from printing the faxes (for example, if the device |
|
|
runs out of paper). The device continues to store incoming faxes as long |
|
|
as there is memory available. (If the memory becomes full, the device stops |
|
|
answering incoming fax calls.) When the error condition is resolved, the |
|
|
faxes stored in memory print automatically, and then they are deleted from |
|
|
memory. |
|
|
Off |
Faxes are never stored in memory. For example, you might want to turn off |
|
Backup fax for security purposes. If an error condition occurs that prevents |
|
|
the device from printing (for example, the device runs out of paper), the |
|
|
device stops answering incoming fax calls. |
|
44 Fax

 NOTE: If Backup fax is enabled and you turn off the device, all faxes stored in memory are deleted, including any unprinted faxes that you might have received while the device was in an error condition. You must contact the senders to ask them to resend any unprinted faxes. For a list of the faxes you have received, print the Fax Log. The Fax Log is not deleted when the device is turned off.
To set backup fax from the device control panel
1.Press Setup.
2.Press right arrow  until Tools appears, and then press OK.
3.Press right arrow  until Backup fax appears, and then press OK.
4.Press right arrow  to select On, On Error Only, or Off.
5.Press OK.
Reprint received faxes from memory
If you set the Backup fax mode to On, the received faxes are stored in memory, whether the device has an error condition or not.
 NOTE: After the memory becomes full, the oldest, printed faxes are overwritten as new faxes are received. If all the stored faxes are unprinted, the device does not receive any fax calls until you print or delete the faxes from memory. You might also want to delete the faxes in memory for security or privacy purposes.
Depending on the sizes of the faxes in memory, you can reprint up to eight of the most recently printed faxes, if they are still in memory. For example, you might need to reprint your faxes if you lost the copy of your last printout.
To reprint faxes in memory from the device control panel
1.Make sure you have paper loaded in the main tray.
2.Press Setup.
3.Press right arrow  until Print Report appears, and then press OK.
4.Press right arrow  until Reprint Faxes appears, and then press OK.
The faxes are printed in the reverse order from which they were received with the most recently received fax printed first, and so on.
5.Press Start.
6.If you want to stop reprinting the faxes in memory, press Cancel.
To delete all the faxes in memory from the device control panel
▲Turn off the device by pressing the Power button.
All faxes stored in memory are deleted from memory when you turn off the power.
Poll to receive a fax
Polling allows the HP All-in-One to ask another fax machine to send a fax that it has in its queue. When you use the Poll to Receive feature, the HP All-in-One calls the designated fax machine and requests the fax from it. The designated fax machine must be set for polling and have a fax ready to send.

Chapter 5
 NOTE: The HP All-in-One does not support polling pass codes. Polling pass codes are a security feature that require the receiving fax machine to provide a pass code to the device it is polling in order to receive the fax. Make sure the device you are polling does not have a pass code set up (or has not changed the default pass code) or the HP All-in-One will not be able to receive the fax.
To set up poll to receive a fax from the device control panel
1.Press left arrow  or right arrow
  to select Black-and-white fax or Color fax, and then press OK.
2.Press right arrow  until Fax Method appears, and then press OK.
3.Press right arrow  until Poll to Receive appears, and then press OK.
4.Enter the fax number of the other fax machine.
5.Press Start.
 NOTE: If you selected Color Fax but the sender sent the fax in black and white, the device prints the fax in black and white.
Forward faxes to another number
You can set up the device to forward your faxes to another fax number. A received color fax is forwarded in black and white.
HP recommends that you verify the number you are forwarding to is a working fax line. Send a test fax to make sure the fax machine is able to receive your forwarded faxes.
To forward faxes from the device control panel
1.Press Setup.
2.Press right arrow  until Fax Settings appears, and then press OK.
3.Press right arrow  until Fax Forwarding appears, and then press OK.
4.Press right arrow  until On appears, and then press OK.
 NOTE: If the device is not able to forward the fax to the designated fax machine (for example, if it is not turned on), the device prints the fax. If you set up the device to print error reports for received faxes, it will also print an error report.
5.At the prompt, enter the number of the fax machine that will receive the forwarded faxes, and then press OK.
Fax Forwarding appears on the device control panel display.
If the device loses power when Fax Forwarding is set up, it saves the Fax Forwarding setting and phone number. When the power is restored to the device, the Fax Forwarding setting is still On.
 NOTE: You can cancel fax forwarding by pressing Cancel on the device control panel when the Fax Forwarding message is visible on the display, or you can select Off from the Fax Fwd, Black menu.
Set the paper size for received faxes
You can select the paper size for received faxes. The paper size you select should match what is loaded in your main tray. Faxes can be printed on letter, A4, or legal paper only.
46 Fax
 Loading…
Посмотреть инструкция для HP OfficeJet 4500 Wireless бесплатно. Руководство относится к категории принтеры, 5 человек(а) дали ему среднюю оценку 7.6. Руководство доступно на следующих языках: английский. У вас есть вопрос о HP OfficeJet 4500 Wireless или вам нужна помощь? Задайте свой вопрос здесь
Не можете найти ответ на свой вопрос в руководстве? Вы можете найти ответ на свой вопрос ниже, в разделе часто задаваемых вопросов о HP OfficeJet 4500 Wireless.
Как удалить замятую бумагу из принтера?
Лучше всего аккуратно вытянуть бумагу из принтера. Выключите принтер и убедитесь, что печатающий узел не нависает над бумагой и что в принтере не осталось бумаги.
Почему после установки оригинального картриджа принтер не работает?
Принтер может не распознать неоригинальный картридж. В этом случае вы получите сообщение о том, что картридж пуст. В инструкции к приобретенному картриджу обычно указаны способы устранения проблемы. Если это сделать не удалось, рекомендуется обратиться к продавцу.
Чем обусловлено плохое качество печати?
Причины плохого качества печати могут быть разными. Убедитесь, что картридж заполнен, а тонер имеется в достаточном количестве. Если такой проблемы нет, причина может заключаться в том, что струйному принтеру требуется чистка, высох картридж или сломан печатающий узел. Для лазерного принтера рекомендуется выполнить калибровку.
В чем разница между лазерным и струйным принтером?
Лазерный принтер печатает тонером, а струйный — чернилами.
Почему при печати на струйном принтере появляются черные полосы?
В большинстве случаев это обусловлено поломкой картриджа струйного принтера. Необходимо заменить картридж.
Что означает аббревиатура DPI?
DPI обозначает Dots Per Inch и представляет собой количество капель чернил (на дюйм), которые подаются на бумагу при печати.
Инструкция HP OfficeJet 4500 Wireless доступно в русский?
К сожалению, у нас нет руководства для HP OfficeJet 4500 Wireless, доступного в русский. Это руководство доступно в английский.
Не нашли свой вопрос? Задайте свой вопрос здесь
-
Страница 1
OFFICEJE T 45 0 0 OFFICEJE T AD V ANT A GE 45 0 0 Us er Guide K7 1 0[…]
-
Страница 2
[…]
-
Страница 3
HP Officejet 4500 (G510)/ HP Officejet 4575 (K710)/HP Officejet Advantage 4500 (K710) All-in-One series User Guide[…]
-
Страница 4
Copyright informati on © 2011 Copyright Hewlett-Packard Development Company, L .P. Hewlett-Packar d Company notices The information con tained in this document is su bject to change without notice. All rights reserved. Reprod uction, adaptation, or tran slation of this material is prohibited without prior written permission of Hewlett-Packard, exc[…]
-
Страница 5
Contents 1 Get started Accessibility…………….. ………………………… ……………………………. …………………………… …….. ……9 Eco-Tips……. …………………. …………. ……… ………… ……… …………. ……… …………. ………… ………… .10 Understand the device par[…]
-
Страница 6
Print photos……………………………………………………………………………………………………. ………..29 Print photos on photo paper (Windows)…. ………………………………………. ………………………29 Print photos on pho to paper (Mac OS X)…………………….. …………… …….[…]
-
Страница 7
Change fax settings……… ………………… …………….. ………………….. ………………….. …………… ……50 Configure the fax header…………………………. …………………………………………. ………………..51 Set the answer mode (Aut o answer)………………………………………[…]
-
Страница 8
Poor print quality an d unexpected printouts……………………………….. …………………………………77 Solution 1: Use genuine HP cartridges……… ………….. …………….. ………….. ……………… …….77 Solution 2: Check the paper………………………………………………………………..[…]
-
Страница 9
Solve wireless problems (some models only) ……………………… ……………. ………………. ……….112 Basic wireless trouble shooting……………………………………………………………………………..112 Advanced wireless troubleshoot ing……………………………………………………. ……..[…]
-
Страница 10
Regulatory information…………………………………………………….. ……………………………………. ..1 40 FCC statem ent…….. …………………. ……… …………. ……… …………. ……… …………. ……………… 141 Notice to users in Ko rea…………………………………………[…]
-
Страница 11
C Additional fax setup Set up faxing (parallel phone systems) ………………………….. ………………… ………………………. .174 Choose the correct fax setu p for your home or office… ……………. ………………… ……………175 Case A: Separate fax line (no voice calls rece ived)……………. ……………[…]
-
Страница 12
Use the HP Solution Center (Windows )……………. …………………….. …………………….. ………….206 HP Utility (Mac OS X)………………………….. ……………………………………… … …………………….. …206 Embedded Web server (some models only)……………… ………………… ……..[…]
-
Страница 13
1 Get started This guide provide s details about how to use t he device and to resolve prob lems. • Accessibility • Eco-Tips • Understand the d evice parts • Use the prod uct control pane l • Finding the d evice model numb er • Select print me dia • Load an original on the scann er glass • Load an original in the automa tic document[…]
-
Страница 14
Eco-Tips HP is committed to helping custo mers reduce thei r environmental footpr int. HP has provided the Eco-Ti ps below to help you focus on wa ys to assess and reduce the impact of your printing choices. In ad dition to specifi c features in this product, please visit the HP Eco Solutions Web site for more inf ormation on H P’s environment[…]
-
Страница 15
1 Control panel 2 Main tray 3 Cartridge access door 4 Scanner glass 5 Automatic document feeder 6 Scanner lid Printing supplies area HP Officejet 4500 / HP Officejet 4575 / HP Officejet 4500 Wireless / HP Officejet Advantage 4500 HP Officejet 4500 Desktop 1 Cartridge access door 2 Ink cartridges Back view HP Officejet 4500 / HP Officejet 4575 / HP […]
-
Страница 16
1 Universal serial bus (USB) port 2 Ethernet port (HP Officejet 4500 / HP Officeje t 4575 / HP Officejet Advantage 4 500 only) 3 Power input 4 1-LINE (fax) 5 2-EXT (phone) Use the product control panel This secti on contains the followin g topics: • Overview o f buttons and lights • Change prod uct settings • Types of message s Overview of bu[…]
-
Страница 17
Label Name and Description 9 Start : Initiates a copy, fax, or scan job. Pressing Start processes the job according to the function selected. 10 Cancel : Stops a job, exits a menu, or exits settings. 11 Scan function indicat or 12 Copy Color function indicator 13 Copy B&W function indicator 14 Fax Color funct ion indicator 15 Fax B&W functi[…]
-
Страница 18
To select a d ifferent mode Press left arrow or righ t arrow to select the desired mode , and then p ress OK . To change se ttings for a mode 1. After selecting a mode , press the arrow but tons to scroll t hrough the ava ilable setting s available, and then p r ess OK to select the settin g you want t o change. 2. Press the arrow button s to chang[…]
-
Страница 19
If the error message shows an error code, pre ss the Power button to turn off the device, and then turn it on again. In most situat ions, this action solves th e problem. If the message persists, your device migh t need service. For more information, see Solve a problem. Critica l error message s Critical error me ssages inform you of a device fail[…]
-
Страница 20
Depending on your country/ region, some of these papers might not b e available . HP Brochure Paper HP Superior Inkjet Paper These papers are glossy-coated or matte-coated on both sides for two- sided use. They are the perfec t choice for near- photographic reproductions and business graphics for report covers, special presentations, brochures, mai[…]
-
Страница 21
HP Photo Value Packs conven iently package Original HP ink cartridges and HP Advanced Phot o Paper to save you time and ta ke the guesswork out of printing affordable professional phot os with your HP printe r. Original HP i nks and HP Advanced Photo Paper have been desi gned to work t ogether so your photos ar e long last ing and vivid, print afte[…]
-
Страница 22
• Do not overload th e tray or ADF (some model s only). For more informa tion, see Media specif ications. • To prevent jams, poor print quality, an d other pr inting pr oblems, avoid load ing the following m edia in the trays or ADF (some models only): ◦ Multi part form s ◦ Media that is damaged, curled, or wrinkl ed ◦ Media wit h cutouts[…]
-
Страница 23
3. Close the l id. Load an original in the auto matic document feeder (ADF) NOTE: The ADF is avail able for some model s only. You can copy, scan, or fa x a one-sided, si ngle- or m ultiple-pag e, A4- or lett er-size document by placing it in the docume nt feeder tray. CAUTION: Do not load photos in the ADF; th is might cause damag e to your photos[…]
-
Страница 24
To load me dia 1. Pull out the tray extender. 2. Insert the media print-side down along the right of the main t ray. Make sure the sta ck of media aligns w ith the right and back edges o f the tray, an d does not exceed t he line mark ing in the tray. NOTE: Do not load p aper while th e device is pr inting. • Envelopes: Load envelopes with th e f[…]
-
Страница 25
Maintain the device This section prov ides instruction s for keeping th e device in top w orking condition . Perform these maintena nce procedures as neces sary. • Clean the scan ner glass • Clean the exterior • Clean the aut omatic docum ent feeder (ADF) (Som e models onl y) Clean the scanner glass NOTE: Dust or dirt on the scann er glass, s[…]
-
Страница 26
Clean the exterior WARNING! Before cl eaning the d evice, turn off the power an d unplug the powe r cord from the electrical socket. Use a soft, dam p, lint-free cloth t o wipe dust, smudges, a nd stains off of the case. The exterior of the de vice does not requ ire cleaning. Keep fluids away from th e interior of the device, as well as fr om the d[…]
-
Страница 27
4. Use the damp clot h to wipe any residue off the rollers o r separator pad. NOTE: If the residue d oes not come off using distil led water, try using isopro pyl (rubbing) al cohol. 5. Close the cover of th e automatic docume nt feeder. To clean th e plastic strip ins ide the automatic document fee der 1. Turn off the de vice and un plug the power[…]
-
Страница 28
4. Lift the au tomatic docu ment feeder m echanism. 5. Clean the plastic strip with a so ft cloth o r sponge slig htly moist ened wit h a non abrasive glass cleaner. CAUTION: Do not use abrasive s, acetone, be nzene, or carbon tetrachl oride on the plasti c strip, si nce they can damage it. Do not pl ace or spray l iquid directly on the plastic str[…]
-
Страница 29
2P r i n t Most print setting s are automat i cally handled by the softwa re applicatio n. You need to change the sett ings manually only when you w ant to change pri nt quality, print on specific types of paper, or use special featu res. For more informat ion about sele cting the b est print media f or your documents, see Select pr int media. This[…]
-
Страница 30
Print documen ts (Mac OS X) 1. Load paper in the t ray. For more information, see Load media. 2. From the File menu in your sof tware app lication, ch oose Print . 3. Make sure the produ ct you want t o use is selected. 4. Change the prin t settings for the option pro vided in the pop-up m enus, as appropriate for your pr oject. NOTE: Click the blu[…]
-
Страница 31
4. Choose Pape r Type/Quali ty from the pop-u p menu, and then choose the following settings: • Paper Typ e: the appropriat e brochure pap er type • Quality: Normal or Best NOTE: Click the blue disclosure t riangle next to the Printer selection to access these options. 5. Select any other prin t settings that you want, and then click Prin t to […]
-
Страница 32
5. Select the l andscape or hori zontal Orie ntation opti on. NOTE: Click the blue d isclosure triang le next to t he Printer selection to access these optio ns. 6. Select any other print settings that you wa nt, and then cl ick Print to beg in printi ng. Print a Web page TIP: To print Web pages corre ctly, yo u might need t o set your pri nt orien[…]
-
Страница 33
Print photos Do not leave un used photo pap er in the input tray. The paper mi ght start to cu rl, which could reduce the qua lity of yo ur printout. Pho to paper shou ld be flat before pr inting. Follow the instructions for your operating system. • Print photos o n photo pap er (Windows) • Print photos on phot o paper (Mac OS X) Print photos o[…]
-
Страница 34
5. If necessary, click the disc losure tria ng le next to Color Options . Select any other print settings that you wa nt, and then cl ick Print to beg in printi ng. 6. Select the app ropriate Photo Fix options: • Off: applies no HP Rea l Life Technolog ies to the ima ge. • Basic: automatically focuses the image; mode rately adjusts image sha rp[…]
-
Страница 35
7. Select the paper type: a . Click More in the Paper type drop-down list. b . Click the desired paper type , and then click OK . 8. Click OK , and then click Print or OK to begi n printi ng. Print on special or custom -sized paper (Mac OS X) NOTE: Before you can print on custom-sized paper, you mu st set up the cust om size in th e printing soft w[…]
-
Страница 36
Follow the instructions for your operating system. • Print borderless d o cuments (Windows) • Print borderless docume nts (Mac OS X) Print borde rless docume nts (Windows) 1. Load paper in the t ray. For more information, see Load media. 2. On the File menu in your softwa re application , click Print . 3. Select the product you w ant to print t[…]
-
Страница 37
Perform two-sided printing (Windows) 1. Load paper in the tray. For more informatio n, see Lo ad media and Guidelin es for two- sided (dup lex) printing. 2. On the F ile menu in your sof tware applicati on, click Print . 3. Select the Two-s ided (Duplex) Printing option i n the Printing Shor tcuts list. 4. Click OK , and then click Print or OK to b[…]
-
Страница 38
3 Scan Using the pro duct’s control pa nel, you can scan origin als and send them to a variet y of destinatio ns, such as a folder or a program on a comp uter. You can also scan original s using the HP softw are provided w ith the product a nd TWAIN-compli ant or WIA-compl iant programs on a com puter. You can use the HP software to convert the t[…]
-
Страница 39
3. Press right arrow to select what to do wi th the scan, and then press OK . 4. Press Start . Edit a scanned document using optical character recognition (OCR) software You can use OCR softwa re to import scanned text in to your pref erred word-processing program for editing. T his allows you to edit letters, newsp aper clippings, and many other d[…]
-
Страница 40
4 Copy You can produce high-qua lity color and grayscale copies on a variety of paper types and sizes. NOTE: If you are copying a do cument when a f ax arrives, the f ax is stored in the device memory until the copying f inishes. This can reduce the num ber of fax pages stored in me mory. This secti on contains the followin g topics: • Copy docum[…]
-
Страница 41
• Lighter/Darker set tings • Resizing orig inals to fit on different paper sizes You can use these set tings for sing le copy jobs, or you can sa ve settings to be used as defaults for future jobs. To change copy setti ngs for a single job 1. Press left arrow or right arrow to n avigate betw een differ ent copy option s. 2. Make any changes to […]
-
Страница 42
5F a x You can use the de vice to send and receiv e faxes, including color faxes. You can schedule faxes t o be sent at a lat er time and set up speed-dials to send faxes quickly and easily to fr equently used nu mbers. From th e device control pa nel, you can also set a number of fax op tions, such a s resolution a nd the contrast between lightnes[…]
-
Страница 43
TIP: You can also send a fax m anually from a ph one or by using monitor diali ng. These feature s allow you to cont rol the pace of your di aling. They a re also useful when you want to use a calling ca rd to charge the cal l and you have to resp ond to tone prompt s while di aling. To send a basic fa x from the devi ce control pane l 1. Load your[…]
-
Страница 44
4. If the recipi ent answers the t elephone, you can engage in a conversa tion before sending you r fax. NOTE: If a fax machine answers t he call, you wi ll hear fax tones f rom the receiving fax machi ne. Proceed to the next step to transm it the fax. 5. When you are ready to send the fax, press Start . NOTE: If prompted, select Send Fax . If you […]
-
Страница 45
Send a fax fro m memory You can scan a black-and-white fax int o memory and t hen send the fax fr om memory. This feature is u seful if the fax num ber you are trying to reach is busy or temporari ly unavail able. The device scans the original s into memory and se nds them once it is able to connect to the rece iving fax machine. Aft e r the device[…]
-
Страница 46
6. Enter the fax numbe r by using the keypad, press Speed Dial to select a speed d ial, or press Redial /Pause to redi al the last number dialed. 7. Press Start . The device scans al l pages and t he scheduled ti me appears on the display. The fax is sent at the scheduled time. To cancel a s cheduled fax 1. Press the left arrow or right arrow to se[…]
-
Страница 47
phone lines. On poor phone lines, ECM in creases sending t ime and phone charges, but sends the data much mo re reliably. The def ault setting is On . Turn ECM off only if it increases phone charges subst antiall y, and you can accept poorer qualit y in exchange for reduced charge s. Before t urning th e ECM setti ng off, consi der the fol lowing. […]
-
Страница 48
You can receive f axes manually from a phone that is: • Directly co nnected to the device (on the 2-EXT port) • On the same phone line, but not di rectly connected to the devi ce To receive a fax manually 1. Make sure the devi ce is turned on and you have pa per loaded in the mai n tray. 2. Remove any origin als from the docum ent feeder tray. […]
-
Страница 49
NOTE: If Backup fax is enable d and you turn off the device, all faxes stored in memory are deleted, including any unpri nted faxes t hat you might have received while the device was in an error condition. You must contact the senders to ask them to resend any unprinted faxes. For a list of the faxes you have received, print t he Fax Log . The Fax […]
-
Страница 50
NOTE: The HP All-in -One does not support pol ling pass codes. Polli ng pass codes are a security feat ure that require the receiving fax m achine to provid e a pass code to the device it is p o lling in orde r to re ceive the fax. Make su re the device you are polling does not have a pass code set up (or has not ch anged the de fault pass code) or[…]
-
Страница 51
NOTE: If an incorrect pape r size is loade d in the main tray when you re ceive a fax, the fax does not print and an error message app ears on the displa y. Load letter, A4, or legal paper, an d then press OK to print the fax. To set the paper si ze for received faxe s from the devic e control panel 1. Press Setup . 2. Press right arrow until Fax S[…]
-
Страница 52
Add num bers to th e junk fax list You can blo ck specific number s by adding th em to the junk fax list. To manually ente r a number to block 1. Press Setup . 2. Press right arrow to select Fax Settings , and then pres s OK . 3. Press right arrow to select Junk Fax Blocker , an d then p ress OK . 4. Press right arrow to select Add , and then pres […]
-
Страница 53
Receive faxes to your co mputer (Fax to PC and Fax to Mac) Use Fax to PC and Fax to Mac to a utomatica lly receive faxes and sa ve faxes directly to your computer. Wi th Fax to PC and Fax to Mac, you can store digital copie s of your faxes easily and also e liminate th e hassle of dealing w ith bulky pap er files. Received faxes are save d as TIFF […]
-
Страница 54
Modify Fax to PC or Fa x to Mac settings You can update the Fax to PC settings from your computer at any time from the Fax Settings page i n the Solution Ce nter. You can upda te the Fax to Mac set tings from t he HP Setup Assistant . You can turn off Fa x to PC or Fa x to Mac and disa ble printing f axes from the d evice control pane l. To modify […]
-
Страница 55
• Set the fax erro r correction mode • Set the d ial type • Set the redi al options • Set the fax speed • Set the fax soun d volume Configure the fax header The fax header prints your nam e and fax number on the top of every fa x you send. HP recommends that you set up the fax header by using the sof tware that you installed with the devi[…]
-
Страница 56
before the device d oes. The number o f rings to answer for th e device should be greater than the nu mber of rings to answ er for the an swering ma chine. For example, set your answering machin e to a low num ber of rings and th e device to answer in the maximum num ber of rings. (The maximum nu mber of rings varies by country/reg ion.) In this se[…]
-
Страница 57
you are trying to send a f ax to another country/re gion or receive a fa x from another country/region, or i f you are using a satellite phone connectio n. To set the fax er ror-correctio n mode 1. Press Setup . 2. Press right arrow to select Fax Settings , and then press OK . 3. Press right arrow to select Error Co rrection , and then press OK . 4[…]
-
Страница 58
If you use one of the following, setting the fax spee d to a slower speed m ight be required: • An Internet phone service • A PBX system • Fax over Internet Prot ocol (FoIP) • An integ rated services di gital network (ISDN) ser vice If you experi ence problems send ing and receivin g faxes, try using a low er Fax Speed . The follow ing tabl[…]
-
Страница 59
NOTE: If you have quest ions about Intern et faxing, co ntact your Int e rnet faxi ng services support d epartment or your loca l servi ce provider for further assistan ce. Use reports You can set up the device to print error repo rts and confirmation reports automati cally for each fax you send a nd receive. You can also ma nually prin t system re[…]
-
Страница 60
3. Press right arrow to select Fax Confirmati on , and then p ress OK . 4. Press right arrow to select one o f the followin g, and then pre ss OK . Off Does not print a fax confir mation report when you se nd and receive faxes successfully. This is the default setting. On Fax Send Prints a fax confirmation report for every fax you send. On Fax Rece[…]
-
Страница 61
• Number of pa ges • Result (status) of tra nsmission To print the fax log from th e device control panel 1. Press Setup . 2. Press right arrow to select Print Report , and then press OK . 3. Press right arrow to select Fax Log , and then p ress OK . 4. Press OK again to prin t the log. To view the fax log fr om the HP software Follow the instr[…]
-
Страница 62
Print a Caller ID History Report Use the follow ing procedure to print a list of Cal ler ID fax number s. To print a Ca ller ID Histo ry Report 1. Press Setup , select Printe r Report , and then select Call er ID History Report . 2. Press OK . Chapter 5 58 Fax[…]
-
Страница 63
6 Work with ink cartridges To ensure the best prin t quality from th e HP All-in-On e, you will need to p erform some simple main tenance proced ures. This sect ion provides guidelin es for handling the ink cartridges , instructions for replac ing the ink cartridg es, and aligning and cleaning the printhead. This section co ntains the following top[…]
-
Страница 64
• Handle in k cartridges caref ully. Droppin g, jarring, or rough hand ling during in stallation can cause temporary pri nting problems. • If you are t ransporting the product, do the f ollowing t o prevent ink leaki ng from the print carriage o r other damage from occurri ng to the product: ◦ Make sure you turn off the product by pressing th[…]
-
Страница 65
Handle the ink cartridges Before you replace o r clean an ink cart ridge, you shoul d know the part na mes and how to handle the i nk cartridge s. 1 Copper-colored contacts 2 Plastic tape with pink pull tab (m ust be removed before installing) 3 Ink nozzles under tape Hold the ink cartrid ges by their black pla stic sides, with th e label on top. D[…]
-
Страница 66
available to avoi d possible printi ng delays. You do not n eed to replac e the ink cartrid ges until print quali ty becomes unaccep table. For more informati on about ordering i nk cartridges for the device, see Order printing supplies onlin e. To replac e the ink ca rtridges 1. Make sure the product i s turned on. CAUTION: If the product is tu rn[…]
-
Страница 67
If you are repl acing the b lack ink cartridge, remove the ink cartridge from the sl ot on the right. 4. Pull the in k cartridge to wa rd you, out of its slot. NOTE: HP provides recycling options for used ink cartridges in many countries/ regions. For more information, see HP inkjet supplies recycling program. 5. Remove the new ink cartridg e from […]
-
Страница 68
6. Hold the ink cartridge with the HP logo on top, and insert the new ink cartridge into the empty ca rtridge slot . Make sure you push th e ink cartridge in firml y until it snaps into place. If you are install ing the tri-color ink cart ridge, slide it into the le ft slot. If you are install ing a black ink cartridge, sli de it into the ri ght sl[…]
-
Страница 69
10. Load the ink cartridge alig nment shee t face down on t he scanner glass in the front right corner with the to p of the page t o the right, and th en press OK . For more informatio n, see Load an o riginal on the scanner glass. The HP All-in-One aligns the ink cartri dges. Recycle or discard the ink cartridge alignment sheet. Store printing sup[…]
-
Страница 70
3. Selects Tools and then select Align Cartri dge . The product pri nts an ink cartridge al ignment sheet. 4. Place the alignment shee t face down on the scanne r glass. For more in formation, see Load an origi nal on the scanner glass. 5. Press OK to scan t he alignment sheet. After the alignment sheet is scanned, alignm ent is complete. Recycle o[…]
-
Страница 71
To align the ink ca rtridges from the HP software 1. Load letter or A4, unuse d, plain white pa per in the inpu t tray. For more in formation, see Load media. NOTE: If you have colored pap er loaded in the in put tray when you align the ink cartridges, the alignment w ill fail. Load u nused plain w hite pape r into the input tray, and then try the […]
-
Страница 72
To clean the ink car tridges from th e product contro l panel 1. Load letter, A4, or legal unused plain white pap er into the input tray. 2. Press Setup . 3. Select Tools , and th en select Clean Cartridge . The device prints a page th at you can recycle or discard. If copy or print quality still se ems poor after you clean t he ink cartridges, try[…]
-
Страница 73
7 Solve a problem The informat ion in Solve a problem suggests sol utions to common prob lems. If your device is not ope rating correctl y and those sug gestions did not solve your prob lem, try using one of the f ollowing support services to obtain assist ance. This section co ntains the following topics: • HP support • General troublesh ootin[…]
-
Страница 74
Obtain el ectronic suppo rt To find support and wa rranty informati on, go to t he HP Web site at www.hp.com/ support. I f prompted, choose your country/reg ion, and the n click Contact HP for informatio n on callin g for technica l support. This Web site also offers technical supp ort, drivers, supplies, ordering informati on and other optio ns su[…]
-
Страница 75
• Message s that appea r when the situation occurs • Answers to these questions: ◦ Has this situati on happened befo re? ◦ Can you re-create it? ◦ Did you add any new ha rdware or softwa re to your comput er at about the time that t his situation began? ◦ Did anything el se occur prior t o this sit uation (such as a t hunderstorm, HP Al[…]
-
Страница 76
For the most current list of telephon e support numbe rs, see www.hp.com/support. $IULFD(QJ OLVKVSHDNLQJ $IULTXHI UDQFRSKRQH ﺮﺋﺍﺰﺠﻟﺍ $UJHQWLQD%XHQ RV$LUHV ?[…]
-
Страница 77
After the phone sup port period After the phone supp ort period, he lp is available fr om HP at an additional cost. Help may also be available at the HP onli ne support Web site: www.hp. com/support. C ontact your HP dealer o r call the sup port phone n umber for your co untry/region t o learn m ore about support opti ons. General troubleshooting t[…]
-
Страница 78
Solve printing problems This secti on contains the followin g topics: • The device shut s down unexpectedly • Error message appears on control -panel display • Alignment f ails • The devi ce is not responding (no thing print s) • Device ta kes a long time to prin t • Blank or partial pa ge printed • Something on the page is mi ssing o[…]
-
Страница 79
Check the d evice software insta llation If the device is turn ed off when prin ting, an aler t message should appear on your comp uter screen; otherwi se, the device soft ware might not be installed co rrectly. T o resolve this, uninstal l the software completely, an d then reinstal l the device sof tware. For more information , see Uninstall and […]
-
Страница 80
There is a blank pa ge in the file Check the file to m ake sure there is no blank p age. Something on the page is missing or in correct Check the margin setting s Make sure th e margin settings fo r the document do not exceed the printable are a of the device. For more information, see Set minimu m marg ins. Check the color print settings Make sure[…]
-
Страница 81
electromagne tic fields. Also , it is recommen ded that you use a U SB cable that is less than 3 meters (9.8 feet) long t o minimize the eff ects of these electroma gnetic fields. If the above so lutions do not w ork, the probl em may be caused by the in ability of the application t o interpret print settings properly. See t he release no tes for k[…]
-
Страница 82
The images be low show the difference between vertica l and ho rizontal streaki ng. Horizontal Streaks Vertical streaks NOTE: Streaks on a copied do cument com monly appear w hen the scanner glass or the plastic stri p in the automat ic document feed er (ADF) is dirty. For informa tion about cleanin g the scanner gl ass and plastic strip in the ADF[…]
-
Страница 83
Step 1: Check the print q uality settings The print qual ity settings in th e product soft ware might not b e optimized for the ty pe of document you are printi ng. Follow th ese steps to check these se ttings. If the issue persists , continue t o the next solution Step 2: Check the Print in Grayscale setting. Windows 1. In the software program fro[…]
-
Страница 84
Mac OS X 1. From the File menu in your sof tware app lication, ch oose Print . 2. Choose Paper Type/Quality from th e pop-up menu. 3. In the Color Options area, make sure the Color setti ng is no t set to Gr ayscale . Solution 5 : Check es timated ink levels and rep lace low or empty in k cartridges Follow these st eps to check the estimated ink le[…]
-
Страница 85
Print Quality Dia gnostic Repor t 1. Load regular, white, le tter-size or A4 pa per 2. On the product contro l panel, press (Setup), select Print Report , select Print Quality , and then press OK . 3. Evaluate the Print Quality Diagnostic Report: a Ink level b Color bars c Large-font text d Alignment pattern a . Ink leve l: Look at the Ink leve l b[…]
-
Страница 86
b . Color bars: Look at th e color bars in the m i ddle of t he page. You shou ld see seven color bars. These b ars should have sharp edges, should be solid (not streaked with w hite or other colors), and sho uld be unif orm in color th roughout. Example of Good Color Bars: All bars are solid, sharp-ed ged, and extend with uniform color across the […]
-
Страница 87
To prevent problem s causing ragged bars on the PQ Diagnostic Report, try the followi ng solutions: • Avoid leaving u n-taped ink cartrid ges outside o f the print e r for an extended period of time . For more informat ion about hand ling ink cart ridges, see H andle the ink cartridg es. • Always turn of f the product usin g the (Power) button,[…]
-
Страница 88
Examples of bad la rge-font text The letters are jagged . The letters are smeared . The letters are ragged on one end . d . Alignment pattern: If the color bars a nd large-font t ext look OK and the ink cartridges are no t empty, look at the alignm ent pattern di rectly above th e color bars. Example of a go od alignment patte rn. The lines are str[…]
-
Страница 89
The lines are jagg ed. Self-T est Report Follow thes e steps to print, and then evaluate a Diagnost ic report . 1. Load regular, wh ite, letter-si ze or A4 paper. 2. On the product contro l panel, press (Setup), select Print Report , select Self- Test , and then press OK . Poor print quality and unexpected printouts 8 5[…]
-
Страница 90
To evaluate th e Diagnostic Pag e: 1. Look at th e color bars i n the middle of the page. There should be t hree color bars and a black bar. All t he bars should have sharp edges. They should b e solid (not strea ked with white or other colors). They shoul d be uniform in co lor throug hout. Example of Goo d Bars — all bars are solid, sharp -edged,[…]
-
Страница 91
Bar colors are not uniform Example of Bad Color Bars — The ye llow bar is streaked w ith another color. Black Text 2. Look at the bl ack text printed on the page. The t ype should be sharp and clear. Example of good black text — the letters are shar p an d clear — the printer is operating correctly Example of bad black text — the letters are sme ar[…]
-
Страница 92
Solution 8: Align the ink cartrid ges Align the ink ca rtridges if you see the follow ing in th e diagnosti c report: • Large-font text: Letters are jagged. • Alignment pattern: Lines are jagged. For instructions, see Align the ink cartrid ges. If the issue persists , continue to the next step. Solution 9 : Replace the problem in k cartridge If[…]
-
Страница 93
To clean the in k cartridge c ontacts 1. Turn on the devic e and open the ink cartridge door. The print carriage moves to the far right side of t h e device. 2. Wait until t he print carriage is id le and silent, and then unplug the power cord f rom the back of the device . NOTE: Depending ho w long the H P All-in-One is unpl ugged, the date and ti[…]
-
Страница 94
NOTE: Clean the are a around the ink nozzle s only if you cont inue to see streaks and smudges on your printe d pages after you have already clean ed the in k cartridges by using the device control panel or th e software you inst alled with the HP All-in-One. Make sure you have the f ollowing materials availa ble: • Dry foam rubber swabs, lint-fr[…]
-
Страница 95
6. Clean the face and ed ges around th e ink nozzle a rea with the swab, as shown below. 1 Nozzle plate (do not clean) 2 Face and edges around the ink n ozzle area CAUTION: Do not clean the nozzle pl ate. 7. Slide th e ink cartridge back into the slot. Push the ink cartridge forward until it clicks into place. 8. Repeat if necessary for the ot her […]
-
Страница 96
Media is not coming out correctl y • Make sure the output tray ex tension is exten ded; otherw ise, print e d pages may fall off the devic e. • Remove excess media fro m the output tray. There is a limit to the number of sh eets the tray can hold. Pages are skewing • Make sure the media loaded in t h e trays is alig ned to the paper guides. I[…]
-
Страница 97
• Size is reduced • Copy qual ity is poor • Copy defects are apparent • The device print s half a page, t hen ejects the paper • Paper mismatch No copy came o ut • Check the pow er Make sure that th e power cord is secu rely connected, and t he device turned on. • Check the s tatus of th e device ◦ The device might b e busy with ano[…]
-
Страница 98
Size is reduced • The reduce/enl arge or other copy featu re might have been set from the device control panel to reduce t he scanned ima ge. Check the settings for the copy job t o make sure that they are f or normal size. • The HP softwa re settings mi ght be set to redu ce the scanned image. Change the settings, if needed. See the on screen […]
-
Страница 99
• Large, blac k typefaces look splotchy (not smooth) The default enhance ment sett ing might not be suita ble for the job. Check th e setting and change it to enhance text o r photographs, if needed. For m o re inform ation, see Change co py settings. • Horizontal gr ainy or white band s in light-g ray to medi um-gray areas The default enhance […]
-
Страница 100
Scan take s too long • Check the setting s ◦ If you set the re solution too h igh, the scan jo b takes longer and re sults in larg er files. To o btain good re sults when scan ning or copy ing, do not use a re solution that is hig her than neede d. You can lowe r the resolution to scan more quickly. ◦ If you acqui re an image through TW AIN, […]
-
Страница 101
Text cannot b e edited • Check the se ttings ◦ Make sure the H P software (or any a dditional OCR software) is properly instal led. ◦ When you scan the ori ginal, make sure that you select a document type o r save the scan in a form at that creates ed itable, searchable text. I f text is classif ied as a graphic, it is not con verted to text […]
-
Страница 102
Text or images on the back of a two-sided o riginal appe ar in the scan Two-sided ori ginals can «bleed » text or ima ges from the back si de to the scan if the originals are p rinted on medi a that is too th in or too transparent. The scanned image is skewed (crooked ) The origina l might have bee n placed incorrectl y. Be sure to use th[…]
-
Страница 103
• Black dots or streaks ◦ Ink, glue, correct ion fluid, or an unwanted subst ance might be on the scanner glass, the scanne r glass might be dirty or scrat ched, or the l id backing might be dirty. Try cleaning th e scanner glass and lid backi ng. See Mainta in the de vice for more informat ion. If cleani ng does not co rrect the problem, the s[…]
-
Страница 104
• The «Dia l Tone Detect ion» test failed • The «Fax Lin e Conditi on» test fa iled The «Fax Hardware T est» failed Solution: • Turn off the device by using the Power button loca ted on the device control pan el and then unplug the pow er cord from the ba ck of the device. Aft e r a few seconds, plug the power co[…]
-
Страница 105
• If you are using a phone splitter, t h is can cause faxing p roblems. (A split ter is a two-cord connector th at plugs into a telephon e wall jack. ) Try removing the split ter and connecting th e device directly t o the tele phone wall jack. • Try connect ing a working pho ne and phone cord to the telep hone wall jack that you are using for […]
-
Страница 106
The «Using Correct Type of Phon e Cord with Fax» test fail ed Solution: • Make sure you used the phone cord supplied in the box wit h the device to connect to the t elephone wal l jack. One en d of the phon e cord should b e connected to the port labeled 1-LINE on the back of th e device, and t he other e nd to your telephone wall jack,[…]
-
Страница 107
The «Dial Tone Detecti on» test failed Solution: • Other equip ment, which uses the same phone line as the devi ce, might be ca using the test to fa il. To find o ut if other e quipment is cau sing a problem, d isconnect everything from the phon e line, and then run the test again . If the Dial Tone Detection Test passe s without the ot[…]
-
Страница 108
The «Fax Line Condition» test fai led Solution: • Make sure you conne ct the device to a n analog phone line or you wi ll not be able to send or receiv e faxes. To che ck if your phon e line is d igital, connect a regular analog phone to the line and l isten for a di al tone. If yo u do not hear a no rmal sounding dia l tone, it might b[…]
-
Страница 109
example, you can not use the device for faxing if an extension phone is off the hook, or if you are using a compute r dial-up modem to send e-mail or access the Internet. The device i s having probl ems sending and receiving fax es Solution: Make sure the device i s turned on. Loo k at the display on t he device. If the display is bla nk and the Po[…]
-
Страница 110
• Other eq uipment, wh ich uses the same phone line as t he device, migh t be in use. For example, you canno t use the device for faxing if an extensio n phone is off t he hook, or if you are using a compu ter dial-up modem to send a n e-mail or ac cess the Internet. • Check to see if another process h as caused an error. Check th e display or […]
-
Страница 111
The device is havi ng problems se nding a manua l fax Solution: NOTE: This possible so lution applie s only in th e countries/ regions that receive a 2-wire phon e cord in the box with the devi ce, includin g: Argentina, Australia, Brazil, Canada, Chi le, China, Col ombia, Greece, India, Indonesia , Ireland, Japan, Korea, Latin America, Mala ysia, […]
-
Страница 112
• If you have a voice mail service at the same phone number you use for fax calls, you must receive faxes manu ally, not automatically. Th is mea ns that you must be available to respond i n person t o incomi ng fax cal ls. For info rmation on se tting up the device when you have a voice mail service, see Case F: Shared vo ice/fax lin e with voic[…]
-
Страница 113
• If the de vice shares the sam e phone line w ith other type s of phone e quipment , such as an answering machine, a computer di al-up modem, or a multi-port swi tch box, the fax sign al level migh t be reduced. The sign al level can also be re duced if you use a splitter or connect ex tra cables to exte nd the leng th of your phon e. A reduced […]
-
Страница 114
Fax tones are recorded on my answeri ng machine Solution: • When you h ave an answer ing machine on t he same phone li ne you use for fax calls, try con necting the answ ering machine directly to the d evice as described in Case I: Shared voice/f ax line with answering m achine. If you do not connect the answering machi ne as recommended, fax ton[…]
-
Страница 115
The computer ca nnot receive faxes (F ax to PC and Fax to Mac) Cause: The H P Digital Ima ging monito r is turned off (Windows). Solution: Check the taskbar and ensure that the HP Digital I maging monit or is turned on at al l times. Cause: The com puter selected to receive faxes is tu rned off. Solution: Make sure the c omputer selected to receive[…]
-
Страница 116
If the installa tion program can not discover the device, print the netw ork configurati on page, and enter the IP address manually in the in stallation program . For more informat ion, see Understand the net work configuration pag e (some models only). Though it is n ot recommended t hat you assign the devi ce with a stati c IP address, you might […]
-
Страница 117
Step 2 — Restart componen ts of the wireless network Turn off the router and th e HP device, and t hen turn them back on in this order: router first and then the HP device. If you still a re unable t o connect, turn of f the router, H P device, and your co mputer. Someti mes, turning of f the power and then turn ing it back o n will recover a n etw[…]
-
Страница 118
To check a wi reless connection 1. Make sure that your computer’s w ireless has been turned on. (F or more info rmation, see the documenta tion that came with your co mputer.) 2. If you are not u sing a unique n etwork name (SSI D), then it is possible that your wireless co mputer could be conne cted to a nearby network that is not yours. The […]
-
Страница 119
A: Make sure the HP device is on the network 1. If the HP device supports Ethernet netwo rking and is connected t o an Ethernet network, make sure an Eth ernet cable is not plugged int o the back of the de vice. If an Ethernet cabl e is plugged into the back, then wireless connectivity is disabled. 2. If the HP devi ce is connected t o a wireless n[…]
-
Страница 120
to communicate with each other over the netwo rk. For more i nformation, see Conf igure your firewall to wo rk with HP devices. If you are abl e to access the EWS, but a re still unabl e to use t he HP device e ven with t h e firewall turn ed off, try enabl ing the firewall sof tware to recognize the HP device. Step 4: Make sure the HP d evice is o[…]
-
Страница 121
connecting to the HP device, ma ke sure the correct version of the printer driver is set as the default. 1. Click Start , point to Settings , and then click Pr inters or Printers and Faxes . — Or — Click Start , click Control Panel , and t h en doub le-click Printers . 2. Determine if the version of the prin ter driver in the Printers or Printers a[…]
-
Страница 122
device access to the network. If the WAP filters MAC a ddresses, then t he device’s MAC address m ust be added to t he WAP’s list of accepted M AC addresse s. • Print the ne twork configura tion page. Fo r more informatio n, see Understand the network configurat ion page (som e models onl y). • Open the WAP’s configuratio n utilit y, and […]
-
Страница 123
NOTE: Refer to your f irewall document ation on how to configu re the firew all port settings and how to a dd HP files to t he “trusted“ li st. Some firewalls cont inue to cause in terference even af ter you disable them. If you continue to have problem s after configuring the firewall as described abo ve and if you are using a comput er runnin[…]
-
Страница 124
NOTE: To use the embedd ed Web server (EWS), th e product must be connected to a networ k using either an Ethernet or a w ireless connectio n. You cannot use the embedded We b server if the product is connected to a co mputer with a USB cabl e. • Embedded Web server cannot be opened • The EWS is only a vailable in English Embedded Web server c […]
-
Страница 125
Troubleshoot installation issues If the follow ing topics do not he lp, see Solve a problem for informati on about HP support. • Hardware insta llation suggestions • Software instal lation sugg estions Hardware ins tallation suggestion s Check the d evice • Make sure t hat all packing tape and mate rial have bee n removed from o utside an d i[…]
-
Страница 126
• Duplexer is locked into plac e. • Paper is loa ded correctly in the tray, a nd is not ja mmed in the de vice. • All latches and covers are clo sed. Software installation s uggestions Verify installation prel iminaries • Make sure to use t he HP software CD that contain s the correct install ation softw are for your operating system. • B[…]
-
Страница 127
NOTE: If your product do es not support wi reless communica tion, the report i s called the «Print er Status Report». I f your product suppo rts wireless communication , the report is c alled the » Self-Test Rep ort». If you need to call HP, it is often usef ul to print the Printer Stat us Report or Self -Test Report before call[…]
-
Страница 128
Self-Test Report 1. Printer Information: Shows device inf ormation (such as the prod uct name, mod el number, serial number, and fi rmware version number), a nd the numbe r of pages printed fro m the tray. 2. Nozzle test pattern: Missing lines indica te pr oblems with the ink cartridg es. Try cleaning the cartridges, or re placing the ca rtridges. […]
-
Страница 129
help troublesho ot network con nectivity problems . If you need to call HP, it is often useful to print this page before call ing. Network Conf iguration Page 1. General Info rmation: Shows in formation about t he current status and active connection type of the network, a nd other informa tion, such as t he URL of the embedded W eb server. 2. 802.[…]
-
Страница 130
• Make sure that the device is clean. For more informa tion, se e Maintain the device. • Make sure that the trays are loaded correct ly and are not too ful l. For more informatio n, see Load media. This secti on contains the followin g topics: • Clear paper ja ms • Avoid paper jams Clear paper jams If the pa per was loaded in the m a in tra[…]
-
Страница 131
To clear a paper jam in the automatic do cument feeder (ADF) (Some models only) 1. Lift the cover of the AD F. 2. Gently pul l the pape r out of the roll ers. CAUTION: If the paper tears when you are re moving it from th e rollers, check the rollers and wheels for torn pieces o f paper t hat might be remaini ng inside th e device. If you do not rem[…]
-
Страница 132
A Technical information This section contains the following topics: • Warranty inform ation • Device specifications • Regulatory information • Environmental product stewardship program • Third-party licenses Warranty information This section contains the following topics: • Hewlett-Packard limited war ranty statement • Ink cartridge w[…]
-
Страница 133
Hewlett-Packard limited warranty statement A. Extent of limited warranty 1. Hewlett-Packard (HP) warrants to the end-user customer that the HP products specified above will be free from defects in materials and workmanship for the duration specified above, which duration begins on the date of purchase by the customer . 2. For software products, HP?[…]
-
Страница 134
Ink ca rtridge wa rranty informa tion The HP cartridge warr anty is applicable when the produc t is used in its designated HP printing device. This warranty does n ot cover HP ink products that have been re filled, remanufactured, refurbished, misused, or tampered with. During the wa rranty period the product is covered as long as the HP ink is not[…]
-
Страница 135
Device specifications This section contains the following topics: • Physical specifications • Product features and capacities • Processor and memory specifications • System requirements • Network protocol specificat ions (Some mode ls only) • Embedded Web serve r specifications (some models o nly) • Media specifications • Print reso[…]
-
Страница 136
Processor: 192 MHz ARM9 core Memory: 64 MB DDR2 Wireless models Processor: 180 MHz ARM9 core Memory: 32 MB SDRAM System requir ements NOTE: For the most current information about suppor ted operating systems and system requirements, visit http://www .hp.com/support/. Operating system compatibility • Windows XP Service Pack 1, Windows Vista, Windo[…]
-
Страница 137
• Microsoft Windows 2003 Server Te rminal Servic es with Citrix Metafr ame XP with Feature Release 3 • Microsoft Windows 2003 Small Busin ess Server Terminal Services • Microsoft Windows Server 200 8 Terminal Services Compatible network prot ocols TCP/IP Network managem ent • HP Web Jetadmin plug-ins • Embedded We b server Feat ures Abili[…]
-
Страница 138
Media size Main tray Borderless B5 (176 x 250 mm; 6.9 x 9.8 inches Borderless (10 x 15 cm, tab) Borderless (4 x 6 inches, tab) Borderless HV Borderless A6 Borderless cab inet Borderless (13 x 18 cm), same dimension as 5 x 7 inches Borderless (8.5 x 11 inches) 10 x 15 cm (tab) 4 x 6 inches (tab) HV Cabinet 13 x 18 cm (same dimension as 5 x 7 inches)[…]
-
Страница 139
Media size Main tray Photo media (89 x 127 mm; 3.5 x 5 inch es) Photo media (102 x 152 mm; 4 x 6 inches) Photo media (5 x 7 inches) Photo media (8 x 10 inches) Photo media (10 x 15 cm) Borderless photo media (89 x 127 mm; 3.5 x 5 inches) Borderless photo media (102 x 152 mm; 4 x 6 inches) Borderless photo media (5 x 7 inches) Borderless photo media[…]
-
Страница 140
Tray Type Weight Capacit y Automatic document feeder (ADF)* Paper 75 g/m 2 (20 lb index) Up to 20 sheets of plain paper (5 mm or 0.2 inches stacked) Output tray All supported media Up to 50 sheets of plain paper (text printing) * Some models only. Set minimum margins The document margins must match (or exceed) t hese margin settings in portrait ori[…]
-
Страница 141
Guidelines for two-si ded (duplex) printing • Always use media that conforms to the devic e specifications. For mor e information, see Media specifications. • Do not print on both sides of tra nsparencies, envelopes, photo paper, glossy me dia, or paper lighter than 16 lb bond ( 60 g/m 2 ) or heavier than 28 lb bond (1 05 g/m 2 ). Jams might oc[…]
-
Страница 142
Paper type Device control panel setting HP Premium Plus Photo Papers Photo Paper HP Premium Photo Papers Photo Paper HP Advanced Photo Paper Photo Paper HP Everyday Photo Paper, Semi-gloss Photo Paper HP Everyday Photo Paper, Matte P r emium Inkjet Other photo papers Photo Paper HP Premium Inkjet Transparency Premium Inkjet HP Iron-on Tran sfer Pre[…]
-
Страница 143
Scan specificat ions • Image editor included • Integrated OCR software automatically converts scanned text to editable text • Scan spe eds vary according to the complexity of the docu ment • Twain-compliant interface • Resolution: 2400 x 4800 ppi optical, up to 19,200 ppi enhanced • Color: 16-bit per RGB color , 48-bit total • Maximum[…]
-
Страница 144
Regulatory information The device meets product requirements fro m regulatory agencies in you r country/region. This section contains the following topics: • FCC statement • Notice to users in Kore a • VCCI (Class B) compliance statement for users in Japan • Notice to users in Japan about the power cord • Noise emission statement for Germ[…]
-
Страница 145
FCC statem ent FCC sta tement The Unit ed States F ederal C ommunications C ommission (in 4 7 CFR 1 5. 1 05 ) has spec ifi ed that the follo wing noti ce be brought to the atten tion o f user s of this pr oduct. This eq uipment has been tes ted and found to compl y with the limits f or a Clas s B digital dev ice , pursuant to P ar t 1 5 of the FCC […]
-
Страница 146
Notice to users in Ja pan about the pow er cord Noise emis sion statement fo r Germany Geräusc hemission LpA < 7 0 dB am Arbeits platz im Normalbetr ieb nach DIN 4 56 3 5 T . 1 9 LED indi cator stateme nt Appendix A 142 Technical information[…]
-
Страница 147
Notice to users of the U.S. telep hone network: FCC requi rements Notice to users of t he U.S. telephone n etwork: FCC requirements This eq uipment complie s w ith FCC rules , P ar t 6 8. On this equipment is a label that contains, among other inf ormation , the FCC Registr ation Number and R inger Equi valent Number (REN) for this eq uipment . If […]
-
Страница 148
Notice to use rs of the Can adian telephon e network Note à l’at tention des utilis ateurs du réseau téléphoni que canadi en/Notice to users of th e Cana dian telephon e network Cet appar eil est conf orme au x spécif ications tec hniques des équipements t ermina ux d’Industr ie Canada . Le n umér o d’enregistr ement atteste de la conf[…]
-
Страница 149
Notice to users i n the European Ec onomic Ar ea Notice to users in t he European Economic A rea This pr oduct is designed t o be connected to the analog S w itched T elecommunicati on Networ ks (P STN) of the E uropean E conomic Ar ea (EEA) countr ies/r egions . Networ k compatibility depends on c ust omer select ed settings, w hich m ust be r ese[…]
-
Страница 150
Exposure to radio freque ncy radiation Exposure to radio fr equency radiation Caution The radiated output power of this device is far below the FC C radio frequency exposure limits. Nevertheless, the device shall be used in such a manner that the potential for human contact during normal operation is minimized . This product and any attached extern[…]
-
Страница 151
European Union regu latory notice European Union Regula tory Noti ce Products bearing the CE marking comply with the following EU Directives: · Low V oltage Direc tive 2006/95/EC · EMC Directive 2004/108/EC CE compliance of this product is valid only if pow ered with the corr ect CE-marked AC adapter provided by HP . If this product has telecommu[…]
-
Страница 152
Declaration o f conformity DECLARATION OF CONFORMITY according to ISO/IEC 17050-1 and EN 17050-1 Supplier’s Name: Hewlett-Packard Company DoC#: SNPRC-0902-01-A Supplier’s Address: 138, Depot Road, #02-01 Singapore 109683 declares, that the product Product Name and Model: HP Officejet 4500 series printer Regulatory Model Number: 1) SNPRC-0902-01[…]
-
Страница 153
DECLARATION OF CONFORMITY according to ISO/IEC 17 050-1 and EN 17050-1 Supplier’s Name: Hewlett-Packar d Company DoC#: SDGOB-0833-Rev.7.0 Supplier’s Address: 138, Depot Road, #02-01 Singapore 1096 83 declares, that the pro duct Product Name and Model: HP Officejet J468 0 and J4624, HP Officejet 4500 Wireless series print er Regulatory Model Num[…]
-
Страница 154
DECLARATION OF CONFORMITY according to ISO/IEC 17050-1 and EN 17050-1 Supplier’s Name: Hewlett-Packard Company DoC#: SNPRC-0902-01-D Supplier’s Address: 138, Depot Road, #02-01 Singapore 109683 declares, that the product Product Name and Model: HP Officejet 4500 series printer, HP Offi cejet Advantage 4500 All- in-One printer, HP Officejet 4575[…]
-
Страница 155
Environmental product steward ship program Hewlett-Packard is committed to providing qua lity products in an environmentally sound ma nner. Design for recycling has been incorporated into this product. The number of mater ials has been kept to a minimum while ensuring proper functionality and reliability. Dissimilar materials have been designed to […]
-
Страница 156
Disposal of waste equipment by users in private hou seholds in the European Unio n Disposal of Waste Equipment by Users in Private Households in the European Union This sy mbol on the product or on its pac kaging indicates that this pr oduct must not be disposed of with y our other household wa ste . Instead, it is y our responsib ility to dispose […]
-
Страница 157
Power c onsumpt ion Hewlett-Packard printing and ima ging equipment mark ed with the ENERGY STAR® logo is qualified to the U.S. Environmental Protection Agency’ s ENERGY STAR specifications for imaging equipment. The following mark will appear on ENERGY STAR qualified imaging products: ENERGY STAR is a U.S. registered service mark of the U.S. EP[…]
-
Страница 158
Third-party licenses This section contains the following topics: • HP Officejet 4500 Desktop • HP Officejet 4500 / HP Officejet 4575 / HP Officejet Advantage 4500 • HP Officejet 4500 Wireless Appendix A 154 Technical information[…]
-
Страница 159
HP Officejet 4500 Desktop Third-part y licenses A ES r ijndael-alg-fst .c @v ersi on 3 .0 (December 2000) Optimised ANS I C code for the R ijndael c ipher (now AE S) @author V i ncent R ijmen <vincen t .rijmen@esat .k u leu ven .ac.be> @author Antoon Bo sselaers <antoon .bosselaers@e sat .kuleu ven .ac.be> @author P aulo Barr eto <pa[…]
-
Страница 160
SHA2 FIP S 180 — 2 SHA- 2 2 4/2 5 6/3 84/512 implementati on La st update: 0 2/0 2/200 7 Issue date: 0 4/30/200 5 Cop yr ight (C) 200 5, 200 7 Oli vie r Gay <oli v ier .gay@a3 .epfl .ch> All r ights r eserved . R edistr ibution and use in so ur ce and binar y f orms , with or w ithout modifi cation , ar e permitted pro vi ded that the follo w[…]
-
Страница 161
ZLIB zlib .h — interface of the ‘zlib’ gener al purpose com pr ession libr ar y v ersion 1.2 .3, J uly 18th , 2005 Cop yr ight (C) 19 9 5- 2005 Jean -loup Gaill y and Mark Adler This s oft w ar e is pro vi d ed ‘as-is’, w ithout any e xpr ess or im plied w arr ant y . In no e v ent w ill the authors be held lia ble fo r an y da[…]
-
Страница 162
HP Office jet 4500 / HP Offi cejet 4575 / H P Officejet A dvantage 4500 Third-part y licenses A ES r ijndael-alg-fst .c @v ersi on 3 .0 (December 2000) Optimised ANS I C code for the R ijndael c ipher (now AE S) @author V i ncent R ijmen <vincen t .rijmen@esat .k u leu ven .ac.be> @author Antoon Bo sselaers <antoon .bosselaers@e sat .kuleu[…]
-
Страница 163
Expat Cop yr ight (c) 19 9 8 , 199 9 , 2000 T hai Open Sour ce Softwar e Center L td P ermissi on is hereb y granted , fr ee of char ge, to an y person obtaining a cop y of this so ftwar e and assoc iated doc umentati on f iles (the «Softw ar e») , to deal in the Softwar e without r estr icti on , including w ithout limitation the ri ghts[…]
-
Страница 164
OpenSSL Cop yr ight (C) 19 9 5-199 8 Er ic Y oung (eay@c r y ptsoft .com) All r ights r eserved . This pac kage is an S SL implementation w ritten b y Er ic Y oung (eay@c r y ptsoft .com) . The im plementati on w as w r it ten so as to conf orm w ith Netscapes S SL . This libr ary is free f or commer c ial and non -commer ci al use as long as the f[…]
-
Страница 165
THIS S OFT W ARE IS PR O VIDED B Y ERIC Y OUNG «A S IS» AND ANY EXP RE S S OR IMPLIED W ARRANTIE S , INCL UDING , BUT NO T LIMITED T O , THE IMPLIED W ARRANTIE S OF MERCHANT ABILITY AND FI TNE SS F OR A P ART ICUL AR P URP O SE ARE DIS CL AIMED . IN NO EVENT SHALL THE A UTHOR OR CONTRIB UT ORS BE LIABLE FOR ANY DIRE CT , IND IRE CT , IN[…]
-
Страница 166
THIS S OFT W ARE IS PR O VIDED B Y THE OpenSSL P RO JECT «A S IS» AND ANY EXP RE S SED OR IMPLIED W ARRANTIE S, INCL UDING, B UT NO T LIMITED T O , THE IMPLIED W ARRANTIE S OF MER CHANT ABILITY AND FI TNE S S FOR A P AR TICULAR PURP OSE ARE DIS CL AIMED . IN NO EVENT SHALL THE OpenS SL PR OJE CT OR IT S CONTRIBUT ORS BE LIABLE F OR ANY […]
-
Страница 167
THIS S OFT W ARE IS PR O VIDED B Y THE OpenSSL P RO JECT «A S IS» AND ANY EXP RE S SED OR IMPLIED W ARRANTIE S, INCL UDING, B UT NO T LIMITED T O , THE IMPLIED W ARRANTIE S OF MER CHANT ABILITY AND FI TNE S S FOR A P AR TICULAR PURP OSE ARE DIS CL AIMED . IN NO EVENT SHALL THE OpenS SL PR OJE CT OR IT S CONTRIBUT ORS BE LIABLE F OR ANY […]
-
Страница 168
THIS S OFT W ARE IS P RO VID ED B Y THE PR OJE CT AND CONTRIBUT OR S «A S IS» AND ANY EXP RE S S OR IMPLIED W ARRANTIE S , INCL UDING , BUT NO T LIMITED T O , THE IMPLIED W ARRANTIE S OF MERCHANT ABILI T Y AND FI TNE S S FOR A P ART ICUL AR PURP OSE ARE DIS CL AIMED . IN NO EVENT SHALL THE PR OJE CT OR CONTR IBUT ORS BE LIABLE F OR ANY […]
-
Страница 169
HP Officejet 45 00 Wireless Third-part y licenses A ES r ijndael-alg-fst .c @v ersi on 3 .0 (December 2000) Optimised ANS I C code for the R ijndael c ipher (now AE S) @author V i ncent R ijmen <vincen t .rijmen@esat .k u leu ven .ac.be> @author Antoon Bo sselaers <antoon .bosselaers@e sat .kuleu ven .ac.be> @author P aulo Barr eto <[…]
-
Страница 170
Expat Cop yr ight (c) 19 9 8 , 199 9 , 2000 T hai Open Sour ce Softwar e Center L td P ermissi on is hereb y granted , fr ee of char ge , to an y person obtaining a cop y of this softwar e and assoc iated doc umentation f iles (the «Softwar e») , to deal in the Softwar e w ithout res tr ic tion , including w ithout limitation the r ights […]
-
Страница 171
OpenSSL Cop yr ight (C) 19 9 5-199 8 Er ic Y oung (eay@c r y ptsoft .com) All r ights r eserved . This pac kage is an S SL implementation w r it ten by Er ic Y oung (eay@c r ypts oft.com). The implementati on was w ritten so as to conf orm w ith Netscapes S SL. This libr ary is free f or commer c ial and non -commer ci a l us e as long as the fo ll[…]
-
Страница 172
THIS S OFT W ARE IS PR O VIDED B Y ERIC Y OUNG «A S IS» AND ANY EXP RE S S OR IMPLIED W ARRANTIE S , INCL UDING , BUT NO T LIMITED T O , THE IMPLIED W ARRANTIE S OF MERCHANT ABILITY AND FI TNE SS F OR A P ART ICUL AR P URP O SE ARE DIS CL AIMED . IN NO EVENT SHALL THE A UTHOR OR CONTRIB UT ORS BE LIABLE FOR ANY DIRE CT , IND IRE CT , IN[…]
-
Страница 173
THIS S OFT W ARE IS PR O VIDED B Y THE OpenSSL P RO JECT «A S IS» AND ANY EXP RE S SED OR IMPLIED W ARRANTIE S, INCL UDING, B UT NO T LIMITED T O , THE IMPLIED W ARRANTIE S OF MER CHANT ABILITY AND FI TNE S S FOR A P AR TICULAR PURP OSE ARE DIS CL AIMED . IN NO EVENT SHALL THE OpenS SL PR OJE CT OR IT S CONTRIBUT ORS BE LIABLE F OR ANY […]
-
Страница 174
THIS S OFT W ARE IS PR O VIDED B Y THE OpenSSL P RO JECT «A S IS» AND ANY EXP RE S SED OR IMPLIED W ARRANTIE S, INCL UDING, B UT NO T LIMITED T O , THE IMPLIED W ARRANTIE S OF MER CHANT ABILITY AND FI TNE S S FOR A P AR TICULAR PURP OSE ARE DIS CL AIMED . IN NO EVENT SHALL THE OpenS SL PR OJE CT OR IT S CONTRIBUT ORS BE LIABLE F OR ANY […]
-
Страница 175
THIS S OFT W ARE IS P RO VID ED B Y THE PR OJE CT AND CONTRIBUT OR S «A S IS» AND ANY EXP RE S S OR IMPLIED W ARRANTIE S , INCL UDING , BUT NO T LIMITED T O , THE IMPLIED W ARRANTIE S OF MERCHANT ABILI T Y AND FI TNE S S FOR A P ART ICUL AR PURP OSE ARE DIS CL AIMED . IN NO EVENT SHALL THE PR OJE CT OR CONTR IBUT ORS BE LIABLE F OR ANY […]
-
Страница 176
B HP supplies and accessories This section provides information on HP supplies and accessories for the de vice. The information is subject to changes, visit the HP Web site ( www.hpshop ping.com) for the latest updates. You may also make purchases throug h the Web site. This section contains the following topics: • Order printing supplies online […]
-
Страница 177
• The HP software on your computer: NOTE: For more information about opening and using these HP software tools, see Device management tools ◦ Solution Center (Windows) : Click Statu s , and then click Estimated Ink Levels . The My Cartridges tab lists the currently installed cartridges. Th e All Cartridges tab lists all supported cartridges for[…]
-
Страница 178
C Additional fax setup After completing all the steps in the gettin g star ted guide, use the instructions in this section to complete your fax setup. Keep your getting started guide for later use. In this section, you will learn how to set up the device so that faxing works successfully with equipment and services you might al ready have on the sa[…]
-
Страница 179
Portugal Russia Saudi Arabia Singapore Spain Taiw an Thailand USA Venezuela Vietnam If you are unsure which kind of telephone syste m y ou have (serial or parallel), check with your telephone company. This section contains the following topics: • Choose the correct fax setup for your home or office • Case A: Separate fax line (no vo ice calls r[…]
-
Страница 180
• Answering machine: An answerin g machine that answers voice calls at the same phon e number you use for fax calls on the device. • Voice mail service: A voice mail subscripti on through your telephone company at the same number you use for fax calls on the device. 3. From the following tab le, choose the combinati on of equip ment and service[…]
-
Страница 181
Other equipment or service s sharing your fax line Recommended fax setup DSL PBX Distinct ive ring service Voice calls Computer dial-up modem Answ ering machine Voice mail service Case J: Shar ed voice/fax line with computer modem and answering machine Case K: Sha red voice/fax line with computer dial-up modem and voice mail Case A: Separate fax li[…]
-
Страница 182
3. (Optional) Change the Rings to Answer setting to the lowest settin g (two rings). 4. Run a fax test. When the phone rings, the device answers automatica lly after the number of rings you set in the Rings to Answer setting. The d evice begins emitting fax reception tones to the sending fax machine and receives the fax. Case B: Set up the device w[…]
-
Страница 183
3. Connect an additional phone cord from the DS L filter to the telephone wall jack. 4. Run a fax test. If you encounter problems se tting up the device with optional equipment, contact your local service provider or vendor for furthe r assistance. Case C: Set up the device wi th a PBX phone system or an ISDN line If you are using either a PBX phon[…]
-
Страница 184
1 Telephone wall jack 2 Use the phone cord supplied in the box with the device to connect to the 1-LINE port You might need to connect the supplied phone cord to the adapter provided for your country/region . To set up the device with a distinctive ring service 1. Using the phone cord supplied in the box wi th the device, connect one end to your te[…]
-
Страница 185
1 Telephone wall jack 2 Use the phone cord supplied in the box with the device to connect to the 1-LINE port You might need to connect the supplied phone cord to the adapter provided for your country/re gion. 3 Telephone (optional) To set up the device with a shared voice/f ax line 1. Using the phone cord supplied in the box with the device, connec[…]
-
Страница 186
Back vi ew of the device 1 Telephone wall jack 2 Use the phone cord supplied in the box with the device to connect to the «1-LINE» port You might need to connect the supplied phone cord to the adapter provided for your country/region . To set up the device with voice mail 1. Using the phone cord supplied in the box wi th the device, conne[…]
-
Страница 187
Set up the d evice with a co mputer dial-up mode m If you are using the same phone line for sending fa xes an d for a computer dial-up modem, follow these directions for setting up the device. Back view of the device 1 Telephone wall jack 2 Use the phone cord supplied in the box with the device to connect to the «1-LINE» port You might ne[…]
-
Страница 188
Set up the device with a compu ter DSL/ADSL m odem If you have a DSL line and u se that phone line to se nd faxes, follow these instructions to set up your fax. 1 Telephone wall jack 2 Parallel sp litter 3 DSL/ADSL filter Connect one end of the phone jack that wa s supplied with the device to connect to the 1-LINE port on the back of the device. Co[…]
-
Страница 189
4. Connect the DSL modem to the parallel splitter. 5. Connect the parallel splitter to the wall jack. 6. Run a fax test. When the phone rings, the device autom atically answers after the nu m ber of rings you set in the Rings to Answer setting. The device begins em itting fax rece ption tones to the send ing fax machine and receives the fax. If you[…]
-
Страница 190
1 Telephone wall jack 2 Use the phone cord supplied in the b ox with the device to connect to the 1- LINE port. You might need to connect the supplied phone cord to the a dapter provided for your country/region. 3 Computer with modem 4 Telephone 1. Remove the white plug from the port labeled 2 -EXT on the back of the product. 2. Find the phone cord[…]
-
Страница 191
Shared voice/fax wi th computer DSL/ADSL mode m Use these instructions if your comp uter has a DSL/ADSL modem 1 Telephone wall jack 2 Parallel splitter 3 DSL/ADSL filter 4 Phone cord supplie d with the device You might need to connect the supplied phone cord to the adapter provided for your country/re gion. 5 DSL/ADSL modem 6 Computer 7 Telephone N[…]
-
Страница 192
To set up the device with a computer DSL/ADSL modem 1. Obtain a DSL filter from your DSL provider. NOTE: Phones in other parts of the ho me/office sharing the same phone number with DSL service will need to be connected to additional DS L filters, otherwise you will experience noise when making voice calls. 2. Using the phone cord supplied in the b[…]
-
Страница 193
3 Answering machine 4 Telephone (optional) To set up the device with a shared voice/f ax line with answering machine 1. Remove the white plug from the port l abeled 2-EXT on the back of the device. 2. Unplug your an swering machine from the telephone wall jack, and connect it to the port labeled 2-EXT on the back of the de vice. NOTE: If you do not[…]
-
Страница 194
Shared voice/ fax line with c omputer dial -up modem and answerin g machine There are two different ways to set u p the product with you r computer based on the number of phone ports on your computer. Before you begin, check y our com puter to see if it has one or two phon e ports NOTE: If your computer has only one phone port, you will need to pur[…]
-
Страница 195
1. Remove the white plug from the port labeled 2-EXT on the back of the produ ct. 2. Find the phone cord that connects from the back of your computer (your computer dial-up modem) to a telephone wall jack. D isconnect th e cord from the telephone wall jack and plug it into the port labeled 2-EXT on the back of the product. 3. Unplug your an swering[…]
-
Страница 196
Shared voice/ fax line with computer DS L/ADSL mo dem and answering machi ne 1 Telephone wall jack 2 Parallel splitter 3 DSL/ADSL filter 4 Phone cord provided with the device connected to the 1-LINE port on the back of the device You might need to connect the supplied phone cord to the adapter provided for your country/re gion. 5 DSL/ADSL modem 6 C[…]
-
Страница 197
To set up the device with a c omputer DSL/ADSL modem 1. Obtain a DSL/ADSL filter from your DSL/ADSL provider. NOTE: Phones in other parts of the h ome/office sharing the same phone number with DSL/ ADSL service will need to be connected to additional DSL/ADSL filters, otherwise you will experience noise when makin g voice calls. 2. Using the phone […]
-
Страница 198
Since your computer dial-up modem shares t he phone line with the device, you cannot use both your modem and the device simultaneously. For exa m ple, you cannot use the device for faxin g if you are using your computer dial-up modem to send an e-mail or access the Internet. There are two different ways to set up the device with your computer based[…]
-
Страница 199
4. Using the phone cord supplied in the box with the device, connect one end to your telephone wall jack, then connect the other end to the port lab eled 1-LINE on the back o f the device. NOTE: You might need to connect the supplied pho ne cord to the adapter provid ed for your country/region. If you do not use the supplied cord to co nnect from t[…]
-
Страница 200
Test fax setup You can test your fax setup to check the status of the device and to ma ke sure it is set up properly for faxing. Perform this test after you have complete d setting up the d evice for faxing. The test does the following: • Tests the fax hardwa re • Verifies the corr ect type of phone cord is connected to the device • Checks th[…]
-
Страница 201
D Network setup (some models only) You can manage network settings for the device through the device control pa nel as described in the next section. Additional adva nced settings are availabl e in the embedded Web server, a configuration and status tool you access fr om your Web browser using an existing netwo rk connection to the device. Fo r mor[…]
-
Страница 202
This section contains the following topics: • Set link speed • To View IP settings • To Change IP settings Set link sp eed You can change the speed at which d ata is tr ansmitted over the network. The default is Automatic . 1. Press the Setup button. 2. Press the arrow keys until Network is highlighted, then press OK . 3. Select Advanced Setu[…]
-
Страница 203
Set up the device for wireless comm un ication (some models only) You may set up the device for wireless comm unication using one of the following w ays: Setup m ethod Infrastructure wireless communicatio n Ad hoc wireless communicatio n * USB cable For more information , see To set up wirele ss communication using the installer (Mac OS X) or To se[…]
-
Страница 204
There are two communication mode options: • Ad hoc: On an ad hoc network, the device is set to ad hoc communication mode and communicates directly with other wire less devices without the use of a WAP. All devices on the ad hoc networ k must: ◦ Be 802.11 compatible ◦ Have ad hoc as the communication mode ◦ Have the same network name ( SSID)[…]
-
Страница 205
NOTE: If you cannot find the network name (SSID) and WPA key or WEP passphrase, contact your network administrator or the person who set up the wireless ne twork.. To set up wireless communic ation using the i nstaller (Windo ws) NOTE: For this method, you will need to have a wirel ess network set up and running. You will also need a USB cable. Do […]
-
Страница 206
To turn off w ireless com munication • Device control panel: Press Setup , then select Wireless , then sele ct Wireless ON/OFF , and then select either On or Off . • Press the wireless button on the front of the device. To prin t a wirele ss test pa ge Print the wireless test page for in formation about t he device’s wireless conne ction. […]
-
Страница 207
Guidelines for ensuring wire less network security This section contains the following topics: • To add hardware add resses to a WAP • Other guidelines To add hardwa re addresses to a WAP MAC filtering is a security feature in which a W AP is configured wi th a list of MAC addresses (also called «hardware addresses») of devices that a[…]
-
Страница 208
not simply delete the device application files from y our computer. Make sure to remove them properly using the uninstall utility provided when you in st alled the software that cam e with the device. There are three methods to uninstall the so ftware on a Windows computer , and one method to uninstall on a Macintosh comp uter. To uninstall from a […]
-
Страница 209
4. Restart yo ur computer. NOTE: It is important that you disconnect the device before restarting your computer. Do not connect the device to your computer until after you have reinstalled the software. 5. Start the Setup program for the device a gain. 6. Select Install . 7. Follow the onscreen in structions. To uninstall from a Macintosh comput er[…]
-
Страница 210
E Device management tools This section contains the following topics: • Toolbox (Windows) • Use the HP Solution Center (Win dows) • HP Utility (Mac OS X) • Embedded Web server (some models only) Toolbox (Windows) The Toolbox provides ma intenance information abo ut the device. NOTE: The Toolbox can be installed fr om the HP Software CD by s[…]
-
Страница 211
NOTE: On a Macintosh computer, the features available in the HP U tility vary depending on the selected device. Ink level warnings and indicators provide es timates for planning pur poses only. When you receive an ink alert message, consider having a replace ment cartridge available to avoid possible printing delays. You do not need to replace cart[…]
-
Страница 212
You can open the embedded We b serv er by using these me thods: • Web browser: In a supported Web browser on your computer, type the IP address or hostname that has been assigned to the device. For example, if the IP address is 123.123.123.123, type the following address into the Web browser: http://123.123.1 23.123 . The IP address and hostname […]
-
Страница 213
F Errors (Windows) This list represents some of the errors you mi ght see on your computer screen (Windows) and how to fix the errors. • Fax Memory Full • Device Disconnected • Ink Alert • Cartridge Problem • Paper Mismatch • The cartridge cradle cannot move • Paper Jam • Paper Jam • The printer is out of paper • Printer Offline[…]
-
Страница 214
Ink level warnings and indicator s provide estima tes for planning purposes only. When you receive a low-ink warning message, consider having a r eplacement cartridge available to avo id possible printing delays. You do not need to replace th e ink ca rtridges until print quality becomes unacceptable. For information about replacing ink cartridges,[…]
-
Страница 215
3. Wait until the print carriage is idle and silent , and then lightly press down on the ink cartridge to release it. 4. Pull the ink cartridge toward you, out of its slot. CAUTION: Do not touch the copper-colore d contacts or ink nozzles. Doing so can result in clogs, ink failure, and bad electrical connections. 5. Hold the ink cartridge with the […]
-
Страница 216
Solution 2: Turn the pr oduct off and on Turn off the product, and then turn it on again. If the problem persists, try the ne xt solution. Solution 3: Cl ean the electrical co ntacts Clean the electrical contacts on the ink cartridge. For more information, see Clean the ink cartridge contacts. If the problem persists, try the ne xt solution. Soluti[…]
-
Страница 217
Before you try to clear the jam, check the following: • Make sure that you ha ve loaded paper that meets specifications and that is not wrinkled, folded, or damaged. For more information, see Media specifications. • Make sure that the pr oduct is clean. For more information, see Maintain the device. • Make sure that the ADF is loa ded correct[…]
-
Страница 218
Usually, you can resolve such problems by completing the following steps: 1. Press the (Power) button to turn off the product. 2. Unplug the power cord, and then plug in the power cord again. 3. Press the (Power) button to turn on the product. If this problem persists, write down the erro r code provided in the message, and then contact HP support.[…]
-
Страница 219
Index Symbols/Numerics (ADF) automatic document feeder clean 22 feeding problems, troubleshoot 22 A accessibility 3, 9 accessories Printer Status Report 123 Self-Test Report 124 warranty 129 acoustic emissions 139 ADF (automatic document feeder) capacity 19 load originals 19 ADSL, fax setup with parallel phone systems 178 after the support period 7[…]
-
Страница 220
default settings copy 37 deleting faxes from memory 45 device control panel locating 10 network settings 197 scan from 34 send faxes 39 dial tone test, failure 103 dial type, setting 53 dial-up modem shared with fax (parallel phone systems) 182 shared with fax and answering machine (parallel phone sy anstems) 189 shared with fax and voice line (par[…]
-
Страница 221
test setup 196 troubleshoot 99 voice mail, set up (parallel phone systems) 181 wall jack test, failed 100 Fax B&W function indicator 13 Fax Color fun ction indicator 13 Fax to Mac activate 49 modify 49 Fax to PC activate 49 modify 49 Firewall configure 118 firewalls, troubleshoot 75 FoIP 54 forwarding faxes 46 G glass, scanner clean 21 load ori[…]
-
Страница 222
shared with fax and voice line (parallel phone systems) 185 shared with fax and voice mail (parallel phone systems) 193 monitor dialing 40, 42 multi-feeds, troubleshoot 92 N network port address 112 networks advanced settings 197 connector illustration 11 firewalls, troubleshoot 75 IP settings 198 link speed 198 operating systems supported 132 prot[…]
-
Страница 223
redial options, setting 53 reduce fax 47 regulatory information 140, 145 regulatory model number 147 replace ink cartridges 61 report wireless test 202 reports confirmation, fax 55 error, fax 56 fax test failed 99 reprint faxes from memory 45 right navigation button 12 rings to answer 51 S save faxes in memory 44 scan error messages 97 from device […]
-
Страница 224
T technical information copy specifications 137 fax specifications 138 scan specifications 139 telephone line, answer ring patte rn 52 telephone wall jack, fa x 100 telephone, fax from receive 43 send 39 temperature specifications 139 tests, fax dial tone, failed 103 failed 99 fax line condition 104 fax phone cord type test failed 102 hardware, fai[…]
-
Страница 225
two-sided 33 uninstall software 204 wireless communication advanced wireless troubleshooting 113 basic wireless troubleshooting 112 Ethernet setup 201 radio, turn off 197 reducing interference 203 regulatory informat ion 145 security 203 set up 199 set up on Mac OS X 201 settings 199 turn off 202 wizard 200 wireless test report print 202 Index 221[…]
-
Страница 226
222[…]
-
Страница 227
[…]
-
Страница 228
www.hp.com/support 20 1 0 © Hewlett-Packard Develop ment Company, L.P.[…]