-
Contents
-
Table of Contents
-
Bookmarks
Quick Links
User Manual
Nord Electro 4d
OS Version 1.x
Part No. 50384
Copyright Clavia DMI AB
Print Edition 1.1
Related Manuals for Clavia Nord Electro 4D
Summary of Contents for Clavia Nord Electro 4D
-
Page 1
User Manual Nord Electro 4d OS Version 1.x Part No. 50384 Copyright Clavia DMI AB Print Edition 1.1… -
Page 2: Important Safety Instructions
Trademarks: The Nord logo is a trademark of Clavia DMI AB. All other trademarks mentioned in this publication are the properties of their respective holders. Specifications and appearances are subject to change without notice.
-
Page 3: Table Of Contents
| 3 Nord Electro 4D Table of Contents Clav .EQ . . . . . . . . . . . . . . . . . . . . . . . . .13 The Quick Tour .
-
Page 4: Thank You
All .trademarks .and .brand .names .mentioned .in .this .manual .are .the . property .of .their .respective .owner’s .and .are .not .affiliated .or .associated . with .Clavia . .These .trademarks .and .brand .names .are .only .mentioned .to . describe .the .types .of .sounds .reproduced .by .Nord .Electro .4D .
-
Page 5: Knobs & Buttons
chaptEr2ovErviEw | 5 2 Overview The .front .panel .of .the .Nord .Electro .4D .has .four .main .areas, .Organ, . Selector buttons Piano, .Program .and .Effects . .We’ll .familiarize .ourselves .briefly .with .the . Selector .buttons .are .used .to . panel .here .and .describe .the .functions .in .detail .in .the .following .chapters .
-
Page 6: Audio Connections
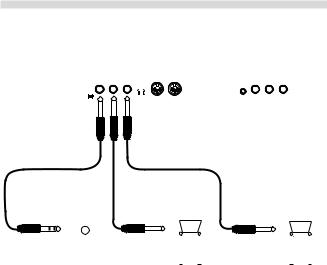
6 | N orDElEctro4DUsErMaNUalosv1.x 3 Connections CONTROL ROTOR SUSTAIN MIDI MIDI MONITOR RIGHT LEFT OUT PEDAL PEDAL PEDAL MONO HEADPHONES Audio connections MIDI Connections Headphones MIDI In This .is .where .you .connect .a .¼» .stereo .connector .from .a .pair .of .head- MIDI .connection .used .to .receive .MIDI .data .to .the .Nord .Electro .4D .from .
-
Page 7: Pedal Connections
chaptEr3coNNEctioNs | 7 Sustain Pedal Pedal Connections ¼» .connector .for .a .switch .type .pedal . .When .a .connected .pedal .is . operated, .the .notes .you .play .will .be .sustained . CONTROL ROTOR SUSTAIN MIDI MIDI MONITOR RIGHT LEFT OUT Rotor Pedal PEDAL PEDAL…
-
Page 8: About The Programs
8 | N orDElEctro4DUsErMaNUalosv1.x 4 Getting Started Let’s .take .a .few .minutes .to .get .familiar .with .the .Electro .4D . .The .user .interface .is .designed .to .be .as .intuitive .as .possible, .and .to .perform .as .well .as .you . do .in .a .live .situation .
-
Page 9: Using The Organ
chaptEr4GEttiNGstartED | 9 Use .the .Model .selector .buttons .to .select .one .of .the .samples .that .are . included .in .the .Electro .4D .from .the .factory . . The Rotary effect Press .the .Samp . The .rotary .effect .adds .some .great .sonic .drama .to .the .organs, .but .can . Env .button .
-
Page 10: Storing A Program
10 | NorDElEctro4DUsErMaNUalosv1.x Storing a program Adding effects If .you .are .happy .with .a .change .to .a .program .that .you .have .made, .you . Select .the .program .number .1 .2 .which . should .probably .store .the .program . is .a .Grand .Piano .with .a .hint .of .reverb . . .Press .the .Store .button .
-
Page 11: Master .Level .Knob
chaptEr5NorDElEctro4DrEfErENcE | 11 5 Nord Electro 4D Reference Master level knob This .control .sets .the .overall .output .level .of . Each .drawbar .represents .a .partial .with .a .fixed .harmonic .interval .relating . the .Electro .4D, .at .the .line .and .the .headphone .
-
Page 12: Rotary .Speed
12 | NorDElEctro4DUsErMaNUalosv1.x Rotary Speed Percussion The .rotary .speaker .speed .is .controlled .with . The .Percussion .effect .adds . the .rotary .speed .buttons .or .with .an .external . extra .attack .to .the .B3 .sound .by . pedal .connected .to .the .rotor .pedal .input .on . having .a .single .envelope .gener- the .rear .panel .
-
Page 13: Additional .Midi .Keyboard
. .That’s .one .reason .why .they .all . sound .and .feel .so .authentic . The .Piano .section .also .includes .the .ability .to .use .samples .from .the . Nord .Sample .Library, .like .the .Mellotron .or .Chamberlin .sounds .that .have . been .licensed .by .Clavia .
-
Page 14: Samp .Env
14 | NorDElEctro4DUsErMaNUalosv1.x Samp Env Program section When .the .Samp .Lib .type .is .active, .the .Samp .Env .LEDs .and .button .can . be .used .to .set .a .desired .velocity .response .and .attack .and .release .time . The .Program .section . behavior .that .affects .the .playback .of .the .samples .
-
Page 15: Instrument .Selectors
chaptEr5NorDElEctro4DrEfErENcE | 15 If .the .Live .memory .is .selected .and .you .decide .you .wish .to .store .the . PressMandMholdMShiftMandMpressMtheMEffectMselectorMtoMcycleMthroughM settings .permanently .as .a .program .you .can .do .so .using .the .stan- theMeffectsMinMaMcounterMclockwiseMfashion.M dard .methods .(see .above) . .You .can .also .store .programs .into .the .Live . memory .location, .in .which .case .the .program .settings .will .replace .the .
-
Page 16: Reverb
16 | NorDElEctro4DUsErMaNUalosv1.x Reverb The .Reverb .section .simulates .the .natural .sound .reflections .in .various . acoustic .environments . .You .can .choose .between .five .reverb .types .with . various .lengths .and .densities, .indicated .by .the .three .LEDs .that .light .up . one .or .two .at .a .time .
-
Page 17: System Menu
chaptEr6thEMENUs | 17 6 The Menus Any .settings .that .you .change .in .the .System, .MIDI, .B3 .or .Rotary .menu .will .take .immediate .effect .on .a .global .basis, .and .will .be .stored .until .you . change .them .the .next .time . .Enter .the .menus .by .pressing .and .holding .Shift .and .the .System, .MIDI, .B3 .or .Rotary .button .(Prog .1, .Prog .2, .Prog .3 .or . Prog .4) .
-
Page 18: Ctrl .Pedal .Mode
18 | NorDElEctro4DUsErMaNUalosv1.x 10 — Ctrl Pedal Mode 4 — Lower Channel A .connected .control .pedal .can .be .used .to .control .several .things . .It .can . This .sets .the .MIDI .channel .that .the .Lower .Manual .of .the .Nord .Elec- be .used .as .a .solitary .organ .swell .pedal .(swell .is .a .combination .of .vol- tro 4D .organ .section .responds .to .when .the .organ .split .and .the .MIDI .
-
Page 19: Tonewheel .Mode
chaptEr6thEMENUs | 19 B3 Menu Rotary Menu 1 — Tonewheel Mode 1- Rotary Model Sets .the .level .of .tonewheel .crosstalk .and .cable .leakage .artifacts .of .the . There .is .one .rotary .model .available, .with .two .separate .microphone . B3 .organ .model . positions .
-
Page 20: System .Requirements
The .Nord .Sound .Manager .is .compatible .with .computers .running .Mac .OSX .10 .4 .or .later, .Windows .XP, .Windows .7 .and .Windows .Vista . .If .you .run .the . Nord .Sound .Manager .on .a .Windows .computer, .you .also .need .a .Clavia .USB .Driver .of .version .3 .0 .or .later .installed .
-
Page 21: The .Toolbar
chaptEr7NorDsoUNDMaNaGEr | 21 The Toolbar Replace (Pianos & Samples) This .feature .makes .it .possible .to .replace .a .piano .or .a .sample .in .the .unit . with .another .piano .or .sample .from .your .hard .drive . .The .process .will . update .all .the .programs .that .used .the .former .piano/sample, .to .use .the .
-
Page 22: The Quick Tour
22 | NorDElEctro4DUsErMaNUalosv1.x Using .the .Toolbar .or .Menu .command: .Click .on .the .Sound .Down . icon .in .the .toolbar . .The .same .command .is .also .available .in .the .File . The Quick Tour menu: .Sound .Download .(Ctrl-D) . Let’s .get .acquainted .with .some .of .the .functions .in .the .Nord .Sound . Browse .to .the .folder .on .the .hard .drive .where .the .desired .sound .is .
-
Page 23: Relink
Open .the .Program .tab .and .right-click .a .program .in .the .list . . Upload sounds from the Nord Electro 4D Select .the .Relink .Samp .Lib .option .in .the .context .menu . .The .menu . will .expand .to .show .the .sample .that .is .linked .to .this .program . .
-
Page 24: Upload .A .Program .Bundle
24 | NorDElEctro4DUsErMaNUalosv1.x After .the .Manager .has .verified .the .files .in .the .Bundle, .the .Program . Upload a Program Bundle Bundle .Download .dialog .will .appear . . Open .the .Program .Tab .and .select .one, .or .several .programs . .Use . ClickMonMShowMDetailsMifMyouMwantMtoMseeMwhatMprograms,MpianosM Ctrl-click .to .make .non-consecutive .selections .like .this .one: .
-
Page 25: Organize .The .Program .Partition
chaptEr7NorDsoUNDMaNaGEr | 25 Organize the program partition Restore By .using .drag .and .drop, .you .can .organize .the .content .of .the .Program . When .you .want .to .restore .the .entire .content .of .the .Nord .Electro .4D, . partition .with .its .128 .programs . click .on .the .Restore .icon .in .the .Toolbar .and .select .a .backup .file .that .
-
Page 26: Sound Manager Reference
26 | NorDElEctro4DUsErMaNUalosv1.x Rename Sound Manager reference This .allows .you .to .rename . a .Program .and .assign .a . Category .to .it . .16 .char- Toolbar acters .can .be .used, .and . the .supported .characters . are: .a-z, .AZ, .0-9 .and .the . hyphen .(-) .
-
Page 27
chaptEr7NorDsoUNDMaNaGEr | 27 FlashingMLEDsMinMtheMPianoMTypeMandMModelMsectionMindicatesMthatM Backup theMpianoMthatMtheMcurrentMProgramMtriedMtoMuseMisMnotMavailableMinM This .will .make .a .backup .of .all .the .pianos, .programs, .Live .programs . theMFlashMmemory.MSelectManotherMprogramMorMdownloadMtheMmiss- and .the .menu .settings .in .the .Nord .Electro .4D . .The .file .that .is .created . ingMpianoMtoMtheMNordMElectroM4D. on .the .hard .drive .will .have .the .extension . .ne4db . .Backing .up .the .entire . memory .content .in .this .manner .will .take .some .time, .depending .on .the . -
Page 28: Menus
28 | NorDElEctro4DUsErMaNUalosv1.x time, .depending .on .the .sizes .of .the .pianos .and .samples .in .the .unit . Menus BackingMupMfromMtheMNordMSoundMManagerMisMdoneMinManMincre- mentalMmanner.MUnlessMyouMchangeMtheMnameMorMtheMlocationMofM In .the .Nord .Sound .Manager, .the .usual .Windows .and .Mac .OSX .key- theMbackupMfile,MonlyMtheMpianosMand/orMprogramsMthatMhaveMbeenM board .commands .can .be .used . .The .menus .can .be .accessed .by .press- changedMsinceMtheMpreviousMbackupMwillMbeMsaved.
-
Page 29: View .Menu
chaptEr7NorDsoUNDMaNaGEr | 29 Select All (Ctrl+A) Find Ctrl+F Select .all .items .in .a .bank/partition . This .is .a .shortcut .to .the .Search .Box . .By .entering .one .or .several .charac- ters .in .the .Search .Box, .you .can .filter .out .the .content .that .is .presented . Invert Selection in .the .lists .
-
Page 30: Note
30 | NorDElEctro4DUsErMaNUalosv1.x Note This .area .may .contain .error .information .about .broken, .corrupted .or . rejected .files, .in .the .unlikely .event .that .something .has .happened .with .a . particular .piano, .program .or .sample .in .the .Nord .Electro .4D .memory . Footer Area The .footer .area .is .located .at .the .bottom .of .the .Nord .Sound .Manager .
-
Page 31: About .The .Midi .Implementation
| 31 8 MIDI functions About the MIDI implementation Nord Electro 4D with a sequencer The .following .MIDI .messages .can .be .transmitted .and .received .from .the . Nord .Electro .4D: Connections Note On/Off Connect .the .MIDI .Out .on .the .Nord .Electro .4D .to .the .MIDI .In .on .
-
Page 32: Mono
32 | NorDElEctro4DUsErMaNUalosv1.x Nord Electro parameter MIDI CC Program and Controller dumps Drawbars .- .Preset .2/Upper Drawbar .1 . To .dump .a .Program .SysEx, .or .MIDI .Controller .data .via .MIDI, .either .to . Drawbar .2 another .Nord .Electro .4D .or .for .recording .the .data .into .another .MIDI . Drawbar .3 device, .proceed .as .follows: Drawbar .4…
-
Page 33: Midi .Implementation .Chart
chaptEr8MiDifUNctioNs | 33 MIDI Implementation Chart Function Transmitted Recognized Remarks Basic Channel 1 .- .16 1 .- .16 Default Channel 1 .- .16 1 .- .16 Mode . Default Mode .3 Mode .3 Message Altered 0-127 0-127 Note True .Voice Number .
-
Page 34: Index
34 | NorDElEctro4DUsErMaNUalosv1.x 9 Index Append . 24 Key .Bounce . 19 Rel . 14 Auto-Panning . 15 Key .Click .Level . 19 Relink . 21 A-Wa . 15 Rename . 26 Replace . 22 Restore . 27 Reverb . 16 LED .
-
Page 35: Declaration Of Conformity
This product, when installed as indicated in the instructions contained in this manual, meets FCC requirements. Modifications not expressly approved by Clavia may void your authority, granted by the FCC, to use the product. 2. IMPORTANT: When connecting this product to accessories and/ or another product use only high quality shielded cables.
-
Page 1
User Manual Nord Electro 4d OS Version 1.x Part No. 50384 Copyright Clavia DMI AB Print Edition 1.1… -
Page 2: Important Safety Instructions
Trademarks: The Nord logo is a trademark of Clavia DMI AB. All other trademarks mentioned in this publication are the properties of their respective holders. Specifications and appearances are subject to change without notice.
-
Page 3: Table Of Contents
| 3 Nord Electro 4D Table of Contents Clav .EQ . . . . . . . . . . . . . . . . . . . . . . . . .13 The Quick Tour .
-
Page 4: Thank You
All .trademarks .and .brand .names .mentioned .in .this .manual .are .the . property .of .their .respective .owner’s .and .are .not .affiliated .or .associated . with .Clavia . .These .trademarks .and .brand .names .are .only .mentioned .to . describe .the .types .of .sounds .reproduced .by .Nord .Electro .4D .
-
Page 5: Knobs & Buttons
chaptEr2ovErviEw | 5 2 Overview The .front .panel .of .the .Nord .Electro .4D .has .four .main .areas, .Organ, . Selector buttons Piano, .Program .and .Effects . .We’ll .familiarize .ourselves .briefly .with .the . Selector .buttons .are .used .to . panel .here .and .describe .the .functions .in .detail .in .the .following .chapters .
-
Page 6: Audio Connections
6 | N orDElEctro4DUsErMaNUalosv1.x 3 Connections CONTROL ROTOR SUSTAIN MIDI MIDI MONITOR RIGHT LEFT OUT PEDAL PEDAL PEDAL MONO HEADPHONES Audio connections MIDI Connections Headphones MIDI In This .is .where .you .connect .a .¼» .stereo .connector .from .a .pair .of .head- MIDI .connection .used .to .receive .MIDI .data .to .the .Nord .Electro .4D .from .
-
Page 7: Pedal Connections
chaptEr3coNNEctioNs | 7 Sustain Pedal Pedal Connections ¼» .connector .for .a .switch .type .pedal . .When .a .connected .pedal .is . operated, .the .notes .you .play .will .be .sustained . CONTROL ROTOR SUSTAIN MIDI MIDI MONITOR RIGHT LEFT OUT Rotor Pedal PEDAL PEDAL…
-
Page 8: About The Programs
8 | N orDElEctro4DUsErMaNUalosv1.x 4 Getting Started Let’s .take .a .few .minutes .to .get .familiar .with .the .Electro .4D . .The .user .interface .is .designed .to .be .as .intuitive .as .possible, .and .to .perform .as .well .as .you . do .in .a .live .situation .
-
Page 9: Using The Organ
chaptEr4GEttiNGstartED | 9 Use .the .Model .selector .buttons .to .select .one .of .the .samples .that .are . included .in .the .Electro .4D .from .the .factory . . The Rotary effect Press .the .Samp . The .rotary .effect .adds .some .great .sonic .drama .to .the .organs, .but .can . Env .button .
-
Page 10: Storing A Program
10 | NorDElEctro4DUsErMaNUalosv1.x Storing a program Adding effects If .you .are .happy .with .a .change .to .a .program .that .you .have .made, .you . Select .the .program .number .1 .2 .which . should .probably .store .the .program . is .a .Grand .Piano .with .a .hint .of .reverb . . .Press .the .Store .button .
-
Page 11: Master .Level .Knob
chaptEr5NorDElEctro4DrEfErENcE | 11 5 Nord Electro 4D Reference Master level knob This .control .sets .the .overall .output .level .of . Each .drawbar .represents .a .partial .with .a .fixed .harmonic .interval .relating . the .Electro .4D, .at .the .line .and .the .headphone .
-
Page 12: Rotary .Speed
12 | NorDElEctro4DUsErMaNUalosv1.x Rotary Speed Percussion The .rotary .speaker .speed .is .controlled .with . The .Percussion .effect .adds . the .rotary .speed .buttons .or .with .an .external . extra .attack .to .the .B3 .sound .by . pedal .connected .to .the .rotor .pedal .input .on . having .a .single .envelope .gener- the .rear .panel .
-
Page 13: Additional .Midi .Keyboard
. .That’s .one .reason .why .they .all . sound .and .feel .so .authentic . The .Piano .section .also .includes .the .ability .to .use .samples .from .the . Nord .Sample .Library, .like .the .Mellotron .or .Chamberlin .sounds .that .have . been .licensed .by .Clavia .
-
Page 14: Samp .Env
14 | NorDElEctro4DUsErMaNUalosv1.x Samp Env Program section When .the .Samp .Lib .type .is .active, .the .Samp .Env .LEDs .and .button .can . be .used .to .set .a .desired .velocity .response .and .attack .and .release .time . The .Program .section . behavior .that .affects .the .playback .of .the .samples .
-
Page 15: Instrument .Selectors
chaptEr5NorDElEctro4DrEfErENcE | 15 If .the .Live .memory .is .selected .and .you .decide .you .wish .to .store .the . PressMandMholdMShiftMandMpressMtheMEffectMselectorMtoMcycleMthroughM settings .permanently .as .a .program .you .can .do .so .using .the .stan- theMeffectsMinMaMcounterMclockwiseMfashion.M dard .methods .(see .above) . .You .can .also .store .programs .into .the .Live . memory .location, .in .which .case .the .program .settings .will .replace .the .
-
Page 16: Reverb
16 | NorDElEctro4DUsErMaNUalosv1.x Reverb The .Reverb .section .simulates .the .natural .sound .reflections .in .various . acoustic .environments . .You .can .choose .between .five .reverb .types .with . various .lengths .and .densities, .indicated .by .the .three .LEDs .that .light .up . one .or .two .at .a .time .
-
Page 17: System Menu
chaptEr6thEMENUs | 17 6 The Menus Any .settings .that .you .change .in .the .System, .MIDI, .B3 .or .Rotary .menu .will .take .immediate .effect .on .a .global .basis, .and .will .be .stored .until .you . change .them .the .next .time . .Enter .the .menus .by .pressing .and .holding .Shift .and .the .System, .MIDI, .B3 .or .Rotary .button .(Prog .1, .Prog .2, .Prog .3 .or . Prog .4) .
-
Page 18: Ctrl .Pedal .Mode
18 | NorDElEctro4DUsErMaNUalosv1.x 10 — Ctrl Pedal Mode 4 — Lower Channel A .connected .control .pedal .can .be .used .to .control .several .things . .It .can . This .sets .the .MIDI .channel .that .the .Lower .Manual .of .the .Nord .Elec- be .used .as .a .solitary .organ .swell .pedal .(swell .is .a .combination .of .vol- tro 4D .organ .section .responds .to .when .the .organ .split .and .the .MIDI .
-
Page 19: Tonewheel .Mode
chaptEr6thEMENUs | 19 B3 Menu Rotary Menu 1 — Tonewheel Mode 1- Rotary Model Sets .the .level .of .tonewheel .crosstalk .and .cable .leakage .artifacts .of .the . There .is .one .rotary .model .available, .with .two .separate .microphone . B3 .organ .model . positions .
-
Page 20: System .Requirements
The .Nord .Sound .Manager .is .compatible .with .computers .running .Mac .OSX .10 .4 .or .later, .Windows .XP, .Windows .7 .and .Windows .Vista . .If .you .run .the . Nord .Sound .Manager .on .a .Windows .computer, .you .also .need .a .Clavia .USB .Driver .of .version .3 .0 .or .later .installed .
-
Page 21: The .Toolbar
chaptEr7NorDsoUNDMaNaGEr | 21 The Toolbar Replace (Pianos & Samples) This .feature .makes .it .possible .to .replace .a .piano .or .a .sample .in .the .unit . with .another .piano .or .sample .from .your .hard .drive . .The .process .will . update .all .the .programs .that .used .the .former .piano/sample, .to .use .the .
-
Page 22: The Quick Tour
22 | NorDElEctro4DUsErMaNUalosv1.x Using .the .Toolbar .or .Menu .command: .Click .on .the .Sound .Down . icon .in .the .toolbar . .The .same .command .is .also .available .in .the .File . The Quick Tour menu: .Sound .Download .(Ctrl-D) . Let’s .get .acquainted .with .some .of .the .functions .in .the .Nord .Sound . Browse .to .the .folder .on .the .hard .drive .where .the .desired .sound .is .
-
Page 23: Relink
Open .the .Program .tab .and .right-click .a .program .in .the .list . . Upload sounds from the Nord Electro 4D Select .the .Relink .Samp .Lib .option .in .the .context .menu . .The .menu . will .expand .to .show .the .sample .that .is .linked .to .this .program . .
-
Page 24: Upload .A .Program .Bundle
24 | NorDElEctro4DUsErMaNUalosv1.x After .the .Manager .has .verified .the .files .in .the .Bundle, .the .Program . Upload a Program Bundle Bundle .Download .dialog .will .appear . . Open .the .Program .Tab .and .select .one, .or .several .programs . .Use . ClickMonMShowMDetailsMifMyouMwantMtoMseeMwhatMprograms,MpianosM Ctrl-click .to .make .non-consecutive .selections .like .this .one: .
-
Page 25: Organize .The .Program .Partition
chaptEr7NorDsoUNDMaNaGEr | 25 Organize the program partition Restore By .using .drag .and .drop, .you .can .organize .the .content .of .the .Program . When .you .want .to .restore .the .entire .content .of .the .Nord .Electro .4D, . partition .with .its .128 .programs . click .on .the .Restore .icon .in .the .Toolbar .and .select .a .backup .file .that .
-
Page 26: Sound Manager Reference
26 | NorDElEctro4DUsErMaNUalosv1.x Rename Sound Manager reference This .allows .you .to .rename . a .Program .and .assign .a . Category .to .it . .16 .char- Toolbar acters .can .be .used, .and . the .supported .characters . are: .a-z, .AZ, .0-9 .and .the . hyphen .(-) .
-
Page 27
chaptEr7NorDsoUNDMaNaGEr | 27 FlashingMLEDsMinMtheMPianoMTypeMandMModelMsectionMindicatesMthatM Backup theMpianoMthatMtheMcurrentMProgramMtriedMtoMuseMisMnotMavailableMinM This .will .make .a .backup .of .all .the .pianos, .programs, .Live .programs . theMFlashMmemory.MSelectManotherMprogramMorMdownloadMtheMmiss- and .the .menu .settings .in .the .Nord .Electro .4D . .The .file .that .is .created . ingMpianoMtoMtheMNordMElectroM4D. on .the .hard .drive .will .have .the .extension . .ne4db . .Backing .up .the .entire . memory .content .in .this .manner .will .take .some .time, .depending .on .the . -
Page 28: Menus
28 | NorDElEctro4DUsErMaNUalosv1.x time, .depending .on .the .sizes .of .the .pianos .and .samples .in .the .unit . Menus BackingMupMfromMtheMNordMSoundMManagerMisMdoneMinManMincre- mentalMmanner.MUnlessMyouMchangeMtheMnameMorMtheMlocationMofM In .the .Nord .Sound .Manager, .the .usual .Windows .and .Mac .OSX .key- theMbackupMfile,MonlyMtheMpianosMand/orMprogramsMthatMhaveMbeenM board .commands .can .be .used . .The .menus .can .be .accessed .by .press- changedMsinceMtheMpreviousMbackupMwillMbeMsaved.
-
Page 29: View .Menu
chaptEr7NorDsoUNDMaNaGEr | 29 Select All (Ctrl+A) Find Ctrl+F Select .all .items .in .a .bank/partition . This .is .a .shortcut .to .the .Search .Box . .By .entering .one .or .several .charac- ters .in .the .Search .Box, .you .can .filter .out .the .content .that .is .presented . Invert Selection in .the .lists .
-
Page 30: Note
30 | NorDElEctro4DUsErMaNUalosv1.x Note This .area .may .contain .error .information .about .broken, .corrupted .or . rejected .files, .in .the .unlikely .event .that .something .has .happened .with .a . particular .piano, .program .or .sample .in .the .Nord .Electro .4D .memory . Footer Area The .footer .area .is .located .at .the .bottom .of .the .Nord .Sound .Manager .
-
Page 31: About .The .Midi .Implementation
| 31 8 MIDI functions About the MIDI implementation Nord Electro 4D with a sequencer The .following .MIDI .messages .can .be .transmitted .and .received .from .the . Nord .Electro .4D: Connections Note On/Off Connect .the .MIDI .Out .on .the .Nord .Electro .4D .to .the .MIDI .In .on .
-
Page 32: Mono
32 | NorDElEctro4DUsErMaNUalosv1.x Nord Electro parameter MIDI CC Program and Controller dumps Drawbars .- .Preset .2/Upper Drawbar .1 . To .dump .a .Program .SysEx, .or .MIDI .Controller .data .via .MIDI, .either .to . Drawbar .2 another .Nord .Electro .4D .or .for .recording .the .data .into .another .MIDI . Drawbar .3 device, .proceed .as .follows: Drawbar .4…
-
Page 33: Midi .Implementation .Chart
chaptEr8MiDifUNctioNs | 33 MIDI Implementation Chart Function Transmitted Recognized Remarks Basic Channel 1 .- .16 1 .- .16 Default Channel 1 .- .16 1 .- .16 Mode . Default Mode .3 Mode .3 Message Altered 0-127 0-127 Note True .Voice Number .
-
Page 34: Index
34 | NorDElEctro4DUsErMaNUalosv1.x 9 Index Append . 24 Key .Bounce . 19 Rel . 14 Auto-Panning . 15 Key .Click .Level . 19 Relink . 21 A-Wa . 15 Rename . 26 Replace . 22 Restore . 27 Reverb . 16 LED .
-
Page 35: Declaration Of Conformity
This product, when installed as indicated in the instructions contained in this manual, meets FCC requirements. Modifications not expressly approved by Clavia may void your authority, granted by the FCC, to use the product. 2. IMPORTANT: When connecting this product to accessories and/ or another product use only high quality shielded cables.
Перед вами файл pdf, где представлена инструкция (руководство) на русском для CLAVIA NORD Electro 4D SW61. Вы можете скачать ее либо изучить в онлайн режиме.
Подробные сведения об инструкции:
Устройство из раздела: синтезатор
Бренд-производитель: CLAVIA DMI AB
Наименование модели: CLAVIA NORD Electro 4D SW61
Инструкция на английском языке
Файл: pdf
Размер файла: 3,88 MB

Скачать инструкцию к HARPER HDT2-1110
ЗАГРУЗИТЬ
Просмотр инструкции онлайн
(скачивание инструкции бесплатно)
Формат файла: PDF
Доступность: Бесплатно как и все руководства на сайте. Без регистрации и SMS.
Дополнительно: Чтение инструкции онлайн
Страница:
(3 из 26)
навигация

1

2

3

4
5

6

7

8

9

10

11

12

13
14

15

16

17

18

19

20

21

22

23

24

25

26
Оглавление инструкции
- Страница 1 из 27
User Manual Nord Electro 4d OS Version 1.1x Part No. 50384 Copyright Clavia DMI AB Print Edition D - Страница 2 из 27
The lightning flash with the arrowhead symbol within an equilateral triangle is intended to alert the user to the presence of uninsulated voltage within the products enclosure that may be of sufficient magnitude to constitute a risk of electric shock to persons. CAUTION — ATTENTION RISK OF ELECTRIC - Страница 3 из 27
| Nord Electro 4D Table of Contents Piano section 1 Introduction Thank you! . . . . . . . . . . . . . . . . . . . . . About this manual . . . . . . . . . . . . . Disclaimer . . . . . . . . . . . . . . . . . . . . . . OS and internal memory . . . . . . . Factory presets . . . . . . . . . . . . . . - Страница 4 из 27
4 | Nord Electro 4D User Manual OS v1.1x 1 Introduction Thank you! OS and internal memory We’d first like to thank you for purchasing the Nord Electro 4D. Our goal when we developed the Nord Electro instruments was to create the best emulations of traditional electromechanical keyboard instruments - Страница 5 из 27
Chapter 2 Overview 2 Overview The front panel of the Nord Electro 4D has four main areas, Organ, Piano, Program and Effects. We’ll familiarize ourselves briefly with the panel here and describe the functions in detail in the following chapters. On the left part of the panel is the Master Level - Страница 6 из 27
6 | Nord Electro 4D User Manual OS v1.1x 3 Connections CONTROL PEDAL ROTOR PEDAL SUSTAIN PEDAL USB MIDI OUT MIDI IN MONITOR IN RIGHT OUT LEFT OUT MONO HEADPHONES Audio connections MIDI Connections Headphones MIDI In This is where you connect a ¼» stereo connector from a pair of headphones. MIDI - Страница 7 из 27
Chapter 3 Connections Sustain Pedal Pedal Connections CONTROL PEDAL ROTOR PEDAL SUSTAIN PEDAL USB MIDI OUT ¼» connector for a switch type pedal. When a connected pedal is operated, the notes you play will be sustained. MIDI IN MONITOR IN RIGHT OUT LEFT OUT MONO HEADPHONES Rotor Pedal ¼» connector - Страница 8 из 27
8 | Nord Electro 4D User Manual OS v1.1x 4 Getting Started Let’s take a few minutes to get familiar with the Electro 4D. The user interface is designed to be as intuitive as possible, and to perform as well as you do in a live situation. We hope that you soon will feel confident in using it, and by - Страница 9 из 27
Chapter 4 Getting Started Use the Model selector buttons to select one of the samples that are included in the Electro 4D from the factory. 5 Press the Samp Env button repeatedly. This will cycle through the four options for the sample’s attack and velocity settings. 6 Press and hold Shift and the - Страница 10 из 27
10 | Nord Electro 4D User Manual OS v1.1x Storing a program Adding effects If you are happy with a change to a program that you have made, you should probably store the program. 1 Select the program number 1.2 which is a Grand Piano with a hint of reverb. 1 2 Turn on Effect 2 (the On LED should be - Страница 11 из 27
Chapter 5 Nord Electro 4D Reference 5 Nord Electro 4D Reference Master level knob This control sets the overall output level of the Electro 4D, at the line and the headphone outputs. This is not a programmable control. If you want to set an output level for a particular program, this can be - Страница 12 из 27
12 | Nord Electro 4D User Manual OS v1.1x Rotary Speed Percussion The rotary speaker speed is controlled with the rotary speed buttons or with an external pedal connected to the rotor pedal input on the rear panel. The Percussion effect adds extra attack to the B3 sound by having a single envelope - Страница 13 из 27
Chapter 5 Nord Electro 4D Reference Additional MIDI keyboard Clavinet sound You can connect an additional MIDI keyboard to the Electro 4D to use the organ in a dual manual fashion, with the external keyboard operating as the lower manual. 1 Connect the external MIDI keyboard’s MIDI out to the - Страница 14 из 27
14 | Nord Electro 4D User Manual OS v1.1x Samp Env When the Samp Lib type is active, the Samp Env LEDs and button can be used to set a desired velocity response and attack and release time behavior that affects the playback of the samples. When none of the Attack LEDs are lit, the sample playback - Страница 15 из 27
Chapter 5 Nord Electro 4D Reference If the Live memory is selected and you decide you wish to store the settings permanently as a program you can do so using the standard methods (see above). You can also store programs into the Live memory location, in which case the program settings will replace - Страница 16 из 27
16 | Nord Electro 4D User Manual OS v1.1x Comp is a compressor that will even out the dynamics of what you play, making low level sounds louder and high level sounds lower in volume. This produces a tight, punchy sound and makes the overall level easier to control in a live mix situation. When this - Страница 17 из 27
Chapter 6 The Menus 6 The Menus Any settings that you change in the System, MIDI, B3 or Rotary menu will take immediate effect on a global basis, and will be stored until you change them the next time. Enter the menus by pressing and holding Shift and the System, MIDI, B3 or Rotary button (Prog 1, - Страница 18 из 27
18 | Nord Electro 4D User Manual OS v1.1x 10 — Ctrl Pedal Mode 4 — Lower Channel A connected control pedal can be used to control several things. It can be used as a solitary organ swell pedal (swell is a combination of volume and frequency control), as a combined organ swell/volume pedal for the - Страница 19 из 27
Chapter 6 The Menus B3 Menu Rotary Menu 1 — Tonewheel Mode 1- Rotary Model Sets the level of tonewheel crosstalk and cable leakage artifacts of the B3 organ model. There is one rotary model available, with two separate microphone positions. The 122 is modeled with the microphones placed - Страница 20 из 27
20 | Nord Electro 4D User Manual OS v1.1x 7 Nord Sound Manager Nord Sound Manager The Nord Sound Manager is the application that allows you to organize the various memory areas, the partitions in the Nord Electro 4D. It is also used to download pianos or programs to the Nord Electro 4D or to upload - Страница 21 из 27
Chapter 8 MIDI functions 8 MIDI functions About the MIDI implementation The following MIDI messages can be transmitted and received from the Nord Electro 4D: Nord Electro 4D with a sequencer Note On/Off Connections • Note On and Note Off messages are transmitted and received. 1 Connect the MIDI - Страница 22 из 27
22 | Nord Electro 4D User Manual OS v1.1x Program and Controller dumps To dump a Program SysEx, or MIDI Controller data via MIDI, either to another Nord Electro 4D or for recording the data into another MIDI device, proceed as follows: Sending program dumps 1 Connect the MIDI OUT on the Nord - Страница 23 из 27
Chapter 8 MIDI functions MIDI Implementation Chart Function Transmitted Recognized Basic Channel 1 — 16 1 — 16 Default Channel 1 — 16 1 — 16 Default Mode 3 Mode 3 Message X X 0-127 0-127 Mode Altered Note Number True Voice Velocity Note ON O, v= 1 — 127 O, v= 1 — 127 Note Off O, v= 1 — 127 O, v= 1 - Страница 24 из 27
24 | Nord Electro 4D User Manual OS v1.1x 9 Index Index K S Key Bounce 19 Key Click Level 19 A Auto-Panning 15 A-Wa 15 L LED 14 Left Out 6 Live 10 Local 18 Lower Channel 18 Lower Manual 12 B B3 11 B3 Menu 19 Balance Bass/Horn 19 Bass Rotor 19 M C Master level 11 Memory Protect 17 MIDI 18 MIDI - Страница 25 из 27
FCC Information (U.S.A.) 1. IMPORTANT NOTICE: DO NOT MODIFY THIS UNIT! This product, when installed as indicated in the instructions contained in this manual, meets FCC requirements. Modifications not expressly approved by Clavia may void your authority, granted by the FCC, to use the product. 2. - Страница 26 из 27
- Страница 27 из 27
Инструкции и руководства похожие на CLAVIA NORD Electro 4D SW61
Другие инструкции и руководства из категории Синтезатор
![]()
User Manual
Nord Electro 4d
OS Version 1.x
|
Part No. 50384 |
Copyright Clavia DMI AB |
|
Print Edition 1.1 |

CAUTION — ATTENTION
RISK OF ELECTRIC SHOCK
DO NOT OPEN
RISQUE DE SHOCK ELECTRIQUE
NE PAS OUVRIR
CAUTION: TO REDUCE THE RISK OF ELECTRIC SHOCK
DO NOT REMOVE COVER (OR BACK).
NO USER SERVICEABLE PARTS INSIDE.
REFER SERVICING TO QUALIFIED PERSONNEL.
ATTENTION:POUR EVITER LES RISQUES DE CHOC ELECTRIQUE, NE
PAS ENLEVER LE COUVERCLE.
AUCUN ENTRETIEN DE PIECES INTERIEURES PAR L´USAGER.
CONFIER L´ENTRETIEN AU PERSONNEL QUALIFE.
AVIS: POUR EVITER LES RISQUES D´INCIDENTE OU D´ELECTROCUTION, N´EXPOSEZ PAS CET ARTICLE A LA PLUIE OU L´HUMIDITET.
The lightning flash with the arrowhead symbol within an equilateral triangle is intended to alert the user to the presence of uninsulated voltage within the products enclosure that may be of sufficient magnitude to constitute a risk of electric shock to persons.
Le symbole éclair avec le point de flèche à l´intérieur d´un triangle équilatéral est utilisé pour alerter l´utilisateur de la presence à l´intérieur du coffret de ”voltage dangereux” non isolé d´ampleur
suffisante pour constituer un risque d`éléctrocution.
The exclamation mark within an equilateral triangle is intended to alert the user to the presence of important operating and maintenance (servicing) instructions in the literature accompanying the product.
Le point d´exclamation à l´intérieur d´un triangle équilatéral est employé pour alerter l´utilisateur de la présence d´instructions importantes pour le fonctionnement et l´entretien (service) dans le livret d´instructions accompagnant l´appareil.
Instructions pertaining to a risk of fire, electric shock or injury to persons.
IMPORTANT SAFETY INSTRUCTIONS
SAVE THESE INSTRUCTIONS
Warning — When using electric products, basic precautions should always be followed, including the following:
|
1) |
Read these instructions. |
10) Protect the power cord from being walked on or pinched |
|
|
2) |
Keep these instructions. |
particularly at plugs, convenience receptacles, and the point |
|
|
where they exit from the apparatus. |
|||
|
3) |
Heed all warnings. |
||
|
11) Only use attachments/accessories specified by the manu- |
|||
|
4) |
Follow all instructions. |
facturer. |
|
|
5) |
Do not use this apparatus near water. |
12) Use only with the cart, stand, |
|
|
6) |
Clean only with dry cloth. |
tripod, bracket, or table specified by the |
|
|
manufacturer, or sold with the apparatus. |
|||
|
7) |
Do not block any ventilation openings. Install in accordance |
When a cart is used, use caution when |
|
|
with the manufacturer’s instructions. |
moving the cart/apparatus combination to |
||
|
|
Do not install near any heat sources such as radiators, heat |
avoid injury from tip-over. |
|
|
13) Unplug this apparatus during lightning |
|||
|
registers, stoves, or other apparatus (including amplifiers) that |
|||
|
produce heat. |
storms or when unused for long periods of time. |
||
|
9) |
Do not defeat the safety purpose of the polarized or |
14) Refer all servicing to qualified service personnel. Servicing |
|
|
grounding-type plug. A polarized plug has two blades with one |
is required when the apparatus has been damaged in any way, |
||
|
wider than the other. A grounding type plug has two blades |
such as power-supply cord or plug is damaged, liquid has been |
||
|
and a third grounding prong. The wide blade or the third prong |
spilled or objects have fallen into the apparatus, the apparatus |
||
|
are provided for your safety. If the provided plug does not fit |
has been exposed to rain or moisture, does not operate nor- |
||
|
into your outlet, consult an electrician for replacement of the |
mally, or has been dropped. |

obsolete outlet.
Additional Safety Information
No naked flame sources, such as lighted candles, should be placed on the apparatus;
Do not use the apparatus in tropical climates.
WARNING: To reduce the risk of fire or electric shock, do not expose this apparatus to rain or moisture.
The apparatus shall not be exposed to dripping or splashing and that no objects filled with liquids, such as vases, shall be placed on the apparatus.
The maims plug is used as the disconnect device and shall remain readily operable.
Il convient de ne pas placer sur l´appareil de sources de flammes nues, telles que des bougies allumées;
L´appareil n’est pas destiné á étre utilisé sous un climat tropical.
L´appareil ne doit pas étre exposé á des égouttements d´eau ou des éclaboussures et de plus qu´aucun objet rempli de liquide tel que des vases ne doit étre placé sur l´appareil.
Lorsque la prise du résau d’alimentation est utilisée comme dispositif de déconnexion, ce dispositif doit demeuré aisément accessible.
Trademarks: The Nord logo is a trademark of Clavia DMI AB. All other trademarks mentioned in this publication are the properties of their respective holders.
Specifications and appearances are subject to change without notice.
Copyright © Clavia DMI AB

Nord Electro 4D Table of Contents
1 Introduction
Thank you!. . . . . . . . . . . . . . . . . . . . . 4
About this manual . . . . . . . . . . . . . 4
Disclaimer. . . . . . . . . . . . . . . . . . . . . . 4
OS and internal memory. . . . . . . 4
Factory presets . . . . . . . . . . . . . . . . 4 Restoring .the .factory .presets . . . . . . . . . 4
OS upgrades. . . . . . . . . . . . . . . . . . . 4
2 Overview
Knobs & buttons. . . . . . . . . . . . . . . 5 Knobs . . . . . . . . . . . . . . . . . . . . . . . . . . . 5 Selector .buttons . . . . . . . . . . . . . . . . . . . 5 On/Off .buttons . . . . . . . . . . . . . . . . . . . . 5 Shift .button . . . . . . . . . . . . . . . . . . . . . . . 5 Drawbars . . . . . . . . . . . . . . . . . . . . . . . . . 5
3 Connections
Audio connections . . . . . . . . . . . . . 6 Headphones . . . . . . . . . . . . . . . . . . . . . . . . . . . . . . . . . . . . . . . . . . . 6 Left .Out .and .Right .Out . . . . . . . . . . . . . . 6 Monitor .In . . . . . . . . . . . . . . . . . . . . . . . . 6
MIDI Connections . . . . . . . . . . . . . . 6 MIDI .Out . . . . . . . . . . . . . . . . . . . . . . . . . 6 MIDI .In . . . . . . . . . . . . . . . . . . . . . . . . . . 6
USB Connection. . . . . . . . . . . . . . . . 6
Pedal Connections . . . . . . . . . . . . . 7 Sustain .Pedal . . . . . . . . . . . . . . . . . . . . . 7 Rotor .Pedal . . . . . . . . . . . . . . . . . . . . . . 7 Control .Pedal . . . . . . . . . . . . . . . . . . . . . 7
4 Getting Started
About the programs . . . . . . . . . . . 8 Selecting programs. . . . . . . . . . . . 8
Edit a program. . . . . . . . . . . . . . . . . 8
Selecting pianos, samples. . . . . 8
Using the Organ . . . . . . . . . . . . . . . 9
The Rotary effect . . . . . . . . . . . . . . 9 Memory Protection . . . . . . . . . . . . 9 Storing a program . . . . . . . . . . . . .10
The Live buffer. . . . . . . . . . . . . . . . .10 Octave Shift . . . . . . . . . . . . . . . . . . .10
Adding effects . . . . . . . . . . . . . . . . .10 Activate .an .amplifier .emulation . . . . . . .10
|
The Delay . . . . . . . . . . . . . . . . . . . . . |
10 |
5 Nord Electro 4D Reference
Master .level .knob . . . . . . . . . . . . . . . . . .11
Organ section . . . . . . . . . . . . . . . . .11 Organ .Model .button . . . . . . . . . . . . . . . .11 The .B3 .model . . . . . . . . . . . . . . . . . . . . .11 The .VX .model . . . . . . . . . . . . . . . . . . . . .11 The .Farf .model . . . . . . . . . . . . . . . . . . . .11 Rotary .Speed . . . . . . . . . . . . . . . . . . . . .12 Vibrato/Chorus . . . . . . . . . . . . . . . . . . . .12 Percussion . . . . . . . . . . . . . . . . . . . . . . .12 Preset/Drawbar/Split . . . . . . . . . . . . . . . .12 Additional .MIDI .keyboard . . . . . . . . . . . .13 The .drawbars . . . . . . . . . . . . . . . . . . . . .13
Piano section . . . . . . . . . . . . . . . . . .13 Clavinet .sound . . . . . . . . . . . . . . . . . . . .13 Pick-up .type . . . . . . . . . . . . . . . . . . . . . .13 Pick-up .Type .Description . . . . . . . . . . . .13
Clav .EQ . . . . . . . . . . . . . . . . . . . . . . . . .13 Acoustics . . . . . . . . . . . . . . . . . . . . . . . .13 Samp .Env . . . . . . . . . . . . . . . . . . . . . . . .14 Piano .Type . . . . . . . . . . . . . . . . . . . . . . .14 Mono . . . . . . . . . . . . . . . . . . . . . . . . . . .14 Model . . . . . . . . . . . . . . . . . . . . . . . . . . .14
Program section . . . . . . . . . . . . . .14 Up/Down .buttons . . . . . . . . . . . . . . . . . .14 Display . . . . . . . . . . . . . . . . . . . . . . . . . .14 Store . . . . . . . . . . . . . . . . . . . . . . . . . . . .14 Live .Mode . . . . . . . . . . . . . . . . . . . . . . . .14 Instrument .selectors . . . . . . . . . . . . . . .15 Shift . . . . . . . . . . . . . . . . . . . . . . . . . . . .15 Octave .Shift . . . . . . . . . . . . . . . . . . . . . .15
Effects . . . . . . . . . . . . . . . . . . . . . . . . .15 EQ . . . . . . . . . . . . . . . . . . . . . . . . . . . . .15 Effect .1 . . . . . . . . . . . . . . . . . . . . . . . . . .15 Effect .2 . . . . . . . . . . . . . . . . . . . . . . . . . .15 Speaker/Comp . . . . . . . . . . . . . . . . . . . .15 Reverb . . . . . . . . . . . . . . . . . . . . . . . . . .16 Delay ./ .Reverb . . . . . . . . . . . . . . . . . . . . .16 Feedback . . . . . . . . . . . . . . . . . . . . . . . .16 Ping .Pong . . . . . . . . . . . . . . . . . . . . . . . .16 Tempo .Tap . . . . . . . . . . . . . . . . . . . . . . .16 Gain . . . . . . . . . . . . . . . . . . . . . . . . . . . .16
6 The Menus
System Menu . . . . . . . . . . . . . . . . . .17 1 .- .Memory .Protect .– .On, .Off . . . . . . . . .17 2 .- .Output .Routing . . . . . . . . . . . . . . . . .17 3 .- .Transpose . . . . . . . . . . . . . . . . . . . . .17 4 .- .Fine .Tune . . . . . . . . . . . . . . . . . . . . .17 5 .- .Sustain .Pedal .Polarity . . . . . . . . . . . .17 6 .- .Rotor .Pedal .Polarity . . . . . . . . . . . . .17 7 .- .Sustain .Pedal .Mode . . . . . . . . . . . . .17 8 .- .Rotor .Pedal .Mode . . . . . . . . . . . . . . .17 9 .- .Ctrl .Pedal .Type . . . . . . . . . . . . . . . . .17 10 .- .Ctrl .Pedal .Mode . . . . . . . . . . . . . . .18 11 .- .Organ .Trig .Mode . . . . . . . . . . . . . . .18
MIDI Menu . . . . . . . . . . . . . . . . . . . . .18 1 .- .Local .Control . . . . . . . . . . . . . . . . . .18 2 .- .MIDI .Interface . . . . . . . . . . . . . . . . . .18 3 .- .MIDI .Channel . . . . . . . . . . . . . . . . . .18 4 .- .Lower .Channel . . . . . . . . . . . . . . . . .18 5 .- .Control .Change .(CC) .Mode . . . . . . .18 6 .- .Program .Change .Mode . . . . . . . . . .18 7 .- .MIDI .Split .Mode . . . . . . . . . . . . . . . .18 8 .- .Dump .One . . . . . . . . . . . . . . . . . . . .18 9 .- .Dump .All . . . . . . . . . . . . . . . . . . . . . .18 10 .- .Send .CC . . . . . . . . . . . . . . . . . . . . .18
B3 Menu . . . . . . . . . . . . . . . . . . . . . .19 1 .- .Tonewheel .Mode . . . . . . . . . . . . . . .19 2 .- .Key .Click .Level . . . . . . . . . . . . . . . . .19 3 .- .Key .Bounce . . . . . . . . . . . . . . . . . . . .19 4 .- .Perc. .Fast .Decay . . . . . . . . . . . . . . . .19 5 .- .Perc. .Slow .Decay . . . . . . . . . . . . . . .19 6 .- .Perc. .Norm .Level . . . . . . . . . . . . . . .19 7 .- .Perc. .Soft .Level . . . . . . . . . . . . . . . . .19 8 .- .Perc .Drawbar .9 .Cancel . . . . . . . . . . .19
Rotary Menu . . . . . . . . . . . . . . . . . .19 1- .Rotary .Model . . . . . . . . . . . . . . . . . . .19 2 .- .Balance .Bass/Horn . . . . . . . . . . . . . .19 3 .- .Treble .Horn .Speed . . . . . . . . . . . . . .19 4 .- .Bass .Rotor .Speed . . . . . . . . . . . . . . . . . . . . . . . . . . . .19 5 .- .Treble .Horn .Acceleration . . . . . . . . .19 6 .- .Bass .Rotor .Acceleration . . . . . . . . . .19
7 Nord Sound Manager
System .requirements . . . . . . . . . . . . . . 20
Installation. . . . . . . . . . . . . . . . . . . . 20
USB .Driver . . . . . . . . . . . . . . . . . . . . . . 20
Sound .Manager . . . . . . . . . . . . . . . . . . 20
Overview . . . . . . . . . . . . . . . . . . . . . 20
The .Toolbar . . . . . . . . . . . . . . . . . . . . . . .21
The .Tabs . . . . . . . . . . . . . . . . . . . . . . . . . . . . . . . . . . . . . . . . . . . . . . . .21
Partition .Memory .Indicator . . . . . . . . . . .21
Right-Clicking . . . . . . . . . . . . . . . . . . . . .21
File .Formats . . . . . . . . . . . . . . . . . . . . . .21
The Quick Tour. . . . . . . . . . . . . . . . 22 Transfer .pianos .to .the .Electro .4D . . . . . 22 Deleting .a .piano . . . . . . . . . . . . . . . . . . 22 Download .a .new .sound . . . . . . . . . . . . 22 Replace . . . . . . . . . . . . . . . . . . . . . . . . 22 Relink . . . . . . . . . . . . . . . . . . . . . . . . . . 23 Download .Queue . . . . . . . . . . . . . . . . . 23 Upload .sounds . . . . . . . . . . . . . . . . . . . 23 Program .Bundles . . . . . . . . . . . . . . . . . 23 Upload .a .Program .Bundle . . . . . . . . . . .24 Downloading .a .Bundle . . . . . . . . . . . . . .24 Organize .the .program .partition . . . . . . 25 Search .Box . . . . . . . . . . . . . . . . . . . . . . 25 Auto .Select . . . . . . . . . . . . . . . . . . . . . . 25 Backup . . . . . . . . . . . . . . . . . . . . . . . . . 25 Restore . . . . . . . . . . . . . . . . . . . . . . . . . 25
Sound Manager reference . . . . 26 Toolbar . . . . . . . . . . . . . . . . . . . . . . . . . 26
Menus. . . . . . . . . . . . . . . . . . . . . . . . . 28 File .Menu . . . . . . . . . . . . . . . . . . . . . . . . 28 Edit .Menu . . . . . . . . . . . . . . . . . . . . . . . 28 View .Menu . . . . . . . . . . . . . . . . . . . . . . . . . . . . . . . . . . . . . . . . . . . . 29 Help . . . . . . . . . . . . . . . . . . . . . . . . . . . 29
Tabs . . . . . . . . . . . . . . . . . . . . . . . . . . 29 Piano .– .Samp .Lib .- .Program .- .Synth . . 29 Search .Box . . . . . . . . . . . . . . . . . . . . . . 29 Loc .- .Location . . . . . . . . . . . . . . . . . . . 29 Name . . . . . . . . . . . . . . . . . . . . . . . . . . 29 Category . . . . . . . . . . . . . . . . . . . . . . . 29 Size . . . . . . . . . . . . . . . . . . . . . . . . . . . 29 Ver .– .Version .Number . . . . . . . . . . . . . 29 Note . . . . . . . . . . . . . . . . . . . . . . . . . . . 30 Footer .Area . . . . . . . . . . . . . . . . . . . . . . 30 Partition .Memory .Indicator . . . . . . . . . . 30 Cancel .Button . . . . . . . . . . . . . . . . . . . 30 Progress .Bars . . . . . . . . . . . . . . . . . . . 30 Message/Text .Area . . . . . . . . . . . . . . . 30 Updates .and .sounds . . . . . . . . . . . . . . 30
8 MIDI functions
About .the .MIDI .implementation . . . . . . .31 Keyboard .velocity . . . . . . . . . . . . . . . . . .31 Program .change . . . . . . . . . . . . . . . . . .31 MIDI .Sysex .(System .Exclusive) . . . . . . . .31
With a sequencer . . . . . . . . . . . . . .31 Connections . . . . . . . . . . . . . . . . . . . . . .31 Local .On/Off . . . . . . . . . . . . . . . . . . . . . .31 MIDI .Channel . . . . . . . . . . . . . . . . . . . . .31 Program .Change . . . . . . . . . . . . . . . . . .31 Controllers . . . . . . . . . . . . . . . . . . . . . . .31 About .controllers .and .“chasing” . . . . . .31
Program and CC dumps. . . . . . . 32 Sending .program .dumps . . . . . . . . . . . 32 Sending .MIDI .Controller .dumps . . . . . . 32 Receive .MIDI .SysEx .dumps . . . . . . . . . 32 MIDI .Controller .list . . . . . . . . . . . . . . . . 32 MIDI .Implementation .Chart . . . . . . . . . 33
9 Index
Index . . . . . . . . . . . . . . . . . . . . . . . . . . 34

4 | Nord Electro 4D User Manual OS v1.x
1 Introduction
Thank you!
We’d .first .like .to .thank .you .for .purchasing .the .Nord .Electro .4D. .Our . goal .when .we .developed .the .Nord .Electro .instruments .was .to .create . the .best .emulations .of .traditional .electromechanical .keyboard .instruments .on .the .market, .and .to .make .these .instruments .compact .and . lightweight. .With .the .Electro .4D .we .have .taken .our .commitment .a .step . further .by .adding .physical .drawbars, .upgrading .the .organ .and .the . piano .and .the .effects .sections .and .also .by .the .ability .to .use .sampled . instruments .from .the .Nord .Sample .Library . . .
This .allows .us .to .for .example .include .some .of .the .fabulous .Mellotron . sounds .in .the .factory .sound .bank. .Each .and .every .piano .and .sample . in .the .Nord .Electro .4D .can .be .replaced .by .you, .using .the .free .Nord .
Sound .Manager .application. .New .pianos .and .other .sounds .are .found . on .the .enclosed .Nord .DVD .and .on .the .www..nordkeyboards..com .web . site. .
No .compromises, .just .a .good .selection .of .outstanding, .classic .keyboard .sounds .with .true .feel, .from .a .natural .keyboard .response .to .the . authentic .sound .quality .– .that .is .what .we .have .been .pursuing .during . the .development. .To .make .a .great .tool .you .have .to .put .all .the .focus .on . a .few .things .and .that .is .exactly .what .we .tried .to .achieve. .We .hope .that . you .will .have .as .much .fun .owning .and .using .the .instrument, .as .we .had . developing .it..
The .physical .drawbars .and .the .improved .B3 .engine .on .the .Electro .4D . are .the .icing .of .a .splendid .cake. .We .sincerely .hope .that .you .two .will . have .a .lot .of .fun .together!
About this manual
You .are .probably .very .eager .to .start .using .your .new .instrument, .and . we .sure .don’t .want .to .keep .you .from .having .fun. .We .will .try .to .cover .all . the .essential .aspects .on .how .to .use .the .Electro .4D .in .the .very .first .few . pages .of .this .manual. .After .that .follows .the .reference .section .where .all . the .functions .are .explained .in .detail. .
Disclaimer
All .trademarks .and .brand .names .mentioned .in .this .manual .are .the . property .of .their .respective .owner’s .and .are .not .affiliated .or .associated . with .Clavia. .These .trademarks .and .brand .names .are .only .mentioned .to . describe .the .types .of .sounds .reproduced .by .Nord .Electro .4D..
OS and internal memory
The .operating .system, .programs .and .pianos .and .samples .in .Nord . Electro .4D .are .stored .in .a .Flash .memory. .A .Flash .memory .keeps .the . data .also .when .the .power .is .turned .off. .Another .big .advantage .is .that . you .can .replace .data .in .the .Flash .memory .at .any .time. .This .means .that . you .will .be .able .to .download .OS .upgrades, .pianos .and .samples .and . programs .to .your .Nord .Electro .4D .from .a .computer. .The .Nord .Electro . 4D .features .a .USB .port .for .quick .and .easy .download .of .new .piano . and/or .instrument .samples..
Factory presets
The .internal .sound .memory .of .Nord .Electro .4D .consists .of .128 . programs. .In .addition .there .is .the .Live .buffer .memories, .which .will .continuously .store .any .changes .as .they .are .made, .and .remember .these . settings .after .the .power .is .turned .off..
All .of .the .128 .factory .Programs .of .Nord .Electro .4D .can .be .replaced. . To .make .sure .you .don’t .accidentally .overwrite .Programs .you .want .to . keep, .it’s .a .good .idea .to .back .up .your .sounds .regularly .on .a .computer . using .the .Nord .Sound .Manager .application. .
Restoring the factory presets
The .factory .Programs .are .available .as .Nord .Sound .Manager .backup . files .for .download .at .the .Nord .web .site .at .www..nordkeyboards..com .or . on .the .included .Nord .DVD..
OS upgrades
The .latest .OS .version .for .Nord .Electro .4D .series .is .available .for .download .at .the .www..nordkeyboards..com .website..

2 Overview
The .front .panel .of .the .Nord .Electro .4D .has .four .main .areas, .Organ, . Piano, .Program .and .Effects. .We’ll .familiarize .ourselves .briefly .with .the . panel .here .and .describe .the .functions .in .detail .in .the .following .chapters..
On .the .left .part .of .the .panel .is .the .Master .Level .knob, .the .organ .model . selector .and .the .Rotary .Speed .section. .The .Master .level .controls .the . entire .instruments .output .level .at .the .two .output .jacks .and .the .headphone .output. .This .control .is .not .programmable, .that .particular .functionality .is .instead .available .in .the .effects .section .with .the .Gain .control. .
The .Organ .section .is .lit .and .active .when .the .Organ .selector .in .the .
Program .area .is .activated. .
Moving .towards .the .middle .of .the .panel, .the .Piano .section .behaves .just . as .the .organ. .The .controls .are .lit .when .the .Piano .selector .is .active..
The .Program .section .contain .the .parameters .and .functions .that .are . used .to .select .and .store .programs, .to .set .the .System, .MIDI, .B3 .and . Rotary .menu .settings .and .to .select .the .instrument .to .be .used .with .the . Organ .or .Piano .selectors. .We’ll .describe .the .functions .in .this .area .in . greater .detail .starting .at .page .14..
The .Effect .section .contains .the .functions .of .the .effects. .Please .refer .to . page .15 .for .more .information..
The .functions .and .settings .of .the .System, .MIDI, .B3 .and .Rotary .menus . are .conveniently .printed .to .the .right .on .the .panel. .
Selector buttons
Selector .buttons .are .used .to . activate .one .setting .in .an .array. .
Selector .buttons .have .a .set . of .round .or .triangular .LEDs .to . indicate .the .current .setting. .
Press .the .button .several .times . to .cycle .through .the .possible . options. .
Holding Shift and pressing a selector button (with the exception of the Type button) will cycle through the settings in a counter clockwise fashion.
On/Off buttons
On/Off .buttons .are .used .for .activating .a .parameter .or .a .group .of .parameters .such .as .effects..
Shift button
Some .buttons .have .a .secondary .function, .which . will .be .available .if .you .hold .down .Shift .while . pressing .the .button. .The .name .of .the .secondary . function .is .printed .below .the .button. .Shift .is .also . used .together .with .the .Up/Down .buttons .when . you .want .to .change .a .setting .in .the .System, . MIDI .or .Sound .menus. .
Knobs & buttons
Knobs
The .knobs .control .the .continuously .variable . parameters .in .the .Nord .Electro .4D..
MM A parameter value can be totally different from the knob’s physical position when you load a Program. As soon as you start turning the knob, the value will ‘snap’ to the knob’s physical position.
Drawbars
The .nine .drawbars .on .the .Nord . Electro 4D .allow .you .to .sculpt . the .organ .sound .in .real .time. .
Their .positions .will .be .stored .in . the .programs, .for .immediate . access. .

6 | Nord Electro 4D User Manual OS v1.x
3 Connections
|
CONTROL |
ROTOR |
SUSTAIN |
MIDI |
MIDI |
MONITOR |
RIGHT |
LEFT OUT |
||||
|
PEDAL |
PEDAL |
PEDAL |
USB |
OUT |
IN |
IN |
OUT |
MONO HEADPHONES |
|||
Audio connections
Headphones
This .is .where .you .connect .a .¼» .stereo .connector .from .a .pair .of .headphones..
MIDI Connections
MIDI In
MIDI .connection .used .to .receive .MIDI .data .to .the .Nord .Electro .4D .from . other .equipment .such .as .keyboards .or .computers..
Left Out and Right Out
The .left .and .right .line .level .outputs .from .the .Nord .Electro .4D .are .unbalanced. .Use .¼» .connectors .to .connect .the .Nord .Electro .4D .to .an .amplifier .or .recording .equipment..
The .Nord .Electro .4D .is .a .stereo .instrument, .with .separate .signal .paths . for .the .left .and .right .audio .channels. .To .properly .experience .the .Electro . 4D, .use .both .outputs .in .a .stereo .operation..
The .System .functions .allow .you .to .separate .the .pianos/samples .and . the .organ .sounds .in .the .left .and .right .outputs. .Read .more .about .this . functionality .on .page .17. .
General .guide .on .audio .connections: .
•.Make .all .the .connections .before .you .turn .on .the .power .to .your .amplifier.. .
•.Turn .on .the .power .to .your .amplifier .last.. .
•.Turn .off .the .power .to .your .amplifier .first..
EE Playing at a high volume level can result in hearing impairments such as permanent hearing loss.
Monitor In
Use .this .to .connect .and .monitor .a .signal .from .an .mp3 .or .a .CD .player . at .the .Nord .Electro .4D’s .headphone .output. .This .allows .you .to .e..g. . rehearse .with .the .Electro .4D .to .pre-recorded .music..
MM Signals connected to this input will not be processed with the Electro 4D’s effects or appear at the Electro 4D’s left and right output jacks.
MIDI Out
MIDI .connection .used .for .sending .keyboard .and .panel .generated .MIDI . data .from .the .Nord .Electro .4D .to .other .equipment .such .as .sound . modules .or .computers..
USB Connection
The .USB .connection .is .used .for .the .Nord .Electro .4D .to .communicate .with .a .personal .computer .in .order .to .update .the .OS .or .to .add .or . replace .any .of .the .piano .and/or .sampled .sounds. .The .computer .can . run .the .Nord .Sound .Manager .application, .or .be .used .to .transfer .the . operating .system .if .the .unit .needs .to .be .updated..
The .Nord .Electro .4D .can .also .transmit .and .receive .MIDI .data .via .the . USB .interface, .read .more .about .this .in .the .MIDI .chapter..
MM Computers running Microsoft Windows operating systems need a driver for the USB connection to work. The driver can be found on the enclosed Nord DVD, or at the www.nordkeyboards.com website.
Pedal Connections
|
CONTROL |
ROTOR |
SUSTAIN |
MIDI |
MIDI |
MONITOR |
RIGHT |
LEFT OUT |
||||||||||||||||||||||||||||||||
|
PEDAL |
PEDAL |
PEDAL |
USB |
OUT |
IN |
IN |
OUT |
MONO HEADPHONES |
|||||||||||||||||||||||||||||||
The .Nord .Electro .4D .has .three .pedal .inputs; .a .sustain .pedal, .a .pedal .to . control .the .rotor .speed .and .a .control .pedal .(an .expression .type .pedal), . which .can .be .used .to .control .various .parameters..
|
chapter 3 Connections |
| 7 |
Sustain Pedal
¼» .connector .for .a .switch .type .pedal. .When .a .connected .pedal .is . operated, .the .notes .you .play .will .be .sustained..
Rotor Pedal
¼» .connector .for .a .switch .type .pedal. .When .a .connected .pedal .is . operated, .the .rotary .speed .will .change. .
MM Two types of pedal polarities can be used with these inputs; you select the one that applies to each pedal, in the System menu which is described on page 17.
It is possible to use only one pedal connected to the sustain pedal input to control sustain for piano sounds and rotary speed selection for organ sounds (see page 17 for details on how to configure this).
Control Pedal
¼» .stereo .connector .for .a .pedal .of .the .potentiometer .type .(also .known . as .expression .pedals). .A .connected .pedal .can .be .used .as .a .swell .pedal . for .the .organs, .a .volume .pedal .for .pianos .and .samples .and .also .as .a . controller .for .two .of .the .effects: .the .P-wah .and .the .ring .modulator .(RM)..
When .connecting .an .expression .pedal .to .the .Control .Pedal .input, .you . should .use .a .stereo .cable .with .a .Tip-Ring-Sleeve .connector. .Please . note .that .the .pedal .must .have .a .stereo .output .jack. .The .resistance . range .of .a .control .pedal .should .be .10 .or .50 .kOhm. .To .simplify .setup, . the .most .common .pedal .models .(Roland, .Yamaha, .Korg .and .Fatar) .are . pre-configured .in .the .Nord .Electro .4D, .and .you .simply .select .the .type . of .pedal .which .you .want .to .use .in .the .System .menu, .see .page .17. .

8 | Nord Electro 4D User Manual OS v1.x
4 Getting Started
Let’s .take .a .few .minutes .to .get .familiar .with .the .Electro .4D. .The .user .interface .is .designed .to .be .as .intuitive .as .possible, .and .to .perform .as .well .as .you . do .in .a .live .situation. .We .hope .that .you .soon .will .feel .confident .in .using .it, .and .by .following .this .short .chapter, .we .will .go .through .most .of .the .functions. .
About the programs
Sound .and .effect .settings .are .stored .in .the .Program .memory .of .the . Nord .Electro .4D. .The .Electro .4D .organizes .the .memory .in .32 .pages . with .4 .programs .in .each .page, .making .this .a .total .of .128 .programs. .
Every .program .can .be .changed .and .replaced .as .you .wish. .A .complete . set .of .the .factory .programs .are .available .on .the .Nord .DVD .that .accompanies .the .unit .and .on .our .website. .This .allows .you .to .get .back .to .the . factory .settings, .should .you .wish .to .do .so, .using .the .Sound .Manager. .
The .chapter .about .the .Nord .Sound .Manager .begins .with .a .separate . tour, .on .page .22..
Selecting programs
Use .the .Up/Down .buttons .to .the .left .of .the .LED .display .to .select .the . page .and .the .program .buttons .1 .~ .4 .to .select .the .programs .within . each .page. .The .page .and .program .number .will .be .displayed .in .the . LED. .
When .the .Electro .4D .leaves .the .factory, .the .first .16 .or .so .pages .are . organized .to .make .it .easier .for .you .to .quickly .check .out .sounds .from . specific .instrument .groups. .The .1st .programs .in .each .page .are .organs, . the .2nd .programs .are .acoustic .pianos, .the .3rd .program .are .electric . pianos .and .the .4th .programs .are .sample .based .instruments. .
1 Press .the .Program .1 .button .to .listen .to .a .B3 .organ .program, .1..1. .
2 Press .the .Up .button .to .get . to .the .next .organ .program, . 2..1. .Keep .pressing .the .Up . button .until .you .are .ready . for .the .next .instrument . group. .
3 Press .and .hold .the .Down . button .to .get .back .to .1..1, . and .then .the .Program .
2 .button .to .listen .to .the . acoustic .grand .on .the .1..2 . location. .
4 Press .the .Up .button .to .get .to .the .next .acoustic .piano..
You .can .of .course .organize .the .programs .in .any .order .you .want. .Such . a .process .can .be .done .quite .easily .by .using .the .drag .and .drop .features . in .the .Nord .Sound .Manager..
Edit a program
Editing .a .program .is .just .as .easy .as .grabbing .a .knob .and .change .a .setting, .or .press .a .button .to .select .a .different .setting. .The .knob’s .physical . position .isn’t .always .as .the .stored .setting .in .the .program .that .is .active, . but .as .soon .as .you .start .turning .a .knob, .the .parameter .will .snap .to .the . knob’s .position..
When .you .have .edited .a .program, .a .dot .will .appear .in .the .lower .right . display .corner .next .to .the .program .number. . 

This .will .alert .you .to .the .fact .that .the .program . 

 has .been .edited .but .not .yet .saved. .If .you .select .

 a .new .program .without .saving, .any .edits .you .
  have .made .will .be .lost .and .the .program .will .have .its .original .settings . the .next .time .you .select .it..
Selecting pianos, samples
1Select .a .program .where .the .Piano .instrument .is .active. .The .LEDs . on .the .piano .section .and .the .Selector .LED .for .the .piano .will .be .lit. .
2 Press .repeatedly . on .the .Piano .Type . selector .to .cycle . through .the .types..
3 Press .the .Model . buttons .to .select . the .various .piano . models .within .the . selected .type. .
4 Press .the .Type . selector .again .
until .the .Samp .Lib .is . activated..

Use .the .Model .selector .buttons .to .select .one .of .the .samples .that .are . included .in .the .Electro .4D .from .the .factory. .
5 Press .the .Samp .
Env .button . repeatedly..
This .will .cycle .through . the .four .options .for . the .sample’s .attack . and .velocity .settings..
6 Press .and .hold . Shift .and .the . Samp .Env .button..
This .allows .you .to . select .one .of .the .four .
available .release .time .settings..
MM This button doubles as the Clavinet EQ selector, when the Clavinet type is active.
Using the Organ
1 Press .the .Organ .instrument .selector .above .the .program .1 .- .4 .
buttons. .
This .activates .the .Organ .section..
2Press .the .Organ .Model .selector .on .the .left .side .of .the .panel, . below .the .master .level .knob, .repeatedly .to .cycle .through .the .three . organs .– .the .B3, .Vox .and .Farfisa .emulations. .
The .settings .for .the .three .organ .instruments . are .made .using .the .drawbars. .The .Farfisa .uses . these .in .a .switching .mode, .with .only .two .settings .(on .or .off) .for .each..
3 Press .the .Drawbar .button .and .make . a .setting .with .the .drawbars .to .change . the .sound. .When .the .physical .position .of .the .drawbars .matches .the . programmed .setting .in .the .program, . the .drawbar .LED .will .be .lit. .
4 Press .and .hold .Shift .and .the .Drawbar/Split .button..
This .activates .the .organ .split .mode. .The .keyboard .will .be .split .at .C4. .
The .lower .half .will .use .the .Lo .setting; .the .upper .half .will .use .the .Up . setting..
If you press and hold both the Shift and the Preset/Split buttons for a couple of seconds, the Split LED will begin to flash and you can press a key on the keyboard to set a new split point as long as these buttons are held down. The key you press will be the first upper manual key.
|
chapter 4 Getting Started |
| 9 |
The Rotary effect
The .rotary .effect .adds .some .great .sonic .drama .to .the .organs, .but .can . of .course .be .used .with .any .other .sound .as .well. .The .Electro .4D .rotary . has .three .available .speeds: .fast, .slow .and .stop. .Stop .does .not . disengage .the .effect; .it .only .stops .the .rotating .speakers. .
1 Make .sure .that .the .Speaker/Comp .effect .is .
activated .and .select .the .Rotary .by .pressing .
the .effect .selector .until .both .the .upper .
LEDs .are .lit..
The .drive .knob .now .controls .the .overdrive .of .the . rotary .amplifier..
2 Press .the .Slow/Stop .button .in .the .Rotary . Speed .section .to .the .left .on .the .panel, .to . cycle .between .the .Fast .and .Slow .speeds . of .the .rotary. .
The .rotors .will .speed .up .and .slow .down, . producing .a .nice .swirly .effect .without .the .negative .side .effects .that .e..g. .alcohol .intake .might . induce..
3 Press .the .Stop .mode .button .to .activate .this .one-speed .mode..
The .Stop .Mode .LED .will .be .lit..
4Press .repeatedly .on .the .Slow/Stop .button .to .cycle .between .Fast . and .Stop..
The .rotary .will .now .emulate .the .functionality .of .an .early, .one .speed . original .rotary .speaker .that .had .only .the .fast .and .the .stopped .rotary . speed .options..
If you connect a foot switch to the rotor pedal input, you can control the rotary speed with this pedal.
Memory Protection
When .the .Nord .Electro .4D .is .shipped .from .factory, .the .memory .protect . is .turned .on .to .prevent .you .(or .your .cat) .from .accidentally .overwriting . any .of .the .original .programs. .Before .you .can .store .any .of .your .own . programs, .this .memory .protect .feature .has .to .be .turned .off .by .toggling . a .setting .located .in .the .System .menu..
1Hold .Shift .and .press .the .Program .1 .button .to .enter .the .System . Menu..
2The .very .first .item .in .the .System .Menu .is .the .Memory .Protection. .
Use .the .Down .button .to .get .to .the .first .item .if .this .isn’t .already . active. .
3Hold .Shift .and .press .the .Down .button .to .switch .from .the .On . setting .to .the .Of .setting. .
4Press .shift .to .exit .the .system .menu. .The .memory .protection .will . now .remain .in .the .Off .setting .until .you .change .it .again..

10 | Nord Electro 4D User Manual OS v1.x
Storing a program
If .you .are .happy .with .a .change .to .a .program .that .you .have .made, .you . should .probably .store .the .program..
1 .Press .the .Store .button..
The .program .number .in .the .LED .starts .flashing..
2 Select .a .new .location .where .you .want .to .store .the .program. .
Use .the .Up/Down .buttons . and .the .program .buttons .to . navigate .to .a .new .program . location .if .you .do .not .want .to . overwrite .the .original .program..
3 Press .the .Store .button .a . second .time .to .confirm . your .choice..
The .edited .program .has .now . replaced .the .previous .one .in . the .location .you .specified..
MM To cancel the procedure, press the Shift button
before you press Store the second time.
MM With Memory Protect set to Off, a double tap on the Store button will store a Program in its original location.
Adding effects
1 Select .the .program .number .1..2 .which .
is .a .Grand .Piano .with .a .hint .of .reverb. .
2 Turn .on .Effect .2 .(the .On .LED .should .
be .lit) .and .press .repeatedly .on .the .
Effect .2 .selector..
The .effect .options .are .indicated .with .the . selector .LEDs .and .changes .in .a .cyclical, . clockwise .fashion .for .each .time .the .selector .is .pressed. .
Some .of .the .effects .have .three .options .that . indicate .the .depth .of .the .effect. .Flang 1 .is .
the .shallowest .version, .Flang .2 .is .a .more .
pronounced .effect .and .when .both .the .Flang .1 .and .Flang .2 .LEDs .are .lit, . you .have .selected .the .most .dramatic .flanger .effect. .
3 Turn .the .effect .rate .knob. .
This .changes .the .rate .of .the .active .effect..
4 Hold .Shift .and .press .repeatedly .on .the .effect .selector..
This .allows .you .to .reverse .through .the .effect .selections..
5 Turn .off .the .effect..
If .you .now .continue .to .press .on .the .effect .selector .after .the .effect .is . turned .off, .the .effect .setting .will .change .even .though .the .effect .is .not . active..
The Live buffer
The .special .Live .buffers .can .be .described .as .a .“live .program .memory”. .
If .you .activate .the .Live .button, .all .changes .to .the .panel .settings .you . make .will .be .continuously .saved .in .the .active .Live .program .(1-4). .If .you . switch .the .power .off, .or .select .another .program, .the .settings .are .still . stored .in .the .Live .memory, .so .when .you .power .up .next .time .(or .return . to .the .Live .memory) .all .settings .will .be .exactly .as .they .were .when .you . left .them..
If .the .Live .memory .is .selected .and .you .decide .you .wish .to .store .the . settings .permanently .as .a .program .you .can .do .so .using .the .standard .methods .(see .above). .You .can .also .store .programs .into .the .Live . memory .location, .in .which .case .the .program .settings .will .replace .the . current .Live .memory .settings..
Octave Shift.
Press .either .of .the .Octave .Shift .buttons .to .shift .the .pitch .up .or .down .in . whole .octaves .within .the .instrument’s . note .range. .Each .instrument .has .a . finite .note .range, .read .more .about .this . in .“Octave .Shift” .on .page .15..
Activate an amplifier emulation
1 Press .the .Speaker/Comp .button .to .activate .the .Amp .emulation..
The .Speaker/Comp .LED .will .be .lit..
2 Press .repeatedly .on .the .selector .to .cycle .through .the .various .options..
The .knob .controls .the .drive .for .the .three .amps .and .the .rotary .simulator, . and .the .amount .when .the .compressor .is .selected..
The Delay.
1 Activate .the .delay/reverb..
2 Hold .Shift .and .press .the .reverb .selector .
button. .The .Delay .LED .lights .up..
3 Tap .the .desired .tempo .on .the .Tempo .Tap .
button..
4 You .can .also .set .the .delay .time .by .holding .the .Tempo .Tap .button .and .adjust .the . tempo .with .the .Up/Down .buttons..
5Adjust .the .number .of .repeats .(Dly1, .Dly2 .
etc..) .by .pressing .the .selector .button .repeatedly..
This finishes our little tour; we hope that you now have the initial knowledge on how to operate most of the functions on the panel. There is another Quick Tour in the Sound Manager chapter.

chapter 5 Nord Electro 4D Reference | 11
5 Nord Electro 4D Reference
Master level knob.
This .control .sets .the .overall .output .level .of . the .Electro .4D, .at .the .line .and .the .headphone . outputs. .This .is .not .a .programmable .control. .If . you .want .to .set .an .output .level .for .a .particular . program, .this .can .be .achieved .with .the .Gain . control..
Organ section
The .Organ .section .in .the .Nord .Electro .4D .features .emulations .of .three . classic .organ .models; .a .B3, .a .Vox .Continental .II .(Vx .model) .and .a . Farfisa .Compact .DeLuxe .(Farf .model)..
Organ Model button
You .select .which .organ .model .to .use, .with .the .
Organ .Model .button..
The B3 model
This .model .is .a .digital .simulation .of .the .classic .
mechanical .tone .wheel .organ. .This .simulation .utilizes .innovative .and . advanced .methods .to .capture .every .nuance .of .the .original .sound, .for . example:
•.An .extremely .accurate .digital .model .of .the .original .chorus .and .vibrato . scanner..
•.Modeling .of .the .individual .random .contact .bounces .for .each .harmonic..
•.Modeling .of .the .unique .frequency .characteristics .of .the .built-in .pre- amplifier .which .forms .the .“body” .of .the .sound..
•.Simulation .of .the .energy .robbing .in .the .tone .wheel .architecture .that . creates .the .typical .“compressed” .sound..
•.Authentic .tuning .of .the .tone .wheels .according .to .the .original .design..
•.Extremely .fast .keyboard .response. .
•.Full .polyphony. .
Each .drawbar .represents .a .partial .with .a .fixed .harmonic .interval .relating . to .the .played .note. .Note .that .the .5 .1/3 .drawbar .is .a .5th .above .the . fundamental .harmonic .although, .in .most .situations .it .is .perceived .as . sounding .below .the .fundamental .harmonic..
Do not forget to try out the four tonewheel modes that are available in the B3 menu, see page 19. These will dramatically change the sound of the B3 model from squeaky clean to a battered, old work horse.
The VX model
The .original .instrument .is .probably .the .most .famous .of .all .the .tran- sistor-based .combo .organs .that .emerged .in .the .early .60’s. .Transistor . technology .made .it .possible .to .manufacture .much .more .compact .and . portable .organ .instruments. .Compared .to .the .mighty .sound .of .tonewheel .organs, .transistor .organs .generally .sounded .reedier .and .weaker, . but .this .one .had .a .distinctive, .timeless .sound .and .is .recreated .faithfully . in .the .Nord .Electro .4D..
The .labels .used .for .the .VX .model .drawbars .are .printed .on .the .row . directly .above .the .drawbars. .The .drawbars .on .the .Electro .4D’s .VX . emulation .control .the .level .of .each .available .partial, .in .the .same .fashion . as .on .a .dual .manual .original .Continental. .The .upper .manual .uses .the . 16, .8, .4, .II .and .III .registers .and .the .lower .manual .uses .the .8, .4, .2 .and .IV . registers. .Each .register .represents .a .fixed .harmonic .interval, .or .groups . of .intervals .(the .II, .III .and .IV) .in .a .relationship .to .the .played .note. .
The .two .rightmost .drawbars .control .the .sum .of .all .partials .in .the .form . of .a .filtered, .soft .and .dark .sounding .signal .(the .sine .icon), .and .an .unfiltered .signal .with .a .bright .and .intense .sound .(the .triangular .icon). .
MM If these drawbars are both fully set to the lowest level, the organ will produce no sound.
The Farf model
This .typical .“buzzy” .sound .of .this .vintage .instrument .is .one .of .the .most . distinct .and .easily .recognizable .organ .sounds .ever .created, .yet .it .is .actually .possible .to .get .quite .a .wide .range .of .sounds .out .of .the .instrument. .
The .labels .used .for .the .Farf .model .drawbars .are .printed .on .the .upper . row .above .the .drawbars. .
The .drawbars .act .as .on/off .switches, .or .“Register .selectors” .when .the .
Farf .model .is .selected. .
 Loading…