инструкцияChicco Activ3

Activ3
TM
Jogging Stroller
Owner’s Manual
Manual del propietario
Read all instructions BEFORE
assembly and USE of product.
KEEP INSTRUCTIONS FOR
FUTURE USE.
Lea todas las instrucciones ANTES
de armar y USAR este producto.
CONSERVE LAS INSTRUCCIONES
PARA USO FUTURO.
IS0097.6ES
©2015 Artsana USA, INC. 02/15
Посмотреть инструкция для Chicco Activ3 бесплатно. Руководство относится к категории коляски, 14 человек(а) дали ему среднюю оценку 8.4. Руководство доступно на следующих языках: английский. У вас есть вопрос о Chicco Activ3 или вам нужна помощь? Задайте свой вопрос здесь
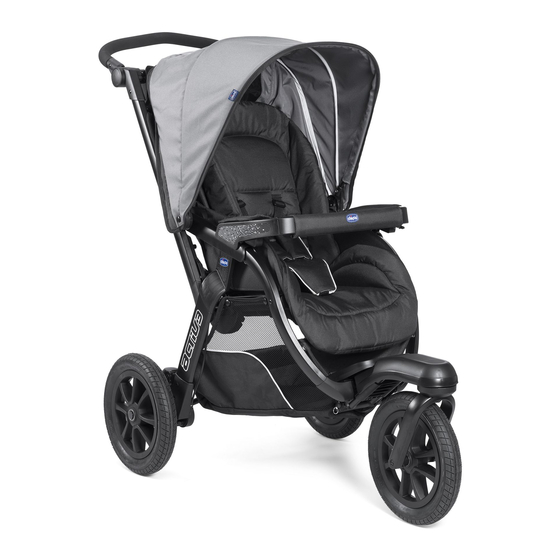
Коляска Chicco Activ3 — это детская коляска, предназначенная для использования на пересеченной местности. Она имеет прочную раму, которая обеспечивает стабильность и надежность во время использования. Благодаря большим колесам с пневматическими шинами, эта коляска обеспечивает хорошую амортизацию и справляется с неровностями на дороге.
Коляска Chicco Activ3 оснащена системой амортизации колес, которая обеспечивает мягкую и комфортную поездку для ребенка. Она также имеет регулируемую ручку, что облегчает управление коляской и позволяет настроить ее подходящее положение.
Коляска имеет широкое сиденье и регулируемую спинку, что обеспечивает удобство и комфорт для ребенка. Она также оснащена пятиточечными ремнями безопасности, чтобы обеспечить безопасность и защиту малыша во время поездки.
Коляска Chicco Activ3 имеет удобный и легко доступный багажник, где можно хранить необходимые вещи для ребенка. Она также легко складывается для компактного хранения и перевозки.
Важно отметить, что точные характеристики этой коляски могут различаться в зависимости от конкретной модели или версии. Перед покупкой рекомендуется проверить спецификации у производителя или в магазине, чтобы убедиться, что эта коляска соответствует вашим требованиям и ожиданиям.
Главная
| Chicco | |
| Activ3 | 06079373470070 | |
| коляска | |
| 8058664076154 | |
| английский | |
| Руководство пользователя (PDF) |
Не можете найти ответ на свой вопрос в руководстве? Вы можете найти ответ на свой вопрос ниже, в разделе часто задаваемых вопросов о Chicco Activ3.
Какой коляска подходит для новорожденного ребенка?
Ребенок должен ровно лежать на спине. Это облегчает дыхание и способствует правильному развитию легких.
Как долго следует пользоваться коляской?
Обычно коляску используют для детей до 36 месяцев.
Безопасно ли ребенку спать в коляска?
Нет, ребенок может задохнуться. Если ребенок заснул в коляска, его следует достать из коляска и поместить в кроватку. Как можно скорее возьмите заснувшего ребенка и положите в кроватку.
Инструкция Chicco Activ3 доступно в русский?
К сожалению, у нас нет руководства для Chicco Activ3, доступного в русский. Это руководство доступно в английский.
Не нашли свой вопрос? Задайте свой вопрос здесь
-
Contents
-
Table of Contents
-
Bookmarks
Quick Links
Read all instructions BEFORE
assembly and USE of product.
KEEP INSTRUCTIONS FOR
FUTURE USE.
Lea todas las instrucciones ANTES
de armar y USAR este producto.
CONSERVE LAS INSTRUCCIONES
PARA USO FUTURO.
Activ3
TM
Jogging Stroller
Owner’s Manual
Manual del propietario
©2013 Artsana USA, INC. 08/13
IS0097.2ES
Related Manuals for Chicco Activ3
Summary of Contents for Chicco Activ3
-
Page 1: Jogging Stroller
USE of product. KEEP INSTRUCTIONS FOR FUTURE USE. Lea todas las instrucciones ANTES de armar y USAR este producto. CONSERVE LAS INSTRUCCIONES PARA USO FUTURO. Activ3 Jogging Stroller Owner’s Manual Manual del propietario ©2013 Artsana USA, INC. 08/13 IS0097.2ES…
-
Page 2
• TO PREVENT A HAZARDOUS, To carry infants 0-6 months you • NEVER LEAVE CHILD UNSTABLE CONDITION, do not MUST use a Chicco KeyFit infant UNATTENDED. Always keep child place more than 10 lbs (4.6 kg) in car seat properly attached to the in view while in the stroller. -
Page 3
COCHECITO se utilice como asiento de seguridad infantil al adicionales y pueden provocar juguete. cochecito que no sea el Chicco una pérdida de control e • SUSPENDA EL USO DEL KeyFit. Utilizar este cochecito con inestabilidad. COCHECITO si se daña o se asientos de seguridad infantil de •… -
Page 4
Chicco recomienda que los niños tengan al menos 6 meses antes de utilizar in a Jogging stroller without a Chicco KeyFit car seat. With the addition of the un cochecito para jogging sin un asiento de seguridad infantil Chicco KeyFit. Al Chicco KeyFit car seat, newborns may be able to ride in the stroller. -
Page 5
Components Components Componentes Componentes A. — Stroller Frame E. — Canopy A. — Estructura de la silla de paseo E. — Capota F. — Pin and Ring B. — Front Wheels F. — Clavija y arandela B. — Ruedas delantera C. -
Page 6
How to Assemble Stroller How to Assemble Stroller Cómo armar el cochecito Cómo armar el cochecito WARNING ADVERTENCIA 2. Line up the holes of the Front Swivel Mount with the holes on the When opening the Stroller, ensure Al abrir la silla de paseo, asegúrese Stroller Frame as shown. -
Page 7
How to Assemble Stroller How to Assemble Stroller Cómo armar el cochecito Cómo armar el cochecito 3. Secure the Metal Pin into position with the Metal Ring. Insert the one end of the Metal Ring into hole on the Metal Pin and rotate the Metal Ring through the hole (as shown). -
Page 8
How to Assemble Stroller How to Assemble Stroller Cómo armar el cochecito Cómo armar el cochecito 6. Insert a Rear Wheel into the corresponding attachment point on the Stroller Frame, push until the axel locks into position. Repeat for the other side. Pull on each Wheel to check that it is securely attached. -
Page 9
How to Open Stroller How to Open Stroller Cómo abrir el cochecito Cómo abrir el cochecito 7. Once the Wheels are in place and 8A. Locate and grasp the Fold/ the Stroller Frame is in an upright Release Handle. position. Rotate the Push Handle up until it clicks into the first position. -
Page 10
How to Open Stroller How to Assemble Parent Tray Cómo abrir el cochecito Como armar la bandeja para padres 9. While twisting the Fold/Release 10. Locate the Hook and Loop Tabs Handle. Pull up and back on the on the underside of the Parent Fold/Release Handle in a rocking Tray. -
Page 11
How to Assemble Parent Tray To Attach Canopy Como armar la bandeja para padres Sujeción de la capota 11. Fold the Parent Tray Cross Bar 12. To attach the Canopy, fasten cover over the Cross Bar and secure the Canopy Clip to stroller frame as the hook and loop tab underneath the shown. -
Page 12
To Attach Canopy Canopy Sujeción de la capota Capota Locate the hook and loop strips 14. To open the Canopy, pull the front along back edge of the Canopy, edge of the Canopy forward. Reverse 1 section on the top and 2 sections this step to close the Canopy. -
Page 13
Canopy To Attach Wrist Strap Capota Sujeción de la correa para las muñecas 15. To Extend the Canopy, unzip the 16A. Wrap the Wrist Strap around the Push Handle and thread the Parent back section on the Canopy and release the extension. Loop through the Handle Loop end and tighten. -
Page 14
Front Wheel Swivel Lock Brakes Traba de la rueda delantera giratoria Frenos 17. To engage the Front Wheel Swivel Lock 18. To engage the Brakes on the on the Stroller. Locate the lever on the LEFT Stroller. Locate the lever on the side of the Push Handle. -
Page 15
How to Adjust the Backrest How to Adjust the Backrest Cómo ajustar el respaldo Cómo ajustar el respaldo The Backrest can be adjusted to 4 20. To raise the Backrest, pull or push it up until the desired position has positions. -
Page 16
A child under 6 months old must Se recomienda que sólo niños ride in a Chicco KeyFit® infant car menores de 6 meses de edad utilicen 22A & 22B. First insert the ends of seat as part of the travel system. -
Page 17
How to Use the Safety Harness How to Use the Safety Harness Cómo utilizar el cinturón de seguridad Cómo utilizar el cinturón de seguridad 23. Cover the Harness Buckle with 24. To release the Harness, press the Cover Strap, attach it to the back on the Harness Buckle Buttons to side of the Harness Buckle using the release the 5-point Harness Buckle as… -
Page 18
Adjustable Rear Suspension To Attach Bumper Bar Suspensión trasera ajustable Installation du Barra de protección 25. Stroller has 2 Suspension Modes. WARNING ADVERTENCIA Flip the Lever up for smooth surfaces Bumper Bar is required to be La barra de protección debe estar and flip the Lever down for rough attached when using Stroller with sujetada cuando se utiliza el… -
Page 19
To Attach Bumper Bar To Attach Bumper Bar Installation du Barra de protección Installation du Barra de protección 27. When installing Bumper Bar, place 27. Al instalar la barra de protección, coloque las lengüetas de plástico entre the Plastic Tabs in between the Arm el apoyabrazos y la tela del asiento (A). -
Page 20
28. To remove the Bumper Bar, press WARNING ADVERTENCIA the two buttons located under the ONLY USE a Chicco KeyFit® UTILICE ÚNICAMENTE un asiento Bumper Bar as shown, then tilt up infant car seat with this product. de seguridad infantil Chicco KeyFit®… -
Page 21
Using the KeyFit Infant Seat Using the KeyFit Infant Seat Cómo utilizar el asiento de seguridad infantil KeyFit Cómo utilizar el asiento de seguridad infantil KeyFit 29A. With the Bumper Bar attached, 30. To remove the KeyFit® infant Place the KeyFit® infant carrier into carrier, squeeze the Release Handle the Stroller Frame. -
Page 22
How to Close the Stroller How to Close the Stroller Cómo cerrar la silla de paseo Cómo cerrar la silla de paseo WARNING ADVERTENCIA When folding the Stroller, make sure Al plegar la silla de paseo, asegúrese that your child and other children de que su hijo y otros niños se are at a safe distance. -
Page 23
How to Close the Stroller How to Close the Stroller Cómo cerrar la silla de paseo Cómo cerrar la silla de paseo 33. Push in the Push Handle side Buttons and rotate the Push Handle down into a folded position as shown. -
Page 24
How to Remove Front Wheel How to Remove the Rear Wheels Cómo quitar la rueda delantera Cómo quitar las ruedas traseras 36. Lay the Stroller down. To Remove the Rear Wheels, pull up on the Spring Release Button on the inside hub of the Wheel Mount as shown. -
Page 25
How to Remove the Seat Fabric How to Remove the Seat Fabric Cómo quitar la tela del asiento Cómo quitar la tela del asiento 37. To remove the Seat Fabric, 38. Release the Fabric Harness Waist remove the Bumper Bar and Canopy Strap at the back of the Seat Pad from the Stroller. -
Page 26
How to Remove the Seat Fabric How to Remove the Seat Fabric Cómo quitar la tela del asiento Cómo quitar la tela del asiento 39. Reveal the 2 Fabric Tabs at the 40. Using a Phillips Screw driver back of the Stroller Seat Bottom and remove 3 screws from the Plastic thread the folded Fabric Tabs through Plate on the frame down tube as… -
Page 27
How to Remove the Seat Fabric How to Remove the Seat Fabric Cómo quitar la tela del asiento Cómo quitar la tela del asiento 41. At the front of the Stroller, undo the hook and loop strip fastened to the Basket. Reveal the 2 Fabric tabs on the Stroller Seat Bottom and thread the Folded Fabric Tabs through the opening on the seat bottom on… -
Page 28
Limpieza y mantenimiento Cleaning and Maintenance Las operaciones de limpieza y mantenimiento deben ser efectuadas exclusivamente por un adulto. This product requires regular maintenance. The cleaning and maintenance of the stroller must only be carried out by an adult. LIMPIEZA CLEANING La silla de paseo se puede desenfundar (consultar la sección «Cómo colocar/quitar la funda»). -
Page 29
For More Information Más información If you have any questions or comments about this product, or are missing any of the parts, please contact us in one of the following ways: By phone (toll free): (877)-424-4226 By e-mail: info.usa@artsana.com By mail: 1826 William Penn Way Lancaster, PA 17601 Si tiene preguntas o comentarios sobre este producto o le falta alguna de las partes, comuníquese con nosotros por alguno de los siguientes medios:… -
Page 30
www.chiccousa.com…
user manualChicco 3-in-1

Read all instructions BEFORE
assembly and USE of product.
KEEP INSTRUCTIONS FOR
FUTURE USE.
Lea todas las instrucciones ANTES
de armar y USAR este producto.
CONSERVE LAS INSTRUCCIONES
PARA USO FUTURO.
Lire les instructions AVANT ď
assembler et ď UTILISER le produit.
GARDER CES INSTRUCTIONS
POUR S’Y RÉFÉRER AU BESOIN.
IS0129ESF_04
©2018 Artsana USA, INC. 02/27
www.chiccousa.com
3 in 1 Steam Sterilizer
Esterilizador de vapor 3 en 1
Stérilisateur à vapeur 3-en-1
Owner’s Manual
Manual del propietario
Manuel du propriétaire
View the manual for the Chicco 3-in-1 here, for free. This manual comes under the category not categorized and has been rated by 1 people with an average of a 9.9. This manual is available in the following languages: English. Do you have a question about the Chicco 3-in-1 or do you need help? Ask your question here
The Chicco 3-in-1 is a multi-functional stroller that can be used in three different configurations: as a keyfit carrier, an infant car seat, and a toddler stroller. The keyfit carrier allows for easy transfer of the car seat from car to stroller, while the infant car seat securely clips in to the stroller frame. When your child is a toddler, the stroller can be converted into a traditional upright stroller with a five-point harness.
The Chicco 3-in-1 is equipped with a multi-position reclining seat, adjustable canopy, and a storage basket for convenience. Its lightweight design makes it easy to manoeuvre and transport. The stroller is compatible with Chicco KeyFit and Fit2 car seats.
Constructed with high-quality materials, the Chicco 3-in-1 stroller is durable and built to last. Its sleek design and ease of use make it a popular choice among parents.
General
Can’t find the answer to your question in the manual? You may find the answer to your question in the FAQs about the Chicco 3-in-1 below.
Is the manual of the Chicco 3-in-1 available in English?
Yes, the manual of the Chicco 3-in-1 is available in English .
Is your question not listed? Ask your question here
Посмотреть инструкция для Chicco Activ3 бесплатно. Руководство относится к категории Коляски, 12 человек(а) дали ему среднюю оценку 8.2. Руководство доступно на следующих языках: английский. У вас есть вопрос о Chicco Activ3 или вам нужна помощь? Задайте свой вопрос здесь
Нужна помощь?
У вас есть вопрос о Chicco а ответа нет в руководстве? Задайте свой вопрос здесь Дай исчерпывающее описание проблемы и четко задайте свой вопрос. Чем детальнее описание проблемы или вопроса, тем легче будет другим пользователям Chicco предоставить вам исчерпывающий ответ.
Елена • 28-9-2020Нет комментариев
Подскажите пожалуйста снимается ли текстиль внутренней обшивки люльки,белая часть ?

Посмотреть фото
Вера • 1-2-2020Нет комментариев
Снимала чехлы с прогулки и после установки чехлов не могу регулировать положение спинки.Куда там какие ремни вставлять
Антонюк Валентина • 11-2-20201 комментарий
Как снять чехлы с автокресла?
Здравствуйте,вам ответили как снять чехлы из автокресло?
Инна • 30-8-2019Нет комментариев
Как снять летний вариант для стирки ?
Екатерина • 12-6-20211 комментарий
Добрый вечер, я покупала каляску 3 в 1 , у меня в каляске в люльке не фиксируется капюшон, постоянно падает?
Там надо сильнее потянуть просто на себя до щелчка
Юлия • 20-4-2021Нет комментариев
Не той стороной установили автокресло на раму, как снять?
Александр • 21-9-2019Нет комментариев
Стерлись покрышки , неможем найти задние колеса
Ирина • 25-3-2022Нет комментариев
Здравствуйте, как вытащить люльку. Если вставили не той стороной?) Заранее спасибо
Марина • 7-9-2021Нет комментариев
Здравствуйте, регулируется ли спинка автокресла?
Юлия • 16-7-2021Нет комментариев
Как снять капюшон с прогулочной коляски? Надо Болтики открутить?
- 1
- 2
Количество вопросов: 15
Главная
| Chicco | |
| Activ3 | 06079373470070 | |
| Коляска | |
| 8058664076154 | |
| английский | |
| Руководство пользователя (PDF) |
Не можете найти ответ на свой вопрос в руководстве? Вы можете найти ответ на свой вопрос ниже, в разделе часто задаваемых вопросов о Chicco Activ3.
Какой Коляска подходит для новорожденного ребенка?
Как долго следует пользоваться коляской?
Безопасно ли ребенку спать в Коляска?
Инструкция Chicco Activ3 доступно в русский?
Не нашли свой вопрос? Задайте свой вопрос здесь

- Manuals
- Brands
- Chicco Manuals
- Stroller
- Piccolo
- Owner’s manual
-
Bookmarks
Quick Links
Read all instructions BEFORE
assembly and USE of product.
KEEP INSTRUCTIONS FOR
FUTURE USE.
Piccolo
Stroller
Owner’s Manual
©2019 Artsana USA, INC. 07/19
IS0183E_01
www.chiccousa.com
Related Manuals for Chicco Piccolo
Summary of Contents for Chicco Piccolo
-
Page 1
Read all instructions BEFORE assembly and USE of product. KEEP INSTRUCTIONS FOR FUTURE USE. Piccolo Stroller Owner’s Manual ©2019 Artsana USA, INC. 07/19 IS0183E_01 www.chiccousa.com… -
Page 2
WARNING Failure to follow all warnings and instructions may result in serious injury or death. For your child’s safety, read the labels and owner’s manual before using the product. • PLEASE SAVE OWNER’S MANUAL • DO NOT use storage basket as a FOR FUTURE USE. -
Page 3
• Before assembly, check that the product and all of its components have not been damaged during transportation. • Do not use accessories, spare parts, or any component not supplied or approved by Chicco as they may make the stroller unsafe. -
Page 4
Components A. — Stroller Frame B. — Front Wheels C. — Cup Holder D. — Canopy… -
Page 5
How to Assemble Stroller WARNING When opening the Stroller, ensure that your child, or other children, are at a safe distance. Ensure that during these operations, the movable parts of the Stroller do not come into contact with your child. If you have hardwood floors or linoleum you may want to perform this step on carpeting… -
Page 6
How to Assemble Stroller 1B. At the same time, pull up on the stroller handle. Place your foot on the rear axle and pull back on the Stroller handle until the Stroller Frame clicks into place. Check to ensure that the Stroller Frame is locked in the open position. -
Page 7
How to Assemble Stroller WARNING Check that the wheels are fitted correctly. 2. Attach the Front Wheel (B) to the Stroller Frame by lining up and inserting the Front Wheel Post into the opening on the frame, as shown. Repeat for the other side. Make sure both Wheels are secure by pulling down on Wheel assemblies. -
Page 8: Front Wheel Swivel Lock
Front Wheel Swivel Lock 3. To engage the swivel lock, pull up on both wheel levers to lock the wheels in place. To unlock the Front Wheels and allow them to swivel, press down on both wheel levers. “CLICK!” “CLICK!”…
-
Page 9
How to Remove Front Wheels 4. Remove the Front Wheels by pressing the Release button on the inside of the front wheel, as shown. At the same time, pull the Front Wheel off of the Stroller Frame. Repeat for the other side. Release Button… -
Page 10
How to Attach the Canopy 5. To attach the canopy (D), insert the canopy frame ends into the canopy mounts, as shown. -
Page 11
How to Attach the Canopy 6. Attach 2 snap buttons on the side of the canopy, as shown. Repeat for the other side. To remove, repeat steps 5 thru 6 in REVERSE. -
Page 12
How to Use the Canopy 7A. Pull the front edge of the Canopy forward to open the Canopy. Reverse this step to close the Canopy. For extra coverage, extend the Canopy extension (7B). -
Page 13
How to Use the Canopy 8. To open the Canopy window, lift up on the flap on the top of the Canopy. To close the Canopy window attach the magnet inside the fabric flap to the magnet on the back of the Canopy, as shown. -
Page 14
How to Recline the Seat 9. To Recline the Backrest, squeeze both buttons on Recline Adjuster and pull down until you reach the desired position. To adjust the Backrest into an upright position, pull out on both recline straps. -
Page 15
How to Attach Cup Holder 10. To attached the Cup Holder (C), locate the cup holder attachment on the Stroller Frame. Insert the Cup Holder wire hook into the cup holder attachment, as shown. Press down on the wire hook to make sure the Cup Holder is fully seated into the cup holder attachment. -
Page 16
How to Use the Brakes WARNING Always apply brakes whenever the stroller is stationary. Never leave the stroller on a sloped surface, with a child onboard, even with the brakes applied. 11. To engage the Stroller brakes, push down on the RED brake lever (11A) to lock the Rear Wheels. -
Page 17
How to Use Safety Harness WARNING This stroller features three harness positions. Always use a harness position located ABOVE the child’s shoulder line. If multiple harness positions are above the child’s shoulder line, use the one closest to it. 12. The Shoulder Straps can be adjusted to 3 height positions as shown. -
Page 18
How to Use Safety Harness 13A. To adjust the Shoulder Strap, slide the end of the strap through harness clip, remove the shoulder pad, and thread the strap through the opening on the seat back. -
Page 19
How to Use Safety Harness 13B. Re-insert the Shoulder Strap into the correct opening on the seat back, and pull it through. Make sure the strap is not twisted. Re-attach the shoulder pad and thread the strap into the harness clip. -
Page 20
How to Use Safety Harness 14. To secure your child, guide the child’s arm through the waist belt and shoulder strap. Insert the waist belt clip into the crotch strap buckle. Repeat for the other side. Pull on both sides to make sure the Clips are secured to the Buckle. -
Page 21
How to Use Safety Harness WARNING Never leave child unattended. Avoid serious injury from falling or sliding out. Always use seat belt. 15. Unbuckle Safety Harness by pressing the button on the center of the crotch strap buckle. Pull out both waist belt clips. -
Page 22
How to Use Safety Harness 16. The length of the Shoulder Straps and Crotch Strap can be adjusted by pulling on the adjustment buckles to tighten or loosen. The length of the waist straps can be adjusted. Press the tab at the end of the Waist Strap Clip and pull on the strap to tighten or loosen, to better fit your child. -
Page 23: How To Fold Stroller
How to Fold Stroller WARNING When folding the Stroller, make sure that your child and other children are at a safe distance. Ensure that during the operations, the movable parts of the Stroller do not come in contact with your child. 17.
-
Page 24
How to Remove Basket 18. To remove the Basket, undo both snap buttons, as shown. Repeat for the other side, and remove. Reverse this step to re-attach the basket. -
Page 25
How to Remove Seat Fabric 19A. To remove the Seat Fabric, release 7 button holes on one side of the Stroller Frame, as shown. Repeat for the other side. 19B. Pull the fabric from the brackets on both sides of the seat, as shown. -
Page 26
How to Remove Seat Fabric 20. Undo 2 D-ring straps on the FRONT and BACK of the Stroller, as shown. Then locate and undo the hook and loop tab at the BACK of the stroller. Back Front View View… -
Page 27
How to Remove Seat Fabric 21. Unbuckle the harness straps and thread the shoulder straps through the back rest (refer to step 11). Pull up on the corner of the seat back and remove the seat fabric from the stroller frame, as shown. -
Page 28: Cleaning And Maintenance
Cleaning and Maintenance This product requires regular maintenance. The cleaning and maintenance of the stroller must only be carried out by an adult. CLEANING Clean the seat fabric and canopy by hand with a sponge or soft cloth using warm water and mild soap. Pat dry with a clean, dry towel. Allow to air dry. Periodically wipe clean plastic parts with a soft damp cloth.
-
Page 29
For More Information If you have any questions or comments about this product, or are missing any of the parts please do not return this product to the store. Contact us in one of the following ways: (877)-424-4226 info.usa@artsana.com www.chiccousa.com 1826 William Penn Way Lancaster, PA 17601… -
Page 30
www.chiccousa.com…
Ниже вы можете найти все модели Chicco Детские коляски, для которых у нас имеются руководства. Также вы можете ознакомиться с часто задаваемыми вопросами в нижней части страницы для получения полезных советов о вашем изделии. Ваша модель отсутствует в списке? Свяжитесь с нами.
Ваше устройство неисправно, и в руководстве отсутствует решение? Перейдите в Repair Café для получения бесплатных ремонтных услуг.
- Chicco 4 Me Детская коляска
- Chicco Best Friend Детская коляска
- Chicco Echo Детская коляска
- Chicco Enjoy Fun Детская коляска
- Chicco Goody Детская коляска
- Chicco i-Move Детская коляска
- Chicco Lite Way Детская коляска
- Chicco Liteway 3 Детская коляска
- Chicco Living Smart Детская коляска
- Chicco Living Детская коляска
- Chicco Miinimo Детская коляска
- Chicco Ohlala Twin Детская коляска
- Chicco Simplicity Детская коляска
- Chicco Skip Детская коляска
- Chicco Trio Love Детская коляска
- Chicco Trolley Me Детская коляска
Часто задаваемые вопросы
Наша служба поддержки выполняет поиск полезной информации по изделиям и отвечает на часто задаваемые вопросы. Если вы заметили неточность в наших часто задаваемых вопросах, сообщите нам об этом с помощью нашей контактной формы.
Каковы плюсы и минусы использования надувных шин на коляске? Проверенный
Самым большим преимуществом пневматических шин для коляски является то, что они очень удобны как для ребенка, так и для человека, толкающего коляску. Пневматические шины обеспечивают амортизацию на неровных поверхностях, таких как лес или пляж. Недостаток в том, что пневматические шины могут спуститься.
Это было полезно (154)
Каковы плюсы и минусы использования сплошных шин на коляске? Проверенный
Цельные шины делают коляску очень маневренной. Недостатком является то, что цельнолитые шины обеспечивают меньшую амортизацию и поэтому менее удобны, чем пневматические или поролоновые шины.
Это было полезно (88)
Каковы плюсы и минусы использования резиновых покрышек на коляске? Проверенный
Самым большим преимуществом шин из пеноматериала для коляски является то, что они не могут спуститься. Поролоновые шины дают немного меньше демпфирования, чем пневматические шины, но более удобны, чем сплошные шины. Во многих современных колясках используется комбинация сплошных шин спереди и поролоновых шин сзади, что делает коляску маневренной и удобной.
Это было полезно (87)
перейти к содержанию
Коляска Chicco Goody Plus

ПРЕДУПРЕЖДЕНИЕ: Автомобиль подходит для детей до 22 кг или 4 лет, в зависимости от того, что наступит раньше.
ПРЕДУПРЕЖДЕНИЕ: Этот продукт не подходит для бега или катания на коньках.
ВЕС
- МАКС 22 кг
В ФОКУСЕ


ПАССЕДЖИНО
- БРОДЯГА
- ПУССЕТ
- SPORTWAGES
- ПАССАЖИРСКАЯ ТЕЛЕЖКА
- СИЛЬЯ-ДЕ-ПАСЕО
www.chicco.com/recycle
Artsana SpA – Via Saldarini Catelli, 1 22070 Grandate (Como) – Италия
www.chicco.com
Сделано в Китае
Для Великобритании: ARTSANA UK LTD Building 1, 2nd Floor, Imperial Place, Maxwell Road, Borehamwood, Hertfordshire, WD6 1JN
Ресепшн.uk@artsana.com 0208 953 6627
www.chicco.co.uk – www.chiccopares.co.uk
Документы / Ресурсы
Рекомендации
-
Bookmarks
Quick Links
���� ������ ��� �������� ��� ������� �����
���� ������ ����� �������� ��� ������� �����
• ISTRUZIONI D’USO
• MODE D’EMPLOI
• GEBRAUCHSANLEITUNG
• INSTRUCTIONS FOR USE
• INSTRUCCIONES DE USO
• INSTRUÇÕES PARA A UTILIZAÇÃO
• GEBRUIKSAANWIJZINGEN
• ANVÄNDNINGSINSTRUKTIONER
S3 BLACK
• NÁVOD K POUŽITÍ
• INSTRUKCJE SPOSOBU
UŻYCIA
• ΟΔΗΓΙΕΣ ΧΡΗΣΗΣ
• KULLANIM BİLGİLERİ
• ИНСТРУКЦИЯ ПО ЭКСПЛУАТАЦИИ
•
Related Manuals for Chicco S3 Black
Summary of Contents for Chicco S3 Black
-
Page 1
S3 BLACK ���� ������ ��� �������� ��� ������� ����� ���� ������ ����� �������� ��� ������� ����� • ISTRUZIONI D’USO • NÁVOD K POUŽITÍ • MODE D’EMPLOI • INSTRUKCJE SPOSOBU • GEBRAUCHSANLEITUNG UŻYCIA • INSTRUCTIONS FOR USE • ΟΔΗΓΙΕΣ ΧΡΗΣΗΣ • INSTRUCCIONES DE USO •… -
Page 3
� � �… -
Page 6
S3 BLACK находилась под солнцем, прежде чем усадить в неё ребёнка подождите, пока она не остынет. Длительное нахождение под солнцем может изменить цвет материалов и тканей ВНИМАНИЕ коляски. ОЧЕНЬ ВАЖНО: ЧТОБЫ ОБЕСПЕЧИТЬ БЕЗОПАСНОСТЬ ПРИ • Не пользоваться изделием, если отдельные его части… -
Page 7
КАК РАСКРЫТЬ/ЗАКРЫТЬ ПЕРЕДНЮЮ ПОДСТАВКУ ДЛЯ НОГ 14. Затем сцепите 5 крючков с защёлкой, которые находятся Чтобы уменьшить габаритные размеры прогулочной коляски, на чехле, с крючками на раме, выполняя действия так, как она поставляется с закрытой передней подставкой для ног. изображено на рисунке 14. ВНИМАНИЕ: Как… -
Page 8
коляски, как изображено на рисунке 29. Чтобы снять капюшон, соответствующие инструкции по эксплуатации. достаточно провести сцепочный механизм в обратном ВНИМАНИЕ: только те детские кресла и люльки CHICCO, направлении. которые оснащены системой CLIK CLAK, могут быть укреплены 30. Чтобы раскрыть капюшон, толкните вперёд переднюю… -
Page 9
а затем потяните на себя оба спусковых крючка. Создайте носком ноги рычаг на “педаль”, чтобы облегчить складывание, Via Saldarini Catelli 1 — 22070 Grandate COMO – ITALY и одновременно толкните ручку вперёд. Пргулочная коляска Тел: +39 031 382 086 — www.chicco.com 47 47… -
Page 10
• ISTRUZIONI D’USO rosso: • MODE D’EMPLOI pantone 186 C • GEBRAUCHSANLEITUNG • INSTRUCTIONS FOR USE • INSTRUCCIONES DE USO • INSTRUÇÕES PARA A UTILIZAÇÃO • GEBRUIKSAANWIJZINGEN logo chicco con trapping sul pallino rosso • ANVÄNDNINGSINSTRUKTIONER… -
Page 11
CLIC… -
Page 15: Инструкция По Эксплуатации
• ВНИМАНИЕ: эта люлька может быть ис- плуатации “KIT TRIO CAR”, чтобы получить пользована совместно только с про- информацию касательно крепления “KIT гулочными колясками CHICCO, которые TRIO CAR” на люльке, установки люльки оснащены системой крепления CLIK в автомобиле и её использования в по- CLAK.
-
Page 16: Использование Капюшона
Периодически чистить пластмассовые части из- удобными крючками (рис. 4 A). делия с помощью влажной ткани. Внимание — используйте только игрушки Chicco со Если на металлические части изделия попала вода, следующими кодами: 71328, 71329, 71330. необходимо вытереть её, чтобы не допустить об- Для…
-
Page 17
ИСПОЛЬЗОВАНИЕ ПЕРЕНОСНОЙ ЛЮЛЬКИ В КАЧЕСТВЕ КОЛЯСКИ Эта люлька может использоваться в качестве коляски, будучи установленной на детские прогулочные коляски Chicco, снабженные системой » Clik Clak «. ПРИСТЕГИВАНИЕ ПЕРЕНОСНОЙ ЛЮЛЬКИ К ДЕТСКОЙ ПРОГУЛОЧНОЙ КОЛЯСКЕ Подготовьте детскую прогулочную коляску, снаб- женную системой Clik Clak, чтобы на нее можно…
(Ocr-Read Summary of Contents of some pages of the Chicco SterilNatural 3in1 Document (Main Content), UPD: 07 August 2023)
-
78, ȟȖȖ’6—4*;&Ȗ$0.1″$5ȏțȖȚȍȏȍȠȓȒȍțȓȚȜȘȞȖȠȓȧȓȝȟȓșȍ ȖȖșȖȕȍȣȞȍțȏȍȧȖȭȘȍȎȓșG ǮȜȒȟȡȦȓȠȓțȍȐȞȓȏȍȠȓșțȍȠȍȝșȍȟȠȖțȍȏȍțȖȥȘȍFȤȓțȠȞȍș- țȍȠȍȥȍȟȠDȘȍȟȓȠȘȍȠȍCȖȘȍȝȍȘȍBȟȚ…
-
26, TPOEFSTWPSTJDIUJHVN[VWFSIJOEFSOEBTTQMÚU[MJDIIFJFS%BNQGBVTUSJUU PEFSIFJFT8BTTFSIFSBVTUSPQGUXBT[V7FSCSFOOVOHFOGàISFOLÚOOUF WARNUNG %BT(FSÊUTFJO;VCFIÚSVOEEJF7FSQBDLVOHTFMFNFOUF1MBTUJLCFVUFM4DIBDIUFMO,BSUPOTVTXTJOELFJO4QJFM[FVHVOENàTTFOEBIFS TUFUTBVFSIBMCEFS3FJDIXFJUFWPO,JOEFSOBVGCFXBISU�…
-
114, t»GFSUŸUMFOÓUÏTJDJLMVTWÏHF[UÏWFMBLÏT[àMÏLCFOUÈSPMUWÓ[ÏTB LÏT[àMÏL GFMTŸCVSLPMBUBOBHZPOGPSSØMFIFU.JOEJHOBHZPOØWBUPTBOEPMHP[[POB LÏT[àMÏLLFMIPHZFMLFSàMKFB[ÏHÏTJTÏSàMÏTFLFU t’JHZFMNF[UFUÏT.JOEFOGFSUŸUMFOÓUÏTJDJLMVTWÏHÏOMFHBMÈCCOÏIÈOZQFS- DFUWÈSKPONJFMŸUUMFWFT[JBGFEŸU�…
-
86, Данное изделие соответствует директиве 2012/19/ЕU. Приведенный на приборе символ перечеркнутой корзины обозначает, что в конце срока службы это изделие, которое следует сдавать в утиль отдельно от домашних отходов, не- обходимо с�…
-
19, AVERTISSEMENT -BQQBSFJMTFTBDDFTTPJSFTFUMFTÏMÏNFOUTEFMFNCBMMBHFTBDIFUTFOQMBTUJRVFCPÔUFTFODBSUPOFUDOFTPOUQBTEFTKPVFUTFUOFEPJWFOU EPODQBTÐUSFMBJTTÏTËMBQPSUÏFEFTFOGBOUTQBSDFRVJMTDPOTUJUVFOUVOFTPVSDFEFEBOHFSQPUFOUJFM »WBOUEVUJMJTFSMBQQBSFJMUPVKPVST�…
-
87, Chicco SterilNatural 3in1 CZ Návod k použití 1żFEQPVäJUÓNTJQP[PSOŞQżFŘUŞUFUFOUPOÈWPEBVMPäUFKFKQSPQżÓQBEOÏEBMÝÓQPVäJUÓ BEZPEČNOSTNÍ UPOZORNĚNÍ UPOZORNĚNÍ! t5FOUPQżÓTUSPKKFVSŘFOWâISBEOŞQSPEPNÈDÓQPVäJUÓBKFQPUżFCBTOÓN[B- DIÈ[FUWTPVMBEVTVäJWBUFMTLâNJQPLZOZ/FQPVäÓWFKUFQSPKJOÏOFäTUBOP- WFOÏÞŘFMZ�…
-
90, SterilNatural 3 v 1 Elektrický parní modu- lární sterilizátor 7ÈäFOâ[ÈLB[OÓLV EŞLVKFNF7ÈNBCMBIPQżFKFNFL7BÝÓWPMCŞ&MFLUSJDLâQBSOÓNP- EVMÈSOÓTUFSJMJ[ÈUPS4UFSJM/BUVSBMWTFEÓLZTWâNUżFNLPOmHV- SBDÓN’6—4*;&$0.1″$5B.*$308″7&QżJ[QƉTPCVKFEF[JOm- LPWBOâNQżFENŞUƉNBWLVDIZOJ[BCÓSÈNÈMPNÓTUB 3ZDIMâ…
-
20, SterilNatural 3 en 1 Stérilisateur électrique à vapeur modulable $IFSDMJFOU /PVTWPVTSFNFSDJPOTFUWPVTGÏMJDJUPOTEFWPUSFDIPJY-FTUÏ- SJMJTBUFVS ÏMFDUSJRVF Ë WBQFVS NPEVMBCMF 4UFSJM/BUVSBM FO TBEBQUFBVYPCKFUTËTUÏSJMJTFSPDDVQBOUVOFTQBDFSÏEVJUEBOT MB DVJTJOF HSÉDF BVY DPOmHVSBUJPOT ‘6— 4*;& $0.1″$5 FU …
-
117, */%¶5«4-&«—¶5«4 HPNC H CBM PMEBMJ HPNC QJSPT KFM[ŸGÏ- OZFLJHZVMMBEKFMF[WFIPHZBLÏT[àMÏLNFMFHT[JL»KFM[ŸGÏOZB GFSUŸUMFOÓUÏTJDJLMVTUFMKFTJEŸUBSUBNBBMBUUÏHWFNBSBE»DJLMVT WÏHF[UÏWFMBLJKFM[ŸO HNFHKFMFOJL B HŸ[JLPO �…
-
88, 5VUPPQFSBDJQSPWÈEŞKUFWäEZTNBYJNÈMOÓPQBUSOPTUÓBCZTUFTOÓäJMJSJ[JLP OFŘFLBOÏIPÞOJLVIPSLÏQÈSZOFCPTLBQÈWÈOÓWFMNJUFQMÏWPEZKFäCZ NPIMBCâU[ESPKFNQPQÈMFOJO t/JLEZOF[BLSâWFKUFPUWPSWâTUVQVQÈSZOBDIÈ[FKÓDÓTFWIPSOÓŘÈTUJWÓLB t1żÓTUSPK[ÈTUSŘLVBOJOBQÈKFDÓLBCFM WäÈEOÏNQżÓQBEŞ OFQPOPżVKUFEP WPEZ�…
-
36, Chicco SterilNatural 3in1 36 una vez a la semana, o cada vez que se noten acumulaciones de DBMFOMBQMBODIBDBMFOUBEPSBDVCBFPFOMBCBTFEFTNPOUBCMF QBSBNJDSPPOEBTJ 7JFSUBFO MB QMBODIBDBMFOUBEPSBDVCB FP FO MB CBTF EFT- NPOUBCMFQBSBNJDSPPOEBTJNMEFVOBTPMVDJØOEFWJOBHSF blanco y agua en proporciones iguales. %FKFBDUVBSIBTUBRVFMBDBMTF…
-
140, 3FW «SUTBOB4Q»4BMEBSJOJ$BUFMMJ(SBOEBUF$0*UBMZ XXXDIJDDPDPN
… -
85, УХОД И ОЧИСТКА ǭȣșȍȒȖȠȓȍȝȝȍȞȍȠȝȓȞȓȒȏȩȝȜșțȓțȖȓȚȘȍȘȖȣșȖȎȜȜȝȓȞȍ- ций. ǰșȓȗȠȓȜȟȠȍȏȦȡȬȟȭȥȍȟȠȪȏȜȒȩȞȖȟȟȜȎșȬȒȍȭȜȟȠȜȞȜȔ- țȜȟȠȪȏȘȜțȢȖȐȡȞȍȤȖȭȣ’6—4*;&Ȗ$0.1″$5ȥȠȜȎȩțȓȕȍȚȜ- ȥȖȠȪȏȖșȘȡȖȖșȖȦțȡȞȝȖȠȍțȖȭ�…
-
108, Chicco SterilNatural 3in1 BQBSBUBNPHVCJUJWSMPWSVŗJ1SJQB[JUFOBUPLBLPCJTUFJ[CKFHMJPQFLPUJOF t1BäOKBQSJŘFLBKUFLPKVNJOVUVQSJKFTLJEBOKBQPLMPQDBOBLSBKVDJLMVTBJUP VWJKFLSBEJUFPQSF[OPLBLPCJTUFTNBOKJMJSJ[JLPEJ[OFOBEOPHJ[MBTLBWSVŗF QBSFJMJLBQBOKBWSMPWSVŗFWPEFÝUPCJNPHMPV[SPLPWBUJPQFLMJOF�…
-
79, Този продукт е в съответствие с Директива 2012/19/ЕС Символът, изобразяващ зачертан контейнер, поставен вър- ху уреда посочва, че апарата, след крайната му употреба, поради необходимостта да бъде третиран отделно от дома- кинските …
-
39, QSPEV[WBQPSRVFOUFUPNFPNÈYJNPDVJEBEPQBSBOÍPSFNPWFSBUBN- QBEPBQBSFMIPFPVBQSPYJNBS PT NFNCSPTPVP SPTUPBPPSJGÓDJP EF TBÓEBEPWBQPSMPDBMJ[BEPOBUBNQBQFSJHPEFRVFJNBEVSB t/PmOBMEPDJDMPEFGVODJPOBNFOUPBÈHVBOFMFDPOUJEBFBTVQFSGÓDJF TVQFSJPSEPBQBSFMIPQPEFSÍPmDBSNVJUPRVFOUFT5PNFDVJEBEPQBSB e…
-
7, 7 SFDDIJPTUBSJTDBMEBOEPFSJNBOFmTTBQFSUVUUBMBEVSBUBEFMDJDMP EJEJTJOGF[JPOF4VMEJTQMBZHBQQBSFMJDPOBEFMWBQPSFmHF JMUFNQPSJNBOFOUFJONJOVUJBMUFSNJOFEFMDJDMP /05″*MSJTDBMEBNFOUPSJDIJFEFDJSDBNJOVUJNFOUSFMBEJTJOGF- [JPOFSJDIJFEFDJSDBNJOVUJ C -B mOF EFM …
-
115, ’JHZFMFN)BÈSBNT[àOFUWBOBLÏT[àMÏLNƆLÚEÏTFLÚ[CFOBGFSUŸUMFOÓUÏTJDJLMVTOFNCJ[UPTIPHZCFGFKF[ŸEJL*MZFOLPSBLÏT[àMÏLCF IFMZF[FUUUÈSHZBLGFSUŸUMFOÓUÏTFOFNCJ[UPTIPHZNFHGFMFMŸFOMF[BKMPUU .JFMŸUULJIÞ[OÈBDTBUMBLP[ØEVHØUFMŸT[ÚSNJOEJHLBQDTPMKBLJBLÏT[àMÏLFUÞHZIPHZB[0/0»#&,*…
-
129, 6WHULO1DWXUDO LQ ㄩⶹ⪇♋⛑㸘㋽㦫⛠㋹ ㎗≜☨⩿ᱶ 㣄わⒷ㺡㥓㠯ㆀ㝗ⓞ⯼㯓ᱨ⏌⛶╱⍙㖸㱱㺶☨⡮ 㨩ᮣ6WHUL1DWXUDO LQㄩⶹ⪇♋⛑㸘㋽㦫⛠㋹⳱㱸㺸 ㈨㺥ᱨ⢗⳯㩖㮔㦫⛠☨㣡㊹♛㸟㽴㔩▙㨏ᱨ㷠㱫ⶥ⭺ 㨏ᱶ)8// 6,=(㨻ᮢ&203$&7㨻⧧0,&52:$9(㨻ᮣ 〉♋㋹㖳㱫╥㝢㐹㸘㋽ⱌ㨾≠㐩ᮢ㢺…
-
8, Chicco SterilNatural 3in1 È pertanto consigliato decalcificare il prodotto almeno una volta alla settimana oppure ogni qual volta si riscontrino depositi di DBMDBSFTVMMBQJBTUSBSJTDBMEBOUFWBTDBFPTVMMBCBTFSFNPWJCJMF QFSNJDSPPOEFJ 7FSTBSFOFMMBQJBTUSBSJTDBMEBOUFWBTDBFPOFMMBCBTFSFNPWJ- CJMFQFSNJDSPPOEFJNMEJVOBTPMV[JPOFEJBDFUPCJB…