-
Contents
-
Table of Contents
-
Troubleshooting
-
Bookmarks
Quick Links
Operation and maintenance manual
Before using the machine, please read the attached operating instructions.
Carefully read the safety rules
Mode d’emploi
Veuillez lire attentivement le mode d’emploi
(notamment les consignes de sécurité) avant d’utiliser l’appareil.
FOR HOUSEHOLD USE ONLY
Related Manuals for Saeco SUP032BR
Summary of Contents for Saeco SUP032BR
-
Page 1
Operation and maintenance manual Before using the machine, please read the attached operating instructions. Carefully read the safety rules Mode d’emploi Veuillez lire attentivement le mode d’emploi (notamment les consignes de sécurité) avant d’utiliser l’appareil. FOR HOUSEHOLD USE ONLY… -
Page 2: Important Safeguards
IMPORTANT SAFEGUARDS When using electrical appliances, basic safety precautions should always be followed to reduce the risk of fire, electric shock, and/or injury to persons, including the following: 1 Read all instructions and information in this instruction book and any other literature included in this carton referring to this product before operating or using this appliance.
-
Page 3
This appliance is for household use only. Any servicing, other than cleaning and user maintenance, should be performed by an authorized service centre. Do not immerse machine in water. To reduce the risk of fire or electric shock, do not disassemble the machine. There are no user serviceable parts inside the machine serviceable by the user. -
Page 4: Table Of Contents
CONTENTS GENERAL INFORMATION … 3 APPLIANCE … 4 … 4 ACCESSORIES INSTALLATION … 5 … 5 STARTING THE MACHINE … 6 SETTING THE LANGUAGE “ ” … 7 AQUA PRIMA WATER FILTER DISPLAY … 8 OPTI DOSE INDICATES THE COFFEE DOSE PER CUP ADJUSTMENTS …
-
Page 5: General Information
GENERAL INFORMATION The coffee machine is suitable for preparing espresso coffee using coffee beans, and it is equipped with a device to dispense steam and hot water. The machine is designed for domestic use only, and is not suitable for heavy or professional use. Warning: no liability is assumed for any damage caused by: •…
-
Page 6: Appliance
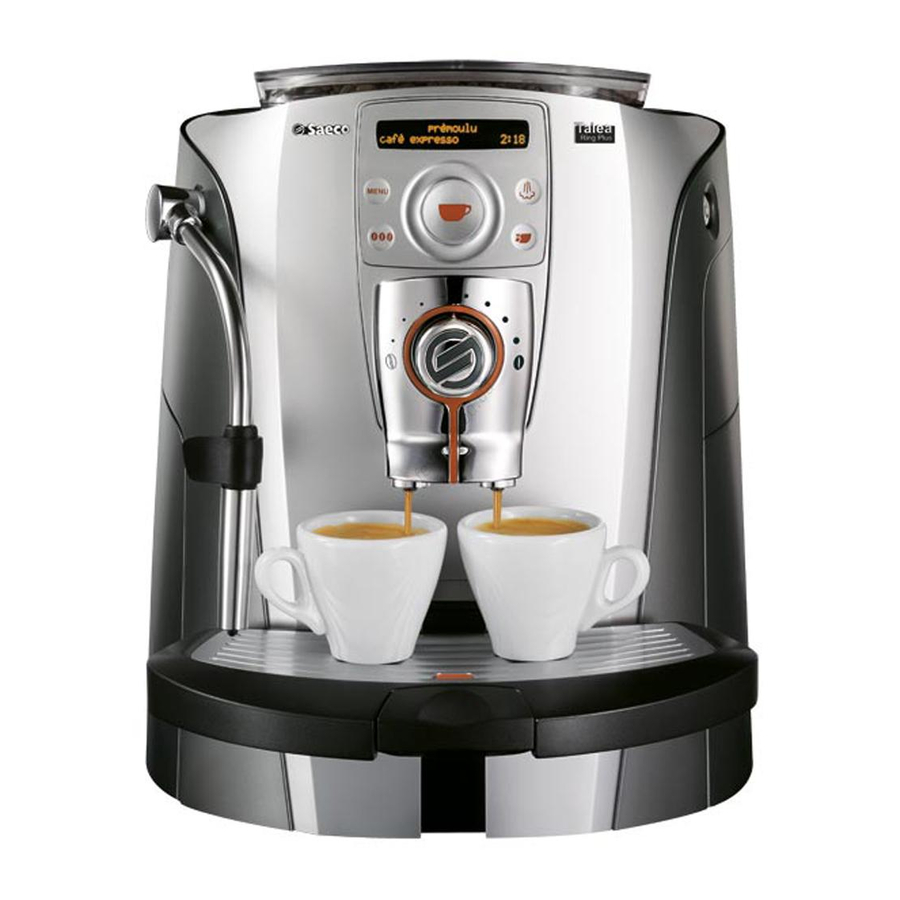
APPLIANCE Cup warming surface Control panel SBS knob Dispensing head Hot water / steam knob Hot water / steam spout Water tank “Milk Island” connection ACCESSORIES “Aqua Prima” Grinder adjustment key Coffee bean hopper Button for raising/lowering the drip tray Socket for power cable Ground coffee Water hardness tester…
-
Page 7: Installation
STARTING THE MACHINE Make sure that the main power button is not pressed in the “ON” position. Remove the coffee bean hopper cover. Fill the hopper with coffee beans. Fill the tank with fresh drinking water. Do not exceed the “max” level indicated on the water tank.
-
Page 8: Setting The Language
INSTALLATION SETTING THE LANGUAGE This allows you to adjust the parameters of the beverages to the typical parameters of the country where the machine is used. This is why some languages are differentiated also by country. language English Talea Ring Plus The machine starts and displays all the messages in the selected language.
-
Page 9: Aqua Prima» Water Filter
“AQUA PRIMA” WATER FILTER To improve the quality of the water you use, and guarantee longer machine life at the same time, it is Remove the “Aqua Prima” Enter the date of the current month. Place a container beneath the steam/hot water spout.
-
Page 10: Display
DISPLAY Accessing the programming menu Click wheel Select the coffee bean dose or the quantity of pre-ground coffee • Press the button twice to make 2 cups. selected espresso coffee order to grind the second serving of coffee. Coffee dispensing is then restarted and completed. (OPTI-DOSE) INDICATES THE GROUND COFFEE QUANTITY It is possible to choose three options (strong, medium and mild) by pressing the…
-
Page 11: Adjustments
COFFEE INTENSITY The SBS system has been carefully designed to give your coffee the intense taste you desire. Simply turn the dial and you will notice that the coffee goes from mild intensity to strong intensity. SBS – SAECO BREWING SYSTEM SBS adjusts the intensity of the brewed coffee.
-
Page 12: Beverage Dispensing
BEVERAGE DISPENSING COFFEE BREWING CAN BE STOPPED AT ANY TIME BY PRESSING THE BUTTON AGAIN. THE STEAM SPOUT MAY REACH HIGH TEMPERATURES: DANGER OF SCALDING. DO NOT TOUCH IT WITH BARE HANDS. Check that all the containers are clean. To carry out this operation, follow the instructions in the “Cleaning and Maintenance”…
-
Page 13: Dispensing Beverages With Ground Coffee
DISPENSING BEVERAGES WITH GROUND COFFEE The machine allows you to use pre-ground and decaffeinated coffee. Pre-ground coffee must be poured into the appropriate compartment positioned next to the coffee bean hopper. Only use coffee ground for espresso machines and never coffee beans or instant coffee. WARNING: ONLY PUT PRE-GROUND COFFEE INTO THE COMPARTMENT WHEN YOU WISH TO DISPENSE THIS TYPE OF BEVERAGE.
-
Page 14: Hot Water Dispensing
BEVERAGE DISPENSING HOT WATER DISPENSING DISPENSING MAY BE PRECEDED BY SHORT SPURTS OF HOT WATER AND SCALDING IS POSSIBLE. THE HOT WATER/STEAM SPOUT MAY REACH HIGH TEMPERATURES: DO NOT TOUCH IT WITH BARE HANDS. USE THE APPROPRIATE HANDLE ONLY. Place a container beneath the steam/hot water spout.
-
Page 15: Dispensing Steam
DISPENSING STEAM DISPENSING MAY BE PRECEDED BY SHORT SPURTS OF HOT WATER AND SCALDING IS POSSIBLE. THE HOT WATER/STEAM SPOUT MAY REACH HIGH TEMPERATURES: DO NOT TOUCH IT WITH BARE HANDS. USE THE APPROPRIATE HANDLE ONLY. Place a container with the beverage to be warmed up beneath the steam spout.
-
Page 16: Making Cappuccino
BEVERAGE DISPENSING MAKING CAPPUCCINO DISPENSING MAY BE PRECEDED BY SHORT SPURTS OF HOT WATER AND SCALDING IS POSSIBLE. THE HOT WATER/STEAM SPOUT MAY REACH HIGH TEMPERATURES: DO NOT TOUCH IT WITH BARE HANDS. USE THE APPROPRIATE HANDLE ONLY. Fill 1/3 of the cup with cold milk. Turn the knob to the position.
-
Page 17: Milk Island Optional )
This device, which may be purchased separately, enables you to easily and comfortably prepare delicious cappuccinos. Warning: before using the Milk Island, read the manual and all precautions carefully for correct use. Important note: the quantity of milk in the carafe must never be below the “MIN” minimum level nor exceed the “MAX”…
-
Page 18: Beverage Programming
BEVERAGE PROGRAMMING Every beverage can be programmed according to your individual tastes. 1. PROGRAMMING FOR SELF-LEARNING You can program the quantity of coffee and/or milk you wish to be dispensed into the cups when you press the button for any beverage. Select the type of beverage you want to program, then press and hold the (for example): programming…
-
Page 19
Check that the water and coffee bean container are full; place the cup under the dispensing head. espresso coffee Select the beverage to program. Press the espresso coffe Change the coffee quantity by navigating the click wheel with your prebrewing: normal espresso coffee Press the button to select the… -
Page 20: Programming The Machine
PROGRAMMING THE MACHINE Some of the machine’s functions can be programmed to customize operations according to your individual preferences. 1 Press the beverage settings Beverage setting (see page 16) machine settings Machine settings (see page 19) maintenance Maintenance (see page 25) beverage settings button.
-
Page 21: Machine Settings
MACHINE SETTINGS To change the machine’s operation settings, press the set the menu language. water hardness set the water hardness. acoustic alarm set/activate the acoustic alarms. filter alert activate/deactivate the “Aqua Prima” To exit any level of “machine settings” without saving the changes made, press the “LANGUAGE”…
-
Page 22: Water Hardness Menu
PROGRAMMING THE MACHINE “WATER HARDNESS” MENU > machine settings > water hardness With the “Water hardness” function you can adapt your machine to the degree of hardness of the water you use, so that the machine will request descaling at the right moment. Hardness is expressed on a scale from 1 to 4.
-
Page 23: Filter Alarm Menu
“FILTER ALARM” MENU > machine settings > filter alert machine settings “RINSE” MENU > machine settings > rinsing The rinse setting cleans the internal circuits in order to guarantee that the beverages are only made with fresh water. The function is enabled as default by the manufacturer. Note: This rinse cycle is performed every time the machine is turned on after the warming phase.
-
Page 24
PROGRAMMING THE MACHINE “CLOCK SETTING” MENU > machine settings > clock setting To set the current time, date and hour format to display. machine settings Time setting > machine settings > clock setting > time setting To set the current time on the machine clock setting 2.7.1 time setting… -
Page 25: Time Format
Time format > machine settings > clock setting > time format To set the time view mode. This setting adjusts all clock functions to either “am/pm” or “24 hour” formats. clock setting 2.7.2 time format Date setting > machine settings > clock setting > date setting To set the date (day, month, year, day of the week).
-
Page 26: Clock Setting » Menu
PROGRAMMING THE MACHINE 2.7.3 date setting tuesday 18/04/06 Select the month and press the Date format > machine settings > clock setting > date format setting the date. clock setting 2.7.4 time format DD/MM/YYYY 2.7.3 date setting tuesday 18/04/06 Select the year and press the 2.7.4 time format DD/MM/YYYY…
-
Page 27: Water Filter » Menu
MAINTENANCE To access the machine’s maintenance programs, press the water filter “WATER FILTER” MENU > maintenance > water filter maintenance Litres remaining > maintenance > water filter > litres left maintenance descaling water filter water filter MAINTENANCE button, select “maintenance” and press group wash wash the Brew Group.
-
Page 28: Maintenance
MAINTENANCE Filter state > maintenance > water filter > filter status maintenance Select by navigating the click It is possible to set: — on — off Press the button to save. Load filter > maintenance > water filter > activate filter maintenance Place a container beneath the steam spout.
-
Page 29: Descaling» Menu
“DESCALING” MENU > maintenance > descaling maintenance Litres remaining > maintenance > descaling > litres left To display how many litres of water can still be used before the machine requests a descaling cycle. maintenance Descaling cycle > maintenance > descaling > execute now To perform the automatic descaling cycle.
-
Page 30
MAINTENANCE Note: before beginning the descaling cycle make sure that: 1. a large enough container is positioned under the water spout; 2. THE “AQUA PRIMA” FILTER HAS BEEN REMOVED. maintenance Descaling is carried out at a controlled temperature. If the machine is cold, you must wait until it has reached the right temperature;… -
Page 31
descaling cycle please wait The machine begins to dispense the descaling solution through the hot water spout. The dispensing occurs at predetermined intervals, in order to allow the solution to be more effective. Insert the tank with fresh drinking water. rinse cycle ok to start cycle Rinse the machine’s circuits by… -
Page 32: Brew Group Washing
Brew Group Washing > maintenance > group wash To clean the machine’s internal circuits used for brewing coffee. To wash the Brew Group, simply clean with water as shown on page 35. This wash completes maintenance of the Brew Group. We recommend using Saeco tablets, which can be purchased separately.
-
Page 33: Programming The Machine
ENERGY SAVING To adjust the energy saving parameters, press the turn-off delay Set the time which must pass after the last product dispensing before the machine enters the energy saving mode. timer setting Enable/disable the machine’s turn on/ off times programmed for the days of the week.
-
Page 34: Monday» Timer Setting
“MONDAY” TIMER SETTING > energy saving > monday This and the following menus are used to set the turn on/off times for each day of the week. The procedure described below shows how to set the turn on/off times for “Monday”. To set the turn on/off times for the other days of the week, follow the same procedure after selecting the desired day.
-
Page 35: Special Functions
SPECIAL FUNCTIONS This menu allows you to access special functions present on the machine. Press the button to access and select “special function” and press the RESTORE SETTINGS > special function > reset settings The function for restoring all the factory settings is contained in this menu. This function is particularly important for restoring the basic parameters.
-
Page 36: Cleaning And Maintenance
CLEANING AND MAINTENANCE GENERAL MACHINE CLEANING The cleaning described below must be performed once a week. Note: if water remains in the tank for several days, do not use it. WARNING! Never immerse the machine in water. If you remove grounds with the machine off or when not signaled on the display, the count of the grounds emptied into the drawer is not reset.
-
Page 37: Cleaning The Brew Group
CLEANING THE BREW GROUP The Brew Group must be cleaned at least once a week. Wash the Brew Group with warm water. WARNING! Do not wash the Brew Group with detergents that can compromise its correct operation. Do not wash in the dishwasher. Open the service door and remove the coffee grounds drawer.
-
Page 38: Error Codes
ERROR CODES GUIDE MESSAGE THAT APPEARS out of service (xx) restart to fix… close coffee bean lid fill container wth coffee insert the brew group insert grounds drawer empty grounds empty grounds drawer close door fill the water tank. empty the drip tray change the filter carafe missing milk island missing…
-
Page 39: Troubleshooting
ROBLEMS The machine does not turn on. Hot water or steam is not dispensed. Coffee has little crema. Brew Group does not come out. Coffee is not brewed. Coffee is brewed slowly. Coffee leaks out of the dispensing head. Please contact the service centre for any problems not covered in the above table or when the suggested solutions do not solve the problem.
-
Page 40: Safety Rules
SAFETY RULES IN CASE OF EMERGENCY IMMEDIATELY UNPLUG THE CORD FROM THE OUTLET. ONLY USE THE APPLIANCE • Indoors. • For preparing coffee, hot water and for frothing milk. • For domestic use. • By adults in non altered psycho-physical conditions. PRECAUTIONS FOR THE USE OF THE MACHINE •…
-
Page 41: Replacement Parts
DANGERS • The appliance must not be used by children and persons who have not been informed of its operation. • The appliance is dangerous to children. When left unattended, unplug from the electrical outlet. • Keep the coffee machine packaging out of the reach of children. •…
-
Page 42: Technical Data
TECHNICAL DATA TECHNICAL DATA Nominal voltage Power rating Power supply Shell material Size (w x h x d) Weight Cable length Control panel Water tank Coffee bean hopper capacity Pump pressure Boiler Coffee grinder Quantity of ground coffee Grounds drawer capacity Safety devices Subject to engineering and manufacturing changes due to technological developments.
-
Page 44
Lors de l’utilisation d’appareils électriques, il est important de prendre les précautions suivantes, afin d’éviter les décharges électriques, les courts circuits et les accidents corporels. 1 Lire toutes les instructions et les indications données dans cette brochure, ainsi que toute autre information que contient l’emballage, avant de mettre la machine en marche. -
Page 45
PRÉCAUTIONS Machine est réservée à un usage domestique. Tout entretien, en dehors du nettoyage et de l’entretien usuel par l’usager, doit être fait par un centre de service autorisé. Ne pas plonger la base dans l’eau. Pour éviter les courts- circuits et les décharges électriques, ne pas démonter la base. -
Page 46
TABLE DES MATIÈRES GÉNÉRALITÉS … 3 APPAREIL … 4 … 4 ACCESSOIRES MISE EN PLACE … 5 … 5 MISE EN MARCHE DE LA MACHINE … 6 SÉLECTIONNER LA LANGUE « » … 7 FILTRE AQUA PRIMA AFFICHEUR … 8 OPTI DOSE INDICATION DE LA QUANTITÉ… -
Page 47: Généralités
GÉNÉRALITÉS La machine à café est indiquée pour la préparation de café expresso avec du café en grains et dotée d’un dispositif pour la distribution d’eau chaude et de vapeur. Au design elegant, cet appareil a ete conçu exclusivement pour un usage domestique et n’est donc pas indique pour un fonctionnement continu de type professionnel.
-
Page 48: Appareil
APPAREIL Plaque chauffe-tasses Tableau de commande Distributeur Bac d’égouttement + Bouton robinet eau- chaude/vapeur Tuyau de distribution de l’eau chaude/vapeur Réservoir d’eau Raccord « Milk Island » ACCESSOIRES Filtre « Aqua Prima » Clé pour régler la mouture Réservoir à café en grains Touche pour lever/baisser le bac d’égouttement Bac de récupération…
-
Page 49: Mise En Place
MISE EN MARCHE DE LA MACHINE S’assurer que l’interrupteur général n’est pas activé. Retirer le couvercle du réservoir à café. Remplir le réservoir avec du café en grains. Remplir le réservoir avec de l’eau fraîche et potable, en veillant à ne jamais dépasser le niveau maximal marqué…
-
Page 50: Sélectionner La Langue
MISE EN PLACE SÉLECTIONNER LA LANGUE Lors de la première mise en marche de la machine, il faut sélectionner la langue souhaitée ; cela permet d’adapter les paramètres des boissons à ceux du Pays d’utilisation. C’est pourquoi certaines langues sont différenciées aussi en fonction du pays. language English Talea Ring Plus…
-
Page 51: Filtre « Aqua Prima
FILTRE « AQUA PRIMA » Pour améliorer la qualité de l’eau utilisée, tout en garantissant la longévité de l’appareil, il est conseillé régler la date sur le mois en cours. Placer un récipient sous la buse de distribution de l’eau chaude/ vapeur filtre à…
-
Page 52: Afficheur
AFFICHEUR Accéder au menu de programmation Disque de sélection Sélectionner la quantité de café à moudre ou prémoulu • Pour obtenir 2 tasses, appuyer 2 fois sur la touche Cette opération est possible jusqu’à ce que le café de la première sélection soit moulé. sélectionné…
-
Page 53: Réglages
DENSITÉ DU CAFÉ Le dispositif SBS a été spécialement conçu pour permettre de donner la densité et l’intensité de goût SBS – SAECO BREWING SYSTEM Pour régler la densité du café distribué. Le réglage peut également être effectué durant la distribution du café.
-
Page 54: Distribution De La Boisson
DISTRIBUTION DE LA BOISSON LA DISTRIBUTION DE CAFÉ PEUT ÊTRE INTERROMPUE À TOUT MOMENT EN APPUYANT DE NOUVEAU SUR LA TOUCHE LA VAPEUR PEUT ATTEINDRE UNE TEMPÉRATURE ÉLEVÉE : RISQUE DE BRÛLURES. ÉVITER TOUT CONTACT DIRECT AVEC LES MAINS. entretien » (voir page 34). Pour la préparation de 2 tasses, la machine distribue le premier café…
-
Page 55: Distribution De La Boisson Avec Du Café Moulu
DISTRIBUTION DE LA BOISSON AVEC DU CAFÉ MOULU La machine permet d’utiliser du café prémoulu ou décaféiné.Verser le café prémoulu dans le compartiment prévu à cet effet à côté du réservoir à café en grains. Ne verser que du café moulu pour machines à café expresso mais jamais du café…
-
Page 56: Distribution Deau Chaude
DISTRIBUTION DE LA BOISSON DISTRIBUTION D’EAU CHAUDE AU DÉBUT DE LA DISTRIBUTION, FAIRE ATTENTION AU RISQUE DE BRÛLURES CAR IL PEUT Y AVOIR DES ÉCLABOUSSURES D’EAU CHAUDE. LA BUSE POUR LA DISTRIBUTION DE L’EAU CHAUDE/ VAPEUR PEUT ATTEINDRE DES TEMPÉRATURES ÉLEVÉES : ÉVITER DE LA TOUCHER DIRECTEMENT AVEC LES MAINS, UTILISER EXCLUSIVEMENT LA POIGNÉE PRÉVUE À…
-
Page 57: Distribution Vapeur
DISTRIBUTION VAPEUR AU DÉBUT DE LA DISTRIBUTION, FAIRE ATTENTION AU RISQUE DE BRÛLURES CAR IL PEUT Y AVOIR DES ÉCLABOUSSURES D’EAU CHAUDE. LA BUSE POUR LA DISTRIBUTION DE L’EAU CHAUDE/ VAPEUR PEUT ATTEINDRE DES TEMPÉRATURES ÉLEVÉES : ÉVITER DE LA TOUCHER DIRECTEMENT AVEC LES MAINS, UTILISER EXCLUSIVEMENT LA POIGNÉE PRÉVUE À…
-
Page 58: Distribution Cappuccino
DISTRIBUTION DE LA BOISSON DISTRIBUTION CAPPUCCINO AU DÉBUT DE LA DISTRIBUTION, FAIRE ATTENTION AU RISQUE DE BRÛLURES CAR IL PEUT Y AVOIR DES ÉCLABOUSSURES D’EAU CHAUDE. LA BUSE POUR LA DISTRIBUTION DE L’EAU CHAUDE/ VAPEUR PEUT ATTEINDRE DES TEMPÉRATURES ÉLEVÉES : ÉVITER DE LA TOUCHER DIRECTEMENT AVEC LES MAINS, UTILISER EXCLUSIVEMENT LA POIGNÉE PRÉVUE À…
-
Page 59: Milk Island En Option )
Cet accessoire, que l’on peut acheter à part, permet de préparer très facilement et en toute commodité d’excellents cappuccinos. Attention : avant d’utiliser le Milk Island consulter le manuel correspondant contenant toutes les précautions pour une utilisation correcte. Remarque importante : la quantité de lait dans la carafe ne doit pas être inférieure au niveau minimal «…
-
Page 60: Programmation Boisson
PROGRAMMATION BOISSON L’utilisateur peut programmer chaque boisson selon son goût personnel. 1. PROGRAMMATION POUR AUTO-APPRENTISSAGE La quantité de café qui est distribuée dans la tasse chaque fois que l’on appuie sur le bouton peut être programmée rapidement pour toutes les boissons. Après avoir sélectionné…
-
Page 61
réservoir à café en grains soient pleins ; mettre la tasse sous le distributeur. café expresso Sélectionner la boisson à appuyant sur café expresso faisant glisser le doigt sur le disque appuyant sur la touche pré-infusion : normale café expresso Appuyer sur la touche pour sélectionner le paramètre pré-infusion. -
Page 62: Programmation Machine
PROGRAMMATION MACHINE personnelles. 1 Appuyer sur la touche 2 Faire glisser le doigt sur le disque pour : réglage des boissons Réglage des boissons (voir page 16) réglage de la machine Réglage de la machine (voir page 19) entretien Entretien (voir page 25) réglage des boissons sélectionner les fonctions…
-
Page 63: Réglage De La Machine
RÉGLAGE DE LA MACHINE sélectionner « réglages de la machine » et appuyer sur la touche de sélection pour : sélectionner la langue des menus. dureté de l’eau choisir le degré de dureté de l’eau. alertes sonores activer les alertes sonores alerte filtre activer/ désactiver l’alerte Pour quitter la fonction «…
-
Page 64: Menu « Dureté De L’eau
PROGRAMMATION MACHINE MENU « DURETÉ DE L’EAU » > réglage de la machine > dureté de l’eau puisse demander de faire un cycle de détartrage au moment voulu. La dureté est exprimée avec une échelle de 1 à 4. La machine est préréglée sur 3. Plonger dans l’eau la bande de test fournie avec le kit pendant dureté…
-
Page 65: Menu « Alerte Filtre
MENU « ALERTE FILTRE » > réglage de la machine > alerte filtre réglage de la machine MENU « RINÇAGE » > réglage de la machine > rinçage effectuée uniquement avec de l’eau fraîche. Cette fonction est activée par défaut par le fabricant. Remarque : ce rinçage doit être fait après la phase de chauffage à…
-
Page 66: Menu « Réglage De L’horloge
PROGRAMMATION MACHINE MENU « RÉGLAGE DE L’HORLOGE » > réglage de la machine > réglage horloge réglage de la machine Réglage de l’heure > réglage de la machine > réglage horloge > réglage de l’heure Cette fonction permet de régler l’heure actuelle sur la machine réglage horloge 2.7.1 réglage de l’heure 16:54…
-
Page 67
Format heure > réglage de la machine > réglage horloge > format de l’heure réglage horloge 2.7.2 format de l’heure Réglage de la date > réglage de la machine > réglage horloge > réglage de la date Cette fonction permet de régler la date (jour, mois, année, jour de la semaine). réglage horloge 2.7.2 format de l’heure… -
Page 68
PROGRAMMATION MACHINE 2.7.3 réglage de la date mardi 18/04/06 avec la touche Format date > réglage de la machine > réglage horloge > format de la date réglage horloge 2.7.4 format de la date JJ/MM/AAAA 2.7.3 réglage de la date mardi 18/04/06 avec la touche 2.7.4… -
Page 69: Menu Filtre À Eau
ENTRETIEN Pour accéder aux programmes d’entretien de la machine, appuyer sur la touche entretien » et appuyer sur la touche filtre à eau gestion du détartrage. MENU « FILTRE À EAU » > entretien > filtre à eau entretien Litres restants >…
-
Page 70
ENTRETIEN État du filtre > entretien > filtre à eau > état du filtre entretien Sélectionner en glissant le doigt sur le disque de sélection. Il est possible de régler : — activé — désactivé Mémoriser en appuyant sur La charge du filtre >… -
Page 71: Menu Détartrage
MENU « DÉTARTRAGE » > entretien > détartrage Pour gérer le détartrage des circuits de la machine. entretien Litres restants > entretien > détartrage > litres restants de détartrage. entretien Cycle de détartrage > entretien > détartrage > exécuter maintenant Cette fonction permet d’exécuter le cycle automatique de détartrage.
-
Page 72
ENTRETIEN 2. QUE LE FILTRE « AQUA PRIMA » NE SOIT PLUS DANS LE RÉSERVOIR À EAU . entretien Le détartrage a lieu à une température contrôlée. Si la machine est froide, attendre qu’elle arrive à la juste température ; dans le cas contraire, procéder comme suit pour refroidir la chaudière : S’il est nécessaire de chauffer la chaudière, la machine exécute ce processus de façon autonome ;… -
Page 73
cycle de détartrage veuillez patienter La machine commence à distribuer la solution détartrante dans la buse de distribution de l’eau chaude. La distribution a lieu à des intervalles préétablis pour permettre à la Remettre le réservoir contenant de l’eau froide potable dans la machine. -
Page 74: Lavage Du Groupe
Lavage du groupe > entretien > rinçage du groupe Cette fonction permet d’effectuer le nettoyage des circuits internes de l’appareil qui servent à la distribution du café. complète l’entretien du groupe de distribution. Il est conseillé d’utiliser des pastilles Saeco, que l’on peut acheter à…
-
Page 75: Programmation Machine
ÉCONOMIE D’ÉNERGIE Pour régler les paramètres de l’économie d’énergie de la machine, appuyer sur la touche sélectionner « économie d’énergie » et appuyer sur la touche d’un doigt pour : arrêt différé Saisir le temps qui doit s’écouler avant que la machine se mette en économie d’énergie depuis le dernier produit distribué.
-
Page 76: Réglage Minuterie « Lundi
RÉGLAGE MINUTERIE « LUNDI » > èconomie d’énergie > lundi Ce menu et ceux qui suivent servent à régler un horaire d’allumage et d’arrêt pour chaque jour de la semaine. L’exemple reporte la façon de régler l’horaire d’allumage et d’arrêt du « Lundi » ; suivre la même procédure après avoir sélectionné…
-
Page 77: Des Fonctions Spéciales
DES FONCTIONS SPÉCIALES Ce menu permet d’accéder aux fonctions spéciales prévues sur la machine. Pour ce faire, appuyer sur la touche Faire glisser le doigt sur le disque de sélection pour : RÉTABLIR RÉGLAGES > fonctions spéciales > rétablir réglages Ce menu contient la fonction pour rétablir toutes les valeurs réglées en usine.
-
Page 78: Nettoyage Et Entretien
NETTOYAGE ET ENTRETIEN NETTOYAGE GÉNÉRAL DE LA MACHINE Le nettoyage décrit ci-dessous doit être fait au moins une fois par semaine. Remarque : ne pas utiliser de l’eau qui n’a pas été remplacée depuis plusieurs jours. ATTENTION ! Ne pas plonger la machine dans l’eau. Le comptage du marc déposé…
-
Page 79: Nettoyage Du Groupe De Distribution
NETTOYAGE DU GROUPE DE DISTRIBUTION Le groupe de distribution doit être nettoyé au moins une fois par semaine. Laver le groupe de distribution à l’eau tiède. ATTENTION ! Ne pas laver le groupe de distribution avec des détergents qui pourraient affecter son fonctionnement.
-
Page 80: Messages D’erreur
MESSAGES D’ERREUR MESSAGE QUI APPARAÎT hors service (xx) redémarrer pour résoudre… fermer couvercle grains de café introduire café dans réservoir insérer groupe de distribution insérer le tiroir à marc Vider le marc de café vider le tiroir à marc fermer porte remplir le réservoir à…
-
Page 81: Problèmes — Causes — Remèdes
ROBLÈMES La machine ne s’allume pas La machine ne distribue ni eau chaude ni vapeur. Le café ne mousse pas. Le groupe de distribution ne peut pas être démonté. Le café ne coule pas. Le café coule lentement. Le café coule en dehors du distributeur.
-
Page 82: Consignes De Sécurité
CONSIGNES DE SÉCURITÉ EN CAS D’URGENCE N’UTILISER L’APPAREIL • que dans des locaux fermés • que pour la préparation de café, d’eau chaude et de mousse de lait • Que par des adultes dotés d’une bonne constitution physique et mentale. MESURES DE PRÉCAUTION CONCERNANT L’UTILISATION DE L’APPAREIL •…
-
Page 83
DANGERS • Ne pas laisser les enfants se servir de l’appareil. Cette consigne vaut également pour les personnes qui ne connaissent pas le fonctionnement de l’appareil. • L’appareil peut représenter un danger pour les enfants. Si l’appareil est laissé sans surveillance, •… -
Page 84: Données Techniques
DONNÉES TECHNIQUES DONNÉES TECHNIQUES Tension nominale Puissance nominale Alimentation Matériau du corps Dimensions (l x a x p) Poids Longueur du câble Tableau de commande Réservoir d’eau Capacité du réservoir à café Pression de la pompe Chaudière Moulin à café Quantité…
-
Page 88
Saeco International Group S.p.A. Via Torretta, 240 I-40041 Gaggio Montano, Bologna Tel: + 39 0534 771111 Fax: + 39 0534 31025 www.saeco.com The manufacturer reserves the right to change the features of the product without prior notice. Le producteur se réserve le droit d“apporter toutes modifications sans préavis. ©…
Saeco Coffee Makers
SUP032BR Инструкция по эксплуатации
Популярность:
7199 просмотры
Подсчет страниц:
88 страницы
Тип файла:
Размер файла:
5.24 Mb
-
Page 1
Operation and maintenance manual Before using the machine, please read the attached operating instructions. Carefully read the safety rules Mode d’emploi Veuillez lire attentivement le mode d’emploi (notamment les consignes de sécurité) avant d’utiliser l’appareil. FOR HOUSEHOLD USE ONLY… -
Page 2: Important Safeguards
IMPORTANT SAFEGUARDS When using electrical appliances, basic safety precautions should always be followed to reduce the risk of fire, electric shock, and/or injury to persons, including the following: 1 Read all instructions and information in this instruction book and any other literature included in this carton referring to this product before operating or using this appliance.
-
Page 3
This appliance is for household use only. Any servicing, other than cleaning and user maintenance, should be performed by an authorized service centre. Do not immerse machine in water. To reduce the risk of fire or electric shock, do not disassemble the machine. There are no user serviceable parts inside the machine serviceable by the user. -
Page 4: Table Of Contents
CONTENTS GENERAL INFORMATION … 3 APPLIANCE … 4 … 4 ACCESSORIES INSTALLATION … 5 … 5 STARTING THE MACHINE … 6 SETTING THE LANGUAGE “ ” … 7 AQUA PRIMA WATER FILTER DISPLAY … 8 OPTI DOSE INDICATES THE COFFEE DOSE PER CUP ADJUSTMENTS …
-
Page 5: General Information
GENERAL INFORMATION The coffee machine is suitable for preparing espresso coffee using coffee beans, and it is equipped with a device to dispense steam and hot water. The machine is designed for domestic use only, and is not suitable for heavy or professional use. Warning: no liability is assumed for any damage caused by: •…
-
Page 6: Appliance
APPLIANCE Cup warming surface Control panel SBS knob Dispensing head Hot water / steam knob Hot water / steam spout Water tank “Milk Island” connection ACCESSORIES “Aqua Prima” Grinder adjustment key Coffee bean hopper Button for raising/lowering the drip tray Socket for power cable Ground coffee Water hardness tester…
-
Page 7: Installation
STARTING THE MACHINE Make sure that the main power button is not pressed in the “ON” position. Remove the coffee bean hopper cover. Fill the hopper with coffee beans. Fill the tank with fresh drinking water. Do not exceed the “max” level indicated on the water tank.
-
Page 8: Setting The Language
INSTALLATION SETTING THE LANGUAGE This allows you to adjust the parameters of the beverages to the typical parameters of the country where the machine is used. This is why some languages are differentiated also by country. language English Talea Ring Plus The machine starts and displays all the messages in the selected language.
-
Page 9: Aqua Prima» Water Filter
“AQUA PRIMA” WATER FILTER To improve the quality of the water you use, and guarantee longer machine life at the same time, it is Remove the “Aqua Prima” Enter the date of the current month. Place a container beneath the steam/hot water spout.
-
Page 10: Display
DISPLAY Accessing the programming menu Click wheel Select the coffee bean dose or the quantity of pre-ground coffee • Press the button twice to make 2 cups. selected espresso coffee order to grind the second serving of coffee. Coffee dispensing is then restarted and completed. (OPTI-DOSE) INDICATES THE GROUND COFFEE QUANTITY It is possible to choose three options (strong, medium and mild) by pressing the…
-
Page 11: Adjustments
COFFEE INTENSITY The SBS system has been carefully designed to give your coffee the intense taste you desire. Simply turn the dial and you will notice that the coffee goes from mild intensity to strong intensity. SBS – SAECO BREWING SYSTEM SBS adjusts the intensity of the brewed coffee.
-
Page 12: Beverage Dispensing
BEVERAGE DISPENSING COFFEE BREWING CAN BE STOPPED AT ANY TIME BY PRESSING THE BUTTON AGAIN. THE STEAM SPOUT MAY REACH HIGH TEMPERATURES: DANGER OF SCALDING. DO NOT TOUCH IT WITH BARE HANDS. Check that all the containers are clean. To carry out this operation, follow the instructions in the “Cleaning and Maintenance”…
-
Page 13: Dispensing Beverages With Ground Coffee
DISPENSING BEVERAGES WITH GROUND COFFEE The machine allows you to use pre-ground and decaffeinated coffee. Pre-ground coffee must be poured into the appropriate compartment positioned next to the coffee bean hopper. Only use coffee ground for espresso machines and never coffee beans or instant coffee. WARNING: ONLY PUT PRE-GROUND COFFEE INTO THE COMPARTMENT WHEN YOU WISH TO DISPENSE THIS TYPE OF BEVERAGE.
-
Page 14: Hot Water Dispensing
BEVERAGE DISPENSING HOT WATER DISPENSING DISPENSING MAY BE PRECEDED BY SHORT SPURTS OF HOT WATER AND SCALDING IS POSSIBLE. THE HOT WATER/STEAM SPOUT MAY REACH HIGH TEMPERATURES: DO NOT TOUCH IT WITH BARE HANDS. USE THE APPROPRIATE HANDLE ONLY. Place a container beneath the steam/hot water spout.
-
Page 15: Dispensing Steam
DISPENSING STEAM DISPENSING MAY BE PRECEDED BY SHORT SPURTS OF HOT WATER AND SCALDING IS POSSIBLE. THE HOT WATER/STEAM SPOUT MAY REACH HIGH TEMPERATURES: DO NOT TOUCH IT WITH BARE HANDS. USE THE APPROPRIATE HANDLE ONLY. Place a container with the beverage to be warmed up beneath the steam spout.
-
Page 16: Making Cappuccino
BEVERAGE DISPENSING MAKING CAPPUCCINO DISPENSING MAY BE PRECEDED BY SHORT SPURTS OF HOT WATER AND SCALDING IS POSSIBLE. THE HOT WATER/STEAM SPOUT MAY REACH HIGH TEMPERATURES: DO NOT TOUCH IT WITH BARE HANDS. USE THE APPROPRIATE HANDLE ONLY. Fill 1/3 of the cup with cold milk. Turn the knob to the position.
-
Page 17: Milk Island Optional )
This device, which may be purchased separately, enables you to easily and comfortably prepare delicious cappuccinos. Warning: before using the Milk Island, read the manual and all precautions carefully for correct use. Important note: the quantity of milk in the carafe must never be below the “MIN” minimum level nor exceed the “MAX”…
-
Page 18: Beverage Programming
BEVERAGE PROGRAMMING Every beverage can be programmed according to your individual tastes. 1. PROGRAMMING FOR SELF-LEARNING You can program the quantity of coffee and/or milk you wish to be dispensed into the cups when you press the button for any beverage. Select the type of beverage you want to program, then press and hold the (for example): programming…
-
Page 19
Check that the water and coffee bean container are full; place the cup under the dispensing head. espresso coffee Select the beverage to program. Press the espresso coffe Change the coffee quantity by navigating the click wheel with your prebrewing: normal espresso coffee Press the button to select the… -
Page 20: Programming The Machine
PROGRAMMING THE MACHINE Some of the machine’s functions can be programmed to customize operations according to your individual preferences. 1 Press the beverage settings Beverage setting (see page 16) machine settings Machine settings (see page 19) maintenance Maintenance (see page 25) beverage settings button.
-
Page 21: Machine Settings
MACHINE SETTINGS To change the machine’s operation settings, press the set the menu language. water hardness set the water hardness. acoustic alarm set/activate the acoustic alarms. filter alert activate/deactivate the “Aqua Prima” To exit any level of “machine settings” without saving the changes made, press the “LANGUAGE”…
-
Page 22: Water Hardness Menu
PROGRAMMING THE MACHINE “WATER HARDNESS” MENU > machine settings > water hardness With the “Water hardness” function you can adapt your machine to the degree of hardness of the water you use, so that the machine will request descaling at the right moment. Hardness is expressed on a scale from 1 to 4.
-
Page 23: Filter Alarm Menu
“FILTER ALARM” MENU > machine settings > filter alert machine settings “RINSE” MENU > machine settings > rinsing The rinse setting cleans the internal circuits in order to guarantee that the beverages are only made with fresh water. The function is enabled as default by the manufacturer. Note: This rinse cycle is performed every time the machine is turned on after the warming phase.
-
Page 24
PROGRAMMING THE MACHINE “CLOCK SETTING” MENU > machine settings > clock setting To set the current time, date and hour format to display. machine settings Time setting > machine settings > clock setting > time setting To set the current time on the machine clock setting 2.7.1 time setting… -
Page 25: Time Format
Time format > machine settings > clock setting > time format To set the time view mode. This setting adjusts all clock functions to either “am/pm” or “24 hour” formats. clock setting 2.7.2 time format Date setting > machine settings > clock setting > date setting To set the date (day, month, year, day of the week).
-
Page 26: Clock Setting » Menu
PROGRAMMING THE MACHINE 2.7.3 date setting tuesday 18/04/06 Select the month and press the Date format > machine settings > clock setting > date format setting the date. clock setting 2.7.4 time format DD/MM/YYYY 2.7.3 date setting tuesday 18/04/06 Select the year and press the 2.7.4 time format DD/MM/YYYY…
-
Page 27: Water Filter » Menu
MAINTENANCE To access the machine’s maintenance programs, press the water filter “WATER FILTER” MENU > maintenance > water filter maintenance Litres remaining > maintenance > water filter > litres left maintenance descaling water filter water filter MAINTENANCE button, select “maintenance” and press group wash wash the Brew Group.
-
Page 28: Maintenance
MAINTENANCE Filter state > maintenance > water filter > filter status maintenance Select by navigating the click It is possible to set: — on — off Press the button to save. Load filter > maintenance > water filter > activate filter maintenance Place a container beneath the steam spout.
-
Page 29: Descaling» Menu
“DESCALING” MENU > maintenance > descaling maintenance Litres remaining > maintenance > descaling > litres left To display how many litres of water can still be used before the machine requests a descaling cycle. maintenance Descaling cycle > maintenance > descaling > execute now To perform the automatic descaling cycle.
-
Page 30
MAINTENANCE Note: before beginning the descaling cycle make sure that: 1. a large enough container is positioned under the water spout; 2. THE “AQUA PRIMA” FILTER HAS BEEN REMOVED. maintenance Descaling is carried out at a controlled temperature. If the machine is cold, you must wait until it has reached the right temperature;… -
Page 31
descaling cycle please wait The machine begins to dispense the descaling solution through the hot water spout. The dispensing occurs at predetermined intervals, in order to allow the solution to be more effective. Insert the tank with fresh drinking water. rinse cycle ok to start cycle Rinse the machine’s circuits by… -
Page 32: Brew Group Washing
Brew Group Washing > maintenance > group wash To clean the machine’s internal circuits used for brewing coffee. To wash the Brew Group, simply clean with water as shown on page 35. This wash completes maintenance of the Brew Group. We recommend using Saeco tablets, which can be purchased separately.
-
Page 33: Programming The Machine
ENERGY SAVING To adjust the energy saving parameters, press the turn-off delay Set the time which must pass after the last product dispensing before the machine enters the energy saving mode. timer setting Enable/disable the machine’s turn on/ off times programmed for the days of the week.
-
Page 34: Monday» Timer Setting
“MONDAY” TIMER SETTING > energy saving > monday This and the following menus are used to set the turn on/off times for each day of the week. The procedure described below shows how to set the turn on/off times for “Monday”. To set the turn on/off times for the other days of the week, follow the same procedure after selecting the desired day.
-
Page 35: Special Functions
SPECIAL FUNCTIONS This menu allows you to access special functions present on the machine. Press the button to access and select “special function” and press the RESTORE SETTINGS > special function > reset settings The function for restoring all the factory settings is contained in this menu. This function is particularly important for restoring the basic parameters.
-
Page 36: Cleaning And Maintenance
CLEANING AND MAINTENANCE GENERAL MACHINE CLEANING The cleaning described below must be performed once a week. Note: if water remains in the tank for several days, do not use it. WARNING! Never immerse the machine in water. If you remove grounds with the machine off or when not signaled on the display, the count of the grounds emptied into the drawer is not reset.
-
Page 37: Cleaning The Brew Group
CLEANING THE BREW GROUP The Brew Group must be cleaned at least once a week. Wash the Brew Group with warm water. WARNING! Do not wash the Brew Group with detergents that can compromise its correct operation. Do not wash in the dishwasher. Open the service door and remove the coffee grounds drawer.
-
Page 38: Error Codes
ERROR CODES GUIDE MESSAGE THAT APPEARS out of service (xx) restart to fix… close coffee bean lid fill container wth coffee insert the brew group insert grounds drawer empty grounds empty grounds drawer close door fill the water tank. empty the drip tray change the filter carafe missing milk island missing…
-
Page 39: Troubleshooting
ROBLEMS The machine does not turn on. Hot water or steam is not dispensed. Coffee has little crema. Brew Group does not come out. Coffee is not brewed. Coffee is brewed slowly. Coffee leaks out of the dispensing head. Please contact the service centre for any problems not covered in the above table or when the suggested solutions do not solve the problem.
-
Page 40: Safety Rules
SAFETY RULES IN CASE OF EMERGENCY IMMEDIATELY UNPLUG THE CORD FROM THE OUTLET. ONLY USE THE APPLIANCE • Indoors. • For preparing coffee, hot water and for frothing milk. • For domestic use. • By adults in non altered psycho-physical conditions. PRECAUTIONS FOR THE USE OF THE MACHINE •…
-
Page 41: Replacement Parts
DANGERS • The appliance must not be used by children and persons who have not been informed of its operation. • The appliance is dangerous to children. When left unattended, unplug from the electrical outlet. • Keep the coffee machine packaging out of the reach of children. •…
-
Page 42: Technical Data
TECHNICAL DATA TECHNICAL DATA Nominal voltage Power rating Power supply Shell material Size (w x h x d) Weight Cable length Control panel Water tank Coffee bean hopper capacity Pump pressure Boiler Coffee grinder Quantity of ground coffee Grounds drawer capacity Safety devices Subject to engineering and manufacturing changes due to technological developments.
-
Page 44
Lors de l’utilisation d’appareils électriques, il est important de prendre les précautions suivantes, afin d’éviter les décharges électriques, les courts circuits et les accidents corporels. 1 Lire toutes les instructions et les indications données dans cette brochure, ainsi que toute autre information que contient l’emballage, avant de mettre la machine en marche. -
Page 45
PRÉCAUTIONS Machine est réservée à un usage domestique. Tout entretien, en dehors du nettoyage et de l’entretien usuel par l’usager, doit être fait par un centre de service autorisé. Ne pas plonger la base dans l’eau. Pour éviter les courts- circuits et les décharges électriques, ne pas démonter la base. -
Page 46
TABLE DES MATIÈRES GÉNÉRALITÉS … 3 APPAREIL … 4 … 4 ACCESSOIRES MISE EN PLACE … 5 … 5 MISE EN MARCHE DE LA MACHINE … 6 SÉLECTIONNER LA LANGUE « » … 7 FILTRE AQUA PRIMA AFFICHEUR … 8 OPTI DOSE INDICATION DE LA QUANTITÉ… -
Page 47: Généralités
GÉNÉRALITÉS La machine à café est indiquée pour la préparation de café expresso avec du café en grains et dotée d’un dispositif pour la distribution d’eau chaude et de vapeur. Au design elegant, cet appareil a ete conçu exclusivement pour un usage domestique et n’est donc pas indique pour un fonctionnement continu de type professionnel.
-
Page 48: Appareil
APPAREIL Plaque chauffe-tasses Tableau de commande Distributeur Bac d’égouttement + Bouton robinet eau- chaude/vapeur Tuyau de distribution de l’eau chaude/vapeur Réservoir d’eau Raccord « Milk Island » ACCESSOIRES Filtre « Aqua Prima » Clé pour régler la mouture Réservoir à café en grains Touche pour lever/baisser le bac d’égouttement Bac de récupération…
-
Page 49: Mise En Place
MISE EN MARCHE DE LA MACHINE S’assurer que l’interrupteur général n’est pas activé. Retirer le couvercle du réservoir à café. Remplir le réservoir avec du café en grains. Remplir le réservoir avec de l’eau fraîche et potable, en veillant à ne jamais dépasser le niveau maximal marqué…
-
Page 50: Sélectionner La Langue
MISE EN PLACE SÉLECTIONNER LA LANGUE Lors de la première mise en marche de la machine, il faut sélectionner la langue souhaitée ; cela permet d’adapter les paramètres des boissons à ceux du Pays d’utilisation. C’est pourquoi certaines langues sont différenciées aussi en fonction du pays. language English Talea Ring Plus…
-
Page 51: Filtre « Aqua Prima
FILTRE « AQUA PRIMA » Pour améliorer la qualité de l’eau utilisée, tout en garantissant la longévité de l’appareil, il est conseillé régler la date sur le mois en cours. Placer un récipient sous la buse de distribution de l’eau chaude/ vapeur filtre à…
-
Page 52: Afficheur
AFFICHEUR Accéder au menu de programmation Disque de sélection Sélectionner la quantité de café à moudre ou prémoulu • Pour obtenir 2 tasses, appuyer 2 fois sur la touche Cette opération est possible jusqu’à ce que le café de la première sélection soit moulé. sélectionné…
-
Page 53: Réglages
DENSITÉ DU CAFÉ Le dispositif SBS a été spécialement conçu pour permettre de donner la densité et l’intensité de goût SBS – SAECO BREWING SYSTEM Pour régler la densité du café distribué. Le réglage peut également être effectué durant la distribution du café.
-
Page 54: Distribution De La Boisson
DISTRIBUTION DE LA BOISSON LA DISTRIBUTION DE CAFÉ PEUT ÊTRE INTERROMPUE À TOUT MOMENT EN APPUYANT DE NOUVEAU SUR LA TOUCHE LA VAPEUR PEUT ATTEINDRE UNE TEMPÉRATURE ÉLEVÉE : RISQUE DE BRÛLURES. ÉVITER TOUT CONTACT DIRECT AVEC LES MAINS. entretien » (voir page 34). Pour la préparation de 2 tasses, la machine distribue le premier café…
-
Page 55: Distribution De La Boisson Avec Du Café Moulu
DISTRIBUTION DE LA BOISSON AVEC DU CAFÉ MOULU La machine permet d’utiliser du café prémoulu ou décaféiné.Verser le café prémoulu dans le compartiment prévu à cet effet à côté du réservoir à café en grains. Ne verser que du café moulu pour machines à café expresso mais jamais du café…
-
Page 56: Distribution Deau Chaude
DISTRIBUTION DE LA BOISSON DISTRIBUTION D’EAU CHAUDE AU DÉBUT DE LA DISTRIBUTION, FAIRE ATTENTION AU RISQUE DE BRÛLURES CAR IL PEUT Y AVOIR DES ÉCLABOUSSURES D’EAU CHAUDE. LA BUSE POUR LA DISTRIBUTION DE L’EAU CHAUDE/ VAPEUR PEUT ATTEINDRE DES TEMPÉRATURES ÉLEVÉES : ÉVITER DE LA TOUCHER DIRECTEMENT AVEC LES MAINS, UTILISER EXCLUSIVEMENT LA POIGNÉE PRÉVUE À…
-
Page 57: Distribution Vapeur
DISTRIBUTION VAPEUR AU DÉBUT DE LA DISTRIBUTION, FAIRE ATTENTION AU RISQUE DE BRÛLURES CAR IL PEUT Y AVOIR DES ÉCLABOUSSURES D’EAU CHAUDE. LA BUSE POUR LA DISTRIBUTION DE L’EAU CHAUDE/ VAPEUR PEUT ATTEINDRE DES TEMPÉRATURES ÉLEVÉES : ÉVITER DE LA TOUCHER DIRECTEMENT AVEC LES MAINS, UTILISER EXCLUSIVEMENT LA POIGNÉE PRÉVUE À…
-
Page 58: Distribution Cappuccino
DISTRIBUTION DE LA BOISSON DISTRIBUTION CAPPUCCINO AU DÉBUT DE LA DISTRIBUTION, FAIRE ATTENTION AU RISQUE DE BRÛLURES CAR IL PEUT Y AVOIR DES ÉCLABOUSSURES D’EAU CHAUDE. LA BUSE POUR LA DISTRIBUTION DE L’EAU CHAUDE/ VAPEUR PEUT ATTEINDRE DES TEMPÉRATURES ÉLEVÉES : ÉVITER DE LA TOUCHER DIRECTEMENT AVEC LES MAINS, UTILISER EXCLUSIVEMENT LA POIGNÉE PRÉVUE À…
-
Page 59: Milk Island En Option )
Cet accessoire, que l’on peut acheter à part, permet de préparer très facilement et en toute commodité d’excellents cappuccinos. Attention : avant d’utiliser le Milk Island consulter le manuel correspondant contenant toutes les précautions pour une utilisation correcte. Remarque importante : la quantité de lait dans la carafe ne doit pas être inférieure au niveau minimal «…
-
Page 60: Programmation Boisson
PROGRAMMATION BOISSON L’utilisateur peut programmer chaque boisson selon son goût personnel. 1. PROGRAMMATION POUR AUTO-APPRENTISSAGE La quantité de café qui est distribuée dans la tasse chaque fois que l’on appuie sur le bouton peut être programmée rapidement pour toutes les boissons. Après avoir sélectionné…
-
Page 61
réservoir à café en grains soient pleins ; mettre la tasse sous le distributeur. café expresso Sélectionner la boisson à appuyant sur café expresso faisant glisser le doigt sur le disque appuyant sur la touche pré-infusion : normale café expresso Appuyer sur la touche pour sélectionner le paramètre pré-infusion. -
Page 62: Programmation Machine
PROGRAMMATION MACHINE personnelles. 1 Appuyer sur la touche 2 Faire glisser le doigt sur le disque pour : réglage des boissons Réglage des boissons (voir page 16) réglage de la machine Réglage de la machine (voir page 19) entretien Entretien (voir page 25) réglage des boissons sélectionner les fonctions…
-
Page 63: Réglage De La Machine
RÉGLAGE DE LA MACHINE sélectionner « réglages de la machine » et appuyer sur la touche de sélection pour : sélectionner la langue des menus. dureté de l’eau choisir le degré de dureté de l’eau. alertes sonores activer les alertes sonores alerte filtre activer/ désactiver l’alerte Pour quitter la fonction «…
-
Page 64: Menu « Dureté De L’eau
PROGRAMMATION MACHINE MENU « DURETÉ DE L’EAU » > réglage de la machine > dureté de l’eau puisse demander de faire un cycle de détartrage au moment voulu. La dureté est exprimée avec une échelle de 1 à 4. La machine est préréglée sur 3. Plonger dans l’eau la bande de test fournie avec le kit pendant dureté…
-
Page 65: Menu « Alerte Filtre
MENU « ALERTE FILTRE » > réglage de la machine > alerte filtre réglage de la machine MENU « RINÇAGE » > réglage de la machine > rinçage effectuée uniquement avec de l’eau fraîche. Cette fonction est activée par défaut par le fabricant. Remarque : ce rinçage doit être fait après la phase de chauffage à…
-
Page 66: Menu « Réglage De L’horloge
PROGRAMMATION MACHINE MENU « RÉGLAGE DE L’HORLOGE » > réglage de la machine > réglage horloge réglage de la machine Réglage de l’heure > réglage de la machine > réglage horloge > réglage de l’heure Cette fonction permet de régler l’heure actuelle sur la machine réglage horloge 2.7.1 réglage de l’heure 16:54…
-
Page 67
Format heure > réglage de la machine > réglage horloge > format de l’heure réglage horloge 2.7.2 format de l’heure Réglage de la date > réglage de la machine > réglage horloge > réglage de la date Cette fonction permet de régler la date (jour, mois, année, jour de la semaine). réglage horloge 2.7.2 format de l’heure… -
Page 68
PROGRAMMATION MACHINE 2.7.3 réglage de la date mardi 18/04/06 avec la touche Format date > réglage de la machine > réglage horloge > format de la date réglage horloge 2.7.4 format de la date JJ/MM/AAAA 2.7.3 réglage de la date mardi 18/04/06 avec la touche 2.7.4… -
Page 69: Menu Filtre À Eau
ENTRETIEN Pour accéder aux programmes d’entretien de la machine, appuyer sur la touche entretien » et appuyer sur la touche filtre à eau gestion du détartrage. MENU « FILTRE À EAU » > entretien > filtre à eau entretien Litres restants >…
-
Page 70
ENTRETIEN État du filtre > entretien > filtre à eau > état du filtre entretien Sélectionner en glissant le doigt sur le disque de sélection. Il est possible de régler : — activé — désactivé Mémoriser en appuyant sur La charge du filtre >… -
Page 71: Menu Détartrage
MENU « DÉTARTRAGE » > entretien > détartrage Pour gérer le détartrage des circuits de la machine. entretien Litres restants > entretien > détartrage > litres restants de détartrage. entretien Cycle de détartrage > entretien > détartrage > exécuter maintenant Cette fonction permet d’exécuter le cycle automatique de détartrage.
-
Page 72
ENTRETIEN 2. QUE LE FILTRE « AQUA PRIMA » NE SOIT PLUS DANS LE RÉSERVOIR À EAU . entretien Le détartrage a lieu à une température contrôlée. Si la machine est froide, attendre qu’elle arrive à la juste température ; dans le cas contraire, procéder comme suit pour refroidir la chaudière : S’il est nécessaire de chauffer la chaudière, la machine exécute ce processus de façon autonome ;… -
Page 73
cycle de détartrage veuillez patienter La machine commence à distribuer la solution détartrante dans la buse de distribution de l’eau chaude. La distribution a lieu à des intervalles préétablis pour permettre à la Remettre le réservoir contenant de l’eau froide potable dans la machine. -
Page 74: Lavage Du Groupe
Lavage du groupe > entretien > rinçage du groupe Cette fonction permet d’effectuer le nettoyage des circuits internes de l’appareil qui servent à la distribution du café. complète l’entretien du groupe de distribution. Il est conseillé d’utiliser des pastilles Saeco, que l’on peut acheter à…
-
Page 75: Programmation Machine
ÉCONOMIE D’ÉNERGIE Pour régler les paramètres de l’économie d’énergie de la machine, appuyer sur la touche sélectionner « économie d’énergie » et appuyer sur la touche d’un doigt pour : arrêt différé Saisir le temps qui doit s’écouler avant que la machine se mette en économie d’énergie depuis le dernier produit distribué.
-
Page 76: Réglage Minuterie « Lundi
RÉGLAGE MINUTERIE « LUNDI » > èconomie d’énergie > lundi Ce menu et ceux qui suivent servent à régler un horaire d’allumage et d’arrêt pour chaque jour de la semaine. L’exemple reporte la façon de régler l’horaire d’allumage et d’arrêt du « Lundi » ; suivre la même procédure après avoir sélectionné…
-
Page 77: Des Fonctions Spéciales
DES FONCTIONS SPÉCIALES Ce menu permet d’accéder aux fonctions spéciales prévues sur la machine. Pour ce faire, appuyer sur la touche Faire glisser le doigt sur le disque de sélection pour : RÉTABLIR RÉGLAGES > fonctions spéciales > rétablir réglages Ce menu contient la fonction pour rétablir toutes les valeurs réglées en usine.
-
Page 78: Nettoyage Et Entretien
NETTOYAGE ET ENTRETIEN NETTOYAGE GÉNÉRAL DE LA MACHINE Le nettoyage décrit ci-dessous doit être fait au moins une fois par semaine. Remarque : ne pas utiliser de l’eau qui n’a pas été remplacée depuis plusieurs jours. ATTENTION ! Ne pas plonger la machine dans l’eau. Le comptage du marc déposé…
-
Page 79: Nettoyage Du Groupe De Distribution
NETTOYAGE DU GROUPE DE DISTRIBUTION Le groupe de distribution doit être nettoyé au moins une fois par semaine. Laver le groupe de distribution à l’eau tiède. ATTENTION ! Ne pas laver le groupe de distribution avec des détergents qui pourraient affecter son fonctionnement.
-
Page 80: Messages D’erreur
MESSAGES D’ERREUR MESSAGE QUI APPARAÎT hors service (xx) redémarrer pour résoudre… fermer couvercle grains de café introduire café dans réservoir insérer groupe de distribution insérer le tiroir à marc Vider le marc de café vider le tiroir à marc fermer porte remplir le réservoir à…
-
Page 81: Problèmes — Causes — Remèdes
ROBLÈMES La machine ne s’allume pas La machine ne distribue ni eau chaude ni vapeur. Le café ne mousse pas. Le groupe de distribution ne peut pas être démonté. Le café ne coule pas. Le café coule lentement. Le café coule en dehors du distributeur.
-
Page 82: Consignes De Sécurité
CONSIGNES DE SÉCURITÉ EN CAS D’URGENCE N’UTILISER L’APPAREIL • que dans des locaux fermés • que pour la préparation de café, d’eau chaude et de mousse de lait • Que par des adultes dotés d’une bonne constitution physique et mentale. MESURES DE PRÉCAUTION CONCERNANT L’UTILISATION DE L’APPAREIL •…
-
Page 83
DANGERS • Ne pas laisser les enfants se servir de l’appareil. Cette consigne vaut également pour les personnes qui ne connaissent pas le fonctionnement de l’appareil. • L’appareil peut représenter un danger pour les enfants. Si l’appareil est laissé sans surveillance, •… -
Page 84: Données Techniques
DONNÉES TECHNIQUES DONNÉES TECHNIQUES Tension nominale Puissance nominale Alimentation Matériau du corps Dimensions (l x a x p) Poids Longueur du câble Tableau de commande Réservoir d’eau Capacité du réservoir à café Pression de la pompe Chaudière Moulin à café Quantité…
-
Page 88
Saeco International Group S.p.A. Via Torretta, 240 I-40041 Gaggio Montano, Bologna Tel: + 39 0534 771111 Fax: + 39 0534 31025 www.saeco.com The manufacturer reserves the right to change the features of the product without prior notice. Le producteur se réserve le droit d“apporter toutes modifications sans préavis. ©…
-
Page 1: Saeco SUP032BR
Operat ion and maintenance manual Be fore using t he machine, please re ad the at t ached opera ting inst ruct ions. Ca refull y read the s afet y rule s Mode d ‘ emploi V euillez lire attentivement le mode d’emploi (notamment les consignes de sécurité) avant d’utiliser l’appareil. FOR HOUSEHOLD USE ONL Y[…]
-
Page 2: Saeco SUP032BR
IMPORT ANT SAFEGU ARDS When using electrical appliances, basic safety precautions should always be followed to reduce the risk of fire, electric shock, and/or injury to persons, including the following: 1 R ead all instructions and information in this instruction book and any other literature included in this carton referring to this product before[…]
-
Page 3: Saeco SUP032BR
CA UTION This appliance is for household use only . Any servicing , other than cleaning and user maintenance, should be performed by an authorized service centre. Do not immerse machine in water . T o reduce the risk of fire or electric shock, do not disassemble the machine. There are no user serviceable parts inside the machine serviceable by the […]
-
Page 4: Saeco SUP032BR
2 CONTENTS GENERAL INFORMA TION ……………………………………………………………………………………………………. 3 APPLIANCE ……………………………………………………………………………………………………………………….. 4 ACCESSORIES ………………………………..[…]
-
Page 5: Saeco SUP032BR
3 The coffee machine is suitable for preparing espresso coffee using coffee beans, and it is equipped with a device to dispense steam and hot water . The machine is designed for domestic use only , and is not suitable for heavy or professional use. W arning: no liability is assumed for any damage caused by: • incorrect use not in accordance with […]
-
Page 6: Saeco SUP032BR
4 Compartment for pre- ground coffee ACCESSORIES “Aqua Prima” ZDWHU¿ OWHU Ground coffee measuring scoop Cleaning brush W ater hardness tester APPLIANCE Grinder adjustment key Power cable Brew Group Coffee grounds drawer Socket for power cable Coffee bean hopper Power button Service door Coffee bean hopper cover Drip tray Control panel S[…]
-
Page 7: Saeco SUP032BR
5 1 2 3 4 7 6 5 INST ALLA TION Attach the female end of the power cord to the machine. Insert the male end into the power outlet (see data tag). Place a container beneath the hot water spout. Remove the coffee bean hopper cover . Fill the hopper with coffee beans. Close the cover pushing it down completely . Remove the water tank. We recommend inst[…]
-
Page 8: Saeco SUP032BR
6 5 1 2 3 4 2.1 language English 6 8 7 Talea Ring Plus INST ALLA TION SETTING THE LANGUAGE :KHQWKHPDFKLQHLVVZLWFKHGRQIRUWKH¿ UVWWLPHLWUHTXLUHVWKHVHOHFWLRQRIWKHGHVLUHGODQJXDJH This allows you to adjust the parameters of the beverages to the typical parameters of the country where the m[…]
-
Page 9: Saeco SUP032BR
7 3 4 1 2 5 6 7 8 9 Remove the “Aqua Prima” ZDWHU¿ OWHUIURPLWVSDFNDJLQJ Enter the date of the current month. “AQUA PRIMA” W A TER FIL TER T o improve the quality of the water you use, and guarantee longer machine life at the same time, it is UHFRPPHQGHGWKDWRXLQVWDOOWKH³$TXD3ULPD´ZDWHU¿ […]
-
Page 10: Saeco SUP032BR
8 • Press the button twice to make 2 cups. 7KLVRSHUDWLRQFDQEHSHUIRUPHGXSXQWLOWKHJULQGLQJRIWKH¿ UVWFXSLVFRPSOHWH Press twice It is possible to choose three options (strong, medium and mild) by pressing the button. These indicate the quantity of coffee the machine grinds for each beverage. This […]
-
Page 11: Saeco SUP032BR
9 MEDIUM COFFEE STRONG COFFEE MILD COFFEE SBS adjusts the intensity of the brewed coffee. The coffee may even be adjusted while brewing. This adjustment has an immediate effect on the selected type of brewing. COFFEE INTENSITY SB S – SA EC O BRE W IN G SYS TEM T o raise the drip tray , press lightly on the lower part of the button. T o lower the […]
-
Page 12: Saeco SUP032BR
10 3 4 5 1 2 COFFEE BR EW ING CAN BE STOPPED A T AN Y TIM E B Y PR ESSING TH E BUT TON A G AIN . THE STE AM SPO UT MA Y R EACH HIG H TEMPER A TUR ES : DANGE R OF SCALDI NG. DO NOT TOUCH IT W ITH BARE H ANDS . Check that all the containers are clean. T o carry out this operation, follow the instructions in the “Cleaning and Maintenance” section […]
-
Page 13: Saeco SUP032BR
11 4 1 2 5 3 DISPENSING BEVERAGES WITH GROUND COFFEE The machine allows you to use pre-ground and decaffeinated cof fee. Pre-ground coffee must be poured into the appropriate compartment positioned next to the cof fee bean hopper . Only use coffee ground for espresso machines and never cof fee beans or instant coffee. WARN IN G: ONL Y PUT PRE — GRO[…]
-
Page 14: Saeco SUP032BR
12 1 2 3 5 6 7 4 HOT W A TER DISPENSING DI SPEN SI NG MA Y B E PRECED ED BY SHO RT S PURTS O F HOT WA TE R AND SCA LDI NG I S POS SI BLE . THE H OT WA TE R /ST EA M SPO UT MA Y R EACH H IGH T EM PER A TU RES: DO NOT TOUC H IT WI TH BAR E HA NDS. U SE TH E APPROPR IA T E HAN DLE O NL Y . BEVERAGE DISPENSING Press the button. Place a container beneat[…]
-
Page 15: Saeco SUP032BR
13 1 2 3 5 6 7 4 DISPENSING STEAM Press the button. Place a container with the beverage to be warmed up beneath the steam spout. T urn the knob to the position. Heat the beverage; move the container while heating. :KHQRXKDYH¿ QLVKHGWXUQ the knob until it is in the rest position ( ). After dispensing, clean the steam spout as[…]
-
Page 16: Saeco SUP032BR
14 3 2 4 5 6 1 8 7 BEVERAGE DISPENSING MAKING CAPPUCCINO DI SPEN SI NG MA Y B E PRECED ED BY SHO RT S PURTS O F HOT WA TE R AND SCA LDI NG I S POS SI BLE . THE H OT WA TE R /ST EA M SPO UT MA Y R EACH H IGH T EM PER A TU RES: DO NOT TOUC H IT WI TH BAR E HA NDS. U SE TH E APPROPR IA T E HAN DLE O NL Y . Press the button. Immerse the steam spout in […]
-
Page 17: Saeco SUP032BR
15 1 2 3 5 4 6 7 8 MILK ISLAND (OPTIONAL) This device, which may be purchased separately , enables you to easily and comfortably prepare delicious cappuccinos. W arning: before using the Milk Island, read the manual and all precautions carefully for correct use. Important note: the quantity of milk in the carafe must never be below the “MIN” mi[…]
-
Page 18: Saeco SUP032BR
16 BEVERAGE PROGRAMMING The following page describes how to program coffee beverages; the settings to program each beverage may dif fer depending on the type of beverage. 2. PROGRAMMING FROM THE “BEVERAGE SETTINGS” MENU T o adjust the settings for preparing beverages: press the button and select “beverage settings” by QDYLJDWLQJWKHFOL[…]
-
Page 19: Saeco SUP032BR
17 1 2 3 4 5 6 7 8 9 10 Check that the water and coffee bean container are full; place the cup under the dispensing head. Press the button. Press the button a few times to adjust the quantity of coffee to be ground or select the use of pre- ground coffee. Press the button to save. Select the beverage to program. Press the EXWWRQWRFRQ¿ […]
-
Page 20: Saeco SUP032BR
18 PROGRAMMING THE MACHINE Some of the machine’s functions can be programmed to customize operations according to your individual preferences. Press the button to: FRQ¿ UPWKHVHOHFWLRQ — save the new settings. 1 Press the button. 1DYLJDWHWKHFOLFNZKHHOZLWKRXU¿ QJHUWR — select the functions — […]
-
Page 21: Saeco SUP032BR
19 1 2 3 2.1 language English “L ANGU AGE ” MENU MACHINE SETTINGS T o change the machine’ s operation settings, press the button, select “machine settings” and press the EXWWRQ1DYLJDWHWKHFOLFNZKHHOZLWKRXU¿ QJHUWR set the menu language. activate/deactivate the “Aqua Prima” ZDWHU¿ OWHUDODU[…]
-
Page 22: Saeco SUP032BR
20 3 1 2 1 2 3 4 5 “ A COUSTI C AL AR M” M ENU > machine settings > acoustic alarm T o turn on/of f a tone each time a button is pressed. Select by navigating the click ZKHHOZLWKRXU¿ QJHU It is possible to set: — on — off Press the button to save. PROGRAMMING THE MACHINE Immerse the water hardness tester included with th[…]
-
Page 23: Saeco SUP032BR
21 3 1 2 3 1 2 3 1 2 “FIL TER ALARM” MENU > machine settings > filter alert 7 RWXUQRQRI IVLJQDOOLQJWKHQHHGWRFKDQJHWKH³$TXD3ULPD´ZDWHU¿ OWHU 7KHPDFKLQHLQIRUPVWKHXVHU ZKHQWKH³$TXD3ULPD´¿ OWHUQHHGVWREHUHSODFHG “RINSE” MENU > machine se[…]
-
Page 24: Saeco SUP032BR
22 1 2 1 2 3 4 “CLOCK SET TI NG” ME NU > machine settings > clock setting T o set the current time, date and hour format to display . In this menu you can set: — the current time (hour and minutes) — the hour format (24 hours — AM/PM) — the current date (day — month — year — day of the week) — the date format (American — international). T[…]
-
Page 25: Saeco SUP032BR
23 1 2 3 4 5 1 2 3 Time for mat > machine settings > clock setting > time format T o set the time view mode. This setting adjusts all clock functions to either “am/pm” or “24 hour” formats. The machine also allows displaying the time in the American format (am/pm). Date setting > machine settings > clock setting > date set[…]
-
Page 26: Saeco SUP032BR
24 4 5 1 2 3 4 5 PROGRAMMING THE MACHINE Select the month and press the EXWWRQWRFRQ¿ UP Select the year and press the EXWWRQWRFRQ¿ UP The day of the week is automatically set according to the set date. Date format > machine settings > clock setting > date format 7 RVHWWKHGDWHYLHZPRGH 7KH[…]
-
Page 27: Saeco SUP032BR
25 1 2 1 2 3 DFFHVVWKHVSHFL¿ FGHVFDOLQJPHQX MAINTENANCE T o access the machine’ s maintenance programs, press the button, select “maintenance” and press the EXWWRQ1DYLJDWHWKHFOLFNZKHHOZLWKRXU¿ QJHUWR DFFHVVWKHVSHFL¿ F³$TXD3ULPD´ ZDWHU¿ OWHUPHQX wash the B[…]
-
Page 28: Saeco SUP032BR
26 1 2 4 1 2 5 3 4 3 When the cycle ends, turn the knob to the rest position ( ) and remove the container . 7KH¿ OWHULVLQLWLDOL]HG Fil t er s t at e > maintenance > water filter > filter status 7 RWXUQWKH¿ OWHUFKHFNRQRIIWKHPDFKLQHFKHFNVZKHQWKH³$TXD3ULPD´ZDWHU¿ OWHU?[…]
-
Page 29: Saeco SUP032BR
27 1 2 1 2 3 “DES CAL ING” MENU > maintenance > descaling 7 RPDQDJHWKHGHFDOFL¿ FDWLRQRIWKHPDFKLQH¶VFLUFXLWV In this menu you can: — check the number of litres before descaling; — carry out the machine descaling cycle. Litres remaining > maintenance > descaling > litres left T o display how many[…]
-
Page 30: Saeco SUP032BR
28 1 2 3 6 4 7 8 9 5 Descaling is carried out at a controlled temperature. If the machine is cold, you must wait until it has reached the right temperature; otherwise you must cool the boiler as follows: Note: before beginning the descaling cycle make sure that: 1. a large enough container is positioned under the water spout; 2. THE “AQUA PRIMA?[…]
-
Page 31: Saeco SUP032BR
29 10 12 13 14 15 16 11 :KHQWKHVROXWLRQLV¿ QLVKHGWKH following message appears on the display: Remove the water tank, rinse with fresh drinking water to eliminate traces of descaling VROXWLRQWKHQUH¿ OOZLWKIUHVK drinking water . Insert the tank with fresh drinking water . Rinse the machine’s circuits b[…]
-
Page 32: Saeco SUP032BR
30 1 2 5 6 3 8 9 4 7 Brew G roup Washin g > maintenance > group wash Insert the tablet as shown above. Press to start. T o clean the machine’ s internal circuits used for brewing coffee. T o wash the Brew Group, simply clean with water as shown on page 35. This wash completes maintenance of the Brew Group. We recommend using Saeco tablets, […]
-
Page 33: Saeco SUP032BR
31 3 1 2 3 1 2 ENERGY SA VING T o adjust the energy saving parameters, press the button, select “energy saving” and press the EXWWRQ1DYLJDWHWKHFOLFNZKHHOZLWKRXU¿ QJHUWR Set the time which must pass after the last product dispensing before the machine enters the energy saving mode. TURN O F F DEL A Y > en[…]
-
Page 34: Saeco SUP032BR
32 1 2 3 4 5 6 7 8 9 10 11 “MOND A Y ” T IMER SETTING > energy saving > monday This and the following menus are used to set the turn on/off times for each day of the week. The procedure described below shows how to set the turn on/off times for “Monday”. T o set the turn on/off times for the other days of the week, follow the same pro[…]
-
Page 35: Saeco SUP032BR
33 1 2 5 3 4 SPECIAL FUNCTIONS This menu allows you to access special functions present on the machine. Press the button to access and select “special function” and press the button. Navigate the FOLFNZKHHOZLWKRXU¿ QJHUWR restore the basic machine operating parameters. RES TORE SETTINGS > special function > reset se[…]
-
Page 36: Saeco SUP032BR
34 1 2 3 4 6 5 9 8 7 CLEANING AND MAINTENANCE With the brush, clean the pre- ground coffee compartment. Switch off the machine and unplug it. Clean the tank and the cover . Remove the drip tray , empty and wash it. Remove the grounds drawer . Clean the display with a dry cloth. Remove and wash the steam spout support; then re-insert it. Remove the […]
-
Page 37: Saeco SUP032BR
35 1 2 3 4 7 8 9 5 6 Open the service door and remove the coffee grounds drawer . The Brew Group must be cleaned at least once a week. W ash the Brew Group with warm water . W ARNING! Do not wash the Brew Group with detergents that can compromise its correct operation. Do not wash in the dishwasher . : DVKWKH%UHZ*URXSDQGWKH¿ […]
-
Page 38: Saeco SUP032BR
36 ERROR CODES G UI DE M ES SA GE T H A T A PP E A RS HO W TO RE MOV E T HE M ES S AG E out of service (xx) restart to fix… :KHUH[[LGHQWL¿HVDQHUURUFRGH7 XUQRIIDQGDIWHU seconds turn the machine on again to restore normal operation.If the problem persists, call the service centre and give the code (xx) […]
-
Page 39: Saeco SUP032BR
37 TROUBLESHOOTING P ROBLEMS C AUSES S OLUTIONS The machine does not turn on. The machine is not connected to the power source. Connect the machine to the power source. The plug has not been plugged into the back of the machine. Insert the plug into the machine’s power socket. Hot water or steam is not dispensed. The hole of the steam spout is cl[…]
-
Page 40: Saeco SUP032BR
38 SAFETY RULES IN CA SE OF EMERGENC Y IMMEDIA TEL Y UNPLUG THE CORD FROM THE OUTLET . ONL Y USE THE APP LIANCE • Indoors. • For preparing coffee, hot water and for frothing milk. • For domestic use. • By adults in non altered psycho-physical conditions. PREC AUTIONS F OR THE USE O F THE MACHINE • Do not use the machine for purposes other[…]
-
Page 41: Saeco SUP032BR
39 F AILURE S ‘RQRWXVHWKHDSSOLDQFHLIDIDLOXUHKDVEHHQYHUL¿ HGRUVXVSHFWHGIRUH[DPSOHDIWHUEHLQJGURSSHG • Any repairs must be performed by an authorized customer service center . • Do not use the appliance with a defective power cord. The manufacturer or its customer service ce[…]
-
Page 42: Saeco SUP032BR
40 TECHNICAL DA T A Nominal voltage See label on the appliance Power rating See label on the appliance Power supply See label on the appliance Shell material ABS — Thermoplastic Size (w x h x d) 320 x 370 x 400 mm — 12.60” x 14.57” x 15.75” Weight 9 Kg — 19.8 lbs Cable length 1200 mm — 47.24” Control panel Front (display 2 x 24 characters) […]
-
Page 43: Saeco SUP032BR
41[…]
-
Page 44: Saeco SUP032BR
IMPORT ANT L ors de l’utilisation d’appareils électriques, il est important de prendre les précautions suivantes, afin d’éviter les décharges électriques, les courts circuits et les accidents corporels. 1 Lire toutes les instructions et les indications données dans cette brochure, ainsi que toute autre information que contient l’embal[…]
-
Page 45: Saeco SUP032BR
PRÉCA UTIONS Machine est réservée à un usage domestique. T out entretien, en dehors du nettoyage et de l’entretien usuel par l’usager , doit être fait par un centre de service autorisé. Ne pas plonger la base dans l’eau. P our éviter les courts — circuits et les décharges électriques, ne pas démonter la base. Elle ne contient aucune[…]
-
Page 46: Saeco SUP032BR
2 T ABLE DES MA TIÈRES GÉNÉRALITÉS ……………………………………………………………………………………………………. …………….. 3 APP AREIL ………………………………………………………………………………………………………. …………………. 4 ACCESSOIRES ………[…]
-
Page 47: Saeco SUP032BR
3 La machine à café est indiquée pour la préparation de café expresso avec du café en grains et dotée d’un dispositif pour la distribution d’eau chaude et de vapeur . Au design elegant, cet appareil a ete conçu exclusivement pour un usage domestique et n’est donc pas indique pour un fonctionnement continu de type professionnel. Attent[…]
-
Page 48: Saeco SUP032BR
4 Logement café prémoulu ACCESSOIRES Filtre « Aqua Prima » Doseur pour le café moulu Pinceau de nettoyage T est de dureté de l’eau APP AREIL Clé pour régler la mouture Câble d’alimentation Groupe de distribution Tiroir à marc Prise pour câble d’alimentation Réservoir à café en grains Interrupteur général Porte de service Couve[…]
-
Page 49: Saeco SUP032BR
5 1 2 3 4 7 6 5 MISE EN PLACE %UDQFKHUOD¿ FKHVXUODSULVHVLWXpH au dos de la machine. Brancher l’autre extrémité du câble sur une prise de courant appropriée (voir la plaque signalétique). Placer un récipient sous la buse de distribution de l’eau chaude. Retirer le couvercle du réservoir à café. Remplir le rése[…]
-
Page 50: Saeco SUP032BR
6 5 1 2 3 4 2.1 language English 6 8 7 Talea Ring Plus MISE EN PLACE SÉLECTIONNER LA LANGUE Lors de la première mise en marche de la machine, il faut sélectionner la langue souhaitée ; cela permet d’adapter les paramètres des boissons à ceux du Pays d’utilisation. C’est pourquoi certaines langues sont différenciées aussi en fonction d[…]
-
Page 51: Saeco SUP032BR
7 3 4 1 2 5 6 7 8 9 ‘pEDOOHUOH¿ OWUH© $TXD3ULPDª régler la date sur le mois en cours. FIL TRE « AQUA PRIMA » Pour améliorer la qualité de l’eau utilisée, tout en garantissant la longévité de l’appareil, il est conseillé G¶LQVWDOOHUOH¿ OWUH© $TXD3ULPDª $SUqVO¶LQVWD[…]
-
Page 52: Saeco SUP032BR
8 • Pour obtenir 2 tasses, appuyer 2 fois sur la touche . Cette opération est possible jusqu’à ce que le café de la première sélection soit moulé. appuyer 2 fois T rois sélections sont possibles en appuyant sur la touche (fort, moyen et léger) qui indiquent la quantité de café que la machine mout pour la préparation de la boisson. Ce[…]
-
Page 53: Saeco SUP032BR
9 CAFE MOYEN CAFE FORT CAFÉ LÉGE R Pour régler la densité du café distribué. Le réglage peut également être effectué durant la distribution du café. Ce réglage a un effet immédiat sur la distribution sélectionnée. DENSITÉ DU CAFÉ SB S – SA EC O BRE W IN G SYS TEM RÉGLAGE DE LA HAUTEUR DU BAC D’ÉGOUTTEMENT RÉGLAGES Le disposi[…]
-
Page 54: Saeco SUP032BR
10 3 4 5 1 2 L A DISTR IBUTI ON DE CAFÉ PEUT ÊTR E INTER ROMPUE À TO UT MOM ENT EN APPU Y ANT D E NOUV E A U SU R L A TOUCHE . L A V APE UR P EUT A T TEINDRE UNE TEMP ÉR A TURE ÉLEVÉE : RISQUE DE BRÛLUR ES. ÉV ITE R TOUT CONT ACT DI RECT A V EC LES MA INS. 9pUL¿ HUTXHWRXVOHVUpVHUYRLUVVRLHQWSURSUHVVXLYUHSRXU[…]
-
Page 55: Saeco SUP032BR
11 4 1 2 5 3 DISTRIBUTION DE LA BOISSON A VEC DU CAFÉ MOULU La machine permet d’utiliser du café prémoulu ou décaféiné.V erser le café prémoulu dans le compartiment prévu à cet effet à côté du réservoir à café en grains. Ne verser que du café moulu pour machines à café expresso mais jamais du café en grains ou soluble. A T TEN[…]
-
Page 56: Saeco SUP032BR
12 1 2 3 5 6 7 4 DISTRIBUTION D’EAU CHAUDE AU DÉB UT DE L A DI STR IB UTI ON, FAIR E A T TENT IO N AU RISQ UE D E BRÛLU RES CAR I L PEUT Y A VOI R DES ÉCL ABO USSU RES D’ EAU CHAU DE . LA B USE PO UR L A DI STRI BUT ION DE L ’EA U CHA UDE / V APEUR P EUT A T TEINDRE DE S TEMPÉR A TURES ÉLEVÉES : ÉVITER DE L A TOU CHE R DI RECTE ME NT A[…]
-
Page 57: Saeco SUP032BR
13 1 2 3 5 6 7 4 DISTRIBUTION V APEUR Appuyer sur la touche . Placer un récipient contenant la boisson à réchauffer sous la buse de vapeur . T ourner le bouton jusqu’au point de repère . Chauffer la boisson en agitant le récipient durant cette opération. Quand la boisson est chaude, tourner le bouton jusqu’à la position de repos ( ). Net[…]
-
Page 58: Saeco SUP032BR
14 3 2 4 5 6 1 8 7 DISTRIBUTION DE LA BOISSON DISTRIBUTION CAPPUCCINO AU DÉB UT DE L A DI STR IB UTI ON, FAIR E A T TENT IO N AU RISQ UE D E BRÛLU RES CAR I L PEUT Y A VOI R DES ÉCL ABO USSU RES D’ EAU CHAU DE . LA B USE PO UR L A DI STRI BUT ION DE L ’EA U CHA UDE / V APEUR P EUT A T TEINDRE DE S TEMPÉR A TURES ÉLEVÉES : ÉVITER DE L A T[…]
-
Page 59: Saeco SUP032BR
15 1 2 3 5 4 6 7 8 MILK ISLAND (EN OPTION) Cet accessoire, que l’on peut acheter à part, permet de préparer très facilement et en toute commodité d’excellents cappuccinos. Attention : avant d’utiliser le Milk Island consulter le manuel correspondant contenant toutes les précautions pour une utilisation correcte. Remarque importante : la […]
-
Page 60: Saeco SUP032BR
16 PROGRAMMA TION BOISSON Pour plus de précision, la page suivante montre comment programmer une boisson contenant du café ; les paramètres à saisir pour programmer chaque boisson peuvent être différents en fonction du type de boisson. 2. PROGRAMMA TION À P ARTIR DU MENU « RÉGLAGE DES BOISSONS » Ce menu permet de régler les paramètres p[…]
-
Page 61: Saeco SUP032BR
17 1 2 3 4 5 6 7 8 9 10 9pUL¿ HUTXHOHUpVHUYRLUjHDXHWOH réservoir à café en grains soient pleins ; mettre la tasse sous le distributeur . Appuyer sur la touche . Appuyer plusieurs fois sur la touche pour régler la quantité de café à moudre ou sélectionner l’emploi de café prémoulu. Mémoriser en appuyant sur […]
-
Page 62: Saeco SUP032BR
18 PROGRAMMA TION MACHINE &HUWDLQHVIRQFWLRQVGHODPDFKLQHSHXYHQWrWUHSURJUDPPpHVD¿ QGHOHVDGDSWHUDX[H[LJHQFHV personnelles. Appuyer sur la touche pour : FRQ¿ UPHUODVpOHFWLRQ — mémoriser les nouveaux réglages 1 Appuyer sur la touche . 2 Faire glisser le doigt sur le disque pour […]
-
Page 63: Saeco SUP032BR
19 1 2 3 2.1 language English MEN U « LA NGUE » RÉGLAGE DE LA MACHINE 3RXUPRGL¿ HUOHVSDUDPqWUHVGHIRQFWLRQQHPHQWGHODPDFKLQHDSSXHUVXUODWRXFKH ; sélectionner « réglages de la machine » et appuyer sur la touche . Faire glisser le doigt sur le disque de sélection pour : sélectionner la langue des m[…]
-
Page 64: Saeco SUP032BR
20 3 1 2 1 2 3 4 5 MEN U « ALERTES SO NOR ES » > réglage de la machine > alertes sonores Pour activer/ désactiver le signal sonore chaque fois que l’on appuie sur une touche. Sélectionner en glissant le doigt sur le disque de sélection. Il est possible de régler : — activé — désactivé PROGRAMMA TION MACHINE Plonger dans l’eau la[…]
-
Page 65: Saeco SUP032BR
21 3 1 2 3 1 2 3 1 2 ME NU « ALER TE FIL TR E » > réglage de la machine > alerte filtre 3RXUDFWLYHUGpVDFWLYHUOHVLJQDOLQGLTXDQWTX¶LOIDXWUHPSODFHUOH¿ OWUH© $TXD3ULPDª(QDFWLYDQWFHWWH IRQFWLRQODPDFKLQHDYHUWLWO¶XWLOLVDWHXUTXDQGOH¿ OWUH© $TXD?[…]
-
Page 66: Saeco SUP032BR
22 1 2 1 2 3 4 ME NU « RÉGL AGE DE L ’HO RLOGE » > réglage de la machine > réglage horloge &HPHQXSHUPHWGHUpJOHUO¶KHXUHDFWXHOOHODGDWHHWOHIRUPDWGHO¶KHXUHTXHO¶RQGpVLUHDI¿ FKHU Il sert à régler : — l’heure actuelle (heure et minutes) OHIRUPDWG¶DI¿ FK[…]
-
Page 67: Saeco SUP032BR
23 1 2 3 4 5 1 2 3 F ormat heure > réglage de la machine > réglage horloge > format de l’heure &HWWHIRQFWLRQSHUPHWGHUpJOHUOHPRGHG¶DI¿ FKDJHGHO¶KHXUH 7 RXWFKDQJHPHQWGXPRGHG¶DI¿ FKDJH PRGL¿ HWRXVOHVSDUDPqWUHVTXLQpFHVVLWHQWG¶XQDI¿ FKDJHUpJODJ[…]
-
Page 68: Saeco SUP032BR
24 4 5 1 2 3 4 5 PROGRAMMA TION MACHINE 6pOHFWLRQQHUOHPRLVHWFRQ¿ UPHU avec la touche . 6pOHFWLRQQHUO¶DQQpHHWFRQ¿ UPHU avec la touche . Le jour de la semaine est réglé automatiquement en fonction de la date saisie. F ormat date > réglage de la machine > réglage horloge > format de la date &HWWH?[…]
-
Page 69: Saeco SUP032BR
25 1 2 1 2 3 DFFpGHUDXPHQXVSpFL¿ TXHSRXUOD gestion du détartrage. ENTRETIEN Pour accéder aux programmes d’entretien de la machine, appuyer sur la touche ; sélectionner « entretien » et appuyer sur la touche . Faire glisser le doigt sur le disque de sélection pour : DFFpGHUDXPHQXVSpFL¿ TXHSRXUOD […]
-
Page 70: Saeco SUP032BR
26 1 2 4 1 2 5 3 4 3 Quand le cycle est terminé, tourner le bouton pour le mettre dans la position de repos ( ) et enlever le UpFLSLHQW/H¿ OWUHHVWDFWLYp État d u filt re > entretien > filtre à eau > état du filtre 3RXUDFWLYHUGpVDFWLYHUOHFRQWU{OHGX¿ OWUHODPDFKLQHYpUL¿ H?[…]
-
Page 71: Saeco SUP032BR
27 1 2 1 2 3 MEN U « DÉT ARTR AGE » > entretien > détartrage Pour gérer le détartrage des circuits de la machine. Dans ce menu, on peut : — voir les litres qui restent avant le détartrage ; — exécuter le cycle de détartrage de la machine. Lit res r est ant s > entretien > détartrage > litres restants 3RXUDI¿ FKHUF[…]
-
Page 72: Saeco SUP032BR
28 1 2 3 6 4 7 8 9 5 Le détartrage a lieu à une température contrôlée. Si la machine est froide, attendre qu’elle arrive à la juste température ; dans le cas contraire, procéder comme suit pour refroidir la chaudière : 5HPDUTXHDYDQWGHFRPPHQFHUOHFFOHGHGpWDUWUDJHYpULÀ HU TX·XQUpFL[…]
-
Page 73: Saeco SUP032BR
29 10 12 13 14 15 16 11 Quand la solution est terminée, O¶DI¿ FKHXULQGLTXH Enlever le réservoir à eau, le rincer à l’eau froide pour éliminer toute trace de solution détartrante et le remplir d’eau froide potable. Remettre le réservoir contenant de l’eau froide potable dans la machine. Rincer les circuits de la machine en[…]
-
Page 74: Saeco SUP032BR
30 1 2 5 6 3 8 9 4 7 Lav age du groupe > entretien > rinçage du groupe Introduire la pastille comme indiqué plus haut. Appuyer sur pour commencer . Cette fonction permet d’effectuer le nettoyage des circuits internes de l’appareil qui servent à la distribution du café. ,OVXIÀ WGHODYHUOHJURXSHGHGLVWULEXWLRQ[…]
-
Page 75: Saeco SUP032BR
31 3 1 2 3 1 2 ÉCONOMIE D’ÉNERGIE Pour régler les paramètres de l’économie d’énergie de la machine, appuyer sur la touche ; sélectionner « économie d’énergie » et appuyer sur la touche . Faire tourner le disque de sélection d’un doigt pour : Saisir le temps qui doit s’écouler avant que la machine se mette en économie d’?[…]
-
Page 76: Saeco SUP032BR
32 1 2 3 4 5 6 7 8 9 10 11 RÉGL AGE MI NUTERI E « LUNDI » > èconomie d’énergie > lundi Ce menu et ceux qui suivent servent à régler un horaire d’allumage et d’arrêt pour chaque jour de la semaine. L ’exemple reporte la façon de régler l’horaire d’allumage et d’arrêt du « Lundi » ; suivre la même procédure après a[…]
-
Page 77: Saeco SUP032BR
33 1 2 5 3 4 DES FONCTIONS SPÉCIALES Ce menu permet d’accéder aux fonctions spéciales prévues sur la machine. Pour ce faire, appuyer sur la touche et choisir « fonctions spéciales » et appuyer sur la touche . Faire glisser le doigt sur le disque de sélection pour : rétablir les paramètres de base de la machine. RÉT ABLIR RÉ GL A GES &[…]
-
Page 78: Saeco SUP032BR
34 1 2 3 4 6 5 9 8 7 NETT OY AGE ET ENTRETIEN Nettoyer le compartiment du café prémoulu à l’aide du pinceau. Éteindre la machine et débrancher OD¿ FKH Laver le réservoir et le couvercle. Retirer le bac d’égouttement, le vider et le laver . Retirer le tiroir à marc. 1HWWRHUO¶DI¿ FKHXUDYHFXQFKLI IRQ sec. Ret[…]
-
Page 79: Saeco SUP032BR
35 1 2 3 4 7 8 9 5 6 Ouvrir la porte de service et enlever le tiroir à marc. Le groupe de distribution doit être nettoyé au moins une fois par semaine. Laver le groupe de distribution à l’eau tiède. A TTENTION ! Ne pas laver le groupe de distribution avec des détergents qui pourraient affecter son fonctionnement. Ne pas le laver au lave-vai[…]
-
Page 80: Saeco SUP032BR
36 MESSAGES D’ERREUR MESSAGE QUI APP AR A ÎT COMMENT RÉT A BLIR LE MESSAGE hors service (xx) redémarrer pour résoudre… Où (xx) indique un code d’erreur .Éteindre et rallumer la machine au bout de 30 secondes pour rétablir le fonctionnement normal.Si le problème persiste, demander l’intervention du Centre d’assistance agréé et co[…]
-
Page 81: Saeco SUP032BR
37 PROBLÈMES — CAUSES — REMÈDES P ROBLÈMES C AUSES R EMÈDES La machine ne s’allume pas La machine n’est pas branchée sur le réseau électrique. Brancher la machine sur le réseau électrique. /D¿ FKHQ¶HVWSDVEUDQFKpHVXUOD prise située au dos de la machine. %UDQFKHUOD¿ FKHVXUODSULVHGHOD?[…]
-
Page 82: Saeco SUP032BR
38 CONSIGNES DE SÉCURITÉ EN CA S D’URGENCE 5HWLUHULPPHGLDWHPHQWOD¿FKHGHODSULVHHOHFWULTXH N’UTIL ISER L ’ APP AREIL • que dans des locaux fermés • que pour la préparation de café, d’eau chaude et de mousse de lait TX¶jGHV¿QVGRPHVWLTXHV • Que par des adultes dotés d’une bonne constituti[…]
-
Page 83: Saeco SUP032BR
39 PA N N E S • Ne pas utiliser l’appareil en cas de problèmes de fonctionnement ou en cas de doute (par ex. : après que l’appareil est tombé par terre). • Faire procéder aux réparations éventuelles par le service après-vente agréé. • Ne jamais utiliser l’appareil lorsque le câble électrique est défectueux. Le câble défect[…]
-
Page 84: Saeco SUP032BR
40 DONNÉES TECHNIQUES T ension nominale V oir plaque signalétique placée sur l’appareil. Puissance nominale V oir plaque signalétique placée sur l’appareil. Alimentation V oir plaque signalétique placée sur l’appareil. Matériau du corps ABS — Thermoplastique Dimensions (l x a x p) 320 x 370 x 400 mm Poids 9K g Longueur du câble 1200 […]
-
Page 85: Saeco SUP032BR
41[…]
-
Page 86: Saeco SUP032BR
[…]
-
Page 87: Saeco SUP032BR
[…]
-
Page 88: Saeco SUP032BR
Saeco Internat ional Group S .p .A . V ia T or ret ta, 240 I-4004 1 Ga ggio Montano , Bologna T e l: + 3 9 05 34 7 7 1111 Fa x: + 39 0534 31025 www . sa ec o . co m © S aec o In te rn at io na l G ro up S .p. A. T he m an uf ac tu re r re se r ve s th e ri gh t to c ha ng e th e fe at ur es of t h e pr od uc t wi th o ut p ri or n ot ic e. Le p ro[…]
Руководстве по эксплуатации Saeco SUP032BR — вам приходилось его терять? Поскольку вы попали сюда, наверняка с вами это случилось. Но вы не единственный человек, сталкивающийся с проблемами с хранением руководства по эксплуатации всех домашних устройств. Ниже несколько советов, касающихся того, зачем собирать руководства по эксплуатации.
Руководстве по эксплуатации Saeco SUP032BR это определенный вид технической документации, являющейся неразлучным элементом каждого устройства, которое мы приобретаем. Они отличаются между собой количеством информации, которую можно найти на тему данного устройства: напр. Saeco SUP032BR. Конечно же, если производитель считает что необходимо передать нам большее количество информации, касающейся устройства Saeco SUP032BR, то стоит ее хоть раз прочитать — в начале, сразу же после покупки данной вещи. Однако мы считаем, что инструкции должны заключать самую важную, наиболее необходимую информацию о Saeco SUP032BR, так, чтобы не отнимать желания пользователя прочесть ее уже в самом начале. Несомненно, если устройство Saeco SUP032BR имеет много продвинутых функций, неизбежно большое количество информации в содержании этого документа.
Które из информации в инструкции Saeco SUP032BR необходимо обязательно прочитать?
- Информацию, касающуюся правильного использования и ухода за устройством Saeco SUP032BR — нам необходимо ознакомиться с основными правилами, чтобы в случае проблем с устройством сервисный центр не отказал нам в гарантийном обслуживании, из-за неправильного использования
- Информация, касающаяся самых частых проблем с Saeco SUP032BR и способы их решения
- Информация, касающаяся гарантии устройства Saeco SUP032BR и ближайших сервисных центров, способных починить устройство в соответствии с рекомендациям производителя Saeco
Как хранить инструкции дома?
Хорошей идеей является предназначение одного ящика, в котором бы хранилась инструкция Saeco SUP032BR а также всех других домашних устройств которыми мы пользуемся. Тогда значительно легче вам будет ее найти, чем искать в родных коробках, которые наверняка уже выбросили вы, или другие домочадцы. Раз в год достаточно просмотреть ящик и выбросить инструкции, которые касаются устройств, которыми вы уже не пользуетесь. Таким образом вы избежите хранения ненужных документов, а останутся только актуальные. Вы можете также скачать и распечатать инструкцию Saeco SUP032BR чтобы разместить ее в своем ящике.