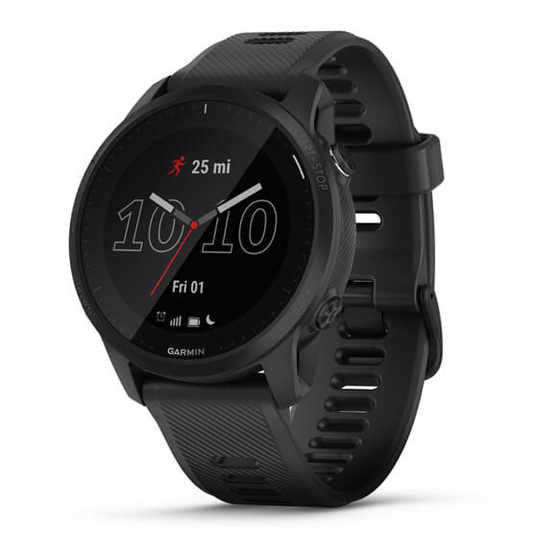
В данной статье дается пошаговая инструкция, показывающая, как настроить часы Garmin, на примере моделей Forerunner 945 и Fenix 6X Pro Solar. Алгоритм применим ко всем моделям с кнопками — например, Instinct.
В статье много иллюстраций, что облегчит понимание каждого этапа персонализации.
5%скидка
Для читателей нашего блога
скидка 5% на весь
ассортимент
Ваш промокод:BLOGСмотреть все часы
Включение и базовая настройка
Хотя изначально часы имеют какой-то уровень заряда, лучше перед настройкой зарядить их полностью. Процесс связи со спутниками может занять до 10 мин., и нежелательно, чтобы в этот момент гаджет выключился.
Для включения нужно нажать и удерживать кнопку Light. Она же выключает часы, если ее удерживать на протяжении 30 сек.
Сразу после включения необходимо наладить сопряжение с телефоном и выставить базовые параметры:
- выбрать язык меню;
- единицы измерения расстояния — км или мили;
- выбрать 12- или 24-часовой формат времени;
- указать пол владельца;
- ввести год рождения, а затем рост и вес пользователя.
Эту информацию часы используют для автоматического расчета спортивной нагрузки и определения допустимых пульсовых зон. Теперь разберем некоторые пункты более подробно.
Выбор языка
При покупке часов Garmin важно обращать внимание на европейскую версию, а не азиатскую APAC. В противном случае кириллицы в меню не будет, максимум — английский.
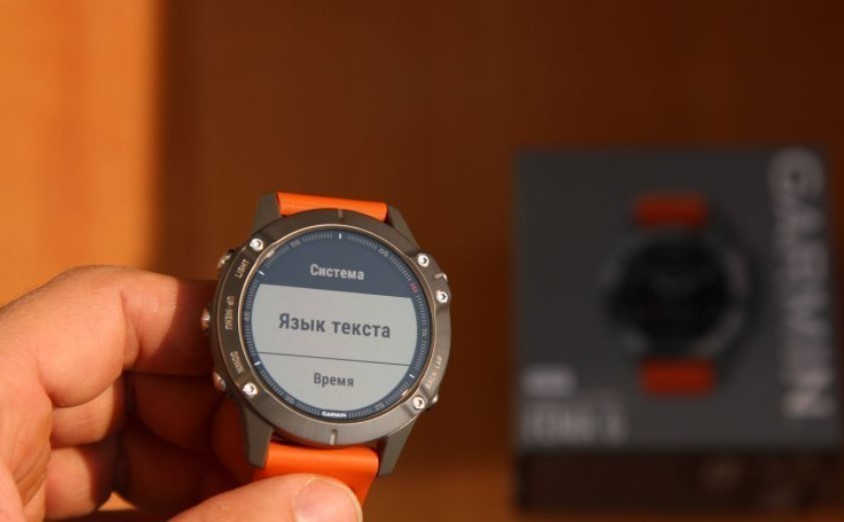
Европейская версия позволяет среди прочего выбрать русский, украинский, эстонский, литовский и латышский языки. Для прокрутки списка нужно нажимать кнопки «Вверх» и «Вниз», для выбора нужного — кнопку «Пуск/Стоп».
Как выставить время
Тут есть 2 варианта: ручной ввод или синхронизация с GPS для автоматического выставления. Второй вариант предпочтителен, ведь тогда будет учитываться ваш часовой пояс и автоматический переход с летнего времени на зимнее (где это применимо).

Как правило, первая синхронизация с GPS длится 3–10 мин. Процесс можно несколько ускорить, выйдя на открытую местность или хотя бы на балкон.
Сопряжение часов со смартфоном
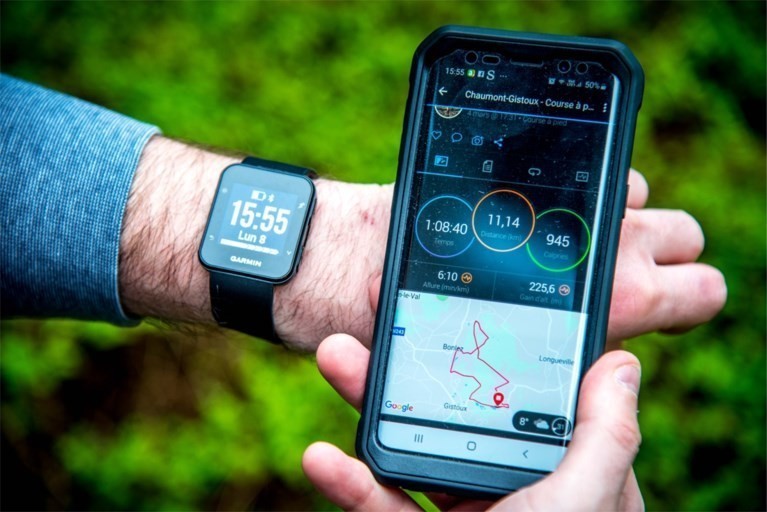
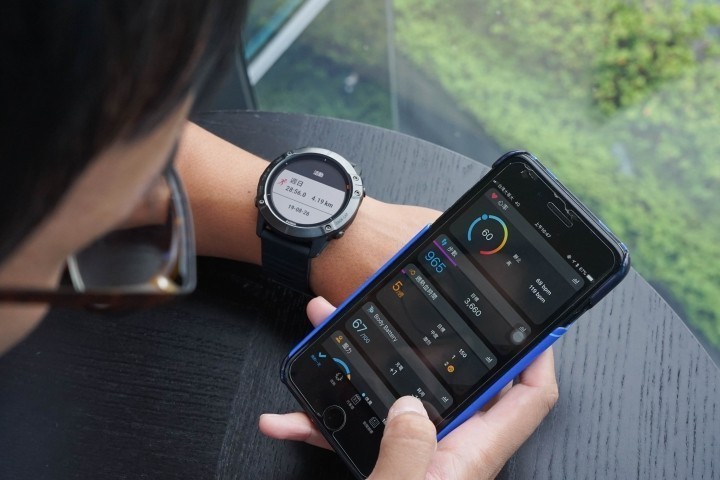
Сопряжение со смартфоном нужно для появления на часах уведомлений с телефона: новые сообщения, звонки и прочие события. Также благодаря подключению будет удобнее просматривать данные о спортивной активности.
Стоит предостеречь от естественной попытки большинства новичков синхронизировать часы только с помощью Bluetooth. Такое соединение ненадежно и часто будет прерываться.
Для качественного подключения необходимо:
1. Установить на смартфон приложение Garmin Connect и включить Bluetooth.
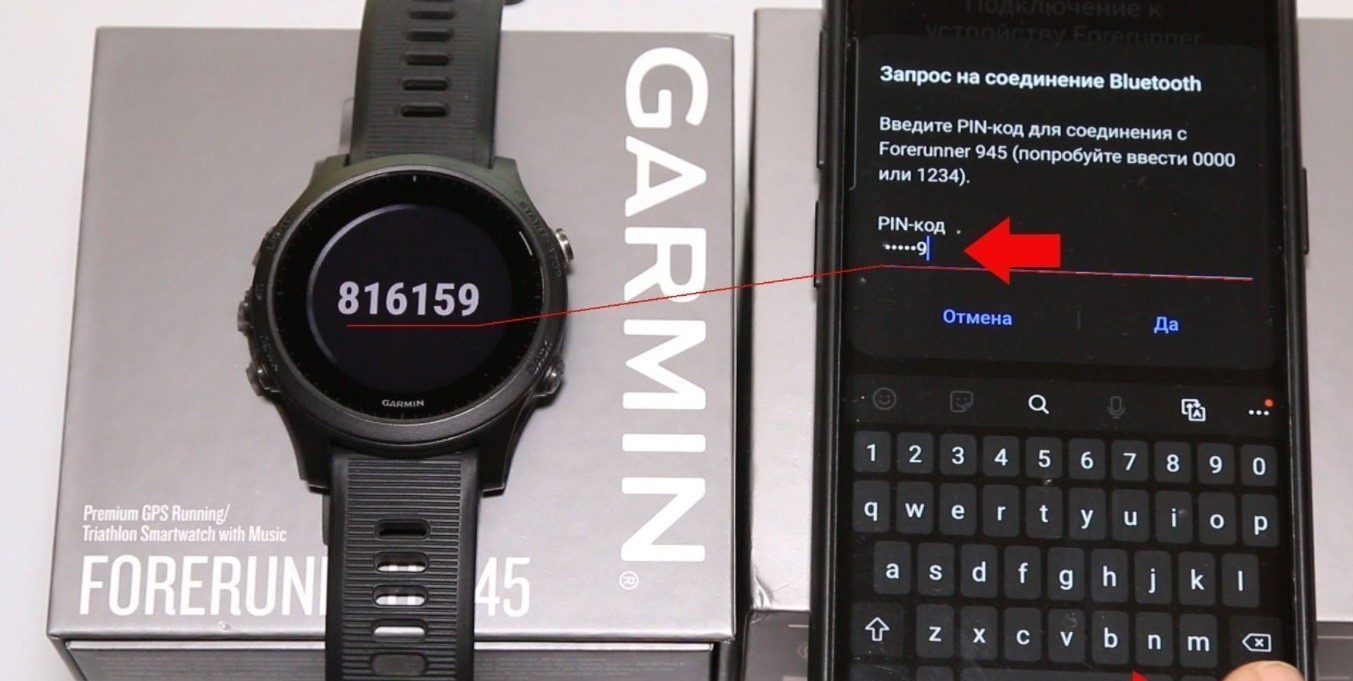
2. В часах выбрать «Меню» → «Настройка» → «Телефон» → «Состояние» → «Сопряжение телефона». А в программе на смартфоне нажать «Добавить устройство».
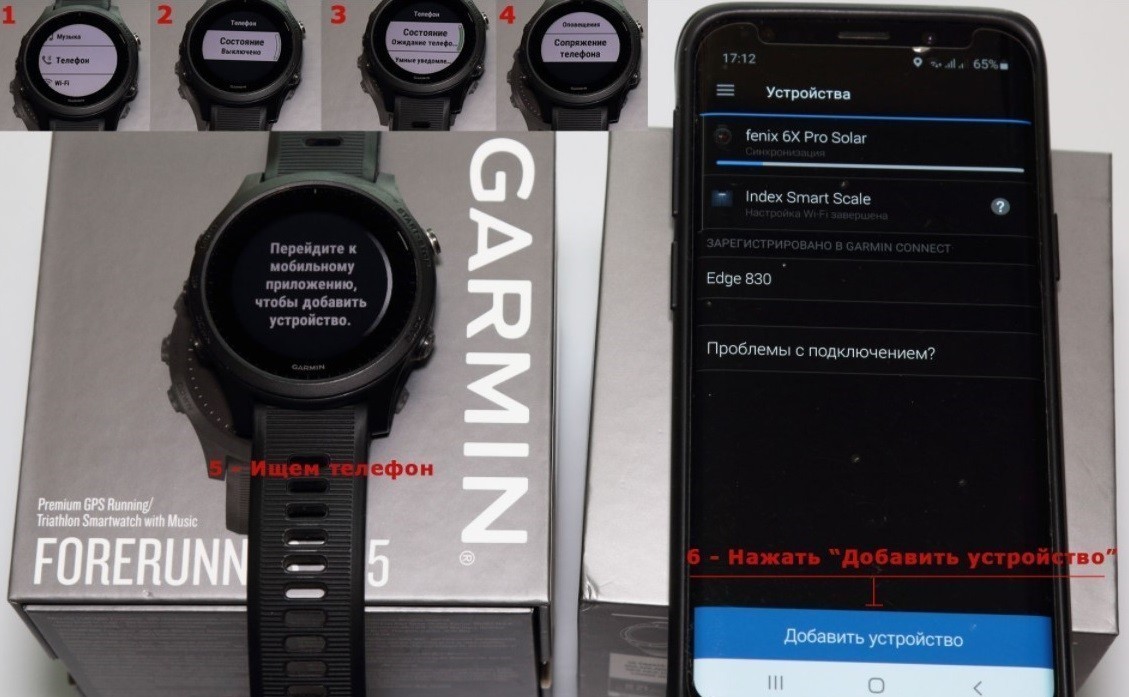
3. Подтвердить на телефоне подключение к часам.
4. Ввести в программе телефона PIN-код, отображенный на часах.
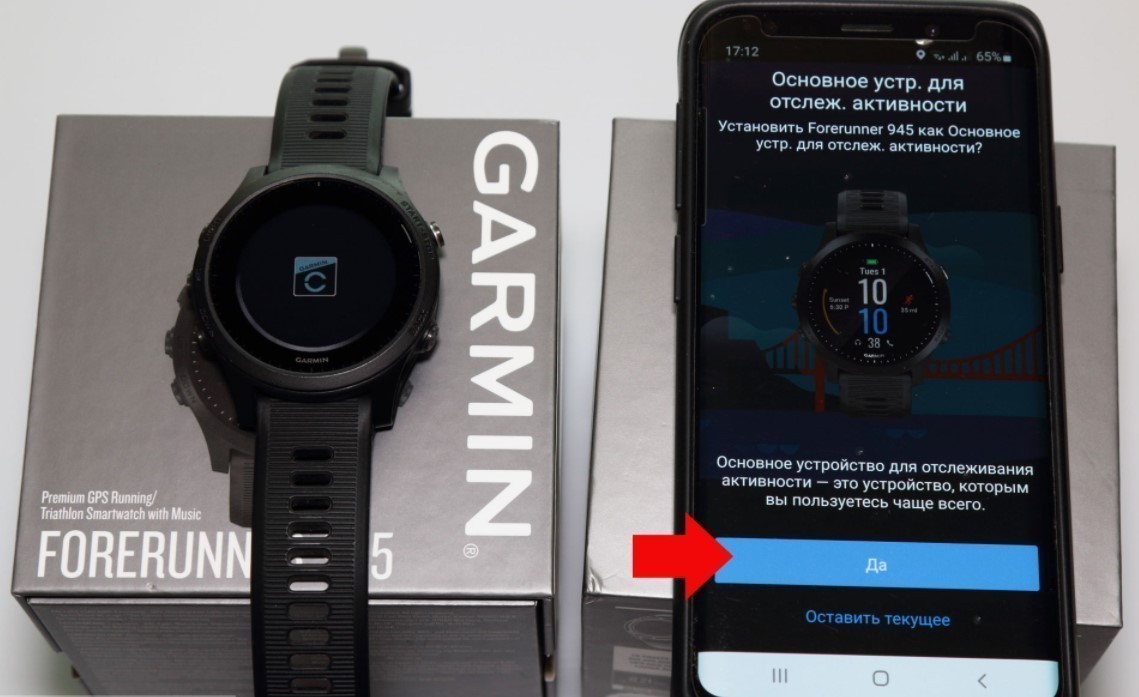
5. Выбрать смартфон как основное устройство для синхронизации.
6. Настроить такие параметры как уведомления и учетную запись TrueUp.
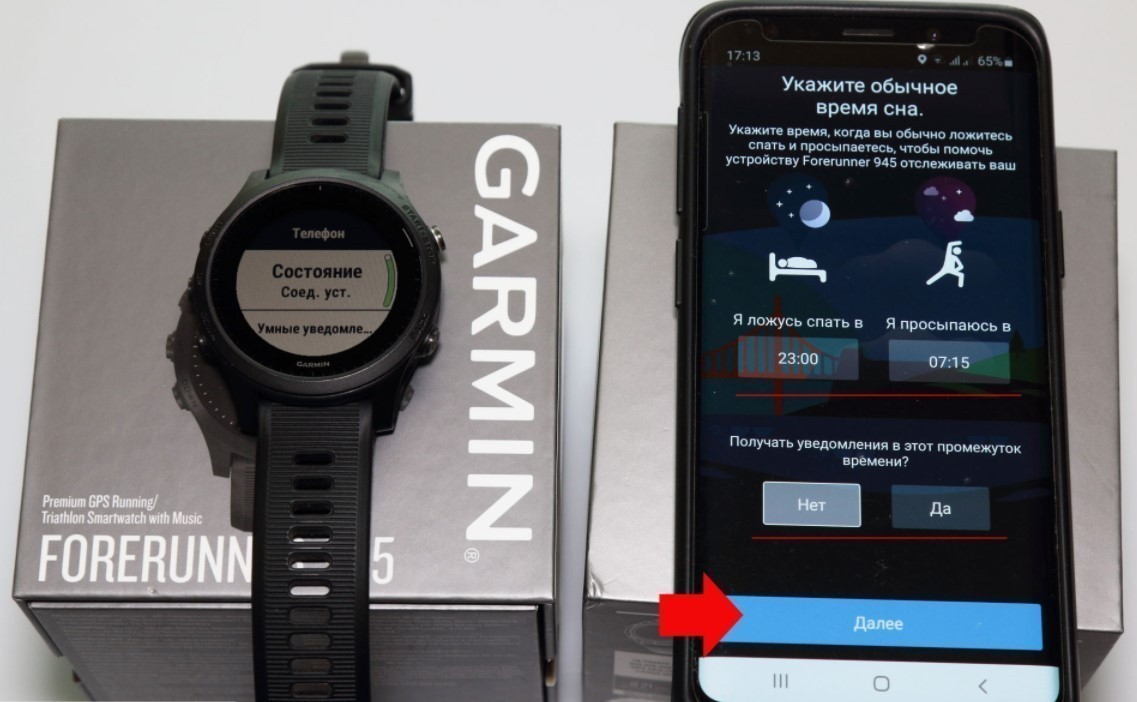
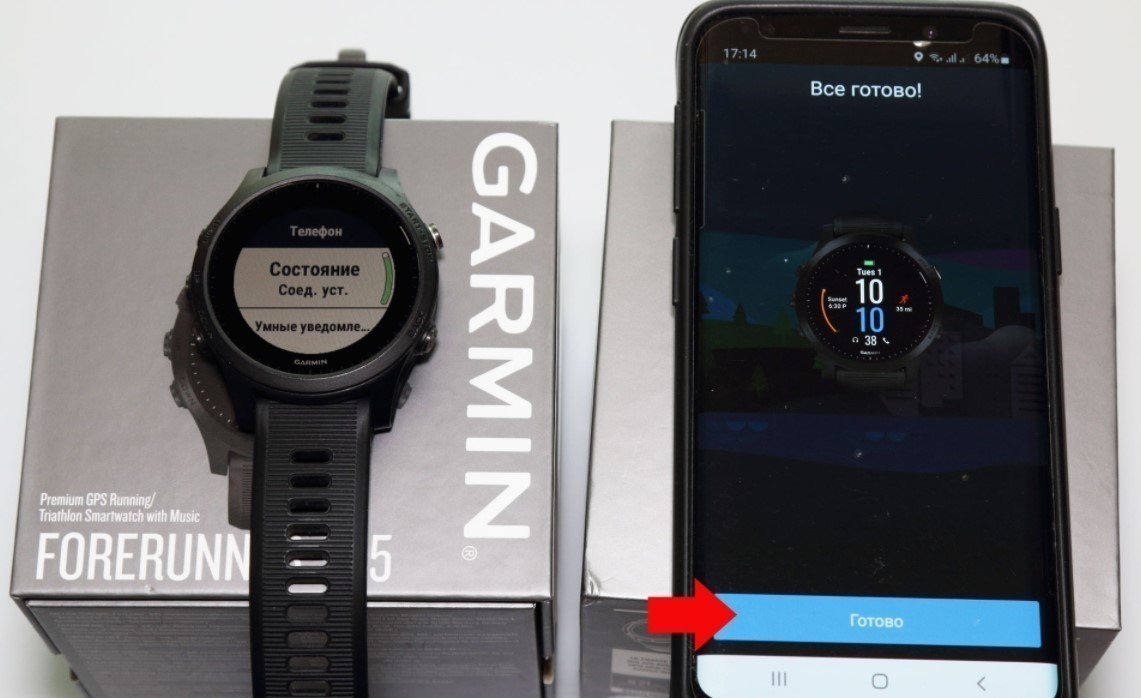
После этого можно включить синхронизацию.
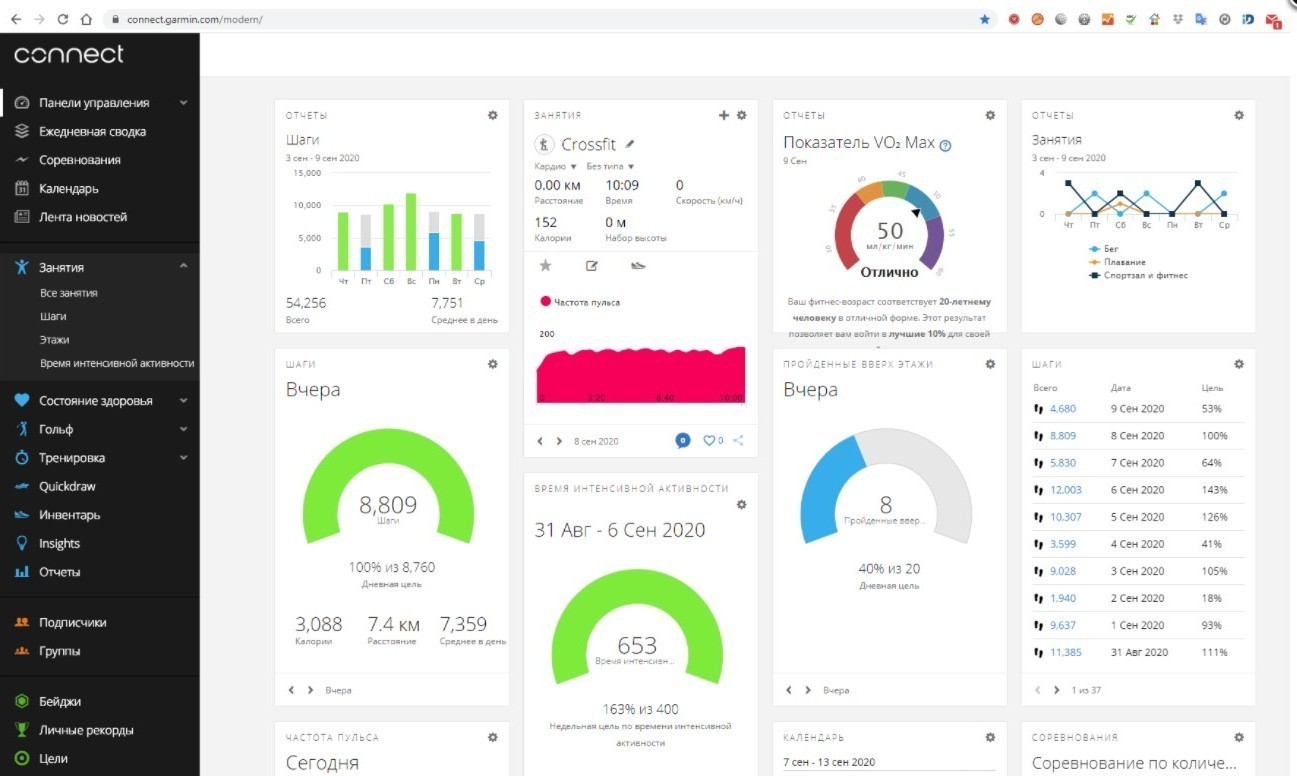
Как зарегистрироваться в сервисе Garmin Connect
Регистрация на сайте Garmin Connect нужна для сохранения и последующего отслеживания всех тренировок, походов и прочей активности. Эти облачные данные останутся даже при смене часов или смартфона. Также сервис проводит анализ состояния здоровья на основании изменения пульса, затрат калорий, времени сна и т.д.
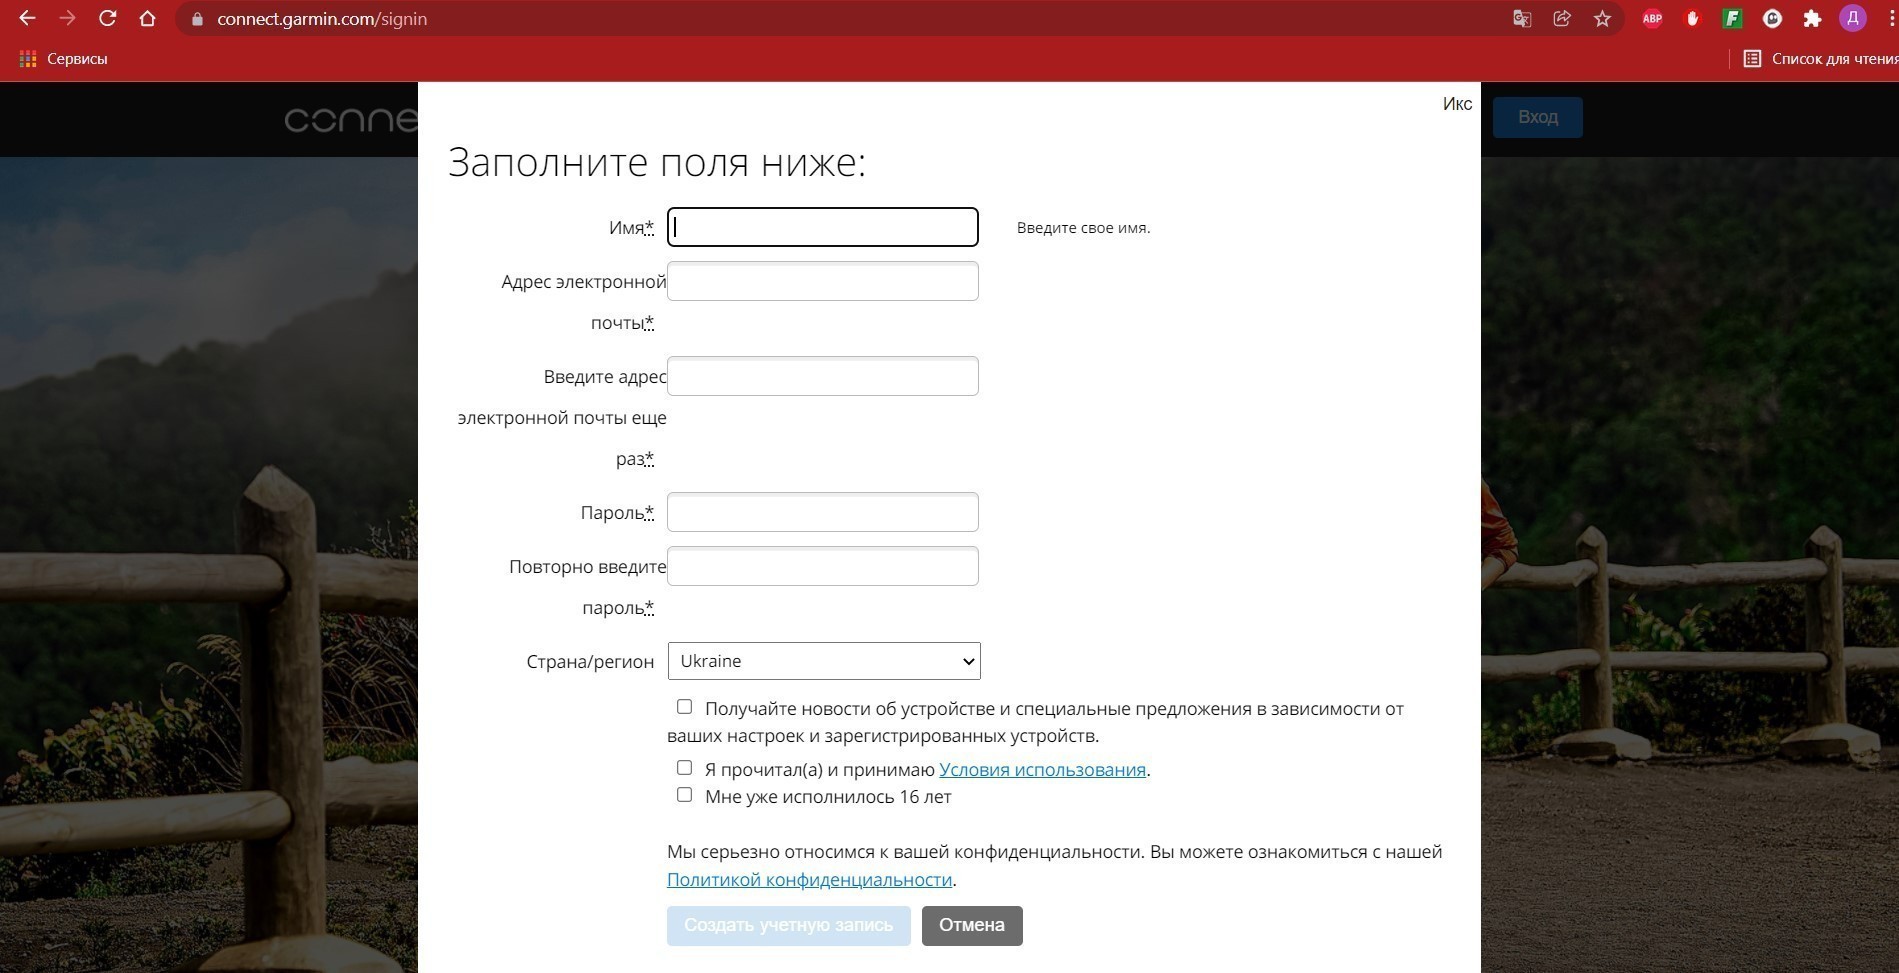
На самом сайте в верхнем левом углу нажимаем кнопку «Вход», далее выбираем «Создать учетную запись» и заполняем форму для регистрации.
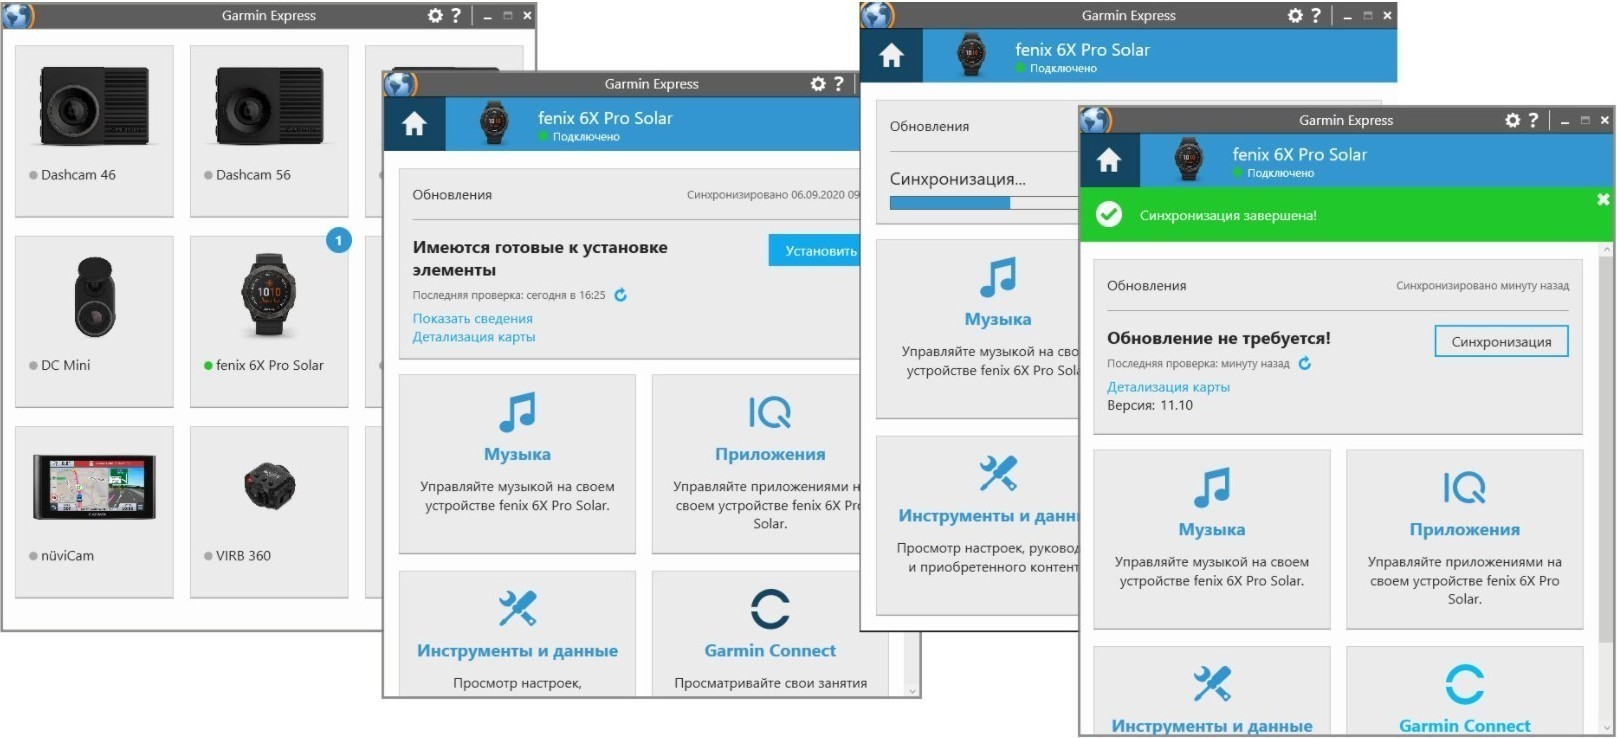
Синхронизация часов Garmin с ПК
Для этого понадобится кабель USB и программа Garmin Express.
Кабель ускорит загрузку и обновление уже имеющихся карт и позволит добавить дополнительные — например, OpenStreetMap.
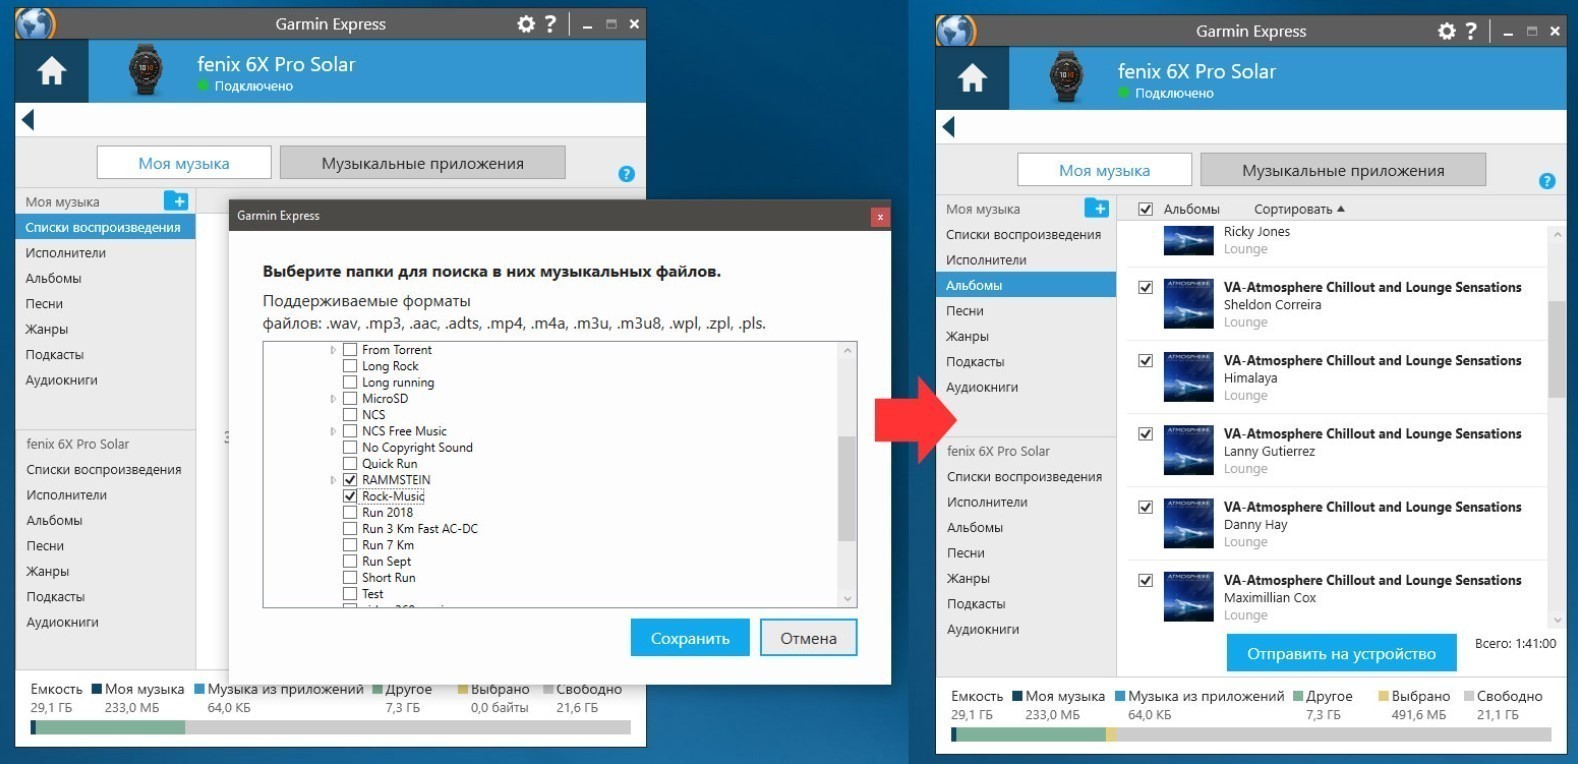
Еще с помощью ПК можно добавить музыкальные треки для воспроизведения через наушники или портативную колонку. Для этого нужно подключить беспроводные наушники по Bluetooth к часам Garmin по схеме: «Настройки» → «Датчики и аксессуары» → «Добавить» → «Наушники».
Подключение выносных датчиков
Конечно, часы Garmin уже оборудованы оптическими датчиками HR для измерения пульса. Но специфика работы такова, что они больше подходят для тренировок с небольшой интенсивностью, когда сердце бьется в одном темпе без скачков нагрузки.
Когда происходит резкое увеличение нагрузки, то быстро распознать изменения пульса оптический датчик не способен в силу своего принципа работы, а не неисправности. Поэтому для серьезных занятий спортом есть смысл приобрести выносные датчики, такие как Garmin HRM PRO или Garmin HRM-Run.
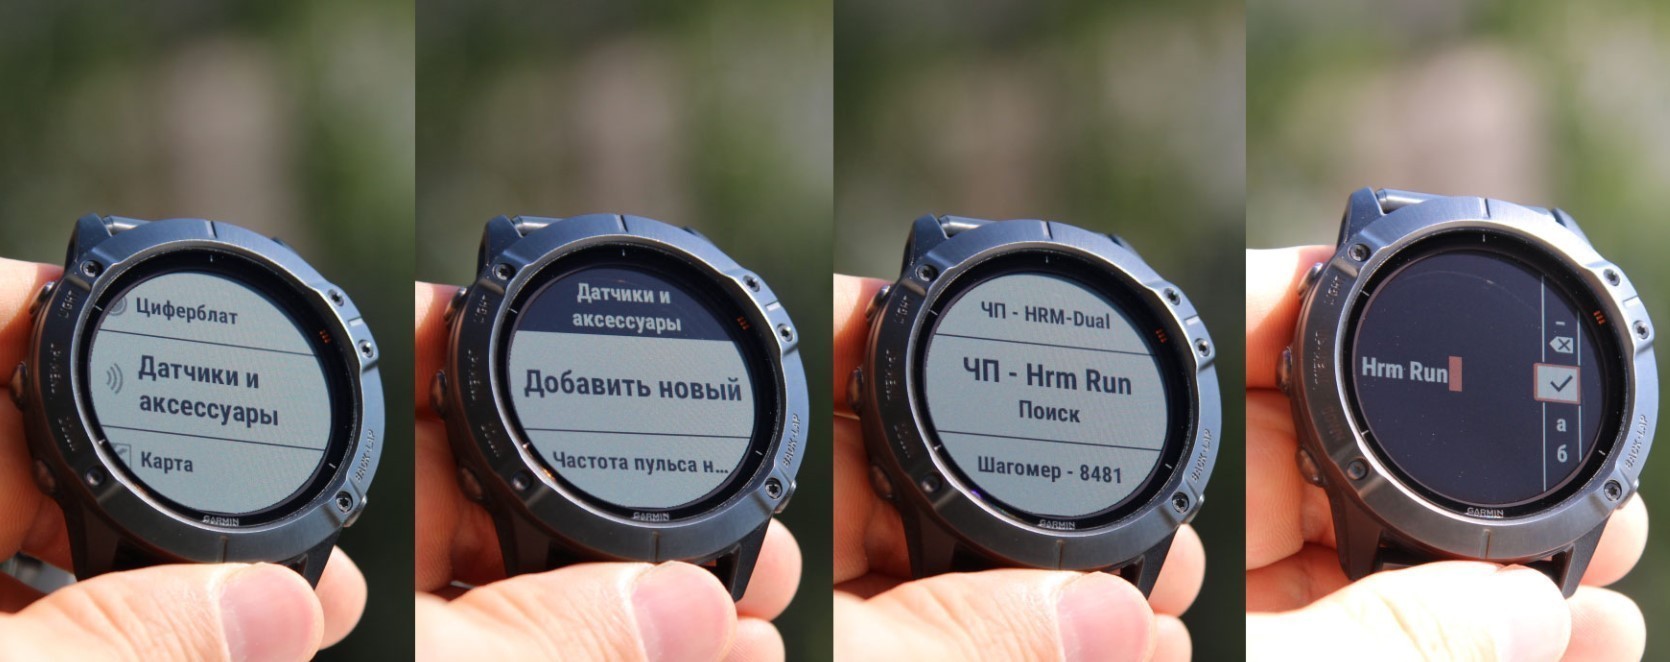
Алгоритм подключения очень прост: «Настройки» → «Датчики и аксессуары» → «Добавить» и затем выбрать необходимый датчик. Для облегчения ориентации во всех элементах их можно переименовать при сопряжении.
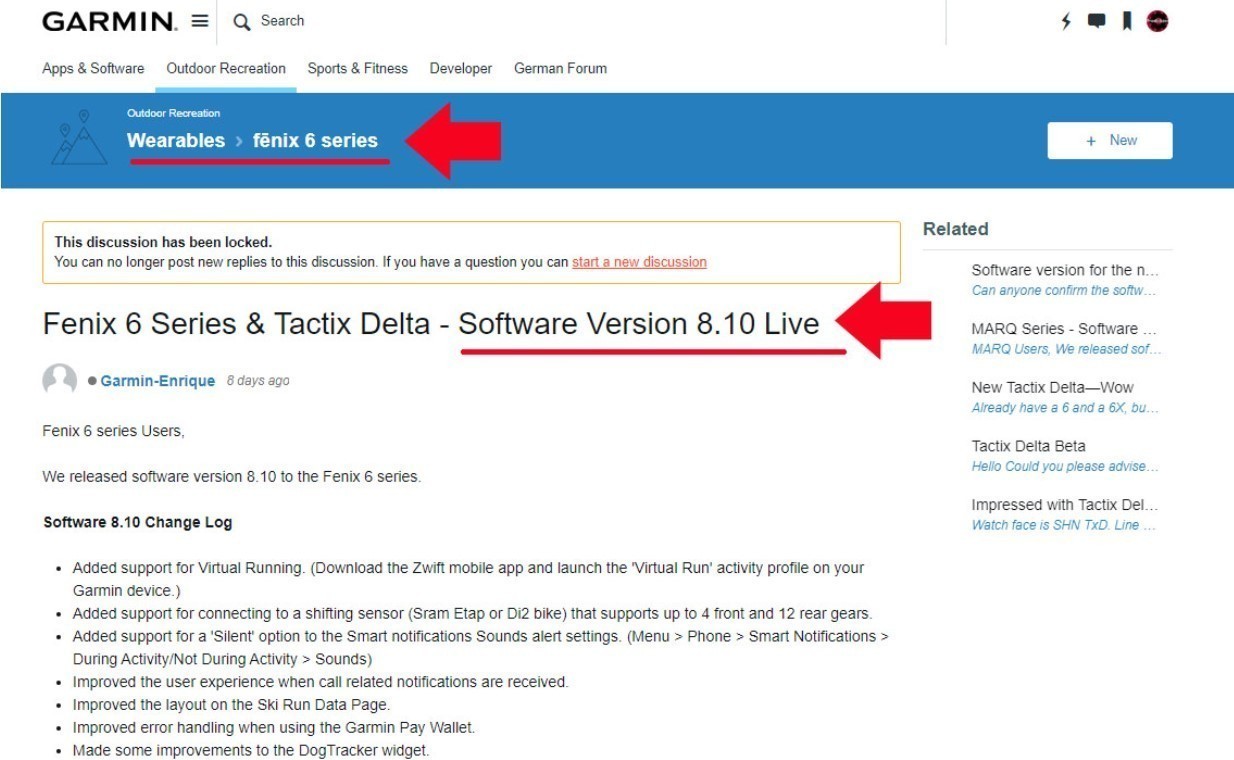
Как обновить версию прошивки?
Рекомендуется сразу обновить версию прошивки часов, ведь с момента выпуска до приобретения может пройти немало времени.
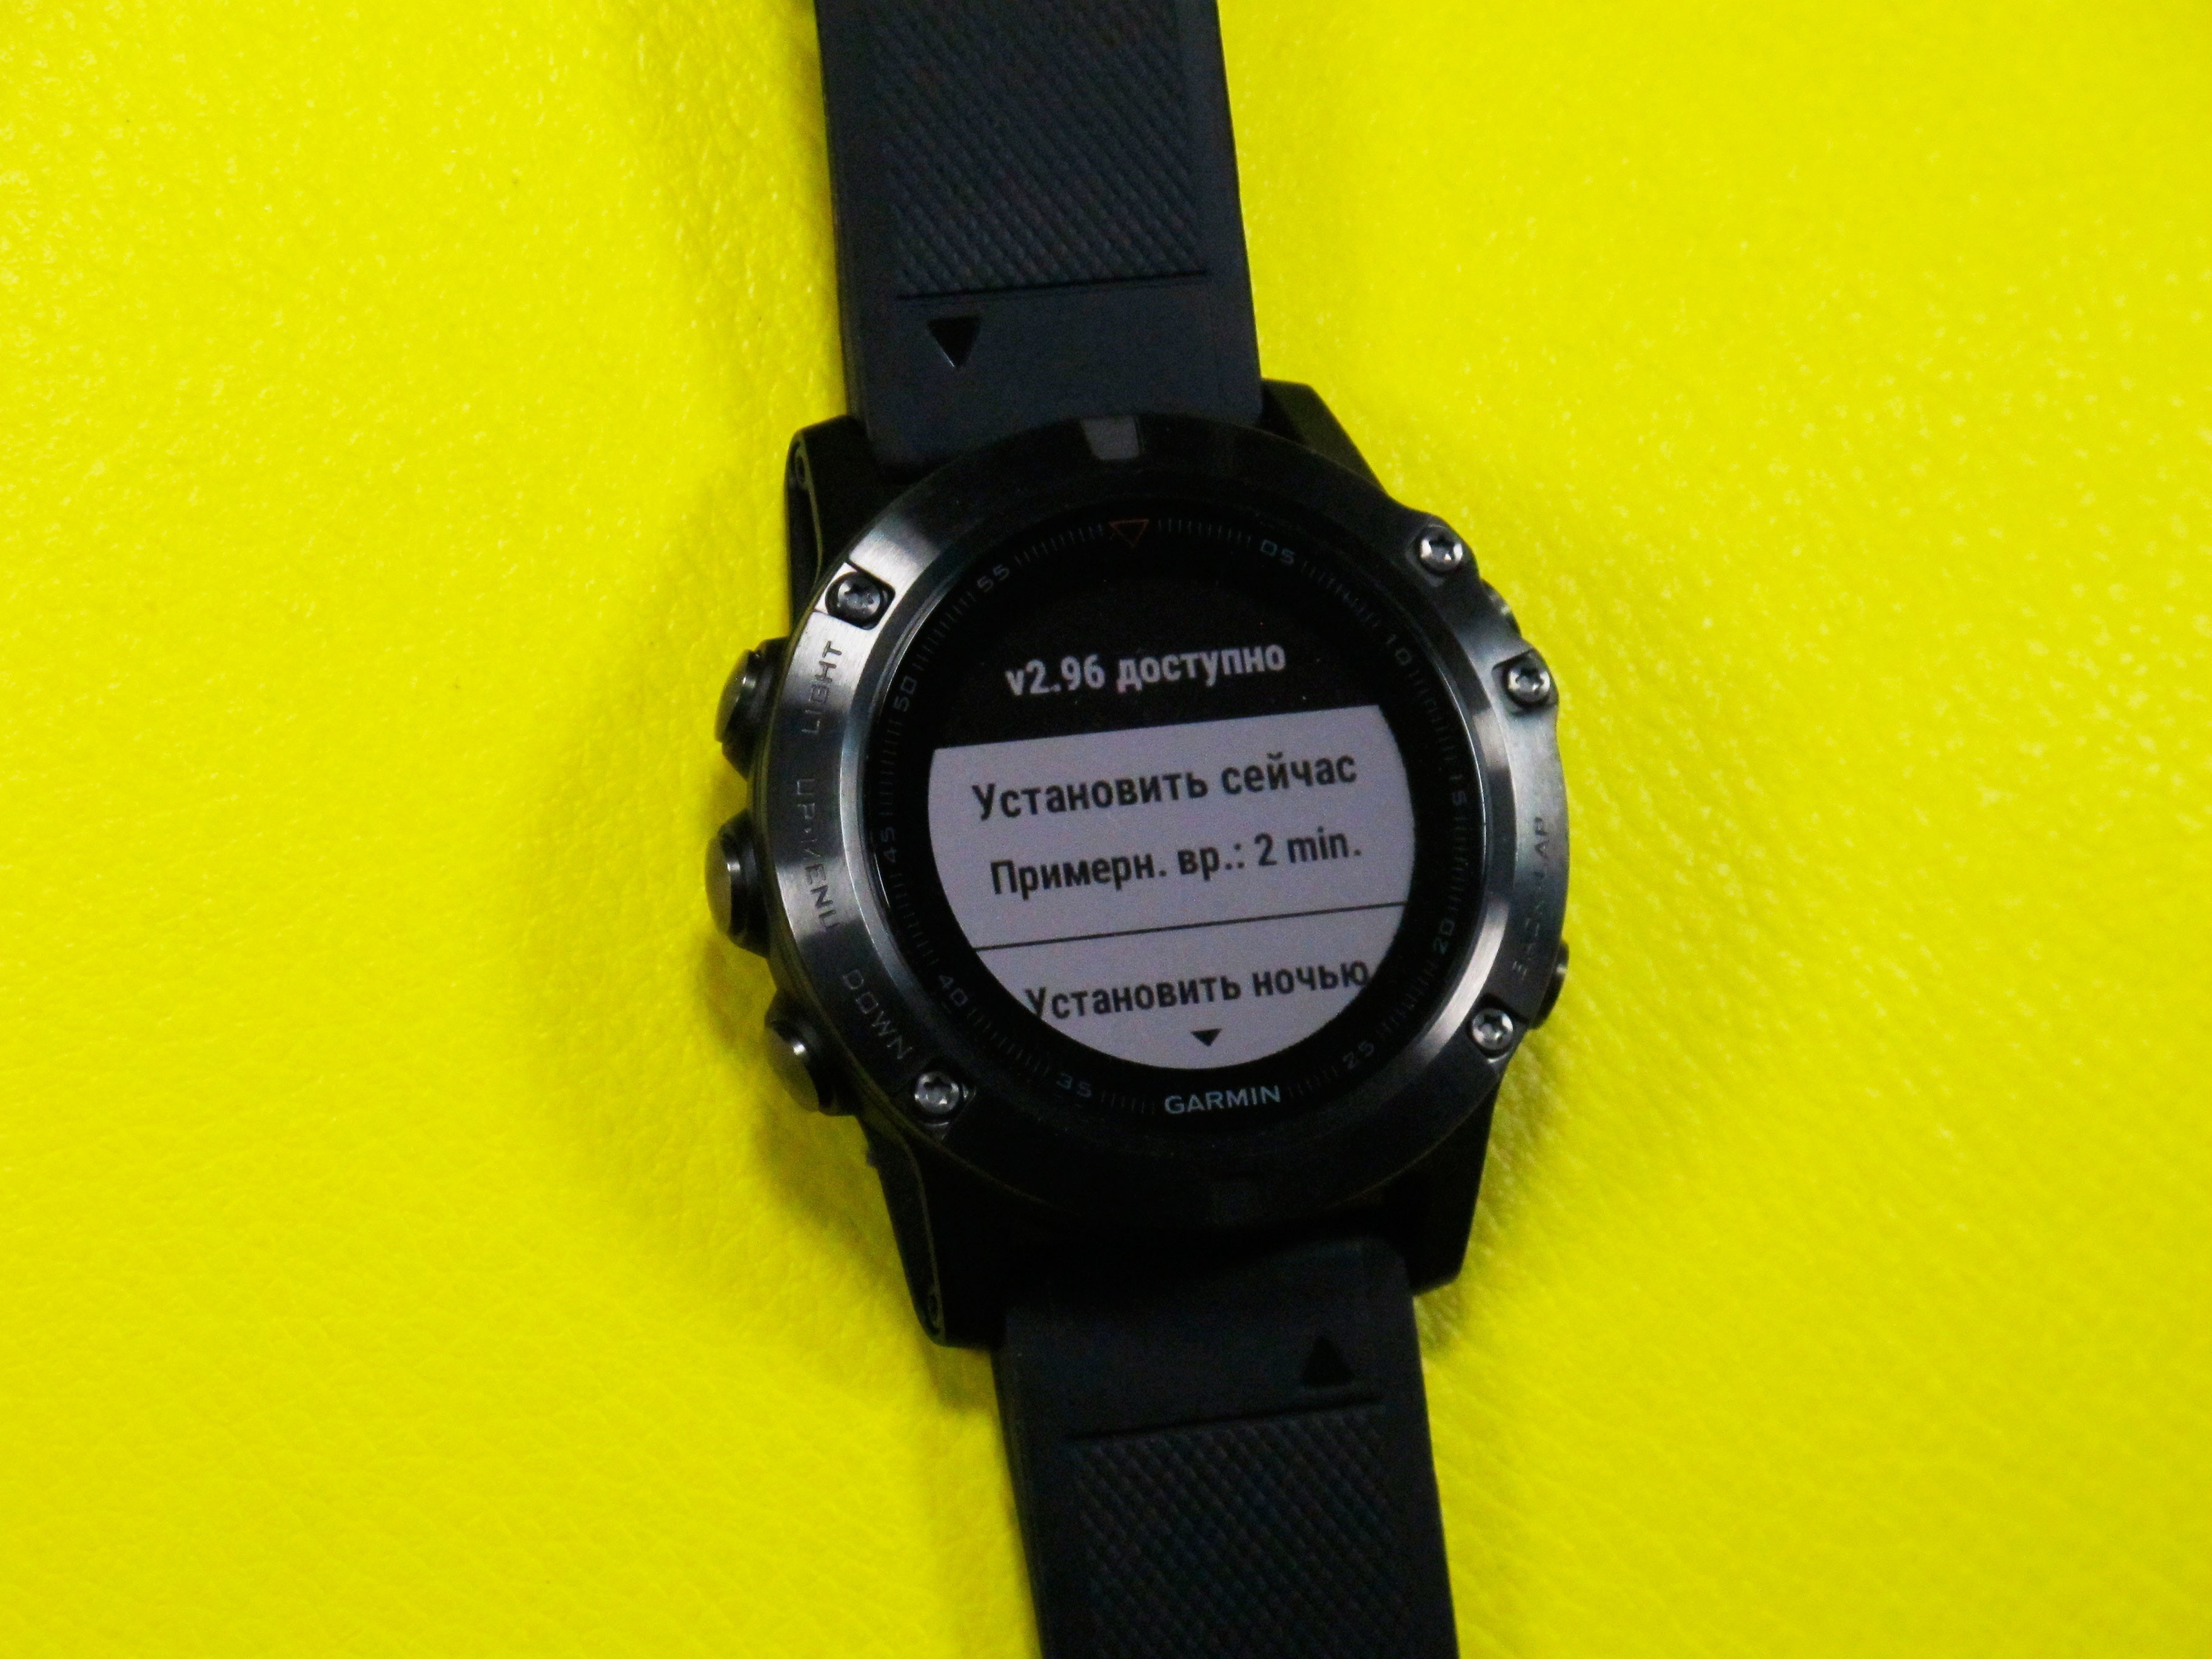
Узнать версию последней прошивки можно на официальном сайте. Там необходимо указать модель ваших часов Garmin. После чего вы увидите в заглавии темы номер актуальной версии прошивки.
Затем сравните это с текущей версией на ваших часах по такому пути: «Настройки» → «Система» → «Об устройстве».
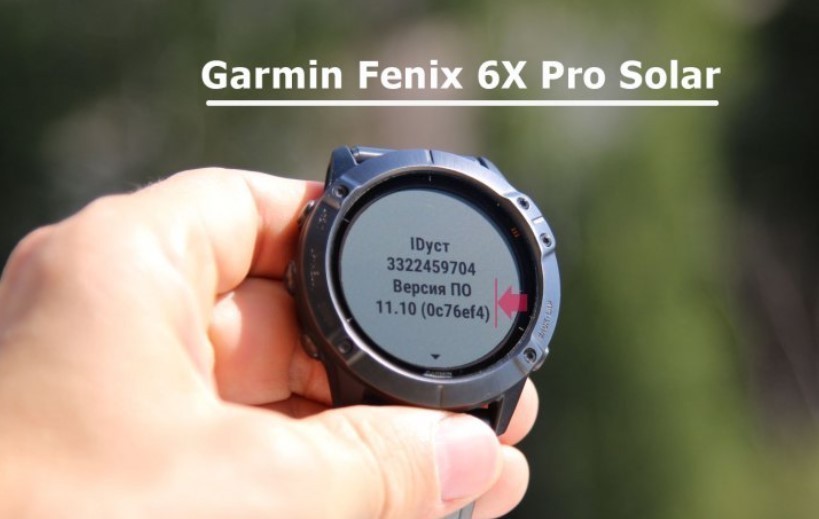
Само обновление происходит либо через программу Garmin Express на ПК в соответствующем окне, либо через беспроводное подключение Wi-Fi и Bluetooth. Но с помощью ПК это займет меньше времени.
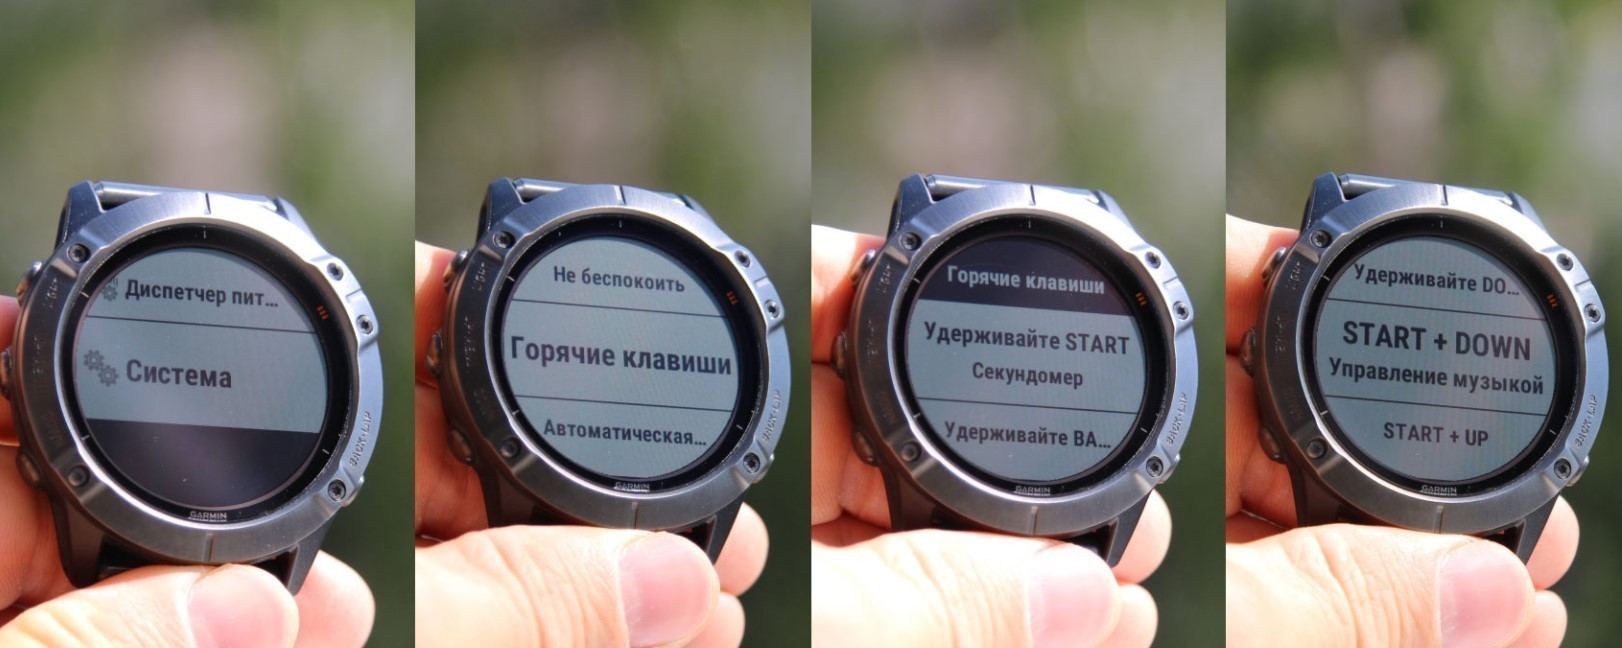
Использование горячих кнопок
Допустим, вы хотите, чтобы секундомер включался продолжительным нажатием всего одной кнопки. Тогда нужно сделать следующие шаги: «Настройки» → «Система» → «Горячие клавиши» → выбрать кнопку, которая станет горячей → выбрать функцию, которую нужно привязать в кнопке.
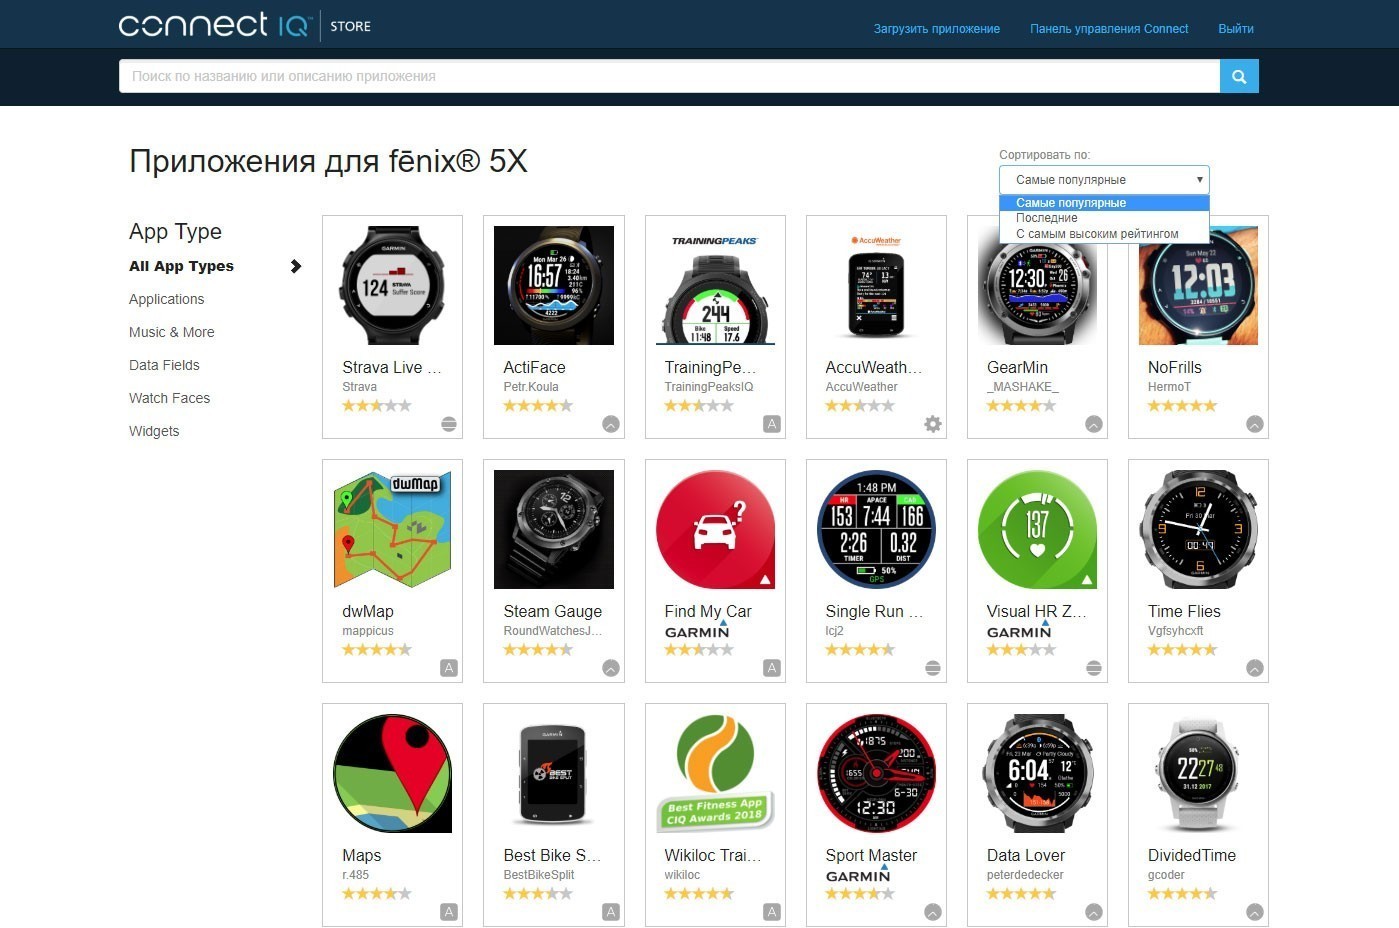
Установка дополнительных циферблатов и приложений
Для часов Garmin предусмотрен сайт Connect IQ — бесплатный каталог циферблатов, виджетов и приложений. Но стоит помнить, что сторонние данные составляются энтузиастами, поэтому они не всегда до конца оптимизированы и могут, к примеру, увеличивать расход батареи. При выборе дополнительных функций обращайте внимание на рейтинг, совместимость и отзывы о приложении.
Чтобы установить дополнительный циферблат в свои часы, нужно выполнить такие шаги (предварительно подключив гаджет к ПК USB-кабелем):
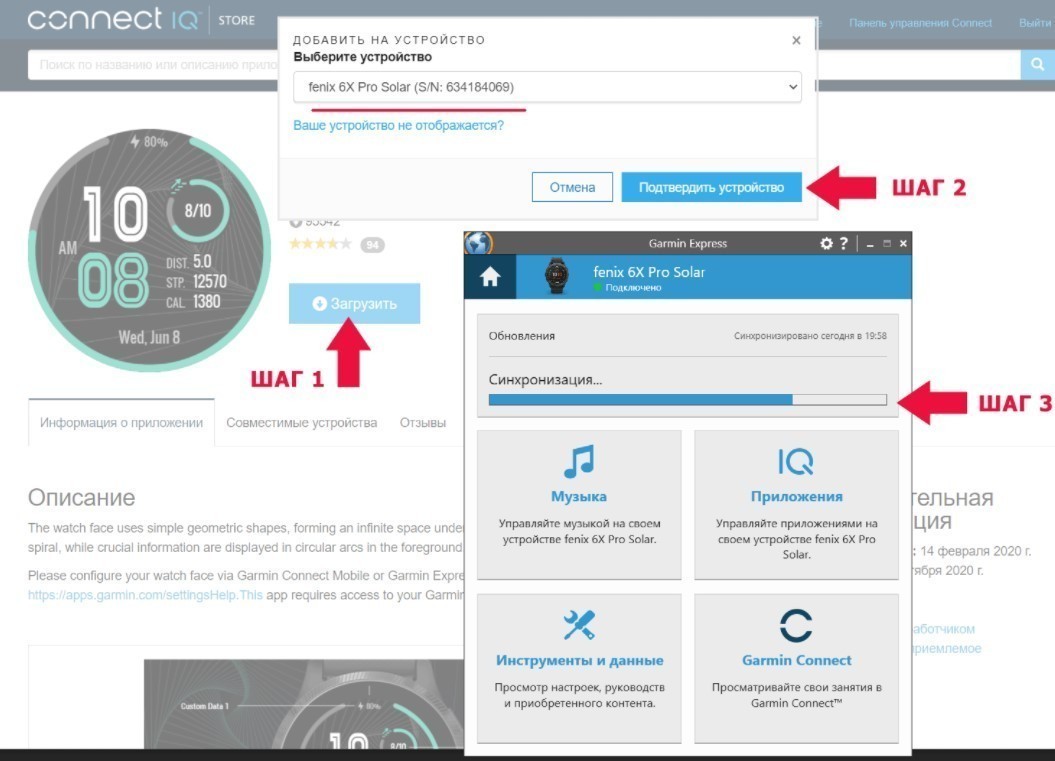
1. Выбрать понравившийся циферблат в каталоге.
2. Загрузить его.
3. Дождаться синхронизации.
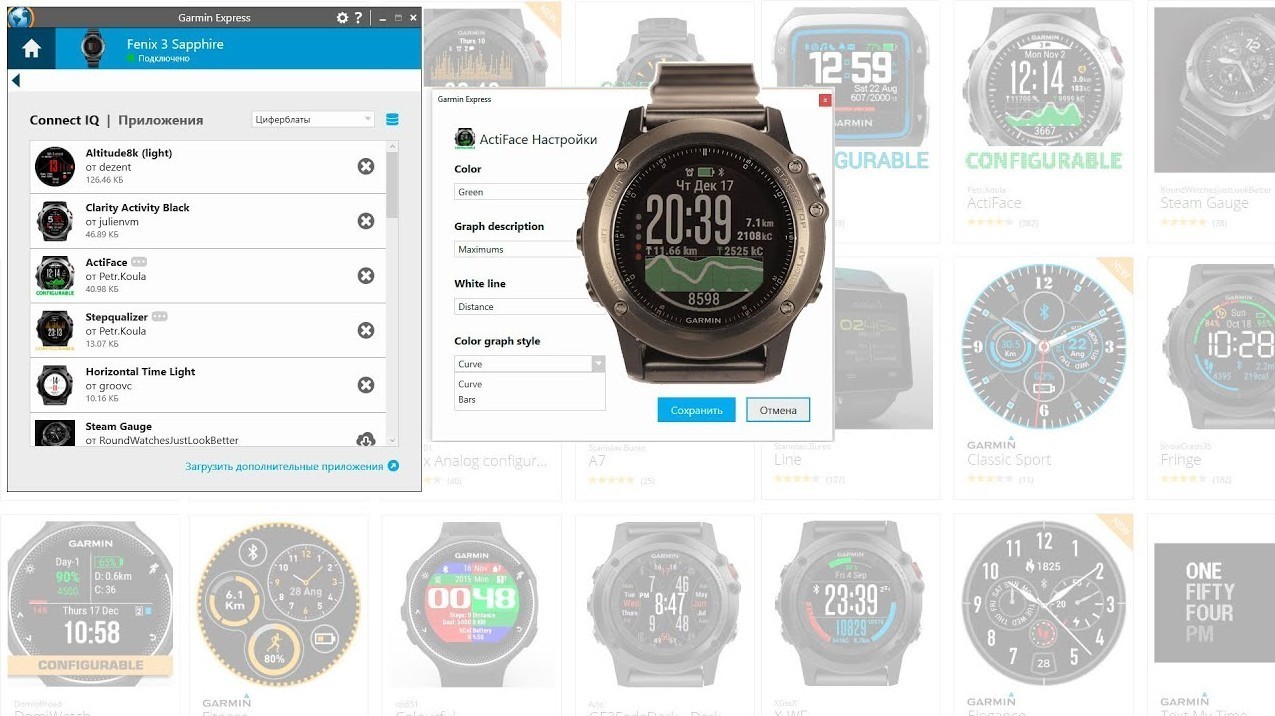
Установка сторонних виджетов и приложений проходит по той же системе.
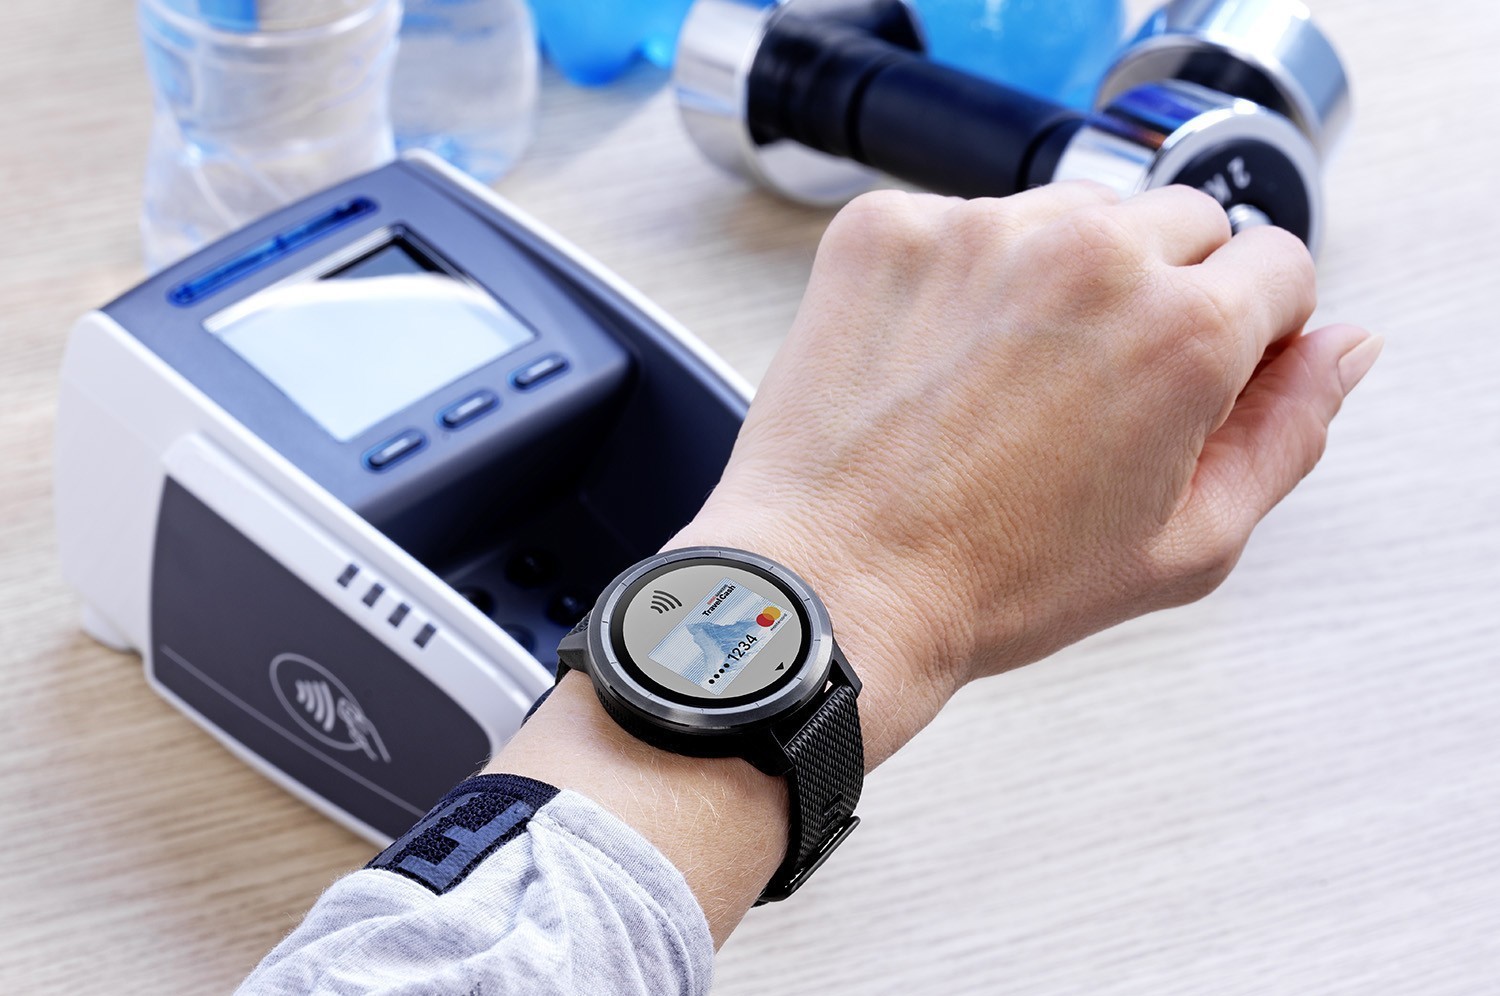
Установка бесконтактной оплаты Garmin Pay
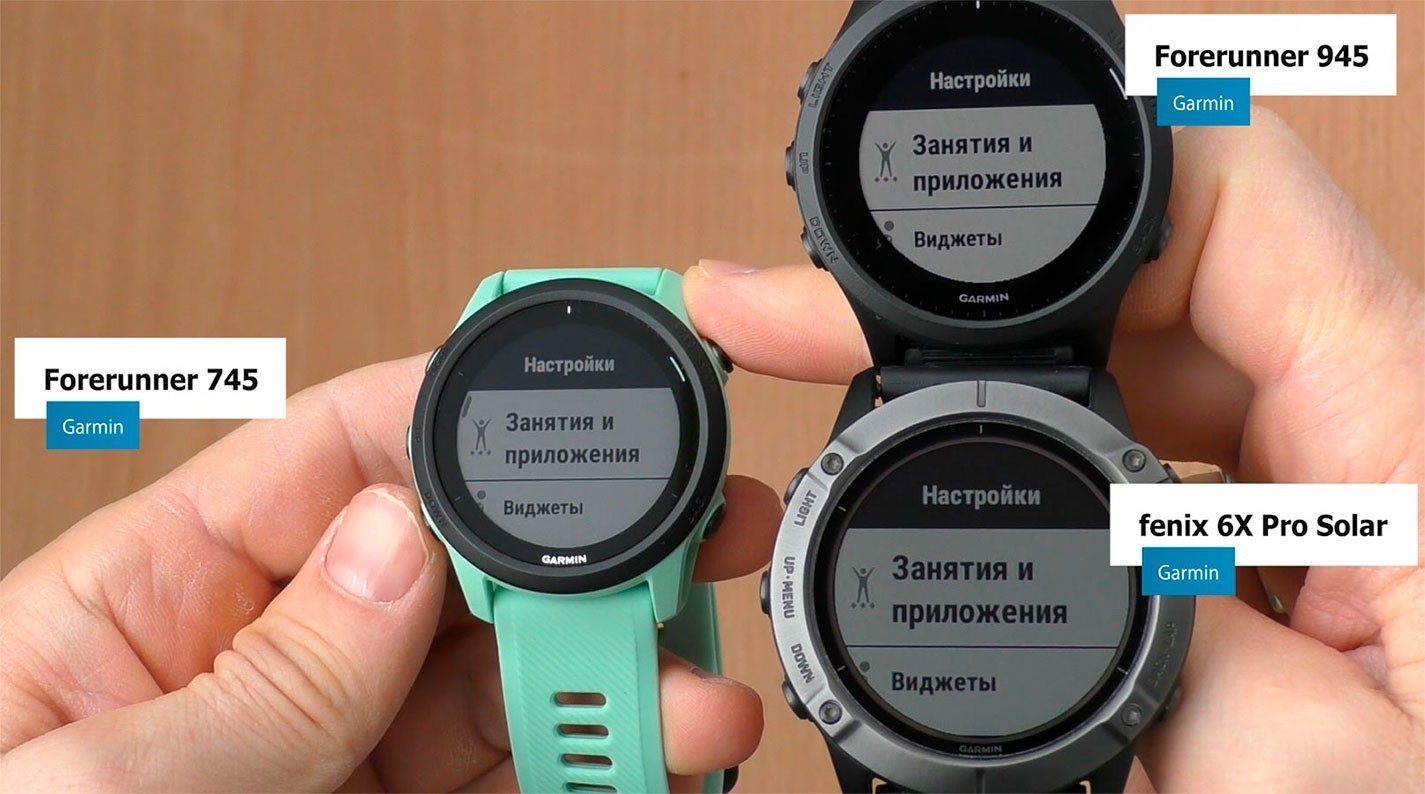
Большинство современных моделей часов Garmin — например, Forerunner 745, Fenix 6 Pro Solar Edition и MARQ Driver — имеют модуль NFC и могут использоваться для бесконтактной оплаты. Для начала нужно убедиться, что ваш банк поддерживает такой вид оплаты, найдя его на официальном сайте Garmin и установив сопряжение часов с программой Garmin Connect на смартфоне с подключением к интернету.
Далее необходимо выполнить такие шаги:
1. Зайти в меню Garmin Connect и выбрать часы для оплаты.
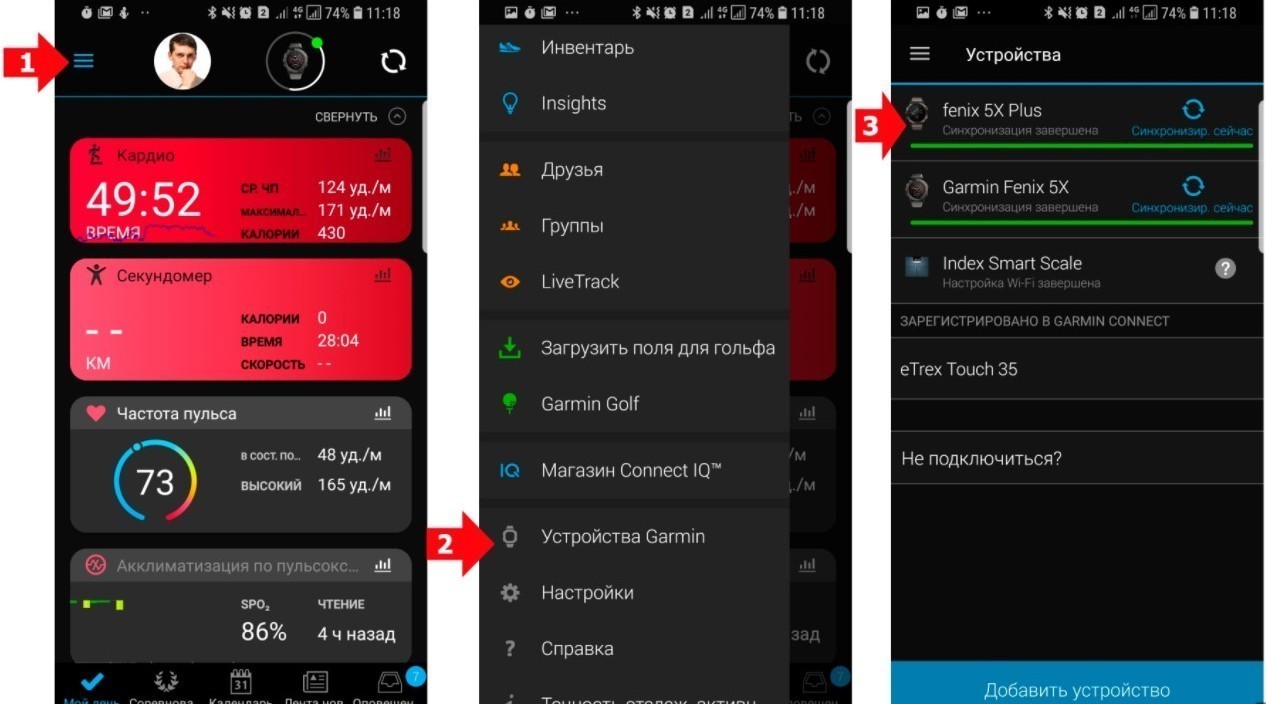
2. В новом окне нажать Garmin Pay и создать кошелек с данными вашей банковской карты.
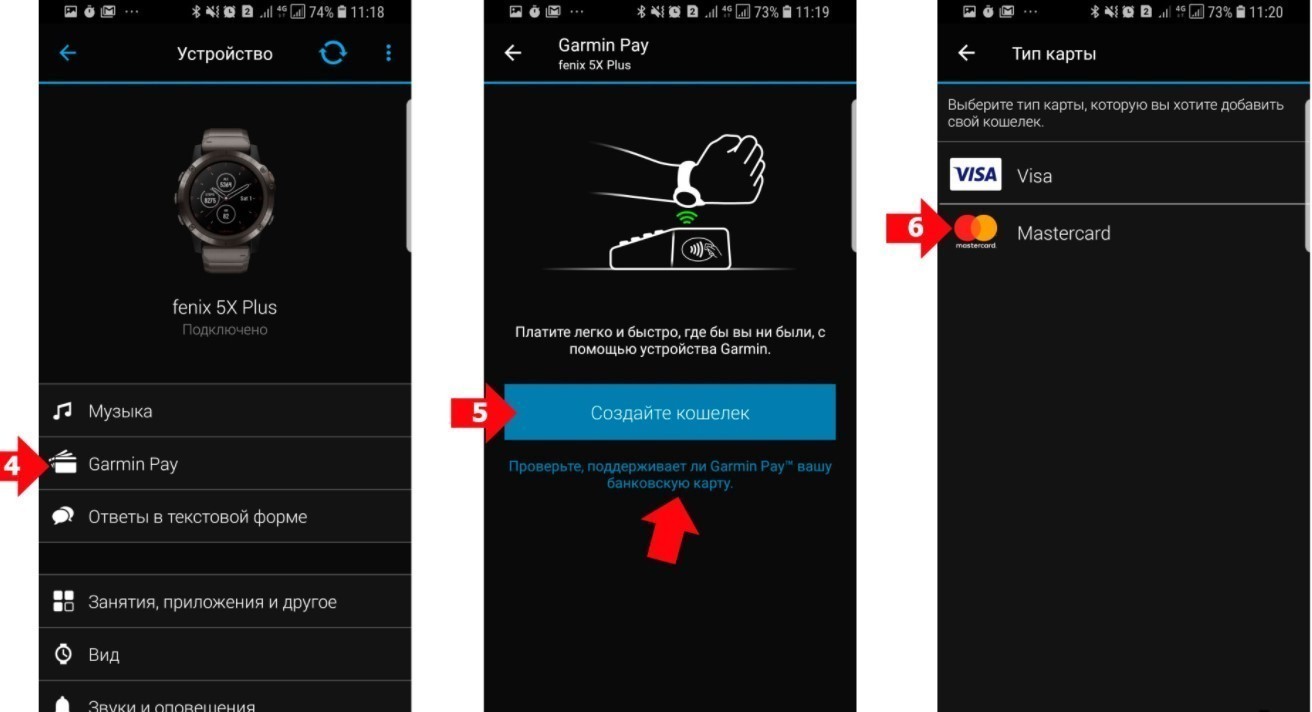
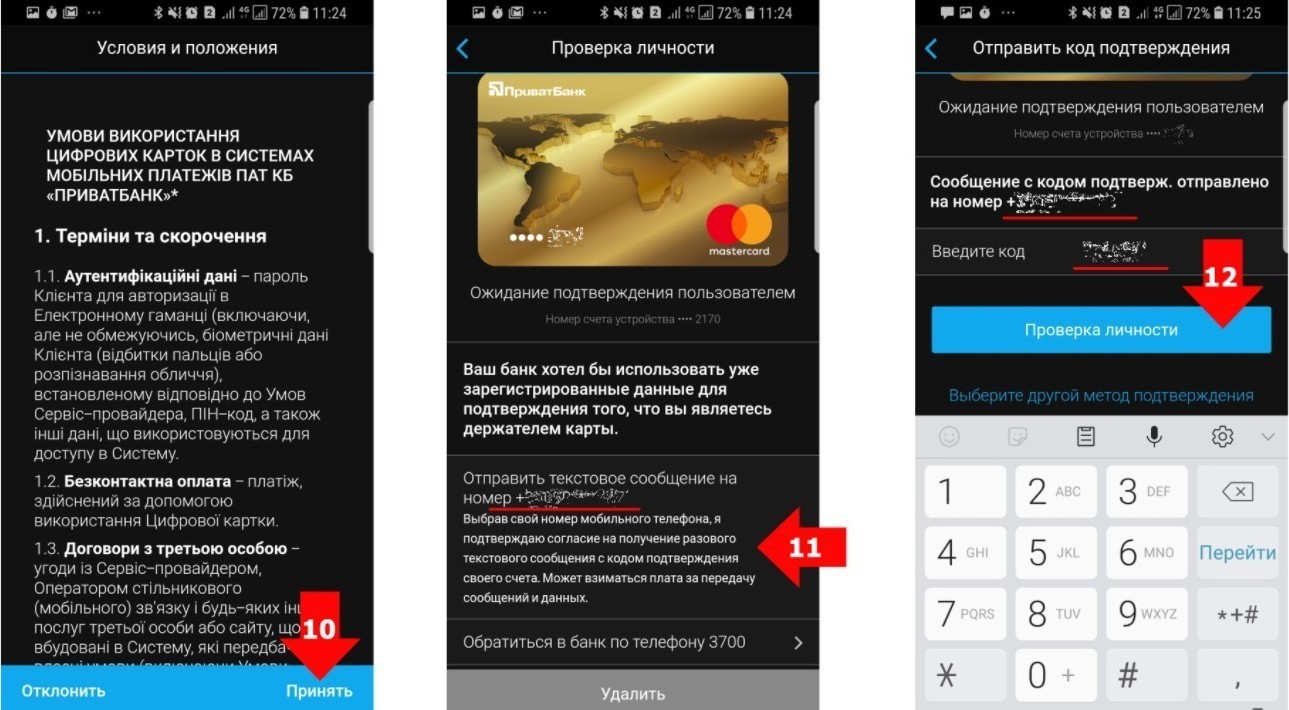
3. Принять соглашение пользователя и указать платежные реквизиты.
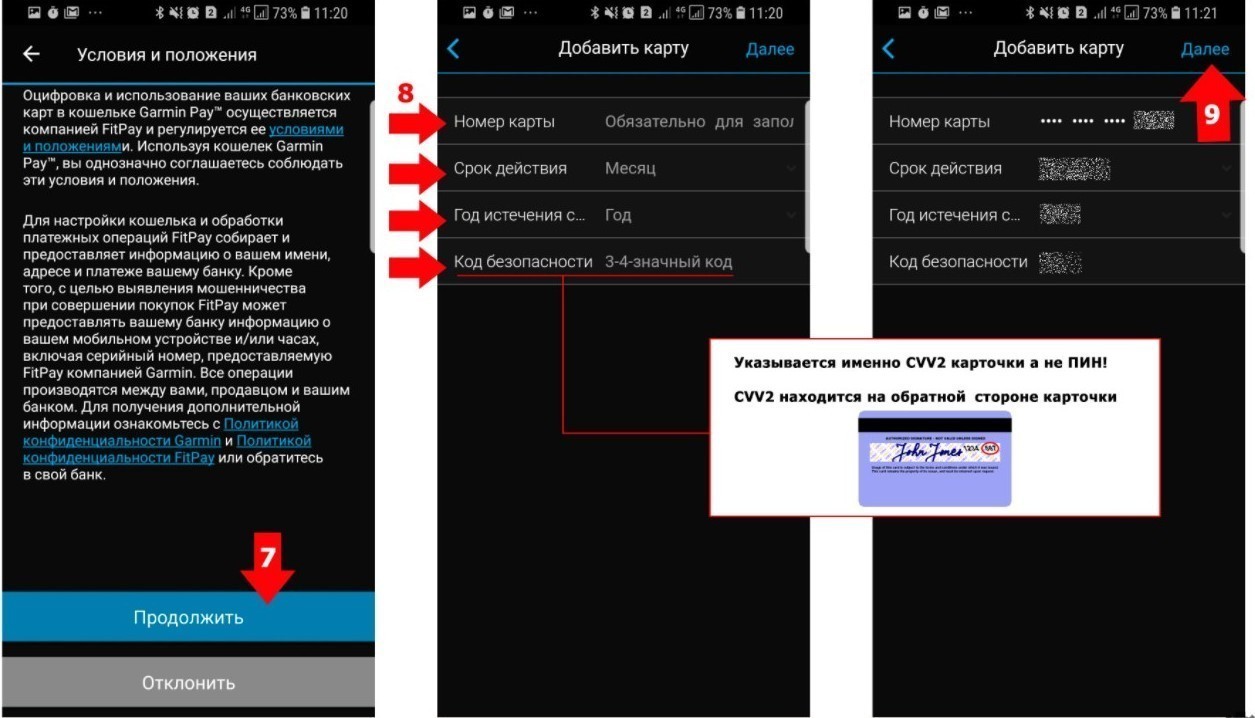
4. Пройти проверку личности.
Чтобы расплатиться, достаточно зайти в меню часов и выбрать значок кошелька, а затем выбрать карту для списания средств.
Вывод
Как видно, настройка часов Garmin довольно проста и интуитивно понятна. Советы из этой статьи помогут владельцам практически всех моделей с кнопками — например, Finix, Instinct или Forerunner. Так что долгого вам пользования и отличных тренировок!
- Manuals
- Brands
- Garmin Manuals
- Watch
- FORERUNNER 945 LTE
- Owner’s manual
-
Contents
-
Table of Contents
-
Troubleshooting
-
Bookmarks
Quick Links
FORERUNNER
945 LTE
®
Owner’s Manual
Related Manuals for Garmin FORERUNNER 945 LTE
Summary of Contents for Garmin FORERUNNER 945 LTE
-
Page 1
FORERUNNER 945 LTE ® Owner’s Manual… -
Page 2
© 2019 Garmin Ltd. or its subsidiaries All rights reserved. Under the copyright laws, this manual may not be copied, in whole or in part, without the written consent of Garmin. Garmin reserves the right to change or improve its products and to make changes in the content of this manual without obligation to notify any person or organization of such changes or improvements. Go to www.garmin.com… -
Page 3: Table Of Contents
Creating a Custom Activity….5 Indoor Activities……..5 Training……… 15 Going for a Virtual Run……5 Workouts……….15 Calibrating the Treadmill Distance..5 Following a Workout From Garmin Recording a Strength Training Connect……….15 Activity……….6 Starting a Workout……16 Tips for Recording Strength Following a Daily Suggested Training Activities……
-
Page 4
Using Do Not Disturb Mode….28 Tips for Missing Running Dynamics Intensity Minutes……..28 Data…………39 Earning Intensity Minutes….28 Performance Measurements….40 Garmin Move IQ™ Events….. 28 Turning Off Performance Activity Tracking Settings….28 Notifications……..40 Turning Off Activity Tracking… 28 Detecting Performance Hydration Tracking……. -
Page 5
Changing the Audio Mode….63 Turning Off the Bluetooth Connecting Bluetooth Headphones..64 Smartphone Connection….53 Turning On and Off Smartphone Garmin Pay……..64 Connection Alerts……53 Setting Up Your Garmin Pay Wallet..64 Bluetooth Connected Features…. 54 Table of Contents… -
Page 6
Paying for a Purchase Using Your Saving or Navigating to a Location on Watch………… 65 the Map……….74 Adding a Card to Your Garmin Pay Navigating with the Around Me Wallet…………. 65 Feature……….75 Managing Your Garmin Pay Cards.. 65 Panning and Zooming the Map..75… -
Page 7
Clocks………… 91 Restarting the Device……102 Setting an Alarm……. 91 Resetting All Default Settings…. 102 Deleting an Alarm……91 Updating the Software Using the Garmin Starting the Countdown Timer..92 Connect App……..102 Using the Stopwatch……92 Updating the Software Using Garmin Syncing the Time with GPS…. -
Page 8
My music cuts out or my headphones do not stay connected……104 Appendix……..105 Data Fields………. 105 VO2 Max. Standard Ratings….112 FTP Ratings……… 112 Wheel Size and Circumference..113 Symbol Definitions……114 Index……….115 Table of Contents… -
Page 9: Introduction
Introduction WARNING See the Important Safety and Product Information guide in the product box for product warnings and other important information. Always consult your physician before you begin or modify any exercise program. Device Overview Select to turn the device on. Select to turn the backlight on and off.
-
Page 10: Gps Status And Status Icons
VIRB ® camera status Setting Up Your Watch To take full advantage of the Forerunner features, complete these tasks. • Pair the Forerunner device with your smartphone using the Garmin Connect (Pairing Your Smartphone ™ with Your Device, page 52).
-
Page 11: Activities And Apps
Activities and Apps Your device can be used for indoor, outdoor, athletic, and fitness activities. When you start an activity, the device displays and records sensor data. You can save activities and share them with the Garmin Connect community. You can also add Connect IQ ™…
-
Page 12: Starting An Activity
Starting an Activity When you start an activity, GPS turns on automatically (if required). If you have an optional wireless sensor, you can pair it to the Forerunner device (Pairing Your Wireless Sensors, page 77). 1 From the watch face, select START. 2 Select an activity.
-
Page 13: Creating A Custom Activity
Creating a Custom Activity 1 From the watch face, select START > Add. 2 Select an option: • Select Copy Activity to create your custom activity starting from one of your saved activities. • Select Other to create a new custom activity. 3 If necessary, select an activity type.
-
Page 14: Recording A Strength Training Activity
• Turn on automatic set detection to start and stop your sets. • Save and send your strength training activity to your Garmin Connect account. You can use the tools in your Garmin Connect account to view and edit activity details. Activities and Apps…
-
Page 15: Using An Ant+ Indoor Trainer
Using an ANT+ Indoor Trainer ® Before you can use a compatible ANT+ indoor trainer, you must mount your bike on the trainer and pair it with your device (Pairing Your Wireless Sensors, page 77). You can use your device with an indoor trainer to simulate resistance while following a course, ride, or workout. While using an indoor trainer, GPS is turned off automatically.
-
Page 16: Creating A Multisport Activity
Creating a Multisport Activity 1 From the watch face, select START > Add > Multisport. 2 Select a multisport activity type, or enter a custom name. Duplicate activity names include a number. For example, Triathlon(2). 3 Select two or more activities. 4 Select an option: •…
-
Page 17: Swimming
Swimming NOTICE The device is intended for surface swimming. Scuba diving with the device may damage the product and will void the warranty. NOTE: The device is compatible with the HRM-Pro accessory and the HRM-Swim accessory (Chest Heart Rate ™ ™…
-
Page 18: Swim Terminology
Stroke type identification is available only for pool swimming. Your stroke type is identified at the end of a length. Stroke types appear in your swimming history and in your Garmin Connect account. You can also select stroke type as a custom data field (Customizing the Data Screens, page 81).
-
Page 19: Auto Rest
Auto Rest The auto rest feature is available only for pool swimming. Your device automatically detects when you are resting, and the rest screen appears. If you rest for more than 15 seconds, the device automatically creates a rest interval. When you resume swimming, the device automatically starts a new swim interval. You can turn on the auto rest feature in the activity options (Activities and App Settings, page 80).
-
Page 20: Recording A Backcountry Skiing Activity
Recording a Backcountry Skiing Activity The backcountry skiing activity lets you manually switch between climbing and descending tracking modes so you can accurately track your statistics. 1 From the watch face, press START. 2 Select Backcountry Ski. 3 Select an option: •…
-
Page 21: Hole Information
Hole Information The device calculates the distance to the front and back of the green, and to the selected pin location (Moving the Flag, page 13). Current hole number Distance to the back of the green Distance to the selected pin location Distance to the front of the green Par for the hole Map of the green…
-
Page 22: Viewing Layup And Dogleg Distances
® automatically track your golf shots, including location, distance, and club type. See the owner’s manual for your club sensors for more information (garmin.com/manuals/ApproachCT10). Using the Golf Odometer You can use the odometer to record the time, distance, and steps traveled. The odometer automatically starts and stops when you start or end a round.
-
Page 23: Playing Audio Prompts During Your Activity
Your device includes several preloaded workouts for multiple activities. You can create and find more workouts using Garmin Connect, or select a training plan that has built-in workouts and transfer them to your device. You can schedule workouts using Garmin Connect. You can plan workouts in advance and store them on your device.
-
Page 24: Starting A Workout
The suggested workout updates automatically to changes in training habits, recovery time, and VO2 max. Turning Daily Suggested Workout Prompts On and Off Daily suggested workouts are recommended based on your previous activities saved to your Garmin Connect account. 1 From the watch face, select START.
-
Page 25: Recording A Critical Swim Speed Test
About the Training Calendar The training calendar on your device is an extension of the training calendar or schedule you set up in Garmin Connect. After you have added a few workouts to the Garmin Connect calendar, you can send them to your device.
-
Page 26: Customizing An Interval Workout
Customizing an Interval Workout 1 Press START. 2 Select an activity. 3 Hold 4 Select Training > Intervals > Structured Repeats. A workout appears. 5 Select START > Edit. 6 Select one or more options: • To set the interval duration and type, select Interval. •…
-
Page 27: Using Virtual Partner
Using Virtual Partner ® The Virtual Partner feature is a training tool designed to help you meet your goals. You can set a pace for the Virtual Partner and race against it. NOTE: This feature is not available for all activities. 1 From the watch face, select START.
-
Page 28: Racing A Previous Activity
You can create a PacePro plan using the Garmin Connect app. You can preview the splits and elevation plot before you run the course.
-
Page 29: Starting A Pacepro Plan
Starting a PacePro Plan 1 From the watch face, select START. 2 Select an outdoor running activity. 3 Hold 4 Select Training > PacePro Plans. 5 Select a plan. TIP: You can select DOWN > View Splits to preview the splits. 6 Select START to start the plan.
-
Page 30: Viewing Your Personal Records
You can download Strava segments to your Forerunner device. Follow Strava segments to compare your performance with your past rides, friends, and pros who have ridden the same segment. To sign up for a Strava membership, go to the segments widget in your Garmin Connect account. For more information, go to www.strava.com.
-
Page 31: Racing A Segment
You can upload your activity data to your Garmin Connect account to view your segment position. NOTE: If your Garmin Connect account and Strava account are linked, your activity is automatically sent to your Strava account so you can review the segment position.
-
Page 32: Setting Up Your User Profile
Setting Up Your User Profile You can update your gender, birth year, height, weight, heart rate zone, and power zone settings. The device uses this information to calculate accurate training data. 1 Hold 2 Select User Profile. 3 Select an option. Fitness Goals Knowing your heart rate zones can help you measure and improve your fitness by understanding and applying these principles.
-
Page 33: Setting Your Heart Rate Zones
• Run often with the wrist or chest heart rate monitor. • Try a few heart rate training plans, available from your Garmin Connect account. • View your heart rate trends and time in zones using your Garmin Connect account. Training…
-
Page 34: Heart Rate Zone Calculations
Select an option: • From the training status widget, hold , and select Options > Pause Training Status. • From your Garmin Connect settings, select Performance Stats > Training Status > > Pause Training Status. TIP: You should sync your device with your Garmin Connect account.
-
Page 35: Activity Tracking
Your device creates a daily step goal automatically, based on your previous activity levels. As you move during the day, the device shows your progress toward your daily goal If you choose not to use the auto goal feature, you can set a personalized step goal on your Garmin Connect account.
-
Page 36: Using Do Not Disturb Mode
NOTE: You can set your normal sleep hours in the user settings on your Garmin Connect account. You can enable the Sleep Time option in the system settings to automatically enter do not disturb mode during your…
-
Page 37: Hydration Tracking
• Select a container to increase your fluid intake by the volume of the container. TIP: You can customize your hydration settings, such as units of measure and daily goal, on your Garmin Connect account.
-
Page 38: Wrist-Based Heart Rate
• For more information about accuracy, go to garmin.com/ataccuracy. • For more information about device wear and care, go to www.garmin.com/fitandcare. Tips for Erratic Heart Rate Data If the heart rate data is erratic or does not appear, you can try these tips.
-
Page 39: Viewing The Heart Rate Widget
Broadcasting Heart Rate Data to Garmin Devices ® You can broadcast your heart rate data from your Forerunner device and view it on paired Garmin devices. NOTE: Broadcasting heart rate data decreases battery life. 1 From the heart rate widget, hold 2 Select Heart Rate Options >…
-
Page 40: Setting An Abnormal Heart Rate Alert
Your heart rate accessory must be out of the water, active, and within range of the device (3 m) while data downloads. Your heart rate data can be reviewed in the device history and on your Garmin Connect account.
-
Page 41: Putting On The Heart Rate Monitor
2 Wet the electrodes on the back of the heart rate monitor to create a strong connection between your chest and the transmitter. 3 Wear the heart rate monitor with the Garmin logo facing right-side up. The loop and hook connection should be on your right side.
-
Page 42: Pool Swimming
Pool Swimming NOTICE Hand wash the heart rate monitor after exposure to chlorine or other pool chemicals. Prolonged exposure to these substances can damage the heart rate monitor. The HRM-Pro accessory is designed primarily for open water swimming, but it can be used occasionally for pool swimming.
-
Page 43: Putting On The Heart Rate Monitor
You should wear the heart rate monitor directly on your skin, just below your sternum. 1 Select a strap extender for the best fit. 2 Wear the heart rate monitor with the Garmin logo facing right-side up. The hook and loop connection should be on your right side.
-
Page 44: Running Dynamics
Running Dynamics You can use your compatible Forerunner device paired with the HRM-Pro accessory or other running dynamics accessory to provide real-time feedback about your running form. If your Forerunner device was packaged with the HRM-Pro accessory, the devices are already paired. The running dynamics accessory has an accelerometer that measures torso movement in order to calculate six running metrics.
-
Page 45: Training With Running Dynamics
Training with Running Dynamics Before you can view running dynamics, you must put on an HRM-Pro, HRM-Run , or HRM-Tri accessory, or the ™ Running Dynamics Pod, and pair it with your device (Pairing Your Wireless Sensors, page 77). If your Forerunner was packaged with the heart rate monitor, the devices are already paired, and the Forerunner is set to display running dynamics.
-
Page 46: Color Gauges And Running Dynamics Data
Elite runners tend to have quick and balanced strides. You can watch the color gauge or data field during your run or view the summary on your Garmin Connect account after your run. As with the other running dynamics data, ground contact time balance is a quantitative measurement to help you learn about your running form.
-
Page 47: Vertical Oscillation And Vertical Ratio Data
Vertical Oscillation and Vertical Ratio Data The data ranges for vertical oscillation and vertical ratio are slightly different depending on the sensor and whether it is positioned at the chest (HRM-Pro, HRM-Run, or HRM-Tri accessories) or at the waist (Running Dynamics Pod accessory).
-
Page 48: Performance Measurements
HRV stress test: The heart rate variability (HRV) stress test requires a Garmin chest heart rate monitor. The device records your heart rate variability while standing still for 3 minutes. It provides your overall stress level.
-
Page 49: About Vo2 Max. Estimates
On the device, your VO2 max. estimate appears as a number, description, and position on the color gauge. On your Garmin Connect account, you can view additional details about your VO2 max. estimate, including your fitness age. Your fitness age gives you an idea of how your fitness compares with a person of the same gender and different age.
-
Page 50: Getting Your Vo2 Max. Estimate For Cycling
The device analyzes several weeks of your training data to refine the race time estimates. TIP: If you have more than one Garmin device, you can enable the Physio TrueUp feature, which allows your ™…
-
Page 51: About Training Effect
(Training Load Focus, page 48). Each feedback phrase, for example, «Highly Impacting VO2 Max.» has a corresponding description in your Garmin Connect activity details. Aerobic Training Effect uses your heart rate to measure how the accumulated intensity of an exercise affects your aerobic fitness and indicates if the workout had a maintaining or improving effect on your fitness level.
-
Page 52: Viewing Your Performance Condition
25). Performing a Guided Test to Determine Your Lactate Threshold This feature requires a Garmin chest heart rate monitor. Before you can perform the guided test, you must put on a heart rate monitor and pair it with your device (Pairing Your Wireless Sensors, page 77).
-
Page 53: Getting Your Ftp Estimate
Getting Your FTP Estimate Before you can get your functional threshold power (FTP) estimate, you must pair a chest heart rate monitor and power meter with your device (Pairing Your Wireless Sensors, page 77), and you must get your VO2 max. estimate (Getting Your VO2 Max.
-
Page 54: Training Status
Cycling performance measurements require a heart rate monitor and a power meter. These estimates are provided and supported by Firstbeat. For more information, go to www.garmin.com /performance-data/running/. NOTE: The estimates may seem inaccurate at first. The device requires you to complete a few activities to learn about your performance.
-
Page 55: Training Status Levels
Training Status Levels Training status shows you how your training affects your fitness level and performance. Your training status is based on changes to your training load and VO2 max. over an extended time period. You can use your training status to help plan future training and continue improving your fitness level.
-
Page 56: Training Load Focus
Recovery Time You can use your Garmin device with wrist-based heart rate or a compatible chest heart rate monitor to display how much time remains before you are fully recovered and ready for the next hard workout.
-
Page 57: Pulse Oximeter
On the device, your pulse oximeter reading appears as an oxygen saturation percentage and color on the graph. On your Garmin Connect account, you can view additional details about your pulse oximeter readings, including trends over multiple days.
-
Page 58: Turning On Pulse Oximeter Sleep Tracking
• Rinse the device with fresh water after each workout. Viewing Your Heart Rate Variability Stress Score Before you can perform the heart rate variability (HRV) stress test, you must put on a Garmin chest heart rate monitor and pair it with your device (Pairing Your Wireless Sensors, page 77).
-
Page 59: Body Battery
51 to 75 is high reserve energy, and 76 to 100 is very high reserve energy. You can sync your device with your Garmin Connect account to view your most up-to-date Body Battery level, long-term trends, and additional details (Tips for Improved Body Battery Data, page 51).
-
Page 60: Smart Features
TIP: You can hold UP, and select Settings > Phone > Pair Phone to manually enter pairing mode. 4 Select an option to add your device to your Garmin Connect account: • If this is the first time you are pairing a device with the Garmin Connect app, follow the on-screen instructions.
-
Page 61: Playing Audio Prompts On Your Smartphone During Your Activity
Playing Audio Prompts on Your Smartphone During Your Activity Before you can set up audio prompts, you must have a smartphone with the Garmin Connect app paired to your Forerunner device. You can set the Garmin Connect app to play motivational status announcements on your smartphone during a run or other activity.
-
Page 62: Bluetooth Connected Features
This Forerunner device has certain features that require an LTE Subscription and must be set up using the Garmin Connect app. For subscription information, go to garmin.com/subscriptions. Some of the features listed here are available using LTE or Bluetooth technology…
-
Page 63: Widgets
Forerunner device. Floors climbed: Tracks your floors climbed and progress toward your goal. Garmin coach: Displays scheduled workouts when you select a Garmin coach training plan in your Garmin Connect account. Golf: Displays golf scores and statistics for your last round.
-
Page 64: Viewing The Widgets
(Safety and Tracking Features, page 58), locking the keys, and turning the device off. You can also open the Garmin Pay wallet. NOTE: You can add, reorder, and remove the options in the controls menu. 1 From any screen, hold LIGHT.
-
Page 65: Viewing The Weather Widget
3 Select UP or DOWN to use the music controls. Connect IQ Features You can add Connect IQ features to your watch from Garmin and other providers using the Connect IQ app. You can customize your device with watch faces, data fields, widgets, and device apps.
-
Page 66: Safety And Tracking Features
Response Coordination Center (IERCC) team if an incident is detected or if you need emergency assistance. A Garmin IERCC team member will attempt to contact emergency services on your behalf and may contact one or more of your emergency contacts.
-
Page 67: Incident Detection
Turning On Live Event Sharing Before you can use live event sharing, you must set up the LiveTrack feature in the Garmin Connect app. NOTE: LiveTrack features are available when your Forerunner device is connected to the Garmin Connect app using Bluetooth technology, or when you obtain the LTE Subscription.
-
Page 68: Spectator Messaging
Spectator messaging is a feature that allows your LiveTrack followers to send you audio and text messages during your run activity. You can set up this feature in the LiveTrack settings of the Garmin Connect app. To receive audio messages, you must have Bluetooth headphones connected to your Forerunner device.
-
Page 69: Music
TIP: Spotify integration requires the Spotify application be installed on your mobile phone. A compatible mobile digital device and premium subscription is required, where available. Go to www.garmin.com/. This product incorporates Spotify software which is subject to third party licenses found here: https://developer.spotify.com/legal/third-party-licenses.
-
Page 70: Downloading Personal Audio Content
Downloading Personal Audio Content Before you can send your personal music to your device, you must install the Garmin Express application on your computer (www.garmin.com/express). You can load your personal audio files, such as .mp3 and .m4a files, to a Forerunner device from your computer.
-
Page 71: Music Playback Controls
Music Playback Controls Select to manage content from some third-party providers. Select to browse the audio files and playlists for the selected source. Select to adjust the volume. Select to play and pause the current audio file. Select to skip to the next audio file in the playlist. Hold to fast forward through the current audio file.
-
Page 72: Connecting Bluetooth Headphones
5 Select your headphones to complete the pairing process. Garmin Pay The Garmin Pay feature allows you to use your watch to pay for purchases in participating stores using credit or debit cards from a participating financial institution. Setting Up Your Garmin Pay Wallet You can add one or more participating credit or debit cards to your Garmin Pay wallet.
-
Page 73: Paying For A Purchase Using Your Watch
Garmin Connect app. Your most recently used payment card appears. 4 If you have added multiple cards to your Garmin Pay wallet, select DOWN to change to another card (optional). 5 Within 60 seconds, hold your watch near the payment reader, with the watch facing the reader.
-
Page 74: Changing Your Garmin Pay Passcode
Changing Your Garmin Pay Passcode You must know your current passcode to change it. If you forget your passcode, you must reset the Garmin Pay feature for your Forerunner device, create a new passcode, and reenter your card information. 1 From the Forerunner device page in the Garmin Connect app, select Garmin Pay > Change Passcode.
-
Page 75: Viewing Data Totals
Viewing Data Totals You can view the accumulated distance and time data saved to your device. 1 From the watch face, hold 2 Select History > Totals. 3 If necessary, select an activity. 4 Select an option to view weekly or monthly totals. Using the Odometer The odometer automatically records the total distance traveled, elevation gained, and time in activities.
-
Page 76: Garmin Connect
Garmin Express application to upload your activity data to your Garmin Connect account and to send data, such as workouts or training plans, from the Garmin Connect website to your device. You can also install device software updates and manage your Connect IQ apps.
-
Page 77: Data Management
Courses You can send a course from your Garmin Connect account to your device. After it is saved to your device, you can navigate the course on your device. You can follow a saved course simply because it is a good route. For example, you can save and follow a bike friendly commute to work.
-
Page 78: Creating A Course On Garmin Connect
Creating a Course on Garmin Connect Before you can create a course on the Garmin Connect app, you must have a Garmin Connect account (Garmin Connect, page 68). 1 From the Garmin Connect app, select 2 Select Training > Courses > Create Course.
-
Page 79: Creating A Round-Trip Course
Creating a Round-Trip Course The device can create a round-trip course based on a specified distance and direction of navigation. 1 From the watch face, select START. 2 Select Run or Bike. 3 Hold 4 Select Navigation > Round-Trip Course. 5 Enter the total distance for the course.
-
Page 80: Navigating To A Destination
Navigating to a Destination You can use your device to navigate to a destination or follow a course. 1 Press START. 2 Select an activity. 3 Hold 4 Select Navigation. 5 Select a category. 6 Respond to the on-screen prompts to choose a destination. 7 Select Go To.
-
Page 81: Navigating To Your Starting Point During An Activity
Navigating to Your Starting Point During an Activity You can navigate back to the starting point of your current activity in a straight line or along the path you traveled. This feature is available only for activities that use GPS. 1 During an activity, press STOP.
-
Page 82: Map
represents your location on the map. Location names and symbols appear on the map. When you are navigating to a destination, your route is marked with a line on the map. • Map navigation (Panning and Zooming the Map, page •…
-
Page 83: Navigating With The Around Me Feature
Navigating with the Around Me Feature You can use the around me feature to navigate to nearby points of interest and waypoints. NOTE: The map data installed on your device must include points of interest to navigate to them. 1 From the map, hold 2 Select Around Me.
-
Page 84: Compass
4 If necessary, select Status to turn on the alert. 5 If necessary, enter a distance or time value, and select Wireless Sensors Your device can be used with wireless ANT+ or Bluetooth sensors. For more information about compatibility and purchasing optional sensors, go to buy.garmin.com. Wireless Sensors…
-
Page 85: Pairing Your Wireless Sensors
Pairing Your Wireless Sensors The first time you connect a wireless sensor to your device using ANT+ or Bluetooth technology, you must pair the device and sensor. After they are paired, the device connects to the sensor automatically when you start an activity and the sensor is active and within range.
-
Page 86: Calibrating Your Foot Pod Manually
77). Manual calibration is recommended if you know your calibration factor. If you have calibrated a foot pod with another Garmin product, you may know your calibration factor. 1 From the watch face, hold 2 Select Settings > Sensors & Accessories.
-
Page 87: Situational Awareness
See the owner’s manual for your Varia device for more information. NOTE: You may need to update the Forerunner software before pairing Varia devices (Updating the Software Using the Garmin Connect App, page 102). tempe The tempe is an ANT+ wireless temperature sensor. You can attach the sensor to a secure strap or loop where it is exposed to ambient air, and therefore, provides a consistent source of accurate temperature data.
-
Page 88: Activities And App Settings
Activities and App Settings These settings allow you to customize each preloaded activity app based on your needs. For example, you can customize data pages and enable alerts and training features. Not all settings are available for all activity types. Hold , select Activities &…
-
Page 89: Customizing The Data Screens
Vibration Alerts: Enables alerts that notify you to inhale or exhale during a breathwork activity. Workout Videos: Enables instructive workout animations for a strength, cardio, yoga, or Pilates activity. Animations are available for pre-installed workouts and workouts downloaded from Garmin Connect. Customizing the Data Screens You can show, hide, and change the layout and content of data screens for each activity.
-
Page 90: Alerts
Alerts You can set alerts for each activity, which can help you to train toward specific goals, to increase your awareness of your environment, and to navigate to your destination. Some alerts are available only for specific activities. There are three types of alerts: event alerts, range alerts, and recurring alerts. Event alert: An event alert notifies you once.
-
Page 91: Setting An Alert
Activity: Sets an activity for routing. The device calculates routes optimized for the type of activity you are doing. Popularity Routing: Calculates routes based on the most popular runs and rides from Garmin Connect. Courses: Sets how you navigate courses using the device. Use the Follow Course option to navigate a course exactly as it appears, without recalculating.
-
Page 92: Auto Lap
Auto Lap Marking Laps by Distance You can use Auto Lap to mark a lap at a specific distance automatically. This feature is helpful for comparing your performance over different parts of an activity (for example, every 1 mile or 5 kilometers). 1 Hold 2 Select Settings >…
-
Page 93: Enabling Auto Climb
Enabling Auto Climb You can use the auto climb feature to detect elevation changes automatically. You can use it during activities such as climbing, hiking, running, or biking. 1 Hold 2 Select Settings > Activities & Apps. 3 Select an activity. NOTE: This feature is not available for all activities.
-
Page 94: Changing The Gps Setting
Changing the GPS Setting For more information about GPS, go to www.garmin.com/aboutGPS. 1 Hold 2 Select Settings > Activities & Apps. 3 Select the activity to customize. 4 Select the activity settings. 5 Select GPS. 6 Select an option: • Select GPS Only to enable the GPS satellite system.
-
Page 95: Watch Face Settings
Watch Face Settings You can customize the appearance of the watch face by selecting the layout, colors, and additional data. You can also download custom watch faces from the Connect IQ store. Customizing the Watch Face Before you can activate a Connect IQ watch face, you must install a watch face from the Connect IQ store (Connect IQ Features, page 57).
-
Page 96: Setting The North Reference
Setting the North Reference You can set the directional reference used in calculating heading information. 1 Hold 2 Select Settings > Sensors & Accessories > Compass > North Ref.. 3 Select an option: • To set geographic north as the heading reference, select True. •…
-
Page 97: Xero Laser Location Settings
5 Select Sleep Time to enable the battery saver feature during your normal sleep hours. TIP: You can set your normal sleep hours in the user settings on your Garmin Connect account. 6 Select Low Battery Alert to receive an alert when the battery is low.
-
Page 98: System Settings
The Every Second recording option provides more detailed activity recordings, but may not record entire activities that last for longer periods of time. USB Mode: Sets the device to use MTP (media transfer protocol) or Garmin mode when connected to a computer.
-
Page 99: Changing The Backlight Settings
Changing the Backlight Settings 1 From the watch face, hold 2 Select Settings > System > Backlight. 3 Select an option: • Select During Activity. • Select Not During Activity. 4 Select an option: • Select Keys to turn on the backlight for key presses. •…
-
Page 100: Starting The Countdown Timer
Starting the Countdown Timer 1 From any screen, hold LIGHT. 2 Select Timer. NOTE: You may need to add this item to the controls menu. 3 Enter the time. 4 If necessary, select an option: • Select Options > Save Timer to save the countdown timer. •…
-
Page 101: Virb Remote
VIRB Remote The VIRB remote function allows you to control your VIRB action camera using your device. Go to www.garmin.com/VIRB to purchase a VIRB action camera. Controlling a VIRB Action Camera Before you can use the VIRB remote function, you must enable the remote setting on your VIRB camera. See the VIRB Series Owner’s Manual for more information.
-
Page 102: Device Information
(Charging the Device, page 94). You can charge the device by plugging the USB cable into a Garmin approved AC adapter with a standard wall outlet or a USB port on your computer. Charging a fully depleted battery takes up to two hours.
-
Page 103: Specifications
5 ATM Operating temperature range From -10° to 50°C (from 14° to 122°F) Wireless frequency 2.4 GHz @ 8 dBm nominal The device withstands pressure equivalent to a depth of 50 m. For more information, go to www.garmin.com/waterrating. Device Information…
-
Page 104: Hrm-Swim Specifications And Hrm-Tri Specifications
1 Wipe the device using a cloth dampened with a mild detergent solution. 2 Wipe it dry. After cleaning, allow the device to dry completely. TIP: For more information, go to www.garmin.com/fitandcare. The device withstands pressure equivalent to a depth of 50 m. For more information, go to www.garmin.com/waterrating. Device Information…
-
Page 105: Replacing The Heart Rate Monitor Battery
Replacing the Heart Rate Monitor Battery 1 Remove the sleeve from the heart rate monitor module. 2 Use a small Phillips (00) screwdriver to remove the four screws on the front of the module. 3 Remove the cover and battery. 4 Wait 30 seconds.
-
Page 106: Changing The Bands
Changing the Bands You can replace the bands with new Forerunner bands or compatible QuickFit ® 22 bands. 1 Use the pin tool to push in the watch pin. 2 Remove the band from the watch. 3 Select an option: •…
-
Page 107
NOTE: Make sure the band is secure. The watch pin should align with the holes on the device. • To install QuickFit 22 bands, remove the watch pin from the Forerunner band, replace the watch pin on the device, and press the new band into place. NOTE: Make sure the band is secure. -
Page 108: Troubleshooting
• Go to support.garmin.com for additional manuals, articles, and software updates. • Go to buy.garmin.com, or contact your Garmin dealer for information about optional accessories and replacement parts. • Go to www.garmin.com/ataccuracy. This is not a medical device. The pulse oximeter feature is not available in all countries.
-
Page 109: The Step Counts On My Device And My Garmin Connect Account Don’t Match
2 Wait while the device syncs your data. Syncing can take several minutes. NOTE: Refreshing the Garmin Connect app or the Garmin Connect application does not sync your data or update your step count. The floors climbed amount does not seem accurate Your device uses an internal barometer to measure elevation changes as you climb floors.
-
Page 110: Restarting The Device
Resetting All Default Settings Before you reset all default settings, you should sync the device with the Garmin Connect app to upload your activity data. NOTE: This deletes all user-entered information and activity history. If you have set up a Garmin Pay wallet, restoring default settings also deletes the wallet from your device.
-
Page 111: Is My Smartphone Compatible With My Device
• Remove your device from the Garmin Connect app and the Bluetooth settings on your smartphone to retry the pairing process. • If you bought a new smartphone, remove your device from the Garmin Connect app on the smartphone you intend to stop using.
-
Page 112: How Can I Manually Pair Ant+ Sensors
Can I use my Bluetooth sensor with my watch? The device is compatible with some Bluetooth sensors. The first time you connect a sensor to your Garmin device, you must pair the device and sensor. After they are paired, the device connects to the sensor automatically when you start an activity and the sensor is active and within range.
-
Page 113: Appendix
Appendix Data Fields NOTE: Not all data fields are available for all activity types. Some data fields require ANT+ or Bluetooth accessories to display data. %FTP: The current power output as a percentage of functional threshold power. % Heart Rate Reserve: The percentage of heart rate reserve (maximum heart rate minus resting heart rate). 10s Balance: The 10-second moving average of the left/right power balance.
-
Page 114
Average Strokes Per Length: The average number of strokes per pool length during the current activity. Average Swolf: The average swolf score for the current activity. Your swolf score is the sum of the time for one length plus the number of strokes for that length (Swim Terminology, page 10). -
Page 115
Flow: The measurement of how consistently you maintain speed and smoothness through turns in the current activity. Front: The front bike gear from a gear position sensor. GCT Balance: The left/right balance of ground contact time while running. GCT Balance Gauge: A color gauge showing the left/right balance of ground contact time while running. Gear Battery: The battery status of a gear position sensor. -
Page 116
Lap % Heart Rate Reserve: The average percentage of heart rate reserve (maximum heart rate minus resting heart rate) for the current lap. Lap 500m Pace: The average rowing pace per 500 meters for the current lap. Lap Ascent: The vertical distance of ascent for the current lap. Lap Balance: The average left/right power balance for the current lap. -
Page 117
Last Lap Distance Per Stroke: Paddle sports. The average distance traveled per stroke during the last completed lap. Last Lap Heart Rate: The average heart rate for the last completed lap. Last Lap Heart Rate %Max.: The average percentage of maximum heart rate for the last completed lap. Last Lap Max. -
Page 118
Normalized Power: The Normalized Power for the current activity. ™ Off Course: The distance to the left or right by which you have strayed from the original path of travel. You must be navigating for this data to appear. Overall Ahead/Behind: Running. The overall time ahead or behind of the target pace. Pace: The current pace. -
Page 119
Time of Day: The time of day based on your current location and time settings (format, time zone, daylight saving time). Timer: The current time of the countdown timer. Time Seated: The time spent seated while pedaling for the current activity. Time Seated Lap: The time spent seated while pedaling for the current lap. -
Page 120: Vo2 Max. Standard Ratings
VO2 Max. Standard Ratings These tables include standardized classifications for VO2 max. estimates by age and gender. Males Percentile 20–29 30–39 40–49 50–59 60–69 70–79 Superior 55.4 52.5 48.9 45.7 42.1 Excellent 51.1 48.3 46.4 43.4 39.5 36.7 Good 45.4 42.4 39.2 35.5…
-
Page 121: Wheel Size And Circumference
Wheel Size and Circumference Your speed sensor automatically detects your wheel size. If necessary, you can manually enter your wheel circumference in the speed sensor settings. The tire size is marked on both sides of the tire. This is not a comprehensive list. You can also measure the circumference of your wheel or use one of the calculators available on the internet.
-
Page 122: Symbol Definitions
Tire Size Wheel Circumference (mm) 27 × 1-1/4 2161 27 × 1-3/8 2169 29 x 2.1 2288 29 x 2.2 2298 29 x 2.3 2326 650 x 20C 1938 650 x 23C 1944 650 × 35A 2090 650 × 38B 2105 650 ×…
-
Page 123: Index
78 assistance 58 music 2, 61, 63 auto climb 85 loading 61, 62 Auto Lap 84 playing 62 Galileo 86 Auto Pause 84 services 61 Garmin Connect 15, 17, 52–54, 57, 58, 68, auto rest 11 music controls 57, 63 70, 102 auto scroll 85 storing data 68 Garmin Express 57, 100 navigation 69, 72, 75, 76, 81 updating software 100…
-
Page 124
safety information 58 vertical oscillation 36–39 satellite signals 86, 101 vertical ratio 36–39 saving activities 3, 6–9, 33 VIRB remote 93 scorecard 14 virtual course 5 screen 91 Virtual Partner 19, 20 segments 22, 23 max. 16, 40–42, 46, 112 settings 28, 50, 75, 79, 80, 83, 86–91, 102 sharing data 23 wallet 2, 65 shortcuts 56 watch faces 57, 87… -
Page 126
June 2021 GUID-2BA30752-33FB-42B8-8484-69C491706113 v2…
Посмотреть инструкция для Garmin Forerunner 945 бесплатно. Руководство относится к категории SmartWatch, 3 человек(а) дали ему среднюю оценку 8.8. Руководство доступно на следующих языках: английский. У вас есть вопрос о Garmin Forerunner 945 или вам нужна помощь? Задайте свой вопрос здесь
Garmin Forerunner 945 — это качественный и эргономичный спортивный умный часы с широким спектром функций. Это силиконовые умные часы с электронным компасом, встроенным барометрическим альтиметром и возможностью использования GLONASS. Они имеют водонепроницаемость класса 5 ATM. Часы оснащены функцией alarm clock и Дисплеем с диагональю 1,2 дюйма, который позволяет увидеть ключевую информацию о вашей тренировке и мониторить ее.
Высота часов 47 мм, ширина 47 мм, глубина 13,7 мм, а вес составляет всего 50 грамм. Эти умные часы оснащены акселерометром, который измеряет ваш педометр, и возможностью подсчета калорий, что позволяет отслеживать ваши тренировки более точно. Выносливость умных часов очень впечатляет — в режиме работы GPS их батарея продержится до 36 часов.
Garmin Forerunner 945 идеально подходят для людей, которые увлечены спортом и фитнесом. Они предоставят пользователям самую актуальную информацию о проделанных тренировках и мониторинг за каждых стадий спортивных занятий. Часы имеют все необходимые функции, которые могут понадобится во время тренировки и бега, делая их правильным выбором для всех, кто привык следить за своим здоровьем.

Главная
| Garmin | |
| Forerunner 945 | 010-02063-10 | |
| SmartWatch | |
| английский | |
| Руководство пользователя (PDF), Правила техники безопасности (PDF) |
Вес и размеры
| Вес | 50 g |
| Ширина | 47 mm |
| Глубина | 13.7 mm |
Свойства
| Барометрический высотомер | Да |
| Электронный компас | Да |
| Будильник | Да |
| Акселерометр | Да |
| Сожженные калории | Да |
| Шагомер | Да |
| Качество сна | Да |
| Таймер | Да |
| Монитор сердечного ритма | Да |
| Вычисление калорий на основе частоты сердечных сокращений | Да |
| Встроенный дальномер | Да |
| Сигнал пульсомера | Bluetooth/ANT+ |
| Рекомендуемая деятельность | Cycling, Fitness, Golf, Running, Swimming |
| Мониторинг активности | Да |
Дизайн
| Материал браслета | Силиконовый |
| Водонепроницаемость | 5 атм |
| Позиционирование на рынке | Спортивные часы |
| Цвет товара | Синий |
Сеть
| Поддрежка ГЛОНАСС | Да |
| Galileo | Да |
| GPS (спутниковый) | Да |
Прочие свойства
Экран
| Диагональ экрана | 1.2 « |
| Разрешение экрана | 240 x 240 пикселей |
| Тип дисплея | Цифровой |
| Сенсорный экран | Нет |
| Технолигия дисплея | MIP |
Энергопитание
| Срок службы батареи (режим GPS) | 36 h |
| Тип батареек | Встроенная батарея |
Порты и интерфейсы
| Bluetooth с низким энергопотреблением (BLE) | Да |
| Bluetooth | Да |
показать больше
Не можете найти ответ на свой вопрос в руководстве? Вы можете найти ответ на свой вопрос ниже, в разделе часто задаваемых вопросов о Garmin Forerunner 945.
Какой вес Garmin Forerunner 945?
Garmin Forerunner 945 имеет вес 50 g.
У смарт-часов есть функции, которых нет у смартфона?
В целом, у смарт-часов нет функций, которых нет у смартфона.
Необходимо ли выключать устройство SmartWatch на ночь?
Выключать устройство SmartWatch на ночь полезно, чтобы продлить срок службы аккумулятора.
Необходим ли интернет для GPS?
Нет, для использования GPS не требуется интернет.
Что означает аббревиатура GPS?
Аббревиатура GPS расшифровывается как Global Positioning System, т. е. система глобального позиционирования.
Что такое GPS?
GPS — это система, которая может использоваться в любой точке мира для определения вашего местоположения с помощью спутников.
Что такое Bluetooth?
Bluetooth — это способ обмена данными по беспроводной сети между электронными устройствами с помощью радиоволн. Расстояние между двумя устройствами обменивающимися данными в большинстве случаев составляет не более десяти метров.
Какой размер экрана Garmin Forerunner 945?
Размер экрана Garmin Forerunner 945 составляет 1.2 «.
Какая высота Garmin Forerunner 945?
Garmin Forerunner 945 имеет высоту 47 mm.
Какое разрешение экрана дисплея Garmin Forerunner 945?
Разрешение экрана Garmin Forerunner 945 следующее 240 x 240 пикселей.
Какая ширина Garmin Forerunner 945?
Garmin Forerunner 945 имеет ширину 47 mm.
Какая толщина Garmin Forerunner 945?
Garmin Forerunner 945 имеет толщину 13.7 mm.
Инструкция Garmin Forerunner 945 доступно в русский?
Да, руководствоGarmin Forerunner 945 доступно врусский .
Не нашли свой вопрос? Задайте свой вопрос здесь
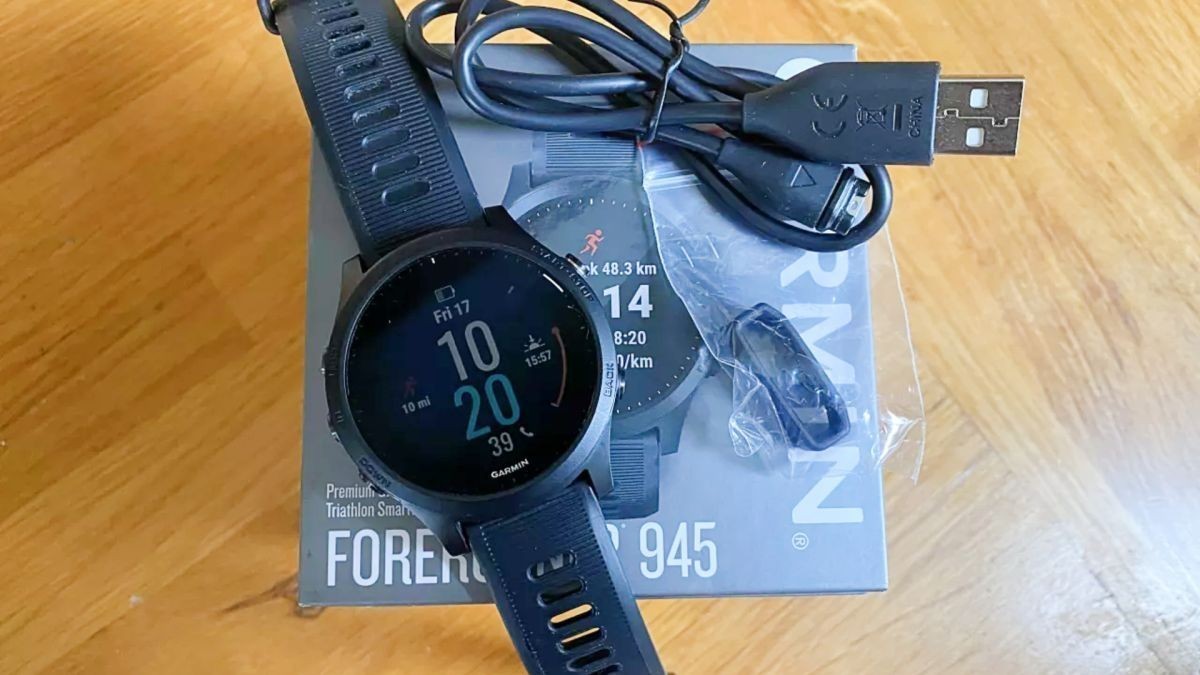
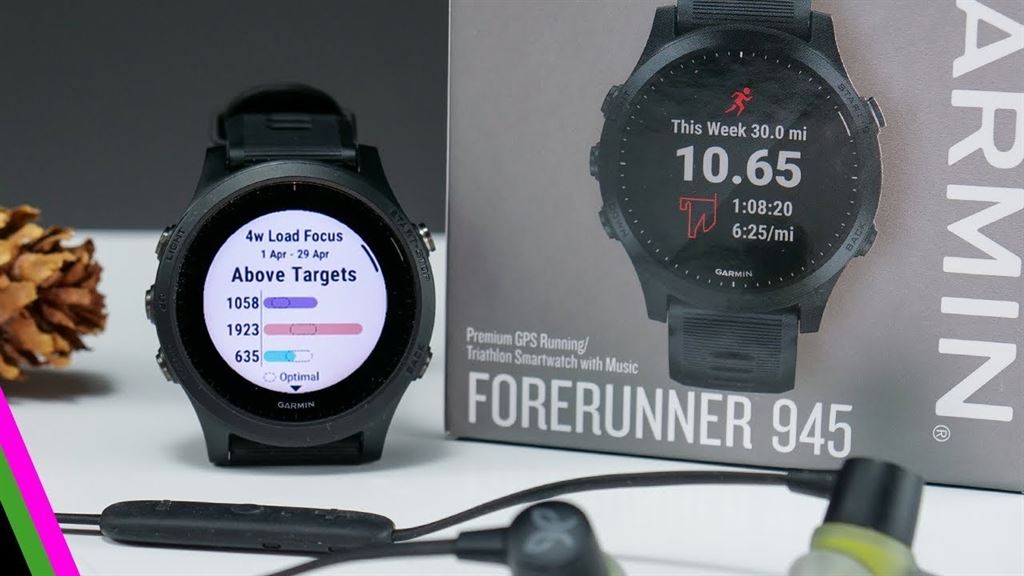
Garmin Forerunner 945 – это сочетание универсальных часов Fenix 5x Plus и Garmin 935 с уклоном в триатлон. Серия 900 как раз создавалась для мультиспорта и триатлона, но не ограничивалась ими. Вспомните Garmin 910, 920, 935. Помимо функций предшественников, Garmin 945 оснастили своими фишками, которые не использовались ранее в подобных гаджетах. Получилась модель на каждый день со строгим и аккуратным дизайном, встроенной бесконтактной оплатой и музыкой, анализом сна и повседневной активности, лучшим на 2019 год анализом тренировок и советами для прогресса.
Содержание:
- Внешний вид, экран
- Автономность и водонепроницаемость
- Датчики
- Основные функции
- Навигация
- Музыка
- Бесконтактные платежи NFC
- Выводы
- Купить Garmin 945
- Инструкция Garmin Forerunner 945 на русском
https://youtu.be/hr73fHOeRbs
Что добавилось в сравнении с Garmin 935:
- Добавлена память для хранения и воспроизведения музыки с часов
- Карты с маршрутами и тепловые карты
- Бесконтактные платежи NFC
- Пульсоксиметр Pulse Ox (впервые появился на Fenix 5x Plus)
- Частота дыхания
- Новый оптический датчик пульса HR Garmin Elevate
- Более подробные детали тренировочной нагрузки, восстановления, тренировочного эффекта и оценки физической формы
- Оценка уровня стресса и уровня “жизненной энергии”
- Акклиматизация по высоте и температуре
- Сигналы о происшествии (подобно сигналу SOS)
- Функция Climb Pro – уведомления о предстоящем подъеме
- Более умный прогноз результата на гонку, исходя из текущей формы
- Время работы в режиме GPS увеличено до 36 часов и 60 часов в режиме Ultra Track
Garmin 945 неважно, каким видом спорта вы занимаетесь, он дает максимальное количество показателей в любых дисциплинах.
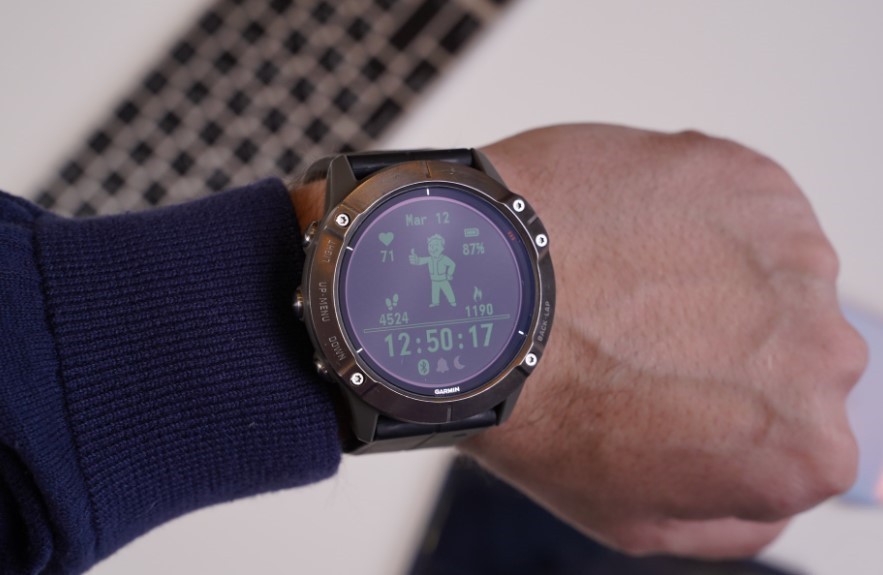
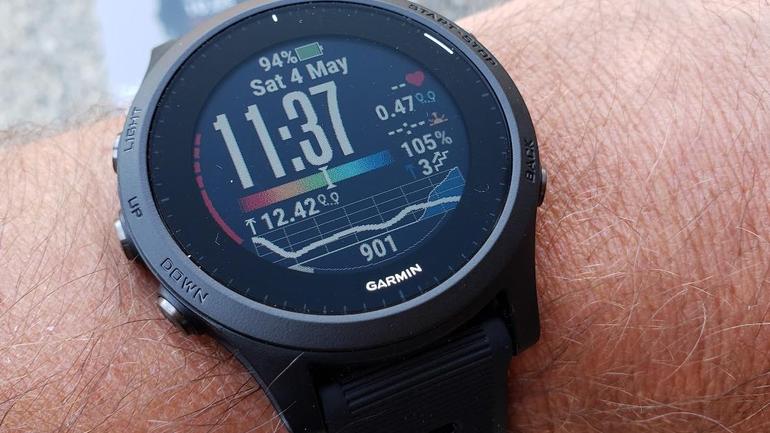
Внешний вид, экран
Размер корпуса 47 x 47 x 13,7 мм, он идентичен предыдущей модели Garmin 935 – изготовлен из крепкого пластика, поэтому очень легкий в сравнении с Fenix и весит всего 50 г. Ремешки из силикона, подходят те же ремешки и аксессуары, что на 935.
Цветной экран 1,2 дюйма с разрешением 240×240. Защищен стеклом Gorilla Glass DX. Управление часами только через 5 кнопок, экран не сенсорный. Экраны данных настраиваются индивидуально: можно скачивать готовые циферблаты, создавать свои и ставить фоновые рисунки на свое усмотрение.
Автономность и водонепроницаемость
Водонепроницаемость 5 атм. В часах гарантированно можно плавать и участвовать в стартах по триатлону.
Аккумулятор проработает до 36 часов в режиме GPS, с музыкой и GPS – около 10 часов, а в режиме Ultra Track – около 60 часов. Режим ультратрек экономит заряд, снижая точность показаний спутника, но это не сильно влияет на качество трека при низкой скорости передвижения. При повседневном использовании часы придется заряжать примерно 1 раз в 2 недели.
Датчики
Garmin 945 поддерживает большинство существующих датчиков по протоколам ANT+ и Bluetooth Smart, включая каденс, мощность, пульс, переключение скоростей на электронной трансмиссии велосипеда, подключение камеры Garmin Virb и многие другие.
Основные функции
В Garmin 945 столько функций, что можно написать целую книгу с их описанием. Кратко перечислим основные функции и остановимся чуть подробнее на самых интересных.
- GPS, Глонасс, Galileo
- Wi-fi, бесконтактная оплата NFC, Bluetooth, ANT+
- Вибросигналы и звуковые уведомления со смартфона: e-mail, фейсбук, sms, звонки, уведомления приложений
- Встроенные карты, компас, барометр, термометр, альтиметр, погода
- Датчик кислорода, напоминание о движении
- Музыкальный плеер в часах, прослушивание подкастов
- Секундомер, таймер, умные часы, будильник
- Уровень стресса, фазы сна, менструальный цикл
- Пульсометр, шагомер, скорость, расстояние, темп, калории
- Виртуальный партнер
- Мультиспортивный режим и множество спортивных режимов под разные виды спорта
- Совместим с Vector, Garmin Connect, измерителями мощностями и каденса
- Виртуальный партнер, автоматическая пауза, автоматический круг
- Фитнес-тесты, персональные тренировки, планы тренировок под разные виды спорта и дистанции, полный анализ тренировочной нагрузки и восстановления
- Частота шагов, длина шага, время и распределение времени контакта с землей, вертикальные колебания, коэффициент вертикальных колебаний, прогноз финишного времени и рекомендации по восстановлению, частота дыхания
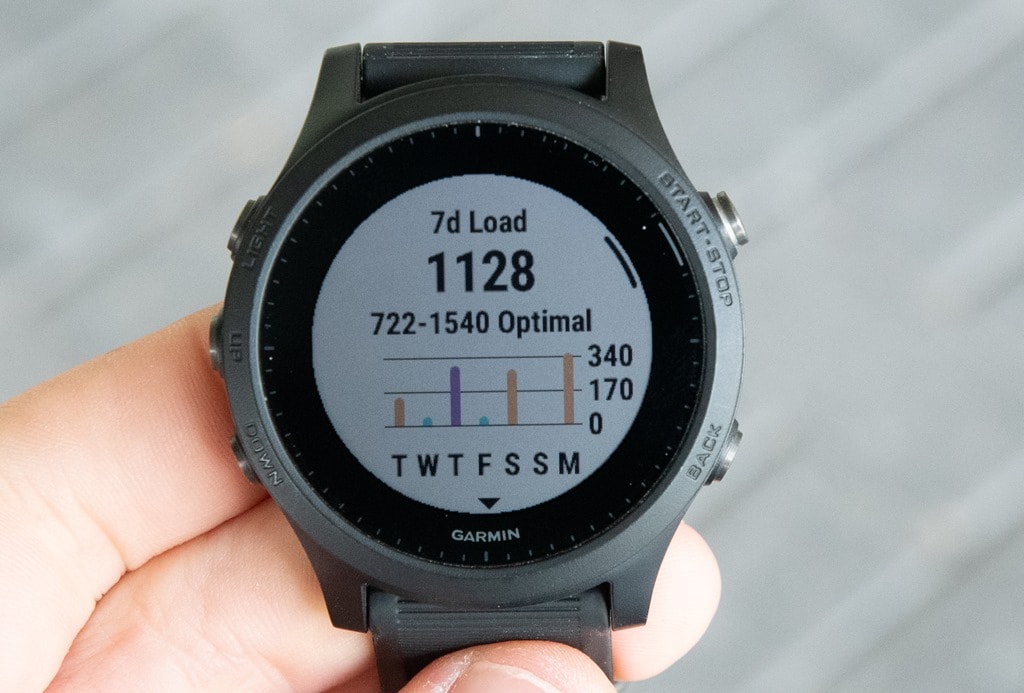
Анализ нагрузки. В конце каждой тренировки часы покажут общий уровень нагрузки, аэробную и анаэробную составляющие, включая эффект, который дала тренировка. Также можно увидеть анализ тренировок за последние 7 и 28 дней, общий эффект от тренировок и совокупный анализ нагрузки. Например, если слишком много аэробных нагрузок, но нет темповых, часы подскажут, какой нагрузки не хватает. Рекомендательная система очень развита, и производитель обещает добавлять функции с обновлениями ПО.
Функция Load Focus – новинка от Garmin. Автоматически определяет тип тренировки: аэробная или анаэробная, степень интенсивности. При этом для правильных показаний часы калибруются самостоятельно, исходя из ежедневной активности.
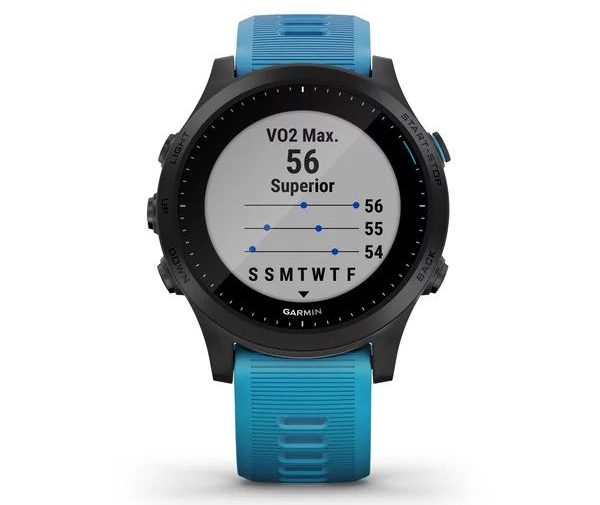
VO2Max – максимальное потребление кислорода. Один из основных показателей в тренировках на выносливость. В новых Гармин 945 этот показатель считается более точно с учетом температуры воздуха и высоты над уровнем моря – такого на рынок до Garmin никто не выпускал.
PulseOX – пульсоксиметр. Замеряет уровень насыщения крови кислородом. На хорошем медосмотре вам наверняка ставили небольшую прищепку на палец, которая показывала значение в процентах – это и есть пульсоксиметр. В часах он пригодится любителям штурмовать горные вершины, в городе в нем нет необходимости.
Тренировочные планы. Создание тренировочных планов в топовых часах уже стало привычным, но в гармин 945 эти процессы стали умнее. Больше возможностей для планирования, возможность загрузить планы с Training Peaks, более точный предсказатель финишного времени на ближайших соревнованиях.
Измерение беговой динамики. Частота шагов, длина шага, время и распределение времени контакта с землей, вертикальные колебания, коэффициент вертикальных колебаний – все эти показатели работают на улучшение физической формы и техники. Большинство данных беговой динамики считываются только с нагрудным датчиком пульса HRM-run и HRM-tri.
Измерение пульса
В часах установлен новый датчик пульса, который ранее вышел с часами Garmin MARQ. Он круглосуточно замеряет пульс для оценки состояния организма и реакции на нагрузку. Рядом с оптическим датчиком пульса встроен пульсоксиметр, который определяет степень насыщения крови кислородом – полезная функция для альпинистов, но в городе не приносит никакой пользы. В отличие от Suunto и Polar оптический датчик Garmin не замеряет пульс под водой.
Уведомления
Часы, как и ближайшие предшественники, получают уведомления с телефона, есть вибрация и звуковой сигнал. К тому же, их можно открыть прямо на часах и посмотреть полный текст. Чтобы скрыть уведомления от посторонних глаз, они отображаются только после поднятия руки. Когда рука в стороне, экран темный.
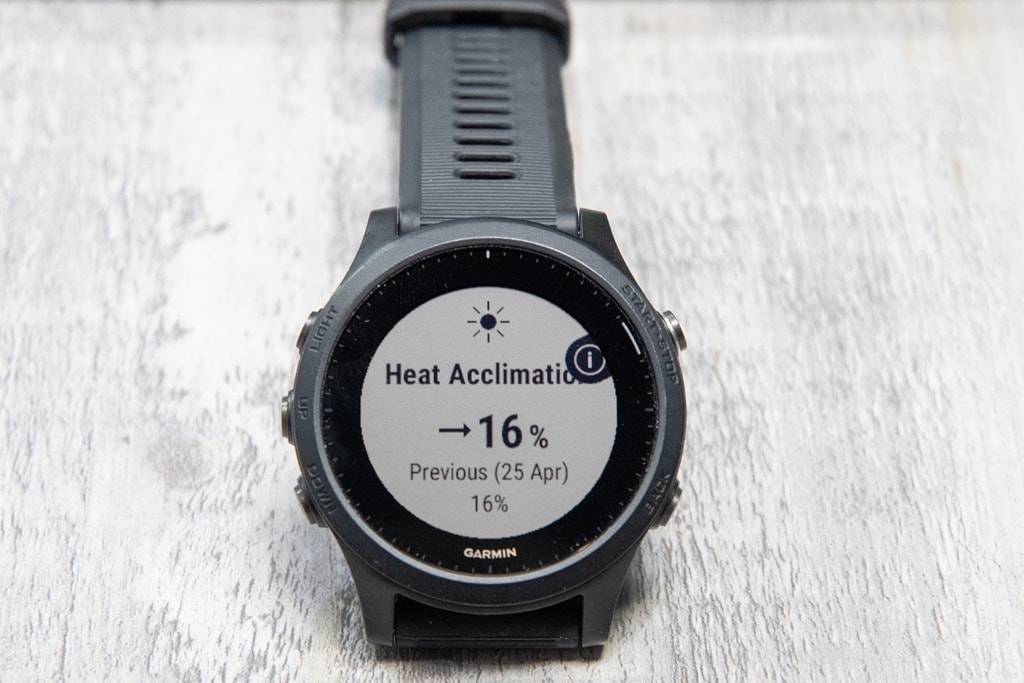
Акклиматизация
Часы помогают правильно акклиматизироваться на высоте для успешного восхождения или горного старта, также помогают адаптироваться к жаре при смене климатического пояса. Учитывается не только температура, но и влажность.
Навигация
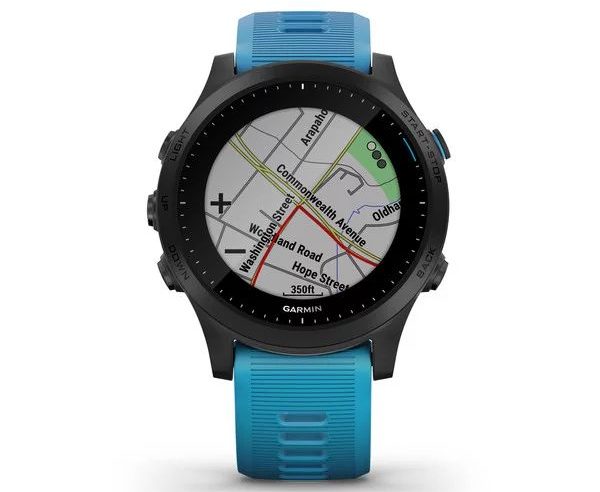
Функции навигации идентичны Fenix 5x Plus. В часах встроены цветные карты того региона, где куплено устройство. При помощи кнопок можно просматривать карту, менять масштаб, искать достопримечательности, кафе, заправки и строить до них маршруты. Часы умеют строить маршруты для бега или велосипеда с учетом тепловых карт.
Точность GPS, Глонасс и Galileo стандартная для топовых устройств Garmin. Не лучше и не хуже, также бывают помехи, небольшие отклонения от линии реального передвижения, но все в рамках погрешности. Однако, производитель говорит о значительном улучшении точности сигнала после обновлений ПО. Возможно, это связано с установкой нового чипа Sony, который потребляет значительно меньше энергии, но ПО еще не доведено до совершенства
Полезная функция для любителей бегать всегда по новым маршрутам: Garmin 945 умеют стоить маршруты для бега и велосипеда на основании тепловых карт и данных других пользователей экосистемы Garmin.
Синхронизация
Часы автоматически синхронизируются со смартфоном и ПК, поддерживают iOS, Android, Windows, MacOS. Поддерживают сегменты Strava, синхронизируются с большинством других спортивных приложений.
Музыка
Почти через 1,5 года после выхода первых беговых часов Гармин с музкой (Garmin 645 Music) Garmin представил встроенную музыку и для триатлетов.
Музыку в часы можно добавить 2 способами:
- Скинуть с ноутбука
- Скачать из онлайн сервисов Spotify, iHeartRadio и Deezer
Из 14,5 гб памяти для музыки доступно около 6,5 гб, в зависимости от веса карт. Часы совместимы со всеми Bluetooth наушниками и колонками. Звук, конечно, не такой, как на хороших смартфонах, но для бега качества звучания более чем достаточно.
Бесконтактные платежи NFC
Эта функция уже мало кого удивляет, но в спортивных часах это по – прежнему редкость. В часы вносятся данные банковских карт, и оплатить покупки можно без телефона и кошелька – одним касанием часов. Не беспокойтесь за безопасность – после каждого снятия часов с руки они требуют ввести пароль, а реальные данные карт заменяются на виртуальные счета. Проверьте, сотрудничает ли ваш банк с Garmin Pay.
Выводы
Garmin Forerunner 945 – самые функциональные часы 2019 года. Помимо всех функций предыдущих моделей Гармин в 945 появились такие новшества как измерение частоты дыхания и всесторонний анализ тренировок с прогнозированием результата, советами, определением качества тренировки.
Нельзя назвать модель совершенно новой, ведь технического прорыва в этой модели нет, а вот собрать все лучшее в одних маленьких и легких часа у Garmin получилось отлично.
Garmin 945 подойдут для любого циклического вида спорта, включая бег, трейлраннинг, лыжные гонки, триатлон, плавание. При этом в часах есть весь функционал для альпинизма, туризма, мультигонок и даже гольфа.
Стоит ли приобретать Garmin 945? Если ценник для вас не кусачий, и хочется носить на руке одни из лучших спортивных часов 2019 года – однозначно стоит! Во всех других случаях можно рассмотреть более скромные варианты, имеющие близкий спортивный функционал, например, Polar Vantage V, Garmin 935, Garmin Fenix 5, Suunto 9, Garmin Instinct.
Купить Garmin 945
Искать самый выгодный ценник на Гармин 945 в России удобно на Яндекс Маркет.
Еще более выгодные варианты ищите на Ebay. Доставка обычно платная, гарантия не действительна в РФ, но экономия может перекрыть все недостатки.
Инструкция Garmin Forerunner 945 на русском
Официальная инструкция к Garmin Forerunner 945 на русском языке.
Занимайтесь спортом, двигайтесь и путешествуйте! Если нашли ошибку или хотите обсудить статью – пишите в комментариях. Мы всегда рады общению.
Подписывайтесь на нас в Telegram, ЯндексДзен и Вконтакте.