
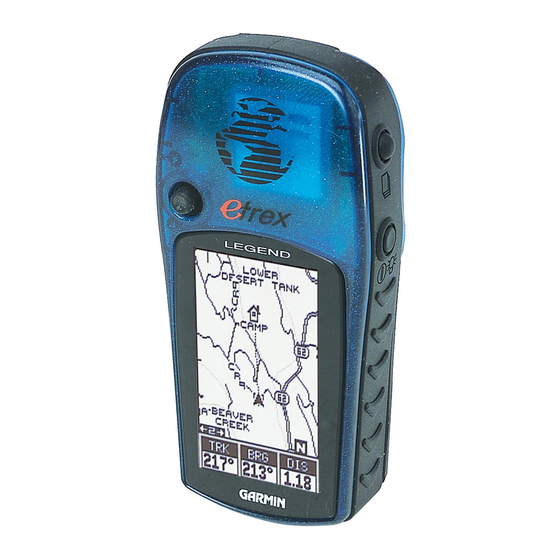
eTrex Legend
®
компании GARMIN
Руководство пользователя и справочник
Личное навигационное устройство
Внимание!
При установке прошивки с сайта garmin.com русский язык в приборе утрачивается.
Внимание!
Если карта региона или области записана и разлочена (привязана к внутреннему номеру)
на SD-карту, то никакие другие карты на эту SD-карту добавлять нельзя или каким-либо
другим способом менять на ней файлы из папки Garmin.
-
Contents
-
Table of Contents
-
Troubleshooting
-
Bookmarks
Quick Links
eTrexLegend
TM
personal navigator
®
owner’s
manual
and
reference
guide
Related Manuals for Garmin eTrex Legend
Summary of Contents for Garmin eTrex Legend
-
Page 1
eTrexLegend personal navigator ® owner’s manual reference guide… -
Page 2
GARMIN®, AutoLocate®, TracBack®, and Personal Navigator® are registered trademarks, eTrex Legend™, and MapSource™ are trademarks of GARMIN Ltd. or its subsidiaries and may not be used without the express permission of GARMIN. April 2005 Part Number 190-00234-00 Rev. D Garmin (Europe) Ltd. -
Page 3: About This Manual
Thank you for choosing the GARMIN eTrex Legend. To get the most from your new eTrex Legend, take time to read through this owner’ s manual in order to understand all of the operating features. This manual is organized into three sections.
-
Page 4
Introduction FCC Compliance Statement The eTrex Legend complies with Part 15 of the FCC interference limits for Class B digital devices FOR HOME OR OFFICE USE. These limits are designed to provide reasonable protection against harmful interference in a residential installation, and are more stringent than “outdoor”… -
Page 5: Warnings And Precautions
Do not mount the eTrex Legend over air bag panels or in the field of air bag deployment.
-
Page 6: Software License Agreement
GPS equipment. Although the eTrex Legend is a precision electronic NAVigation AID (NAVAID), any NAVAID can be misused or misinter- preted and, therefore, become unsafe.
-
Page 7: Maintenance
GARMIN and that the Software in source code form remains a valuable trade secret of GARMIN. You agree not to decompile, disassemble, modify, reverse assemble, reverse engineer or reduce to human readable form the Software or any part thereof or create any deriva- tive works based on the Software.
-
Page 8: Limited Warranty
This GARMIN product is warranted to be free from defects in materials or work- manship for one year from the date of purchase. Within this period, GARMIN will at its sole option, repair or replace any components that fail in normal use. Such repairs or replacement will be made at no charge to the customer for parts or labor, provided that the customer shall be responsible for any transportation cost.
-
Page 9: Product Registration
Product Registration Help us to better support you by completing our on-line registration today! Have the serial number of your eTrex Legend handy and connect to our website (www.garmin.com). Look for the Product Registration link on the Home Page. Serial Number Use this area to record the external serial number (8-digit number located inside the battery compartment) in case it is lost, stolen, or needs service.
-
Page 10: Table Of Contents
The Main Pages Main Page Basics …4 Satellite The Main Page …5 Options …6-7 Navigating Navigating with eTrex Legend …8 The Main Page …9-10 Options …11-15 Using the Pan Map Option …12 Stop Navigation …13 Hide/Show Navigation Status …13 Hide/Show Data Fields …13 Setup …14-15…
-
Page 11: Getting Started
Before you begin to explore the eTrex Legend’ s operat- ing features, you should be familiar with the information contained in the Quick Start which includes instructions for installing batteries, how the buttons function, starting the eTrex Legend, adjusting the screen contrast, and basic navigation techniques to help you start enjoying your eTrex Legend immediately.
-
Page 12: Features And Button Function
The FIND button: • Press to access the Find Menu NOTE: The eTrex Legend is designed to be held and operated in the left hand, but it can be held and operated using the right hand as well to suit your preference.
-
Page 13: Battery Installation
Installing the Batteries The eTrex Legend operates on two “AA” batteries (not included), which are placed into the back of the unit. Rechargeable Alkaline, NiMH, NiCad or Lithium batteries may be used. Stored data is not lost when the batteries are removed.
-
Page 14: Main Page Basics
Satellite Page Map Page Navigation Page Trip Computer All of the information you need to operate the eTrex Legend can be found on five main pages (or display screens). You can press and release the PAGE button to cycle through the Satellite Page, Map Page, Navigation Page, Trip Computer, and Main Menu Page.
-
Page 15: Satellite
The Wide Area Augmentation System (WAAS) capability produces a more accurate position fix. When enabled (the GPS mode set to ‘Normal’ and the interface set to other than RTCM mode), this feature searches for a WAAS satellite near your location and then receives data for correcting differentials in the GPS satellite signals and the WAAS satellite numbers (Number 33 or above) display on the Satellite Page.
-
Page 16: Options
2. Use the THUMB STICK to highlight the ‘Use With GPS Off’ option and then press it in to activate. The eTrex Legend stops tracking satellites and should not be used for navigation. However, the next time you turn the unit on, it returns to Normal GPS operation.
-
Page 17: Options
The eTrex Legend relies on satellite signals to provide navigational guidance, so getting a clear view of the sky is necessary because GPS signals do not travel through rocks, buildings, people, metal, or heavy tree cover.
-
Page 18: Navigating
There are three methods of navigating when using the eTrex Legend and each is graphically displayed on the Map Page. Goto — A direct path to a selected destination (waypoint, city, address, etc.).
-
Page 19: Map
The map shown above displays a higher level of detail than the basemap provided with the unit (i.e. residential streets, parks, etc.), because GARMIN MapSource data has been downloaded to the unit from the mapping program on the optional CD-ROM.
-
Page 20
“overzoom” displays just below the map scale. In many instances the map displays an ‘Accuracy Circle’ surrounding the ‘Position Icon’. The eTrex Legend uses both map resolution and GPS accuracy in defining your location to a point within the circle. The smaller the circle, the more accurate your location. -
Page 21: Options
Map Page options allow a variety of operating and custom features for your eTrex Legend. Not all of the Map Page options are available at the same time. Many are replaced by an opposite option when they are selected, such as Hide Data Fields/Show Data Fields.
-
Page 22: Using The Pan Map Option
Options Map Page with Panning Arrow Highlighted Map Item Map Item Information Using the Pan Map option The Map Page pan function allows you to display an arrow used to point at and identify items on the map, and to move the map in order to view areas beyond the current viewing area on the display.
-
Page 23: Stop Navigation
Hide/Show Navigation Status The ‘Hide Nav Status/Show Nav Status’ option allows you to view GPS navigation data in a window at the top of the page that lists the status of satellite tracking and accuracy of GPS positioning. When hidden, more map area is displayed.
-
Page 24: Setup
Setup Options Page Setup Tracks Setup Map Features Setup Text Setup (Continued) Final ETA Final ETE Heading Maximum Speed Moving Avg. Speed Odometer Off Course Overall Avg. Speed Pointer Speed (For definitions, see Appendix C, pages 54-55.) The ‘Setup Map’ option displays the five Map Setup Pages, each accessed by an on-screen button.
-
Page 25: The Measure Distance Option
Map Features — Points of Interest, Waypoints, Street Label, and Land Cover, Scale options; ‘Off’, ‘Auto’, or 20 ft.-500 miles, sets the maximum scale at which the feature should appear on the screen. Some types of data will display only to certain zoom scales.
-
Page 26: Navigation
GPS Receiver and the approximate accuracy of your current position. The Compass Ring displays your heading while you are moving, but the data fields at the bottom of the page will not display any destination related data, such as Estimated Time of Arrival.
-
Page 27: Options
Navigation Page The options include: Stop Navigation — “Grayed out” unless you are navigating on a Goto, Track, or Route. Bearing Pointer/Course Pointer — Toggles between Bearing (always directed at destination) and Course (distinctive with dots across center of compass, shows amount of correction needed to be back on course.) Big Numbers/Big Compass — toggles to display data fields in large text format while removing the Status…
-
Page 28: Options
Navigation Options Bent pointer shows current direction, the approaching turn, and points towards the next waypoint. Navigation Page Data Fields Options Menu (The slider at the side of the menu indicates a multi-page list of options.) To Setup the Navigation Page: 1.
-
Page 29: Trip Computer
The Trip Computer Page displays up to eight different types of navigation data and are user programmable. Each data field is selectable and can contain one of many data information options. The default settings for these fields are shown in the illustration. By selecting the information options that you prefer and arranging them in a desired order on the page, you can customize the Trip Computer Page to meet your navigation needs.
-
Page 30: Options
Trip Computer Options Trip Computer Page Trip Computer Page The Trip Computer provides a variety of data fields with read-outs of current information as you travel. The Option Menu for this page provides the fol- lowing options: Reset, Big Numbers, and Restore Defaults.
-
Page 31
Trip Computer Page Data Fields Use the ZOOM IN/OUT buttons to jump to the first or last item on the page, and to page up or down. The list of data field options with definitions is in Appendix C, pages 54-55. Bearing Course Current Destination… -
Page 32: Main Menu
Main Menu The Main Page The Main Menu provides you with a directory of the eTrex Legend’ s advanced features. From the Main Menu page you can mark and create new waypoints; find map items such as cities, interstate exits, addresses, points of interest, etc.; create routes; save tracks;…
-
Page 33: Using The Main Menu
The Main Menu provides access to additional eTrex Legend feature pages. The pages listed below provide enhancements to eTrex Legend operation. Press the PAGE button repeatedly to cycle to the Main Menu or select it from the page list at the top of each main page.
-
Page 34
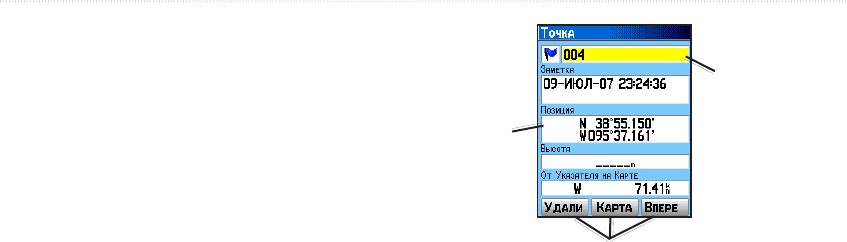
Main Menu Mark Mark Waypoint Page Map Symbol List Marking a Waypoint with the Panning Arrow The Mark Waypoint Page The Mark Waypoint Page allows you to mark and record your current (or any other) location as a waypoint and appears with a graphic name block (man with a flag) that displays the assigned number for that waypoint and a waypoint symbol. -
Page 35: Mark Options
To create a waypoint using the panning arrow when a map item is not highlighted: 1. With the Pan Map feature active, move the panning arrow (map pointer) on the map to the location you want to mark and then, press the THUMB STICK. 2.
-
Page 36: Projecting A Waypoint
Main Menu Mark Options Enter Distance and Bearing to Project a Waypoint Waypoint Symbol Field Waypoint Name Field Using the keyboard to edit Projecting a Waypoint Projecting a waypoint from any map item (another waypoint, etc.) allows you to establish a new waypoint on a bearing and distance projected from that map item.
-
Page 37: Find Options
To delete a waypoint: 1. Use the Find feature to display the waypoint. 2. Highlight the ‘Delete’ button and then press the THUMB STICK. To save Map or Find Menu items as waypoints: 1. Access the Information Page for the desired item (highlighted from the map or selected from the Find Menu).
-
Page 38: Finding A Waypoint
Finding a Waypoint Waypoints that you have created and stored in the eTrex Legend can be found by selecting the “Waypoint’ option from the Find Menu. You can find a waypoint from the list of waypoints using the ‘By Name’ or ‘Nearest’…
-
Page 39: Finding A Favorite
Finding a Favorite Favorites are map items and waypoints designated as those you would like to give a special status, as they are frequently used or have other special significance. The process for finding favorite waypoints from the ‘Favorites’ list is the same as finding a regular waypoint. To find a ‘Favorite’: 1.
-
Page 40: Finding An Exit
Main Menu Find Options List of Exit Types Exits List Exit Information Page Services Information To find a city: 1. Use the THUMB STICK to select the ‘Cities’ option, then press it in to display the find ‘By Name’ or find by ‘Nearest’…
-
Page 41: Finding A Point Of Interest
5. Scroll through the list to highlight the desired exit. 6. Press in on the THUMB STICK to display the Infor- mation Page for that exit. This page contains the exit description with a list of available services near that exit along with the distance and bearing fields. 7.
-
Page 42: Finding An Address Or Intersection
Main Menu Find Options Point of Interest Info Page Find Address Page Entering an Address Finding a Point of Interest — (Continued) Once you have selected an item, you can display the Information Page for that item. You can then use the on- screen buttons to ‘Goto’…
-
Page 43
2. Use the THUMB STICK to highlight ‘Address’ and press it in to display the ‘Find Address’ page. 3. Highlight the’ Number’ field and use the keyboard for entering numbers. 4. Move to the ‘Street’ field using the THUMB STICK. 5. -
Page 44: Using A Goto
Main Menu Find Options Information Page Navigation Page A Map Page Goto Using a Goto to Navigate to a Destination The Goto function allows you to create a direct route to a destination, (waypoint, city, or point of interest). Once you have accessed the Information Page for an item, use the Goto button at the bottom of the page to initiate travel to a map item using the Map and Navigation Pages for guidance.
-
Page 45: Routes Options
Route navigation allows you to create a sequence of intermediate waypoints which lead you to your final destination. The eTrex Legend stores 20 routes, each with up to 50 waypoints. A route can be created and modified from the Route Page, and waypoints can be added to a route from the Find Menu.
-
Page 46: Editing A Route
Main Menu Routes Options A Route Options Menu Route Area in Acres Routes List With Two Copied Routes Copied Routes have a ‘1’ Suffix Delete Route Prompt Editing a Route To remove all waypoints: 1. Select the Route Page options button and press the THUMB STICK in to access the Options Menu.
-
Page 47
To restore default settings for the route: 1. Select the Route Page options button and press the THUMB STICK in to access the Options Menu. 2. Select ’Restore Defaults’ and then press in on the THUMB STICK to restore factory settings. To review a waypoint: 1. -
Page 48
Main Menu Routes Options Moving a Route Waypoint by clicking and dragging. Map Page Route Options Adding a Route Waypoint to an end point on the Route Map Page To change a route waypoint: (Continued) 3. Select a new waypoint, access its Information Page and press the on-screen ‘OK’… -
Page 49: Navigating A Route
the line becomes thin. Press in on the THUMB STICK to display the word ‘ADD’ next to the line. 3. Drag the line to a map item or other location where you want to establish a new waypoint and then press in on the THUMB STICK to place the new waypoint.
-
Page 50: Data Fields For The Route Page
Main Menu Routes Options Data Field Options Menu Distance to Point vs Leg Distance. To view Leg informa- tion, highlight the end waypoint on a leg. Navigating a Route (Continued) bottom of the page and then press in on the THUMB STICK to begin navigating the route.
-
Page 51: Using Track Logs
The ‘TracBack’ feature allows you to return along a traveled path without marking any waypoints. When you are ready to return to where you started, the eTrex Legend takes you back by following the ‘Track Log’ that you left behind. You can save a total of ten tracks in the unit memory.
-
Page 52: Tracks Options
Main Menu Tracks Options Saved Track Page Save Track Options TracBack Options Track Log Setup Menu Record Method Options If you choose Auto-record, you can set the recording interval from More to Least Often. You can set recording intervals for Time or Distance as desired.
-
Page 53: Time Page
The Setup Menu The Setup Pages allow you to customize your eTrex Legend to your personal preferences. You can choose time settings, units of measure, display backlighting and contrast settings, heading measurement, interface options and system operating mode. By highlighting the icons on the Setup Menu and then pressing in on the THUMB STICK, you can display the Setup Page for each of the menu items.
-
Page 54: Setup Options
(a reference model of the earth’ s shape) and is usually listed in the title block of the map. If you are com- paring GPS coordinates to a paper map, chart, or other reference, the map datum in this field must match the horizontal map datum used to generate the map or other reference.
-
Page 55: Display Page
Display Page You can adjust the amount of time that the backlight- ing feature stays on and adjust the screen contrast. Backlighting Timeout — Choose from Stays On, to delays of 15 seconds, 30 seconds, one, or two minutes before timing out. Contrast Adjustment — Can be adjusted from light to dark using the slider adjacent to the contrast bar.
-
Page 56: Interface Page
GARMIN — The proprietary format used to exchange waypoint, track, and map data with a PC. GARMIN DGPS — Allows DGPS input using a GARMIN beacon receiver and a standard RTCM SC-104 and DGPS tuning.
-
Page 57: System Page
System Page The System Setup Page allows you to change: GPS — Choose one of the four GPS options other than ‘Normal’ to significantly save battery power. The ‘Battery Saver’ mode reduces the rate of satellite signal position updating and the ‘Use With GPS Off’ option stops satellite signal reception altogether.
-
Page 58: Accessories
Main Menu Accessories Accessory Menu Sun & Moon Page Overhead Moon Phase Stop Animation Buttons Location Options List Accessories Menu The accessory pages (features which enhance the unit operation, but are not essential) include: sun and moon position relative to a location, a calendar, a hunting and fishing best times record, an area calculator, and a basic calculator.
-
Page 59: Calendar Page
Calendar This feature provides you with a monthly calendar with programmable reference notes dates. You can display one monthly calendar of days at a time and mark days on each with reference notes using the data entry keypad. You can create reference notes for multiple months and for months in years yet to come.
-
Page 60: Hunt And Fish Page
Main Menu Accessories Hunt & Fish Page ‘New Location’ Options Hunt and Fish This feature provides you with a listing of best times for hunting and fishing for a chosen location and date. To set the date: Highlight the date field and then press in on the THUMB STICK to begin data entry of individual characters.
-
Page 61: Area Calculator Page
To calculate the area: 1. With the eTrex Legend “Ready to Navigate”, press ‘Start’ when you are ready to begin. 2. Begin walking or traveling the outskirts of the area you want to measure. As soon as you change direc- tion, the eTrex Legend begins to display the area traversed thus far.
-
Page 62: Appendix A: Specifications
With optional GARMIN Differential Beacon Receiver Input (such as GARMIN GBR 21 or 23). The temperature rating for the eTrex Legend may exceed the usable range of some batteries. Alkaline batter- ies can rupture at high temperatures. External power can only be applied using the GARMIN Auto Power Adapter or PC Interface Cable with Auto Power Adapter.
-
Page 63: Appendix B: Accessories
Automotive Mounting Bracket: Can be temporarily or permanently mounted on the dash. (Shown at right) Carry Lanyard: Provides convenient method for car- rying the eTrex Legend. Attaches to a slot on the bottom of the unit. (Included) Carrying Case: Protects the eTrex Legend and permits use while in the case.
-
Page 64: Appendix C: Data Field Definitions
Final ETE — The estimated time needed to reach your final destination. Heading — Your moving direction. Location (lat/lon) — Your current GPS position. Location (selected) — The lat/lon of point defined on map. Maximum Speed — The maximum second-by-second speed recorded since last reset.
-
Page 65: Appendix C: Data Field Definitions
To Course — The compass direction you must go in order to get back to the original course. Trip Odometer — A running tally of distance travelled since last reset. Trip Time — Moving — Total time the unit has been moving since the last reset of the trip timers.
-
Page 66: Appendix D: Mapsource Setup
CD-ROM. The eTrex Legend can accept up to 8 MB of data from any MapSource program loaded on a PC and connected to the eTrex Legend Data Port. For this function you need the eTrex PC Data Cable provided with your unit.
-
Page 67: Appendix E: Troubleshooting
THUMB STICK to the left. The eTrex Legend is programmed to provide “pop-up” messages concerning operational characteristics and conditions. Press in on the THUMB STICK to acknowledge a message and return to the current feature. Probable Cause Batteries are exhausted.
-
Page 68: Appendix F: Wiring Diagram
DGPS (Differential GPS) corrections are accepted in RTCM SC-104 version 2.0 format through the ‘Data In’ line. The GARMIN GBR 21 and GBR 23 are the recom- mended beacon receivers for use with the eTrex Legend. Other beacon receivers with the correct RTCM format may be used, but may not correctly display status or allow tuning control from the GPS unit.
-
Page 69: Index
Accessories … 53 Accessories Menu … 48 Accessories Page … 23 Accuracy Circle … 10 Activate a route … 34 Alignment Bar … 2 Amount of Memory Used … 47 Area Calculator … 51 Arrow, Panning … 2, 10–12, 29 Automotive Mounting Bracket …
-
Page 70
Favorite 29 Intersection 32 Point of Interest 31 Waypoint 28 FIND button … 2, 27 Find Menu … 23, 27 GARMIN DGPS 46 Limited Warranty vi, vii Proprietary Sentences 58 Getting Started … 1 Glide Ratio … 21 Global Positioning System (GPS) … -
Page 71
How To (Continued) change data fields 18 copy the route 36 create a reference note for a selected date 49 create a route 35 create a waypoint 24–25 delete a waypoint 27 delete the route 36 edit a waypoint 26 find an exit 30 find a city 30 find a Favorite 29… -
Page 72
Index Main Page Menu Button … 4 Maps Features 15 MapSource CD-ROMs 15, 53, 56 Map Datum … 44 Map Page … 4, 8, 9, 10 Map Page, Main … 54 Map Page options … 11–15 Map Scale … 9, 10 Marking Location 12 Options 26… -
Page 73
Turn … 14, 18, 21, 55 Turning GPS Receiver “off” … 6 Units of Measure … 10, 23, 43, 44 Units Page … 44 Unit I.D. Number … 47 Use With GPS Off … 6, 7 Using Find Menu 48 Goto 34 Main Menu 23… -
Page 74: Index
WGS84 (World Geodetic Survey 1984) … 44 Wide Area Augmentation System (WAAS) … 1, 47 Wiring Diagram … 58 www.GARMIN.com … vii www.nima.mil … 44 ZOOM IN … 9, 10 ZOOM IN button … 2 ZOOM OUT … 9, 10…
-
Page 76
For the latest free software updates throughout the life of your GARMIN products, visit the GARMIN web site at © Copyright 2005 GARMIN Ltd. or its subsidiaries Unit 5, The Quadrangle, Abbey Park Industrial Estate Part Number: 190-00234-00 Rev. D www.garmin.com.
Посмотреть инструкция для Garmin ETrex Legend HCX бесплатно. Руководство относится к категории навигаторы, 5 человек(а) дали ему среднюю оценку 8.2. Руководство доступно на следующих языках: русский. У вас есть вопрос о Garmin ETrex Legend HCX или вам нужна помощь? Задайте свой вопрос здесь
Не можете найти ответ на свой вопрос в руководстве? Вы можете найти ответ на свой вопрос ниже, в разделе часто задаваемых вопросов о Garmin ETrex Legend HCX.
Какой вес Garmin ETrex Legend HCX?
Garmin ETrex Legend HCX имеет вес 156 g.
Необходим ли интернет для GPS?
Нет, для использования GPS не требуется интернет.
Что означает аббревиатура GPS?
Аббревиатура GPS расшифровывается как Global Positioning System, т. е. система глобального позиционирования.
Что такое GPS?
GPS — это система, которая может использоваться в любой точке мира для определения вашего местоположения с помощью спутников.
Можно ли обновить карты моей навигационной системы?
Большинство навигационных систем поддерживают обновление карт. Большинство брендов периодически обновляют карты.
Какая высота Garmin ETrex Legend HCX?
Garmin ETrex Legend HCX имеет высоту 56 mm.
Какое разрешение экрана дисплея Garmin ETrex Legend HCX?
Разрешение экрана Garmin ETrex Legend HCX следующее 176 x 220 пикселей.
Какая ширина Garmin ETrex Legend HCX?
Garmin ETrex Legend HCX имеет ширину 107 mm.
Какая толщина Garmin ETrex Legend HCX?
Garmin ETrex Legend HCX имеет толщину 30 mm.
Инструкция Garmin ETrex Legend HCX доступно в русский?
Да, руководствоGarmin ETrex Legend HCX доступно врусский .
Не нашли свой вопрос? Задайте свой вопрос здесь
Инструкции на русском языке для навигаторов Garmin представлены в таблице. Выберите название вашего устройства и скачайте инструкцию.
Раздел: Авто, мото оборудование и транспорт
Тип: Gps Навигатор
Характеристики, спецификации
Область применения:
универсальный
Количество путевых точек:
1000
Емкость путевого журнала:
10000 точек
Возможность загрузки карты местности:
есть
Функция расчета маршрута:
есть
Размер дисплея:
3.3×4.3 см
Разрешение экрана:
176×220 пикс.
Поддержка технологии «WAAS»:
есть
Количество элементов питания:
2
Водонепроницаемый корпус:
есть
Комплектация:
Прибор eTrex Legend HCx, ПО, USB кабель, ремешок, инструкция
Габариты (ШхВхГ):
56x107x30 мм
Инструкция к Gps Навигатору Garmin eTrex Legend HCx
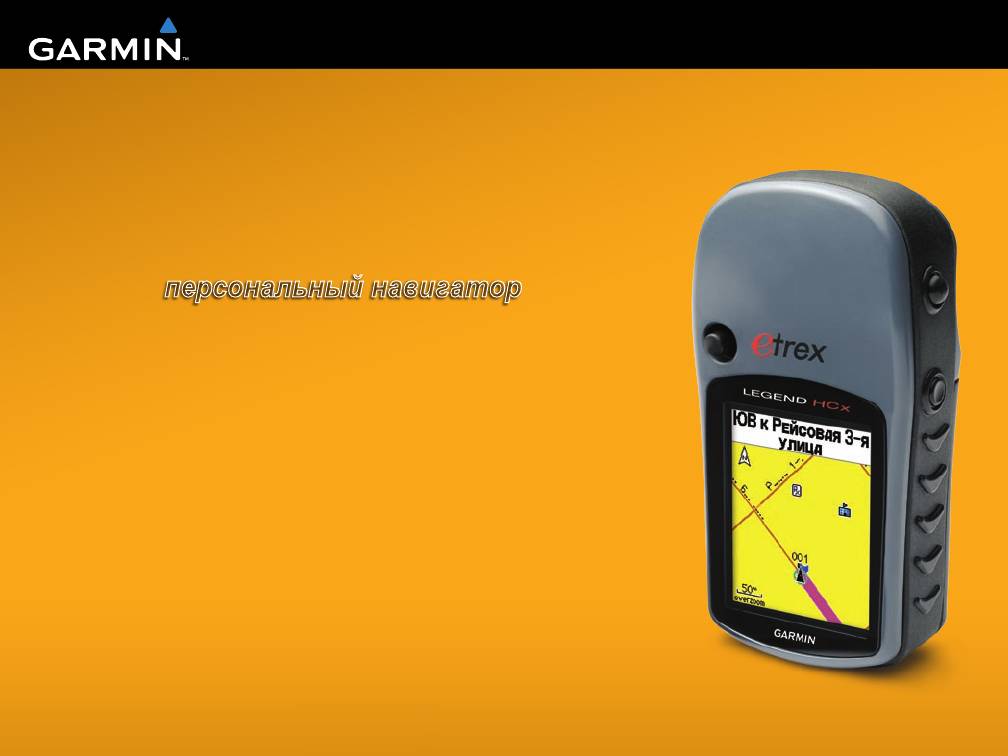
Руководство пользователя
®
eTrex
серии HC
персональный навигатор

© Garmin Ltd. или подразделения, 2007 г.
Garmin International, Inc.
Garmin Ltd. (Европа)
Garmin Corporation
st
nd
1200 East 151
Street,
Liberty House
No. 68, Jangshu 2
Road,
Olathe, Kansas 66062, USA
Hounsdown Business Park,
Shijr, Taipei County, Taiwan
Тел.: (913) 397-8200 или
Southampton, Hampshire, SO40 9RB UK
Тел.: (886) 2-2642-9199
(800) 800-1020
Тел.: +44 (0) 870-8501241
Факс: (886) 2-2642-9099
Факс: (913) 397-8282
(звонок не из Великобритании)
0808 2380000
(звонок из Великобритании)
Факс: +44 (0) 870-8501251
Все права защищены. За исключением случаев, когда иное явно указано в настоящем документе, никакая часть данного руководства не может быть
воспроизведена, скопирована, передана, распространена, загружена или сохранена на каком-либо носителе в любых целях без предварительного
письменного разрешения компании Garmin. Компания Garmin предоставляет разрешение на загрузку одной копии этого руководства на жесткий
диск или другой электронный носитель информации для просмотра и печати одной копии этого руководства или внесенных в него изменений
при условии, что такая электронная или печатная копия руководства содержит полный текст этого предупреждения об авторских правах. Любое
несанкционированное коммерческое распространение или изменение этого руководства строго запрещены.
Приведенная в этом документе информация может быть изменена без уведомления. Компания Garmin оставляет за собой право изменять или улучшать
продукты и вносить изменения в содержание без обязательства уведомлять какое-либо лицо или организацию о таких изменениях или улучшениях.
Посетите веб-сайт компании Garmin (www.garmin.com) для получения последних обновлений и дополнительной информации об использовании этого
и других продуктов Garmin.
®
™
™
Garmin
— зарегистрированный в США и других странах товарный знак компании Garmin Ltd. или ее подразделений. Garmin Mobile
, myGarmin
®
®
®
®
®
eTrex
, AutoLocate
, TracBack
, BlueChart
и MapSource
— товарные знаки компании Garmin Ltd. или ее подразделений. Данные
™
товарные знаки запрещено использовать без явного разрешения Garmin. microSD
— товарный знак компании The SD Card
™
Association. TransFlash
— товарный знак компании SanDisk Corporation.
Данная русская версия руководства по эксплуатации устройств серии eTrex HC, первоначально написанном на английском языке
(№ изделия Garmin 190-00817-00, версия B), представляется для удобства пользователей. При необходимости информацию об
эксплуатации устройства серии eTrex HC см. в самой последней версии руководства на английском языке.
Июнь 2007 г. Номер документа 190-00817-45, версия C Отпечатано на Тайване

ВВедение
Регистрация продукта
ВВедение
Зарегистрируйте продукт сегодня, чтобы мы могли лучше
®
®
Благодарим вас за выбор устройства Garmin
eTrex Vista
обслуживать вас. Перейдите на наш веб-сайт по адресу:
®
®
HCx, eTrex Legend
HCx, eTrex Summit
HC или eTrex
http://my.garmin.com.
®
Venture
HC. В этих устройствах используются средства
Он потребуется для обслуживания продукта. Храните чек или
GPS и полнофункциональные карты Garmin для создания
его копию в надежном месте.
портативного приемника GPS с непревзойденными
эксплуатационными характеристиками. Все модели серии
Связь с Garmin
eTrex функционируют одинаково за немногими исключениями.
Свяжитесь с Garmin при возникновении вопросов во время
Если функция, рассматриваемая в данном руководстве,
использования устройства. В службу поддержки Garmin можно
не является общей для всех устройств серии HC, в тексте
обратиться по телефону: (913) 397-8200 или (800) 800-1020,
делается соответствующее замечание. Сравните комплектацию
с понедельника по пятницу, с 8 до 17 часов по Центральному
устройства со списком компонентов на упаковке. Если какой—
времени; или посетите сайт www.garmin.com/support и выберите
либо компонент отсутствует, немедленно обратитесь к дилеру
Product Support.
Garmin.
В европейское отделение компании Garmin Ltd. можно
обратиться по телефону +44 (0) 870-8501242 (звонок не из
Подсказки и кнопки быстрого доступа
Великобритании) или 0808 2380000 (звонок из Великобритании).
•
Чтобы быстро вернуться в главное меню с любой
страницы дважды нажмите кнопку .
См. руководство Правила техники
•
Чтобы увеличить срок службы батарей, выключайте
безопасности и сведения об изделии в упаковке изделия
GPS, если устройство eTrex не используется для
для ознакомления с предупреждениями по безопасности и
навигации. Уменьшите яркость подсветки дисплея,
другой важной информацией.
быстро нажав и отпустив кнопку .
Навигационные устройства серии eTrex HC Руководство пользователя

ВВедение
Содержание
Страница “Дорожный Компьютер” …………. 35
Главное меню ………………………………………….. 36
Введение …………………………………………………..i
Треки ……………………………………………………….. 36
Подсказки и кнопки быстрого доступа ………..i
Страница маршрутов ………………………………. 36
Регистрация продукта………………………………….i
Страница “Шоссе” …………………………………… 36
Начало работы …………………………………………1
Меню “Настройки” …………………………………… 37
Установка элементов питания и
Маршрутные точки сближения
крепление ремешка ………………………………..1
(страница Опасные пут. точки) ……………. 43
Работа с eTrex ……………………………………………..2
Календарь ……………………………………………….. 43
Функциональное назначение клавиш …………3
Калькулятор ……………………………………………. 44
Включение eTrex …………………………………………4
Секундомер ……………………………………………… 44
Настройка подсветки ………………………………….4
Астрономические данные
Инициализация приемника GPS …………………4
(страница Солнце и Луна) …………………… 44
Основные действия …………………………………7
Охота и рыбалка ……………………………………… 44
Создание и использование маршрутных
Меню игр …………………………………………………. 44
точек ……………………………………………………….7
Приложение ……………………………………………45
Маршрутные точки сближения (страница
Технические характеристики …………………… 45
Опасные пут. точки) ……………………………….9
Дополнительные аксессуары …………………. 46
Использование меню поиска ………………….. 10
Подключение устройства eTrex
Использование треков (функция “Пути”) .. 16
к компьютеру ………………………………………. 47
Создание маршрута ………………………………… 20
Лицензионное соглашение на
Главные страницы …………………………………23
программное обеспечение …………………. 48
Страница “Спутник” ………………………………… 24
Заявление о соответствии ………………………. 48
Страница “Карта” ……………………………………. 24
Указатель ………………………………………………..49
Страница “Компас” …………………………………. 27
Страница “Высотомер” …………………………… 32
Навигационные устройства серии eTrex HC Руководство пользователя
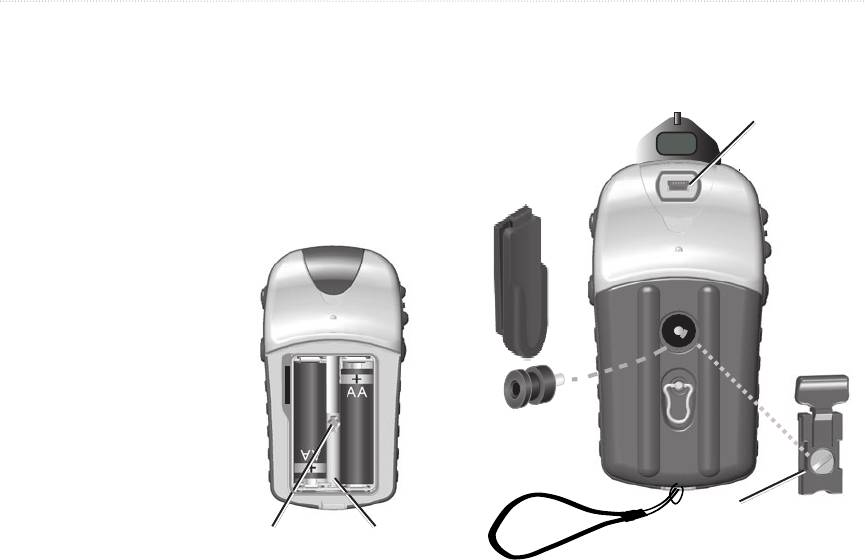
начало работы
Прикрепление ремешка:
начало работы
1. Пропуститепетлюремешкасквозьушковнижнейчасти
устройства.
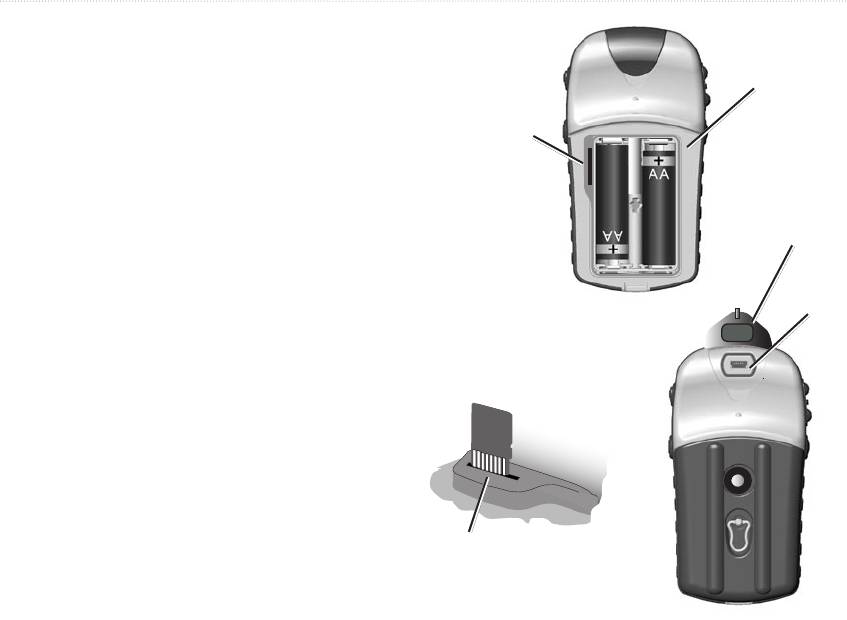
Установка элементов питания
2. Проденьтеремешоквпетлюитугозатяните.
и крепление ремешка
Дополнительный
Разъем USB
Устройство eTrex работает от двух элементов питания типа AA
зажим для пояса
(под защитной
(прикрепляется
(не входят в комплект). Рекомендуется использовать щелочные,
крышкой)
к поясу или
NiMH или литиевые элементы питания. Информацию об
браслету)
определении типа элемента питания можно найти на стр. 37.
Установка элементов
питания:
1. Снимитекрышкуотсека
дляэлементовпитания,
повернувстопорное
кольцона1/4оборота
противчасовойстрелки
НАЖМИТЕ, ЧТОБЫ ИЗВЛЕЧЬ
ивытянувкрышку.
2. Вставьтеэлементы
питания,соблюдая
Кнопка зажима
полярность.
для пояса
Извлеките элементы питания,
если не собираетесь пользоваться
устройством в течение
Дополнительный
длительного времени (несколько
переходник для крепления
Паз для
Отсек для эле-
месяцев). Сохраненные данные
(Не снимать. Переходник
защелки
ментов питания
используется для крепления
не теряются при извлечении
Крепление
ремешка
устройства с помощью различных
элементов питания.
дополнительных наборов.)
Навигационные устройства серии eTrex HC Руководство пользователя
начало работы
Работа с eTrex
Используемые термины
Выделенное
— переместить выделенную цветом область на экране
поле
вверх, вниз, влево или вправо с помощью четырехпозиционной
(плюс простое нажатие) клавиши для
Поле
выбора нужного поля.
— указание о нажатии клавиши означает, что вы
должны нажать и быстро отпустить данную клавишу.
— область страницы, где отображаются или вводятся
данные или опции.
Экранные кнопки
— с помощью клавиши
Используемые обозначения
выберите кнопку на экране, затем нажмите
В тексте данного руководства в инструкциях по выбору элемента
на клавишу . (Простое нажатие клавиши ВВОД/
используются стрелки (>). Такие стрелки указывают на то, что
МАНИПУЛЯТОР)
необходимо последовательно выбрать несколько элементов на
— когда просматриваемый список объектов
экране с помощью и нажимать кнопку
не помещается целиком на экране, рядом со списком появляется
после выбора каждого элемента. Например, если указано
полоса прокрутки. Для прокрутки списка вверх или вниз
“выберите > ”, вы должны выделить “Сервис”
воспользуйтесь (положения вверх/вниз)
и нажать кнопку . Затем необходимо выделить “Сведения”
или используйте клавиши In и Out.
и снова нажать кнопку .
— заводские настройки, которые хранятся
в памяти устройства. Пользователь может изменить настройки
устройства или восстановить заводские настройки, выбрав
.
Навигационные устройства серии eTrex HC Руководство пользователя
начало работы
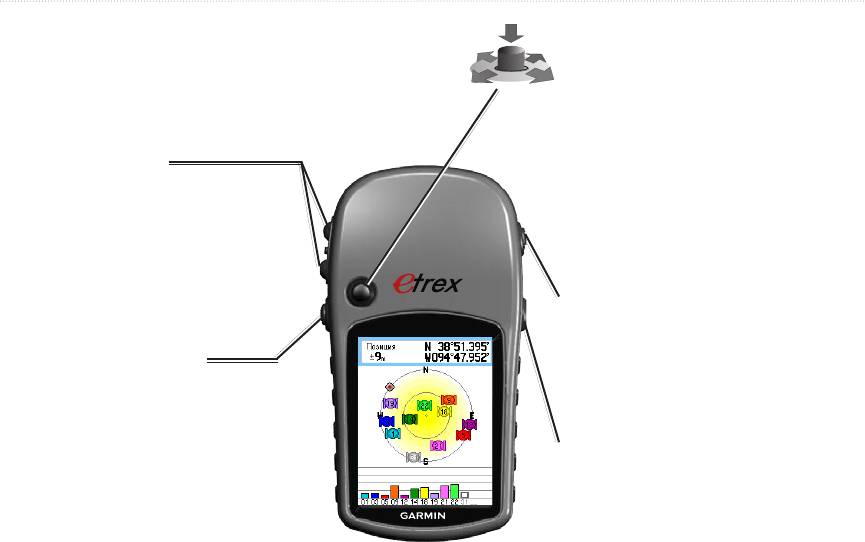
Функциональное назначение клавиш
Для перемещения вверх, вниз, вправо, влево;
для выделения полей, кнопок или значков на
экране; для ввода данных или перемещения
по карте.
Нажмите и отпустите для ввода выделенных
опций или данных и подтверждения экранных
сообщений.
На странице карты нажатие позволяет
Нажмите и удерживайте, чтобы ОТМЕТИТЬ
увеличить или уменьшить масштаб карты.
свое текущее положение в качестве
На остальных страницах нажатие позволяет
маршрутной точки.
прокрутить список вверх или вниз, а также
переместить выделенный ползунок.
Нажмите для последовательного просмотра
основных страниц.
Нажмите и удерживайте, чтобы включить
Нажмите и отпустите, чтобы открыть меню
или выключить компас. (только в моделях
опций для данной страницы.
Vista HCx и Summit HC)
Нажмите и удерживайте, чтобы открыть
меню поиска.
Нажмите и удерживайте, чтобы включить или
выключить устройство.
Нажмите и отпустите, чтобы включить
подсветку или просмотреть время, дату
и уровень заряда батареи.
Навигационные устройства серии eTrex HC Руководство пользователя
начало работы
Включение eTrex
Для инициализации устройства eTrex:
Держитеустройствовпередисебя,направивлицевую
Чтобы включить или выключить питание
панельвсторонунеба.ПриемникGPSвыполняет
устройства eTrex:
поискспутниковыхсигналов;надисплееотображается
НажмитеиудерживайтеклавишуПИТАНИЕ.
сообщение“Поискспутников”,дотехпор,покане
наберетсядостаточносигналовдляопределения
Настройка подсветки
местоположенияспутника.
Чтобы отрегулировать уровень подсветки:
1. НажмитеибыстроотпуститеклавишуПИТАНИЕ.
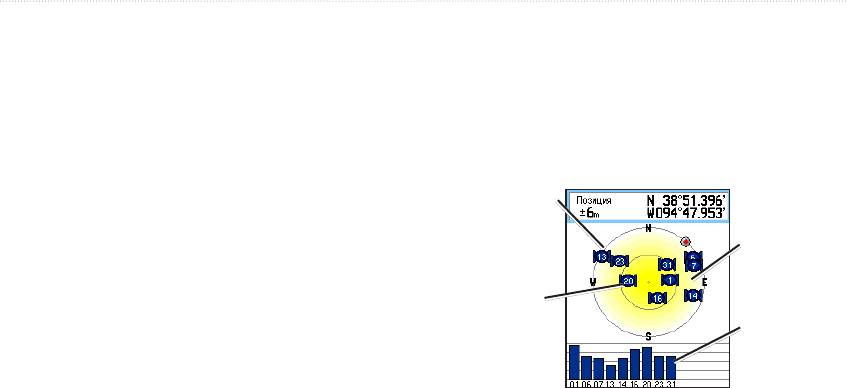
Внешнее кольцо
2. СпомощьюМАНИПУЛЯТОРАувеличьтеилиуменьшите
представляет
яркость(положения“Вверх”или“Вниз”).
горизонт.
Отображается
3. НажмитеВВОДилиВЫХОД длявыхода.
номер каждого
спутника.
Инициализация приемника GPS
Внутреннее
кольцо соот-
При первом включении устройства eTrex приемник GPS
Отображается
ветствует углу
должен получить данные со спутников и определить
уровень сигнала
в 5 градусов
текущее местоположение. Для лучшего приема спутниковых
каждого
над горизонтом.
сигналов вы должны находиться вне помещения и обеспечить
спутника.
беспрепятственный обзор неба.
Если устройству не удается определить местонахождение
спутников, появляется список возможных решений. Выделите
подходящий способ решения проблемы, затем нажмите
кнопку .
Навигационные устройства серии eTrex HC Руководство пользователя
начало работы
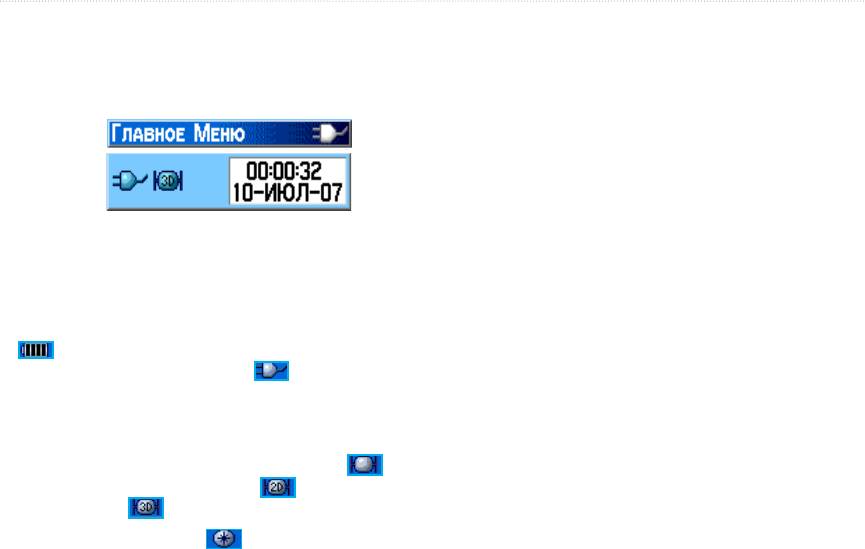
Строка состояния, дата и время
Использование картографических баз
Строка состояния и окно “Дата/Время” отображаются под
данных
ползунковым регулятором подсветки после кратковременного
Для работы многих функций eTrex в полном объеме требуются
нажатия кнопки .
подробные картографические данные, поэтому перед началом
использования устройства необходимо загрузить карты.
В устройствах eTrex Vista HCx и Legend HCx предусмотрен
слот для карт памяти microSD™ (приобретаются отдельно), на
которые можно записать подробные карты с дополнительных
дисков MapSource. Используя выбранные данные MapSource,
Строка состояния — Окно даты/времени
можно просмотреть списки близлежащих ресторанов, гостиниц,
торговых центров, мест отдыха и развлечений с указанием
Питание устройства осуществляется от элементов питания
адресов. Для моделей eTrex Summit HC и Venture HC объем
или от дополнительного источника питания. Состояние
загружаемых карт не должен превышать 24 МБ, а для eTrex Vista
источника питания отображается в главном меню и в строке
HCx и Legend HCx этот объем определяется размером карты
состояния. Значок питания от внутренних элементов питания
памяти microSD.
отображает уровень оставшегося заряда по мере разряда
элементов. Значок внешнего питания отображается в том
Установите карту памяти microSD в устройство eTrex ,
случае, если питание устройства осуществляется от внешнего
соедините его c компьютером с помощью кабеля USB
источника.
и загрузите карты с помощью программы MapSource
с компьютера на карту памяти. Дополнительные карты microSD
Состояние спутникового сигнала отображается во время
можно купить в магазинах электронных товаров; посетите также
поиска и установления связи со спутниками (значок ),
веб-сайт компании Garmin www.garmin.com для приобретения
установления двухмерной (2D, значок ) и трехмерной (3D)
совместимых продуктов MapSource и карт памяти microSD
привязки (значок ) местоположения.
с предварительно загруженными данными.
Значок электронного компаса (только в моделях Vista HCx
и Summit HC) появляется при активации компаса.
Навигационные устройства серии eTrex HC Руководство пользователя 5
начало работы
Перенос данных на карту памяти
™
microSD
В устройствах eTrex Vista HCx и Legend HCx имеется слот для
Отсек для
карт памяти microSD.
элементов
Слот для карты
питания
Установка карты памяти microSD:
mcroSD
НАЖМИТЕ, ЧТОБЫ ИЗВЛЕЧЬ
со снятой
1. Назаднейпанелиустройстваснимитекрышкуотсекадля
крышкой
элементовпитания.
2. Вставьтекартупамятивслот,расположенныйулевого
Защитная
краявверхнейчастиотсекадляэлементовпитания.
крышка
разъема USB
3. Дляизвлечениякартыпамятиизслотаустройства
eTrexнажмитенакартупонаправлениювнизибыстро
отпустите.
Разъем
Доступ к слоту
USB
Для переноса картографических данных на
карты microSD
карту памяти microSD:
1. Назаднейпанелиустройстваоткройтезащитнуюкрышку
Контакты карты должны
разъемаUSB.
быть направлены в сторону
от элементов питания.
2. ПрисоединитекабельUSBкUSB-разъемукомпьютера
Тайвань
икразъемуmini-USBназаднейпанелиустройства.
3. Длявыбораизагрузкинеобходимыхкартследуйте
указаниям,приведеннымнадискескартографическими
НАЖМИТЕ, ЧТОБЫ ИЗВЛЕЧЬ
даннымиMapSource.
Карта mcroSD в слоте
Установка и удаление
карты памяти microSD
Доступ к разъему USB
Навигационные устройства серии eTrex HC Руководство пользователя