- Manuals
- Brands
- Humminbird Manuals
- Fish Finder
- 748 3D
- Operation manual
-
Contents
-
Table of Contents
-
Troubleshooting
-
Bookmarks
Quick Links
748 3D Operations Manual
531879-1EN_A
Related Manuals for Humminbird 748 3D
Summary of Contents for Humminbird 748 3D
-
Page 1
748 3D Operations Manual 531879-1EN_A… -
Page 2
Your Humminbird® is designed for trouble-free use in even the harshest marine environment. In the unlikely event that your Humminbird® does require repairs, we offer an exclusive Service Policy — free of charge during the first year after purchase, and available at a reasonable rate after the one-year period. -
Page 3
It must be disposed of and collected for recycling and recovery of waste EEE. Humminbird® will mark all EEE products in accordance with the WEEE Directive. It is our goal to comply in the collection, treatment, recovery, and environmentally sound disposal of those products;… -
Page 4: Table Of Contents
Table of Contents Power On the Unit How Sonar Works 3D Sonar ……………………4 2D Sonar ……………………5 What’s on the 3D Sonar Display What’s on the 2D Sonar Display Understanding the 2D Sonar Display …………..10 Real Time Sonar (RTS™) Window …………….10 SwitchFire™…
-
Page 5
Table of Contents Start-Up Options Menu Normal……………………29 Simulator …………………… 30 System Status ………………….30 Self Test……………………31 Accessory Test………………….31 PC Connect ………………….32 X-Press™ Menu Main Menu Quick Tips for the Main Menu ……………… 35 Note for all Menu Settings………………35 User Mode ……………. -
Page 6
Table of Contents Sonar Menu Tab 3D Bottom Style …………..48 (3D Sonar Views only) 3D Frame Style ……………. 48 (3D Sonar Views only) 2D Beam Select………………….48 Surface Clutter ………………….49 SwitchFire™ ………………….49 Fish ID+™ …………………… 50 Fish ID Sensitivity ………………..51 Fish ID 3D Reference ………….. -
Page 7
U.S. by our authorized international distributors. To obtain a list of authorized international distributors, please visit our Web site at humminbird.com or contact our Customer Resource Center at (334) 687-6613. NOTE: Entries in this Table of Contents which list (with Temp/Speed only) require the purchase of separate accessories. -
Page 9: Power On The Unit
Power On Follow the instructions below to power on your Humminbird® control head. 748 Title Screen 1. Press the POWER/LIGHT key. 2. When the Title screen is displayed, press the MENU key to access the Start-Up Options Menu. 3. Use the 4-WAY Cursor Control key to select Normal (if there is a transducer attached to the control head) or Simulator (if there isn’t a…
-
Page 10: How Sonar Works
How Sonar Works Sonar technology is based on sound waves. The 700 Series™ Fishing System uses sonar to locate and define structure, bottom contour and composition, as well as depth directly below the transducer. Your 700 Series™ Fishing System sends a sound wave signal and determines distance by measuring the time between the transmission of the sound wave and when the sound wave is reflected off of an object;…
-
Page 11
When all the echoes are viewed side by side, an easy to interpret “graph“ of the bottom, fish, and structure appears. The sound pulses are transmitted at various frequencies depending on the application. Very high frequencies (455 kHz) are used for greatest definition but the operating depth is limited. -
Page 12: 3D Sonar
3D Sonar Your Fishing System uses a six- element transducer that transmits at 455 kHz and is capable of reaching depths of 240 ft (75 m). Each transmitted beam is symmetrical and 16 degrees in width. The six beams are lined up next to each other to provide a total coverage of 53 degrees from side to side, and 16 degrees from front to back.
-
Page 13: Sonar
2D Sonar Your Fishing System also has the capability of displaying traditional 2-dimensional sonar information from either a 455 kHz beam or an 83 kHz beam. The 455 kHz single beam has the advantage of providing increased sonar resolution but is limited to a depth capability of 240 ft (75 m).
-
Page 14: What’s On The 3D Sonar Display
What’s on the 3D Sonar Display In 3D views, your Fishing System can display a variety of useful information Depth — Water depth can be set to alarm when the water becomes too shallow. Temperature — Water surface temperature. Bottom Contour — Shows the shape of the bottom derived from depth measurements on 6 beams.
-
Page 15
about the area under and adjacent to your boat, including the following items: Boat/Direction Arrow — A simple, solid 3D boat is drawn when the Upper Depth Range is 0. A solid 3D arrow is drawn when the Upper Depth Range is not 0. Upper and Lower Depth Range Fish ID+™… -
Page 16: What’s On The 2D Sonar Display
What’s on the 2D Sonar Display The 700 Series™ Fishing System can display a variety of useful information Depth — Water depth can be set to alarm when the water becomes too shallow. Speed — If a Temp/Speed accessory is attached, the Fishing System can display the speed of the boat and can keep a Triplog of nautical or statute miles traveled.
-
Page 17
about the area under your boat, including the following items: Bait Ball Hollow Fish Symbol (see Fish ID+™) Thermoclines — Layers of water with different temperatures that appear at different depths and different times of the year. A thermocline typically appears as a continuous band of gray levels moving across the display at the same depth. -
Page 18: Understanding The 2D Sonar Display
Understanding the 2D Sonar Display It is important to understand the significance of the display. The display does not show a literal 3-dimensional representation of what is under the water. Each vertical band of data received by the control head and plotted on the display represents something that was detected by a sonar return at a particular time.
-
Page 19: Switchfire
SwitchFire™ SwitchFire™ controls how the sonar returns are displayed in the Sonar Views. SwitchFire™ settings are available in the Sonar Menu Tab. To see the maximum sonar information available within the transducer beam so more fish arches and better jig tracking are shown, choose Max Mode. To see less clutter and more fish size accuracy interpreted from the transducer beam, choose Clear Mode.
-
Page 20: Bottom Presentation
Bottom Presentation As the boat moves, the unit charts the changes in depth on the display to create a profile of the Bottom Contour. The type of bottom can be determined from the return charted on the display. A Hard Bottom such as compacted sediment or flat rock appears as a thinner line across the display.
-
Page 21
Inverse is a method where weak returns are shown with dark pixels and strong returns with lighter pixels. This has the benefit of ensuring that weak signals will be clearly visible on the display. Structure ID® represents weak returns as light pixels and strong returns as dark pixels. -
Page 22: Views
Views The sonar information from your Fishing System is displayed on the screen in a variety of easy-to-read views. • Default View: When you first power up the control head, 2D Sonar View will be the default view. • Cycle: When you press the VIEW key repeatedly, the display cycles through the available views on your screen.
-
Page 23
To customize your view rotation: 1. Press the MENU key twice to access the tabbed Main Menu, then press the RIGHT Cursor key until the Views tab is selected. 2. Press the UP or DOWN Cursor keys to select a View. 3. -
Page 24: 3D Sonar View
3D Sonar View 3D Sonar View displays a 3-dimensional representation of the bottom. The sonar returns from each of the six elements are combined to create this 3- dimensional, wire-frame image. This graphic depiction of the bottom provides you with an effective tool for understanding the terrain beneath the boat. •…
-
Page 25
3D Sonar View Boat Icon Depth Upper Temperature Depth Range Reference Frame Triplog with Fish ID+™ Timer, Symbols Distance Travelled, 3D Bottom and Average Contour Speed Lower Speed Depth Range Voltage To change the selected perspective: In some situations, the 3D Sonar View and the 2D/3D Sonar View may not display certain information due to the slope of the terrain. -
Page 26: Sonar View
2D Sonar View Sonar View presents a 2-dimensional historical log of sonar returns. The most recent sonar returns are charted on the right side of the display. As new information is received, the historical information scrolls left across the display. •…
-
Page 27: 2D/3D Sonar Combo View
2D/3D Sonar Combo View 2D/3D Sonar Combo View displays a 3-dimensional representation of the bottom next to the traditional 2-dimensional sonar representation. The 2D/3D Sonar Combo View is especially useful for evaluating the bottom terrain from the 3D window while simultaneously viewing the 2D window for structure and bottom hardness.
-
Page 28: 6-Beam Sonar View
6-Beam Sonar View 6-Beam Sonar View displays information from each of the six 455 kHz beams in a traditional 2D representation. This view displays the raw sonar returns from each of the beams that are used to create the 3-dimensional wire frame representation of the bottom in the 3D Sonar View.
-
Page 29: 2D Zoom View
2D Zoom View 2D Zoom View provides a magnified view of the bottom and structure. The Sonar Zoom View makes it easier to see separate sonar returns that would usually be displayed close together, such as those caused by fish suspended close to the bottom or within structure.
-
Page 30: 2D Big Digits View
2D Big Digits View Big Digits View provides digital data in a large, easy-to-see format. • Digital Readouts: Depth is always displayed. Readouts for temperature, speed, and Triplog information are displayed automatically if the appropriate accessory is connected to the Fishing System. NOTE: The digital readouts in the Big Digits View cannot be customized.
-
Page 31: What’s On The 700 Series™ Control Head
What’s on the 700 Series™ Control Head Your 700 Series™ Fishing System interface is easy to use. A combination of keys and special features allows you to control what you see on the display. Refer to the following illustration, and see Key Functions for more information. Screen MENU key EXIT key…
-
Page 32: Key Functions
Key Functions Your Fishing System user interface consists of a set of easy-to-use keys that work with various on-screen views and menus to give you flexibility and control over your fishing experience. POWER/LIGHT Key The POWER/LIGHT key is used to power the Fishing System on and off.
-
Page 33: View Key
VIEW Key The VIEW key is used to cycle through all available views. Press the VIEW key to advance to the next view. Repeatedly pressing VIEW cycles through all views available. Views can be hidden to optimize the system to your fishing requirements (see Views and Views Menu Tab).
-
Page 34: Exit Key
EXIT Key The EXIT key has multiple functions, which depend on the situation: • If an alarm is sounding, press the EXIT key to cancel the alarm. • If a menu tab is selected, press the EXIT key to exit the menu mode and return to the view.
-
Page 35: Accessory Bus
NOTE: Accessories to enable WeatherSense®, SmartCast® Wireless Sonar Link , and GPS functionality require separate purchases. Visit our Web site at humminbird.com or contact our Customer Resource Center at 1-800-633-1468 for details. Accessory Bus…
-
Page 36: The Menu System
The Menu System The Menu System is divided into easy-to-use menu modules as follows: • Start-Up Options Menu: Press the MENU key during the power on sequence to view the Start-Up Options Menu. From the Start-Up Options Menu, you can choose the following Fishing System Modes: Normal, Simulator, System Status, and PC Connect.
-
Page 37: Start-Up Options Menu
Start-Up Options Menu Press the MENU key during the power on sequence to view the Start-Up Options Menu, and select one of the modes described on the following pages. Also, see Power On for additional information. Normal Use Normal for on-the-water operation with a transducer connected. If a functioning transducer is connected, Normal operation will be selected automatically at power up, and your Fishing System can be used on the water.
-
Page 38: Simulator
Simulator Use Simulator to learn how to use your Fishing System before taking your boat on the water. The Simulator is a very powerful tool that provides a randomly-updated display which simulates on the water operation. Simulator We recommend going through this manual while using the Simulator, since all of the menus function and affect the display in the same way as…
-
Page 39: Self Test
Self Test displays results from the internal diagnostic self test, including unit serial number, Printed Circuit Board (PCB) serial number, software revision, total hours of operation, and the input voltage. Self Test Screen Accessory Test lists the accessories connected to the system. System Status Accessory Test Screen NOTE: The speed accessory will be detected only if the paddlewheel has moved since your Fishing System was powered up.
-
Page 40: Pc Connect
Internet access, you will need a PC Connect Cable (AS PC2). NOTE: The PC Connect cable requires a separate purchase. For more information, visit our Web site at humminbird.com or contact our Customer Resource Center at 1-800-633-1468. Updating Software requires the following top-level steps: 1.
-
Page 41: X-Press™ Menu
X-Press™ Menu The X-Press™ Menu provides a shortcut to your most frequently-used settings. The options provided on the X-Press™ Menu correspond with the current view. For example, if you are in a Sonar View and press the MENU key once, the Sonar X-Press™…
-
Page 42: Main Menu
Main Menu The Main Menu provides the standard set of menu options, including the settings that are changed less frequently. The Main Menu is organized under the following tabs to help you find a specific menu item quickly: Alarms, Sonar, Setup, Views, and Accessories. NOTE: Menu options can be expanded or simplified by setting the User Mode to Advanced or Normal.
-
Page 43: Quick Tips For The Main Menu
Quick Tips for the Main Menu • From any menu option on a menu tab, press the EXIT key to jump directly to the top of the tab. • From the bottom of a menu tab, press the DOWN Cursor key to jump directly to the top of the tab.
-
Page 44: User Mode (Normal Or Advanced)
User Mode (Normal or Advanced) Menu options can be simplified or expanded by setting your Fishing System User Mode to Normal or Advanced. Normal Mode is the default setting when you first power on your 700 Series™ Fishing System. Normal mode is provided for users who want greater simplicity and fewer menu choices.
-
Page 45
Sonar Tab, Normal Mode Sonar Tab, Advanced Mode Main Menu… -
Page 46: (Sonar X-Press™ Menu
Sonar X-Press™ Menu (Sonar Views only) The Sonar X-Press™ Menu provides a shortcut to your most frequently-used settings. Press the MENU key once while in any of the Sonar Views to access the Sonar X-Press ™ Menu. NOTE: Menu options will vary with the view (2D, 3D, 6-Beam, 2D Zoom View, or Combo View).
-
Page 47: Bottom Zoom (3D Sonar, 3D/2D Sonar Combo Views Only)
3D Bottom Zoom (3D Sonar, 3D/2D Sonar Combo Views only) Off, 1.5x, 2x, 2.5x, 3x; Default = Off Settings: 3D Bottom Zoom provides a magnified image of the bottom. Use 3D Bottom Zoom to increase the detail of the bottom on the display. 3D Lower Range (3D Sonar, 3D/2D Sonar Combo, 6-Beam Sonar Views only)
-
Page 48: Sonar Window (3D/2D Sonar Combo View Only)
2D Sonar Window (3D/2D Sonar Combo View only) Settings: Wide, Medium, Narrow, Default = Medium 2D Sonar Window sets the width of the 2-dimensional Sonar Window in the 3D/2D Combo View. See Views for more information. Reset View (3D Sonar, 3D/2D Sonar Combo Views only) Settings: Press the RIGHT Cursor key to activate.
-
Page 49: Sensitivity (2D Sonar, 2D Sonar Zoom, 2D Big Digits Views Only)
Sensitivity (2D Sonar, 2D Sonar Zoom, 2D Big Digits Views only) Settings: Low = 1, High = 20, Default = 10 Sensitivity controls how much detail is shown on the display and will adjust the sensitivity of all sonar frequencies. When operating in very clear water or greater depths, increase the sensitivity to see weaker returns that may be of interest.
-
Page 50: Upper Range (Advanced: 2D Sonar, 2D Big Digits Views Only)
Upper Range (Advanced: 2D Sonar, 2D Big Digits Views only) Settings: 0 to 990 ft or 0 to 327 m [International Models only], Default = 0 ft Upper Range sets the shallowest depth range that will be displayed on the Sonar and Big Digits Views.
-
Page 51: Chart Speed (2D Sonar, 2D Sonar Zoom, 2D Big Digits Views Only)
Chart Speed (2D Sonar, 2D Sonar Zoom, 2D Big Digits Views Only) Settings: 1-9, Ultra, where 1 = Slow, 9 = Fast, Ultra = Fastest, Default = 5 Chart Speed determines the speed at which the sonar information moves across the display, and consequently the amount of detail shown.
-
Page 52: Alarms Menu Tab
Alarms Menu Tab From any view, press the MENU key twice to access the Main Menu. The Alarms tab will be the default selection. NOTE: When an alarm is triggered, you can silence it by pressing any key. The alarm will be silenced, and will not be triggered again until a new instance of the alarm condition is detected.
-
Page 53: Depth Alarm
Depth Alarm Settings: Off, 1 to 100 ft, or 0.5 to 30 m [International Models only], Default = Off Depth Alarm sounds when the depth becomes equal to or less than the menu setting. Fish ID Alarm Settings: Off, All, Large/Medium, Large, Default = Off Fish ID Alarm sounds when the Fishing System detects fish that correspond to the alarm setting.
-
Page 54: Temp. Alarm
Temp. Alarm Settings: Off, 33-120 Fahrenheit, 0-50 Celsius [International Models only]; Default = Off Temp. Alarm sounds when the water temperature detected by the Fishing System reaches the Temp. Alarm setting, which is either set in degrees Fahrenheit or Celsius [International Models only]. For example, if the Temp.
-
Page 55: Sonar Menu Tab
Sonar Menu Tab Press the MENU key twice to access the Main Menu and then press the RIGHT Cursor key until the Sonar tab is selected. NOTE: Menu options can be expanded or simplified by setting the User Mode to Advanced or Normal. See Main Menu: User Mode for details.
-
Page 56: Bottom Style (3D Sonar Views Only)
3D Bottom Style (3D Sonar Views only) Settings: Grid Only, Shaded with Grid, Shaded, Default = Shaded with Grid 3D Bottom Style selects the bottom style used in the 3D Sonar View. 3D Frame Style (3D Sonar Views only) Settings: Simple, 2, 3, 4, Complex, Default = 3 3D Frame Style selects the frame style used in the 3D Sonar View.
-
Page 57: Surface Clutter
Surface Clutter Settings: Low = 1 to High = 10, Default = 5 Surface Clutter adjusts the filter that removes surface clutter noise caused by algae and aeration. The lower the setting, the less surface clutter will be displayed. Surface Clutter Surface Clutter SwitchFire™…
-
Page 58: Fish Id
Fish ID+™ Settings: Off, 3D Markers, Symbol Only, Symbol + Depth, Default = Symbol + Depth Fish ID+™ uses advanced signal processing to interpret sonar returns and will display a Fish Symbol when very selective requirements are met. When a fish is detected, a fish icon and its depth are displayed above the return that has been classified as being a fish.
-
Page 59: Fish Id Sensitivity
When Fish ID+™ is turned off, the Fishing System shows only the raw sonar returns on the display. These returns will often result in “arches“ forming on the display, indicating potential targets. Due to the transducer beam angle, the distance to a fish decreases as the fish moves into the beam, and then increases as it moves out again, creating a Fish Arch when this distance change is shown on the display.
-
Page 60: Fish Id 3D Reference (3D Sonar Views Only)
Fish ID 3D Reference (3D Sonar Views only) Settings: Surface, Both, Bottom, Default = Bottom Fish ID 3D Reference selects the reference line style used in the 3D Sonar View. Selecting Surface draws a line from the fish icon to the surface plane. Bottom draws a line from the fish icon to the bottom contour;…
-
Page 61: 83 Khz Sensitivity (Advanced, 2D Sonar Views Only)
83 kHz Sensitivity (Advanced, 2D Sonar Views only) Settings: -10 to +10, Default = 0 83 kHz Sensitivity changes the sensitivity of the 83 kHz beam. Increasing the 83 kHz Sensitivity will display additional weak returns, and decreasing the 83 kHz Sensitivity will display fewer weak returns.
-
Page 62: Noise Filter (Advanced)
Noise Filter (Advanced) Settings: Off, Low, Medium, High 1, High 2, High 3, Default = Low Noise Filter adjusts the sonar Noise Filter to limit interference on the display from sources such as your boat engine, turbulence, or other sonar devices. The Off setting removes all filtering.
-
Page 63: Setup Menu Tab
Setup Menu Tab From any view, press the MENU key twice to access the tabbed Main Menu, then press the RIGHT Cursor key until the Setup tab is selected. NOTE: Menu options will vary depending on which accessories are attached to the unit. NOTE: Menu options can be expanded or simplified by setting the User Mode to Advanced or Normal.
-
Page 64: Units — Depth
Units — Depth Settings: Domestic Models: Feet, Fathoms; International Models: Meters; Default = Feet/Meters Units — Depth selects the units of measure for all depth-related readouts. Units — Temp (International only) Settings: Celsius, Fahrenheit; Default = Celsius Units — Temp selects the units of measure for all temperature-related readouts. [International Models only].
-
Page 65: User Mode
User Mode Settings: Normal, Advanced, Default = Normal User Mode sets the menu system to Normal or Advanced. When set to Normal (default setting), the basic set of menu options are shown in the menu system. When set to Advanced, additional menu options are added to the menu system. See Main Menu: User Mode for details.
-
Page 66: Select Readouts (Advanced, 2D Sonar And 3D Sonar Views Only)
Select Readouts (Advanced, 2D Sonar and 3D Sonar Views only) Settings: Various, Default = Off Select Readouts sets the information to display in each of the 6 fixed-position data windows The readout arranged around the left and bottom edges of position on the screen the 2D or 3D Sonar Views.
-
Page 67: Depth Offset (Advanced)
Depth Offset (Advanced) Settings: -10.0 to +10.0 ft or -3.0 to 3.0 m [International Models only], Default = 0.0 ft Depth Offset will adjust the digital depth readout to indicate depth from the waterline or boat’s keel. Enter a positive vertical measurement from the transducer to the waterline to read the depth from the waterline.
-
Page 68: Nmea Output (Advanced)
NMEA Output (Advanced) Settings: Off, On; Default = Off NMEA Output turns the NMEA* output on or off. NMEA Output should be turned On if you connect the NMEA Output wires of the GPS Receiver cable to another NMEA-compatible device, such as an autopilot. *NMEA 0183 is a National Marine Electronics Association standard for data communication.
-
Page 69: Speed Calibration (Advanced, With Temp/Speed Only)
Speed Calibration (Advanced, with Temp/Speed only) Settings: -20% to +20%, Default = 0% Speed Calibration will adjust the speed readout by the percentage entered, and will appear in the menu if a Temp/Speed Accessory is connected and the paddlewheel has moved at least once. Demonstration Settings: Off, Visible, Default = Visible Demonstration controls whether the Demonstration Mode is visible or off.
-
Page 70: Views Menu Tab
Views Menu Tab From any view, press the MENU key twice to access the tabbed Main Menu, then press the RIGHT Cursor key until the Views tab is selected. This menu tab allows you to set the available views to either hidden or visible in the view rotation.
-
Page 71: Accessories Menu Tab
Accessories Menu Tab (with accessories attached) NOTE: Accessories to enable WeatherSense® and the SmartCast® Wireless Sonar Link require separate purchases. You can visit our Web site at humminbird.com or contact our Customer Resource Center at 1-800-633-1468 for additional details. Accessories Menu Tab…
-
Page 72: Troubleshooting
Troubleshooting Before contacting the Humminbird® Customer Resource Center, please read the following section. Taking the time to review these troubleshooting guidelines may allow you to solve a performance problem yourself, and therefore avoid sending your unit back for repair. Fishing System Doesn’t Power Up If your Fishing System doesn’t power up, use the Installation Guide that also…
-
Page 73: Display Problems
Display Problems There are several main conditions or sources of possible interference that may cause problems with the quality of the information displayed on the control head. Look in the following table for some symptoms of display problems and possible solutions: Problem Possible Cause The control head loses…
-
Page 74: Finding The Cause Of Noise
Finding the Cause of Noise Electrical noise usually affects the display with many black dots at high speeds, and high sensitivity readings. One or more of the following sources can cause noise or interference: Possible Source of Noise Isolation Turn off any nearby electronic devices to see Other electronic devices if the problem goes away, then turn them on one at a time to see if the noise re-appears.
-
Page 75: 700 Series™ Fishing System Accessories
700 Series™ Fishing System Accessories Accessories customize the Humminbird® Fishing System to your needs and enable you to stay on the edge of new technology. When an accessory is connected to the Humminbird® Fishing System, additional menus and readouts are added automatically to the Main Menu System. Accessories available today that are supported by your Humminbird®…
-
Page 76: Specifications
IPX Rating ..IP67 Waterproof/Submersible @ 1 m for 30 minutes and dust tight NOTE: Humminbird® verifies maximum stated depth in saltwater conditions, but actual depth performance may vary due to transducer installation, water type, thermal layers, bottom composition and slope.
-
Page 77: Glossary
Fish and other objects close to the bottom that fall within the dead zone will probably not be visible in the sonar beam. Precision sonar beams, such as the Humminbird® 20° beam, have a smaller dead zone than wider sonar beams.
-
Page 78
Noise appears as random “dots“ on the display and is caused by a variety of sources. Many Humminbird® products have a Noise Filter menu setting that allows the user to clear the screen of noise that is difficult to eliminate (also, see Troubleshooting). -
Page 79
Many Humminbird® units operate at up to 40 times per second when in single frequency operation. Due to the limitation of the speed of sound in water, the update rate begins to slow as depth increases to deeper than 50 feet. -
Page 80
Thermoclines Water layer(s) of distinctly different temperatures that create a sonar reflection due to the density of the differing water temperatures. Typically a thermocline will appear as a continuous band across the display at some distance above the bottom contour. Thermoclines are of interest to anglers because fish will suspend above or below the thermocline as they seek the optimum temperature and oxygen levels. -
Page 81: Contact Humminbird
Contact Humminbird® Contact the Humminbird® Customer Resource Center in any of the following ways: By Telephone: (Monday — Friday 8:00 a.m. to 4:30 p.m. Central Standard Time): 1-800-633-1468 By e-mail: (typically we respond to your e-mail within three business days): service@humminbird.com…


Спасибо за то, что выбрали марку номер 1 в США среди рыбопоисковых эхолотов! Репутация Humminbird строится на разработке и производстве оборудования высшего класса, действительно соответствующего стандартам морского оснащения. Ваш прибор сделан так, что вы не будете иметь с ним проблем даже в самых сложных условиях. Если все же ваш прибор требует ремонта, обратитесь к информации в гарантийном талоне или к местному представителю.
Внимание! Данный прибор не может быть использован в качестве навигационного устройства с целью предотвращения повреждения лодки, столкновения, мели или персональных требований по навигации. При движении лодки глубина может измениться очень быстро, и вы можете не успеть среагировать. Не забывайте – датчик предназначен для того, чтобы осматривать зону под лодкой. Всегда работайте с эхолотом на невысокой скорости, если предполагаете, что впереди мель или затопленные объекты.
Предупреждение: самостоятельная разборка, ремонт, попытка сменяя серийного номера как прибора, так и дополнительного оборудования влекут отказ в гарантийном обслуживании Предупреждение: При изготовлении прибора использован свинец. Помните об этом, вскрывая прибор.
Fish ID+™, FishingGPS®, Humminbird®, Matrix™, RTS®, SmartCast®, Structure ID®, Total Screen Update®, WeatherSense®, WhiteLine®, X-Press™ являются зарегистрированными торговыми марками Humminbird®
Все иллюстрации сделаны на основе оригинальной англоязычной инструкции. Меню позволяет переключиться на русский язык, в котором вы увидите названия и заголовки, используемые в данном руководстве для перевода английских терминов
Как работает сонар
Сонар использует звуковые волны для определения присутствия и местоположения подводных объектов. Время между передачей сигнала и получением эха может быть использовано для определения расстояния до объекта. Анализируя сигнал, можно получить информацию о местоположении объекта, его размере или расположении подводных объектов. Приборы Humminbird состоят из двух основных компонентов: сонара и датчика. Сонар состоит из приемника и передатчика, а также устройства контроля и жидкокристаллического дисплея. Датчик устанавливается под поверхностью воды и конвертирует электрический импульс от передатчика в механические импульсы или звуковые волны. Тот же датчик получает отраженные сигналы (эхо) и преобразует их назад в электрический сигнал для последующего отображения на экране дисплея.
Приемо-передающий цикл очень короткий. Звуковая волна способна пройти от поверхности до глубины 70 м и вернуться назад менее чем за 1 секунду. Поэтому ваша лодка не может «обогнать» сигнал.
Многие составляющие влияют на информаицю, которая может быть получена от эха, полученного датчиком. Сонарные сигналы, сгенерированные на более высокой частоте имеют преимущество – они позволяют оперировать с более высоким разрешением, хотя расстояние (глубина), которое может пройти более высокочастотные сигнал, сравнительно небольшое. Низкочастотные сигналы могут пройти бОльшее расстояние, но информация от них более «бедная».
Контур сигнала, передаваемого сонаром, также влияет на получаемую информацию. Единственный широкий пучок охватывает большую зону, однако скрадывает детали. Узкий пучок обеспечивает прекрасную детализацию, однако зона охвата ограничена.
1

3D Sonar
Ваш эхолот 748 3D использует шестиэлементные датчик, с рабочей частотой 455кгц и рабочей глубиной 75 метров. Каждый из 6 пучков – 16 градусов шириной и симметричен. Общий угол охвата – 53 градуса от левого до правого края и 16 градусов от переднего до заднего края. Одновременное использование нескольких узких пучков обеспечивает широкую зону охвата для изучения рельефа дна и местоположения объектов без снижения того высокого качества детализации, которое может обеспечить лишь узкий пучок. Эхолот 748 3D накапливает информацию от непрерывных серий возвращенных сигналов. Затем она интерпретирует эту информацию, создавая 3-хмерное изображение подводной ситуации за вашей лодкой по мере вашего движения.
2D Sonar
Ваш эхолот 748 3D также имеет возможность отображать привычную двухмерную картинку, получаемую либо от пучка с частотой 455кгц, либо от пучка частотой 83кгц. Один пучок 455кгц имеет ограничение по рабочей глубине 75м, зато он чрезвычайно детализирован. Пучок 83кгц может работать на большей глубине (330м), но обеспечиваемая им детализация несколько ниже, чем у пучка 455кгц.
Замечание: На рабочую глубину влияют такие факторы как скорость лодки, плотность дна, свойства вода и тип установки датчика.
Что мы видим на дисплее (3D)
В режиме построения 3-хмерной картинки 748 3D может отобразить много полезной информации об области под и рыдом с вашей лодкой, включая:
Замечание: Ряд информационных сведений в данном списке (касательно скорости, температуры, GPS) возможны при подключении соответствующего дополнительного оборудования. Если подключены одновременно и сенсор скорости/температуры, и GPS, то в режиме 3D будет видна только информация от GPS.
7
1
|
2 |
|||
|
5 |
|||
|
6 |
|||
|
9 |
|||
|
10 |
|||
|
11 |
12 |
||

1.Глубина — можно установить предупредительный сигнал при приближении мели
2.Температура – показывает температуру поверхности воды
3.Скорость – если подключен сенсор скорости/температуры или GPS, экран покажет скорость лодки и будет вести путевой журнал о пройденном расстоянии.
4.Заряд батарей – можно установить предупреждающий сигнал о разрядке
5.Контур дна – показывает контур дна на основе измерения глубин шестью пучками. Возможны три вида показа; передние края контура обведены, чтобы обеспечить бОльшую понятность. Ширина охвата дна примерно равна глубине.
6.Fish ID+ tm – для показа местоположения рыбы используется символ. Для индикации пучка, в котором обнаружена рыба используется шесть символов. Левонаправленный символ указывает, что рыба слева от лодки, правонаправленный – справа, и каждый из них может быть трех размеров. Более крупный символ обозначает более сильный сигнал. Символы, использующиеся для двухмерной картинки, те же, что и для трехмерного изображения.
7.Стрелка направления движения лодки – если верхняя граница глубины «0», то для показа лодки используется простой трехмерный символ лодки. Черная стрелка – это символ, отображающий лодку в случаях, когда верхняя граница глубины не «0».
8.Рамка – ограничивает определенную зону или рыбу. В работе используются рамки разной формы и стиля.
9.Таймер – накапливает информацию от сенсора скорости/температуры или GPS
10.Средняя скорость – считывается от сенсора скор/темп. Или GPS
11.Расстояние – пройденное расстояние, считываемое от сенсора скор/темп или GPS
12.Верхний и нижний уровни глубины
|
Что видно на экране в двухмерном изображении |
|||
|
1. |
Глубина |
11. Диалоговый блок курсора – показывает |
|
|
2. |
Скорость |
глубину прямо под точкой, куда указывает |
|
|
3. |
Температура |
курсор |
|
|
4. |
Косяки рыбы |
12. |
Заряд батарей |
|
5. |
Таймер |
13. |
Окно реального времени |
|
6. |
Пройденное расстояние |
14. |
Мягкое дно |
|
7. |
Средняя скорость |
15. |
Символ рыбы |
|
8. |
Твердое дно |
16. |
Термоклин |
|
9. |
Каменистое дно |
17. |
Придонные структуры |
|
10. Вторичное эхо |
18. Вид курсора в режиме «замороженного |
|||||||||||||
|
экрана» |
||||||||||||||
|
18 |
||||||||||||||
|
1 |
17 |
|||||||||||||
|
2 |
16 |
|||||||||||||
|
3 |
||||||||||||||
|
4 |
15 |
|||||||||||||
|
5 |
||||||||||||||
|
6 |
||||||||||||||
|
7 |
||||||||||||||
|
8 |
||||||||||||||
|
9 |
14 |
|||||||||||||
|
10 |
||||||||||||||
|
13 |
||||||||||||||
|
11 |
12 |
|||||||||||||
3

Виды обзора
— трехмерный — трех- и двухмерный комбинированный
— шестипучковый — двухмерный
— режим увеличения в 2-хметром обзоре — режим больших цифр в 2-мерном обзоре
По умолчанию выбран трехмерный вид обзора. Если нажимать кнопку VIEW, можно последовательно увидеть все возможные режимы просмотра информации. Любой из «Видов» может быть скрыт или включен в цикл перебора – см. меню «Выбрать виды» в Дополнительном меню пользователя.
Замечание: Когда вы изменяете любую настройку, влияющую на работу сонара, изображение на экране меняется немедленно (то есть вам даже не нужно выходить из меню, чтобы активизировать внесенные изменения). Например, в меню X-Press можно быстро переключаться между инверсным видом обзора и видом Structure ID.
Замечание: если цифра, указывающая глубину, мигает, то это означает, что у прибора проблемы с определением дна. Обычно это происходит, если глубина слишком большая, либо датчик находится не в воде, либо лодка двигается слишком быстро, либо по иной причине, которая мешает прибору получать точную и постоянную информацию.
Вид обзора 3D
Показывает трехмерную картинку дна. Глубина всегда показана в верхнем левом углу. Температура и скорость показаны, если подключен соответствующйи сенсор или GPS. Эхо от каждого из 6 пучков объединяются для создания трехмерного изображения схемы дна. Эта графика – эффективный метод для понимания рельефа за лодкой. Символ лодки указывает расположение вашей лодки относительно отображаемого дна.
Самый новый сигналы появляются в верхней правой стороне экрана и по мере поступления новой информации смещаются ниже и левее. Ширина охватываемой зоны примерно равно глубине. Уровни глубины автоматически подбираются таким образом, чтобы дно было постоянно показано на экране. В неокторых ситуациях выбранная точка обзора трехмерной картинки может мешать отображению части информации из-за контура дна. Вы можете поменять точку перспективы, чтобы увидеть то, что скрыто. Для этого воспользуйтесь курсорной кнопкой со стрелками. Переустановить точку перспективы в выбранную по умолчанию (то есть ту, которая была установлена на фабрике) можно с помощью опции Восстановить Вид из меню X-Press. Если возвращенный сигнал удовлетворяет определенным критериям, то он воспринимается как рыба и отображается одним из 18 видов символов рыбы. Кроме трех размеров, сигнализирующих о силе сигнала, каждый из 6 пучков имеет собственный набор символов (см. ниже Fish ID+ или Заголовки основного меню Гидролокатор)
Шесть дополнительных цифровых информационных блоков возможны при подключении дополнительного оборудования. Эти блоки можно настроить так, чтобы видеть только ту информацию, которая вам действительно нужна (см. Выбор отсчетов)
4

символ лодки
верхний диапазон
сетка
символ рыбы
рельеф
нижний диапазон
путевой журнал
Вид обзора 6 пучков
Этот вид обзора показывает информацию от каждого из 6 455 кгц пучков в традиционном 2-мерном виде. Вы увидите необработанные эхо от каждого из пучков, которые используются для построения трехмерного изображения. Этот вид обзора может быть использовать для идентификации придонных структур и объектов в толще воды (ведь трехмерное изображение строится как сетка). Кроме того, обнаруженные объекты отображаются в привязке к положению лодки. Самое правое окно показывает объекты, которые находятся далеко справа от лодки. То же для левых объектов. Оставшиеся окна показываются объекты, которые существенно ближе к лодке. Цифровые блоки в данном виде обзора переустанавливать нельзя.
Верхний диапазон
Символ лодки
Исторический
экран для каждого пучка
Нижний диапазон
5

Вид обзора Комбинированный (3D/2D)
Показывает трехмерную картинку дна рядом с традиционным трехмерным изображением. Глубина указана в левом верхем углу. Этот вид обзора особенно полезен для одновременного изучения рельефа (от трехмерной картинки) и непосредственной структуры дна, его плотности и придонных объектов (от двухмерной картинки). Переустанавливать цифровые информационные блоки в этом виде обзора нельзя.
Верхний диапазон
|
Верхний диапазон |
||
|
Трехмерное |
Нижний диапазон |
|
|
изображение |
Окно реального времени RTS.
Это окно расположено с правой стороны экрана в стандартном режиме просмотра. Это окно обновляет информацию с максимально возможной для данной глубины скоростью и показывает только те сигналы, которые возвращаются от дна, придонных структур и рыб, попавших в пучок датчика.
Узкое окно RTS (Слева на иллюстрации) показывает силу возвращенного сигнала только с помощью оттенков серого цвета. Выбираемые оттенки соответствуют тем, что используются в стандартном окне (т.е. в режимах Structure ID, WhiteLine, Черное дно). Глубина, с которого возвращается сигнал, определяется по ее вертикальному местоположению относительно шкалы глубины вдоль правой границы экрана
Широкое окно RTS (справа на иллюстрации) показывает силу возвращенного сигнала с помощью блоков разного размера Длина блока показывает, насколько силен или слаб возвращенный сигнал.
Глубина, с которого возвращается сигнал, определяется по ее вертикальному местоположению относительно шкалы глубины вдоль правой границы экрана.
Оттенки серого в данном окне не используются.
6

|
Вид обзора «Двухмерный» |
||
|
Глубина |
Верхний диапазон |
|
|
Скорость |
Окно реального времени |
|
|
Температура |
||
|
Путевой журнал |
||
|
Историческое окно |
Курсор |
|
|
Уровень напряжении |
||
|
Диалоговый блок |
Нижний диапазон |
|
|
курсора |
При этом традиционном видом обзора, отображающим «историческую» картинку возвращенных сигналов, глубина указывается постоянно в левом верхнем углу экрана. Значения температуры и скорости лодки отображаются только при подключения соответствующего дополнительного оборудования. Новейшая информация появляется справа и по мере поступления еще более новой, старая смещается влево. Значения верхней и нижней границы уровней глубины указаны вдоль правого края экрана. Выбранный для этого масштаб показывает расстояние от поверхности воды до той глубины, которая позволяет показывать дно на экране. Этот масштаб автоматически подбирается таким образом, чтобы картинка дна присутствовала на экране постоянно. При подключении различного дополнительного оборудования возможны 6 цифровых информационных блоков, форму и появление которых на экране можно выбирать на свое усмотрение (меню Установки, опция Выбор отсчетов).
В двухмерном режиме ваш прибор работает как типичный рыбопоисковый эхолот. Шесть пучков общим охватом 53 градуса позволяют вам искать рыбу в более широкой зоне. Дно рисуется на основе информации от двух центральных пучков. Символы, используемые для отображения рыб, те же, что и для трехмерного изображения. Они указывают местоположение рыб по отношению к лодке. (см. меню Гидролокатор, опция Fish ID+). Воспользуйтесь двухмерным режимом, чтобы определить структуры и плотность дна.
Рамка заморозки – нажав любую стрелку курсорной кнопки, вы остановите (заморозите) картинку на экране. Передвигая с помощью курсорной кнопки со стрелками курсор по экрану и устанавливая его у интересующего объекта, вы увидите значение глубины, на которой он находится. В режиме «заморозки» окно реального времени продолжает работать в обычном режиме. Кроме того, можно увидеть эффект от изменения установок с помощью Быстрого Редактирования Изображения. Чтобы выйти из режима «заморозки», нажмите кнопку Exit. Картинка на экране снова начнет двигаться. “Заморозка» возможна только при двухмерном виде обзора.
Режим Крупные цифры
Замечание: Таймер, Дистанция, Заряд батарей, Средняя скорость – опции Путевого журнала. Они вычисляются с момента последнего сброса Путевого журнала.
Этот режим позволяет показывать цифровую информацию в крупном легкочитаемом формате. Текущая глубина присутствует всегда. Если подключено необходимое дополнительное оборудование, то автоматически отображается информация о текущей скорости лодки, температуре, пройденном пути и средней скорости за все время. Как-либо изменить вид представления данных в этом режиме просмотра нельзя
7

|
Глубина |
Таймер – показывает |
|||||||
|
суммарное время |
||||||||
|
Дистанция – |
||||||||
|
показывает |
||||||||
|
Температура |
общую пройденное |
|||||||
|
расстояние |
||||||||
|
Скорость |
Заряд батарей |
|||||||
|
Средняя скорость |
||||||||
|
Режим увеличения |
||||||||
|
Глубина |
Верхний диапазон в |
|||||||
|
нормальном режиме |
||||||||
|
Верхний диапазон в |
||||||||
|
режиме увеличения |
||||||||
|
Окно в нормальном |
||||||||
|
Увеличенный |
двухмерном режиме |
|||||||
|
блок |
Блок, подлежащий |
|||||||
|
увеличению. Именно |
||||||||
|
он показан слева. |
||||||||
|
Кратность |
Нижний диапазон в |
|||||||
|
нормальном режиме. |
||||||||
|
увеличения |
||||||||
Данный режим увеличивает определенную часть изображения на экране. Увеличивая разрешение, этот режим дает возможность зрительно разделять объекты, которые в уменьшенном виде казались слитыми: например, рыба, располагающаяся очень близко ко дну или прячущаяся в придонной растительности. Цифровое значение глубины указано в верхнем левом углу экрана.
В режиме увеличения экран разделяется на два части: более узкая часть – для стандартной картинки – справа, и более широкая – для увеличенной области – слева. Правая часть показывает также очерченный контуром блок. Именно он показан слева в увеличенном масштабе. Этот блок сдвигается постоянно таким образом, чтобы в него попадало дно.
При изменении глубины меняется и увеличенное изображение. Это происходит автоматически и таким образом, чтобы показывать дно. Блок увеличения указывает, где относительно расположена та зона, которая отображается в увеличенном масштабе. Масштаб увеличения указан цифрами в нижнем левом углу экрана и может изменяться, чтобы соответствовать текущим условиям (см. выше – увеличиваемый блок должен включать дно) Цифры в верхнем в нижнем правом углу указывают текущий выбранный диапазон просматриваемой глубины. В режиме увеличения на экране больше нет никаких других цифровых данных типа температуры, уровня напряжения и т.д.
8
Представление дна
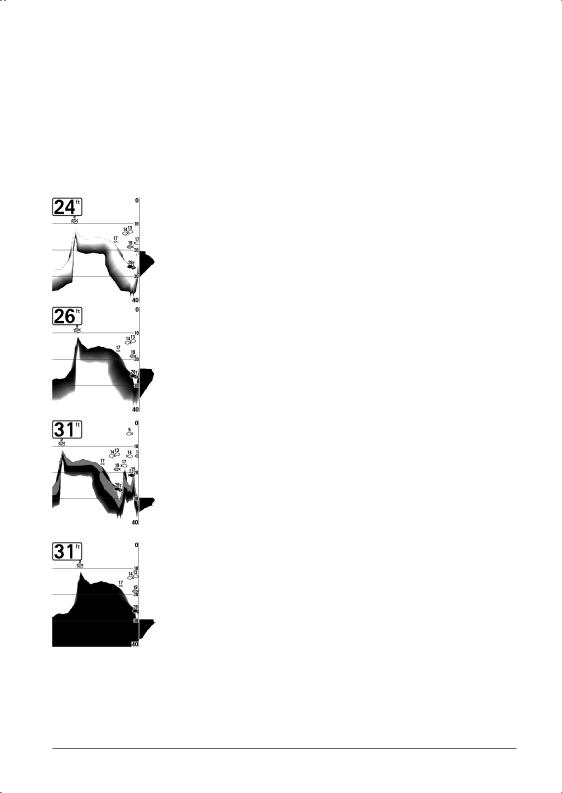
По мере движения лодки создается контур дна. Тип дна можно определить с помощью используемых точек и оттенков серого. Твердое дно типа плотной глины и плоского каменного дна отображается более тонкой темной полосой поперек экрана. Мягкое дно типа песка или ила – это более широкая полоса. Каменистое дно – это прерывистое скопление темных контуров – см. иллюстрацию на развороте данного руководства.
Сигналы, возвращенные от дна, структур и рыб могут быть представлены с помощью ряда функций: Обратный (Inverse), Белая Линия (WhiteLine), Structure ID или Черное ниже дна (Черное дно).
Inverse – это метод, при котором более слабые сигналы показаны более темными точками, а более сильные – более светлыми. Это может иметь преимущество в случае, когда надо изучить именно слабые сигналы, так как в данном случае они будут хорошо видны.
Structure ID® – показывает слабые возвращенные сигналы как светлые точки и сильные – как темные точки. Это дает преимущество в случаях, когда нужно абсолютно четко видеть сильные сигналы на экране.
Whiteline® — выделяет самые сильные сигналы, обводя их светлым контуром. Это помогает отделять придонные структуры от самого дна.
Черное ниже дна – все точки ниже контура дна – черные. Это максимально четко отделяет дно от придонных структур. Все, что «не дно», то есть структуры, рыба, термоклины – будет отображаться по методу Structure ID.
9
 Loading…
File Specifications:1399/1399281-748_3d.pdf file (17 Feb 2023) |
Accompanying Data:
Humminbird 748 3D Fish Finder PDF Operation Manual (Updated: Friday 17th of February 2023 05:55:02 AM)
Rating: 4.4 (rated by 11 users)
Compatible devices: 531338-1_C, 798ci SI, Matrix 77c, 150SX, 550 500 series, 788c, RF15, SOLIX series.
Recommended Documentation:
Operation Manual (Text Version):
(Ocr-Read Summary of Contents of some pages of the Humminbird 748 3D Document (Main Content), UPD: 17 February 2023)
-
Humminbird 748 3D User Manual
-
Humminbird 748 3D User Guide
-
Humminbird 748 3D PDF Manual
-
Humminbird 748 3D Owner’s Manuals
Recommended: SB-2180, RM85, HDS 4.0/20 E Ec, DVP-FX74
Links & Tools
-
| 1 HDS Carbon | Quick Start Guide — EN HDS Carbon Quick Start GuideOverviewNo. Key Function1 Touchscreen2 Pages key Activates the home page3 Cursor keys Pans the cursor, moves through menu items and adjusts values4Zoom out/Zoom in keys Zooms the screen; press keys simultaneously to save a Man Overboard …
HDS Carbon 294
-
400W / 500W SeriesGarmin Optional DisplaysPilot’s Guide Addendum For: • GDL 69/69A XM Satellite Datalink• GTX 330/330D TIS• Garmin TAWS (GPS 500W & GNS 530W)• Garmin HTAWS (Helicopter Installations)• Terrain Proximity (Helicopter Installations)• Garmin GTS 8XX Series TAS …
GNC 420AW 78
-
MaintenanceIf your boat remains in the water for long periods of time, algae andother marine growth can reduce the effectiveness of the transducer.Periodically clean the face of the transducer with a mild, marine-safeand plastic-safe soap or solution.If your boat remains out of the water for a long per …
700059-1 6
-
Document number: 86074-1Use with: 81183-1Date: 1 August 2002ST290 Graphic Display — quick reference guide ST290 Graphic Display — quick reference guideOperationChapter Select modeSelectchapterSelect chapterIncrease parameter value, orselect popup menu valueDecrease parameter value, orselect popup menu valueEdit …
St290 3
Operating Impressions, Questions and Answers:
3.0
Rated 3 out of 5
3 out of 5 stars (based on 1 review)
Your overall rating
HUMMINBIRD 748 3D (01) PDF MANUAL
Click here to download HUMMINBIRD 748 3D (01) PDF MANUAL
HUMMINBIRD 748 3D (01) PDF MANUAL
FREE ENGLISH PDF
OPERATING INSTRUCTIONS
USER GUIDE – USER MANUAL
OWNER GUIDE – OWNER MANUAL
REFERENCE GUIDE – REFERENCE MANUAL
INSTRUCTION GUIDE – INSTRUCTION MANUAL
Your overall rating
- YouTube
HUMMINBIRD 748 3D (01) PDF MANUAL
HUMMINBIRD 748 3D (01) PDF MANUAL
Обзор эхолота Humminbird Fishfinder 748 3D
Эхолот Fishfinder 748 3D – с монохромным дисплеем с 12 оттенками серого, трехмерное отображение, экран высокого качества. Четкое отображение структуры позволяет держать под контролем все происходящее в воде. Работа эхолота происходит в двух действиях 3D и 2D. Устройства подходят для разных видов рыбалки, зимой и летом, в пресной и соленой воде. Габариты эхолота компактны, он с легкостью помещается в карман рыбацкой куртки. В комплекте идут крепежные элементы для экрана и датчика, что позволяют легко производить установку приборов.

Эхолот Fishfinder 748 3D – пятидюймовое устройство для изучения рельефа дна и поиска рыбы. Прибор с шести лучами производит точный поиск рыбных косяков. На экране отображается трехмерное изображение, которое можно поворачивать и рассматривать под разным углом. Изображение также можно увеличивать в диапазоне от 2 до 8 раз. Для рыбалки в темное время суток на экране эхолота установлена яркая белая подсветка. При необходимости прибор можно дополнить GPS-приемником. Корпус эхолота полностью водонепроницаемый и ударопрочный, при падении эхолота в водоем он держится на воде и не тонет. Рабочая глубина при 3D функции достигает 70 метров, при 2D функции до 300 метров. Эхолот подходит для применения на мелководье и в воде с течением.
Как работает эхолот
Работа эхолота – несложный процесс, совершаемый автоматически. Прибор посылает звуковые импульсы в сторону дна. В момент движения сигнал анализирует объекты, которые встречаются в толще воды. Импульсы изучают предметы их плотность, размер и количество в котором встречаются объекты. Достигнув дна сигнал возвращается наверх. Затем происходит обработка полученных данных, и информация отображается на дисплее эхолота. Данные датчика обновляются с частотой 40 раз в секунду. Эхолот подходит для использования в движении, однако важно сохранять скорость не выше 10 км/ч, иначе возможно искажение данных.
Как пользоваться эхолотом
Устройство Humminbird Fishfinder 748 3D прост в применении. До рыбалки эхолот нужно полностью зарядить. Перед использованием необходимо настроить язык и единицу в которой будут осуществляться измерение глубины и температуры, после сохранить настройки. Затем эхолот можно начать применять в деле. В эхолотах уже установлены заводские настройки, которые подходят для использования прибора на рыбалке. Параметры легко изменяются, более подробно с настройками нужно ознакомиться в инструкции. Эхолот не требует специальных навыков, его необходимо включить и дальше работа происходит автоматически.
Технические параметры
Характеристики модели Humminbird Fishfinder 748 3D:
• тип экрана – монохромный, с 12 оттенками серого;
• 5 дюймов;
• расширение экрана – 640 на 320 пикселей;
• размер – длина – 185, ширина – 180, высота – 100 миллиметра;
• максимальная рабочая глубина в режиме 3 D – 70 метров;
• максимальная рабочая глубина в режиме 2 D – 300 метров;
• тип подсветки – белый;
• встроенный трансдьюсер;
• напряжение в диапазоне от 10 до 20 В;
• мощность излучателя – 1000 Вт;
• количество лучей – 6;
• общий угол излучения – 53 градуса;
• частота сканирования – 83/455 КГц;
• GPS – установка происходит дополнительно;
• возможность выбора русского языка.
Комплектация при покупке:
• эхолот с 3 D экраном;
• проводной датчик, с кабелем 6 метров;
• крепление для устройств;
• держатель для кабелей;
• датчик измерения скорости и температуры;
• кабель питания для устройств;
• инструкция по использованию и установки датчика на русском языке;
• паспорт изделия.
Основные возможности эхолота
Эхолот Humminbird Fishfinder 748 3D имеет достаточно обширный функционал. Однако прибор прост в использовании, все функции в меню предельно понятны. Основной функционал:
• возможность настройки на соленую и пресную воду, для отображения более точной информации;
• функция остановки, позволяет замедлить картинку на дисплее, для более точного изучения;
• при подключенном датчике скорости отображается преодоленное расстояние и время;
• звуковые сигналы при обнаружении рыбы и выходе на мелкую воду, также звуками обозначается малый заряд прибора;
• система zoom позволяет приближать отдельные фрагменты изображения;
• функция распознавания эха, позволяет распознавать крючок на глубине до 12 метров;
• возможность настройки скорости воспроизведения картинки на экране;
• при установленном GPS возможность отмечать пройденный путь;
• функция SwitchFire позволяет отображать только рельеф и рыбу, сокращает помехи;
• простое подключение к компьютеру, для обмена сохраненной геолокации и обновление программ;
• функция ID+ определяет размер рыбы.
Преимущества и недостатки
Преимущества модели Humminbird Fishfinder 748 3D:
• установлен датчик измеряющий глубину, температуру воды и скорость перемещения;
• сопровождение звуковыми сигналами;
• датчики легко устанавливаются, в комплекте идет подставка для установки;
• возможность менять наклон и поворот корпуса для удобной рыбалки;
• при изготовлении корпуса используется технология защиты IPX7, что делает прибор водонепроницаемым;
• возможность регулировать верхнюю и нижнюю часть диапазона, вручную и автоматически;
• возможность запоминания настроек в памяти эхолота;
• доступна установка более крупных шрифтов, для удобства чтения;
• производитель дает официальную гарантию на 2 года;
• приемлемая цена устройства и аксессуаров.
К недостаткам эхолотов относят монохромный экран и дополнительную установку GPS датчика. Ограниченная глубина для работы эхолота в режиме 3D. Во время зимней рыбалки провод быстро замерзает, однако само устройство способно выдерживать мороз до -20°С.
Эхолот, требует аккуратного хранения в сухом месте, при контакте с соленой водой устройство необходимо промыть проточной водой и вытереть насухо.
Обзор эхолотов для рыбалки: для каяка, лодки ПВХ, байдарки. Эхолоты – устройства, определяющие рельеф дна, и позволяющие быстро найти места для хорошего улова.