-
Contents
-
Table of Contents
-
Bookmarks
Quick Links
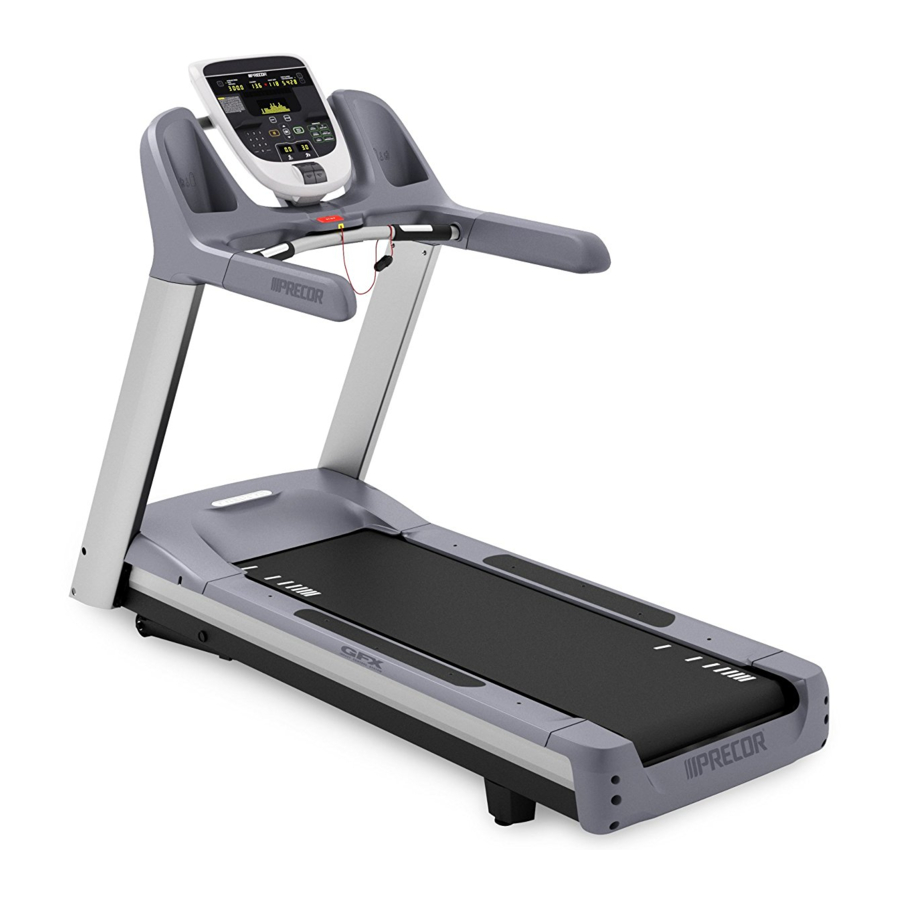
Commercial Treadmill Owner’s Manual
C
O
M
M
E
R
C
I
A
L
P
R
O
D
U
C
T
S
D
I
V
I
S
I
O
N
Related Manuals for Precor C954i
Summary of Contents for Precor C954i
-
Page 1
Commercial Treadmill Owner’s Manual… -
Page 2: Important Safety Instructions
• If you purchased the optional chest strap, review the guidelines found in the Precor Heart Rate Option Owner’s Manual that is supplied with that option.
-
Page 3: Password Security
Club Information . MAXIMUM USER WEIGHT You should not allow runners over 160 kg or walkers heavier than 225 kg on the treadmill. SAFETY APPROVAL When identified with the ETL-c logo, the treadmill has been tested and conforms to the require- ments of CAN/CSA-E-335-1/3-94, Safety of Household and Similar Electrical Appliances.
-
Page 4: Grounding Instructions
GROUNDING INSTRUCTIONS The C956i or C954i treadmill must be grounded. If it should malfunction or break down, ground- ing provides a path of least resistance for electric current which reduces the risk of electrical shock. The C956i or C954i treadmill is equipped with a power cord having an equipment-ground- ing conductor and a grounding plug.
-
Page 5: Table Of Contents
Turning the Unit ON and OFF … 21 Checking the Alignment of the Running Belt … 21 Club Information … 22 Treadmill Location within the Club … 22 Weight Limitations … 22 Changing the Club Settings … 22 Selecting the Language … 24 Determining the Units of Measure …
-
Page 6
Features on the Display Console … 29 Top Display Windows … 30 Upper Display (C956i only) … 30 Center Display (C956i and C954i) … 30 Keys on the Display Console … 32 Keypad Tips … 32 Exercising on the Treadmill … 36 Using the Security Clip … -
Page 7: Radio Frequency Interference (Rfi)
EN55022, Limits & Methods of Measurement of Radio Interference, Information Technology Equipment. Per the standard, the treadmill is a Class A product. In a domestic environment, this product may cause radio interference, in which case the user is responsible to take adequate measures to alleviate the interference.
-
Page 8: Obtaining Service
Do not attempt to service the treadmill yourself except for the maintenance tasks described in this manual. The treadmill does not contain any user-serviceable parts. For information about product operation or service, visit the Precor Web Site at www.precor.com or contact an authorized Precor Commercial Products Customer Support Representative at 1-888-665-4404.
-
Page 9: Unpacking The Treadmill
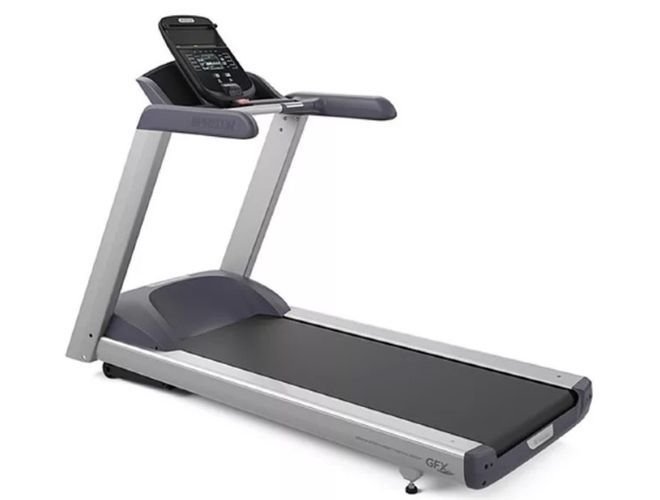
Unpacking the Treadmill Thank you for purchasing the Precor C956i or C954i treadmill. Built to the exacting standards of the health club environment, the treadmill is intended for commercial use and can withstand the rigors of daily club use with little maintenance.
-
Page 10: Hardware Kit
(L) six power cord clips Diagram 2 Hardware kit (not shown to scale). Note: After assembling the treadmill, be sure to store the hex keys in a secure place. The tools are used for specific maintenance procedures that are described in this manual.
-
Page 11: Setting Up The Treadmill
Fill out and mail the limited warranty card. The serial number can be found on the shipping container or on the label near the power receptacle. Write the serial number onto the Precor limited warranty card found on the back cover of this manual and in the Obtaining Service section.
-
Page 12
To avoid injury to yourself or damage to the unit, ask for help in maneuvering the treadmill. Remove the Diagram 4 hood. Hood 4. Remove the hood. Diagram 4. Gently, lift the hood off the treadmill and set it aside. page 12… -
Page 13
Remove the Diagram 5 shipping fasteners from the left side front panel. Shipping fasteners found on left and right sides of the front panel. Left side mounting bracket 5. Attach the left side upright support. Diagram 5. Take the following steps. a. -
Page 14
CAUTION: To avoid damage to the display cable, read the following steps carefully. Damage to the cable due to improper assembly is not covered by the Precor limited warranty. 6. Secure the display console to the left upright support. Diagram 7. -
Page 15
Diagram 9 Route the cable. Right upright support Display cable Base frame Base mounting bracket Right upright support Bracket hole Lower board b. Route the display cable through the right upright support. Ask an assistant to hold the upright support close to the right side mounting bracket. Route the cable through the upright support (see Diagram 9, #1) and pull it out of the large hole on the side of the support near its base. -
Page 16
Diagram 11 Secure the right upright support. Screws (D), washers (E), and barrel spacers (F) Tighten so that the upright is secure, but leave room for adjustments. Front panel Shipping fasteners with washers (B) 8. Secure the right side upright support. Diagram 11. Obtain two long sockethead screws (D), washers (E) and barrel spacers (F) from the Hardware kit. -
Page 17
(93 cm). It will not fit through a standard 32-inch doorway. 11. Attach the handrails. Diagram 13. For ease of assembly, place the side rails or adjustable rear feet on blocks. Obtain assistance to lift the treadmill. Do not place blocks beneath the running bed. -
Page 18
13. Tighten all mounting screws with the hex keys provided. Diagram 15. Start at the front of the treadmill with the four screws that attach the upright supports to the front panel. Tightening these screws first helps pull the rest of the treadmill’s parts into alignment. -
Page 19
Use a bubble level as shown in Diagram 16 to verify that the running deck is level. If the treadmill is placed on a slightly, uneven surface, adjusting the rear feet can help, but will not compensate for extremely uneven surfaces. -
Page 20
Important: Check the length of the power cord to make sure that it cannot get pinched or damaged by the incline lift movement. CAUTION: The treadmill requires a dedicated, grounded circuit. A 20 amp dedicated circuit is recommended. Make sure that no other product or machine uses the same circuit as the treadmill. -
Page 21: Turning The Unit On And Off
Important: If the belt needs alignment, make the adjustments immediately after turning the treadmill OFF. Failure to do so might cause the belt to tear or fray, which is not covered by the Precor Limited Warranty. 7. To stop the running belt, press the red STOP button.
-
Page 22: Club Information
CSAFE compatible devices TREADMILL LOCATION WITHIN THE CLUB It is important to keep the area around the treadmill open and free from encum- brances such as other equipment. The minimum space requirement needed for user safety and proper maintenance is one meter by two meters square, directly behind the running belt.
-
Page 23
5, 6, 5, 1, 5, 6, 5 Note: Once you begin entering the sequence above, each key must be pressed within four seconds of the other or the Precor banner reappears and you have to begin again. Display key functions within the Club Custom Mode ▼▲… -
Page 24: Selecting The Language
Password Settings Enabled Disabled CAUTION: Precor recommends that you leave the password protection enabled. If you choose to change the security of the treadmill, it is your responsibility to make sure that no unauthorized personnel or children are allowed on or near the treadmill.
-
Page 25: Determining The Club Speed Limit
SETTING A PAUSE TIME LIMIT Setting a pause time limit is useful because the treadmill returns to the Precor banner at a selected interval after the STOP button is pressed whether the user planned to return or not.
-
Page 26: Removing Or Providing A Fitness Test
Press ENTER to confirm your selection. CHANGING THE C956i CUSTOM PROGRAMS Note: This aspect of the Club Custom mode does not appear in the C954i treadmill. Two custom programs (Program 1 and Program 2) exist in the C956i treadmill. After you modify Program 1 (or opt to bypass it), Program 2 appears on the dis- play.
-
Page 27: Viewing The Odometer, Hours Of Use, Software Version And Error Log
To view the serial number, press ENTER. Write the serial number onto the warranty registration form and in the space provided on page 8. The serial number is helpful should you ever need to contact Customer Support. To return to the Precor banner, press ENTER, STOP, or RESET. page 27…
-
Page 28: Using Csafe Standard Equipment
USING CSAFE STANDARD EQUIPMENT The C956i and C954i are fully compatible with CSAFE protocols. If the unit is connected to a CSAFE master device, the user will be prompted to enter a user ID. Five zeros appear on the display. The left zero blinks to indicate that it is awaiting input. The…
-
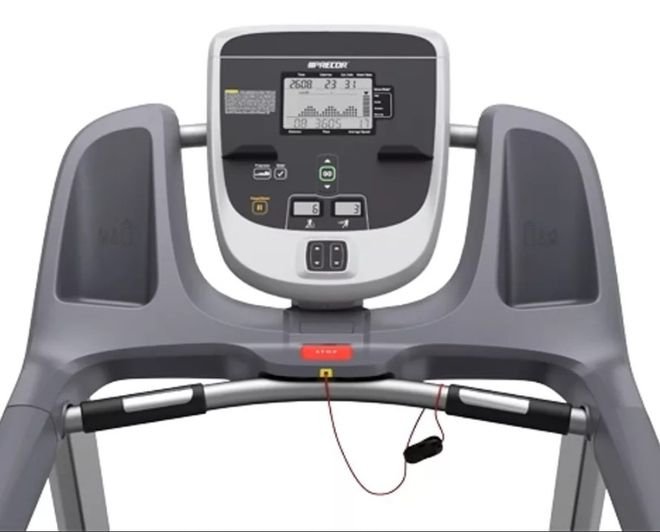
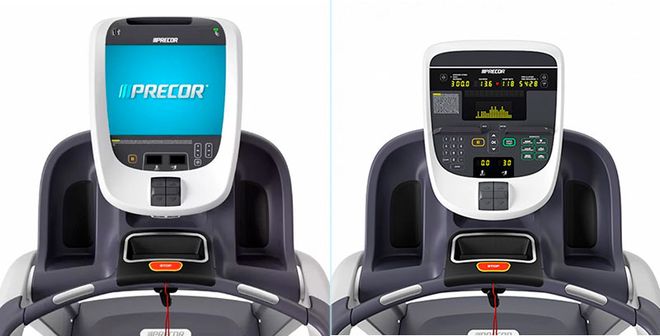
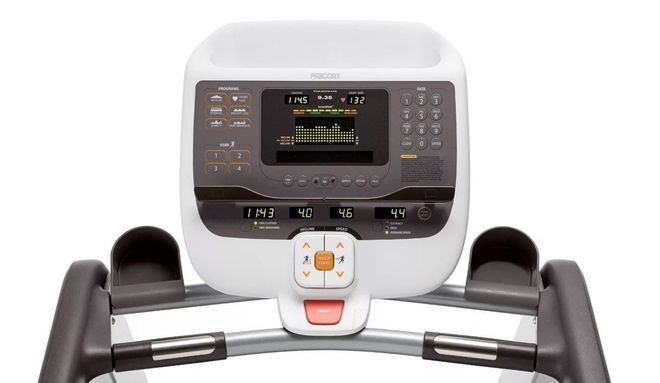
Page 29: The C956I/C954I Display
The C956i/C954i Display The C956i or C954i is designed so users can work out with minimal instruction or training. The directions on the console and the prompts on the display will guide a user through the entire workout session. Before the treadmill is used, however, we recommend that you familiarize yourself with it so you can instruct your customers to use it safely and effectively.
-
Page 30: Top Display Windows
UPPER DISPLAY (C956i only) The Precor banner and program profiles appear in the large center display (LED matrix). Always start a workout at the Precor banner. During workouts, the program profile appears in the center display and corresponds to the program you selected.
-
Page 31
INCLINE: Displays the percent of incline during your workout. The INCLINE ▲ and ▼ keys affect the treadmill’s lift and let you set an incline between 0% and 15%. The values displayed can change (in 0.5% increments). You can also use the numeric keys to designate the incline, once the program has begun. -
Page 32: Keys On The Display Console
KEYS ON THE DISPLAY CONSOLE The Precor treadmills have an easy-to-use keypad that is activated by the slightest touch. Remind users that they only need to apply gentle pressure to the keypad. Each key on the keypad provides specific functions. Numeric keys (numbered 1 — 0) let you enter data in answer to the display prompts and change the speed or incline during a workout.
-
Page 33
To resume a workout, the SPEED s must be pressed. If no key press is detected and the pause time limit elapses, the display returns to the Precor banner. A default time limit of two minutes exists or a “pause time limit” can be set by the club, refer to Club Information . -
Page 34
Eventually, the two meet at the target speed. Another feature of the SPEED ▼▲ keys lets you review the treadmill’s speed and pace any time during your workout. If speed and/or pace is not one of the chosen features being displayed, you can view the speed of the running belt and your pace by lightly touching the SPEED ▼… -
Page 35
The QUICKSTART key can be pressed any time during the setup prompts. Default values apply after that point. See the table below: Press QUICKSTART at the,… Precor banner Program prompt Workout Time prompt Distance Goal prompt Calorie Goal prompt Weight prompt Age prompt ENTER: Workout specific prompts need to be answered and “entered”… -
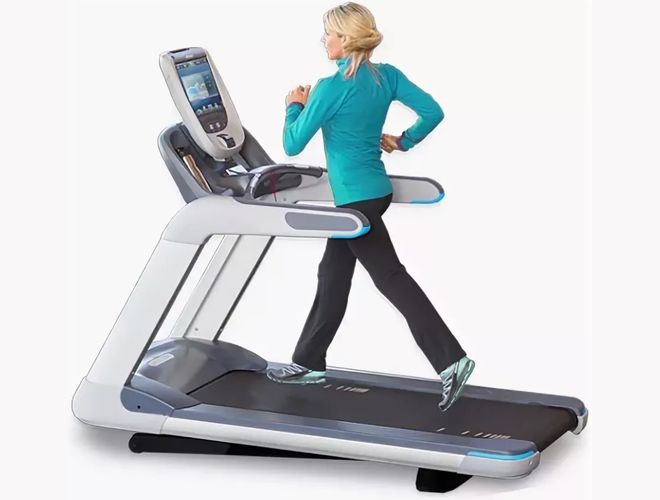
Page 36: Exercising On The Treadmill
Exercising on the Treadmill Once the C956i or C954i is set up, it is ready to use. There are no complex instruc- tions to follow or mandatory programming steps required to operate the treadmill. The easy-to-understand prompts let you select a program and specify how long you want to work out.
-
Page 37
To exit the summary state, press RESET again or wait until the time limit (two minutes) elapses. The display returns to the Precor banner. Note: The factory setting for pause mode is two minutes (120 seconds). The club has the option to change the setting. -
Page 38: Quick Steps To Working Out
RESET, to return to the Precor banner. QUICK STEPS TO WORKING OUT The steps to working out on the C956i/C954i are listed below. A short explanation appears on the left with the more thorough description following on the right. CAUTION: Before beginning any fitness program, obtain a complete physical examination from your physician.
-
Page 39
Select a workout 4. At the Precor banner, select one of the following options: option. 5. To display the program selections, use any ▼ or ▲ key. Press Select a program. 6. Follow the prompts on the display. Once you have entered Begin exercising. -
Page 40: Cooling Down After A Workout
You are given two minutes to review your workout statistics before the display automatically resets to the Precor banner. You can also press RESET, to return to the Precor banner. step down from the treadmill.
-
Page 41: Programs
Programs The C954i provides four programs while the C956i lets you choose between 21 variable programs. This section provides information about the special features and functions of the treadmill’s programs and how to best utilize the: • SmartRate feature • Track course •…
-
Page 42
Diagram 23 Target Zones. 20 25 30 35 40 45 50 55 60 65 70 75 For the ideal “weight loss” range, your heart rate should be between 55% and 70% of your maximum aerobic heart rate. It should never exceed 85% of your maximum aerobic heart rate or go above your target zone. -
Page 43: Manual Mode And The Quickstart Key
MANUAL MODE AND THE QUICKSTART KEY Manual mode (C956i and C954i) lets you control the incline and running belt speed which affects the effort you put into your workout. As with other programs, when you complete the time limit set for the program, the automatic cool-down period begins.
-
Page 44: C956I Interval Program
C956i INTERVAL PROGRAM The three interval programs on the C956i let you select the rest and work intervals according to your training regimen. In the 1-3 interval program, each rest interval is followed by three work intervals. In the 1-2 interval program, each rest interval is followed by two work intervals.
-
Page 45: C956I Custom Programs
• The treadmill provides a 3-minute warm-up period before entering the Heart Rate program. During this time, you may make changes to the incline by using the numeric keypad or INCLINE ▲▼ keys. Use the SPEED ▼▲ keys to set the running belt’s speed.
-
Page 46: C956I Weight Loss Program
Note: The speed remains constant, if you were at or below 1 mph (1.5 kph). C956i WEIGHT LOSS PROGRAM The Precor Weight Loss program incorporates the latest findings on fat-burning and weight loss through exercise. It is based on research at the world-renowned Cooper Institute for Aerobics Research and it is designed to help you burn the most fat during a 28-minute workout, while minimizing the risk of discomfort and injury.
-
Page 47: C956I Goal-Based Programs
Note: The club can remove the Fitness Test from the choice of programs on the treadmill. If Custom Program 2 appears as program number 16 on the C956i, the Fitness Test has been disabled by the club and is no longer available to the user.
-
Page 48
• you complete the test. The C956i or C954i is built to withstand the rigors of the health club environment. However, as club manager or owner, you are responsible for cleaning and main- page 48… -
Page 49: Maintenance
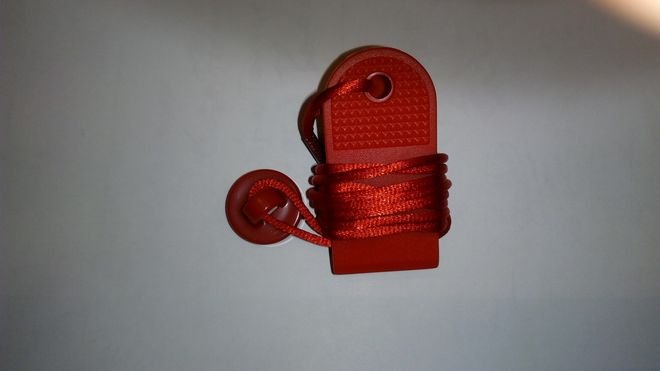
A safety lanyard with its security clip must be fastened to the treadmill’s red STOP button. Do not allow users on a tread- mill without it. To order parts or to contact a Precor authorized service provider in your area, refer to Obtaining Service . CLEANING THE EQUIPMENT Most of the working mechanisms are protected inside the treadmill’s hood and…
-
Page 50: Aligning And Adjusting The Running Belt
Realigning the belt takes a few simple adjustments. If you are unsure about this procedure, call Precor Customer Support (see Obtaining Service .) Take the following steps to align the running belt on the treadmill. To ensure your safety, make all adjustments while the treadmill is OFF.
-
Page 51: Storing The Chest Strap
Refer to Obtaining Service . LONG TERM STORAGE When the treadmill is not in use for any length of time, turn it OFF. Ensure that the power cord is unplugged from the wall outlet and is positioned so that it will not become damaged or interfere with other equipment or people.
-
Page 52
Notes: page 52… -
Page 53: Warranty Registration Card
PLACE We are confident that you will be pleased with your purchase and that your new Precor equipment will help satisfy your customers’ fitness needs, while helping you meet your business goals. To allow us to serve you better, please take a few moments to complete and return your warranty registration.
-
Page 54
❑ Ellipticals What other brands of cardio equipment do you currently offer (check all that apply): ❑ Life Fitness ❑ True What other Precor equipment do you currently offer (check all that apply): ❑ EFX ❑ Cycle ® ❑ Treadmill ❑… -
Page 55: Precor Limited Warranty
To claim under this warranty, the buyer must notify Precor or your authorized Precor dealer within 30 days after the date of discovery of any nonconformity and make the affected product available for inspection by Precor or its service representative.
-
Page 56: Specifications
U.S. and foreign patents for both the mechanical construction and the visual aspects of its product design. Any party contemplating the use of Precor’s product designs is hereby forewarned that Precor considers the unauthorized appropriation of its proprietary rights to be a very serious matter.
This manual is also suitable for:
C956i
QUICK
START
PAUSE/
RESET
ENTER
CLEAR
1
2
3
4
5
6
7
8
9
0
PROGRAMS
PROGRAMS
MANUAL
HEART
RATE
PERFORMANCE
INTERVAL
VARIETY
WEIGHT LOSS
Before beginning any fitness program, see
your physician for a thorough physical examination. Seek advice from
your physician to learn the target heart rate appropriate for your fitness
level. Do not allow children or those unfamiliar with its operation on or
near this equipment. Read the product owner’s manual or consult a
qualified instructor before operating this equipment. Improper use of
this equipment can result in serious injury. If you feel pain, faintness, or
dizziness, stop exercising immediately.
HEART RATE
SmartRate
OK
PAUSE/
RESET
Product Owner’s Manual
Commercial Products
Treadmills:
• 932i
• 954i
Ellipticals:
• EFX534i
• EFX532i
Cycle:
• 842i
Посмотреть инструкция для Precor 954i бесплатно. Руководство относится к категории беговые дорожки, 2 человек(а) дали ему среднюю оценку 7.8. Руководство доступно на следующих языках: английский. У вас есть вопрос о Precor 954i или вам нужна помощь? Задайте свой вопрос здесь
Не можете найти ответ на свой вопрос в руководстве? Вы можете найти ответ на свой вопрос ниже, в разделе часто задаваемых вопросов о Precor 954i.
Сколько часов в неделю нужно тренироваться взрослому человеку?
Взрослым рекомендуется выполнять умеренно интенсивные упражнения не менее 2,5 часов в неделю. Желательно распределить их на несколько дней.
Какой максимально допустимый пульс взрослого человека?
Можно определить для себя максимально допустимый пульс, отняв от 220 свой возраст.
Инструкция Precor 954i доступно в русский?
К сожалению, у нас нет руководства для Precor 954i, доступного в русский. Это руководство доступно в английский.
Не нашли свой вопрос? Задайте свой вопрос здесь
Краткое содержание страницы № 1
Commercial Treadmill Owner’s Manual
COMMERCIAL PRODUCTS DIVISION
Краткое содержание страницы № 2
COMMERCIAL PRODUCTS DIVISION IMPORTANT SAFETY INSTRUCTIONS When using the C956i or C954i treadmill, always follow basic precautions, including the following: To ensure your safety and to protect the unit, read all the instructions before assem- bling and using the treadmill. To ensure the proper use and safety of the treadmill, make sure that all users read this manual. Please make this manual a part of your club’s training program. Remind the club users that before beginning any fitness pro
Краткое содержание страницы № 3
COMMERCIAL PRODUCTS DIVISION IMPORTANT SAFETY INSTRUCTIONS Use care when getting on or off the treadmill. Use the stationary handrail and straddle the running belt. Step onto the running belt when the speed is at or below 1 mph (1.5 kph). Never step off the treadmill while the running belt is moving. Keep your body and head facing forward. Never attempt to turn around on the treadmill. Never turn ON the treadmill when someone is standing on the machine. Never block the air openings on th
Краткое содержание страницы № 4
COMMERCIAL PRODUCTS DIVISION GROUNDING INSTRUCTIONS The C956i or C954i treadmill must be grounded. If it should malfunction or break down, ground- ing provides a path of least resistance for electric current which reduces the risk of electrical shock. The C956i or C954i treadmill is equipped with a power cord having an equipment-ground- ing conductor and a grounding plug. The plug must be inserted into an appropriate outlet that is properly installed and grounded in accordance with all local cod
Краткое содержание страницы № 5
COMMERCIAL PRODUCTS DIVISION Table of Contents Important Safety Instructions ………………………………………………………. 2 Password Security ……………………………………………………………………………………3 Maximum User Weight ……………………………………………………………………………..3 Safety Approval ……………………………………………………………………………………….3 Grounding I
Краткое содержание страницы № 6
COMMERCIAL PRODUCTS DIVISION Table of Contents The C956i/C954i Display …………………………………………………………….. 29 Features on the Display Console ……………………………………………………………..29 Top Display Windows………………………………………………………………………………30 Upper Display (C956i only)………………………………………………………………………30 Center Display (C956i and
Краткое содержание страницы № 7
COMMERCIAL PRODUCTS DIVISION RADIO FREQUENCY INTERFERENCE (RFI) Federal Communications Commission Part 15 The treadmill has been tested and found to comply with: The IEC EMC Directive (international electromagnetic compatibility certification) The limits for a Class A digital device, pursuant to Part 15 of the FCC Rules. These limits are designed to provide reasonable protection against harmful interference in a commercial installation. The treadmill generates, uses, and can radiate radio fr
Краткое содержание страницы № 8
COMMERCIAL PRODUCTS DIVISION OBTAINING SERVICE Do not attempt to service the treadmill yourself except for the maintenance tasks described in this manual. The treadmill does not contain any user-serviceable parts. For information about product operation or service, visit the Precor Web Site at www.precor.com or contact an authorized Precor Commercial Products Customer Support Representative at 1-888-665-4404. To help customer support personnel expedite your call, have your serial number availabl
Краткое содержание страницы № 9
COMMERCIAL PRODUCTS DIVISION Unpacking the Treadmill Thank you for purchasing the Precor C956i or C954i treadmill. Built to the exacting standards of the health club environment, the treadmill is intended for commercial use and can withstand the rigors of daily club use with little maintenance. Important: Before using the treadmill, we urge you to familiarize yourself and your staff with the entire Owner’s Manual. Understanding this manual will help you and your customers use the treadmill safel
Краткое содержание страницы № 10
COMMERCIAL PRODUCTS DIVISION HARDWARE KIT After unpacking the treadmill, open the hardware kit and make sure that you have the following items shown in Diagram 2. ❑ (A) twelve 1-inch buttonhead hex screws ❑ (B) sixteen stainless steel washers — place on 1-inch screws ❑ (C) four ⁵⁄₈-inch flat head hex screws — attach to upper handrails ❑ (D) four 3¹⁄₂-inch socket head screws — install upright supports ❑ (E) four black washers — fasteners for upright supports ❑ (F) four barrel spacers — place on 3
Краткое содержание страницы № 11
COMMERCIAL PRODUCTS DIVISION Setting Up the Treadmill You do not need any special knowledge or experience to set up the treadmill. However, because of its size and weight, you will need to obtain assistance. INSTALLATION REQUIREMENTS Follow these installation requirements when installing the treadmill. If you do not install the treadmill according to the following guidelines, you could void the Precor limited warranty. Set up the treadmill on a solid, flat surface. Unpack and assemble the tre
Краткое содержание страницы № 12
COMMERCIAL PRODUCTS DIVISION Diagram 3 Lift the rear of the unit and roll it to its assembly location. Rear end cap Lift the unit by grasping the hand holds inside the rear end caps. 2. Make sure that the power switch is OFF. Check the ON/OFF power switch on the front of the treadmill. Place the switch in the O (OFF) position. Make sure that the treadmill is not plugged into a power source. 3. Move the treadmill. Diagram 3. Grasp the hand holds inside the rear end caps and use proper lifting tec
Краткое содержание страницы № 13
COMMERCIAL PRODUCTS DIVISION Diagram 5 Remove the shipping fasteners from the left side front panel. Shipping fasteners found on left and right sides of the front panel. Left side mounting bracket 5. Attach the left side upright support. Diagram 5. Take the following steps. a. Remove the shipping fasteners from the front panel. With the supplied hex key and a ½-inch box end wrench, loosen and remove the two bolts and nuts on the left side of the front panel. These fasteners hold the front panel
Краткое содержание страницы № 14
COMMERCIAL PRODUCTS DIVISION Diagram 7 Attach the display console to the left upright support. Display console Display cable Screws (A) with washers (B) Left side upright support CAUTION: To avoid damage to the display cable, read the following steps carefully. Damage to the cable due to improper assembly is not covered by the Precor limited warranty. 6. Secure the display console to the left upright support. Diagram 7. Remove any tape or wire ties that secure the display cable. Unwrap the cable
Краткое содержание страницы № 15
COMMERCIAL PRODUCTS DIVISION Diagram 9 Route the cable. 2 1 Right upright support Display cable Base frame Base mounting bracket 3 Right upright support Bracket hole Lower board b. Route the display cable through the right upright support. Ask an assistant to hold the upright support close to the right side mounting bracket. Route the cable through the upright support (see Diagram 9, #1) and pull it out of the large hole on the side of the support near its base. Diagram 9, #2. Note: If you encou
Краткое содержание страницы № 16
COMMERCIAL PRODUCTS DIVISION Diagram 11 Secure the right upright support. 1 Screws (D), washers (E), and barrel spacers (F) Tighten so that the upright is secure, but leave room for adjustments. Front panel Shipping 3 fasteners with 2 washers (B) 8. Secure the right side upright support. Diagram 11. Obtain two long sockethead screws (D), washers (E) and barrel spacers (F) from the Hardware kit. Place a washer and barrel sleeve on each bolt and insert the fasteners through the side of the upright
Краткое содержание страницы № 17
COMMERCIAL PRODUCTS DIVISION Handrail alignment and installation. Diagram 13 1 2 Handrail Lower Console extension handrail bracket 3 Screw (A) 5 4 and washer (B) Screw (C) Important: With the handrails attached, the width of the treadmill is 36.75 inches (93 cm). It will not fit through a standard 32-inch doorway. 11. Attach the handrails. Diagram 13. For ease of assembly, place the side rails or adjustable rear feet on blocks. Obtain assistance to lift the treadmill. Do not place blocks beneath
Краткое содержание страницы № 18
COMMERCIAL PRODUCTS DIVISION Diagram 14 Replace the 1 hood and 2 secure it. Hood Buttonhead screws (A) with washers (B) secure the hood to the siderail. Buttonhead screws (A) with washers (B) secure the front of the hood. 12. Replace the hood. Diagram 14. Reposition the hood on the treadmill. Re- move four buttonhead screws (A) with washers (B) from the hardware kit. Two buttonhead screws and washers are placed through the front panel and the remaining two screws and washers are used to secure t
Краткое содержание страницы № 19
COMMERCIAL PRODUCTS DIVISION Diagram 16 Adjust the level of the treadmill. Bubble level Running belt Adjustable rear foot 14. Level the unit. Diagram 16. Check to make sure that the running deck is level by taking the following steps: a. Use a bubble level as shown in Diagram 16 to verify that the running deck is level. If the treadmill is placed on a slightly, uneven surface, adjusting the rear feet can help, but will not compensate for extremely uneven surfaces. Important: If you need to make
Краткое содержание страницы № 20
COMMERCIAL PRODUCTS DIVISION Diagram 18 Attach the power cord clip. 1 Cord clip Front panel Power cord 2 Incline lift CAUTION: To make sure the power cord is not pinched or damaged by the incline lift, attach the power cord to the base frame using the clips provided. 15. Attach the power cord clip. Diagram 18, #1. Remove a cord clip from the Hardware kit. Wrap it around the power cord near its receptacle and clamp it shut. 16. Insert the clip into the base frame. Diagram 18, #2. Insert the serra
Электрическая беговая дорожка Precor от ведущего американского производителя спортивного оборудования удобна, прочна, отзывчива к движениям спортсмена. Кардиотренажер разработан с применением инновационных технологий, подходит для эксплуатации в тренажерных залах и домашних условиях.
Содержание
- 1 Особенности
- 2 Платформа и полотно
- 3 Инновационные технологии
- 4 Характеристики
- 5 Покупка беговой дорожки Precor
- 6 Консоль
- 7 Программы
- 8 Отзывы
Особенности
- Беговая дорожка отличается от аналогов высокой плавностью хода, благодаря чему тренировка максимально приближена к бегу в естественных природных условиях.
- Светодиодная консоль повышает производительность, функциональность и комфортность использования тренажера. Управление и настройка параметров максимально упрощены.
- В оборудовании Precor установлен датчик шагов – он автоматически останавливает беговое полотно, если человека на нем нет.
Платформа и полотно
Конструкция беговой дорожки усовершенствована. Толщина основания деки составляет 2,5 см, оно покрыто восковым слоем, что упрощает обкатку тренажера сразу после покупки и установки.
Для деки разработчики использовали два вида материала:
- древесное волокно высокой плотности – для внутренней части;
- фенопласт – для наружных частей с обеих сторон.
При необходимости пользователь может перевернуть деку на другую сторону, тем самым увеличив срок эксплуатации вдвое. Дополнительная смазка ей и беговому полотну не требуется.
Дизайн рамы и материалы подобраны так, чтобы обеспечить плавный ход и бесшумную работу.
Инновационные технологии
Конструкция беговой дорожки запатентована: производитель использовал несколько технологий, не имеющих аналогов:
- Технология Ground Effects обеспечивает максимальную стабильность и высокую прочность беговому полотну. При этом оно остается достаточно гибким, чтобы смягчать ударную нагрузку при движении. Система амортизации создает боковую устойчивость, снижает нагрузку на ступни спортсмена, уменьшает риск травм.
- Integrated Footplant Technology (IFT) учитывает меняющуюся скорость движения стоп во время тренировки и подстраивается под каждый меняющийся шаг. В результате движения пользователя становятся плавными и легкими, а занятия – более комфортными. Контроллер IFT четко работает в паре с асинхронным электродвигателем.
Характеристики
- Производитель – компания Precor (США).
- Тип – электрическая.
- Источник питания – сеть 220 В.
- Длина шнура – 3,7 метра.
- Тип двигателя – асинхронный.
- Мощность – 3-4 л. с. (зависит от модели).
- Минимальная скорость – 0,5 км/ч.
- Максимальная скорость – 19,3 км/ч.
- Максимальное время тренировки – 120 минут.
- Предустановленные программы – 13-28.
- Пользовательские настройки – есть.
- Угол наклона – меняется.
- Диапазон изменений угла наклона – от 0 до 15 %.
- Датчик сердечных сокращений – сенсорный контактный.
- Датчик удаленного измерения ЧСС с помощью нагрудного ремня.
- Нагрудный ремень – в комплекте.
- Размеры тренажера – 2,24 х 0,89 х 1,63 см.
- Размеры бегового полотна – 0,51 х 1,53 см.
- Тип платформы – двусторонняя.
- Вес тренажера – 207 кг.
- Максимально допустимая нагрузка – до 180 кг.
- Транспортировочные ролики – есть.
- Держатель для бутылки с водой – есть.
- Консоль – P10-P30 (зависит от модели).
- Wi-Fi – есть, доступен опционально.
Цена беговых дорожек Precor на российском рынке варьируется от 480 тысяч до 1,5 миллионов рублей.
Покупка беговой дорожки Precor
Посмотреть актуальную цену и купить беговую дорожку Precor теперь можно прямо здесь с Яндекс Маркета:
Консоль
Консоль, установленная в кардиотренажере, изготовлена из материалов премиум-класса и укомплектована:
- датчиками движения;
- цифровой клавиатурой;
- ЖК-дисплеем;
- персональным проигрывателем аудио- и видеоконтента (доступен опционально);
- разъемом для подключения и зарядки мобильных устройств.
Консоль многоязычная – выбрать русский язык пользователь может в меню. Как это сделать, указано в инструкции к беговой дорожке Precor – она идет в комплекте с оборудованием.
Отображаемые значения
На дисплее консоли отображаются следующие параметры:
- текущая скорость движения;
- угол наклона;
- средняя скорость движения;
- пройденное расстояние;
- количество затраченных калорий;
- пульс;
- средний пульс;
- длина шага;
- время, прошедшее с начала тренировки;
- время, оставшееся до конца тренировки;
- процент выполненного норматива.
Цифровая клавиатура
С ее помощью пользователь вводит персональные данные (вес, рост, возраст) – на основе этих сведений система в дальнейшем сможет более точно оценить эффективность тренировки, подсчитать количество затраченных калорий и другие индивидуальные показатели.
Для удаления введенных данных используется кнопка «Отмена». Для подтверждения – «Ввод».
Функциональные клавиши
Пауза – нажатием на эту кнопку спортсмен может приостановить или закончить тренировку. Время перерыва в разных моделях меняется. В большинстве дорожек оно составляет 2 минуты, но есть тренажеры, где предустановленная длительность составляет 30 секунд.
ОК и стрелки ▲▼ – для навигации по параметрам тренировки и подтверждения выбранных значений. С помощью стрелок пользователь может менять информацию, отображаемую на дисплее.
Quick Start – клавиша быстрого старта.
Скорость и сопротивление – с помощью этой клавиши можно регулировать уровень нагрузки и интенсивности тренировки, максимально увеличивая ее эффективность.
Стоп – красная кнопка в нижней части консоли используется для остановки бегового полотна.
Под кнопкой «Стоп» находится гнездо для ключа безопасности. Чтобы начать тренировку, пользователю нужно закрепить зажим со шнуром на одежде. В случае падения человека во время тренировки ключ выпадет из разъема, что послужит сигналом к остановке бегового полотна.
Программы
В моделях американской компании предустановлено 13-28 программ тренировки. Базовый комплекс есть во всех беговых дорожках, он включает:
- 3-4 режима помогают похудеть: интервальный бег, аэробика, зона пульса, сжигание жира.
- Поддержание формы – этот режим включает несколько интервальных тренировок, бег по холмам, подъем в горы.
- Мышечный тонус – в этой категории объединены программы разной сложности для тонуса ног и ягодичных мышц.
- Повышение эффективности объединяет несколько интервальных пробежек с увеличением скорости, забег на дистанцию 5 км и другие программы.
- Пользовательские настройки – режим по индивидуальным параметрам, заданным в меню.
После отключения оборудования все текущие и контролируемые показатели сохраняются – ввести новые данные без перезапуска не получится. Для перезапуска спортсмену
Фитнес-тест Геркина
По этому протоколу в США и Канаде оценивают уровень физической подготовки служащих армии, ВМФ, ВВС и правоохранительных органов. Для его прохождения спортсмену нужно ввести свой возраст и вес, после чего нажать на кнопку «Go» на дисплее.
Режим включает несколько стадий разной длительности и сложности:
- Сначала идет 3-минутная разминка со скоростью 4,8 км/ч с уклоном полотна 0%.
- Первая стадия длится минуту. Скорость движения увеличивается до 7,24 км/ч. Угол наклона не меняется.
- Вторая стадия той же длительности, что и предыдущая. Скоростной режим прежний, но угол наклона увеличивается до 2%.
- На последующих стадиях скорость и угол увеличиваются поочередно. За 15 секунд до окончания каждого отрезка автоматика замеряет и регистрирует частоту пульса.
- 3-минутная заминка с теми же параметрами, что и разминка.
- Контрольное измерение пульса.

Тест считается пройденным, если пульс в конце каждого минутного отрезка равен или выше 85% от нормы.
Отзывы
Елена, Санкт-Петербург
Разминаюсь в зале на беговой дорожке линейки Experience Series. Полезная штука: ввели с тренером оптимальные для меня параметры сжигания жира, и результат был уже через месяц занятий. Нравится дизайн, простота управления – изменить скорость и угол наклона можно двумя клавишами. Ниши под мобильный телефон и бутылку с водой удобные. Длины полотна достаточно, чтобы не соскакивать во время бега или резкой смены скоростного режима. Работает бесшумно – музыка и видео со звуком на консоли хорошо слышны на минимальной громкости.
Ольга, фитнес-тренер в Москве
Периодически сама разминаюсь на дорожке – у каждого тренера нашего клуба в специальной программе создан свой аккаунт с персональными данными. Все тренировки и нагрузки фиксируются в нем, что удобно для мониторинга и оценки физической активности.
Отмечу удобные поручни: можно держать руки впереди и сбоку. Дорожка движется плавно – чтобы споткнуться или упасть с нее, нужно очень постараться.
Читайте также:
- Беговая дорожка Life Fitness
- Беговая дорожка Torneo Cross
- Беговая дорожка Xiaomi Walkingpad