-
Contents
-
Table of Contents
-
Troubleshooting
-
Bookmarks
Quick Links
Multi Channel
AV Receiver
Operating Instructions
STR-DH590
Connection and Preparation
Playback
Menu/Other Functions
Troubleshooting/
Specifications
Related Manuals for Sony STR-DH590
Summary of Contents for Sony STR-DH590
-
Page 1
Multi Channel Connection and Preparation AV Receiver Playback Menu/Other Functions Operating Instructions Troubleshooting/ Specifications STR-DH590… -
Page 2
Refer to ÉTATS-UNIS. NON APPLICABLE AU these numbers whenever you call upon your CANADA, Y COMPRIS LA PROVINCE DE Sony dealer regarding this product. QUÉBEC. Model No. STR-DH590 For the customers in the USA Serial No. -
Page 3
12) Use only with the cart, stand, tripod, CAUTION bracket, or table specified by the You are cautioned that any changes or manufacturer, or sold with the apparatus. modifications not expressly approved in this When a cart is used, use caution when manual could void your authority to operate moving the cart/apparatus combination to this equipment. -
Page 4
Europe should be sent to the manufacturer’s authorized For the customers in Europe representative, Sony Belgium, bijkantoor van Sony Europe Limited, Da Vincilaan 7-D1, 1935 Disposal of waste batteries Zaventem, Belgium. and electrical and electronic equipment (applicable in the… -
Page 5: Table Of Contents
Table of Contents Troubleshooting/ Specifications Supplied Items ………. 6 Troubleshooting ……..40 Main Features of the Receiver ….7 Precautions ……….47 Parts and Controls ……..8 Specifications ……… 48 On Copyrights ……… 50 Connection and On BLUETOOTH Communication … 50 Preparation Supported Playable Formats ….52 Index …………53…
-
Page 6: Supplied Items
URL or use the QR code reader function to access the site. • Calibration microphone (1) • Startup Guide (1) For the customers in Europe http://rd1.sony.net/help/ha/ Explains how to connect the 5.1-channel strdh59/h_eu/ speaker system, perform initial settings and listen to connected devices.
-
Page 7: Main Features Of The Receiver
Main Features of the Receiver Compatible with digital audio formats DTS-HD and Dolby TrueHD are supported (only when devices are connected via HDMI cables). Compatible with high quality 4K video formats* The receiver supports HDCP 2.2, Dolby Vision, HDR10 and Hybrid Log-Gamma, letting you enjoy high quality video images (page 18).
-
Page 8: Parts And Controls
Parts and Controls Receiver front panel (power) SPEAKERS Turns the receiver on or sets it to the Turns on or off the speaker system. standby mode. •“SPK ON”: The speaker system is turned on. Power indicator •“OFF SPEAKERS”*: The speaker •Green: The receiver is turned on.
-
Page 9: Night Mode
NIGHT MODE INPUT SELECTOR Activates the Night Mode function Selects the input channel connected to which allows you to retain a theater- the device you want to use. like environment at low volume levels. CALIBRATION MIC jack (page 26) Note …
-
Page 10: Indicators On The Display Panel
Indicators on the display panel Input indicator Lights up to indicate the current input. Preset station number (The number will change according to the preset station you select.) Digital signals are input through the OPTICAL jack. D.RANGE Lights up when dynamic range COAX compression is activated.
-
Page 11: Receiver Rear Panel
Receiver rear panel POWER SUPPLY port For power supply only. HDMI IN/OUT jacks (page 18, 19, 20, 21, 22, 23) All of the HDMI IN/OUT jacks on the receiver support HDCP 2.2. HDCP 2.2 is newly enhanced copyright protection technology that is used to protect content such as 4K movies.
-
Page 12: Input Buttons
Input buttons Remote control BLUETOOTH, MEDIA BOX, BD/DVD, SAT/CATV, GAME, SA-CD/CD, TV, FM Selects the input channel connected to the device you want to use. When you press any of the input buttons, the receiver turns on. Note When you press BLUETOOTH, the receiver turns on only if “BT POWER”…
-
Page 13
DIMMER Note Adjusts the brightness of the display • The above explanation is intended to serve as panel. examples. • Depending on the model of your connected DISPLAY device, some functions explained in this section Displays information on the display may not work with the supplied remote control. -
Page 14: Connection And Preparation
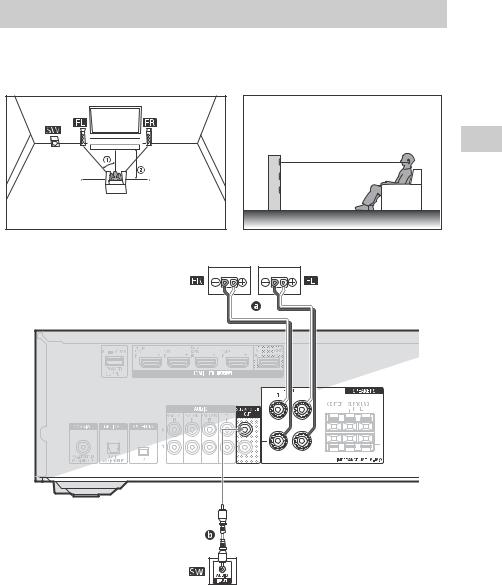
Connection and Preparation 1: Deciding on the Speaker System Decide on the speaker system you want to set up according to the number of speakers and subwoofers that you are using. The illustration and table below indicate the types of speakers that can be connected to the receiver and the general positions for placing the speakers.
-
Page 15: 2: Setting/Connecting Speakers
2: Setting/Connecting Speakers Set up the speakers and subwoofers in a room using the layout you prefer for your speaker system and connect them to the receiver. The speaker layout drawings on page 16 and 17 provide the ideal layout examples. You do not have to set up the speakers and subwoofers in exactly the same way as the layout examples.
-
Page 16
5.1-channel speaker system To fully enjoy theater-like multi-channel surround sound, you need five speakers (two front speakers, a center speaker, and two surround speakers) and a subwoofer. 30˚ 100˚ – 120˚ Speaker cable (not supplied) Monaural audio cable (not supplied) -
Page 17
2.1-channel speaker system If you select [Front Surround] for the sound field setting, you can enjoy surround effects equivalent to that of a 5.1-channel speaker system using only the two front speakers. Place the speakers as shown below and change the direction of the front speakers little by little to find the direction that provides the best surround effect. -
Page 18: 3: Connecting A Tv
About HDMI features • Sony recommends that you use an HDMI cable made by Sony or another HDMI-authorized cable. Be sure to use a High Speed HDMI Cable with Ethernet. For video signals that require a high bandwidth such as 4K/60p 4:4:4, 4:2:2 and 4K/60p 4:2:0 10 bit etc., be sure to use a Premium High Speed HDMI Cable with Ethernet, which supports bandwidths up to 18 Gbps.
-
Page 19
• All of the digital audio jacks are compatible with 32 kHz, 44.1 kHz, 48 kHz, and 96 kHz sampling frequencies. • When connecting a TV to the receiver via the TV IN jacks of the receiver, set the sound output jack of the TV to “Fixed”… -
Page 20
When the Audio Return Channel (ARC)-compatible HDMI jack on the 4K TV is not compatible with HDCP 2.2 4K content copyright is protected by HDCP 2.2. To enjoy 4K content, connect the HDMI jack on the receiver to the HDCP 2.2-compatible HDMI jack on the TV using an HDMI cable. In this case, the TV sound cannot be sent to the receiver using the Audio Return Channel (ARC) function of the TV. -
Page 21
Connecting a TV not compatible with 4K When an HDMI jack on the TV is Audio Return Channel (ARC)-compatible The Audio Return Channel (ARC) is a function that sends TV digital sound to audio-visual devices through an HDMI cable. If “ARC” is indicated for the TV’s HDMI input jack, this TV is compatible with the Audio Return Channel (ARC) function. -
Page 22
When an HDMI jack on the TV is not Audio Return Channel (ARC)-compatible The Audio Return Channel (ARC) is a function that sends TV digital sound to audio-visual devices through an HDMI cable. If “ARC” is not indicated for the TV’s HDMI input jack, this TV is not compatible with the Audio Return Channel (ARC) function. -
Page 23: 4: Connecting Audio-Visual Devices
4: Connecting Audio-Visual Devices For notes when connecting audio-visual devices to the HDMI jacks on the receiver, see “About HDMI features” (page 18). Connecting devices with HDMI jacks Ultra HD Blu-ray™ player, Blu-ray Disc™ player, DVD player Media box Audio/Video Audio/Video signals signals…
-
Page 24
Connecting devices with analog audio jacks and coaxial digital audio jack Audio Video Audio Video signals signals signals signals Ultra HD Cable box or Blu-ray™ player, satellite box Blu-ray Disc™ player, DVD player To the TV’s VIDEO To the TV’s input jack VIDEO input jack Recommended connection… -
Page 25: 5: Connecting The Fm Antenna (Aerial)
5: Connecting the FM 6: Turning on the Antenna (aerial) Receiver and Performing Easy Setup Turn on the receiver and a TV to perform the initial settings in accordance with the instructions on the Easy Setup screen displayed on the TV. …
-
Page 26: Selecting The Language
Turn the TV on, and then 2. Selecting the language switch the input of the TV to the input to which the You can select the language of messages receiver is connected. on the screen. Press / to select your Press …
-
Page 27
Note • Insert the plug of the calibration Before you perform Auto microphone all the way into the Calibration CALIBRATION MIC jack. If the calibration microphone is not connected securely, Check the following items: measurements may not be made properly. •… -
Page 28
• Press HOME, AMP MENU, or (muting) Confirm the instructions on on the remote control. the screen, and then press • Press SPEAKERS on the receiver. • Change the volume level. The measurement starts in 5 seconds. • Connect the headphones. The measurement process takes approximately 30 seconds. -
Page 29: 7: Setting For Hdmi
Setting the HDMI Signal Format 7: Setting for HDMI Select the appropriate setting for the Perform this setting when the receiver is connected TV and audio-visual devices. connected to a TV or audio-visual devices using an HDMI cable. Press AMP MENU, then press / and to select “<HDMI>”…
-
Page 30: Playback
Start playback on the Playback connected device. Playing Back Sound and To enjoy the sound and image of a connected device without turning on the Images on Connected TV receiver, set “STBY.THRU” to “ON” in the “<HDMI>” menu. and/or Audio-Visual …
-
Page 31: Playing Back Sound On A Bluetooth Device
The receiver is Select “STR-DH590” on the searching for a Flashes slowly BLUETOOTH device to BLUETOOTH device display. connect If “STR-DH590” is not displayed, BLUETOOTH pairing Flashes quickly repeat this process from step 1. BLUETOOTH When the BLUETOOTH connection is connection is…
-
Page 32
Adjust the volume. Adjust the volume. Adjust the volume of the BLUETOOTH Adjust the volume of the BLUETOOTH device first. If the volume level is still device first. If the volume level is still too low, press +/– to adjust the too low, press … -
Page 33: Selecting Sound Effects
2 Press and hold MUSIC and press Selecting Sound Effects (power) on the receiver. (power) MUSIC Selecting a sound field You can select a sound field according to your speaker configuration, the audio “S.F. CLEAR” appears on the display content, or your individual preferences.
-
Page 34
Plays back all audio signals without adding any Direct DIRECT surround effect. HD Digital Cinema Sound (HD-D.C.S.) is Sony’s new innovative home theater technology using the latest acoustic and digital signal processing technologies. It is based on the precise response measurement data of a mastering studio. -
Page 35
Relations between sound fields and speaker outputs The list below shows which speaker outputs sound when a certain sound field is selected. 2-channel content Front Center Surround Button Sound field Display panel Subwoofer speakers speaker speakers 2ch Stereo 2CH ST. –… -
Page 36
Multi-channel content Front Center Surround Button Sound field Display panel speakers Subwoofer speakers speaker 2ch Stereo 2CH ST. – – – 2CH/ Multi Ch Stereo MULTI ST. MULTI Direct DIRECT HD-D.C.S. HD-D.C.S. -
Page 37: Menu/Other Functions
Home menu items Menu/Other Functions Menu Description Select to display video from Watch Operating Menu on the the connected device. Select to listen to sound from TV Screen Listen the built-in FM tuner or the connected device. Select to re-run the [Easy You can display the menu on the TV screen Easy Setup Setup] to make the basic…
-
Page 38: Selecting The Speaker Pattern
Selecting the speaker pattern You can select the speaker pattern you want according to your speaker installation. AMP MENU Press AMP MENU, then press / and to select “<SPKR>” – “PATTERN”. Press / to select the speaker pattern you want, and then press Speaker Front left/right Surround left/…
-
Page 39: Reverting To The Factory Default Settings
Reverting to the Factory Default Settings You can clear all memorized settings and restore the receiver to the factory default settings by the following procedure. Be sure to use the buttons on the receiver to perform this operation. Press (power) to turn off the receiver.
-
Page 40: Troubleshooting/Specifications
TV. If the problem persists after doing all of the • If the TV does not have a System Audio above, consult your nearest Sony dealer. Control function, set “AUDIO.OUT” in the “<HDMI>” menu to: – “TV+AMP” if you want to listen to the…
-
Page 41
• If the TV is not compatible with the Audio • Check that the receiver and all devices Return Channel (ARC) function, connect are turned on. the receiver to the TV using an optical • Check that MASTER VOLUME on the digital audio cable (not supplied) or a receiver is not set to “VOL MIN”. -
Page 42
• Adjust the speaker level. • Audio signals (format, sampling frequency, bit length, etc.) transmitted • Check that the speaker settings are from an HDMI jack may be suppressed by appropriate for the setup using “AUTO the connected device. Check the setup of CAL”… -
Page 43
• Be sure to use a High Speed HDMI Cable • If connected to devices other than those with Ethernet. manufactured by Sony that support the No 4K content appears on the TV Control for HDMI function, set screen. -
Page 44
• Be sure to connect the receiver to an FM radio HDMI input jack of a TV that is supporting 4K. You have to connect an HDMI cable to an HDMI jack that supports HDCP 2.2 The FM reception is poor. when you use a playback device for 4K •… -
Page 45: Error Messages
BLUETOOTH device. causing the protection error. After checking the above items and fixing any problems, plug in the AC power cord (mains lead) and turn on the receiver. If the problem persists, consult your nearest Sony dealer.
-
Page 46
“USB FAIL” appears on the display [Warning 41:], [Warning 42:] panel. The input signal from the calibration An over-current from the POWER SUPPLY microphone is too large. The microphone port was detected. Turn off the receiver, may be too close to the speakers. Please disconnect the USB device, and then turn place the calibration microphone at your on the receiver again. -
Page 47: Precautions
• Do not place the receiver near device Precautions such as a TV, VCR, or tape deck. (If the receiver is being used in combination with a TV, VCR, or tape deck, and is On safety placed too close to that device, noise may result, and picture quality may Should any solid object or liquid fall into suffer.
-
Page 48: Specifications
Output (Analog) Specifications SUBWOOFER Voltage: 2 V/1 kilohm Equalizer Gain levels AUDIO POWER SPECIFICATIONS ±10 dB, 1 dB step POWER OUTPUT AND TOTAL INPUT SHORT (with sound field and equalizer bypassed) HARMONIC DISTORTION: Weighted network (USA models only) Input level With 6 ohm loads, both channels driven, from 20 Hz –…
-
Page 49
Compatible BLUETOOTH profiles Mass (Approx.) A2DP 1.2 (Advanced Audio Distribution 7.1 kg (15 lb 11 oz) Profile) Design and specifications are subject to AVRCP 1.6 (Audio Video Remote Control change without notice. Profile) Supported Codecs , AAC Transmission range (A2DP) 20 Hz –… -
Page 50: On Copyrights
Licensing Administrator, Inc. in the United become shorter under the following States and other countries. conditions. “BRAVIA” is a trademark of Sony Corporation. • When a person, metal object, wall or “PlayStation” is a registered trademark of other obstruction is between the devices Sony Computer Entertainment Inc.
-
Page 51
BLUETOOTH technology. • Sony shall not be held liable in any way for damages or other loss resulting from information leaks during communication using BLUETOOTH technology. -
Page 52: Supported Playable Formats
Supported Playable Formats Supported digital audio formats The digital audio formats that this receiver can decode depend on the digital audio output jacks of the connected device. This receiver supports the following audio formats. Maximum number of Connection with the Digital audio format decoded channels receiver…
-
Page 53: Index
Index FM radio 30 Format Numerics Audio 52 2.1-channel 17 Front Surround 17 2ch Stereo 34 4K 19 Hall 34 5.1-channel 16 HDCP 2.2 19 HD-D.C.S. 34 ARC 19 HDMI 18 Audio Enhancer 34 HDMI signal format 29 Audio format 52 HDR 18 Audio Return Channel 19 Headphone(2ch) 34…
-
Page 54
Receiver Display panel 10 Front panel 8 Rear panel 11 Remote control 12 Battery 13 Reset Receiver 39 Sound fields 33 Sound effects 33 Sound field 33 Speaker Cable 15 Pattern 38 Sports 34 Stadium 34 Subwoofer 14 Supplied items 6 Supported playable formats Audio 52 TV screen… -
Page 56
©2018 Sony Corporation Printed in Malaysia 4-726-906-12(1)
(Ocr-Read Summary of Contents of some pages of the Sony STR-DH590 Document (Main Content), UPD: 05 June 2023)
-
54, Help Guide MULTI CHANNEL AV RECEIVER STR-DH590 Operating the receiver with the menu on the display panel You can operate this receiver using the display panel as well as the TV screen. To return to the previous display Press or BACK. To exit the menu Press AMP MENU. Note Some parameters and settings may appear dimmed on the display panel. This means that they are either unavailable or fixed and unchangeable. Related To…
-
68, Help Guide MULTI CHANNEL AV RECEIVER STR-DH590 Controlling HDMI devices “CTRL.HDMI” You can turn the Control for HDMI function on or off. For details, see “Preparing to use the “BRAVIA” Sync function.” This operation is only available using the display panel on the front of the receiver. Note When you set “CTRL.HDMI” to “CTRL ON,” “AUDIO.OUT” setting may be changed automatically. When the receiver is in standby mode, the (power) indicator on the…
-
21, Help Guide MULTI CHANNEL AV RECEIVER STR-DH590 Selecting a sound field You can select from a variety of sound fields according to the speaker connection and input source. Note When connecting headphones to the receiver, [Headphone(2ch)] is selected as a sound field automatically. The sound fields for movie and music may not work, depending on the input or the speaker pattern you select and the audio formats. The receiver may play signals at a lower sampling frequency t…
-
94, Help Guide MULTI CHANNEL AV RECEIVER STR-DH590 No sound or only a very low level of sound is heard from specific speakers. Check that the speaker settings are appropriate by using following settings: Perform Auto Calibration in [Easy Setup] from the home menu. Press AMP MENU, then select “<SPKR>” — “PATTERN” on the display panel. Then check that sound is output from each speaker correctly by pressing AMP MENU and selecting “<LEVEL>” — “T. TONE” on the disp…
-
36, Help Guide MULTI CHANNEL AV RECEIVER STR-DH590 Adjusting the speaker size [Size] You can adjust the size of each speaker (front, center and surround). Note [Size] cannot be set when headphones are connected. Hint When the front speakers are set to [Small], the center and surround speakers are also automatically set to [Small]. If you do not use the subwoofer, the front speakers are automatically set to [Large]. You can also adjust the size of each speaker from the “<SPKR>” me…
-
76, Sony STR-DH590 Help Guide MULTI CHANNEL AV RECEIVER STR-DH590 Setting BLUETOOTH audio codecs “BT AAC” You can enable and disable AAC (Advanced Audio Coding) audio. This operation is only available using the display panel on the front of the receiver. Note If you change this setting, the setting is applied from the next time you connect the BLUETOOTH device. You cannot use this function while a BLUETOOTH device is connected. In this case, “BT AAC” on the display panel …
-
79, Help Guide MULTI CHANNEL AV RECEIVER STR-DH590 Updating the software “UPDATE” Before updating, visit the customer support website to download the latest software version to your USB flash drive. This operation is only available using the display panel on the front of the receiver. Note It may take about 15 minutes for the update to be completed. Do not turn the receiver off while the software is being updated. It may cause a malfunction.…
-
24, Help Guide MULTI CHANNEL AV RECEIVER STR-DH590 Relations between sound fields and speaker outputs The list below shows which speaker outputs sound when a certain sound field is selected. Note When no sound is heard, check that all the speakers are securely connected to the correct speaker terminals, and the correct speaker pattern is selected. 2-channel content -: No sound is output. ◎: Outputs sound. ○: Outputs sound depending on the speaker pattern setting and content to be played ba…
-
1, Help Guide MULTI CHANNEL AV RECEIVER STR-DH590 This Help Guide explains functions and settings that are not mentioned in the supplied Startup Guide or Operating Instructions. Introduction How to use this Help Guide Using the home menu Playback Overview Playing AV devices Playing back video and sound from connected AV devices Listening to the radio Listening to FM radio Tuning to a station directly Presetting FM radio stations Setting th…
-
55, Help Guide MULTI CHANNEL AV RECEIVER STR-DH590 List of settings that can be adjusted using the menu on the display panel You can adjust the following settings from the setting menu on the display panel of the receiver by pressing AMP MENU. Some settings can also be adjusted using the menu displayed on the TV screen. Auto Calibration settings “<A. CAL>” Auto Calibration start “START” …
-
62, Help Guide MULTI CHANNEL AV RECEIVER STR-DH590 Changing the name for each input “NAME IN” You can enter up to 8 characters for each input name. This operation is only available using the display panel on the front of the receiver. Related Topic List of settings that can be adjusted using the menu on the display panel 4-731-210-11(1) Copyright 2018 Sony Corporation Select the input you want to change the name. 1 Press AMP MENU. 2 Select “<INPUT>” — “NAME IN” on th…
-
49, Help Guide MULTI CHANNEL AV RECEIVER STR-DH590 Using the sleep timer You can set the receiver to turn off automatically after a specified period of time (up to 2 hours). Hint To check the remaining time before the receiver turns off, press SLEEP. The remaining time appears on the display panel. The sleep timer will be canceled if you press (power). 4-731-210-11(1) Copyright 2018 Sony Corporation Press SLEEP. Each time you press SLEEP, the d…
-
112, Help Guide MULTI CHANNEL AV RECEIVER STR-DH590 Cannot make a BLUETOOTH connection. The BLUETOOTH device you attempted to connect does not support the A2DP profile, and cannot be connected with the receiver. Press BLUETOOTH on the receiver to connect to the last connected BLUETOOTH device. Turn on the BLUETOOTH function of the BLUETOOTH device. Establish a connection from the BLUETOOTH device. The pairing registration information has been erased. Perform the pairing operation again. While co…
-
22, Sony STR-DH590 Help Guide MULTI CHANNEL AV RECEIVER STR-DH590 Selectable sound fields and their effects Button Sound field Display panel Effects of the sound field 2CH/MULTI 2ch Stereo 2CH ST. Plays back 2-channel audio signals without adding any surround effect. Monaural and multi-channel audio signals are output after being converted into a 2-channel signal. This sound field is suited for playing back audio signals as they are from two front speakers only, without adding any …
-
65, Help Guide MULTI CHANNEL AV RECEIVER STR-DH590 Synchronizing audio with video output “A/V SYNC” You can delay the output of audio to minimize the time gap between audio output and a visual display. This function is useful when using a large LCD or plasma monitor or a projector. You can set the function for each input independently. During playback, you can also select this function from the options menu displayed by pressing OPTIONS. This operation is only available u…
-
17, Sony STR-DH590 You can also tune in to a preset station by pressing PRESET+/– on the remote control. Related Topic Naming preset stations [Name In] 4-731-210-11(1) Copyright 2018 Sony Corporation 17
…
![]()
|
Multi Channel |
|||
|
Connection and Preparation |
|||
|
AV Receiver |
|||
|
Playback |
|||
|
Operating Instructions |
Menu/Other Functions |
||
|
Troubleshooting/ |
|||
|
Specifications |
|||
STR-DH590
For the customers in the USA
Owner’s Record
The model and serial numbers are located on the rear of the receiver. Record the serial number in the space provided below. Refer to these numbers whenever you call upon your Sony dealer regarding this product.
Model No. STR-DH590
Serial No.
WARNING
To reduce the risk of fire or electric shock, do not expose this apparatus to rain or moisture.
To reduce the risk of fire, do not cover the ventilation opening of the appliance with newspapers, tablecloths, curtains, etc.
Do not expose the appliance to naked flame sources (for example, lighted candles).
To reduce the risk of fire or electric shock, do not expose this appliance to dripping or splashing, and do not place objects filled with liquids, such as vases, on the appliance.
Do not install the appliance in a confined space, such as a bookcase or built-in cabinet.
As the main plug is used to disconnect the unit from the mains, connect the unit to an easily accessible AC outlet. Should you notice an abnormality in the unit, disconnect the main plug from the AC outlet immediately.
The unit is not disconnected from the mains as long as it is connected to the AC outlet, even if the unit itself has been turned off.
CAUTION
Risk of explosion if the battery is replaced by an incorrect type.
Do not expose batteries or appliances with battery-installed to excessive heat, such as sunshine and fire.
CAUTION
HOT SURFACE
To reduce the risk of thermal burn hazard, do not touch the hot surface where this symbol is displayed.
FOR UNITED STATES CUSTOMERS. NOT APPLICABLE IN CANADA, INCLUDING IN THE PROVINCE OF QUEBEC.
POUR LES CONSOMMATEURS AUX ÉTATS-UNIS. NON APPLICABLE AU CANADA, Y COMPRIS LA PROVINCE DE QUÉBEC.
For the customers in the USA
This symbol is intended to alert the user to the presence of uninsulated “dangerous voltage” within the product’s enclosure that may be of sufficient magnitude to constitute a risk of electric shock to persons.
This symbol is intended to alert the user to the presence of important operating and maintenance (servicing) instructions in the literature accompanying the appliance.
Important Safety Instructions
1)Read these instructions.
2)Keep these instructions.
3)Heed all warnings.
4)Follow all instructions.
5)Do not use this apparatus near water.
6)Clean only with dry cloth.
7)Do not block any ventilation openings. Install in accordance with the manufacturer’s instructions.
 Do not install near any heat sources such as radiators, heat registers, stoves, or other apparatus (including amplifiers) that produce heat.
9)Do not defeat the safety purpose of the polarized or grounding-type plug. A polarized plug has two blades with one wider than the other. A grounding type plug has two blades and a third grounding prong. The wide blade or the third prong are provided for your safety. If the provided plug does not fit into your outlet, consult an electrician for replacement of the obsolete outlet.
10)Protect the power cord from being walked on or pinched particularly at plugs, convenience receptacles, and the point where they exit from the apparatus.
11)Only use attachments/accessories specified by the manufacturer.
2GB

12)Use only with the cart, stand, tripod, bracket, or table specified by the manufacturer, or sold with the apparatus. When a cart is used, use caution when moving the cart/apparatus combination to avoid injury from tip-over.
13)Unplug this apparatus during lightning storms or when unused for long periods of time.
14)Refer all servicing to qualified service personnel. Servicing is required when the apparatus has been damaged in any way, such as power-supply cord or plug is damaged, liquid has been spilled or objects have fallen into the apparatus, the apparatus has been exposed to rain or moisture, does not operate normally, or has been dropped.
NOTE:
This equipment has been tested and found to comply with the limits for a Class B digital device, pursuant to Part 15 of the FCC Rules. These limits are designed to provide reasonable protection against harmful interference in a residential installation. This equipment generates, uses and can radiate radio frequency energy and, if not installed and used in accordance with the instructions, may cause harmful interference to radio communications. However, there is no guarantee that interference will not occur in a particular installation. If this equipment does cause harmful interference to radio or television reception, which can be determined by turning the equipment off and on, the user is encouraged to try to correct the interference by one or more of the following measures:
Reorient or relocate the receiving antenna.
Increase the separation between the equipment and receiver.
Connect the equipment into an outlet on a circuit different from that to which the receiver is connected.
Consult the dealer or an experienced radio/ TV technician for help.
CAUTION
You are cautioned that any changes or modifications not expressly approved in this manual could void your authority to operate this equipment.
Properly shielded and grounded cables and connectors must be used for connection to host computers and/or peripherals in order to meet FCC emission limits.
To reduce the risk of electric shock, the speaker cable should be connected to the apparatus and the speakers in accordance with the following instructions.
1)Disconnect the AC power cord from the MAINS.
2)Strip 10 to 15 mm of the wire insulation of the speaker cable.
3)Connect the speaker cable to the apparatus and the speakers carefully so as not to touch the core of speaker cable by hand. Also disconnect the AC power cord from the MAINS before disconnecting the speaker cable from the apparatus and the speakers.
This equipment must not be co-located or operated in conjunction with any other antenna or transmitter.
For the customers in Canada
Properly shielded and grounded cables and connectors must be used for connection to host computers and/or peripherals.
This device complies with Industry Canada’s licence-exempt RSSs. Operation is subject to the following two conditions:
(1)This device may not cause interference; and
(2)This device must accept any interference, including interference that may cause undesired operation of the device.
For the customers in the USA and Canada
This equipment complies with FCC/IC radiation exposure limits set forth for an uncontrolled environment and meets the FCC radio frequency (RF) Exposure Guidelines and RSS-102 of the IC radio frequency (RF) Exposure rules. This equipment should be installed and operated keeping the radiator at least 20 cm or more away from person’s body.
3GB
For the customers in Australia
Disposal of old electrical & electronic equipment (applicable in the European Union and other countries with separate collection systems)
For the customers in Europe
Disposal of waste batteries and electrical and electronic equipment (applicable in the European Union and other countries with separate collection systems)
This symbol on the product, the battery or on the packaging indicates that the product and the battery shall not be treated as household waste. On certain batteries this symbol might be used in combination with a chemical symbol. The chemical symbol for lead (Pb) is added if the battery contains more than 0.004% lead. By ensuring that these products and batteries are disposed of correctly, you will help to prevent potentially negative consequences for the environment and human health which could be caused by inappropriate waste handling. The recycling of the materials will help to conserve natural resources. In case of products that for safety, performance or data integrity reasons require a permanent connection with an incorporated battery, this battery should be replaced by qualified service staff only. To ensure that the battery and the electrical and electronic equipment will be treated properly, hand over these products at end-of-life to the appropriate collection point for the recycling of electrical and electronic equipment. For all other batteries, please view the section on how to remove the battery from the product safely. Hand the battery over to the appropriate collection point for the recycling of waste batteries. For more detailed information about recycling of this product or battery, please contact your local Civic Office, your household waste disposal service or the shop where you purchased the product or battery.
Notice for customers: the following information is only applicable to equipment sold in countries applying EU directives
This product has been manufactured by or on behalf of Sony Corporation.
EU Importer: Sony Europe Limited. Inquiries to the EU Importer or related to
product compliance in Europe should be sent to the manufacturer’s authorized representative, Sony Belgium, bijkantoor van Sony Europe Limited, Da Vincilaan 7-D1, 1935 Zaventem, Belgium.
Hereby, Sony Corporation declares that this equipment is in compliance with Directive 2014/53/EU.
The full text of the EU declaration of conformity is available at the following internet address: http://www.compliance.sony.de/
This radio equipment is intended to be used with the approved version(s) of software that are indicated in the EU Declaration of Conformity. The software loaded on this radio equipment is verified to comply with the essential requirements of the Directive 2014/53/EU.
You can check the software version by pressing AMP MENU, then select “<SYSTEM>” using  /
/ and
and  .
.
This Multi Channel AV Receiver is intended for sound and video playback from connected devices, music streaming from a BLUETOOTH® device, and FM tuner.
This equipment has been tested and found to comply with the limits set out in the EMC regulation using a connection cable shorter than 3 meters.
Excessive sound pressure from earphones and headphones can cause hearing loss.
4GB

|
Table of Contents |
|
|
Supplied Items …………………………………… |
6 |
|
Main Features of the Receiver ……………… |
7 |
|
Parts and Controls ……………………………… |
8 |
|
Connection and |
|
|
Preparation |
|
|
1: Deciding on the Speaker System ……… |
14 |
|
2: Setting/Connecting Speakers …………. |
15 |
|
3: Connecting a TV …………………………….. |
18 |
|
4: Connecting Audio-Visual Devices …… |
23 |
|
5: Connecting the FM Antenna |
|
|
(aerial) ………………………………………… |
25 |
|
6: Turning on the Receiver and |
|
|
Performing Easy Setup …………………. |
25 |
|
7: Setting for HDMI ……………………………. |
29 |
|
Playback |
|
|
Playing Back Sound and Images on |
|
|
Connected TV and/or Audio-Visual |
|
|
Devices ……………………………………….. |
30 |
|
Playing Back Sound on a BLUETOOTH |
|
|
Device …………………………………………. |
31 |
|
Selecting Sound Effects …………………….. |
33 |
|
Menu/Other Functions |
|
|
Operating Menu on the TV Screen ……… |
37 |
|
Selecting the speaker pattern ……………. |
38 |
|
Reverting to the Factory Default |
|
|
Settings ………………………………………. |
39 |
|
Troubleshooting/ |
|
|
Specifications |
|
|
Troubleshooting ………………………………. |
40 |
|
Precautions ………………………………………. |
47 |
|
Specifications ………………………………….. |
48 |
|
On Copyrights ………………………………….. |
50 |
|
On BLUETOOTH Communication ……….. |
50 |
|
Supported Playable Formats ………………. |
52 |
|
Index ……………………………………………….. |
53 |
5GB

Supplied Items
•Receiver (1)
•Remote control (1)
•R03 (size AAA) batteries (2)
•FM wire antenna (aerial) (1)
|
• |
Calibration microphone (1) |
|
• |
Startup Guide (1) |
Explains how to connect the 5.1-channel speaker system, perform initial settings and listen to connected devices.
• Operating Instructions (this booklet) (1)
•The text enclosed in bracket ([—]) appears on the TV screen, and the text enclosed in double quotation mark (“—”) appears on the display panel.
•The items displayed on the TV screen may vary depending on the area.
The Help Guide (web-based online operating instructions) provides information on advanced functions and operations.
You can view the Help Guide on your computer as well as a smartphone or tablet.
Open your Web browser and enter the following URL or use the QR code reader function to access the site.
For the customers in Europe
http://rd1.sony.net/help/ha/ strdh59/h_eu/
For the customers in Taiwan
http://rd1.sony.net/help/ha/ strdh59/zh-tw/
Explains necessary connections, initial settings, and basic operations.
About manuals provided for this product
•Some illustrations are presented as conceptual drawings, and may be different from the actual products.
•The manuals provided for this product mainly describe the procedures for using the remote control. You can also use the controls on the receiver if they have the same or similar names as those on the remote control.
For the customers in other areas
http://rd1.sony.net/help/ha/ strdh59/h_zz/
6GB

Main Features of the Receiver
Compatible with digital audio formats
DTS-HD and Dolby TrueHD are supported (only when devices are connected via HDMI cables).
Compatible with high quality 4K video formats*
The receiver supports HDCP 2.2, Dolby Vision, HDR10 and Hybrid Log-Gamma, letting you enjoy high quality video images (page 18).
* You need to change the setting of “SIG. FMT.” depending on the input video signal.
Equipped with an Auto Calibration function (D.C.A.C.) that makes your viewing and listening environment close to ideal
D.C.A.C. measures and calibrates the distance, level, and frequency characteristics of the speakers using the supplied monaural calibration microphone to fit your viewing and listening environment (page 26).
Reproduces a virtual surround sound even in an environment where the back speaker cannot be installed (Front Surround)
Allows you to enjoy surround sound equivalent to that of a 5.1-channel speaker system with only two front speakers (page 17).
Compatible with BLUETOOTH® wireless technology
•Connect a WALKMAN®, smartphone, or tablet to the receiver via the BLUETOOTH function to play music content on those devices wirelessly (page 31).
•You can turn on this receiver from a paired BLUETOOTH device even when the receiver is in standby mode. For details on operation, visit the Help Guide.
Sound fields selectable by preference
You can select from a variety of sound fields according to speaker connections or input sources (2ch Stereo, Direct, etc.) (page 33).
Equipped with an Audio Return Channel (ARC)-compatible HDMI jack
TV sound can be output from the receiver using only one HDMI cable (page 19, 21).
7GB
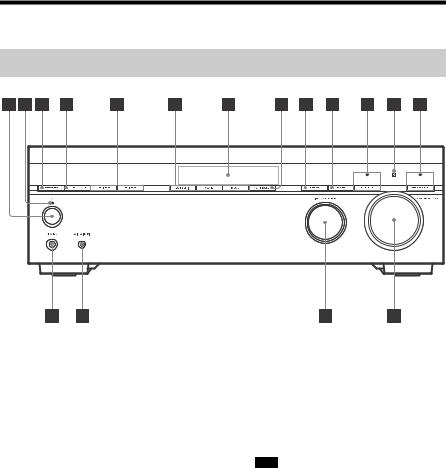
Parts and Controls
Receiver front panel
(power)
Turns the receiver on or sets it to the standby mode.
Power indicator
•Green: The receiver is turned on.
•Red: The receiver is in standby mode, and you have set one of the following:
–“CTRL.HDMI” is set to “CTRL ON”.
–“BT STBY” is set to “STBY ON”.*
–“STBY.THRU” is set to “ON” or “AUTO”.
•The indicator goes off: The receiver is in standby mode and:
–“CTRL.HDMI” is set to “CTRL OFF”.
–“BT STBY” is set to “STBY OFF”.
–“STBY.THRU” is set to “OFF”.
*The indicator lights up in red only if a device has been paired with the receiver and “BT POWER” is set to “BT ON”. If no devices are paired with the receiver or “BT POWER” is set to “BT OFF”, the indicator turns off.
SPEAKERS
Turns on or off the speaker system.
•“SPK ON”: The speaker system is turned on.
•“OFF SPEAKERS”*: The speaker system is turned off.
*“OFF” and “SPEAKERS” appears alternately on the display panel.
Note
No sound is output from the speakers when you select “OFF SPEAKERS”. Be sure to select “SPK ON”.
TUNING MODE
Selects auto tuning or preset tuning mode.
TUNING +/–
Scans a FM station or selects preset stations/channels.
2CH/MULTI, MOVIE, MUSIC (page 33)
Display panel (page 10)
8GB

NIGHT MODE
Activates the Night Mode function which allows you to retain a theaterlike environment at low volume levels.
Note
•The Night Mode function does not work in the following cases:
–[Pure Direct] is set to [On].
–Headphones are connected.
–[Direct] is being used and an analog input is selected.
•The receiver may play signals at a lower sampling frequency than the actual sampling frequency of the input signals, depending on the audio format.
DISPLAY
Displays information on the display panel.
DIMMER
Adjusts the brightness of the display panel.
BLUETOOTH
Switches the input of the receiver to [BT] and automatically connects to the last connected device.
Sets the receiver to pairing mode when there is no pairing information on the receiver.
Disconnects the BLUETOOTH device when the receiver is connected to a BLUETOOTH device.
BLUETOOTH indicator (page 31)
Remote control sensor
Receives signals from remote control.
PURE DIRECT
Activates the Pure Direct function which allows you to enjoy higherfidelity sound from all inputs.
The indicator above the button lights up when the Pure Direct function is activated.
Note
[Calibration Type], [Night Mode], [Bass], [Treble], and “D. RANGE” do not work when the Pure Direct function is selected.
MASTER VOLUME (page 30)
INPUT SELECTOR
Selects the input channel connected to the device you want to use.
CALIBRATION MIC jack (page 26)
PHONES jack
Connect headphones here.
9GB
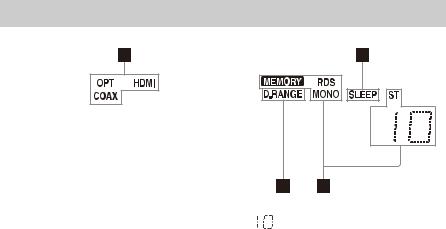
Indicators on the display panel
Input indicator
Lights up to indicate the current input.
OPT
Digital signals are input through the OPTICAL jack.
COAX
Digital signals are input through the COAXIAL jack.
HDMI
Digital signals are input through the selected HDMI jack.
SLEEP
Lights up when the sleep timer is activated.
Tuning indicator
Lights up when the receiver tunes to a radio station.
MEMORY
A memory function, such as Preset Memory, etc., is activated.
RDS (European and Asia-Pacific models only)
Tuned to a station with RDS services.
MONO
Monaural broadcast
ST
FM stereo broadcast
Preset station number (The number will change according to the preset station you select.)
D.RANGE
Lights up when dynamic range compression is activated.
10GB
![]()
Receiver rear panel
POWER SUPPLY port
For power supply only.
HDMI IN/OUT jacks (page 18, 19, 20, 21, 22, 23)
All of the HDMI IN/OUT jacks on the receiver support HDCP 2.2. HDCP 2.2 is newly enhanced copyright protection technology that is used to protect content such as 4K movies.
SPEAKERS terminals (page 15, 16, 17)
SUBWOOFER OUT jacks (page 16, 17)
AUDIO IN jacks (page 22, 24)
FM ANTENNA terminal (page 25)
OPTICAL IN jack (page 20, 22)
COAXIAL IN jack (page 24)
11GB
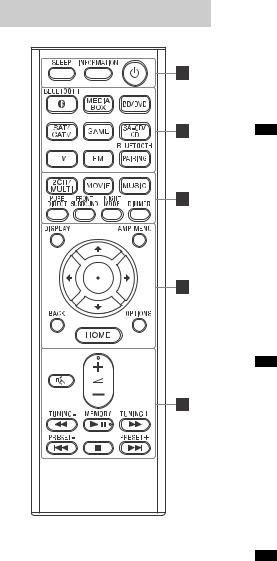
Remote control
Turns the receiver on or sets it to the standby mode.
INFORMATION
Displays information such as audio format, etc. on the TV screen.
SLEEP
Sets the receiver to turn off automatically at a specified time.
Input buttons
BLUETOOTH, MEDIA BOX, BD/DVD, SAT/CATV, GAME, SA-CD/CD, TV, FM
Selects the input channel connected to the device you want to use. When you press any of the input buttons, the receiver turns on.
Note
When you press BLUETOOTH, the receiver turns on only if “BT POWER” is set to “BT ON” in the “<BT>” menu.
BLUETOOTH PAIRING (page 31)
Switches the input of the receiver to [BT] and sets the receiver to the pairing mode.
2CH/MULTI, MOVIE, MUSIC (page 33)
Selects a sound field.
PURE DIRECT
Activates the Pure Direct function which allows you to enjoy higherfidelity sound from all inputs.
Note
[Calibration Type], [Night Mode], [Bass], [Treble], and “D. RANGE” do not work when the Pure Direct function is selected.
FRONT SURROUND
Activates the Front Surround function which allows you to enjoy theater-like surround sound only with two front speakers.
NIGHT MODE
Activates the Night Mode function which allows you to retain a theaterlike environment at low volume levels.
Note
•The Night Mode function does not work in the following cases:
–[Pure Direct] is set to [On].
–Headphones are connected.
–[Direct] is being used and an analog input is selected.
•The receiver may play signals at a lower sampling frequency than the actual sampling frequency of the input signals, depending on the audio format.
12GB
DIMMER
Adjusts the brightness of the display panel.
DISPLAY
Displays information on the display panel.
AMP MENU
Displays the menu on the display panel to operate the receiver.
 (enter),
  /
/ /
/
 /
/

Press  ,
,  ,
, 
 ,
, 
 to select the menu
items. Then, press  to enter the selection.
BACK
Returns to the previous menu or exits a menu or on-screen guide that is displayed on the TV screen.
OPTIONS (page 37)
Displays the options menu on the TV screen.
HOME (page 37)
Displays the home menu on the TV screen.
(volume) +*/–
Adjusts the volume level of all speakers at the same time.
(muting)
Turns off the sound temporarily. Press the button again to restore the sound.
/ (fast rewind/fast forward), (play/pause)*,/ (previous/next),(stop) (page 32)
TUNING +/–
Scans a FM station.
MEMORY*
Stores a station that you are receiving as a preset station.
PRESET +/–
Selects preset stations or channels.
*The +, , and MEMORY buttons have tactile dots. Use the tactile dots as reference when operating the receiver.
Note
•The above explanation is intended to serve as examples.
•Depending on the model of your connected device, some functions explained in this section may not work with the supplied remote control.
To insert batteries into the remote control
Insert two R03 (size AAA) batteries (supplied) in the remote control. Make sure that the + and – ends are in the correct position when installing batteries.
Note
•Do not leave the remote control in an extremely hot or humid place.
•Do not use a new battery with an old one.
•Do not mix manganese batteries and other kinds of batteries.
•We recommend that you use AAA manganese batteries.
•Do not expose the remote control sensor on the front panel of the receiver to direct sunlight or lights. Doing so may cause a malfunction.
•If you do not intend to use the remote control for an extended period of time, remove the batteries to avoid possible damage from battery leakage and corrosion.
•When the receiver no longer responds to the remote control, replace both of the batteries with new ones.
13GB

Connection and Preparation
1: Deciding on the Speaker System
Decide on the speaker system you want to set up according to the number of speakers and subwoofers that you are using. The illustration and table below indicate the types of speakers that can be connected to the receiver and the general positions for placing the speakers.
|
Abbreviations |
||||||||||||||
|
used in |
Speaker type |
Function of each speaker |
||||||||||||
|
illustrations |
||||||||||||||
|
FL |
Front left speaker |
Produces sounds from front left/right channels. |
||||||||||||
|
FR |
Front right speaker |
|||||||||||||
|
CNT |
Center speaker |
Produces vocal sounds from center channel. |
||||||||||||
|
SL |
Surround left speaker |
Produces sounds from surround left/right channels. |
||||||||||||
|
SR |
Surround right speaker |
|||||||||||||
|
SW |
Subwoofer |
Produces LFE (low frequency effect) channel sounds |
||||||||||||
|
and reinforces bass parts of other channels. |
||||||||||||||
Tip
As the subwoofer (SW) does not emit highly directional signals, you can place it wherever you want.
Speaker systems described in this manual
This manual describes the installation, connection, and setting procedures using the typical speaker systems indicated in the table below as examples. To learn about all speaker systems supported by this receiver, see “Selecting the speaker pattern” (page 38).
|
Speaker system |
For setting/connecting speakers, |
Speaker pattern |
|
|
see page |
(“PATTERN”) |
||
|
5.1-channel |
16 |
“5.1” |
|
|
2.1-channel |
17 |
“2.1” |
|
14GB
2: Setting/Connecting Speakers
Set up the speakers and subwoofers in a room using the layout you prefer for your speaker system and connect them to the receiver. The speaker layout drawings on page 16 and 17 provide the ideal layout examples. You do not have to set up the speakers and subwoofers in exactly the same way as the layout examples. Adjust the speaker layout to optimally suit your room environment.
Note
•Connect speakers with a nominal impedance of 6 ohms to 16 ohms.
•Before connecting cables, be sure to disconnect the AC power cord (mains lead).
•Before connecting the AC power cord (mains lead), make sure that metallic wires of the speaker cables are not touching each other between the SPEAKERS terminals or on the receiver rear panel. If the wires are touching, it may result in damage to the amplifier circuit.
•When you connect a subwoofer with an auto standby function, turn off the function when watching movies. If the auto standby function is set to on, it turns to standby mode automatically based on the level of the input signal to the subwoofer, and the sound may not be output.
Tip
If you have one subwoofer, connect it to either of the SUBWOOFER OUT jacks. If you have two subwoofers, you can connect them to both SUBWOOFER OUT jacks.
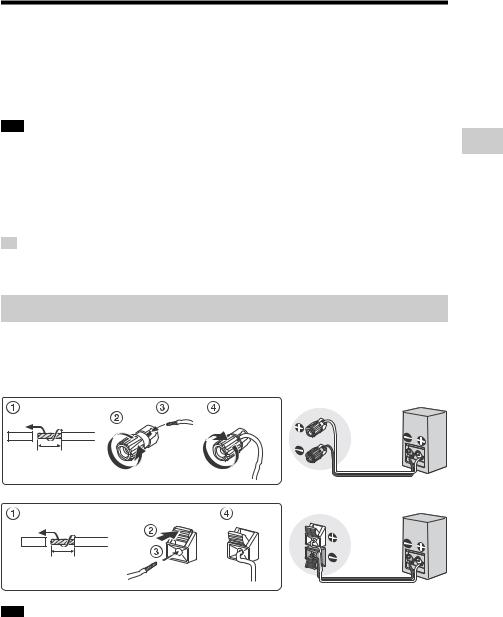
How to connect speaker cables
Connect speaker cables with the polarities + (red)/– (black) matched between the receiver and the speakers as illustrated below. Strip the jacket to 10 mm (13/32 in) at each end of the speaker cables, and then tightly twist the speaker wire strands. Insert the stripped ends of the cables into the terminals.
Preparation and Connection
10 mm (13/32 in)
10 mm (13/32 in)
Note
•Be sure not remove too much of the speaker cable sleeves, so as to prevent the wires of the speaker cables from touching each other.
•Improper connection may result in fatal damage to the receiver.
15GB

 5.1-channel speaker system
To fully enjoy theater-like multi-channel surround sound, you need five speakers (two front speakers, a center speaker, and two surround speakers) and a subwoofer.
 Speaker cable (not supplied)
 Monaural audio cable (not supplied)
16GB
 2.1-channel speaker system
If you select [Front Surround] for the sound field setting, you can enjoy surround effects equivalent to that of a 5.1-channel speaker system using only the two front speakers. Place the speakers as shown below and change the direction of the front speakers little by little to find the direction that provides the best surround effect.
Set the height of a tweeter of the front speaker at the same height as your ears.
Preparation and Connection
 Speaker cable (not supplied)
  Monaural audio cable (not supplied)
17GB
 Loading…